You can check the Microsoft authentication methods status per user in the Microsoft Entra admin…
Send email with Microsoft Graph PowerShell
You can send email from Exchange Online with the Send-MgUserMail PowerShell cmdlet. Once you connect with Microsoft Graph, you can also send an automated email without inserting credentials. This article will show you how to send an Exchange Online email with the Send-MgUserMail cmdlet in Microsoft Graph PowerShell.
Table of contents
Send-MgUserMail prerequisites
The below prerequisites are essential:
- Purchase a Microsoft 365 user license that will be used for authentication purposes.
Note: The Send-MgUserMail cmdlet will not work on a trial or developer tenant account. It will also not work from an unlicensed mailbox unless it’s a shared mailbox. The shared mailbox needs to have a licensed user as a member with Send As permissions to use for the Microsoft 365 authentication.
Install Microsoft Graph PowerShell
First, you need to install Microsoft Graph PowerShell module.
Install-Module Microsoft.Graph -Force
Import-Module Microsoft.Graph
Important: You need Microsoft Graph version 2.0 or higher to use the new parameters.
Verify your Microsoft Graph PowerShell SDK module version.
Get-InstalledModule Microsoft.Graph | ft -AutoSizeLet’s check out the PowerShell script to send an email with the cmdlet Send-MgUserMail.
Send email with Send-MgUserMail
As mentioned above, you can send email with a PowerShell script. To make it more understandable, we will start to send an email with a basic message. Then, we will show you other ways to add more information to the email you want to send, like adding Cc/Bcc and an attachment.
We will show you two different methods to send an email with Send-MgUserMail:
- Send an email with credentials (sign in with licensed mailbox)
- Send automated email without credentials (register app & client secret)
Note: Configure SPF, DKIM, and DMARC authentication methods so the emails that are sent will be delivered to the recipient’s inbox and not get blocked by their spam filter or delivered to their junk folder.
Send-MgUserMail with basic message
Use the below PowerShell script to send a basic email.
- Fill in the sender in line number 2
- Fill in the recipient in line number 3
- Fill in the subject of the email in line number 4
- Fill in the body message of the email in line number 5
- Choose HTML or Text for the type of the message email in line number 6
- Choose true to save an email in the sent items folder or false to not save the email in the sent items in line number 7
Note: The sender must be an email from your tenant.
# Email details
$sender = "info@alitajran.com"
$recipient = "bob.green@gmail.com"
$subject = "Sending with MgUserMail"
$body = "Come and join us at the biggest tech event!"
$type = "HTML" #Or you can choose "Text"
$save = "false" #Or you can choose "true"

# Import MgGraph module
Import-Module Microsoft.Graph.Users.Actions

# Connect to MgGraph with required permissions
Connect-MgGraph -Scopes 'Mail.Send', 'Mail.Send.Shared'

$params = @{
    Message         = @{
        Subject       = $subject
        Body          = @{
            ContentType = $type
            Content     = $body
        }
        ToRecipients  = @(
            @{
                EmailAddress = @{
                    Address = $recipient
                }
            }
        )
    }
    SaveToSentItems = $save
}
# Send message
Send-MgUserMail -UserId $sender -BodyParameter $params
Using the above script, you can get a Microsoft prompt to sign in if you’re not yet connected to Microsoft Graph with the correct permissions. Remember to sign in with the licensed mailbox.
Note: You can also sign with an unlicensed shared mailbox if one of the users has a licensed mailbox with Send As or Send on Behalf permissions.
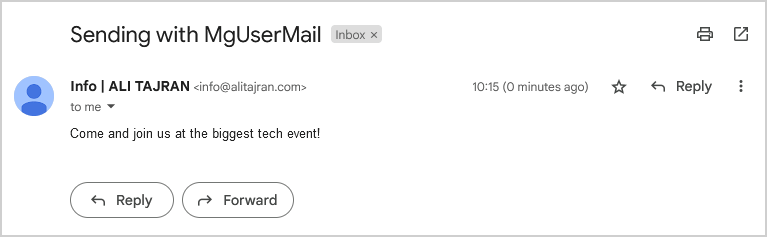
The basic email with text will look like the below example.
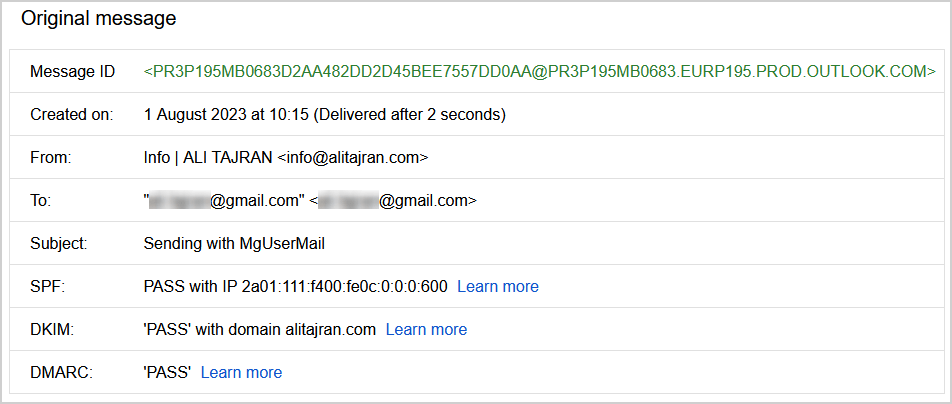
If you want to get more detailed information about the mail, you can view the original message.
Send-MgUserMail with Cc and Bcc
Use the below PowerShell script to send an email with Cc and Bcc.
- Fill in the sender in line number 2
- Fill in the recipient in line number 3
- Fill in the cc recipient in line number 4
- Fill in the bcc recipient in line number 5
- Fill in the subject of the email in line number 6
- Fill in the body message of the email in line number 7
- Choose HTML or Text for the type of the message email in line number 8
- Choose true to save email in sent items folder, or false to not save the email in sent items in line number 9
# Email details
$sender = "info@alitajran.com"
$recipient = "bob.green@gmail.com"
$ccrecipient = "amanda.hansen@gmail.com"
$bccrecipient = "m365info@outlook.com"
$subject = "Sending with MgUserMail"
$body = "Come and join us at the biggest tech event!"
$type = "HTML" #Or you can choose "Text"
$save = "false" #Or you can choose "true"
# Import MgGraph module
Import-Module Microsoft.Graph.Users.Actions
# Connect to MgGraph with required permissions
Connect-MgGraph -Scopes 'Mail.Send', 'Mail.Send.Shared'
$params = @{
Message = @{
Subject = $subject
Body = @{
ContentType = $type
Content = $body
}
ToRecipients = @(
@{
EmailAddress = @{
Address = $recipient
}
}
)
CcRecipients = @(
@{
EmailAddress = @{
Address = $ccrecipient
}
}
)
BccRecipients = @(
@{
EmailAddress = @{
Address = $bccrecipient
}
}
)
}
SaveToSentItems = $save
}
# Send message
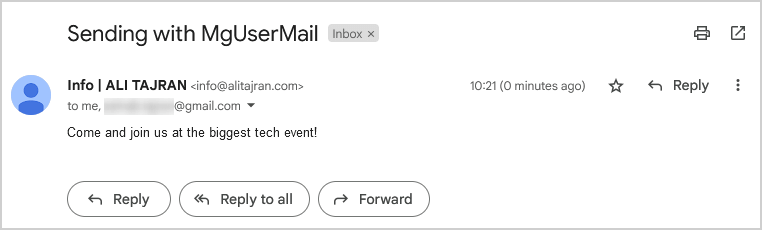
Send-MgUserMail -UserId $sender -BodyParameter $paramsThe result of the email is sent with a Cc and Bcc recipient.
Note: The Bcc is not shown, and you have to check that in the Bcc recipient’s inbox.
Send-MgUserMail with attachment
You can also send a mail with an attachment file. Therefore you need to create an attachment file in C:\temp.
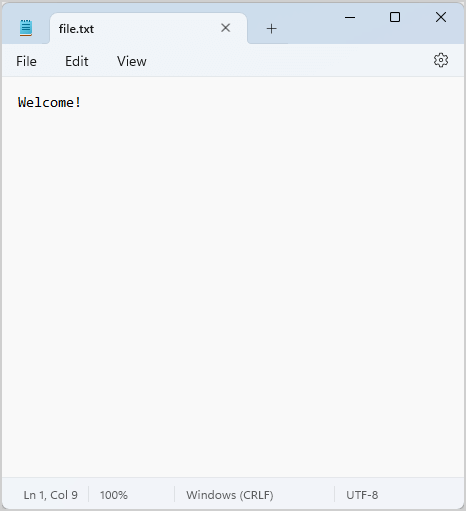
Follow the below steps to create an attachment file:
- Type the text Welcome!
- Name it file
- Save it as .txt in the path C:\temp
Use the below PowerShell script to send an email with Cc, Bcc, and attachment file.
- Fill in the sender in line number 2
- Fill in the recipient in line number 3
- Fill in the cc recipient in line number 4
- Fill in the bcc recipient in line number 5
- Fill in the subject of the email in line number 6
- Fill in the body message of the email in line number 7
- Fill in the attachment path where you saved the .txt file in line number 8
- Choose HTML or Text for the type of the message email in line number 11
- Choose true to save an email in the sent items folder or false to not save the email in the sent items in line number 12
# Email details
$sender = "info@alitajran.com"
$recipient = "bob.green@gmail.com"
$ccrecipient = "amanda.hansen@gmail.com"
$bccrecipient = "m365info@outlook.com"
$subject = "Sending with MgUserMail"
$body = "Come and join us at the biggest tech event!"
$attachmentpath = "C:\temp\file.txt"
$attachmentmessage = [Convert]::ToBase64String([IO.File]::ReadAllBytes($AttachmentPath))
$attachmentname = (Get-Item -Path $attachmentpath).Name
$type = "HTML" #Or you can choose "Text"
$save = "false" #Or you can choose "true"
# Import MgGraph module
Import-Module Microsoft.Graph.Users.Actions
# Connect to MgGraph with required permissions
Connect-MgGraph -Scopes 'Mail.Send', 'Mail.Send.Shared'
$params = @{
Message = @{
Subject = $subject
Body = @{
ContentType = $type
Content = $body
}
ToRecipients = @(
@{
EmailAddress = @{
Address = $recipient
}
}
)
CcRecipients = @(
@{
EmailAddress = @{
Address = $ccrecipient
}
}
)
BccRecipients = @(
@{
EmailAddress = @{
Address = $bccrecipient
}
}
)
Attachments = @(
@{
"@odata.type" = "#microsoft.graph.fileAttachment"
Name = $attachmentname
ContentType = "text/plain"
ContentBytes = $attachmentmessage
}
)
}
SaveToSentItems = $save
}
# Send message
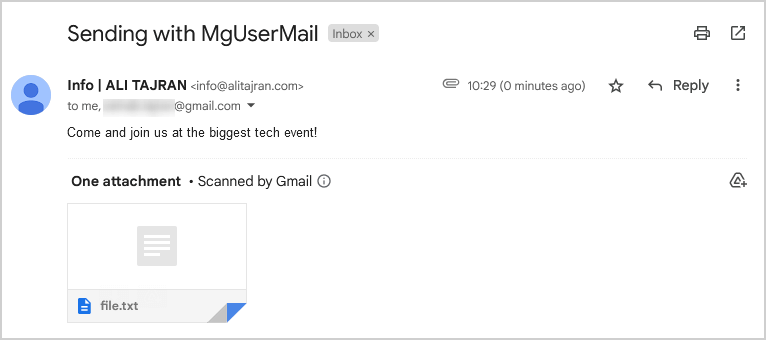
Send-MgUserMail -UserId $sender -BodyParameter $paramsThe result of the email sent with a Cc, Bcc recipient, and attachment file you created.
Note: The Bcc is not shown, and you have to check that in the Bcc recipient’s inbox.
Automate send email with Send-MgUserMail
You can also send an email without inserting credentials or getting an MFA prompt. To do this, you need to register an application in Azure AD. Then you need to create a Client Secret for your application in Azure AD. Lastly, you must assign permission to this newly created app.
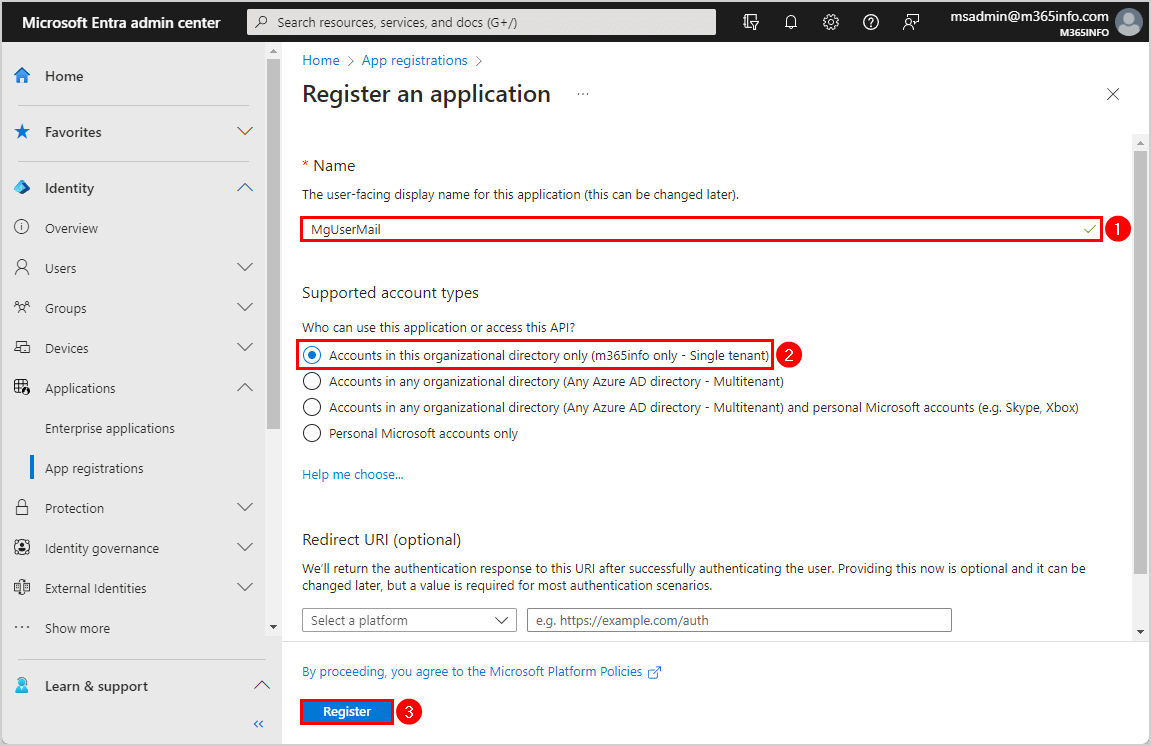
1. Register new application in Azure
You must register an application to get the Application (client) ID and Directory (tenant) ID.
- Sign in Microsoft Entra admin center and enter your credentials
- Expand Identity
- Click on Applications > App registrations
- Click New registration
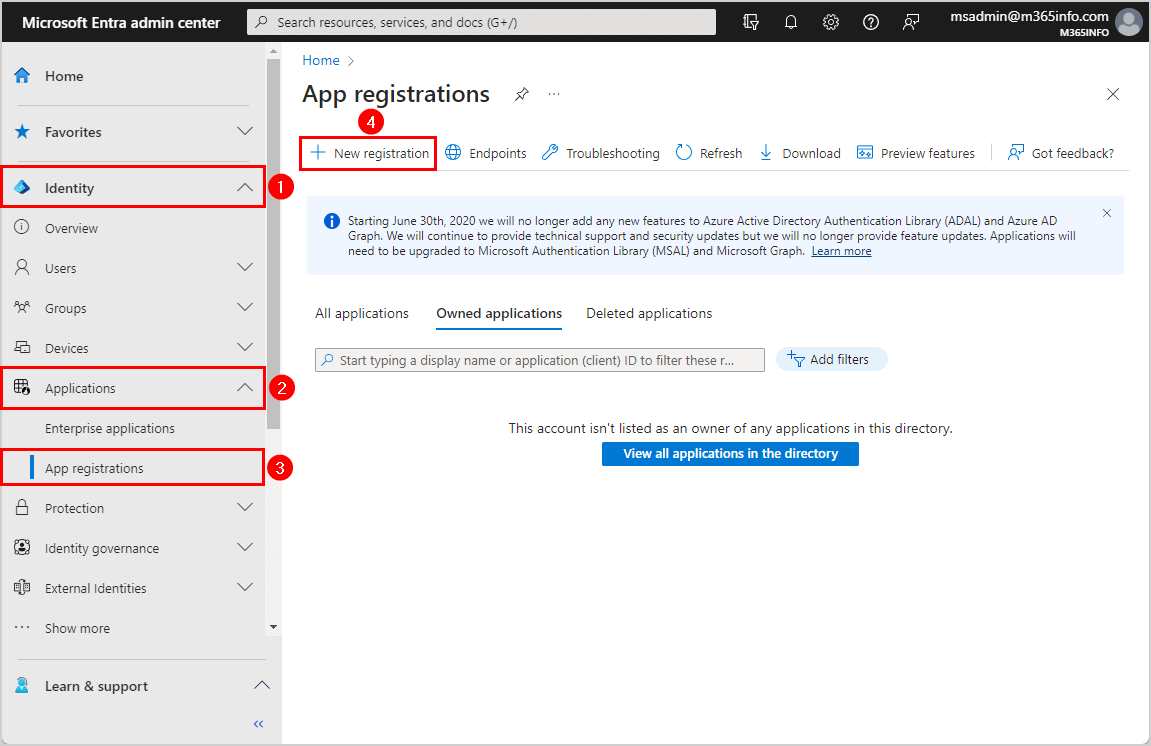
- Name your application MgUserMail
- Select Accounts in this organizational directory only (- Single tenant)
- Click Register
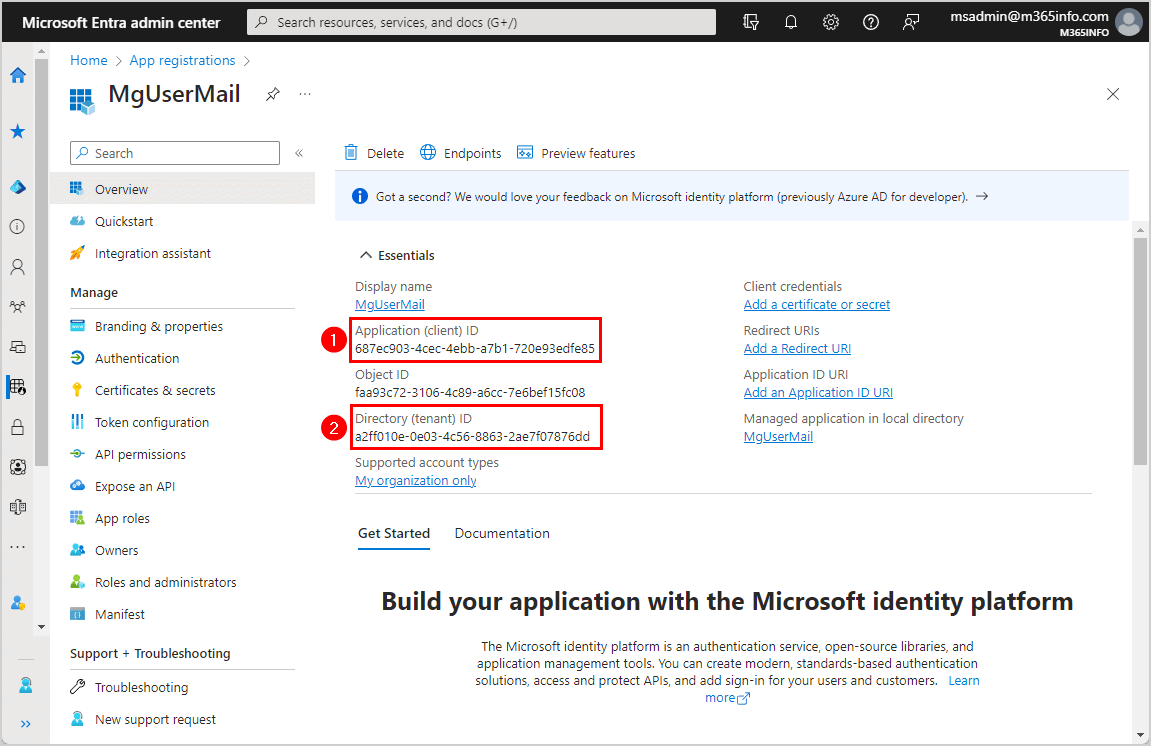
- Copy the Application (client) ID and paste it into Notepad
- Copy the Directory (tenant) ID and paste it into Notepad
You will need these values later when connecting with Microsoft Graph.
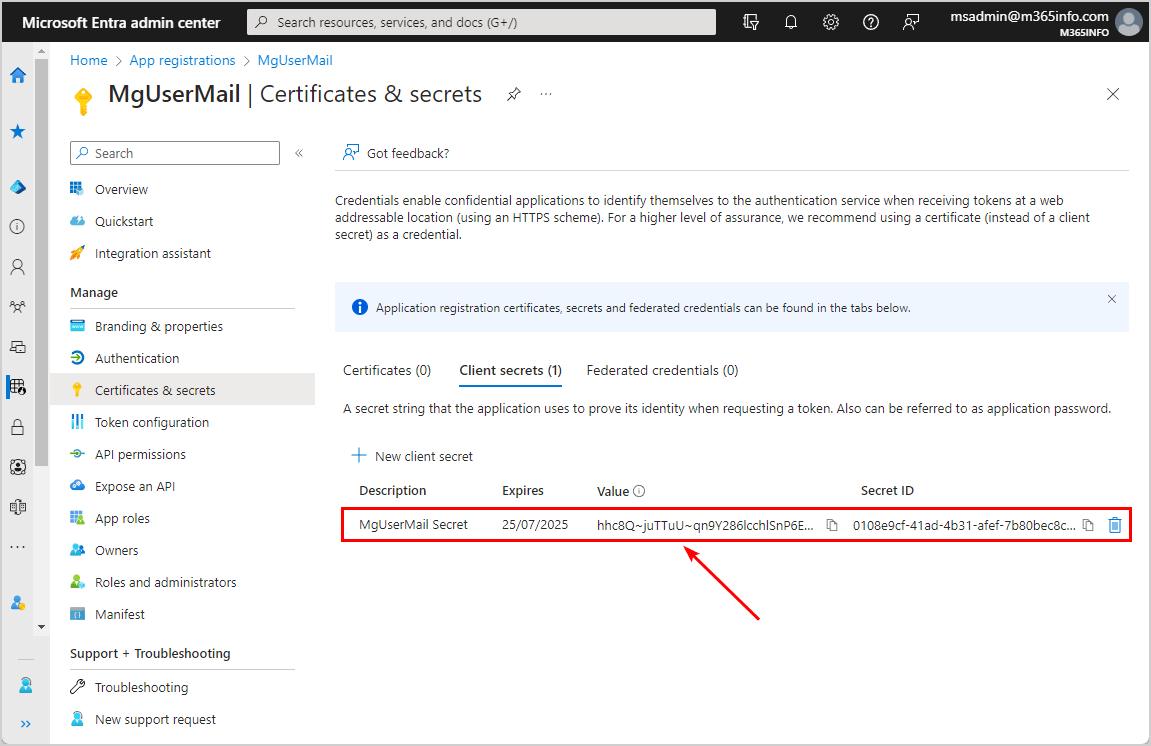
2. Create Client Secret for new app
Go to the MSGraph bot application overview page in Azure AD.
To create a Client Secret for your application in the Microsoft Entra portal, follow these steps:
- Click on Certificates & secrets
- Click Client secrets > New client secret
- Type the description
- Select an expiration date
- Click Add
Note: The Client Secret expiration date has a maximum of 24 months (2 years). You can Create unlimited Client Secret in Microsoft Entra ID with PowerShell.

- Copy the client secret Value and save it
Note: Client secret values cannot be viewed except immediately after creation. Remember to save the secret when created before leaving the page.
3. Assign API permissions
You have registered a new application and created a client secret for this application. Now we need to select API permissions for the MgUserMail application.
Time needed: 8 minutes
How to assign API permissions to the newly created application.
- Assign API permissions
Click API permission
Click Add a permission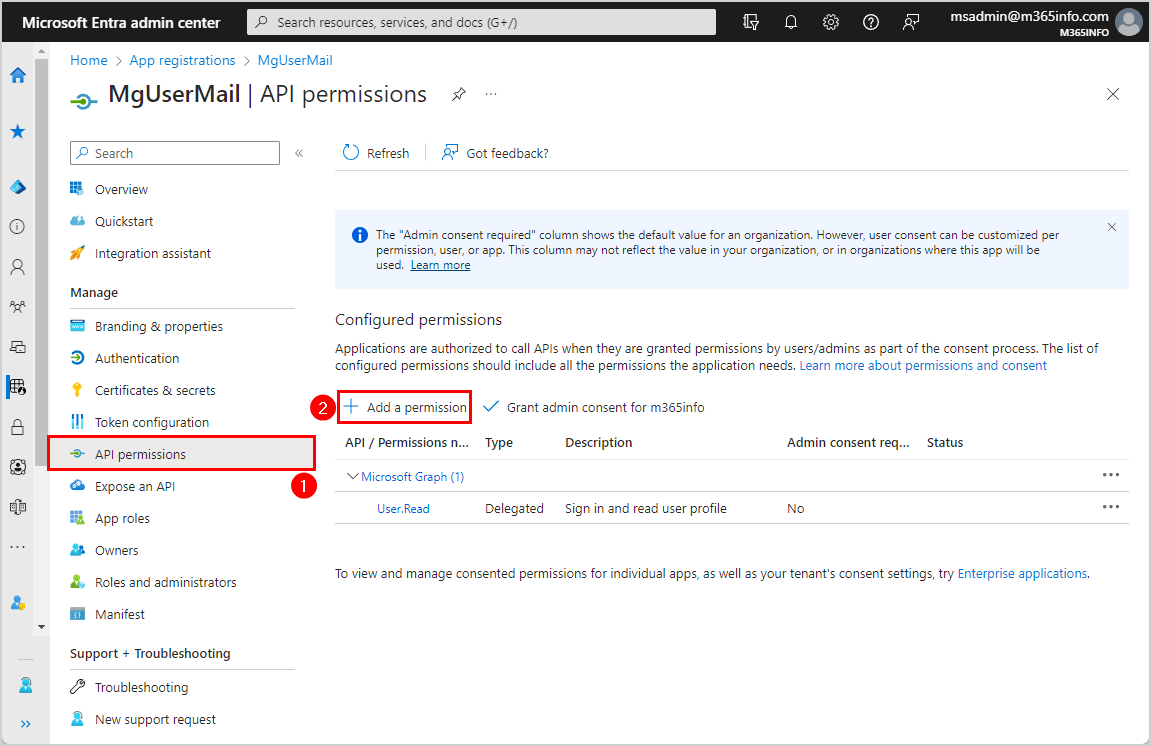
- Request API permissions
Under the tab Microsoft APIs
Click Microsoft Graph
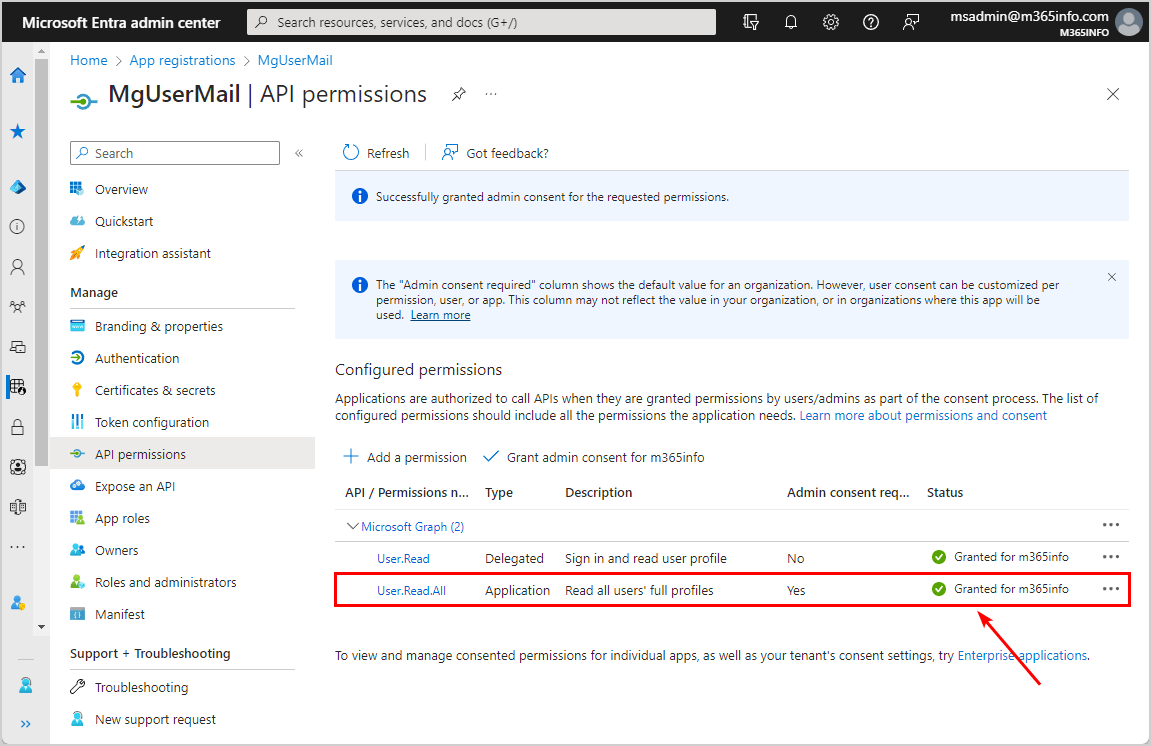
- Select application permissions
Click Application permissions
Search for User.Read.All
Select User > User.Read.All
Click Add permissions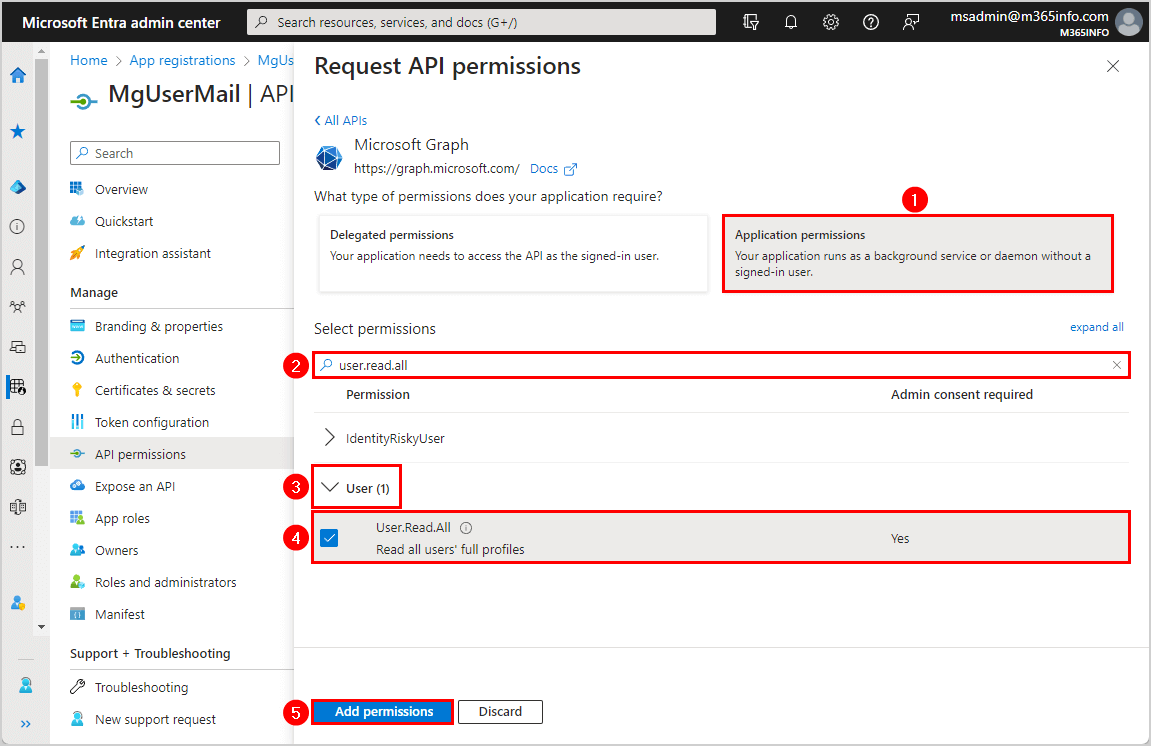
- Grant admin consent
Click Grant admin consent for m365info
Click Yes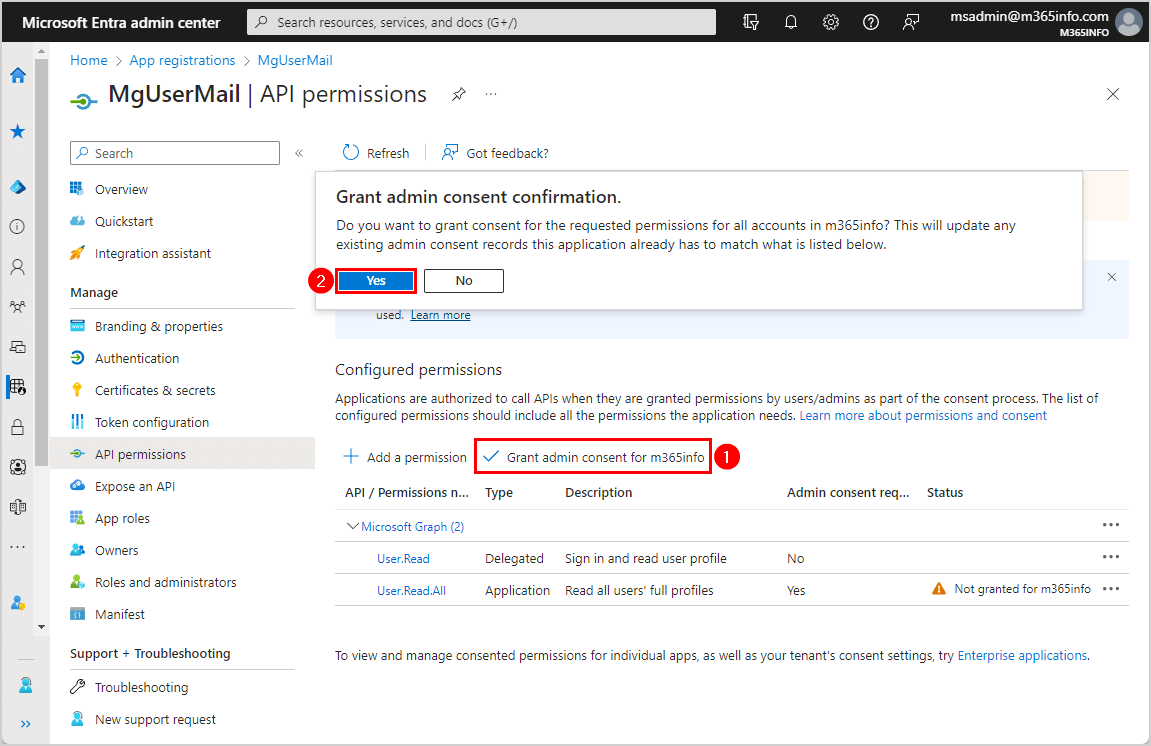
- Successfully granted admin consent for the requested permissions
See the green check mark under status
4. Send automated email with Send-MgUserMail
We will send an automated email with a Cc recipient, Bcc recipient, and attachment file. Remember to create an attachment .txt file and save it C:\temp.
Note: If you want to send a basic automated email, use a hashtag (#) before the command lines to exclude some options.
You need to change the below parameters with your own values.
- Type the Application (client) ID in line number 2
- Type the Directory (tenant) ID in line number 3
- Type the Client Secret in line number 4
- Type the sender in line number 25
- Type the recipient in line number 26
- Type the Cc recipient in line number 27
- Type the Bcc recipient in line number 28
- Type the subject of the email in line number 29
- Type the body message of the email in line number 30
- Type the attachment path in line number 31
- Choose HTML or Text for the type of the message email in line number 34
- Choose true to save an email in the sent items folder or false to not save the email in the sent items in line number 35
Run the below PowerShell script.
# Configuration
$ClientId = "687ec903-4cec-4ebb-a7b1-720e93edfe85"
$TenantId = "a2ff010e-0e03-4c56-8863-2ae7f07876dd"
$ClientSecret = "hhc8Q~juTTuU~qn9Y286lcchlSnP6EAYlFl-lcHo"
# Convert the client secret to a secure string
$ClientSecretPass = ConvertTo-SecureString -String $ClientSecret -AsPlainText -Force
# Create a credential object using the client ID and secure string
$ClientSecretCredential = New-Object -TypeName System.Management.Automation.PSCredential -ArgumentList $ClientId, $ClientSecretPass
# Connect to Microsoft Graph with Client Secret
Connect-MgGraph -TenantId $TenantId -ClientSecretCredential $ClientSecretCredential
# Email details
$sender = "info@alitajran.com"
$recipient = "bob.green@gmail.com"
$ccrecipient = "amanda.hansen@gmail.com"
$bccrecipient = "m365info@outlook.com"
$subject = "Sending with MgUserMail (Client Secret)"
$body = "Come and join us at the biggest tech event!"
$attachmentpath = "C:\temp\file.txt"
$attachmentmessage = [Convert]::ToBase64String([IO.File]::ReadAllBytes($AttachmentPath))
$attachmentname = (Get-Item -Path $attachmentpath).Name
$type = "HTML" #Or you can choose "Text"
$save = "false" #Or you can choose "true"
# Import MgGraph module
Import-Module Microsoft.Graph.Users.Actions
$params = @{
Message = @{
Subject = $subject
Body = @{
ContentType = $type
Content = $body
}
ToRecipients = @(
@{
EmailAddress = @{
Address = $recipient
}
}
)
CcRecipients = @(
@{
EmailAddress = @{
Address = $ccrecipient
}
}
)
BccRecipients = @(
@{
EmailAddress = @{
Address = $bccrecipient
}
}
)
Attachments = @(
@{
"@odata.type" = "#microsoft.graph.fileAttachment"
Name = $attachmentname
ContentType = "text/plain"
ContentBytes = $attachmentmessage
}
)
}
SaveToSentItems = $save
}
# Send message
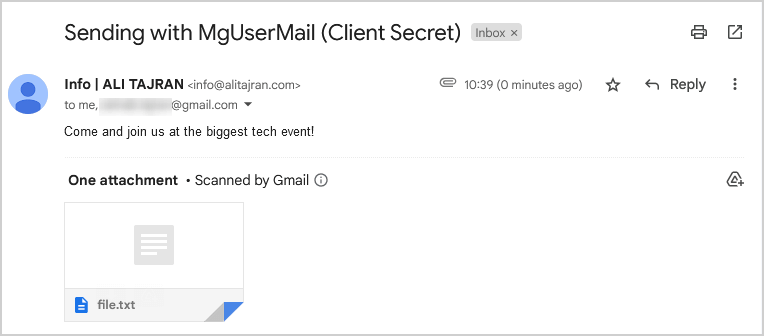
Send-MgUserMail -UserId $sender -BodyParameter $paramsThe result of the email sent using Client Secret including Cc, Bcc recipient, and attachment file.
Note: The Bcc is not shown, and you have to check that in the Bcc recipient’s inbox.
You can successfully send an email with the Send-MgUserMail cmdlet.
Read more: Export Microsoft 365 users licenses »
Conclusion
You learned how to send Exchange Online email with the Send-MgUserMail PowerShell cmdlet. Remember to sign with a licensed mailbox with Send As or Send on Behalf permissions. If you don’t want to sign in with credentials, you need to create a client secret app to send an automated email with the Send-MgUserMail cmdlet.
Did you enjoy this article? You may also like Configure Certificate-Based Authentication to run automated scripts. Don’t forget to follow us and share this article.
How does the registered application receive sendas privileges on the senders address?
the privileges mail.send, mail.send.shared or not provided to registered application.