If you want multiple users to access the same mailbox, without paying a license because…
How to configure SPF DKIM and DMARC for Microsoft 365
To prevent spam, spoofing, phishing attacks, and other email security risks from your domain, it’s essential to set up SPF, DKIM, and DMARC. The three email authentication methods help authenticate email senders by verifying that the emails came from the domain they claim to be from. This article will teach you how to configure SPF, DKIM, and DMARC for Microsoft 365.
Table of contents
What are SPF, DKIM, and DMARC records?
SPF, DKIM, and DMARC are three important email authentication and security methods to prevent your domain from spoofing, phishing, and other email-based cyberattacks. These three email methods work together to verify the authenticity of the sender’s identity and protect email recipients from fraudulent or malicious emails. Each method serves a specific purpose in enhancing email security.
To get the maximum protection for your domain, you need to set up all three methods:
- SPF (Sender Policy Framework)
- DKIM (DomainKeys Identifies Mail)
- DMARC (Domain-based Message Authentication Reporting and Conformance)
Domains that don’t configure SPF, DKIM, and DMARC records correctly may find their emails marked as spam or not delivered to their recipients. There is also a higher risk of spoofers that pretend to send emails on behalf of your domain without your permission. Therefore you must configure SPF, DKIM, and DMARC for your Microsoft 365 domain.
Configure SPF record for Microsoft 365
The SPF record specifies which mail servers are authorized to send emails on behalf of a specific domain.
The SPF record includes a list of all the IP addresses of all the servers that are allowed to send emails from a specific domain. So when your domain mail server receives an email, it will go through the list of IP addresses (SPF record) before it reaches the recipient.
You need to set up the SPF record for your domain and publish it into your DNS. After that, verify you configured the SPF record for your Microsoft 365 domain correctly.
Read more: Configure SPF record for Microsoft 365 »
How to configure DKIM record for Microsoft 365
DKIM verifies the authenticity of an email sender and its content. When you send an email from your domain with DKIM enabled, it will add a digital signature to the email’s header using encryption techniques. This way, DKIM ensures that the email sender is authentic and the content has not been changed since it was sent.
The DKIM record has two CNAME selectors (selector1 and selector2). These selectors are unique identifiers that include the tenant name and the onmicrosoft.com domain name.
You must add the DKIM CNAME records to your DNS hosting provider. After you publish the CNAME records selector1 and selector2, you must enable the DKIM keys in Microsoft 365 Defender.
Important: You must enable the DKIM keys in Microsoft 365 Defender or with PowerShell after you publish the DKIM CNAMEs records in your DNS hosting provider.
DKIM is based on public key infrastructure:
- Private keys: Secret keys are only visible to the sender, which uses the private keys to digitally sign (proof of identity) the email header message
- Public keys: Available keys to everyone published in DNS records for verification for the recipient
For example, a sender creates a digital signature for the email using their private keys. The recipient gets the email and uses the sender’s public key to verify the digital signature. If the signature is valid, it means that the message has not been modified and it came from an authentic sender.
Therefore you should set up your DKIM record to protect your domain from others that change your email content or pretend to be the sender. Verify you configured the DKIM record for your domain and enabled the DKIM records.
Read more: Configure DKIM record for Microsoft 365 »
How to configure DMARC record for Microsoft 365
DMARC record consists of DMARC policies and reports. DMARC tells the mail server that receives an email what it should do after SPF and DKIM checks.
The DMARC policy instructs the mail server to quarantine emails that fail SPF and/or DKIM, to reject such emails, or to do none. DMARC reports to domain administrators about which emails pass or fail the SPF and/or DKIM checks.
You can only add the DMARC record at your DNS hosting provider after you have published a valid SPF and DKIM record. Verify you configured the DMARC record for your Microsoft 365 domain correctly. Always remember to change the DMARC policy from none to reject or quarantine.
Read more: Configure DMARC record for Microsoft 365 »
Verify SPF, DKIM, and DMARC records
After you configure SPF, DKIM, and DMARC records, always verify you did it correctly. We will show you three ways to check the email authentication methods you set up.
Verify with Dmarcian
To verify SPF, DKIM, and DMARC records, use the Dmarcian tool:
- Go to DMARC Domain Checker
- Type your domain m365info.com
- Click Check My Domain
It checks whether your domain is protected against abuse by phishers and spammers.
The result shows that everything is green, which means that the SPF, DKIM, and DMARC records are published correctly in your DNS hosting provider.
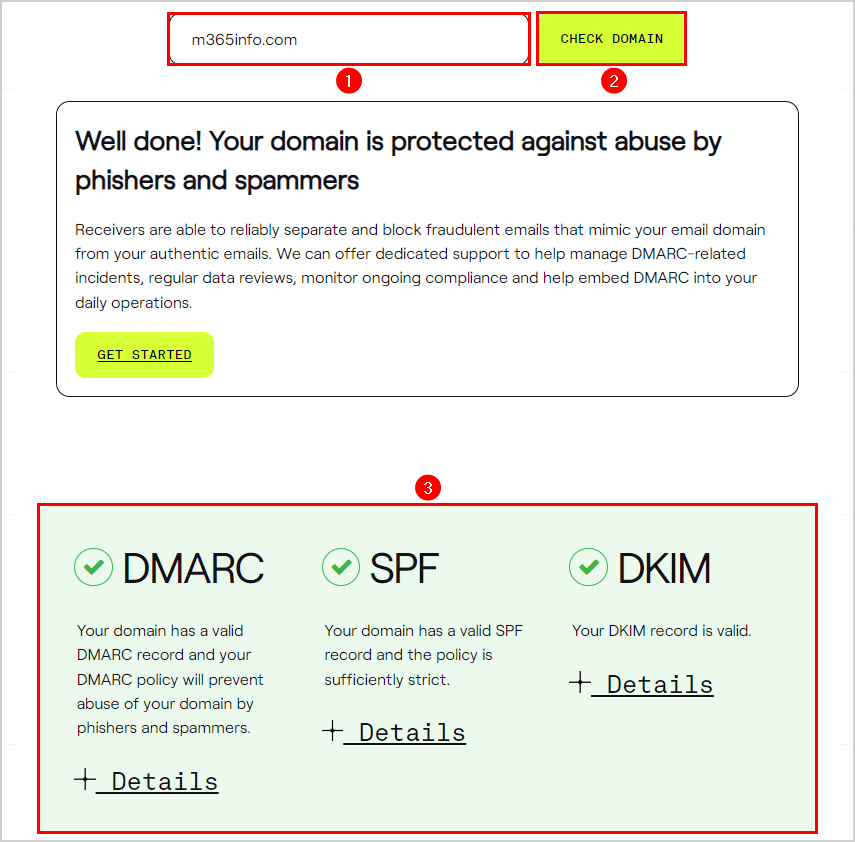
You successfully published SPF, DKIM, and DMARC records.
Note: Even if you have published the DKIM CNAMEs into your DNS hosting provider, the Dmarcian test will not show whether your DKIM keys are enabled/disabled. Therefore you should send a test mail and analyze the message header.
Verify with Gmail message header
In our example, an organization user with the email address Amanda.Hansen@m365info.com sends an email to an external recipient with a Gmail address.
Our example:
- Organization sender: Amanda.Hansen@m365info.com
- External recipient: bob.green@gmail.com
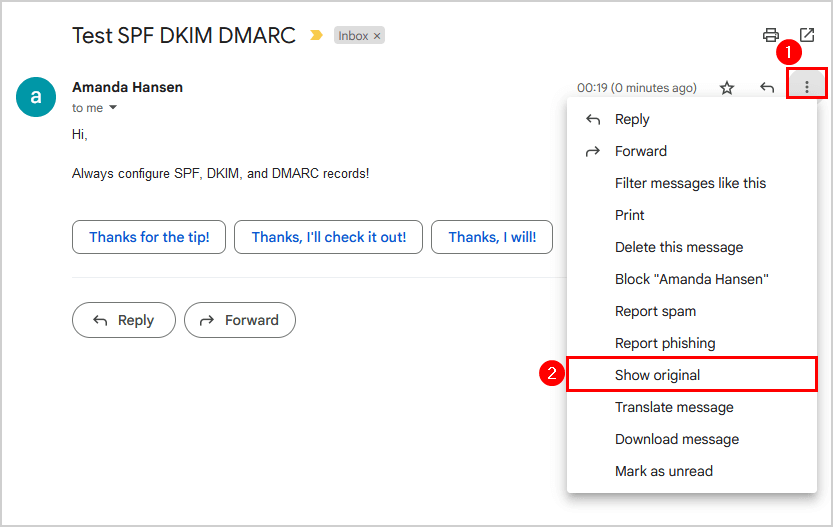
Go to the recipient inbox to view the original message header:
- Open the email
- Click the three dots
- Click Show original
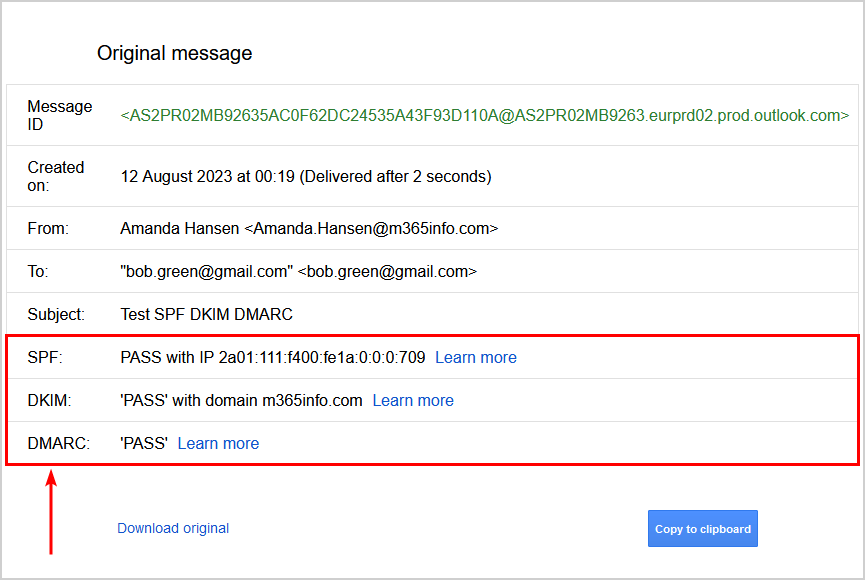
The original message in Gmail only shows the authentication method (SPF, DKIM, DMARC) when it passed the test. So if one of the authentication methods fails the Gmail test, it will not type fail but remove the authentication method.
- SPF: PASS
- DKIM: PASS
- DMARC: PASS
In our example, all three email authentication methods have passed the test.
Verify with CheckTLS
The best way to test SPF, DKIM, and DMARC records is with the CheckTLS tool:
- Go to CheckTLS
- Click on Select Extra Items to Show
- Select SPF Info, DKIM Info, DMARC Info
- Click Start Listener
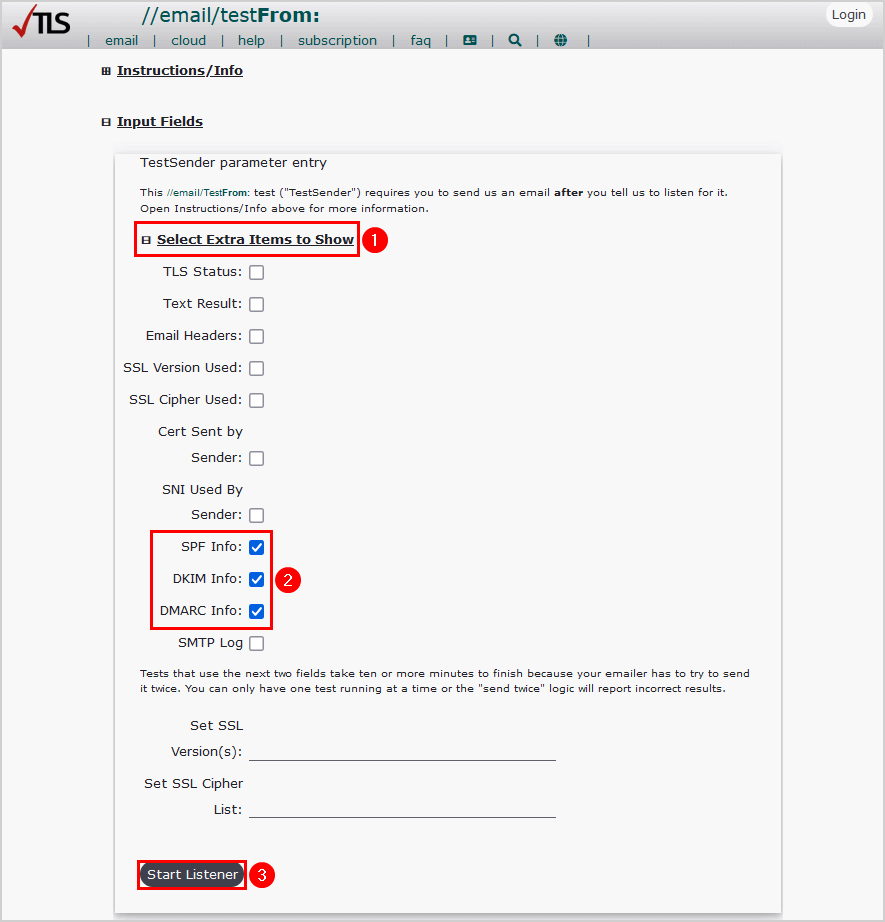
Your test is setup.
- Copy the below values to send a test email
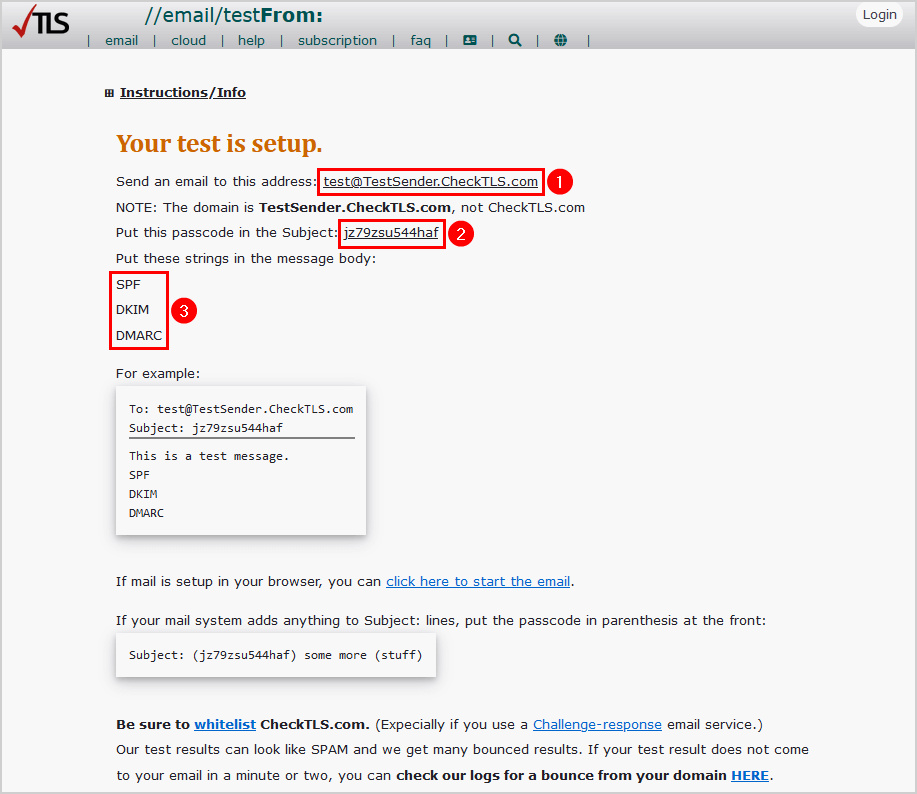
- Create a new email
- Copy and paste the address to test@TestSender.CheckTLS.com
- Copy and paste the passcode in the subject of the email
- Type SPF, DKIM, and DMARC in the message
See the below example and send an email to test@TestSender.CheckTLS.com.

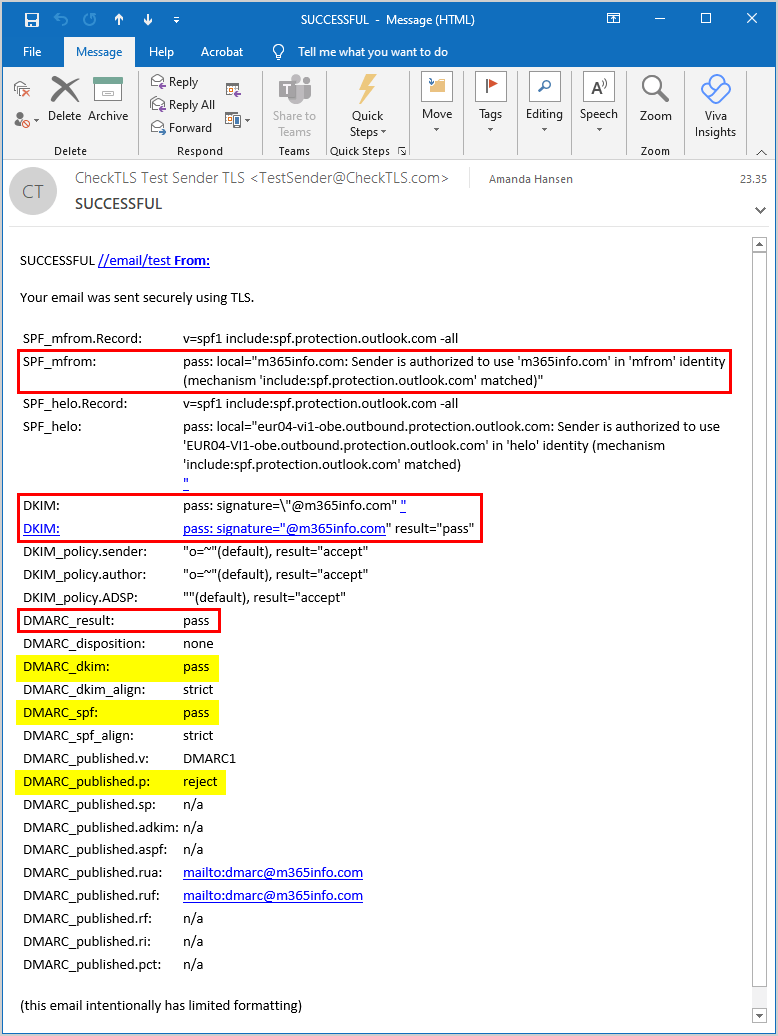
- Check your inbox, and open the email from CheckTLS to see the report items you selected
- The results show that the email was sent successfully
- SPF: pass
- DKIM: pass
- DMARC_result: pass
It also splits the DMARC results and shows the DMARC_dkim: pass and the DMARC_spf: pass. Always check if the DMARC policy is published as p=reject or p=quarantine, depending on how you set it up.
You successfully configured SPF, DKIM, and DMARC for your Microsoft 365 domain!
Read more: Enable reply all storm protection in Exchange Online »
Conclusion
You learned how to configure SPF, DKIM, and DMARC for Microsoft 365 domain. These three important email authentication methods protect your domain against phishers and spammers. Remember to verify you published valid SPF, DKIM, and DMARC records once you set it up.
Did you enjoy this article? You may also like How to improve Microsoft Entra MFA security. Don’t forget to follow us and share this article.
This Post Has 0 Comments