Multiple users can access a shared mailbox, but you can convert it to a regular…
Enable reply all storm protection in Exchange Online
The reply-all storm protection feature reduces the impact of email recipients for large organizations. If an employee sends an email using Reply All, it may send to all the recipients of an organization which could be over 10,000 users. To avoid this storm, Microsoft has released an update of the reply-all storm protection. In this article, you will learn how to enable reply all storm protection in Exchange Online PowerShell and Exchange Admin Center.
Table of contents
- How to set reply-all storm protection
- Enable reply-all storm protection with Exchange Online
- View reply-all storm protection with PowerShell
- Enable reply-all storm protection with PowerShell
- Change reply-all storm protection settings in single PowerShell command
- Reply-all storm protection report
- Conclusion
How to set reply-all storm protection
Microsoft announced a new reply-all storm protection feature with an updated version. Now the admins can modify the settings of this feature in the Exchange Admin Center and with PowerShell.
If you want to protect your organization from unwanted and disruptive reply-all email storms, you should enable this feature.
There are two ways to enable and configure reply-all storm protection in Microsoft 365:
- Exchange Admin Center (EAC)
- Exchange Online PowerShell
Note: The reply-all storm protection feature only protects large organizations with a minimum of 1000 employees. There is no need to enable this feature if you have a smaller organization, as you can’t change its settings to lower than 1000 recipients.
Enable reply-all storm protection with Exchange Online
How to enable the reply-all storm protection with Exchange Online:
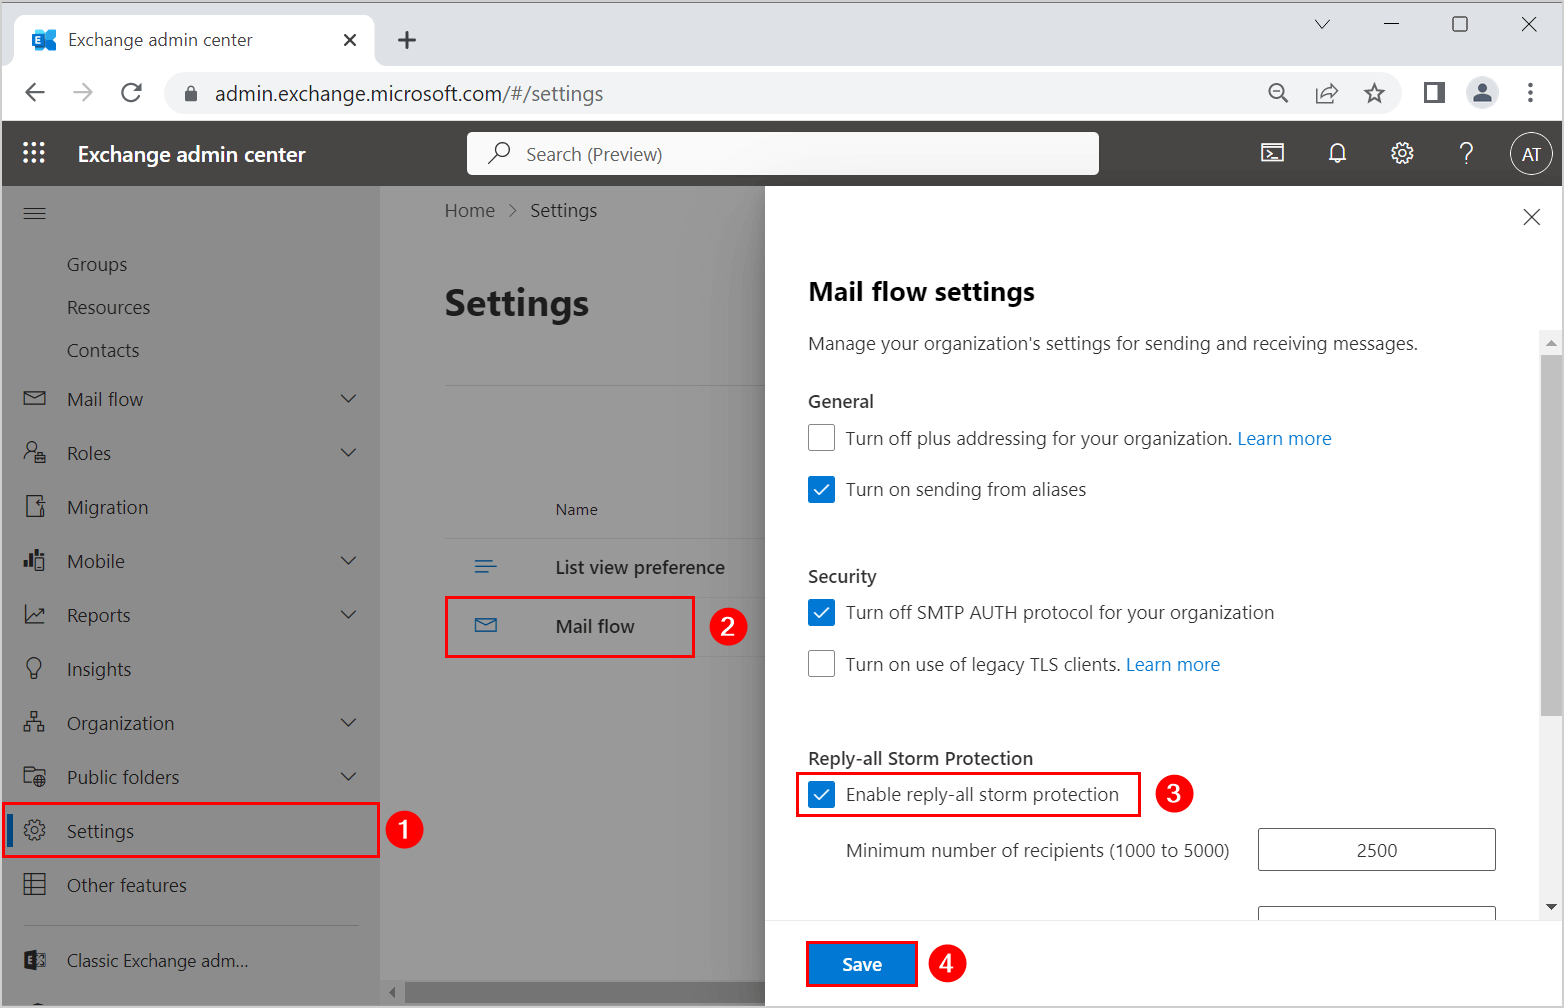
- Sign in to Exchange Admin Center
- On the navigation pane, click on Settings
- Click on Mail flow
- Select Enable reply-all storm protection
- Click Save
Change reply-all storm protection settings in Exchange Online
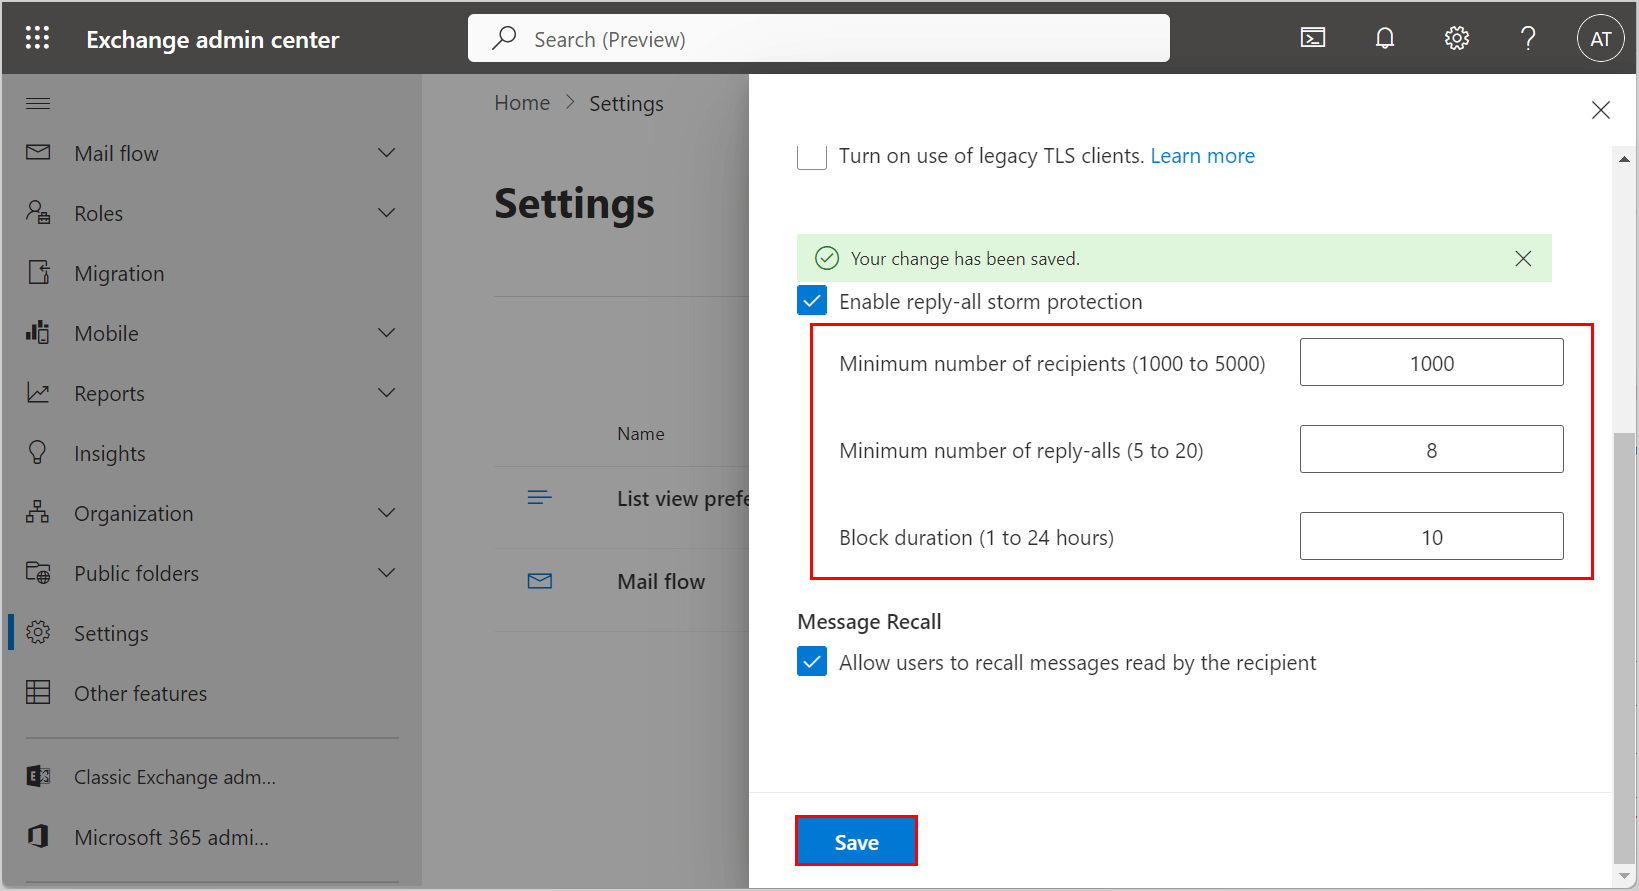
Once you enable the reply-all storm protection feature in Exchange Online, you can change its settings:
- Lower the number of recipients to a minimum of 1000
- Change the number of reply-alls to 8
- Change the block duration hours to 10
- Click Save
An alert appears: Your change has been saved. Now you have successfully adjusted the reply-all storm protection settings.
View reply-all storm protection with PowerShell
You can also view the reply-all storm protection feature with PowerShell. First, you need to connect to Exchange Online PowerShell.
Connect-ExchangeOnlineRun the command below to view the reply-all storm protection status.
Get-TransportConfig | fl *storm*The PowerShell console output shows these settings below if it is enabled.
PS C:\> Get-TransportConfig | fl *storm*

ReplyAllStormProtectionEnabled          : True
ReplyAllStormDetectionMinimumRecipients : 2500
ReplyAllStormDetectionMinimumReplies    : 10
ReplyAllStormBlockDurationHours         : 6
Enable reply-all storm protection with PowerShell
Use the below command to enable the reply-all storm protection feature.
Set-TransportConfig -ReplyAllStormProtectionEnabled $trueChange the number of recipients with PowerShell
You can adjust the settings of the number of recipients in the reply all storm protection by using the below command. In our example, we lowered it to 1000 recipients (which is the minimum).
Note: The number that you can set is between 1000 (minimum) and 5000 (maximum).
Set-TransportConfig -ReplyAllStormDetectionMinimumRecipients 1000Change the number of replies with PowerShell
Run the below PowerShell command to lower the minimum of replies to 8.
Note: The number that you can set is between 5 (minimum) and 20 (maximum).
Set-TransportConfig -ReplyAllStormDetectionMinimumReplies 8Change the block duration hours with PowerShell
Adjust the block duration hours to 10 by using the PowerShell command below. It’s better to set a longer block duration hour, so nobody of the users restarts the reply-all storm.
Note: The number that you can set is between 1 (minimum) and 24 (maximum) hours.
Set-TransportConfig -ReplyAllStormBlockDurationHours 10Change reply-all storm protection settings in single PowerShell command
You can also change all the settings of the reply-all storm protection in a single PowerShell command. Use the below command to adjust the settings at once. In our example, we used the same numbers as above.
Set-TransportConfig -ReplyAllStormProtectionEnabled $true -ReplyAllStormDetectionMinimumRecipients 1000 -ReplyAllStormDetectionMinimumReplies 8 -ReplyAllStormBlockDurationHours 10Reply-all storm protection report
To check the reply-all storm protection report, follow the below steps:
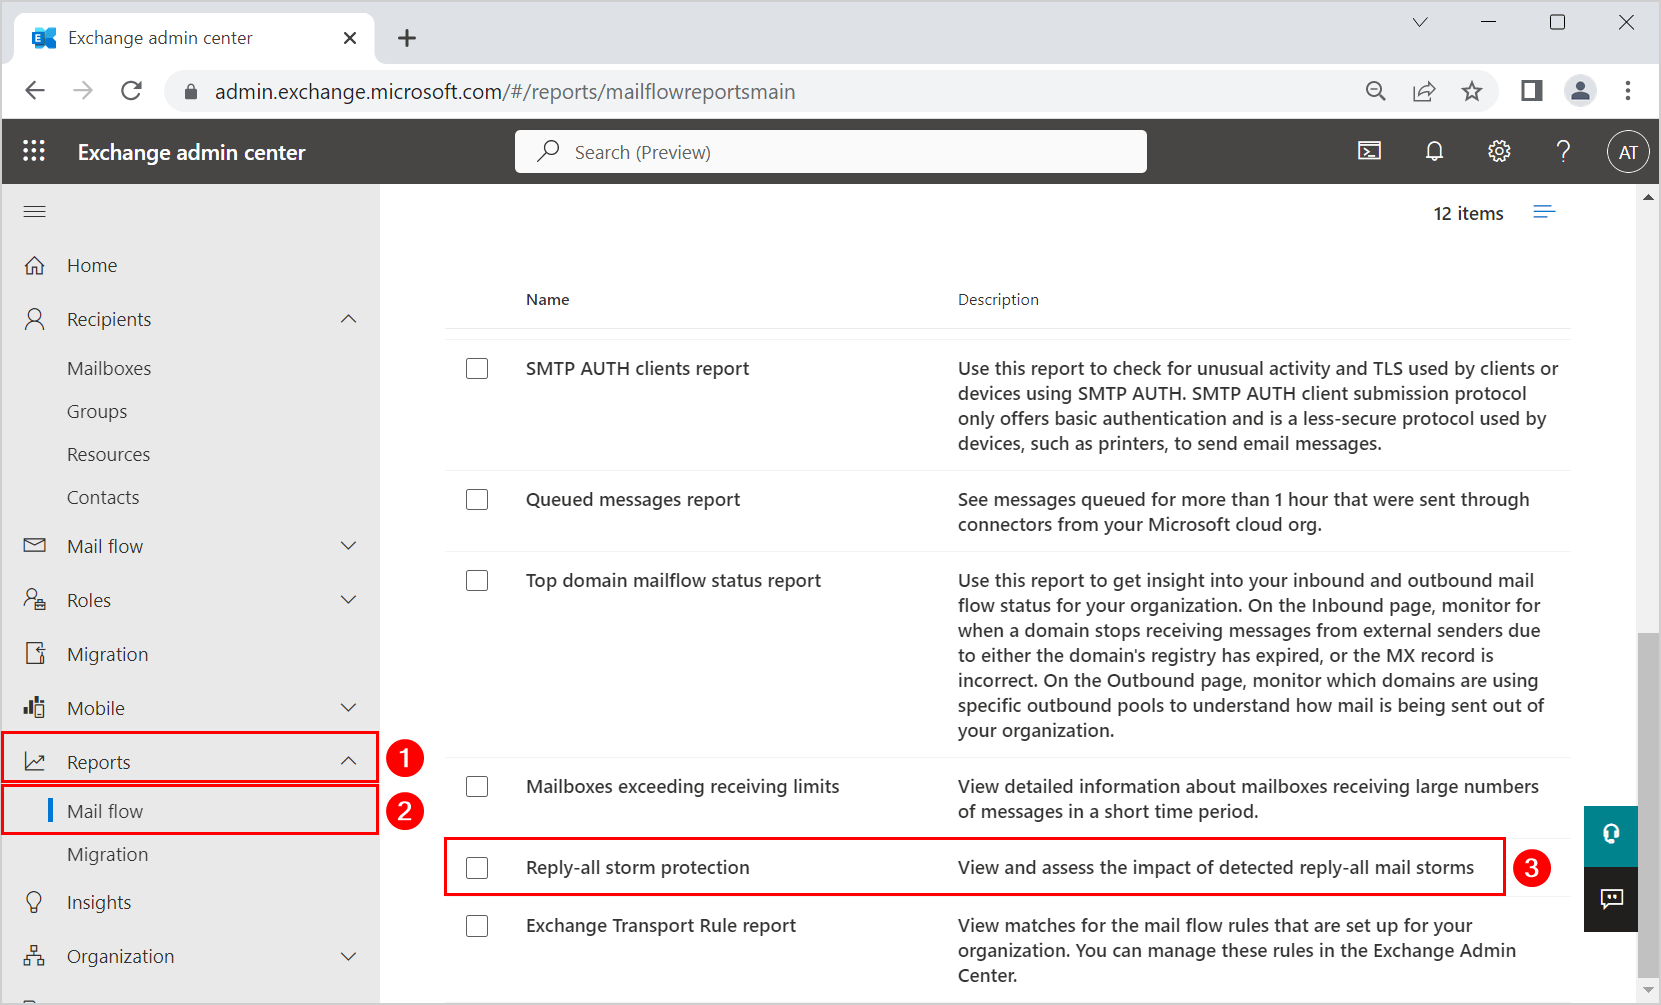
- Sign in to Exchange Admin Center
- In the navigation pane > expand Reports
- Click on Mail flow
- Scroll down and click on Reply-all storm protection report
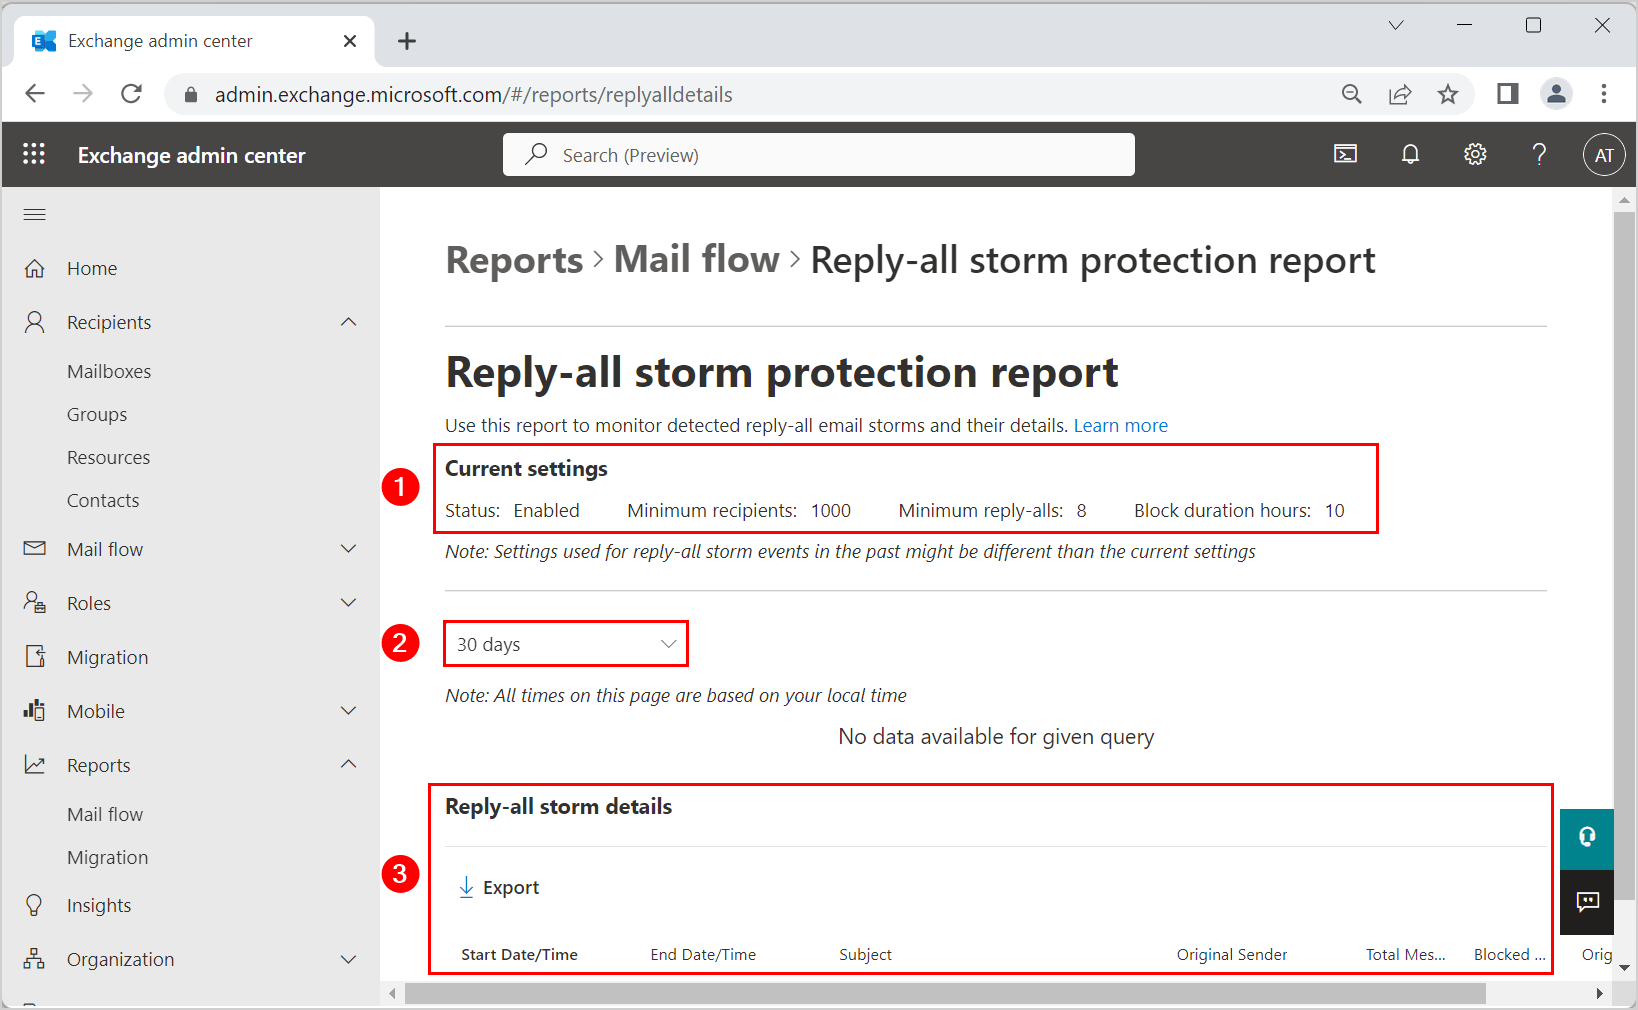
You can observe any details of the last couple of hours or days. In our example, we changed it to 30 days, but no data is available.
The reply-all storm protection report shows:
- Current settings
- Retrieve data of min. 3 hours and max. 30 days
- Details of detected reply-all storms in a report
Conclusion
You learned how to enable reply-all storm protection in Exchange Admin Center and Exchange Online PowerShell. The latest update allows admins to change the settings of the reply-all storm protection. You can also view the reply-all storm protection report for details and analysis.
What Others Are Reading
This Post Has 0 Comments