It's necessary to protect your organization and have strong security to prevent MFA fatigue. That's…
How to create Microsoft 365 Groups
You can create different Microsoft 365 group types in the Microsoft 365 portals. In the Microsoft Entra admin center and MS Graph PowerShell, it’s only possible to create the following two groups: Security and Microsoft 365. In this article, you will learn how to create Microsoft 365 groups with Microsoft Graph PowerShell.
Table of contents
- Microsoft 365 group types
- Connect to Microsoft Graph PowerShell
- Create a Security Group with PowerShell
- Create a Dynamic Security Group with PowerShell
- Check Dynamic Security Group in Microsoft Entra ID
- Create a Microsoft 365 Group with PowerShell
- Create a Dynamic Microsoft 365 Group with PowerShell
- Check Dynamic Microsoft 365 Group in Microsoft Entra ID
- Conclusion
Microsoft 365 group types
In Microsoft 365, there are several group types to create and manage in your organization. The most recommended type is the Microsoft 356 group.
The table below shows the different group types in Microsoft 365:
| Group types | Group description | Mail-enabled | Microsoft Graph PowerShell |
|---|---|---|---|
| Microsoft 365 group | Allows (internal and external) users to collaborate as a team by giving them a group email and a shared workspace for files, calendars, and notes. | ✓ | ✓ |
| Distribution list | Creates an email address for a group of people to send email notifications. | ✓ | ☓ |
| Dynamic distribution list | Sends mass email messages to all members of a group list within an organization. | ✓ | ☓ |
| Security group | Grants access to resources such as SharePoint sites. | ☓ | ✓ |
| Mail-enabled security group | Sends messages to all group members and grants access to resources like OneDrive, SharePoint, and admin roles. | ✓ | ☓ |
If you want to create all the groups, it’s best to create them in the Microsoft 365 admin center, Exchange admin center, or Exchange Online PowerShell. That’s because you have the option to select all of the group types.
In the Microsoft Entra admin center and Microsoft Graph PowerShell, you can only create the below types of groups, and that’s what we will focus on:
- Microsoft 365 group
- Microsoft 365 group (dynamic membership)
- Security group
- Security group (dynamic membership)
Connect to Microsoft Graph PowerShell
Before you start, you must Install the Microsoft Graph PowerShell module. Start Windows PowerShell as administrator and run the below command.
Install-Module Microsoft.Graph -ForceImportant: Always install the latest Microsoft Graph PowerShell module version before you run a cmdlet or script to prevent errors and incorrect results.
Run the Connect-MgGraph cmdlet with the below scopes to authenticate with Microsoft Graph.
Connect-MgGraph -Scopes "User.Read.All", "Group.ReadWrite.All", "GroupMember.ReadWrite.All", "Directory.ReadWrite.All"Now that you are all set, you can use the commands with MS Graph PowerShell.
Create a Security Group with PowerShell
To create a new Security group with PowerShell, you will use the New-MgGroup cmdlet with the minimum required attributes:
- -DisplayName
- -MailEnabled ($false)
- -MailNickName (Specify without any spaces)
- -SecurityEnabled ($true)
Run the below PowerShell command to create a new Security group.
New-MgGroup -DisplayName "Security Group" -MailEnabled:$false -MailNickName "SecurityGroup" -SecurityEnabledThe PowerShell result shows the specification of the group.
DisplayName    Id                                   MailNickname  Description GroupTypes
-----------    --                                   ------------  ----------- ----------
Security Group a5377de2-3463-4aa4-bcdf-f066044409e4 SecurityGroup                 {}
You can also create the security group in a different way. It’s best to use a hashtable containing the specified parameters as an array enclosed in braces brackets { }. To create the group with a hashtable, we will use the -BodyParameter.
In our example, the hashtable is defined with actual values for creating a security group.
Run the below PowerShell command to create a security group.
$ParamsGroup = @{
    DisplayName = "Security Group"
    MailEnabled = $false
    MailNickname = "SecGroup"
    SecurityEnabled = $true
}

New-MgGroup -BodyParameter $ParamsGroup
The PowerShell output shows the below results.
DisplayName    Id                                   MailNickname  Description GroupTypes
-----------     --                                   ------------ ----------- ----------
Security Group 77efba4d-fca6-4a86-b585-a181ad5d7838 SecGroup                      {}
You created a security group, so now you can add owners and add members to the group.
Create a Dynamic Security Group with PowerShell
You can also create a Dynamic Security group, which is the same as a security group but with a dynamic membership. You need to create a rule that contains a group of users to add them as members.
It means that you can’t manually add or remove the members of a group. The group members are specified to a rule, so the group will automatically change whenever a user is added or removed from the rule.
To specify a dynamic security group, you must use three more parameters than the security group:
- The -GroupTypes parameter with the value DynamicMemberShip to confirm it’s a dynamic security group.
- The -MembershipRule parameter, where you must specify the members in a rule syntax. In our example, we will add all the users from the sales department, so we need to use the syntax (user.department -eq “sales”).
- The -MembershipRuleProcessingState parameter with the value On.
Note: The total length of a single membership rule can’t exceed 3071 characters
To create a Dynamic Security group, you need the minimum required attributes:
- -DisplayName
- -MailEnabled ($false)
- -MailNickName (Specify without any spaces)
- -SecurityEnabled ($true)
- -GroupTypes (DynamicMembership)
- -MembershipRule (Using a rule to specify the users)
- -MembershipRuleProcessingState (On)
Run the below PowerShell command to create a Dynamic Security group.
New-MgGroup -DisplayName "Dynamic Security Group" -MailEnabled:$false -MailNickName "DynamicSec" -SecurityEnabled:$true -GroupTypes "DynamicMembership" -MembershipRule "(user.department -eq ""sales"")" -MembershipRuleProcessingState OnThe PowerShell output shows the results.
DisplayName            Id                                   MailNickname    Description GroupTypes
-----------            --                                   ------------    ----------- ----------
Dynamic Security Group 50438c83-9ecb-45a2-8d58-fa9199c87c61 DynamicSecurity             {DynamicMembership}
You created a Dynamic Security group, including members from the sales department.
To create the same dynamic security group, you can also use a hashtable. It contains the specified parameters as an array enclosed in braces brackets { }. To create the group with a hashtable, we will use the -BodyParameter.
$ParamsGroup = @{
    DisplayName                   = "Dynamic Security Group"
    MailEnabled                   = $false
    MailNickName                  = "DynamicSec"
    SecurityEnabled               = $true
    GroupTypes                    = @("DynamicMembership")
    MembershipRule                = 'user.department -eq "sales"'
    MembershipRuleProcessingState = "On"
}

New-MgGroup -BodyParameter $ParamsGroup
The PowerShell output shows a security group with a dynamic membership.
DisplayName            Id                                   MailNickname Description GroupTypes
-----------            --                                   ------------ ----------- ----------
Dynamic Security Group 02dd9b36-d52d-48b4-9f9c-2545dcdef3ba DynamicSec               {DynamicMembership}
Check Dynamic Security Group in Microsoft Entra ID
In the Microsoft Entra admin center, you can see the dynamic membership rules of the newly created group.
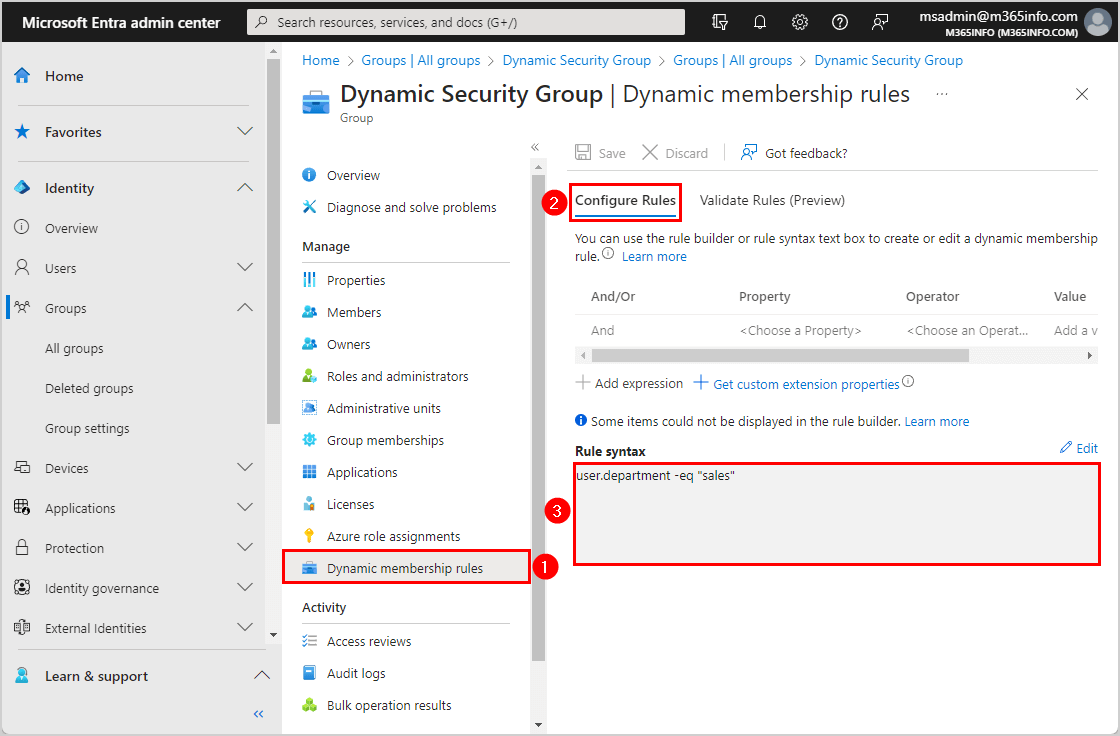
To check a dynamic security group in Microsoft Entra ID, follow these steps:
- Sign in to the Microsoft Entra admin center
- Expand Identity > Groups > All groups
- Click on the newly created Dynamic Security Group
- Click Dynamic membership rules
The screenshot below shows the rule syntax you created to select these members for the group.
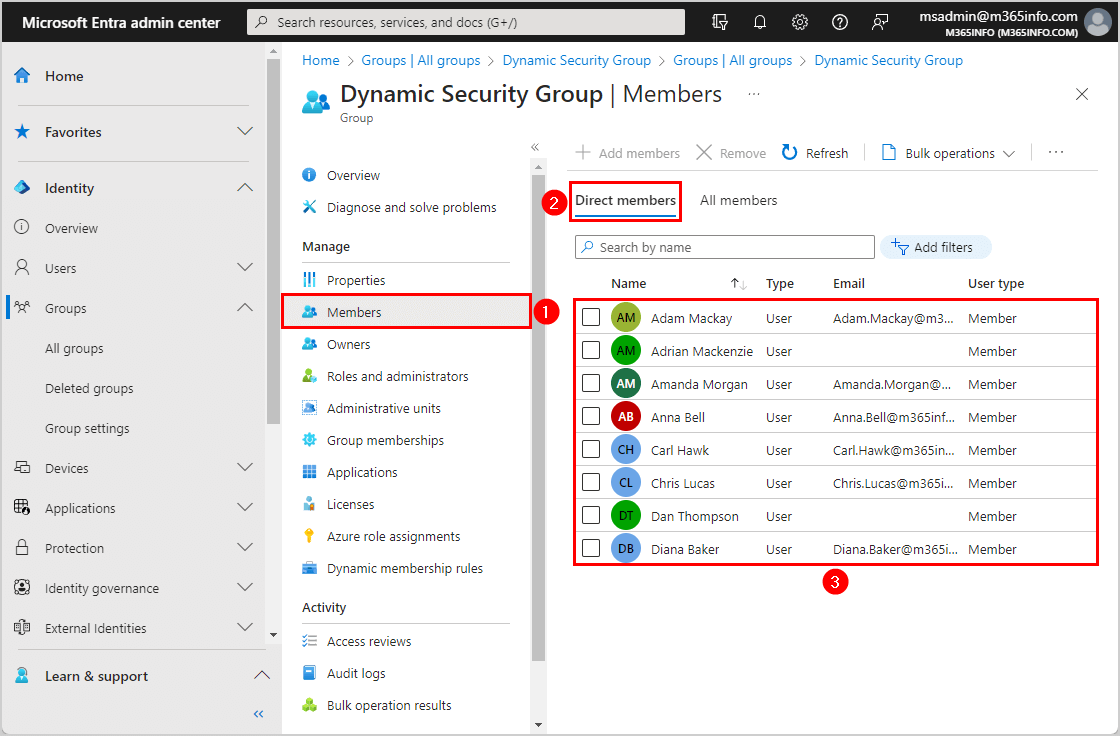
- Click Members
The screenshot below shows all the direct members from the sales department added to this group.
Create a Microsoft 365 Group with PowerShell
To create a new Microsoft 365 group with PowerShell, you will use the New-MgGroup cmdlet with the minimum required attributes:
- -DisplayName
- -GroupTypes @(“Unified”)
- -MailEnabled ($true)
- -MailNickName (Specify it in one word without spaces)
- -SecurityEnabled ($true)
Run the below PowerShell command.
New-MgGroup -DisplayName "M365 Group" -GroupTypes @("Unified") -MailEnabled:$true -MailNickName "M365Group" -SecurityEnabled:$trueThe PowerShell results show the created group.
DisplayName Id                                   MailNickname Description GroupTypes
----------- --                                   ------------ ----------- ----------
M365 Group  49ee36a8-4775-48f4-b540-e8459b3ba2a7 M365Group                {Unified}
You can also create the Microsoft 365 group with a hashtable containing the specified parameters as an array enclosed in braces brackets { }. To create the group with a hashtable, we will use the -BodyParameter.
In our example, the hashtable is defined with actual values for creating a Microsoft 365 group.
Run the below PowerShell command to create a Microsoft 365 group.
$ParamsGroup = @{
    DisplayName     = "M365 Group"
    GroupTypes      = @("Unified")
    MailEnabled     = $true
    MailNickname    = "M365"
    SecurityEnabled = $true
}

New-MgGroup -BodyParameter $ParamsGroup
The PowerShell output result.
DisplayName Id                                   MailNickname Description GroupTypes
----------- --                                   ------------ ----------- ----------
M365 Group  223a295c-2988-46df-b996-1289b6aa86a0 M365                     {Unified}
It automatically creates an email for the Microsoft 365 group, which you can find in Microsoft Entra ID. The next step is to add owners and add members to the group.
Create a Dynamic Microsoft 365 Group with PowerShell
You can also create a Dynamic Microsoft 365 group, which is the same as a Microsoft 365 group but with a dynamic membership. You need to create a rule that contains a group of users to add them as members.
It means that you can’t manually add or remove the members of a group. The group members are specified to a rule, so the group will automatically change whenever a user is added or removed from the rule.
To specify a dynamic Microsoft 365 group, you must use three more parameters than the Microsoft 365 group:
- The -GroupTypes parameter with the values @(“Unified”, DynamicMembership) to confirm it’s a Dynamic Microsoft 365 group.
- The -MembershipRule parameter, where you need to specify the members in a rule syntax. In our example, we will add all the users from the marketing department, so we need to use the syntax (user.department -eq “marketing”).
- The -MembershipRuleProcessingState parameter with the value On.
Run the below PowerShell command to create a Microsoft 365 group with dynamic membership.
New-MgGroup -DisplayName "M365 Dynamic Group" -MailEnabled:$true -MailNickName "M365Dynamic" -SecurityEnabled:$true -GroupTypes "DynamicMembership", "Unified" -MembershipRule "(user.department -eq ""marketing"")" -MembershipRuleProcessingState OnThe PowerShell output shows the results of the group.
DisplayName         Id                                   MailNickname Description GroupTypes
-----------         --                                   ------------ ----------- ----------
M365 Dynamic Group  fcd0af69-cba7-42b5-bd9f-111610707b62 M365Dynamic              {DynamicMembership, Unified}
You created a dynamic Microsoft 365 group, including members from the sales department.
To create the same dynamic Microsoft 365 group, you can also use a hashtable. It contains the specified parameters as an array enclosed in braces brackets { }. To create the group with a hashtable, we will use the -BodyParameter.
$ParamsGroup = @{
    DisplayName                   = "M365 Dynamic Group"
    MailEnabled                   = $true
    MailNickName                  = "M365Dyn"
    SecurityEnabled               = $true
    GroupTypes                    = @("Unified", "DynamicMembership")
    MembershipRule                = 'user.department -eq "marketing"'
    MembershipRuleProcessingState = "On"
}

New-MgGroup -BodyParameter $ParamsGroup
The PowerShell output shows the new group.
DisplayName        Id                                   MailNickname Description GroupTypes
-----------        --                                   ------------ ----------- ----------
M365 Dynamic Group c2bf6af7-a49c-475a-8218-cc134aa3bb75 M365Dyn                  {Unified, DynamicMembership}
Check Dynamic Microsoft 365 Group in Microsoft Entra ID
In Microsoft Entra admin center, you can see the dynamic membership rules of the newly created group.
To check a dynamic Microsoft 365 group in Microsoft Entra ID, follow these steps:
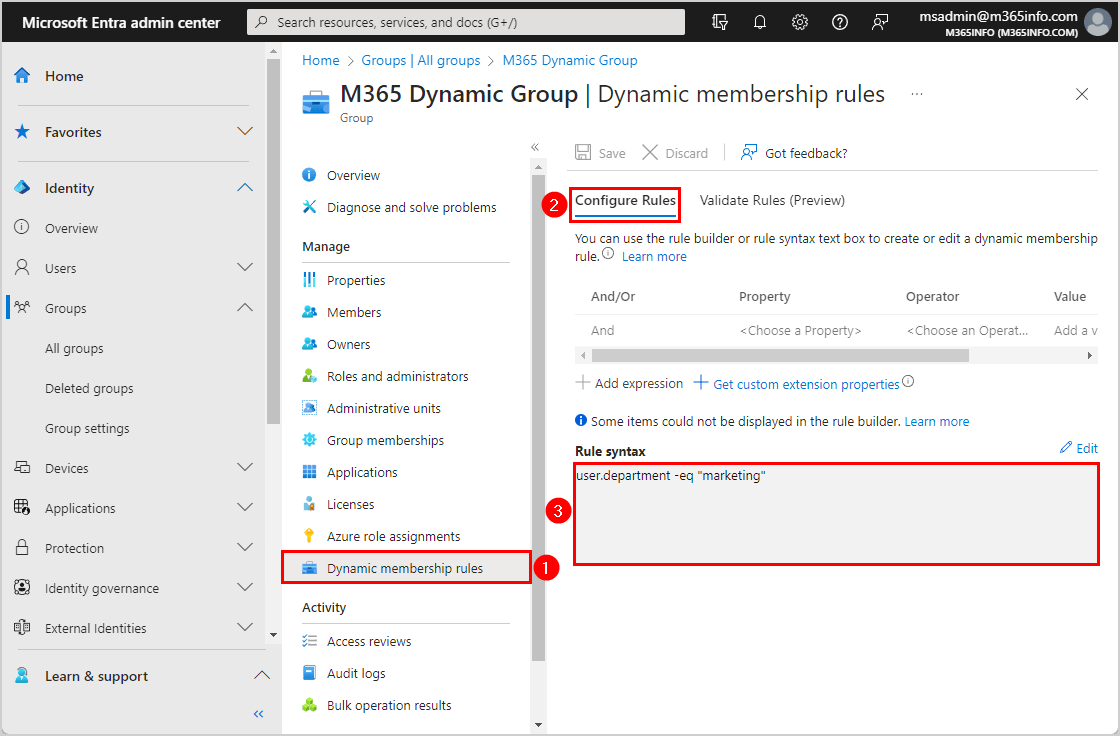
- Sign in to the Microsoft Entra admin center
- Expand Identity > Groups > All groups
- Click on the newly created Dynamic Microsoft 365 Group
- Click Dynamic membership rules
The below screenshot shows the rule syntax you created to select these members for the group.
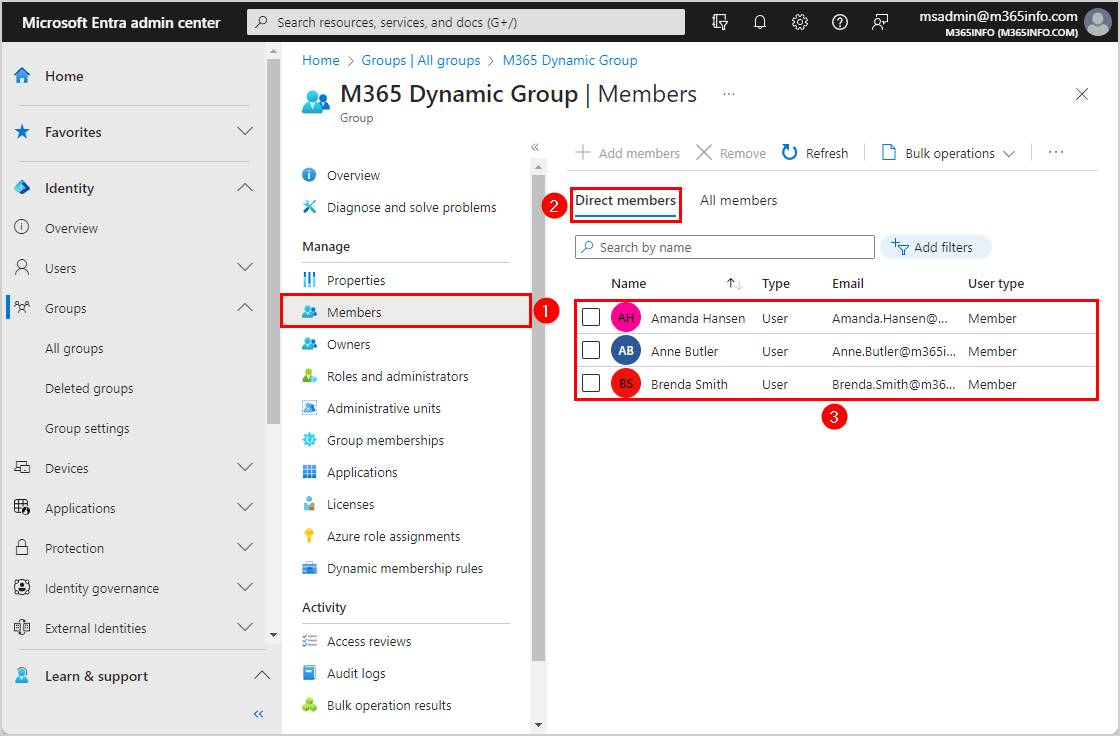
- Click Members
The below screenshot shows all the direct members from the marketing department added to this group.
That’s it!
Read more: How to convert Distribution List to Security Group »
Conclusion
You learned how to create Microsoft 365 groups with Microsoft Graph PowerShell. There are different group types where you can add members or add a dynamic membership. Remember that it’s only possible to create a Security or Microsoft 365 group with the New-MgGroup PowerShell cmdlet.
Did you enjoy this article? You may also like Export distribution group and members with PowerShell. Don’t forget to follow us and share this article.
This Post Has 0 Comments