Sometimes, you must delete members from a distribution list because they don't belong there anymore.…
How to use Get-Mailbox in PowerShell
To display Microsoft 365 mailbox information for a single user, you can get all the available properties with PowerShell. It’s also faster to view specific information for multiple or all mailboxes. In this article, you will learn how to use the Get-Mailbox cmdlet in Exchange Online PowerShell.
Table of contents
- Connect to Exchange Online
- Get-EXOMailbox PowerShell cmdlet
- Get-Mailbox PowerShell cmdlet
- Get-Mailbox output results in PowerShell
- Format Get-Mailbox output for all mailboxes
- Get all mailboxes in Out-Gridview
- Bulk export all mailboxes to CSV file
- Use Filter parameter with Get-Mailbox in PowerShell
- Conclusion
Connect to Exchange Online
Before you start, you need to Install Exchange Online PowerShell module.
To be able to run the PowerShell commands, you need to run Windows PowerShell as administrator and Connect to Exchange Online PowerShell.
Connect-ExchangeOnlineGet-EXOMailbox PowerShell cmdlet
You can use the Get-EXOMailbox cmdlet to retrieve results faster than the Get-Mailbox cmdlet. However, it doesn’t work in Exchange Server on-premises and it only works in Exchange Online.
Note: We recommend using the Get-EXOMailbox cmdlet for better performance and reliability.
All module versions contain nine exclusive Get-EXO* cmdlets for Exchange Online PowerShell optimized for speed in bulk data retrieval.
See the below list with the improved Exchange Online PowerShell cmdlets that are available only in the module.
| EXO module cmdlet | Older related cmdlet |
|---|---|
| Get-EXOMailbox | Get-Mailbox |
| Get-EXORecipient | Get-Recipient |
| Get-EXOCasMailbox | Get-CASMailbox |
| Get-EXOMailboxPermission | Get-MailboxPermission |
| Get-EXORecipientPermission | Get-RecipientPermission |
| Get-EXOMailboxStatistics | Get-MailboxStatistics |
| Get-EXOMailboxFolderStatistics | Get-MailboxFolderStatistics |
| Get-EXOMailboxFolderPermission | Get-MailboxFolderPermission |
| Get-EXOMobileDeviceStatistics | Get-MobileDeviceStatistics |
Get-Mailbox PowerShell cmdlet
We will use the Get-Mailbox cmdlet to view mailbox object information. When you use the Get-Mailbox cmdlet to display information about mailboxes, the information will be displayed in a table format.
Run the most basic PowerShell cmdlet.
Get-MailboxThe PowerShell output is based on a predefined output format with a header for each property.
Name                      Alias           Database                       ProhibitSendQuota    ExternalDirectoryObjectId
----                      -----           --------                       -----------------    -------------------------
41377e9c-dc47-46c0-b4a5-… Amanda.Hansen   EURPR02DG549-db028             99 GB (106,300,440,… 41377e9c-dc47-46c0-b4a5-1d5bbdcb5cc5
82cd0d62-e974-4892-aca6-… Anna.Bell       EURPR02DG037-db046             99 GB (106,300,440,… 82cd0d62-e974-4892-aca6-e0387abc62be
5cae3874-442b-459c-8f33-… Anne.Butler     EURPR02DG275-db096             99 GB (106,300,440,… 5cae3874-442b-459c-8f33-3aee5b879275
0f38d53f-cbe0-4844-86e9-… Brenda.Smith    EURPR02DG598-db076             99 GB (106,300,440,… 0f38d53f-cbe0-4844-86e9-1032a45ba31b
411a8f10-0dfa-4034-a1e3-… Brian.Mill      EURPR02DG558-db051             99 GB (106,300,440,… 411a8f10-0dfa-4034-a1e3-a8b6e4cad2f6
52a6c1c7-77d2-4109-99b9-… Carl.Hawk       EURPR02DG234-db124             99 GB (106,300,440,… 52a6c1c7-77d2-4109-99b9-a4076167b6e2
Catch All                 Catch.All       EURPR02DG588-db346             49.5 GB (53,150,220… 182292ee-eaec-438b-bf14-f25dec9cf1cd
d5dc703a-45d0-4dc3-89ba-… Charles.Mitchel EURPR02DG517-db333             99 GB (106,300,440,… d5dc703a-45d0-4dc3-89ba-16f088925e41
b602b148-2fcf-435a-9d34-… Diana.Baker     EURPR02DG060-db131             99 GB (106,300,440,… b602b148-2fcf-435a-9d34-ce72c3a8c748
It shows the Name, Alias, Database, Mailbox size quota, and Object ID for each mailbox.
Display all existing mailboxes information
When you use the Get-Mailbox cmdlet without specifying anything, it will not display all the existing mailboxes in your organization. If you have many mailboxes, you must add the -ResultSize parameter with the value Unlimited.
Display a list of all the existing mailboxes with the below PowerShell command.
Get-Mailbox -ResultSize UnlimitedThe PowerShell output displays a complete list of all the existing mailboxes in Exchange Online.
Count the mailbox number
Count the number of Exchange Online mailboxes.
(Get-Mailbox -ResultSize Unlimited).CountThe PowerShell output shows the number of mailboxes.
Display single mailbox information
To get information about a specific mailbox, you must provide the -Identity parameter.
You can use one of the below values that identify the mailbox:
- Name
- Alias
- Distinguished name (DN)
- Canonical DN
- Domain
- Email address
- GUID
- LegacyExchangeDN
- SamAccountName
- User ID or user principal name (UPN)
In our example, we want to get mailbox information about the user Brenda.Smith@m365info.com.
Use the PowerShell command syntax.
Get-Mailbox -Identity "identity"Run the PowerShell command example.
Get-Mailbox "Brenda.Smith@m365info.com"The PowerShell output result is displayed in a table format with a predefined header for each object property.
Name                      Alias           Database                       ProhibitSendQuota    ExternalDirectoryObjectId
----                      -----           --------                       -----------------    -------------------------
0f38d53f-cbe0-4844-86e9-… Brenda.Smith    EURPR02DG598-db076             99 GB (106,300,440,… 0f38d53f-cbe0-4844-86e9-1032a45ba31b
It shows the Name, Alias, Database, Mailbox size quota, and Object ID for a single mailbox.
Get-Mailbox output results in PowerShell
We will show you how to get three different output results using the Get-Mailbox cmdlet in PowerShell:
- Format-Table (ft)
- Format-List (fl)
- Out-GridView
Format-Table option
When you use a PowerShell command, the results are displayed in Format-Table with the default properties. It displays the information in columns with a header at the top and values listed under it.
The disadvantage of the Format-Table option in the PowerShell console output is the width. The amount of data that can be displayed on the screen is restricted to the width of the PowerShell console.
When you use the Get-Mailbox cmdlet, the default display is Format-Table. Then, you can customize your output by adding the pipeline (|) and typing the required properties or parameters.
See the PowerShell command syntax.
Get-Mailbox "Brenda.Smith@m365info.com" | Format-TableUse the below PowerShell command example.
Get-Mailbox "Brenda.Smith@m365info.com" | Format-TableRun the below PowerShell command with the properties you want to display.
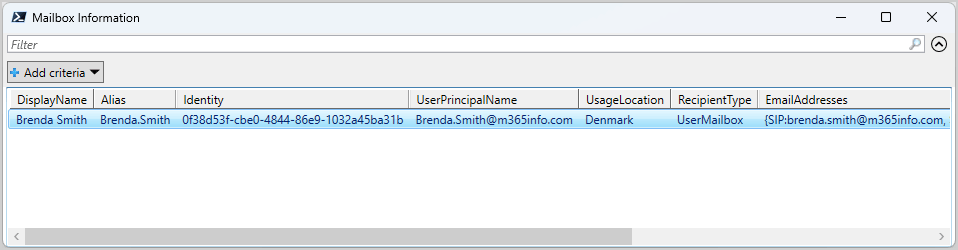
Get-Mailbox "Brenda.Smith@m365info.com" | Format-Table Alias, Identity, UserPrincipalName, UsageLocation, RecipientTypeSee the PowerShell output result.
Alias        Identity                             UserPrincipalName         UsageLocation RecipientType
-----        --------                             -----------------         ------------- -------------
Brenda.Smith 0f38d53f-cbe0-4844-86e9-1032a45ba31b Brenda.Smith@m365info.com Denmark       UserMailbox
It displays the values for the properties you choose in the format table.
Format-List option
The Format-List shows all the available properties of a single mailbox. It also displays the PowerShell output information in a long list. The advantage is that the information about each property is not affected by the width limitation.
The Get-Mailbox cmdlet contains around 250 properties, but most are non-relevant. In our example, we want to see all the available properties of a single mailbox.
See the PowerShell command syntax.
Get-Mailbox "Brenda.Smith@m365info.com" | Format-ListRun the below PowerShell command example.
Get-Mailbox "Brenda.Smith@m365info.com" | Format-ListOut-Gridview
The Out-GridView cmdlet sends the output from a command to a grid view window, where the output is displayed in an interactive table. The advantage is that even if your screen is not wide enough, you can still see the output result by scrolling in the Out-GridView.
Run the below PowerShell command example with the properties you want to display.
Get-Mailbox "Brenda.Smith@m365info.com" | Format-Table Alias, Identity, UserPrincipalName, UsageLocation, RecipientTypeIt displays the properties in an Out-GridView, as shown below.
Format Get-Mailbox output for all mailboxes
We want to optimize the output displayed by the Get-mailbox command.
There are a few things with problems:
- Using the Format-Table (ft) displays very limited information, whereas the Format-List (fl) displays too much information, which is not easy to read.
- The PowerShell console screen has a specific width for each header, which leads to a limited amount of data displayed.
We will show you different solutions to find or filter the mailboxes.
Using the Property option
The property option enables you to filter the relevant properties. In our example, we want to display the following properties: Alias, Display Name, and Email Address.
It will automatically override the default properties displayed by the Get-Mailbox command.
See the PowerShell syntax example.
Get-Mailbox -ResultSize Unlimited | Format-Table -Property Alias, Displayname, EmailAddressesYou can use a shortened version without specifying the -Property option. When you use the option Format-Table, you can use the abbreviation ft, and for Format-List, you can use the abbreviation fl.
Run the below PowerShell command example.
Get-Mailbox -ResultSize Unlimited | Format-Table Alias, Displayname, EmailAddressesSee the PowerShell output results.
Alias           DisplayName     EmailAddresses
-----           -----------     --------------
Amanda.Hansen   Amanda Hansen   {SIP:amanda.hansen@m365info.com, SPO:SPO_a21d1f73-5b3e-47db-bccd-16559e7d5560@SPO_a2ff010e-0e03-4c56-8863-2ae7f07876dd, SMTP:Amanda.…
Anna.Bell       Anna Bell       {SIP:anna.bell@m365info.com, SMTP:Anna.Bell@m365info.com, smtp:Anna.Bell@ms365info.onmicrosoft.com}
Anne.Butler     Anne Butler     {SIP:anne.butler@m365info.com, SMTP:Anne.Butler@m365info.com}
Brenda.Smith    Brenda Smith    {SIP:brenda.smith@m365info.com, SMTP:Brenda.Smith@m365info.com, smtp:Brenda.Smith@ms365info.onmicrosoft.com}
Brian.Mill      Brian Mill      {SIP:brian.mill@m365info.com, SMTP:Brian.Mill@m365info.com}
Carl.Hawk       Carl Hawk       {SIP:carl.hawk@m365info.com, SMTP:Carl.Hawk@m365info.com, smtp:Carl.Hawk@ms365info.onmicrosoft.com}
Catch.All       Catch All       {smtp:Catch.All@ms365info.onmicrosoft.com, SMTP:Catch.All@m365info.com}
Charles.Mitchel Charles Mitchel {SMTP:Charles.Mitchel@m365info.com, smtp:Charles.MitchelNEW@m365info.com}
Diana.Baker     Diana Baker     {SMTP:Diana.Baker@m365info.com, SPO:SPO_13fee752-5966-4b62-98e2-f27fe9e5f66d@SPO_a2ff010e-0e03-4c56-8863-2ae7f07876dd}
It shows all the properties you provided, but some values are too long for the limited PowerShell console output width.
A solution to the limited width of the values output could be using the Format-List (fl) with the same PowerShell command.
Run the below PowerShell command example.
Get-Mailbox -ResultSize Unlimited | Format-List Alias, Displayname, EmailAddressesSee the PowerShell output result.
Alias          : Amanda.Hansen
DisplayName    : Amanda Hansen
EmailAddresses : {SIP:amanda.hansen@m365info.com, SPO:SPO_a21d1f73-5b3e-47db-bccd-16559e7d5560@SPO_a2ff010e-0e03-4c56-8863-2ae7f07876dd, SMTP:Amanda.Hansen@m365info.com}

Alias          : Anna.Bell
DisplayName    : Anna Bell
EmailAddresses : {SIP:anna.bell@m365info.com, SMTP:Anna.Bell@m365info.com, smtp:Anna.Bell@ms365info.onmicrosoft.com}

Alias          : Anne.Butler
DisplayName    : Anne Butler
EmailAddresses : {SIP:anne.butler@m365info.com, SMTP:Anne.Butler@m365info.com}

Alias          : Brenda.Smith
DisplayName    : Brenda Smith
EmailAddresses : {SIP:brenda.smith@m365info.com, SMTP:Brenda.Smith@m365info.com, smtp:Brenda.Smith@ms365info.onmicrosoft.com}

Alias          : Brian.Mill
DisplayName    : Brian Mill
EmailAddresses : {SIP:brian.mill@m365info.com, SMTP:Brian.Mill@m365info.com}

Alias          : Carl.Hawk
DisplayName    : Carl Hawk
EmailAddresses : {SIP:carl.hawk@m365info.com, SMTP:Carl.Hawk@m365info.com, smtp:Carl.Hawk@ms365info.onmicrosoft.com}

Alias          : Catch.All
DisplayName    : Catch All
EmailAddresses : {smtp:Catch.All@ms365info.onmicrosoft.com, SMTP:Catch.All@m365info.com}

Alias          : Charles.Mitchel
DisplayName    : Charles Mitchel
EmailAddresses : {SMTP:Charles.Mitchel@m365info.com, smtp:Charles.MitchelNEW@m365info.com}

Alias          : Diana.Baker
DisplayName    : Diana Baker
EmailAddresses : {SMTP:Diana.Baker@m365info.com, SPO:SPO_13fee752-5966-4b62-98e2-f27fe9e5f66d@SPO_a2ff010e-0e03-4c56-8863-2ae7f07876dd}
View mailbox statistics
You can also show the mailbox and folder size information of a single or all mailboxes.
Run the below PowerShell command to show information for a single mailbox.
Get-Mailbox "Amanda.Hansen@m365info.com" | Get-MailboxStatistics | Format-List DisplayName, StorageLimitStatus, TotalItemSize, TotalDeletedItemSize, ItemCount, DeletedItemCountThe PowerShell output shows the mailbox statistics of a single mailbox.
DisplayName          : Amanda Hansen
StorageLimitStatus   :
TotalItemSize        : 28.66 MB (30,056,815 bytes)
TotalDeletedItemSize : 4.378 MB (4,590,806 bytes)
ItemCount            : 766
DeletedItemCount     : 801
Run the below PowerShell command to show information for all mailbox sizes.
Get-Mailbox -ResultSize Unlimited | Get-MailboxStatistics | Format-List DisplayName, StorageLimitStatus, TotalItemSize, TotalDeletedItemSize, ItemCount, DeletedItemCountView mailbox quota size
Run the below PowerShell command to show quotas assigned to a single mailbox.
Get-Mailbox "Amanda.Hansen@m365info.com" | Format-List *QuotaIt shows the below PowerShell output.
ProhibitSendQuota            : 99 GB (106,300,440,576 bytes)
ProhibitSendReceiveQuota     : 100 GB (107,374,182,400 bytes)
RecoverableItemsQuota        : 30 GB (32,212,254,720 bytes)
RecoverableItemsWarningQuota : 20 GB (21,474,836,480 bytes)
CalendarLoggingQuota         : 6 GB (6,442,450,944 bytes)
IssueWarningQuota            : 98 GB (105,226,698,752 bytes)
RulesQuota                   : 256 KB (262,144 bytes)
ArchiveQuota                 : 100 GB (107,374,182,400 bytes)
ArchiveWarningQuota          : 90 GB (96,636,764,160 bytes)
Run the below PowerShell command to show quotas assigned to all mailboxes.
Get-Mailbox -ResultSize Unlimited | Format-List DisplayName, Alias, *QuotaUsing the Wrap option
Another solution to view the long values in the PowerShell output is to use the -Wrap option.
The properties, such as Email addresses that include long values and reach the PowerShell console width limitation will be moved to the next line. In this case, we can see the entire value of the email addresses.
Run the PowerShell command example.
Get-Mailbox -ResultSize Unlimited | Format-Table Alias, Displayname, EmailAddresses -WrapSee the PowerShell output results.
Alias           DisplayName     EmailAddresses
-----           -----------     --------------
Amanda.Hansen   Amanda Hansen   {SIP:amanda.hansen@m365info.com, SPO:SPO_a21d1f73-5b3e-47db-bccd-16559e7d5560@SPO_a2ff010e-0e03-4c56-8863-2ae7f07876dd,
                                SMTP:Amanda.Hansen@m365info.com}
Anna.Bell       Anna Bell       {SIP:anna.bell@m365info.com, SMTP:Anna.Bell@m365info.com, smtp:Anna.Bell@ms365info.onmicrosoft.com}
Anne.Butler     Anne Butler     {SIP:anne.butler@m365info.com, SMTP:Anne.Butler@m365info.com}
Brenda.Smith    Brenda Smith    {SIP:brenda.smith@m365info.com, SMTP:Brenda.Smith@m365info.com, smtp:Brenda.Smith@ms365info.onmicrosoft.com}
Brian.Mill      Brian Mill      {SIP:brian.mill@m365info.com, SMTP:Brian.Mill@m365info.com}
Carl.Hawk       Carl Hawk       {SIP:carl.hawk@m365info.com, SMTP:Carl.Hawk@m365info.com, smtp:Carl.Hawk@ms365info.onmicrosoft.com}
Catch.All       Catch All       {smtp:Catch.All@ms365info.onmicrosoft.com, SMTP:Catch.All@m365info.com}
Charles.Mitchel Charles Mitchel {SMTP:Charles.Mitchel@m365info.com, smtp:Charles.MitchelNEW@m365info.com}
Diana.Baker     Diana Baker     {SMTP:Diana.Baker@m365info.com, SPO:SPO_13fee752-5966-4b62-98e2-f27fe9e5f66d@SPO_a2ff010e-0e03-4c56-8863-2ae7f07876dd}
It shows the rest of the Email Addresses displayed on the next line.
Using the Group option
When we use the Get-Mailbox command, the result includes a list of all the mailbox types, such as:
The Group option enables you to group the output results. When you use the Group option, you must specify the properties that will serve as the source for the grouping.
In our example, we want to group the information according to the mailbox type, so we will use the property RecipientTypeDetails.
Run the PowerShell command example.
Get-Mailbox -ResultSize Unlimited | Group RecipientTypeDetailsThe PowerShell output result is shown below.
Count Name                      Group
----- ----                      -----
    1 DiscoveryMailbox          {Discovery Search Mailbox}
    2 EquipmentMailbox          {Projector 21, Projector 8}
    1 RoomMailbox               {RoomTest8}
    2 SharedMailbox             {Catch All, Info Box}
   19 UserMailbox               {Amanda Hansen, Anna Bell, Anne Butler, Brenda Smith…}
It shows the number of all the different mailbox types you have and groups the names together.
Using the Sort option
Using the Sort option, you can sort the output by relating it to a specific property header. The values for the header will be sorted ascending by default. If you want to use descending sorting, you need to specify that.
You can sort by the following properties:
- Name
- DisplayName
- Alias
- Office
- ServerLegacyDN
In our example, we want to sort the output of the Get-Mailbox command by the property Alias.
See the PowerShell command syntax.
Get-Mailbox -ResultSize Unlimited | Sort AliasRun the below PowerShell command example.
Get-Mailbox -ResultSize Unlimited | Sort Alias -DescendingThe PowerShell output result.
Name                      Alias           Database                       ProhibitSendQuota    ExternalDirectoryObjectId
----                      -----           --------                       -----------------    -------------------------
fd199cb4-2ebf-4171-96e2-… Susan.Brown     EURPR02DG429-db133             99 GB (106,300,440,… fd199cb4-2ebf-4171-96e2-12fd75453e39
c32b2b27-d809-439a-a3e3-… Stephen.Hunter  EURPR02DG597-db438             99 GB (106,300,440,… c32b2b27-d809-439a-a3e3-eb7a749eeb72
1e367b85-f0c0-4c9c-a16a-… Soren.Vest      EURPR02DG387-db004             99 GB (106,300,440,… 1e367b85-f0c0-4c9c-a16a-22d132f1d8e6
e5c3a5e8-eeae-4829-94dc-… Ryan.Walker     EURPR02DG514-db387             99 GB (106,300,440,… e5c3a5e8-eeae-4829-94dc-fb7228bcf8da
RoomTest8                 RoomTest8       EURPR02DG611-db195             99 GB (106,300,440,… 274d72d7-cc30-4a64-bc33-c99ff96c3abf
85df102b-1330-4359-8e6b-… Rene.Gibs       EURPR02DG489-db525             99 GB (106,300,440,… 85df102b-1330-4359-8e6b-240677b26454
Projector 8               Projector8      EURPR02DG512-db190             49.5 GB (53,150,220… 3c06bdad-3224-4b93-ac4e-fb7dcd23e0ce
Projector 21              Projector21     EURPR02DG597-db175             49.5 GB (53,150,220… 6f4d2832-2753-4433-aba9-11dd73c14e39
3bb176aa-d0ba-47f7-aecc-… Mary.James      EURPR02DG233-db100             99 GB (106,300,440,… 3bb176aa-d0ba-47f7-aecc-f4837593006e
213a5a8b-0bcf-40cc-b114-… Laura.Terry     EURPR02DG117-db074             99 GB (106,300,440,… 213a5a8b-0bcf-40cc-b114-edb1b2a423f4
12eefbb2-e5f4-4eec-bd18-… Ken.Walker      EURPR02DG393-db032             99 GB (106,300,440,… 12eefbb2-e5f4-4eec-bd18-df7ca2f1ee6b
33a56fba-ed21-456d-90be-… Justin.Russel   EURPR02DG387-db166             99 GB (106,300,440,… 33a56fba-ed21-456d-90be-ade268b9acc8
The PowerShell output is sorted by the Alias in descending order, meaning the last letters in the alphabet will come first in line.
Using the AutoSize option
The Autosize option is relevant when we choose to display information using Format-Table. When you use the ft option, the PowerShell output uses a predefined table row width.
The PowerShell console is not wide enough to display all the properties if you don’t open it in full screen. Because of the width limitation, PowerShell removes the other last default properties from the display, such as Database, ProhibitSendQuota, and ExternalDirectoryObjectId.
You can avoid this using the -Autosize parameter because PowerShell will customize the table row width to fit the values under the table headers.
Run the below PowerShell command example.
Get-Mailbox -ResultSize Unlimited | Format-Table -AutosizeSee the PowerShell output result.
Name                                                         Alias                                                        Database           ProhibitSendQuota              ExternalDirectoryObjectId
----                                                         -----                                                        --------           -----------------              -------------------------
41377e9c-dc47-46c0-b4a5-1d5bbdcb5cc5                         Amanda.Hansen                                                EURPR02DG549-db028 99 GB (106,300,440,576 bytes)  41377e9c-dc47-46c0-b4a5-1d5bbdcb5cc5
82cd0d62-e974-4892-aca6-e0387abc62be                         Anna.Bell                                                    EURPR02DG037-db046 99 GB (106,300,440,576 bytes)  82cd0d62-e974-4892-aca6-e0387abc62be
5cae3874-442b-459c-8f33-3aee5b879275                         Anne.Butler                                                  EURPR02DG275-db096 99 GB (106,300,440,576 bytes)  5cae3874-442b-459c-8f33-3aee5b879275
0f38d53f-cbe0-4844-86e9-1032a45ba31b                         Brenda.Smith                                                 EURPR02DG598-db076 99 GB (106,300,440,576 bytes)  0f38d53f-cbe0-4844-86e9-1032a45ba31b
411a8f10-0dfa-4034-a1e3-a8b6e4cad2f6                         Brian.Mill                                                   EURPR02DG558-db051 99 GB (106,300,440,576 bytes)  411a8f10-0dfa-4034-a1e3-a8b6e4cad2f6
52a6c1c7-77d2-4109-99b9-a4076167b6e2                         Carl.Hawk                                                    EURPR02DG234-db124 99 GB (106,300,440,576 bytes)  52a6c1c7-77d2-4109-99b9-a4076167b6e2
Catch All                                                    Catch.All                                                    EURPR02DG588-db346 49.5 GB (53,150,220,288 bytes) 182292ee-eaec-438b-bf14-f25dec9cf1cd
d5dc703a-45d0-4dc3-89ba-16f088925e41                         Charles.Mitchel                                              EURPR02DG517-db333 99 GB (106,300,440,576 bytes)  d5dc703a-45d0-4dc3-89ba-16f088925e41
b602b148-2fcf-435a-9d34-ce72c3a8c748                         Diana.Baker                                                  EURPR02DG060-db131 99 GB (106,300,440,576 bytes)  b602b148-2fcf-435a-9d34-ce72c3a8c748
DiscoverySearchMailbox{D919BA05-46A6-415f-80AD-7E09334BB852} DiscoverySearchMailbox{D919BA05-46A6-415f-80AD-7E09334BB852} EURPR02DG219-db026 50 GB (53,687,091,200 bytes)
It shows the entire output result for all the properties of each mailbox.
Combination of display parameters
We can use a combination of display parameters to optimize the PowerShell output. We will show you how to use the following parameters:
- Sort
- Format-Table
- Group
PowerShell command syntax:
Get-Mailbox -ResultSize Unlimited | Sort RecipientTypeDetails | Format-Table Name, Alias -Group RecipientTypeDetails- First, it will get all the existing mailboxes in Exchange Online.
- Then, it will Sort the mailboxes using the RecipientTypeDetails property.
- We also use the Format-Table (ft) and only want to display the Alias and the Name properties.
- Lastly, the option Group will display the information in sections according to the mailbox types.
See the PowerShell output result.
   RecipientTypeDetails: DiscoveryMailbox

Name                                                         Alias
----                                                         -----
DiscoverySearchMailbox{D919BA05-46A6-415f-80AD-7E09334BB852} DiscoverySearchMailbox{D919BA05-46A6-415f-80AD-7E09334BB852}

   RecipientTypeDetails: EquipmentMailbox

Name         Alias
----         -----
Projector 8  Projector8
Projector 21 Projector21

   RecipientTypeDetails: RoomMailbox

Name      Alias
----      -----
RoomTest8 RoomTest8

   RecipientTypeDetails: SharedMailbox

Name      Alias
----      -----
Catch All Catch.All
Info Box  InfoBox

   RecipientTypeDetails: UserMailbox

Name                                 Alias
----                                 -----
41377e9c-dc47-46c0-b4a5-1d5bbdcb5cc5 Amanda.Hansen
1e367b85-f0c0-4c9c-a16a-22d132f1d8e6 Soren.Vest
e5c3a5e8-eeae-4829-94dc-fb7228bcf8da Ryan.Walker
85df102b-1330-4359-8e6b-240677b26454 Rene.Gibs
3bb176aa-d0ba-47f7-aecc-f4837593006e Mary.James
213a5a8b-0bcf-40cc-b114-edb1b2a423f4 Laura.Terry
12eefbb2-e5f4-4eec-bd18-df7ca2f1ee6b Ken.Walker
2ab57f6a-6824-40a3-8fb0-d4357e8b91b1 John.Doe2
c32b2b27-d809-439a-a3e3-eb7a749eeb72 Stephen.Hunter
29a12fd8-bbd2-440f-b457-8e304200a85d Frank.Olsen
b602b148-2fcf-435a-9d34-ce72c3a8c748 Diana.Baker
d5dc703a-45d0-4dc3-89ba-16f088925e41 Charles.Mitchel
52a6c1c7-77d2-4109-99b9-a4076167b6e2 Carl.Hawk
411a8f10-0dfa-4034-a1e3-a8b6e4cad2f6 Brian.Mill
0f38d53f-cbe0-4844-86e9-1032a45ba31b Brenda.Smith
5cae3874-442b-459c-8f33-3aee5b879275 Anne.Butler
82cd0d62-e974-4892-aca6-e0387abc62be Anna.Bell
33a56fba-ed21-456d-90be-ade268b9acc8 Justin.Russel
fd199cb4-2ebf-4171-96e2-12fd75453e39 Susan.Brown
It divides the output into sections according to the mailbox types (User, Shared, Room, Equipment, DiscoveryMailbox).
Get all mailboxes in Out-Gridview
We will get all the Exchange Online mailboxes and send the output to an interactive table (Out-GridView).
Run the below PowerShell command.
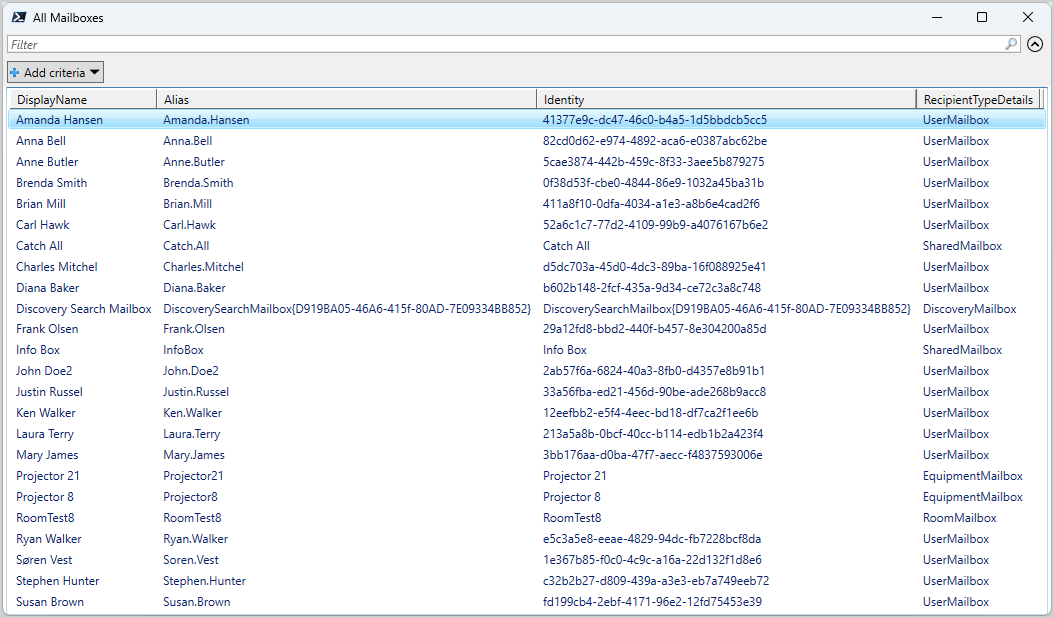
Get-Mailbox -ResultSize Unlimited | Select-Object DisplayName, Alias, Identity, RecipientTypeDetails | Out-GridView -Title "All Mailboxes"The Out-GridView appears with a detailed list of mailboxes where you can filter and search the results.
Bulk export all mailboxes to CSV file
We will bulk export all the Exchange Online mailboxes to a CSV file. After that, we can open it with Microsoft Excel.
Run the below PowerShell command.
Get-Mailbox -ResultSize Unlimited | Select-Object DisplayName, Alias, Identity, RecipientTypeDetails | Export-Csv "C:\temp\AllMailboxes.csv" -Encoding UTF8 -NoTypeInformationUse Filter parameter with Get-Mailbox in PowerShell
You can change the PowerShell display output using the -Filter parameter with the Get-Mailbox cmdlet. It helps you to find a specific mailbox without knowing the exact name.
Display list of user mailboxes
Run the below PowerShell command to show all user mailboxes.
Get-Mailbox -Filter '(RecipientTypeDetails -eq "UserMailbox")' | Select-Object Identity, UserPrincipalName, AliasDisplay list of shared mailboxes
Run the below PowerShell command to show all shared mailboxes.
Get-Mailbox -Filter '(RecipientTypeDetails -eq "SharedMailbox")' | Select-Object Identity, UserPrincipalName, AliasDisplay list of room mailboxes
Run the below PowerShell command to show all room mailboxes.
Get-Mailbox -Filter '(RecipientTypeDetails -eq "RoomMailbox")' | Select-Object Identity, UserPrincipalName, AliasDisplay list of equipment mailboxes
Run the below PowerShell command to show all equipment mailboxes.
Get-Mailbox -Filter '(RecipientTypeDetails -eq "EquipmentMailbox")' | Select-Object Identity, UserPrincipalName, AliasFind mailbox with wildcard
In our example, we want to find all the mailboxes with the letters “al” in their name. You need to use a wildcard to find the string values.
Note: Not all the properties accept the wildcard asterisk (*). See the entire list of filterable properties in Exchange Online PowerShell.
- Use an asterisk (*) before and after the letters
Run the below PowerShell command.
Get-Mailbox -ResultSize Unlimited -Filter {Alias -like '*al*'} | Format-Table -AutoSizeThe PowerShell result is shown below.
Name                                 Alias       Database           ProhibitSendQuota              ExternalDirectoryObjectId
----                                 -----       --------           -----------------              -------------------------
Catch All                            Catch.All   EURPR02DG588-db346 49.5 GB (53,150,220,288 bytes) 182292ee-eaec-438b-bf14-f25dec9cf1cd
12eefbb2-e5f4-4eec-bd18-df7ca2f1ee6b Ken.Walker  EURPR02DG393-db032 99 GB (106,300,440,576 bytes)  12eefbb2-e5f4-4eec-bd18-df7ca2f1ee6b
e5c3a5e8-eeae-4829-94dc-fb7228bcf8da Ryan.Walker EURPR02DG514-db387 99 GB (106,300,440,576 bytes)  e5c3a5e8-eeae-4829-94dc-fb7228bcf8da
It shows all the mailboxes that include the letters “al” in their Alias.
Option 2: Find mailbox using wildcard at the beginning of string value
Get all the mailboxes that start with the letters “an” in their name.
- Use an asterisk (*) after the letters
Run the PowerShell command example.
Get-Mailbox -ResultSize Unlimited -Filter "Alias -like 'an*'" | Format-Table -AutoSizeSee the PowerShell output result.
Name                                 Alias       Database           ProhibitSendQuota             ExternalDirectoryObjectId
----                                 -----       --------           -----------------             -------------------------
82cd0d62-e974-4892-aca6-e0387abc62be Anna.Bell   EURPR02DG037-db046 99 GB (106,300,440,576 bytes) 82cd0d62-e974-4892-aca6-e0387abc62be
5cae3874-442b-459c-8f33-3aee5b879275 Anne.Butler EURPR02DG275-db096 99 GB (106,300,440,576 bytes) 5cae3874-442b-459c-8f33-3aee5b879275
It shows all the mailboxes that start with the letters “an” in their Alias.
Option 3: Find mailbox using wildcard at the end of string value
Get all the mailboxes that end with the letters “er” in their name.
- Use an asterisk (*) before the letters
Run the PowerShell command example.
Get-Mailbox -ResultSize Unlimited -Filter "Alias -like '*er'" | Format-Table -AutoSizeSee the PowerShell output result.
Name                                 Alias          Database           ProhibitSendQuota             ExternalDirectoryObjectId
----                                 -----          --------           -----------------             -------------------------
5cae3874-442b-459c-8f33-3aee5b879275 Anne.Butler    EURPR02DG275-db096 99 GB (106,300,440,576 bytes) 5cae3874-442b-459c-8f33-3aee5b879275
b602b148-2fcf-435a-9d34-ce72c3a8c748 Diana.Baker    EURPR02DG060-db131 99 GB (106,300,440,576 bytes) b602b148-2fcf-435a-9d34-ce72c3a8c748
12eefbb2-e5f4-4eec-bd18-df7ca2f1ee6b Ken.Walker     EURPR02DG393-db032 99 GB (106,300,440,576 bytes) 12eefbb2-e5f4-4eec-bd18-df7ca2f1ee6b
e5c3a5e8-eeae-4829-94dc-fb7228bcf8da Ryan.Walker    EURPR02DG514-db387 99 GB (106,300,440,576 bytes) e5c3a5e8-eeae-4829-94dc-fb7228bcf8da
c32b2b27-d809-439a-a3e3-eb7a749eeb72 Stephen.Hunter EURPR02DG597-db438 99 GB (106,300,440,576 bytes) c32b2b27-d809-439a-a3e3-eb7a749eeb72
It shows all the mailboxes that end with the letters “er” in their Alias.
Get all inactive mailboxes
You can also check if there are any inactive mailboxes in your organization using the -Filter parameter.
Run the below PowerShell command example.
Get-Mailbox -ResultSize Unlimited -Filter 'IsInactiveMailbox -eq $True' | Format-Table UserPrincipalName, Identity, IsInactiveMailboxThe PowerShell output result.
UserPrincipalName          Identity                             IsInactiveMailbox
-----------------          --------                             -----------------
Amanda.Morgan@m365info.com 41377e9c-dc47-46c0-b4a5-1d5bbdcb5dd5 True
Carlos.Baker@m365info.com  82cd0d62-e974-4892-aca6-e0387abc63be True
Mike.Shawn@m365info.com    5cae3874-442b-459c-8f33-3aee5b879175 True
Trevor.Smith@m365info.com  0f38d53f-cbe0-4844-86e9-1032a45ba51b True
That’s it!
Note: To get the essential properties from all the mailboxes in a CSV file, read the article Export Microsoft 365 mailbox size report with PowerShell.
Read more: How to save sent items in shared mailbox »
Conclusion
You learned how to use the Get-Mailbox with Exchange Online PowerShell. With the Get-Mailbox PowerShell cmdlet, you can get a list of properties for a single or bulk all Microsoft 365 mailboxes. Use the -Filter parameter to find inactive mailboxes.
Did you enjoy this article? You may also like Configure Catch all Mailbox in Microsoft 365. Don’t forget to follow us and share this article.
This Post Has 0 Comments