In the current article, we will review the following subjects: The flow of a “deleted…
How to save sent items in shared mailbox
A Microsoft 365 shared mailbox allows a group of two or more users to send and receive emails from the same email address. As a result, the group can always see the same inbox. By default, the emails sent from one person in the group can’t be seen by the other users. This article will show you how to save sent items in a shared mailbox with Microsoft 365 admin center and PowerShell.
Table of contents
- Save sent items in Microsoft 365 shared mailbox
- Save copy sent items with Microsoft 365 admin center
- How to manage shared mailbox copy sent items with PowerShell
- Connect to Exchange PowerShell
- Save sent items in single shared mailbox
- Save sent items on all shared mailboxes
- Disable sent items in single shared mailbox
- Disable save sent items for all shared mailboxes
- Display all shared mailboxes copy sent items settings
- Export sent items settings for all shared mailboxes to CSV file
- Conclusion
Save sent items in Microsoft 365 shared mailbox
By default, the user who sends an email from a shared mailbox is the only one in the group who can see it. This can be troubling, as the other users don’t know what a person has sent from the same shared mailbox.
Therefore, you need to edit the settings in the sent items of the shared mailbox in Microsoft 365. It allows all the users of the shared mailbox to see the sent emails. This way, when a user sends an email, the email will be in their personal sent items folder, and a copy will be saved in the shared mailbox sent items folder.
There are two ways to automatically save sent items to your shared mailbox in Microsoft 365:
- Microsoft 365 admin center
- Exchange Online PowerShell
First, we will show you how to enable a copy of sent items using the Microsoft 365 admin center for one shared mailbox. Then, we will show the steps to enable and disable save sent items in a single and all shared mailboxes with PowerShell. Lastly, you can view the settings of the sent items in an Out-GridView or export it to a CSV file.
Note: Most of the users don’t want to have a copy in their personal sent items folder, so you need to configure Save copy items sent ONLY in shared mailbox (Outlook).
Save copy sent items with Microsoft 365 admin center
Follow the steps below to enable save copy items sent in Microsoft 365 shared mailbox:
- Sign in to Microsoft 365 admin center
- On the navigation pane, expand Teams & groups and select Shared mailboxes
- Click on the shared mailbox name on the right
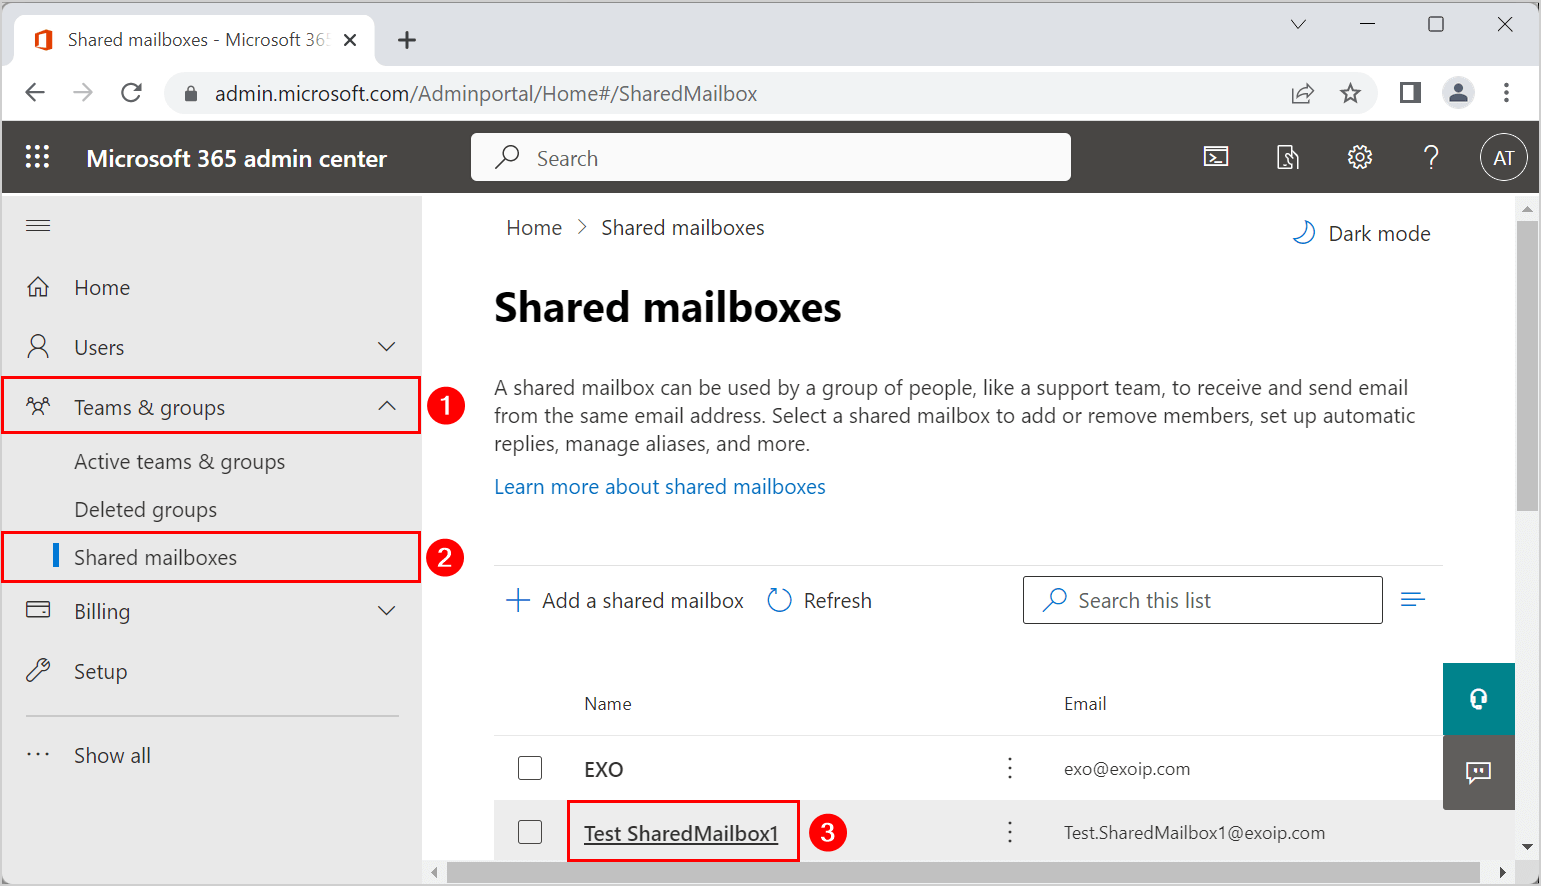
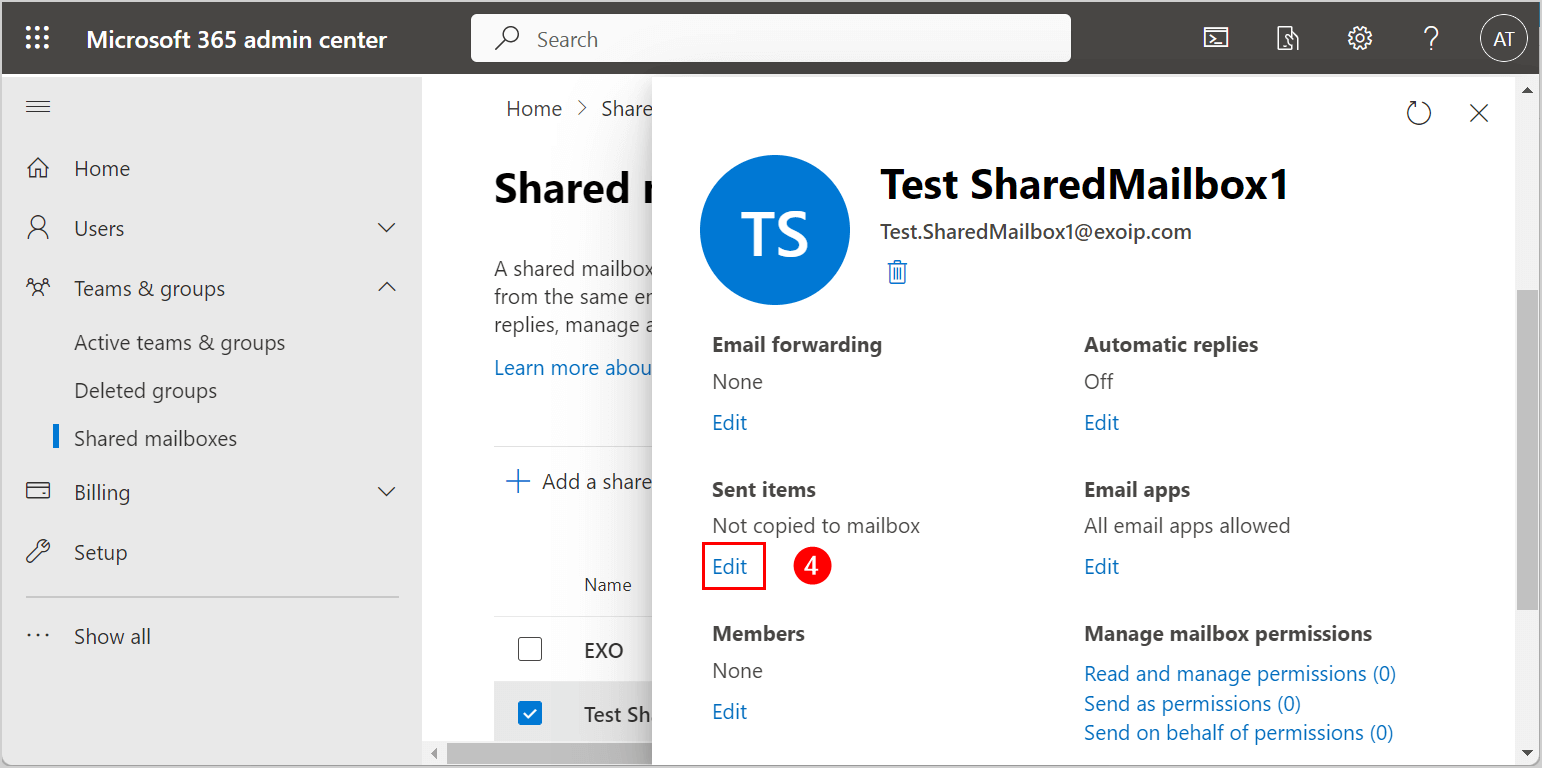
- Scroll down to Sent items and click on Edit
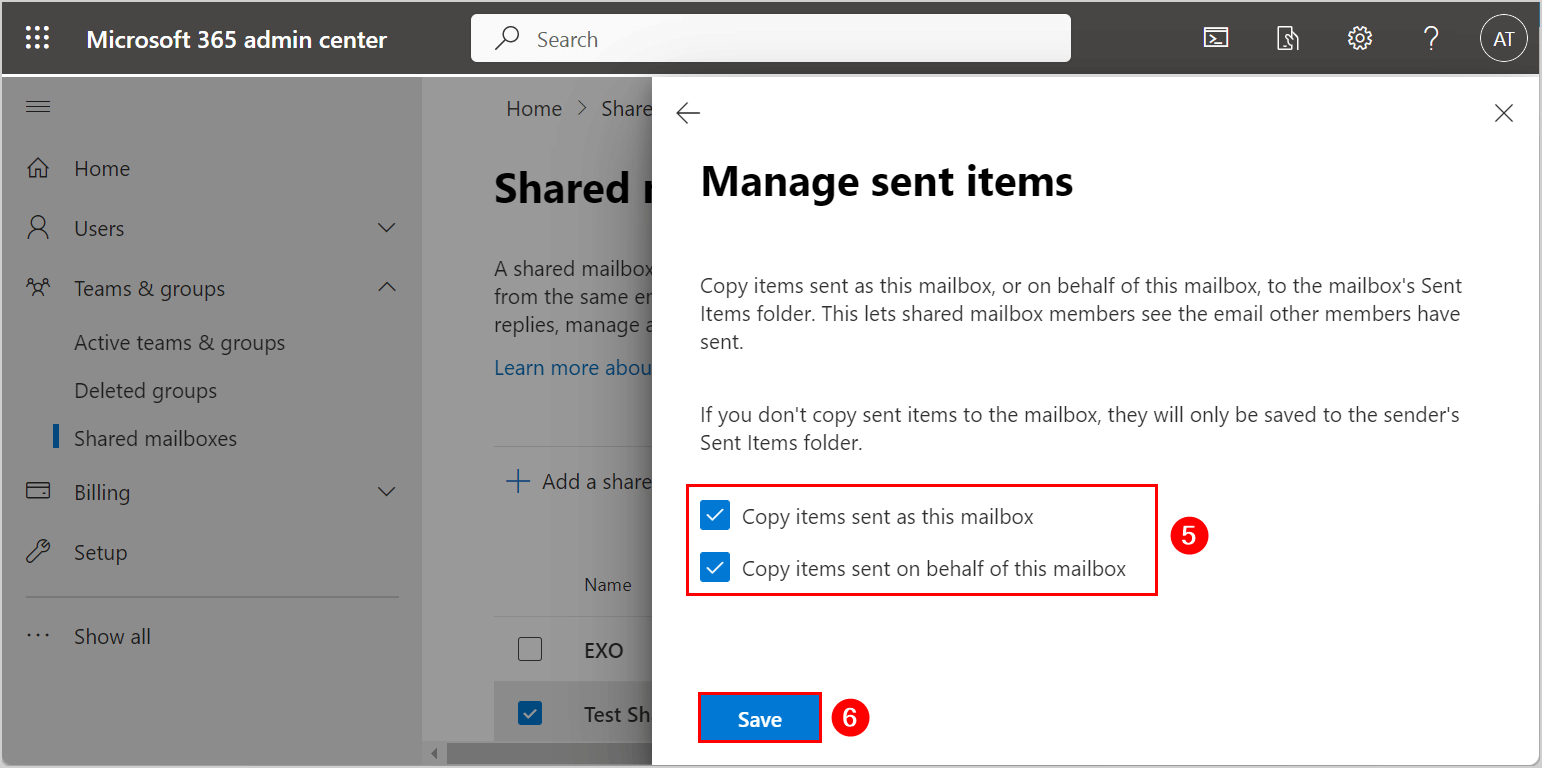
- Select both boxes
- Copy items sent as this mailbox
- Copy items sent on behalf of this mailbox
- Click on Save
You can go through each one of your shared mailboxes in the Microsoft admin center and change the settings. Follow the above steps and enable both features for each shared mailbox.
Suppose you want to enable these features for multiple shared mailboxes in one command, we suggest you use PowerShell. Let’s look into that in the next step.
How to manage shared mailbox copy sent items with PowerShell
The PowerShell command we will use is Set-Mailbox, with the specific parameters:
- MessageCopyForSentAsEnabled: It will enable ($true) or disable ($false) a copy of the sent email to the recipient (the delegate) with Send As permissions.
- MessageCopyForSendOnBehalfEnabled: It will enable ($true) or disable ($false) a copy of the sent email to the recipient (the delegate) with Send on Behalf permissions.
Connect to Exchange PowerShell
If you want to run the below commands to change the copy item sent settings, you need to Connect to Exchange Online PowerShell.
Connect-ExchangeOnlineNote: When you run the PowerShell commands, it may take a few minutes before it takes effect in the Microsoft 365 admin portal. Also, it can take up to one hour to see the sent emails in the shared mailbox sent items folder.
Save sent items in single shared mailbox
Use the PowerShell commands below to save sent items in shared mailboxes automatically. Here you can change the settings for a single shared mailbox or all the shared mailboxes in Microsoft 365. We will first enable copy items sent for one single shared mailbox.
Enable copy items sent as
Run the below command to enable copy items sent as this mailbox for a single shared mailbox. You can type the name or email address between quotation marks.
Set-Mailbox "info@0365info.com" -MessageCopyForSentAsEnabled $trueEnable copy items send on behalf
Run the below command to copy items sent on behalf of this mailbox for a single shared mailbox.
Set-Mailbox "info@o365info.com" -MessageCopyForSendOnBehalfEnabled $trueEnable copy items sent as and on behalf in one command
You can also enable both features for a single shared mailbox in one command with PowerShell.
Enable copy items sent as and on behalf of a single shared mailbox with the command below.
Set-Mailbox "info@0365info.com" -MessageCopyForSentAsEnabled $true -MessageCopyForSendOnBehalfEnabled $trueSave sent items on all shared mailboxes
You can save sent items on all shared mailboxes with a single command with PowerShell. We will first show you how to enable each one of the features for all shared mailboxes in Microsoft 365. Then you can enable both features in one command; copy items sent as and on behalf of all shared mailboxes.
Enable copy items sent as for all shared mailboxes
You can copy items sent as for all shared mailboxes in one command shown below.
Get-Mailbox –ResultSize Unlimited -RecipientTypeDetails Sharedmailbox | Set-Mailbox -MessageCopyForSentAsEnabled $trueEnable copy items send on behalf of all shared mailboxes
Run the command below to enable the feature copy items send on behalf of all shared mailboxes in Microsoft 365.
Get-Mailbox –ResultSize Unlimited -RecipientTypeDetails Sharedmailbox | Set-Mailbox -MessageCopyForSendOnBehalfEnabled $trueEnable copy items sent as and send on behalf of all shared mailboxes
Enable both features for all the shared mailboxes in one command.
Get-Mailbox –ResultSize Unlimited -RecipientTypeDetails Sharedmailbox | Set-Mailbox -MessageCopyForSendOnBehalfEnabled $true -MessageCopyForSentAsEnabled $trueDisable sent items in single shared mailbox
You can disable save sent items in a Microsoft 365 shared mailbox with a single PowerShell command. We will show you how to disable the feature copy items sent as and sent on behalf of a single shared mailbox.
Disable copy items sent as
Disable the feature copy items sent as this mailbox for a single shared mailbox.
Type the mailbox name between quotation marks and run the below PowerShell command.
Set-Mailbox "info@0365info.com" -MessageCopyForSentAsEnabled $falseDisable copy items sent on behalf of
Disable the feature copy items sent on behalf of this mailbox for a single shared mailbox.
Run the below PowerShell command.
Set-Mailbox "info@o365info.com" -MessageCopyForSendOnBehalfEnabled $falseDisable copy items sent as and sent on behalf of a single shared mailbox
Disable both featuress, copy items sent as and sent on behalf of a single shared mailbox
Run the below PowerShell command to disable both features for a single shared mailbox.
Set-Mailbox "info@0365info.com" -MessageCopyForSentAsEnabled $false -MessageCopyForSendOnBehalfEnabled $falseDisable save sent items for all shared mailboxes
You can disable save sent items for all shared mailboxes with a single PowerShell command. We will show you how to disable each one of the features copy items sent as and sent on behalf of all shared mailboxes.
Disable copy items sent as for all shared mailboxes
Disable the feature copy items sent as this mailbox with the below PowerShell command.
Get-Mailbox –ResultSize Unlimited -RecipientTypeDetails Sharedmailbox | Set-Mailbox -MessageCopyForSentAsEnabled $falseDisable copy items sent on behalf of all shared mailboxes
Disable the feature copy items sent on behalf this mailbox with the below PowerShell command.
Get-Mailbox –ResultSize Unlimited -RecipientTypeDetails Sharedmailbox | Set-Mailbox -MessageCopyForSendOnBehalfEnabled $falseDisable copy items sent as and send on behalf of all shared mailboxes
Disable both features for all the shared mailboxes in the below PowerShell command.
Get-Mailbox –ResultSize Unlimited -RecipientTypeDetails Sharedmailbox | Set-Mailbox -MessageCopyForSendOnBehalfEnabled $false -MessageCopyForSentAsEnabled $falseDisplay all shared mailboxes copy sent items settings
You can get the copy sent items settings for all shared mailboxes with PowerShell and display the results in the output or an Out-GridView.
Display all shared mailboxes disabled copy items sent as
Display all the shared mailboxes with MessageCopyForSentAsEnabled as false.
Run the below PowerShell command.
Get-Mailbox -ResultSize Unlimited -RecipientTypeDetails "SharedMailbox" | Where-Object {$_.MessageCopyForSentAsEnabled -eq $false} | ft Name, MessageCopyForSentAsEnabledThe PowerShell output result shows all the shared mailboxes that have disabled the feature copy items sent as this mailbox.
Name                 MessageCopyForSentAsEnabled
----                 ---------------------------
Info Box                                   False
Catch All                                  False
Test SharedMailbox                         False
Test SharedMailbox 3                       False
Display all shared mailboxes disabled copy items send on behalf
Display all shared mailboxes with MessageCopyForSendOnBehalfEnabled as false.
Run the below PowerShell command
Get-Mailbox -ResultSize Unlimited -RecipientTypeDetails "SharedMailbox" | Where-Object {$_.MessageCopyForSendOnBehalfEnabled -eq $false} | ft Name, MessageCopyForSendonBehalfEnabledThe PowerShell output result shows all the shared mailboxes that have disabled the feature copy items sent on behalf of this mailbox.
Name                 MessageCopyForSendOnBehalfEnabled
----                 ---------------------------------
Info Box                                         False
Catch All                                        False
Test SharedMailbox                               False
Test SharedMailbox 2                             False
Display sent items settings for all shared mailboxes
You can also view all the shared mailbox sent items settings with their values (true or false).
Run the below PowerShell command.
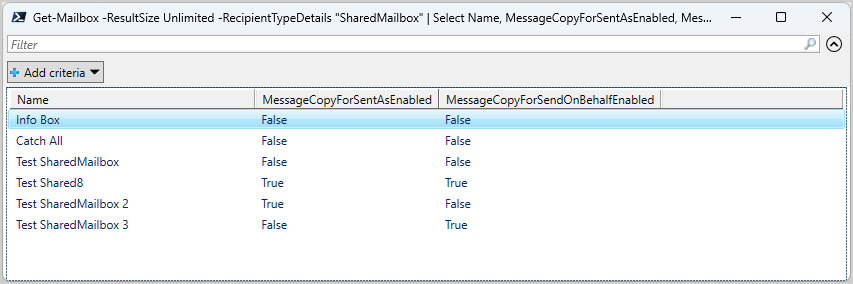
Get-Mailbox -ResultSize Unlimited -RecipientTypeDetails "SharedMailbox" | ft Name, MessageCopyForSentAsEnabled, MessageCopyForSendOnBehalfEnabledThe PowerShell output result.
Name                 MessageCopyForSentAsEnabled MessageCopyForSendOnBehalfEnabled
----                 --------------------------- ---------------------------------
Info Box                                   False                             False
Catch All                                  False                             False
Test SharedMailbox                         False                             False
Test Shared8                                True                              True
Test SharedMailbox 2                        True                             False
Test SharedMailbox 3                       False                              True
Display sent items settings for all shared mailboxes to Out-GridView
Display the sent items settings to an Out-GridView, where the output is displayed in an interactive table.
Run the below PowerShell command.
Get-Mailbox -ResultSize Unlimited -RecipientTypeDetails "SharedMailbox" | Select Name, MessageCopyForSentAsEnabled, MessageCopyForSendOnBehalfEnabled | Out-GridViewThe Out-GridView shows all the shared mailboxes that have enabled (true) or disabled (false) the features MessageCopyForSentAsEnabled and MessageCopyForSendOnBehalfEnabled.
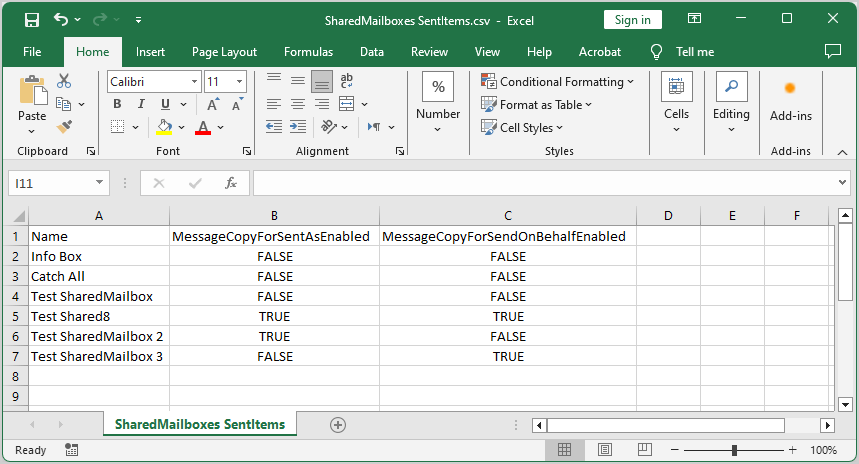
Export sent items settings for all shared mailboxes to CSV file
You can export the sent items settings for all shared mailboxes to a CSV file with PowerShell.
Run the below PowerShell command to export settings to a CSV file.
Get-Mailbox -ResultSize Unlimited -RecipientTypeDetails "SharedMailbox" | Select Name, MessageCopyForSentAsEnabled, MessageCopyForSendOnBehalfEnabled | Export-Csv -Path "C:\temp\SharedMailboxes SentItems.csv" -NoTypeInformation -Encoding UTF8Open the CSV file with an application like Microsoft Excel to see the results.
That’s it!
Read more: How to use Get-Mailbox in PowerShell »
Conclusion
You learned how to save sent items in a single shared mailbox with PowerShell and via the Microsoft 365 admin center. With PowerShell, you can enable and disable the sent items settings for all shared mailboxes. Or export the sent items settings for all shared mailboxes to an Out-GridView or CSV file.
If you configure a shared mailbox, remember to enable the copy items sent settings. This way, all the users of the shared mailbox can see the sent emails in the shared mailbox sent items folder.
Did you enjoy this article? You may also like Export Microsoft 365 users password report. Don’t forget to follow us and share this article.
What Others Are Reading

Is there a way to keep items send from shared mailbox in shared mailbox only?
Yes, read the article Save copy items sent ONLY in shared mailbox (Outlook).
The steps involved in using send permissions in an Office 365 shared mailbox to store a copy of outgoing messages are outlined in great detail in this article. The post is well-organized and simple to understand, with detailed yet concise instructions. Anyone who uses Office 365 and wants to back up copies of outgoing messages will find this article helpful.