Running commands gives you many results as an output. This can be overwhelming. It's better…
Export Microsoft 365 mailbox size report with PowerShell
Do you want to export all Microsoft 365 mailbox storage size data? In Microsoft 365 admin center, you can export a mailbox usage report. But this list does not show detailed information. In this article, we will show you how to export the Microsoft 365 mailbox size report with PowerShell.
Table of contents
Get mailbox size report in Microsoft 365 admin center
We want to show you how to display and export the mailbox usage report in Microsoft 365 admin center.
1. Display mailbox usage report
Follow the steps below to get all user mailboxes storage in Microsoft 365:
- Sign in to Microsoft 365 admin center
- On the menu, click Reports > Usage
- Under Overview > Click Exchange
- Click on Mailbox usage
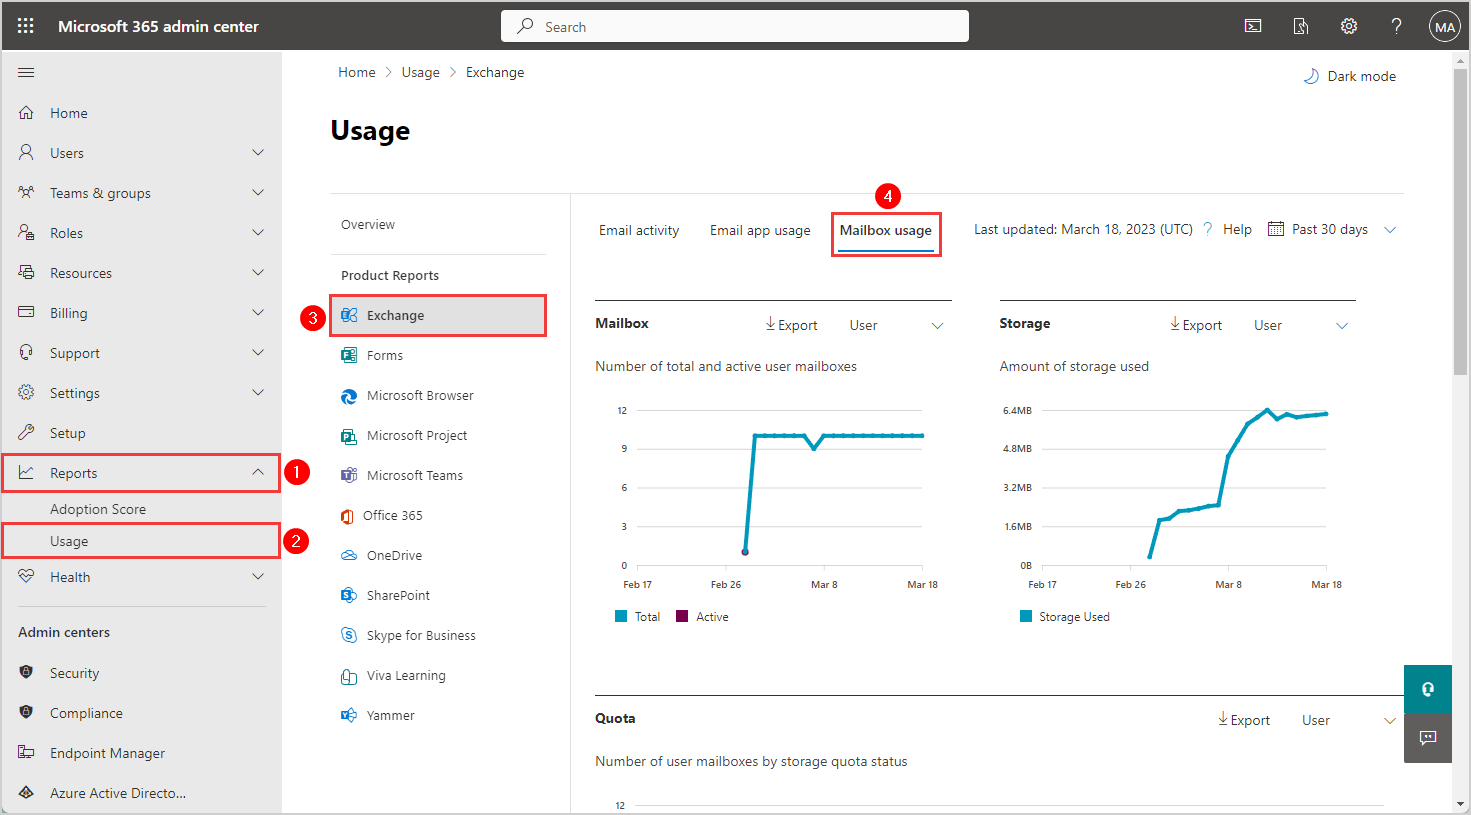
You can see the total number of mailbox storage used in the graphs. But we want to see the storage used per mailbox.
- Scroll below to see the list of information for each mailbox
Note: By default, you can only see numbers and letters instead of the usernames of each mailbox. Since September 2021, Microsoft has been hiding user information for all reports, but you can change these settings.
The username for each mailbox is concealed for privacy. In the next step, we will show you how to view the usernames in a report.
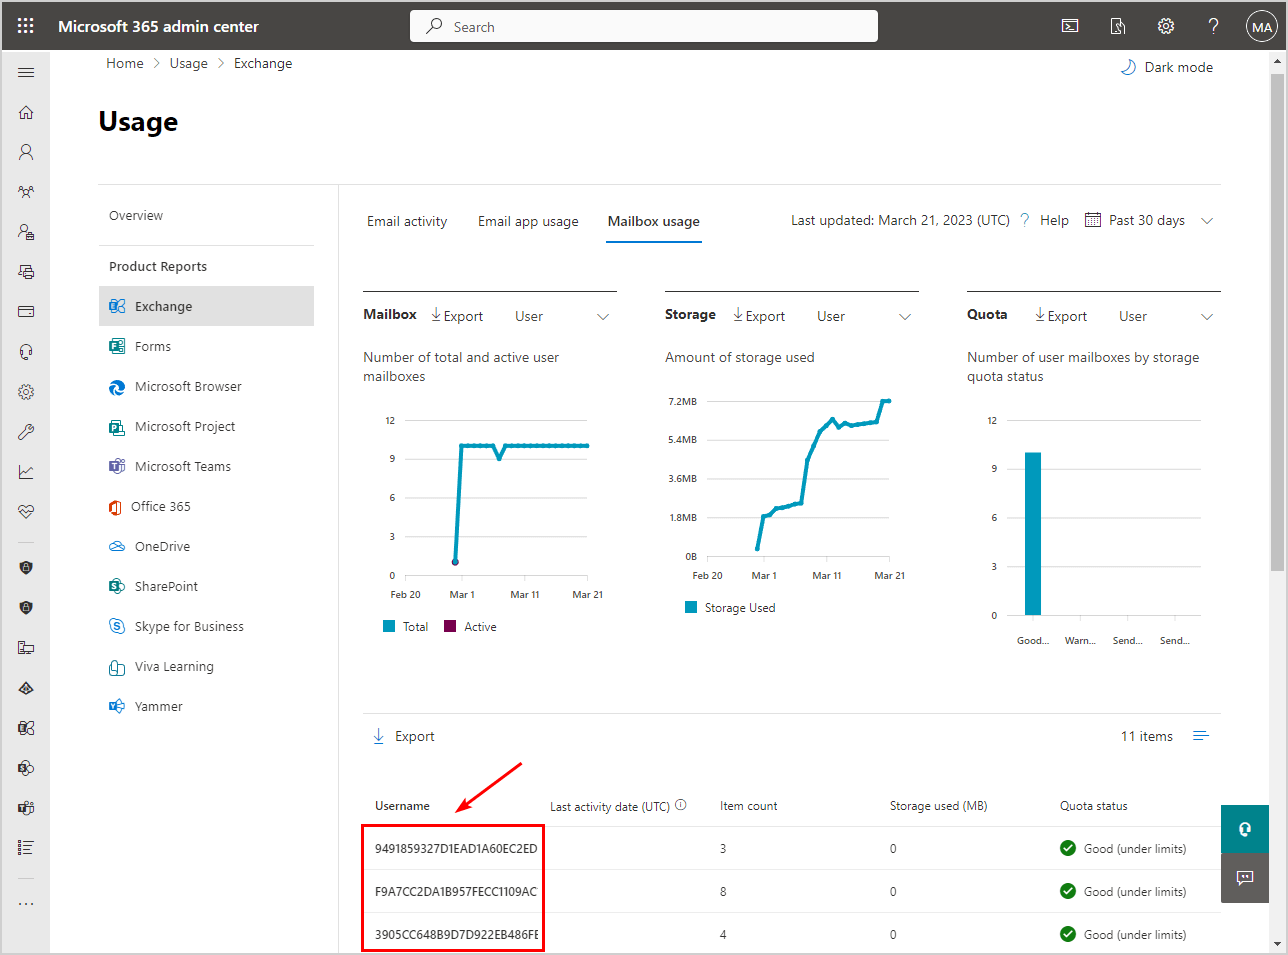
If you can see the username, skip the next step and go to Export mailbox usage to CSV file.
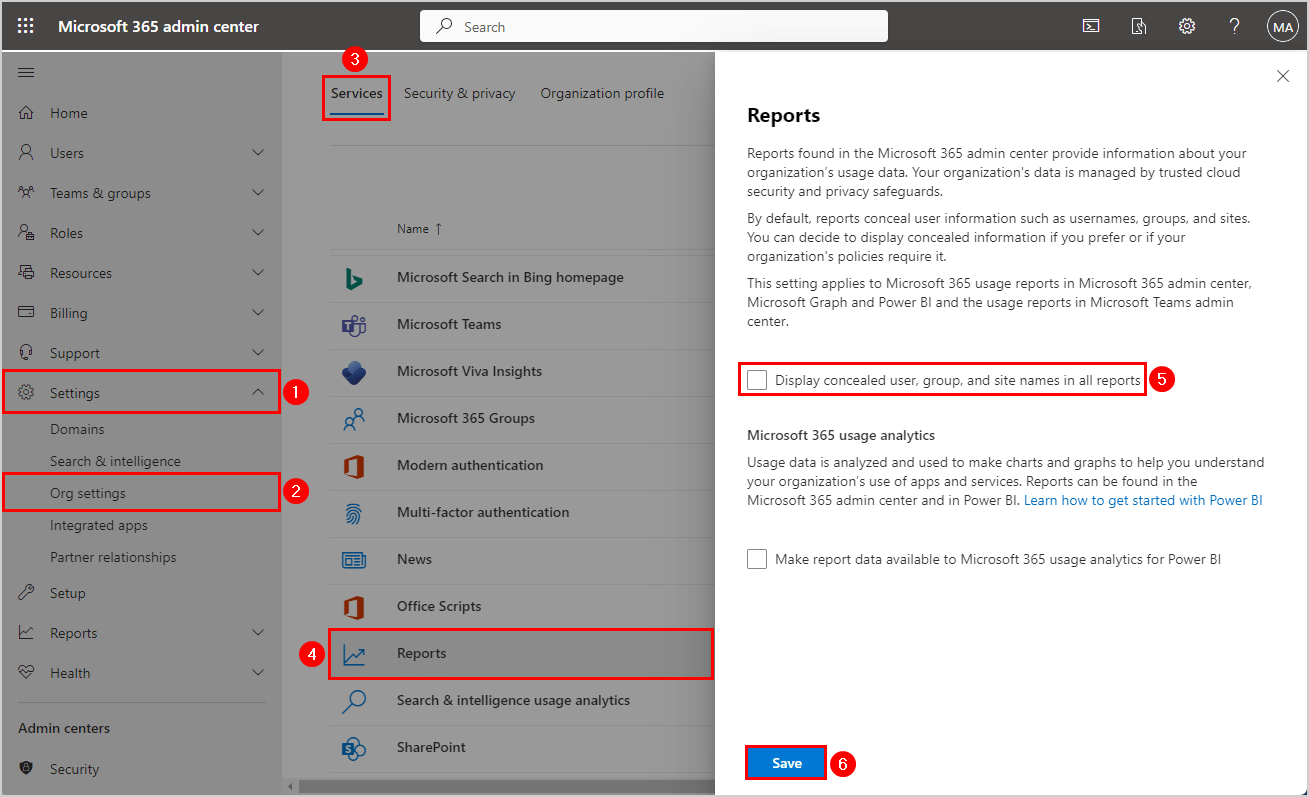
2. Display username in mailbox usage report
To display usernames in reports, follow these steps:
- Click on Settings > Org Settings
- Click Services
- Click Reports
- Clear the checkbox Display concealed user, group, and site names in all reports
- Click Save
3. Export mailbox usage to CSV file
Once you display the usernames, you can export the mailbox size report to a CSV file.
Return to the list of all mailbox usage. In Microsoft 365 admin center, navigate to Reports > Usage > Exchange > Mailbox usage.
- Click Export
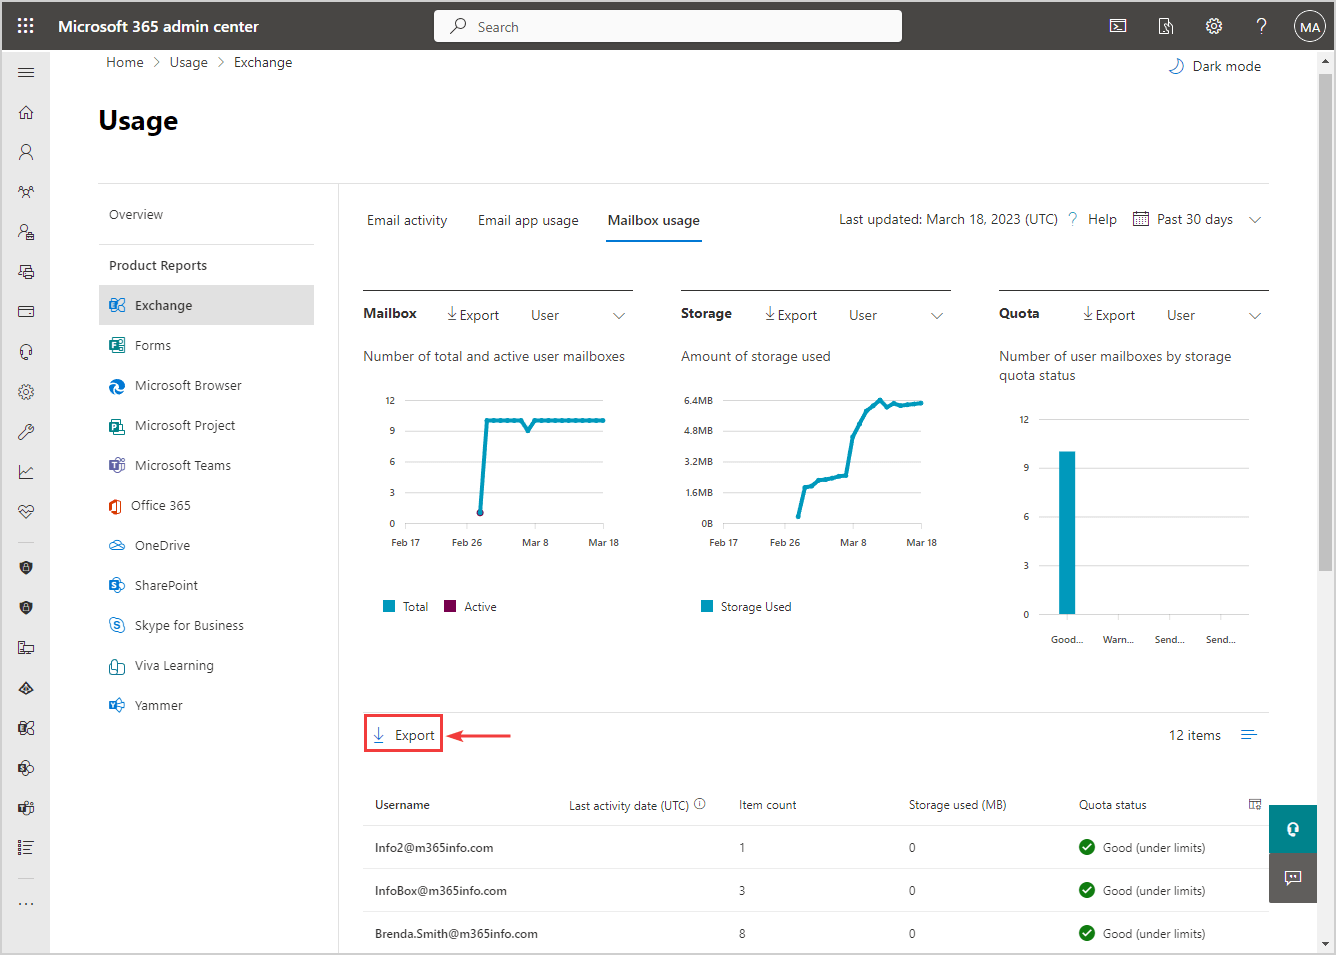
- Open the CSV file with Microsoft Excel to view and sort the data
The mailbox usage report from Microsoft 365 shows all the mailboxes and how much storage is used.
The Mailbox Usage Report shows limited data on the mailbox sizes. If you want more detailed data, we recommend you use the PowerShell script in the next step.
Get Microsoft 365 mailbox size report with PowerShell script
An excellent way to get the mailbox size of all users is with the below PowerShell script.
The MailboxSizeReport365.ps1 PowerShell script has 2 options:
- Export to CSV File (OFFICE 365)
- Enter the Mailbox Name with Wild Card (Export) (OFFICE 365)
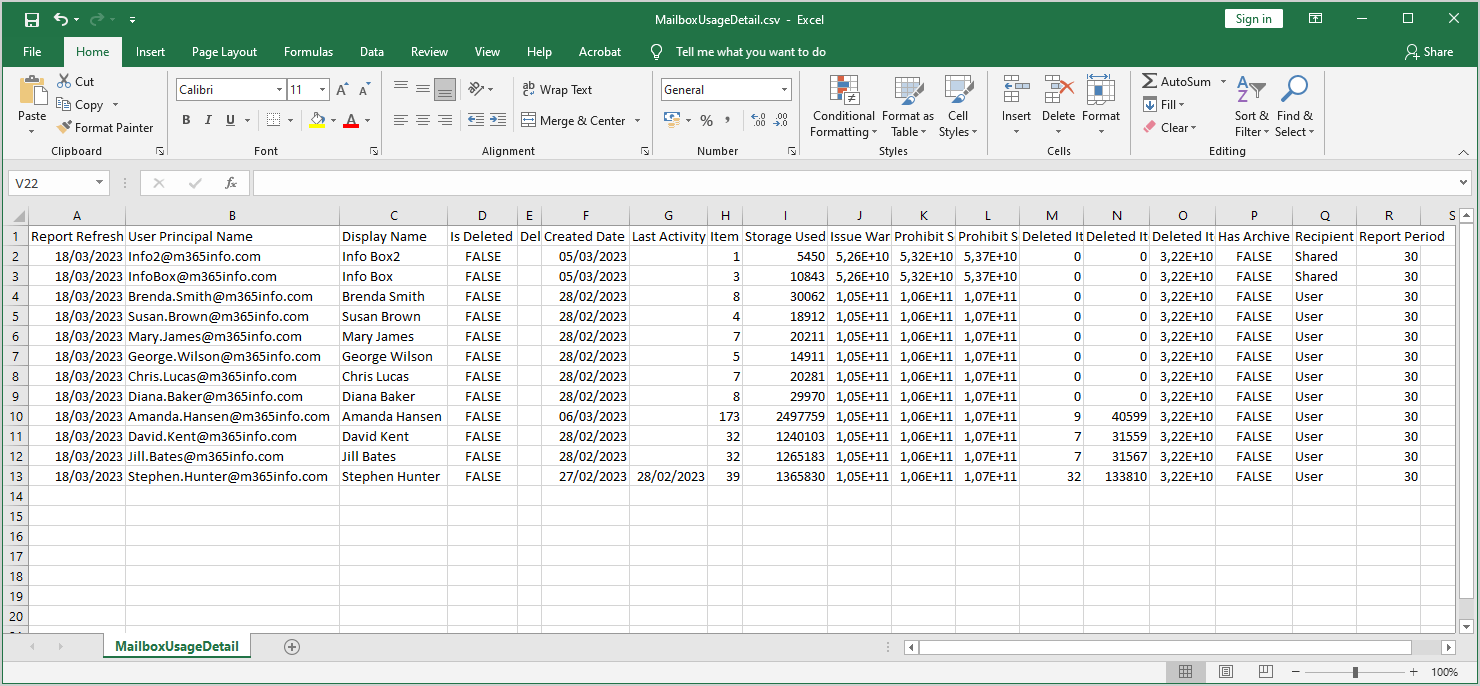
The scripts will run and find all users with a mailbox and gather the following information per mailbox in the CSV file:
- Display Name
- Alias
- SamAccountName
- RecipientType
- Recipient OU
- Primary SMTP address
- Email Addresses
- Database
- ServerName
- TotalItemSize
- ItemCount
- DeletedItemCount
- TotalDeletedItemSize
- ProhibitSendReceiveQuota-In-MB
- UseDatabaseQuotaDefaults
- LastLogonTime
- ArchiveName
- ArchiveStatus
- ArchiveState
- ArchiveQuota
- ArchiveTotalItemSize
- ArchiveTotalItemCount
We will show you both options and the results in the next steps.
1. Connect to PowerShell Online
Start Windows PowerShell as administrator and run the cmdlet Connect-ExchangeOnline to Connect to Exchange Online PowerShell.
Connect-ExchangeOnline2. Download MailboxSizeReport365 PowerShell script
To download the MailboxSizeReport365 PowerShell script, choose one of the options:
- Download the MailboxSizeReport365.ps1 PowerShell script
- Or copy the below script into Notepad and save it as a MailboxSizeReport365.ps1 file
Note: The script will not fetch inactive mailbox folder statistics. You need to assign a license to the user mailbox before you can get any data.
<#
    .SYNOPSIS
    .\MailboxSizeReport365.ps1

    .DESCRIPTION
    Connect to Exchange Online PowerShell first.
    The script exports a Mailbox Size Report for all Microsoft 365 mailboxes
    to a CSV file. You can also export a single mailbox or WildCard as an option.

    .LINK
    o365info.com/microsoft-365-mailbox-size-report

    .NOTES
    Written By: o365info
    Website:    o365info.com

    .CHANGELOG
    V1.00, 03/24/2023 - Initial version
#>

Write-host "

Mailbox Size Report 365
----------------------------

1.Export to CSV File (OFFICE 365)

2.Enter the Mailbox Name with Wild Card (Export) (OFFICE 365)"-ForeGround "Cyan"

#----------------
# Script
#----------------

Write-Host "               "

$number = Read-Host "Choose The Task"
$output = @()
switch ($number) {

    1 {

        $i = 0
        $CSVfile = Read-Host "Enter the Path of CSV file (Eg. C:\Report.csv)"

        $AllMailbox = Get-mailbox -Resultsize Unlimited

        Foreach ($Mbx in $AllMailbox) {

            $Stats = Get-mailboxStatistics -Identity $Mbx.distinguishedname -WarningAction SilentlyContinue

            if ($Mbx.ArchiveName.count -eq "0") {
                $ArchiveTotalItemSize = $null
                $ArchiveTotalItemCount = $null
            }
            if ($Mbx.ArchiveName -ge "1") {
                $MbxArchiveStats = Get-mailboxstatistics $Mbx.distinguishedname -Archive -WarningAction SilentlyContinue
                $ArchiveTotalItemSize = $MbxArchiveStats.TotalItemSize
                $ArchiveTotalItemCount = $MbxArchiveStats.BigFunnelMessageCount
            }

            $userObj = New-Object PSObject

            $userObj | Add-Member NoteProperty -Name "Display Name" -Value $mbx.displayname
            $userObj | Add-Member NoteProperty -Name "Alias" -Value $Mbx.Alias
            $userObj | Add-Member NoteProperty -Name "SamAccountName" -Value $Mbx.SamAccountName
            $userObj | Add-Member NoteProperty -Name "RecipientType" -Value $Mbx.RecipientTypeDetails
            $userObj | Add-Member NoteProperty -Name "Recipient OU" -Value $Mbx.OrganizationalUnit
            $userObj | Add-Member NoteProperty -Name "Primary SMTP address" -Value $Mbx.PrimarySmtpAddress
            $userObj | Add-Member NoteProperty -Name "Email Addresses" -Value ($Mbx.EmailAddresses -join ",")
            $userObj | Add-Member NoteProperty -Name "Database" -Value $Stats.Database
            $userObj | Add-Member NoteProperty -Name "ServerName" -Value $Stats.ServerName
            $userObj | Add-Member NoteProperty -Name "TotalItemSize" -Value $Stats.TotalItemSize
            $userObj | Add-Member NoteProperty -Name "ItemCount" -Value $Stats.ItemCount
            $userObj | Add-Member NoteProperty -Name "DeletedItemCount" -Value $Stats.DeletedItemCount
            $userObj | Add-Member NoteProperty -Name "TotalDeletedItemSize" -Value $Stats.TotalDeletedItemSize
            $userObj | Add-Member NoteProperty -Name "ProhibitSendReceiveQuota-In-MB" -Value $Mbx.ProhibitSendReceiveQuota
            $userObj | Add-Member NoteProperty -Name "UseDatabaseQuotaDefaults" -Value $Mbx.UseDatabaseQuotaDefaults
            $userObj | Add-Member NoteProperty -Name "LastLogonTime" -Value $Stats.LastLogonTime
            $userObj | Add-Member NoteProperty -Name "ArchiveName" -Value ($Mbx.ArchiveName -join ",")
            $userObj | Add-Member NoteProperty -Name "ArchiveStatus" -Value $Mbx.ArchiveStatus
            $userObj | Add-Member NoteProperty -Name "ArchiveState" -Value $Mbx.ArchiveState
            $userObj | Add-Member NoteProperty -Name "ArchiveQuota" -Value $Mbx.ArchiveQuota
            $userObj | Add-Member NoteProperty -Name "ArchiveTotalItemSize" -Value $ArchiveTotalItemSize
            $userObj | Add-Member NoteProperty -Name "ArchiveTotalItemCount" -Value $ArchiveTotalItemCount

            $output += $UserObj
            # Update Counters and Write Progress
            $i++
            if ($AllMailbox.Count -ge 1) {
                Write-Progress -Activity "Scanning Mailboxes . . ." -Status "Scanned: $i of $($AllMailbox.Count)" -PercentComplete ($i / $AllMailbox.Count * 100)
            }
        }

        $output | Export-csv -Path $CSVfile -NoTypeInformation -Encoding UTF8 #-Delimiter ","

        ; Break
    }

    2 {
        $i = 0
        $CSVfile = Read-Host "Enter the Path of CSV file (Eg. C:\DG.csv)"

        $MailboxName = Read-Host "Enter the Mailbox name or Range (Eg. Mailboxname , Mi*,*Mik)"

        $AllMailbox = Get-mailbox $MailboxName -Resultsize Unlimited

        Foreach ($Mbx in $AllMailbox) {

            $Stats = Get-mailboxStatistics -Identity $Mbx.distinguishedname -WarningAction SilentlyContinue

            if ($Mbx.ArchiveName.count -eq "0") {
                $ArchiveTotalItemSize = $null
                $ArchiveTotalItemCount = $null
            }
            if ($Mbx.ArchiveName -ge "1") {
                $MbxArchiveStats = Get-mailboxstatistics $Mbx.distinguishedname -Archive -WarningAction SilentlyContinue
                $ArchiveTotalItemSize = $MbxArchiveStats.TotalItemSize
                $ArchiveTotalItemCount = $MbxArchiveStats.BigFunnelMessageCount
            }

            $userObj = New-Object PSObject

            $userObj | Add-Member NoteProperty -Name "Display Name" -Value $mbx.displayname
            $userObj | Add-Member NoteProperty -Name "Alias" -Value $Mbx.Alias
            $userObj | Add-Member NoteProperty -Name "SamAccountName" -Value $Mbx.SamAccountName
            $userObj | Add-Member NoteProperty -Name "RecipientType" -Value $Mbx.RecipientTypeDetails
            $userObj | Add-Member NoteProperty -Name "Recipient OU" -Value $Mbx.OrganizationalUnit
            $userObj | Add-Member NoteProperty -Name "Primary SMTP address" -Value $Mbx.PrimarySmtpAddress
            $userObj | Add-Member NoteProperty -Name "Email Addresses" -Value ($Mbx.EmailAddresses -join ",")
            $userObj | Add-Member NoteProperty -Name "Database" -Value $Stats.Database
            $userObj | Add-Member NoteProperty -Name "ServerName" -Value $Stats.ServerName
            $userObj | Add-Member NoteProperty -Name "TotalItemSize" -Value $Stats.TotalItemSize
            $userObj | Add-Member NoteProperty -Name "ItemCount" -Value $Stats.ItemCount
            $userObj | Add-Member NoteProperty -Name "DeletedItemCount" -Value $Stats.DeletedItemCount
            $userObj | Add-Member NoteProperty -Name "TotalDeletedItemSize" -Value $Stats.TotalDeletedItemSize
            $userObj | Add-Member NoteProperty -Name "ProhibitSendReceiveQuota-In-MB" -Value $Mbx.ProhibitSendReceiveQuota
            $userObj | Add-Member NoteProperty -Name "UseDatabaseQuotaDefaults" -Value $Mbx.UseDatabaseQuotaDefaults
            $userObj | Add-Member NoteProperty -Name "LastLogonTime" -Value $Stats.LastLogonTime
            $userObj | Add-Member NoteProperty -Name "ArchiveName" -Value ($Mbx.ArchiveName -join ",")
            $userObj | Add-Member NoteProperty -Name "ArchiveStatus" -Value $Mbx.ArchiveStatus
            $userObj | Add-Member NoteProperty -Name "ArchiveState" -Value $Mbx.ArchiveState
            $userObj | Add-Member NoteProperty -Name "ArchiveQuota" -Value $Mbx.ArchiveQuota
            $userObj | Add-Member NoteProperty -Name "ArchiveTotalItemSize" -Value $ArchiveTotalItemSize
            $userObj | Add-Member NoteProperty -Name "ArchiveTotalItemCount" -Value $ArchiveTotalItemCount

            $output += $UserObj
            # Update Counters and Write Progress
            $i++
            if ($AllMailbox.Count -ge 1) {
                Write-Progress -Activity "Scanning Mailboxes . . ." -Status "Scanned: $i of $($AllMailbox.Count)" -PercentComplete ($i / $AllMailbox.Count * 100) -ErrorAction SilentlyContinue
            }
        }

        $output | Export-csv -Path $CSVfile -NoTypeInformation -Encoding UTF8 #-Delimiter ","

        ; Break
    }

    Default { Write-Host "No matches found , Enter Options 1 or 2" -ForeGround "red" }
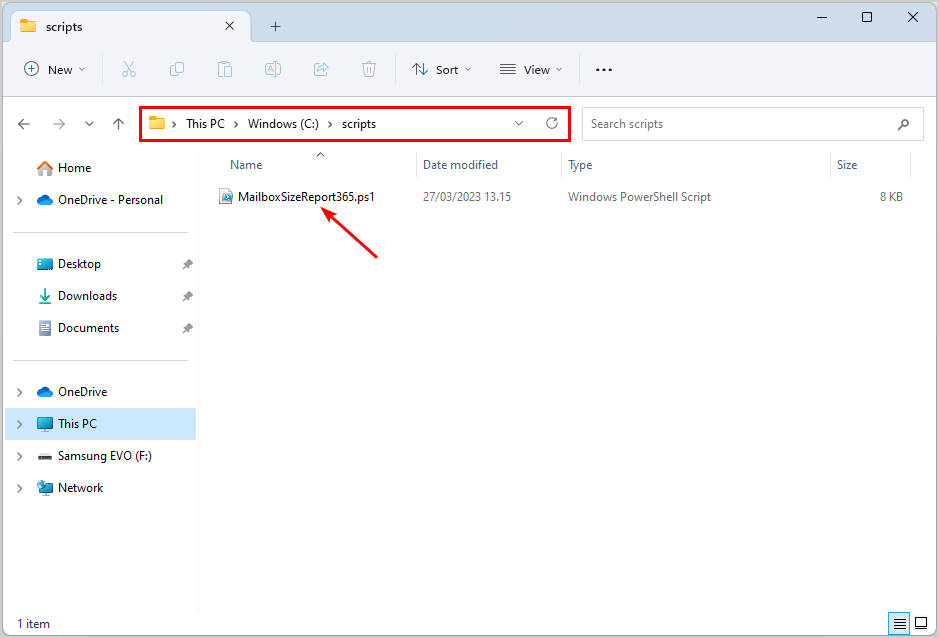
}- Create the folders scripts and temp in the (C:) drive if you don’t have them already
- Save the MailboxSizeReport365.ps1 PowerShell script in the C:\scripts folder
Open the file to check if it is unblocked to prevent errors when running the script.
3. Export all Microsoft 365 size report
1. Run the following PowerShell command to start the script.
C:\scripts\.\MailboxSizeReport365.ps1The output will display the Mailbox Size Report 365 script, which has 2 options.
PS C:\scripts\.\MailboxSizeReport365.ps1

Mailbox Size Report 365
----------------------------
1.Export to CSV File (OFFICE 365)

2.Enter the Mailbox Name with Wild Card (Export) (OFFICE 365)

Choose The Task:
First, we want to show option 1. Export to CSV File (OFFICE 365)
2. Type 1 and press Enter.
PS C:\scripts\.\MailboxSizeReport365.ps1


Mailbox Size Report 365
----------------------------

1.Export to CSV File (OFFICE 365)

2.Enter the Mailbox Name with Wild Card (Export) (OFFICE 365)

Choose The Task: 1
The script will ask for a path, so when you export the CSV file, it will get exported to that path.
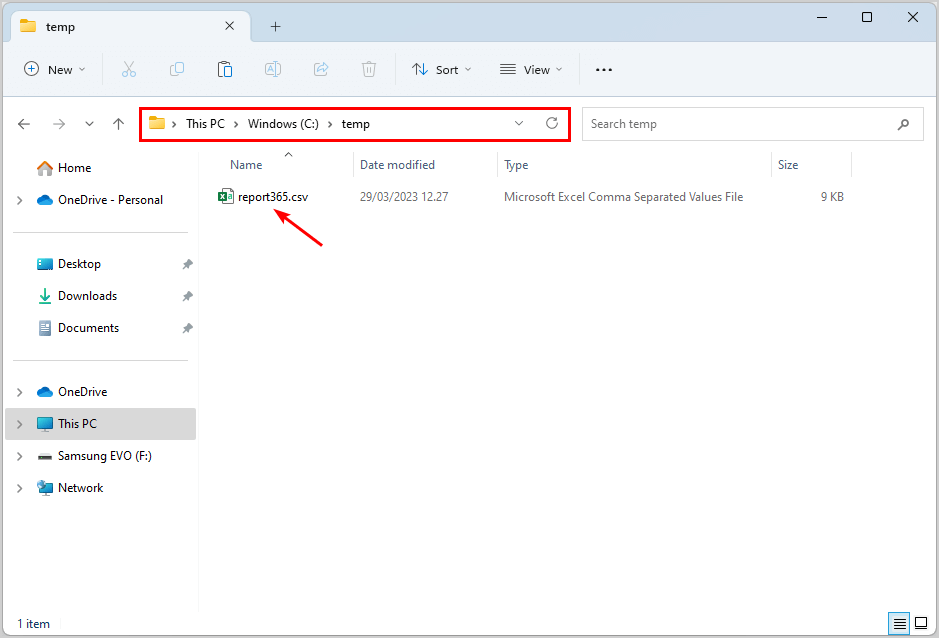
3. Insert the following path C:\temp\report365.csv and press Enter.
PS C:\scripts\.\MailboxSizeReport365.ps1


Mailbox Size Report 365
----------------------------

1.Export to CSV File (OFFICE 365)

2.Enter the Mailbox Name with Wild Card (Export) (OFFICE 365)

Choose The Task: 1
Enter the Path of CSV file (Eg. C:\Report.csv): C:\temp\report365.csv
The Mailbox Size Report 365 script starts scanning all the mailboxes in the organization. It may take a few minutes if you have many mailbox users.
After that, the list is created, and the results are exported to a CSV file. When it is done, you can exit the script.
You will find the list exported in a CSV file in C:\temp.
4. Export specific Microsoft 365 mailbox size report
You can also export one specific Microsoft 365 mailbox or several mailboxes that start or end with the same letters or numbers.
1. Run the following PowerShell command to start the script.
C:\scripts\.\MailboxSizeReport365.ps1The output will display the Mailbox Size Report 365 script with 2 options.
We want to show option 2. Enter the Mailbox Name with Wild Card (Export) (OFFICE 365)
2. Type number 2 and press Enter.
PS C:\scripts\.\MailboxSizeReport365.ps1

Mailbox Size Report 365
----------------------------
1.Export to CSV File (OFFICE 365)

2.Enter the Mailbox Name with Wild Card (Export) (OFFICE 365)

Choose The Task: 2
The script will ask for a path, so when you export the CSV file, it will get exported to that path.
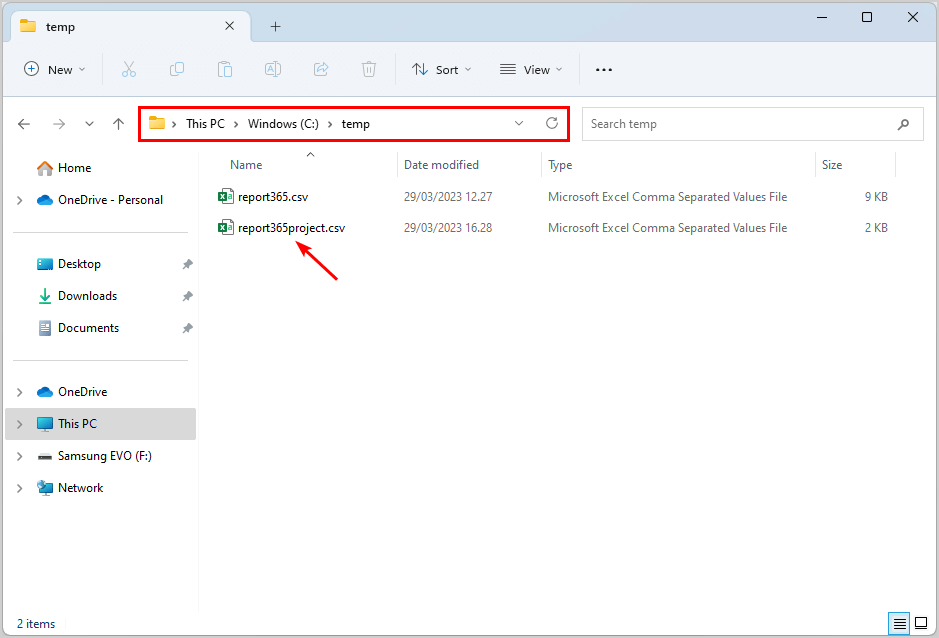
3. Type the following path C:\temp\report365project.csv and press Enter.
PS C:\scripts\.\MailboxSizeReport365.ps1

Mailbox Size Report 365
----------------------------
1.Export to CSV File (OFFICE 365)

2.Enter the Mailbox Name with Wild Card (Export) (OFFICE 365)

Choose The Task: 2
Enter the Path of CSV file (Eg. C:\DG.csv): C:\temp\report365project.csv
Now the script will ask to enter the mailbox name or a range.
You can type the full name of the mailbox or the letters and numbers the mailbox has with an asterisk (*). Use the asterisk before, after, or between letters and numbers.
We will show you examples of how to use the asterisk (*):
- Place (*) at the end to show all mailboxes that start with pr*
- Insert two asterisks to show all mailboxes that have these letters *pr*
- Place (*) at the beginning to show all mailboxes that end with *pr
4. Insert project* to show all the mailboxes that start with the name project.
PS C:\scripts\.\MailboxSizeReport365.ps1

Mailbox Size Report 365
----------------------------

1.Export to CSV File (OFFICE 365)

2.Enter the Mailbox Name with Wild Card (Export) (OFFICE 365)

Choose The Task: 2
Enter the Path of CSV file (Eg. C:\DG.csv): C:\temp\report365project.csv
Enter the Mailbox name or Range (Eg. Mailboxname , Mi*,*Mik): project*
The Mailbox Size Report 365 PowerShell script will start scanning all the mailboxes. When it’s done, you can exit the script.
Check if the list is successfully exported to a CSV file. Go to the path C:\temp\ and find the report365project.csv file.
5. Open Microsoft 365 report CSV file with Excel
Load all the CSV data into Microsoft Excel by following the below steps:
- Open Microsoft Excel and select New blank workbook
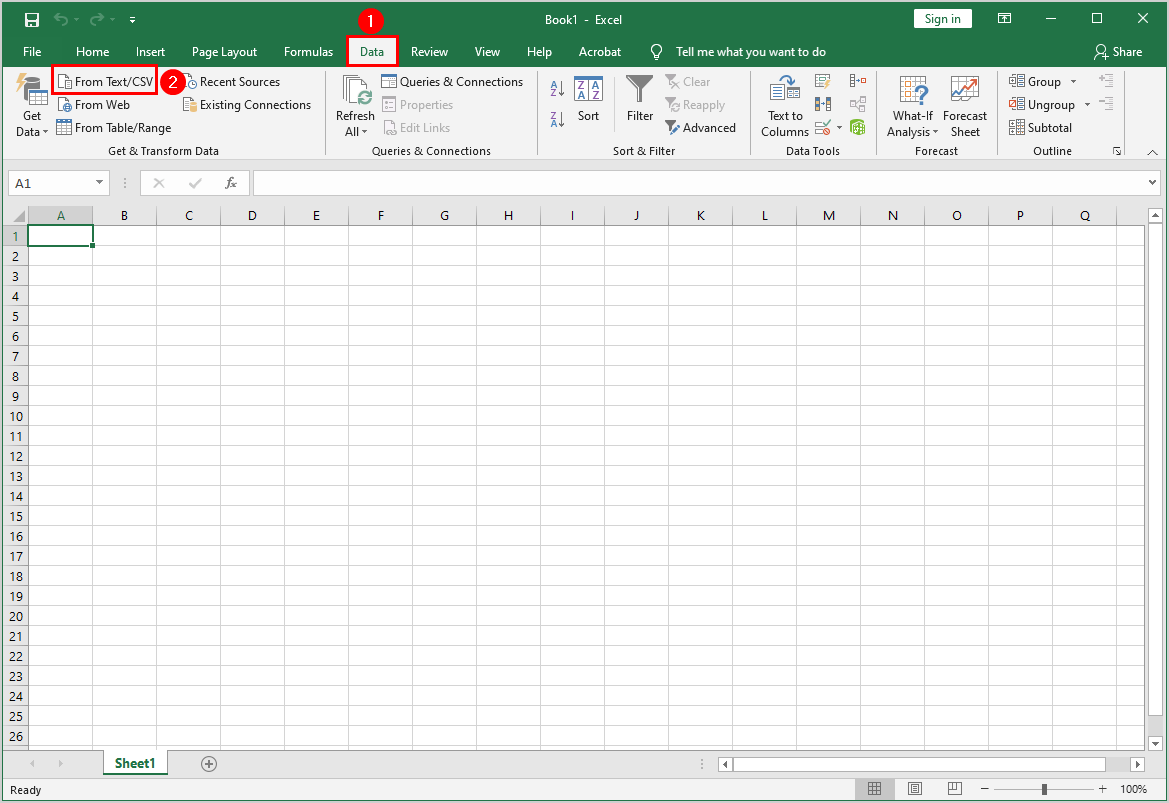
- Click on Data > From Text/CSV
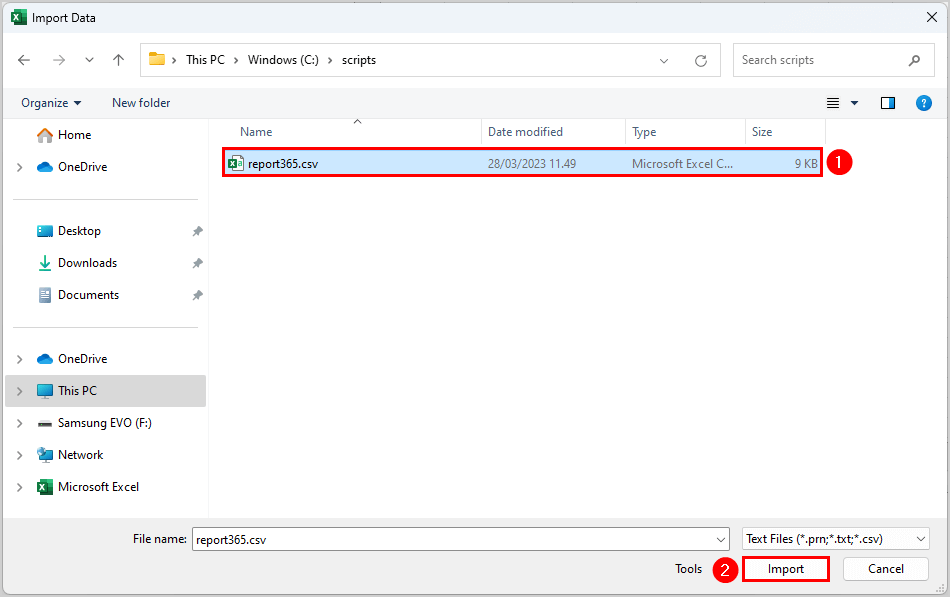
- Find and select the report365.csv file
- Click Import
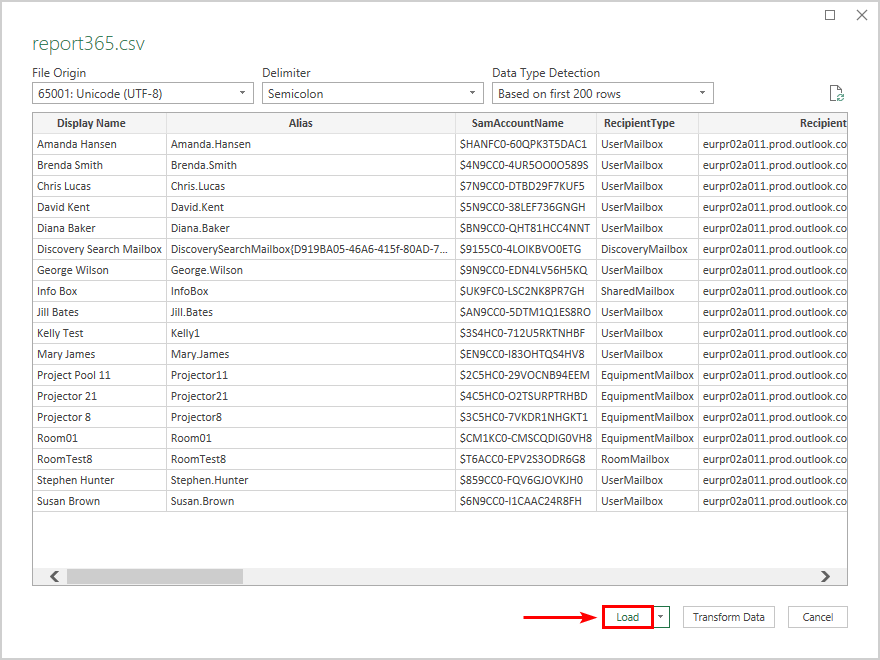
- Check all the columns and click Load
Note: If you don’t have a license, you can’t find the mailbox because it will not show the inactive mailbox. Assign a license first, and then you can fetch the mailbox.
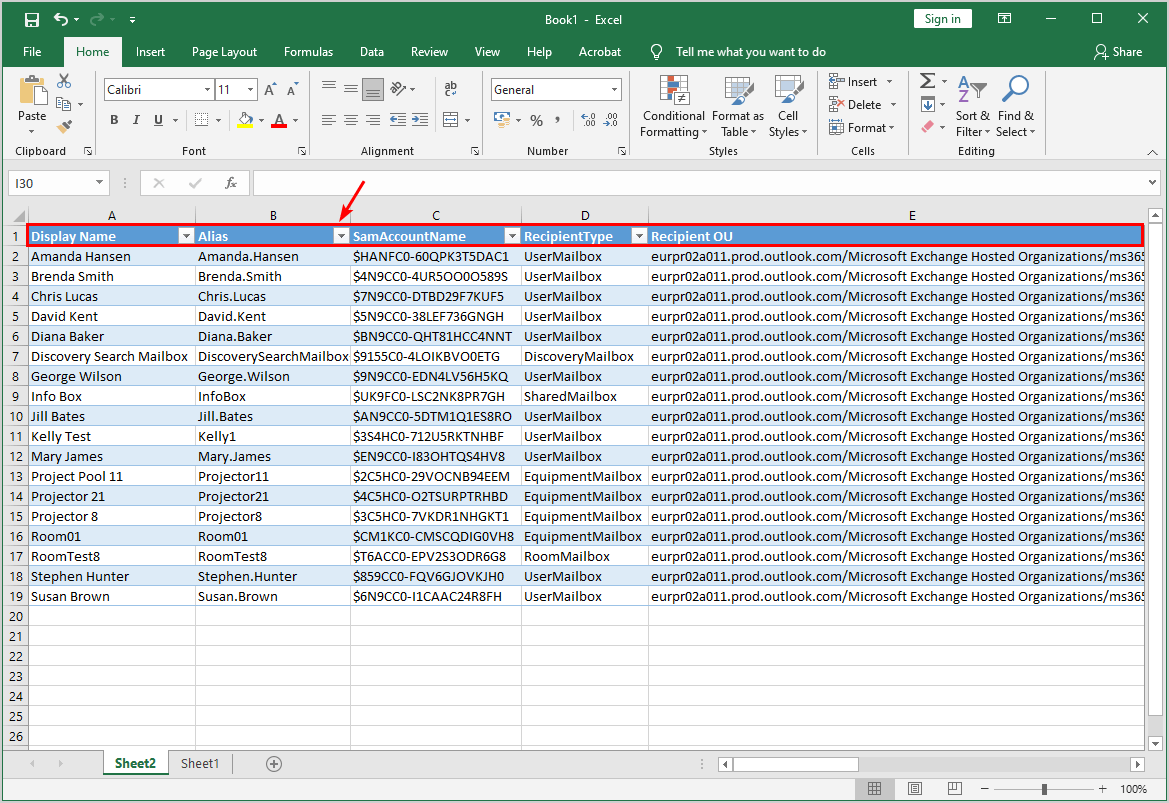
- Microsoft Excel loads and formats the data from the CSV file
- Sort and filter the columns by clicking on the arrows in the first row
It is easy to export a Microsoft 365 mailbox size report, and you can also remove unnecessary information.
Read more: Export Microsoft 365 users licenses »
Conclusion
You learned how to export the Microsoft 365 mailbox size report in Exchange Online with PowerShell. Use the MailboxSizeReport365.ps1 PowerShell script to list the mailbox size data of all mailboxes. This script shows information per mailbox, such as storage usage, item size, and deleted items size.
Did you enjoy this article? You may also like How to set Microsoft 365 password to never expire. Don’t forget to follow us and share this article.
If it possible to import the list of users from txt file or csv and only get the mailbox size on those users?
Is there a way to automate the reports or is that something you would have to do with either BI/Purview? I haven’t found it yet, but there might already be a way. If there isn’t a way through the EAC, Admin Center, BI or Purview, then would it be possible to set up a scheduled task on a windows server to run this script daily/weekly/monthly, so that you can achieve the same thing?
You can automate the report with a scheduled task on your Windows Server by following the below article:
Configure Certificate-Based Authentication to run automated PowerShell scripts.
Somehow missed this blog post and script, which is again very handy to have and run once per month etc. Thanks again for creating this content!