It's important to add the organization's contact information to the Microsoft 365 help pane. This…
Configure WordPress SMTP to send emails via Microsoft 365
WordPress often does not send your emails, and that’s a big problem. That’s because the hosting has unreliable SMTP (Simple Mail Transfer Protocol). The solution is to send emails without any delivery problems from your WordPress website when installing an SMTP plugin and configuring the SMTP to send emails via Exchange Online. This article will show how to configure WordPress SMTP to send emails via Microsoft 365.
Table of contents
WordPress SMTP prerequisites
The below prerequisites are essential:
- Purchase a Microsoft 365 user license that will be used for authentication purposes.
Note: The SMTP configuration will not work on a trial or developer tenant account. It will also not work from an unlicensed mailbox, unless it’s a shared mailbox. The shared mailbox needs to have a licensed user as member with Send As permissions, so you can use that for the Microsoft 365 authentication and get the access token.
1. Download WordPress plugin Fluent SMTP
Install the Fluent SMTP WordPress plugin:
- Login to your WordPress site
- Click Plugins from the menu
- Click Add New
- Search for fluent smtp
- Click Install Now
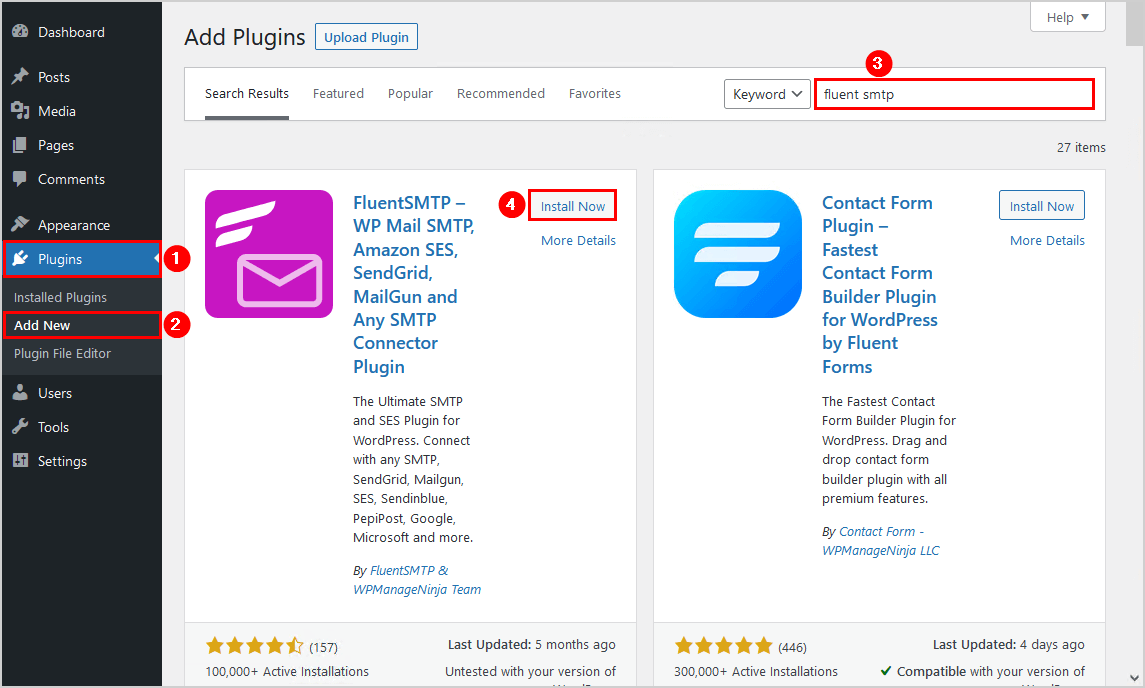
- Click Activate Plugin
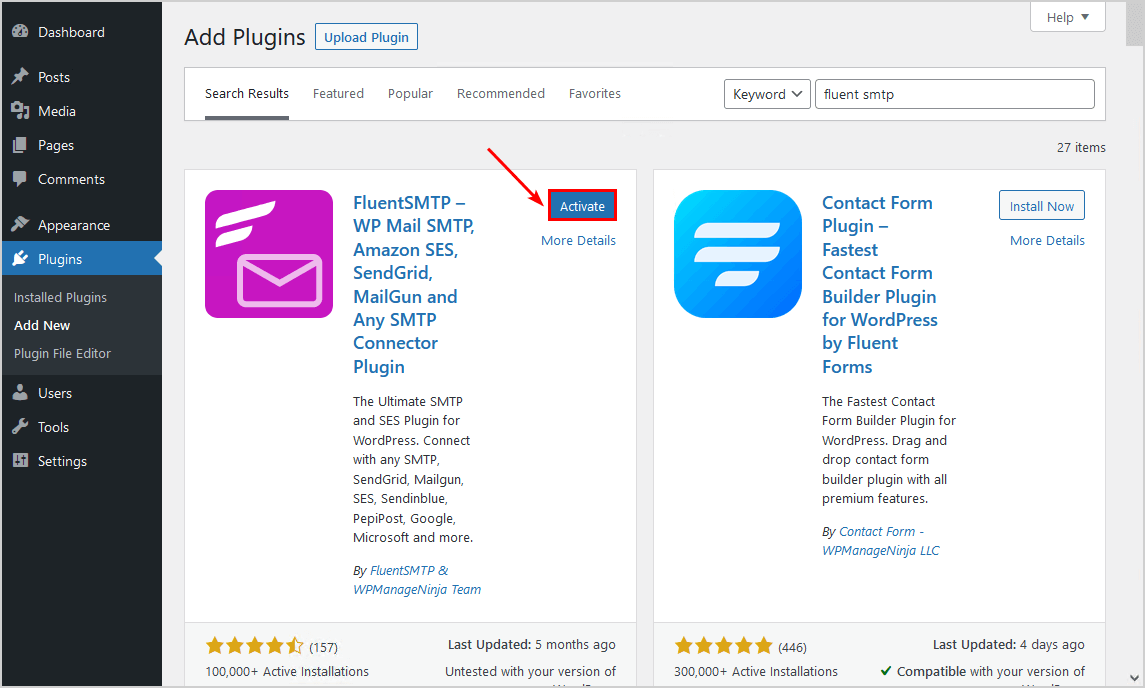
Next, we need to configure the plugin Fluent SMTP for it to work.
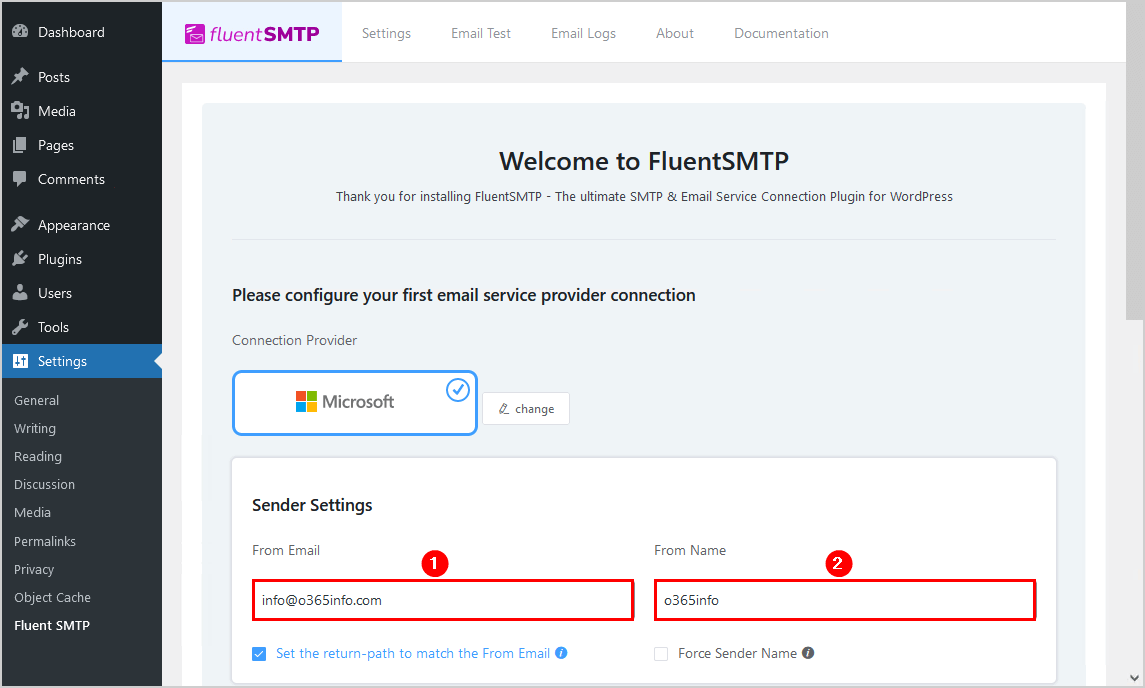
2. Configure Fluent SMTP WordPress plugin
Configure the Fluent SMTP plugin to use Microsoft 365 (Exchange Online) as the mail server.
- Click on Settings > Fluent SMTP
- Choose Microsoft

- Type From Email info@365info.com
- Type From Name o365info
Note: For the sender mail, you can choose a licensed or unlicensed shared mailbox. The important difference is that for an unlicensed shared mailbox, the user needs to have a licensed mailbox with Send As permissions.
For example, you have an unlicensed shared mailbox with a couple of members. The member you will authenticate with Microsoft 365 to get an access token in the next step must have a licensed mailbox and Send As permission to the shared mailbox. You will use that account later in the authentication process.
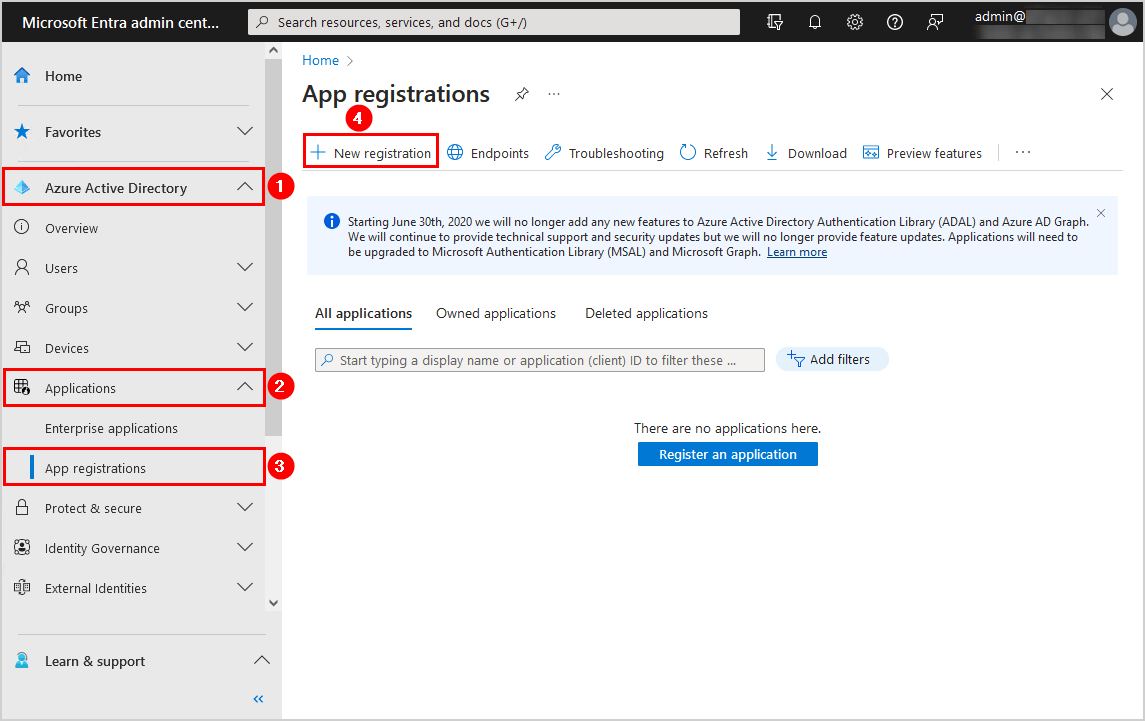
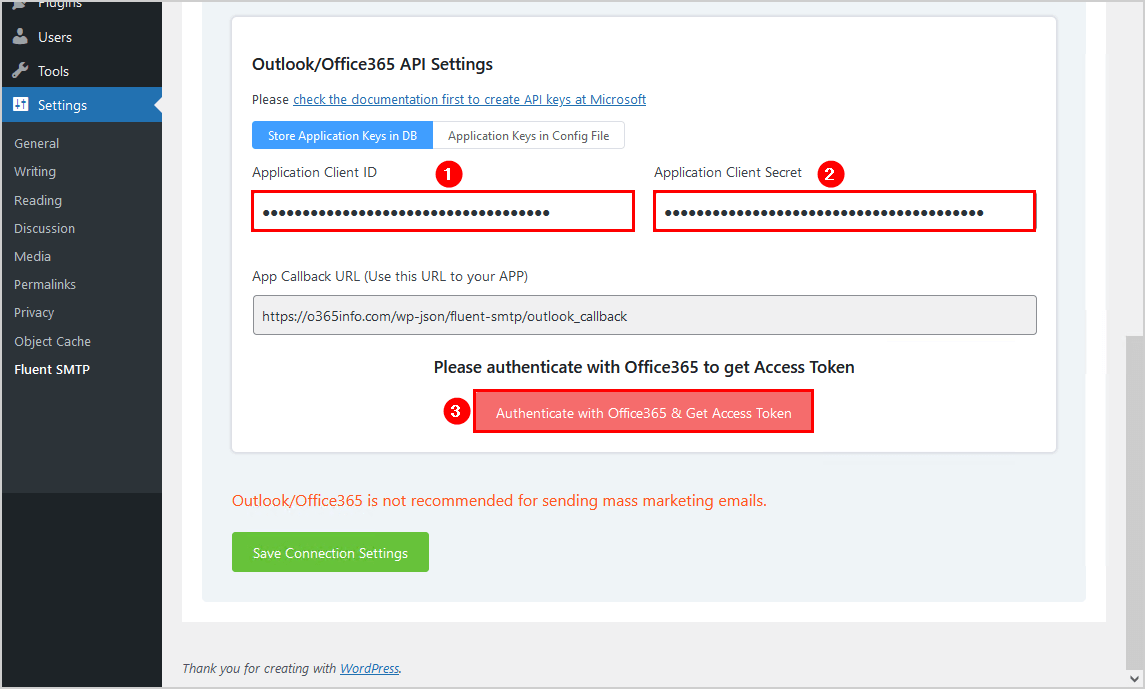
Before going further, we need to create an Application Client ID and Application Client Secret. Therefore we need to register a new application in Microsoft Azure and create a new client secret.
Create new application
- Sign into Microsoft Entra admin center with your admin credentials
- Open Azure Active Directory
- Click Applications > App registrations
- Click New registration
Note: Sign into the Microsoft Entra portal as admin, or you need to grant consent to the application registration.
- Type the name FluentSMTP
- Select Accounts in any organizational directory and personal Microsoft accounts
- Select Web
- Copy and paste the (App Callback) URL from Fluent SMTP configuration page
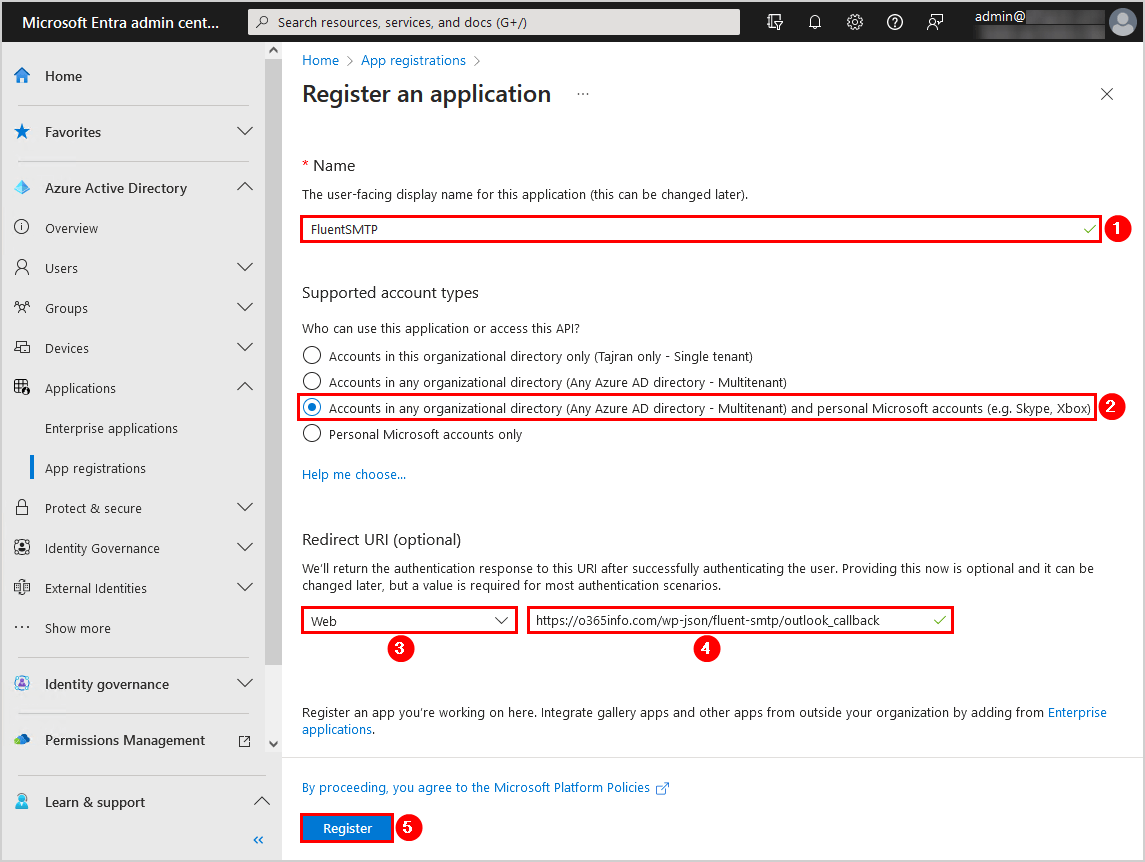
A notification appears: Successfully created application FluentSMTP.
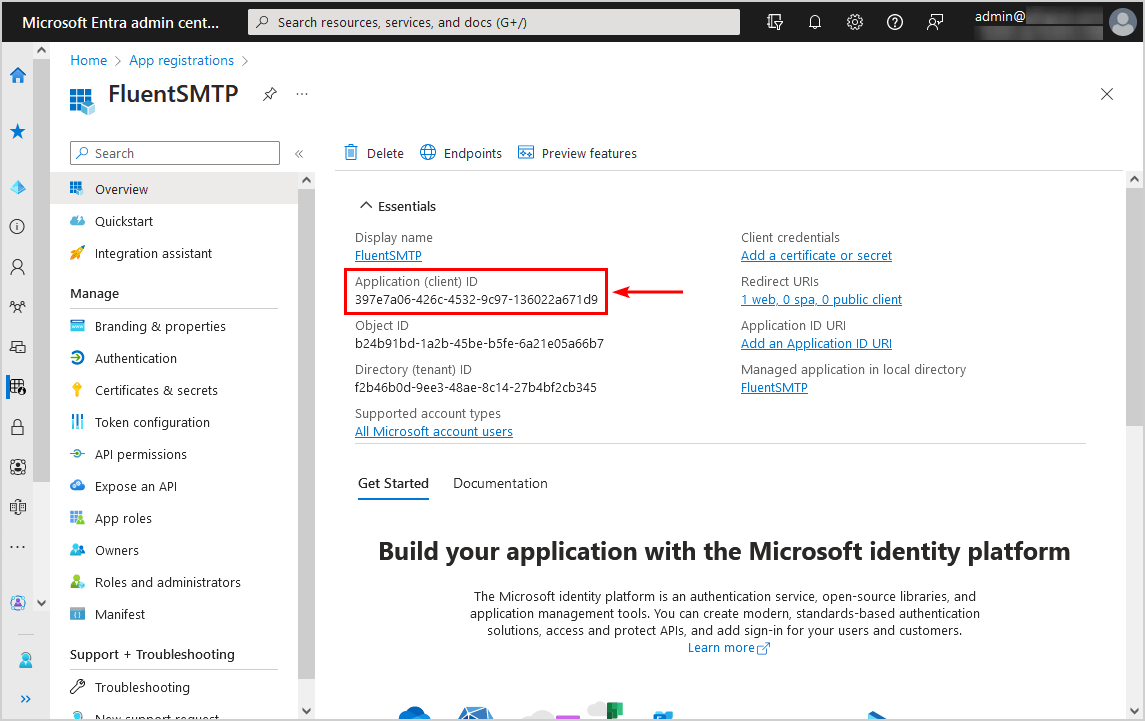
Application Client ID
You will be redirected to the newly created App registrations (FluentSMTP)
- Copy Application (client) ID
- Click Certificates & secrets
- Click Client secrets
- Click New client secret
- Type the description FluentSMTP Secret
- Select 730 days (24 months)
- Click Add
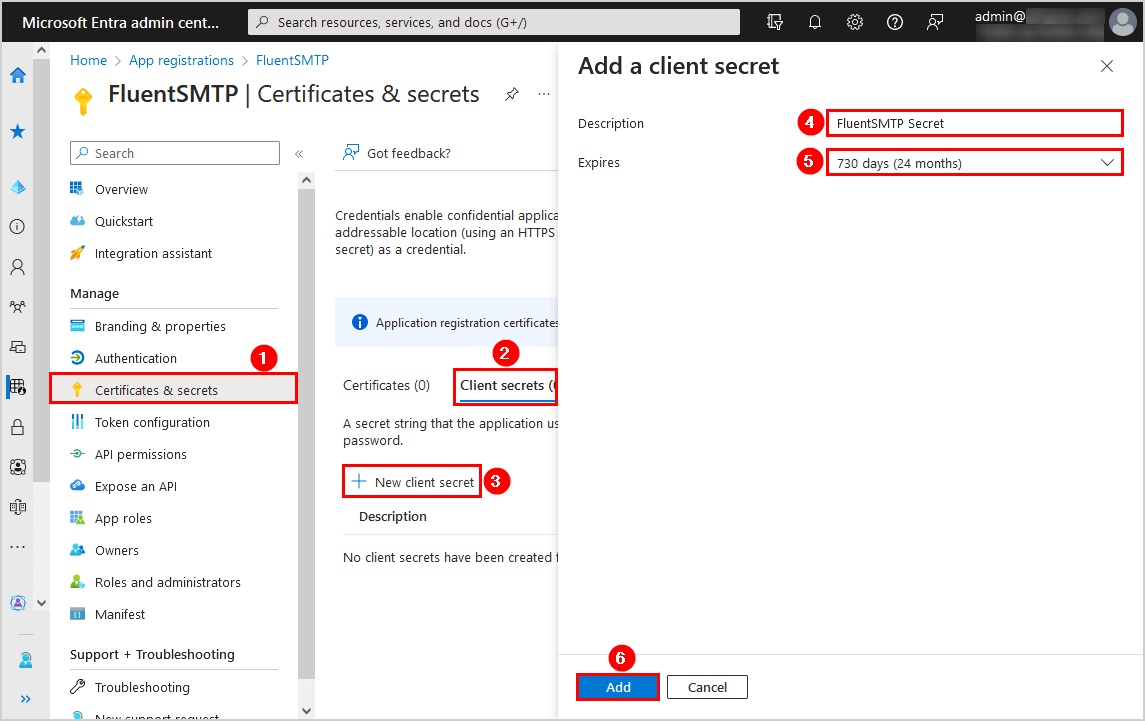
You will get a notification: Successfully updated application FluentSMTP Secret credentials
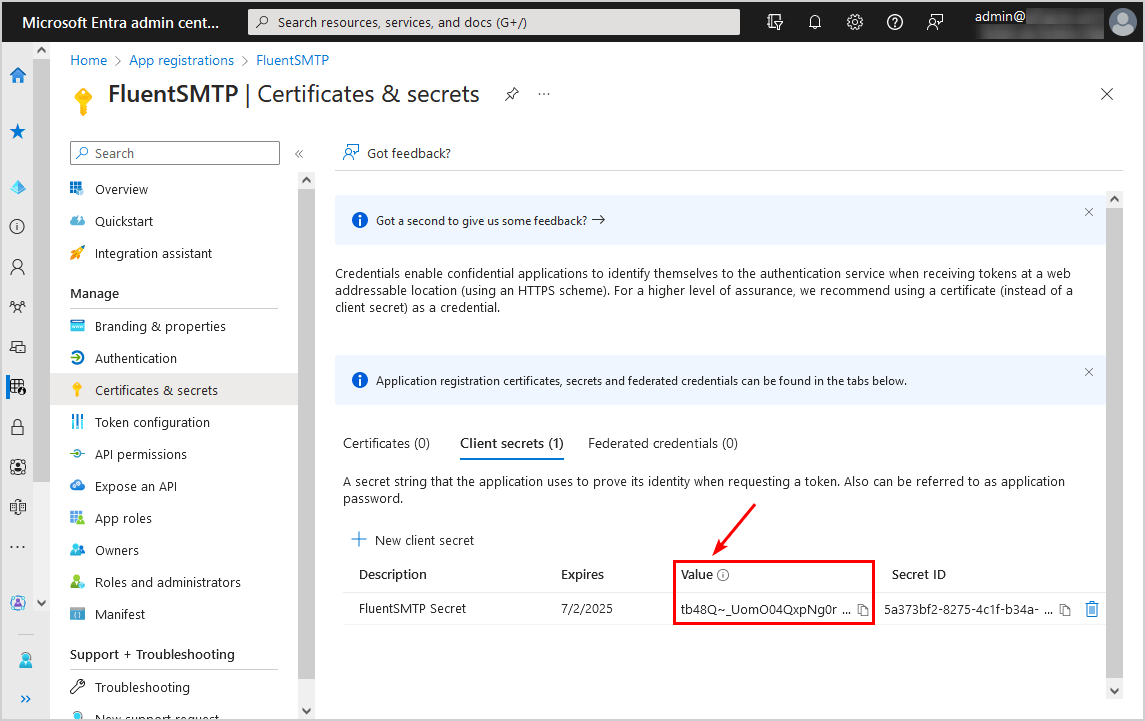
Application Client Secret
There is 1 Client secret available.
- Copy the Client secret Value
Note: The Client Secret Value can’t be viewed after you leave the page. It is important to save the Value somewhere, or you won’t see it again.
Authenticate with Microsoft 365
Go back to the Fluent SMTP configuration page and fill in the information:
- Paste the Application Client ID
- Paste the Application Client Secret value
- Click Authenticate with Office365 & Get Access Token
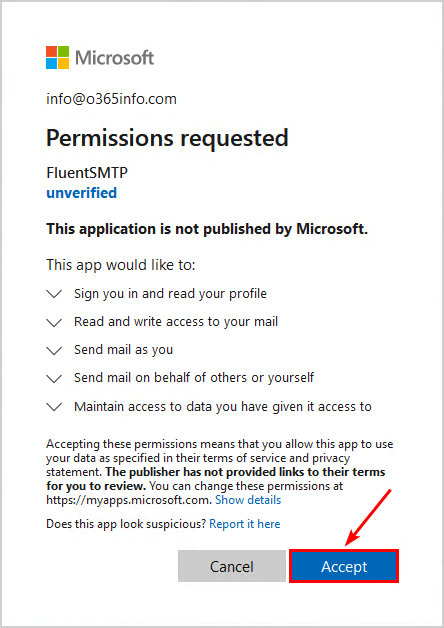
The Microsoft prompt with Permission requested will pop up.
Note: You must sign in with a purchased licensed mailbox.
- Click Accept
- Copy the Access Code
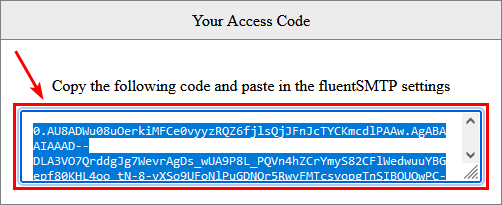
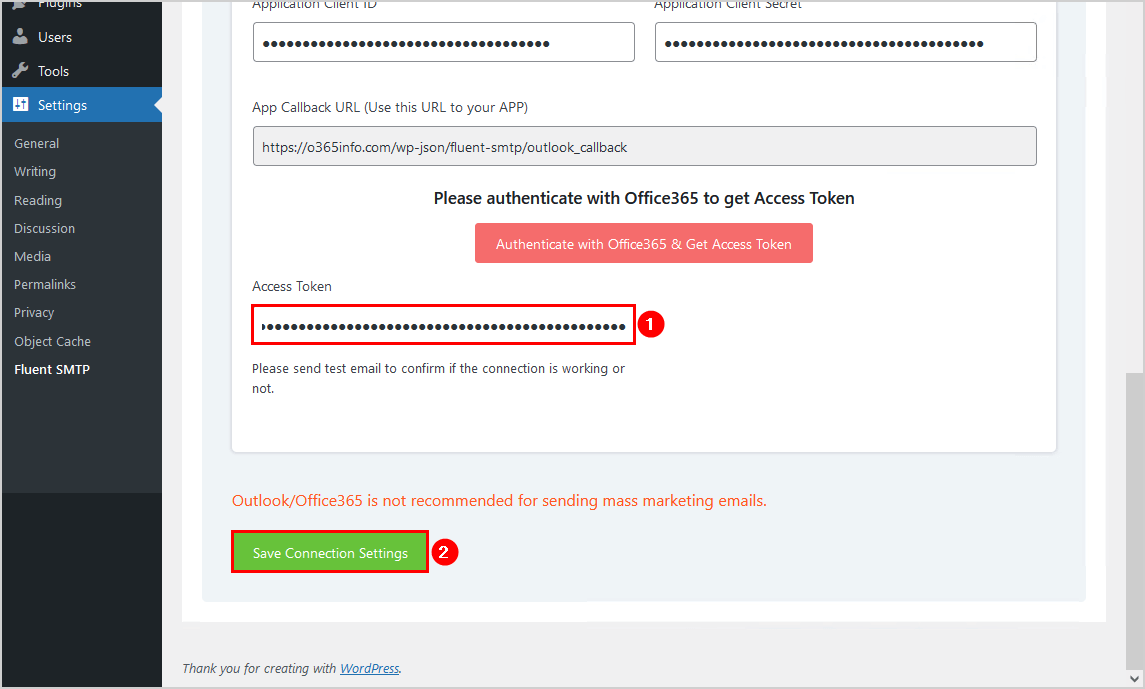
- Paste it under Access Token
- Click Save Connection Settings
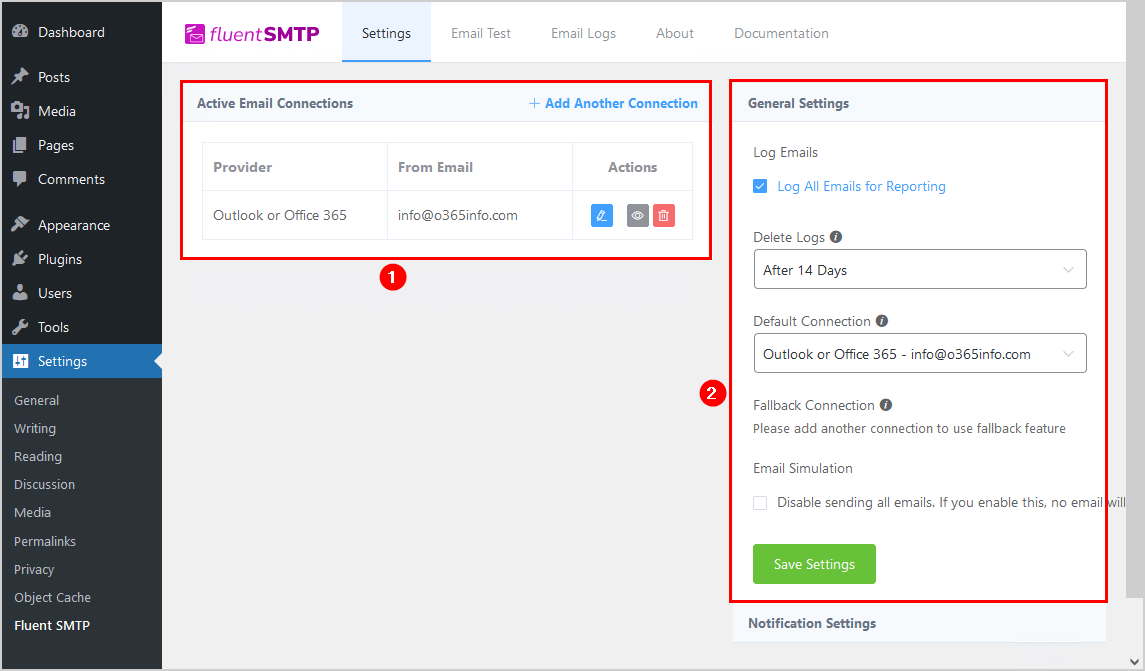
Verify active Microsoft 365 connection
Now you connected Fluent SMTP with your Microsoft account.
- Go to Settings > Fluent SMTP
- You can see the Active Email Connections with the provider and from email
- The General Settings can be changed
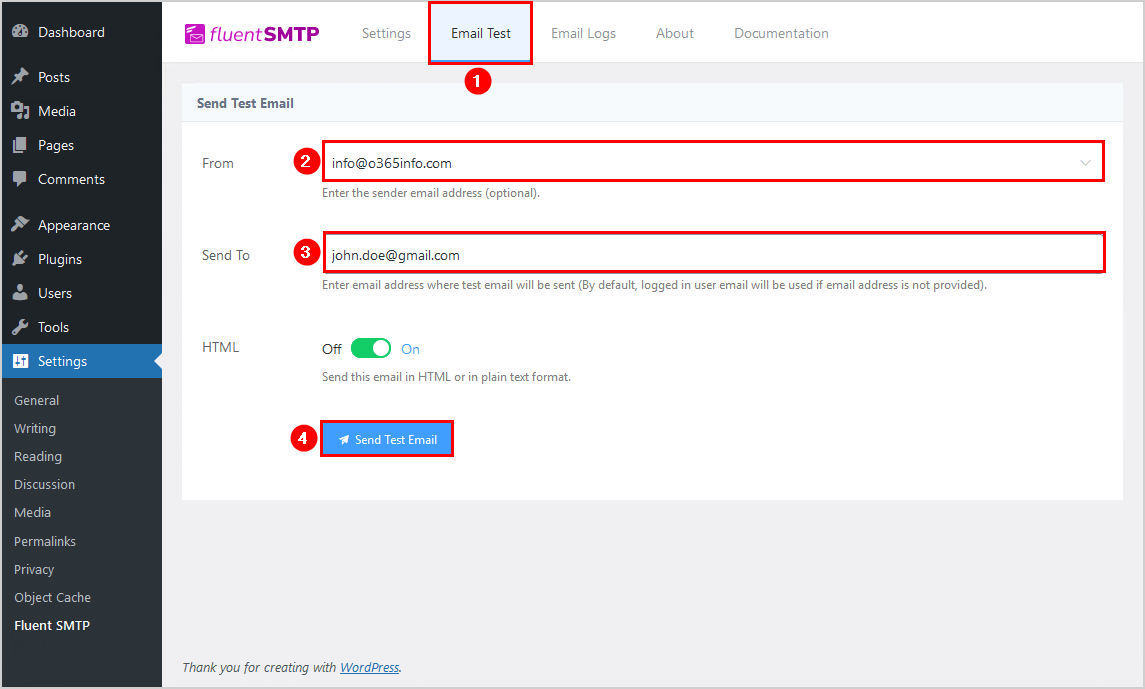
3. Send test mail using Microsoft 365 SMTP
We will send a test email from Fluent SMTP plugin with the below steps:
- Go to Settings > Fluent SMTP
- Click the tab Email Test
- Choose From info@o365info.com
- Type Send To john.doe@gmail.com
- Click Send Test Email
Note: The From field is selectable from a dropdown. You can only choose the email address you added in the first step under Sender Settings > from email field.
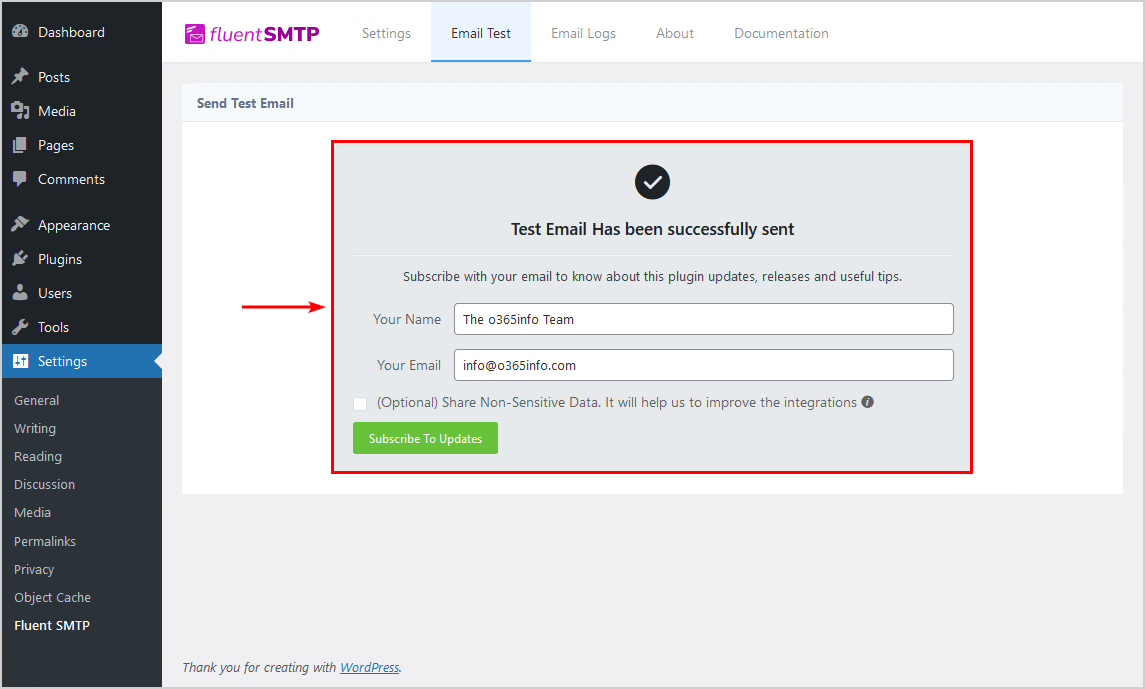
4. Confirm send mail with Fluent SMTP
The Fluent SMTP WordPress plugin shows that the test email has been successfully sent.
The below image shows that the recipient received your test email successfully.
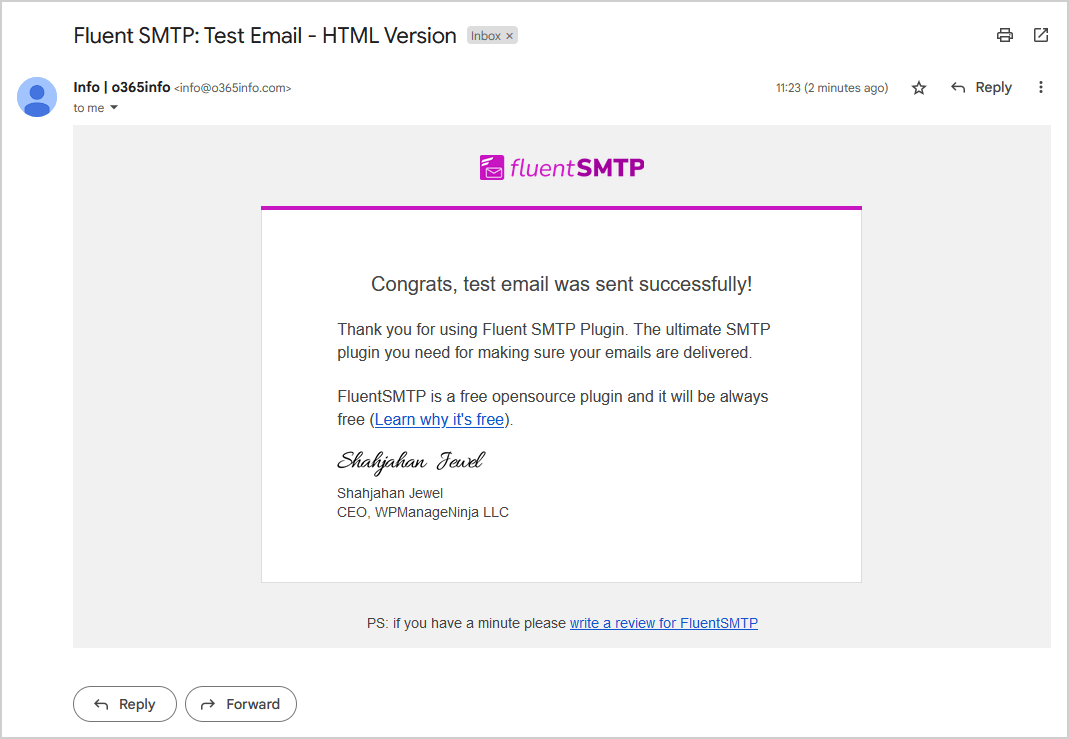
Open Outlook and go to your Sent Items folder, where you will find the test email.

You can successfully send an email from your WordPress site via Microsoft 365.
Read more: How to simulate spam mail »
Conclusion
You learned how to configure a WordPress SMTP plugin to send emails via Microsoft 365. Remember that you must have a purchased licensed mailbox to configure the SMTP, otherwise it will not work.
Did you enjoy this article? You may also like Fix Outlook error 500 repeating redirects. Don’t forget to follow us and share this article.
This Post Has 0 Comments