A guest is an external user in an organization that can share data from Microsoft…
Restore Azure AD users with Microsoft Graph PowerShell
A recently deleted Azure AD user will remain available in the Azure AD recycle bin for 30 days. Within these 30 days, you can fully restore an Azure AD user account with the Restore-MgDirectoryDeletedItem cmdlet. If you create a CSV file, you can bulk restore deleted Azure AD users. In this article, you will learn how to restore Azure AD users with Microsoft Graph PowerShell.
Table of contents
Restore MsolUser deprecated
Microsoft announced the Restore-MsolUser cmdlet will be deprecated on March 30, 2024. You need to replace the MS Online PowerShell modules with Microsoft Graph PowerShell. To restore an Azure AD user, we will use the Microsoft Graph PowerShell cmdlets.
Manage Azure AD users with Microsoft Graph PowerShell
We created specific articles to manage Azure AD users with Microsoft Graph PowerShell:
- Export Azure AD users with Microsoft Graph PowerShell
- Remove Azure AD user with Microsoft Graph PowerShell
- Restore Azure AD user with Microsoft Graph PowerShell (this article)
- Update Azure AD user with Microsoft Graph PowerShell
Connect to Microsoft Graph PowerShell
Before you start, you must install the Microsoft Graph PowerShell module. Start Windows PowerShell as administrator and run the below command to install the Microsoft Graph module.
Install-Module Microsoft.Graph -ForceYou also need to connect to MS Graph with the below scopes.
Connect-MgGraph -Scopes "User.ReadWrite.All"Now, you are all set to use the Microsoft Graph PowerShell commands.
Bulk export list soft deleted Azure AD users to CSV
You can get a list of all the Azure AD deleted users in the recycle bin. The below script will show the list in a grid view and save a CSV file. To bulk export the list to a CSV file, create a temp folder and save it in your (C:) drive.
We will use the Get-MgDirectoryDeletedItemAsUser PowerShell cmdlet with the -All parameter.
Run the below PowerShell script.
# Connect with privileges
Connect-MgGraph -Scopes "User.ReadWrite.All"

# Retrieve deleted directory items
$DeletedItems = Get-MgDirectoryDeletedItemAsUser -All -Property 'Id', 'userPrincipalName', 'displayName', 'deletedDateTime', 'userType'

# Check if there are no deleted accounts
if ($DeletedItems.Count -eq 0) {
    Write-Host "No deleted accounts found in the recycle bin." -ForegroundColor Cyan
}
else {
    # Create an array to store the report
    $Report = @()

    # Loop through the deleted items
    foreach ($Item in $DeletedItems) {
        $DeletedDate = Get-Date($Item.DeletedDateTime)
        $DaysSinceDeletion = (New-TimeSpan $DeletedDate).Days

        # Create a custom object for each item and add it to the report
        $ReportLine = [PSCustomObject]@{
            Id                    = $Item.Id
            UserPrincipalName     = $Item.UserPrincipalName
            'Display Name'        = $Item.DisplayName
            Deleted               = $DeletedDate
            'Days Since Deletion' = $DaysSinceDeletion
            Type                  = $Item.UserType
        }
        $Report += $ReportLine
    }

    # Sort the report by 'Display Name'
    $Report | Sort-Object 'Display Name' | Select-Object Id, UserPrincipalName, 'Display Name', Deleted, 'Days Since Deletion' | Format-Table
    $Report | Sort-Object UserId | Export-Csv -Path "C:\temp\AzureDeletedUsers.csv" -Encoding UTF8 -NoTypeInformation
}
See the below PowerShell output result.
Id                                   UserPrincipalName                                              Display Name  Deleted             Days Since Deletion
--                                   -----------------                                              ------------  -------             -------------------
12eefbb2-e5f4-4eec-bd18-df7ca2f1ee6b 12eefbb2-e5f4-4eec-bd18-df7ca2f1ee6bKen.Walker@m365info.com    Ken Walker    06/11/2023 22.17.08                   0
2b8f4e12-46f1-45ef-bcac-0d5ab84c819c 2b8f4e12-46f1-45ef-bcac-0d5ab84c819cMegan.Jones@m365info.com   Megan Jones   06/11/2023 22.17.10                   0
381ba50d-e356-4b5c-afd5-9157cd38d338 381ba50d-e356-4b5c-afd5-9157cd38d339Kelly.Test@m365info.com    Kelly Test    06/11/2023 22.17.12                   0
67962421-00e7-448b-b382-83b7b434e41c 67962421-00e7-448b-b382-83b7b434e41cGeorge.Wilson@m365info.com George Wilson 06/11/2023 22.18.08                   0
d601b048-c7d7-4113-8089-2ca8d7303265 d601b048-c7d7-4113-8089-2ca8d7303266Laura.Terry@m365info.com   Laura Terry   06/11/2023 22.18.28                   0
a9532b30-4edb-4b66-a3b0-6ac972a6065b a9532b30-4edb-4b66-a3b0-6ac972a6065bJill.Bates@m365info.com    Jill Bates    06/11/2023 22.18.48                   0
You will find the CSV file in the C:\temp folder. Open the CSV file with an application like Microsoft Excel to see the results. These are all the deleted users in the Azure AD recycle bin.
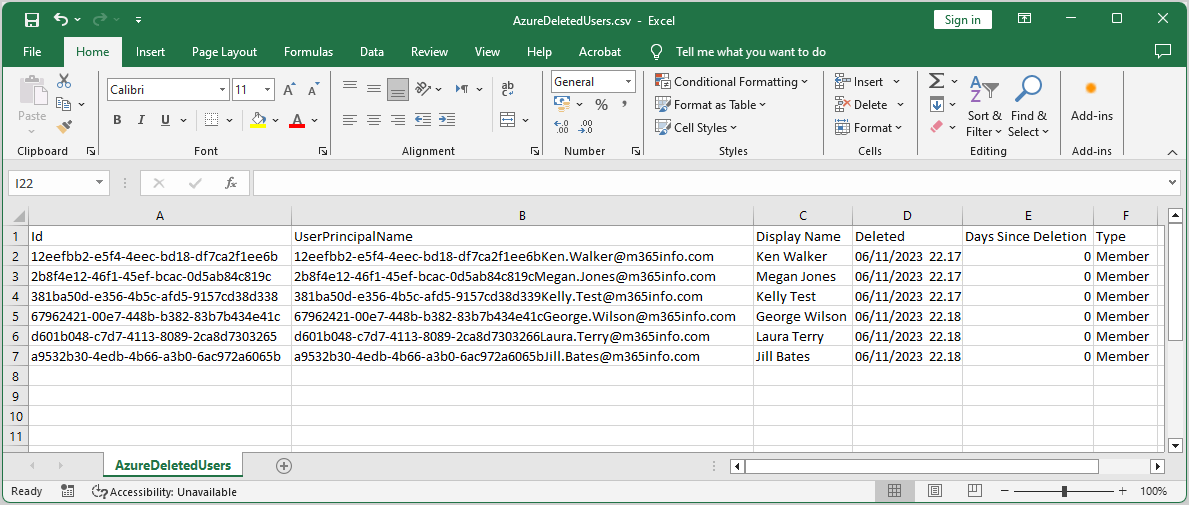
You can use this CSV file to restore some of your Azure AD users.
Restore Azure AD users
When you delete an Azure AD user, the account moves to the Azure AD recycle bin and remains for 30 days. You can only restore a deleted user if the user is still in the Azure AD recycle bin. We will show you how to restore an already deleted Azure AD user account in three methods:
- Restore a single Azure AD user account
- Restore multiple Azure AD users with CSV
- Bulk restore all Azure AD users
1. Restore-MgDirectoryDeletedItem Azure AD user
Let’s say you made a mistake and want to restore the same user account. Unfortunately, you can’t use the Restore-MgUser cmdlet because it will not work. Therefore, we need to use the Restore-MgDirectoryDeletedItem with the -DirectoryObjectId parameter.
Note: The Restore-MgUser cmdlet does not exist.
In our example, we want to delete the user account Jill.Bates@m365info.com. When you restore a user account, you must use the Object ID number.
Run the below PowerShell command example.
Restore-MgDirectoryDeletedItem -DirectoryObjectId "a9532b30-4edb-4b66-a3b0-6ac972a6065b"The PowerShell output shows the below results.
Id                                   DeletedDateTime
--                                   ---------------
a9532b30-4edb-4b66-a3b0-6ac972a6065b
2. Restore multiple Azure AD users from CSV
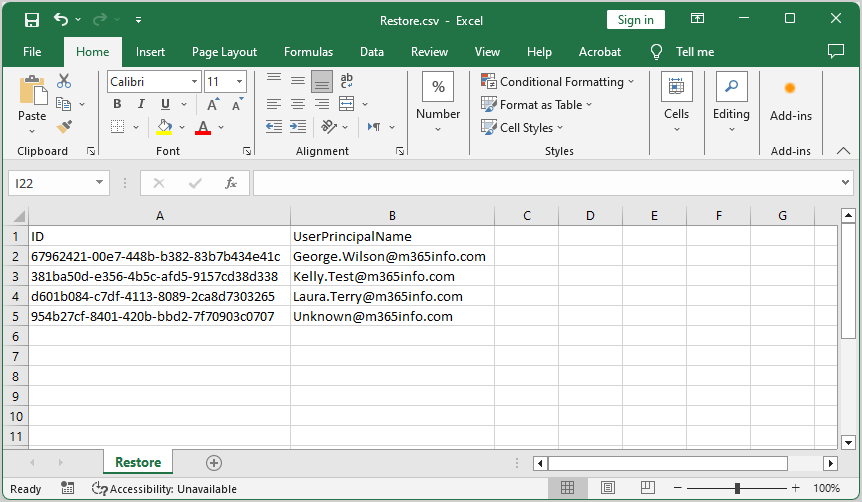
To restore a few Azure AD users from the recycle bin, you need to create a CSV file. We need to use the Get-MgDirectoryDeletedItemAsUser cmdlet with the -All parameter to get all the deleted users in the Azure AD recycle bin. Also, we will use the Restore-MgDirectoryDeletedItem cmdlet to restore the users from the CSV file.
Note: You need to provide the ID number with the hyphens (-) of the user account, or the PowerShell script will not work. We will also list the UPN for each user to get a clear picture of to whom each ID number belongs.
Create a CSV file with 2 columns:
- Type ID at the top of the first column
- Type UserPrincipalName at the top of the second column
- List the ID number, including hyphens (-) of each user under ID
- List the UPN for each user under UserPrincipalName
See the below CSV file example.
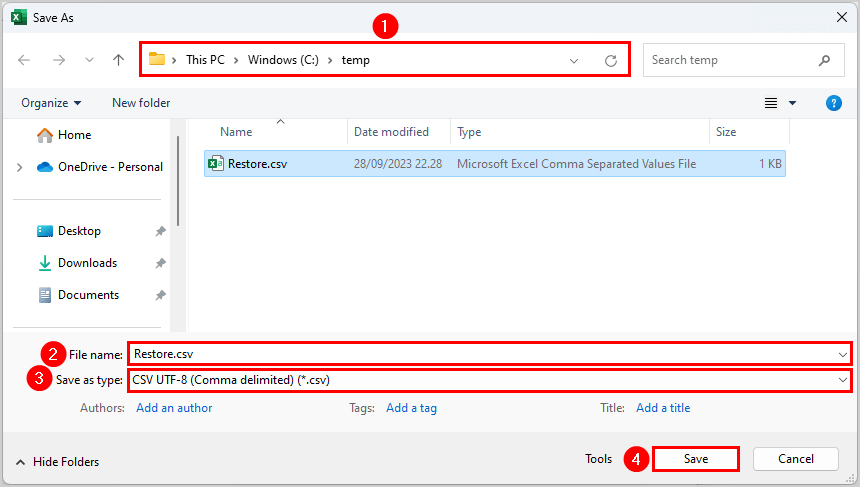
- Create the folder temp if you don’t have it already in the (C:) drive
- Name the file Restore.csv
- Save as type CSV UTF-8 (Comma delimited)(*.csv)
- Click Save
- Run the below PowerShell script to restore multiple Azure AD users
# Connect with privileges
Connect-MgGraph -Scopes "User.ReadWrite.All"

# Retrieve deleted directory items
$DeletedItems = Get-MgDirectoryDeletedItemAsUser -All -Property 'Id', 'displayName'

# Import the CSV file with user IDs
$UserIds = Import-Csv -Path "C:\temp\Restore.csv"

foreach ($UserId in $UserIds) {
    $Id = $UserId.ID

    # Check if the user ID exists in the deleted items
    $DeletedUser = $DeletedItems | Where-Object { $_.Id -eq $Id }

    if ($DeletedUser) {
        # Restore the user by ID
        Restore-MgDirectoryDeletedItem -DirectoryObjectId $DeletedUser.Id #-WhatIf
        Write-Host "Restored user $($DeletedUser.displayName)" -ForegroundColor Green
    }
    else {
        Write-Host "User with ID $Id not found in deleted items." -ForegroundColor Yellow
    }
}

Write-Host "Restoration process completed." -ForegroundColor Cyan- The PowerShell output result appears
Restored user George Wilson with ID: 67962421-00e7-448b-b382-83b7b434e41c
Restored user Kelly Test with ID: 381ba50d-e356-4b5c-afd5-9157cd38d338
Restored user Laura Terry with ID: d601b084-c7df-4113-8089-2ca8d7303265
User with ID 954b27cf-8401-420b-bbd2-7f70903c0707 not found in deleted items.
Restoration process completed.
3. Bulk restore all soft deleted Azure AD users
You can bulk restore all the deleted Azure AD users in the recycle bin. We need to use the Get-MgDirectoryDeletedItemAsUser and Restore-MgDirectoryDeletedItem cmdlets in our script.
Run the below PowerShell script.
# Connect with privileges
Connect-MgGraph -Scopes "User.ReadWrite.All"

# Retrieve deleted directory items
$DeletedItems = Get-MgDirectoryDeletedItemAsUser -All -Property 'Id', 'displayName'

# Check if there are no deleted accounts
if ($DeletedItems.Count -eq 0) {
    Write-Host "No deleted accounts found in the recycle bin." -ForegroundColor Cyan
}
else {
    # Restore deleted users
    foreach ($Item in $DeletedItems) {
        # Restore the user by ID
        Restore-MgDirectoryDeletedItem -DirectoryObjectId $Item.Id #-WhatIf
        Write-Host "Restored user $($Item.DisplayName)" -ForegroundColor Green
    }

    Write-Host "Restoration process completed." -ForegroundColor Cyan
}
It will restore all the deleted users in the Azure AD recycle bin.
Restored user Ken Walker
Restored user Jill Bates
Restored user Megan Jones
Restoration process completed.
You successfully managed to restore Azure AD users with the Restore-MgDirectoryDeletedItem cmdlet.
Read more: Enable or disable Exchange ActiveSync mailboxes »
Conclusion
You learned how to restore Azure AD users with Microsoft Graph PowerShell. You can bulk export all deleted Azure AD users in the recycle bin to a single CSV file. Then, you can restore a single, multiple, or all Azure AD user accounts from the recycle bin with MS Graph PowerShell.
Did you enjoy this article? You may also like Reset MFA for Microsoft 365 user. Don’t forget to follow us and share this article.
This Post Has 0 Comments