To prevent spam, spoofing, phishing attacks, and other email security risks from your domain, it's…
How to Export email addresses with PowerShell
Each mailbox or recipient can have multiple email addresses. You can search and get all email addresses in the organization for a single or all users. These are the primary SMTP addresses and secondary smtp aliases. In this article, you will learn how to export email addresses with PowerShell to a CSV file.
Table of contents
- Manage email addresses in Exchange Online
- Primary vs. Secondary email address
- Connect to Exchange Online PowerShell
- Get single mailbox email addresses
- Get primary SMTP address
- Display only smtp email addresses
- Display only SIP addresses
- Display only x500 addresses
- Search all email addresses with specific domain name suffix
- Export all email addresses to CSV file
- Conclusion
Manage email addresses in Exchange Online
To manage email addresses in your Microsoft 365 organization, use the following articles:
- Add email addresses with PowerShell
- Remove email addresses with PowerShell
- Export email addresses with PowerShell (this article)
Primary vs. Secondary email address
Some users in your organization have multiple email addresses. You can search and find specific email addresses for both a single user and all users.
Each user should have a primary SMTP address. The secondary smtp email address is also known as the alias. An alias is another email address people can use to email the user. There are also proxy email addresses, which are additional addresses known as SIP or x500 addresses.
The table below shows the difference between SMTP and smtp email addresses.
| SMTP | smtp |
|---|---|
| Only one address | Zero, one, or multiple addresses |
| Primary email address | Secondary email address or Alias |
| Written in uppercase letters (SMTP) | Written in lowercase letters (smtp) |
| Use PrimarySmtpAddress in PowerShell to display only SMTP addresses. | Use EmailAddresses in PowerShell to show all email addresses (SMTP, smtp, SIP, x500 addresses) |
| The recipient can send and accept messages from the SMTP email address. | By default, the recipient can only accept email messages sent to the smtp email address. The recipient can’t send from an alias address unless you turn on sending from aliases in the Microsoft 365 tenant.* |
*You can only send from Alias email address, if you have an Exchange Online mailbox, because the feature is unavailable for Exchange on-premises mailboxes.
Connect to Exchange Online PowerShell
To run the PowerShell commands specified in the current article, you must Connect to Exchange Online PowerShell.
Connect-ExchangeOnlineGet single mailbox email addresses
We will use the Get-Mailbox cmdlet to display information about the email addresses.
To get all the email addresses of a single user mailbox, run the below PowerShell command.
Get-Mailbox "Amanda.Hansen@m365info.com" | Select-Object -ExpandProperty EmailAddressesThe PowerShell output shows the below result.
SMTP:Amanda.Hansen@m365info.com
SPO:SPO_a21d1f73-5b3e-47db-bccd-16559e7d5560@SPO_a2ff010e-0e03-4c56-8863-2ae7f07876dd
Get primary SMTP address
Run the below PowerShell command to show the primary SMTP address of a specific Exchange Online recipient.
Get-Mailbox "Amanda.Hansen@m365info.com" | Select-Object DisplayName, PrimarySmtpAddressThe PowerShell output shows the below result.
DisplayName   PrimarySmtpAddress
-----------   ------------------
Amanda Hansen Amanda.Hansen@m365info.com
To display the primary SMTP address of all Exchange Online mailboxes, run the below PowerShell command.
Get-Mailbox -ResultSize Unlimited | Select-Object DisplayName, PrimarySmtpAddressDisplay only smtp email addresses
With the Get-Mailbox cmdlet, you can’t specify a type of email address, such as a proxy email address. Therefore, you need to add the hashtable, which is a special array in the PowerShell command.
The hashtable is created in parts:
- Use the @ character to create the hashtable followed by braces brackets { } and a name.
- Use the = character and define the array name.
- The expression part is to create a PowerShell-filtered search query.
- Define a filter with the Where-Object PowerShell statement with the comparison operator -cmatch, which is case-sensitive only to get smtp email addresses.
Run the PowerShell command to list only the smtp email addresses of a single mailbox.
Get-Mailbox "Brenda.Smith@m365info.com" | Select-Object DisplayName, @{Name = "EmailAddresses"; Expression = { ($_.EmailAddresses | Where-Object { $_ -cmatch "smtp:*" } | ForEach-Object { $_ -replace 'smtp:' }) -join ';' } }The PowerShell output shows the below output.
DisplayName  EmailAddresses
-----------  --------------
Brenda Smith brenda.alias2@m365info.com;brenda.alias@m365info.com;Brenda.Smith@ms365info.onmicrosoft.com
To display smtp email addresses of all Exchange Online mailboxes, run the below PowerShell command.
Get-Mailbox -ResultSize Unlimited | Select-Object DisplayName, @{Name = "EmailAddresses"; Expression = { ($_.EmailAddresses | Where-Object { $_ -cmatch "smtp:*" } | ForEach-Object { $_ -replace 'smtp:' }) -join ';' } }Display only SIP addresses
To show only the SIP addresses of all mailboxes, you need to use the Where-Object with the -like PowerShell comparison operator.
Run the below PowerShell command to show all SIP addresses for all users.
Get-Mailbox -ResultSize Unlimited | Select-Object DisplayName, @{Name = "SIP Email Address"; Expression = { $_.EmailAddresses | Where-Object { $_ -like "sip:*" } } }The PowerShell output shows the below result.
DisplayName              SIP Email Address
-----------              -----------------
Adam Mackay              SIP:adam.mackay@m365info.com
Amanda Hansen
Amanda Morgan            SIP:amanda.morgan@m365info.com
Andrea Baker             SIP:andrea.baker@m365info.com
Anna Bell
Blake Martin             SIP:blake.martin@m365info.com
Brenda Smith             SIP:brenda.smith@m365info.com
Brian Mill               SIP:brian.mill@m365info.com
Carl Hawk                SIP:carl.hawk@m365info.com
Display only x500 addresses
To view only the x500 email addresses of all mailboxes, you need to use the Where-Object with the -cmatch PowerShell comparison operator.
Run the below PowerShell command to get a list of all the x500 addresses of all mailboxes.
Get-Mailbox -ResultSize Unlimited | Select-Object DisplayName, @{Name = "x500 Email Address"; Expression = { $_.EmailAddresses | Where-Object { $_ -cmatch "x500:*" } } }Search all email addresses with specific domain name suffix
To search for specific email addresses, you can use the Where-Object in PowerShell. To filter the result, we will use the -eq or -like PowerShell comparison operators.
The PowerShell syntax will look like the below example using -eq.
Where-Object { $_.EmailAddresses -eq "smtp:Amanda.Hansen@m365info.com" }Another PowerShell syntax example using -like.
Where-Object { $_.EmailAddresses -like "*@m365info.com" }In our example, we want to get all email addresses with the domain name suffix m365info.com.
Run the below PowerShell command to get all Primary SMTP with a specific domain name suffix for all mailboxes.
Get-Mailbox -ResultSize Unlimited | Select-Object DisplayName, PrimarySMTPAddress, @{Name = "Proxy Email Addresses"; Expression = { $_.EmailAddresses -cmatch "smtp" } } | Where-Object { ($_.PrimarySMTPAddress -like "*m365info.com*") }The PowerShell output shows a list of all the email addresses of the user.
DisplayName        PrimarySmtpAddress              Proxy Email Addresses
-----------        ------------------              ---------------------
Adam Mackay        Adam.Mackay@m365info.com        {smtp:Adam.Mackay1@m365info.com, smtp:Adam.Mackay@ms365info.onmicrosoft.com}
Amanda Hansen      Amanda.Hansen@m365info.com
Andrea Baker       Andrea.Baker@m365info.com
Anna Bell          Anna.Bell@m365info.com          smtp:Anna.Bell@ms365info.onmicrosoft.com
Blake Martin       Blake.Martin@m365info.com
Brenda Smith       Brenda.Smith@m365info.com       {smtp:brenda.alias2@m365info.com, smtp:brenda.alias@m365info.com, smtp:Brenda.Smith@ms365info.onmicrosoft.com}
Brian Mill         Brian.Mill@m365info.com
Carl Hawk          Carl.Hawk@m365info.com          smtp:Carl.Hawk@ms365info.onmicrosoft.com
Carol Piper        Carol.Piper@m365info.com        {smtp:carol-p@m365info.com, smtp:Carol@m365info.com}
Catch All          Catch.All@m365info.com          smtp:Catch.All@ms365info.onmicrosoft.com
Chris Lucas        Chris.Lucas@m365info.com        smtp:Chris.Lucas@ms365info.onmicrosoft.com
Test SharedMailbox test.sharedmailbox@m365info.com smtp:test.sharedmailbox@ms365info.onmicrosoft.com
To search all email addresses, we will use the Get-Recipient to go through all mail-enabled objects. We will add the -Filter parameter with a specific domain suffix.
Run the PowerShell command example to get all email addresses of all the recipients.
Get-Recipient -ResultSize Unlimited -Filter { EmailAddresses -like "*@m365info.com" } | Format-Table DisplayName, EmailAddressesThe PowerShell output results.
DisplayName              EmailAddresses
-----------              --------------
Amanda Hansen            {SMTP:Amanda.Hansen@m365info.com, SPO:SPO_a21d1f73-5b3e-47db-bccd-16559e7d5560@SPO_a2ff010e-0e03-4c56-8863-2ae7f07876dd}
Chris Lucas              {SIP:chris.lucas@m365info.com, smtp:Chris.Lucas@ms365info.onmicrosoft.com, SMTP:Chris.Lucas@m365info.com}
Diana Baker              {SIP:diana.baker@m365info.com, SMTP:Diana.Baker@m365info.com, SPO:SPO_13fee752-5966-4b62-98e2-f27fe9e5f66d@SPO_a2ff010e-0e03-4c56-8863-2ae7f07876dd}
Info Box                 {SIP:479a0514b10f491aab2aec92c9673a35infobox@m365info.com, SMTP:InfoBox@m365info.com}
Projector 8              {SIP:3c06bdad32244b93ac4efb7dcd23e0ceprojector8@m365info.com, SMTP:Projector8@m365info.com}
To search email addresses of soft-deleted mailboxes in Exchange Online, run the below PowerShell command.
Get-Mailbox -ResultSize Unlimited -SoftDeletedMailbox -Filter { EmailAddresses -like "*@m365info.com" } | Format-Table DisplayName, EmailAddressesThe PowerShell output result is shown below.
DisplayName        EmailAddresses
-----------        --------------
Test SharedMailbox {DLTDNETID:10032003642DB69B, SMTP:test.sharedmailbox33@m365info.com, smtp:test.sharedmailbox1@m365info.com}
Run the below PowerShell command to get a list of all Distribution Group email addresses.
Get-DistributionGroup -ResultSize Unlimited -Filter { EmailAddresses -like "*@m365info.com" } | Format-Table DisplayName, EmailAddressesSee the below PowerShell output results.
DisplayName          EmailAddresses
-----------          --------------
Finance UK mail list {smtp:FinanceUK@ms365info.onmicrosoft.com, SMTP:FinanceUK@m365info.com}
RoomGroup            {SMTP:RoomGroup@m365info.com}
Sales Spain          {smtp:SalesSpain@ms365info.onmicrosoft.com, SMTP:SalesSpain@m365info.com}
Sales Spain          {smtp:SalesSpain1@ms365info.onmicrosoft.com, SMTP:SalesSpain1@m365info.com}
Sales USA            {smtp:SalesUSA@ms365info.onmicrosoft.com, SMTP:SalesUSA@m365info.com}
SalesUK              {smtp:SalesUK@ms365info.onmicrosoft.com, SMTP:SalesUK@m365info.com}
Run the below PowerShell command to get all Dynamic Distribution Group email addresses.
Get-DynamicDistributionGroup -ResultSize Unlimited -Filter { EmailAddresses -like "*@m365info.com" } | Format-Table DisplayName, EmailAddressesSee the below PowerShell output result.
DisplayName    EmailAddresses
-----------    --------------
Dynamic        {SMTP:Dynamic@m365info.com}
Dynamic test 2 {SMTP:Dynamic2@m365info.com}
Run the below PowerShell command to get all Unified Group email addresses.
Get-UnifiedGroup -ResultSize Unlimited -Filter { EmailAddresses -like "*@m365info.com" } | Format-Table DisplayName, EmailAddressesThe PowerShell output result is shown below.
DisplayName        EmailAddresses
-----------        --------------
Sales Team         {SPO:SPO_079142cc-bb67-440e-b99a-0be94049c99a@SPO_a2ff010e-0e03-4c56-8863-2ae7f07876dd, smtp:SalesTeam@ms365info.onmicrosoft.com, SMTP:SalesTeam@m365info.com}
Management Team    {SPO:SPO_05de02ce-e6eb-48dc-8020-2121678d9382@SPO_a2ff010e-0e03-4c56-8863-2ae7f07876dd, smtp:ManagementTeamc7f@ms365info.onmicrosoft.com, smtp:ManagementT1@m365info.com}
IT                 {SPO:SPO_5c3acbd0-31e8-4788-b6be-d2cb0f7e3029@SPO_a2ff010e-0e03-4c56-8863-2ae7f07876dd, smtp:IT@ms365info.onmicrosoft.com, SMTP:IT@m365info.com}
M365 Dynamic Group {SPO:SPO_839a2af8-6518-4712-ae12-8e9025c9bf2c@SPO_a2ff010e-0e03-4c56-8863-2ae7f07876dd, smtp:M365Dyn@ms365info.onmicrosoft.com, SMTP:M365Dyn@m365info.com}
ZZgroup            {SPO:SPO_e82d151f-a843-4e9e-8474-c5b3304c0b41@SPO_a2ff010e-0e03-4c56-8863-2ae7f07876dd, smtp:ZZgroup@ms365info.onmicrosoft.com, SMTP:ZZgroup@m365info.com}
Sales              {SPO:SPO_336a3658-0414-4c8c-8d9c-fa2b7b71d071@SPO_a2ff010e-0e03-4c56-8863-2ae7f07876dd, smtp:Sales@ms365info.onmicrosoft.com, SMTP:Sales@m365info.com}
Export all email addresses to CSV file
To export all email addresses to a CSV file, you need to create a temp folder in the (C:) drive.
- Specify the CSV file path in line 2
- Run the PowerShell script to export all the email addresses to an Out-GridView and CSV file
# CSV export file path
$CsvPath = "C:\temp\AllEmailAddresses.csv"
# Initialize an empty array to store recipient information
$recipientInfo = @()
# Retrieve recipient information
$recipients = Get-recipient -ResultSize Unlimited
# Iterate through each recipient
foreach ($recipient in $recipients) {
$recipientData = [PSCustomObject]@{
DisplayName = $recipient.DisplayName
'Primary Email Addresses' = ($recipient.EmailAddresses | Where-Object { $_ -cmatch "SMTP:" } | ForEach-Object { $_ -replace "SMTP:", "" }) -join ";"
'Proxy Email Addresses' = ($recipient.EmailAddresses | Where-Object { $_ -cmatch "smtp:" } | ForEach-Object { $_ -replace "smtp:", "" }) -join ";"
'SIP Email Addresses' = ($recipient.EmailAddresses | Where-Object { $_ -like "sip:*" } | ForEach-Object { $_ -replace "sip:", "" }) -join ";"
'X500 Email Addresses' = ($recipient.EmailAddresses | Where-Object { $_ -like "x500:*" } | ForEach-Object { $_ -replace "x500:", "" }) -join ";"
}
$recipientInfo += $recipientData
}
# Output the recipient information to Out-GridView
$recipientInfo | Out-GridView -Title "Microsoft 365 email addresses"
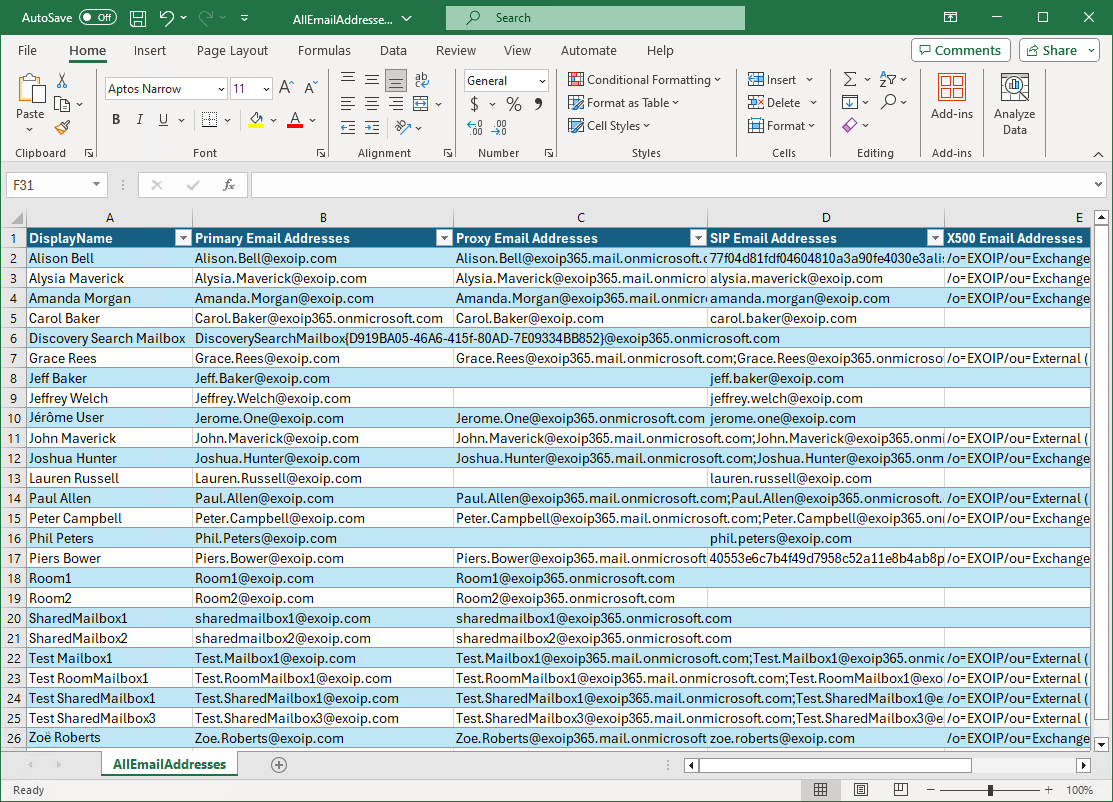
# Export the recipient information to a CSV file
$recipientInfo | Export-Csv $CsvPath -NoTypeInformation -Encoding utf8- The Out-GridView results appears
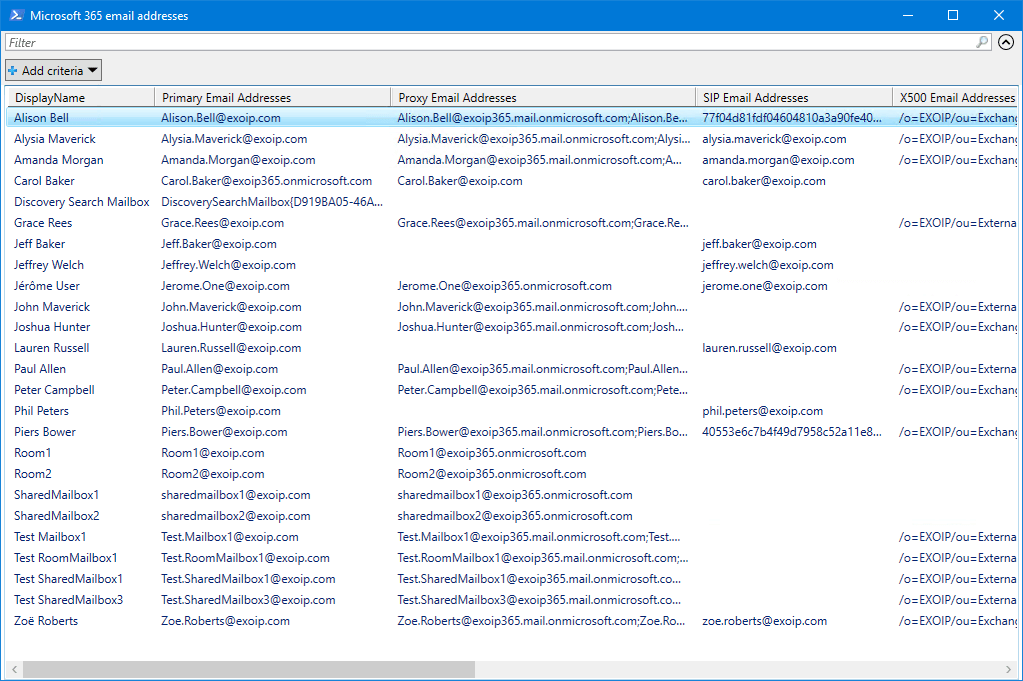
- Open the CSV file with Microsoft Excel to see the results
That’s it!
Read more: How to export Full Access mailbox permission »
Conclusion
You learned how to search and export email addresses with PowerShell. There are different queries to use in the PowerShell command to retrieve the results you want. Another way is to export all the email addresses and filter them in Microsoft Excel.
Did you enjoy this article? You may also like How to use Logical Operators in PowerShell. Don’t forget to follow us and share this article.
This Post Has 0 Comments