Getting an email from an unauthorized sender with your domain's address does not look good…
How to Configure Passkeys in Microsoft Entra ID
A passkey is a simple and secure way to sign in without having to enter a username or password. It also adds an extra layer of security to protect your account. In this article, you will learn how to configure passkeys in Microsoft Entra ID with Microsoft Authenticator.
Table of contents
Prerequisites
Microsoft Entra ID allows passkeys to be used for passwordless authentication. This passkey can be used instead of a password and allows you to sign in using your face, fingerprint, or PIN.
There are a few prerequisites before you enable passkeys in Microsoft Entra and register them for the users:
- It’s recommended to Migrate legacy MFA and SSPR to Authentication methods policy
- The users must have Microsoft Authenticator method (MFA) enabled
- Update to the latest Microsoft Authenticator app (Version 6.8.7 or later)
- Requires at least Android 14 or IOS 17 and up
- Mobile and desktop should be connected to the internet and have Bluetooth turned on (cross-device authentication)
Enable passkeys in Microsoft Entra ID
There are two methods to enable passkeys in Microsoft Entra ID with Microsoft Authenticator app:
- Microsoft Entra admin center
- Microsoft Graph PowerShell
Method 1. Microsoft Entra admin center
To enable passkeys in Microsoft Entra, follow these steps:
- Sign in to Microsoft Entra admin center
- Click Protection > Authentication methods
- Click FIDO2 security key
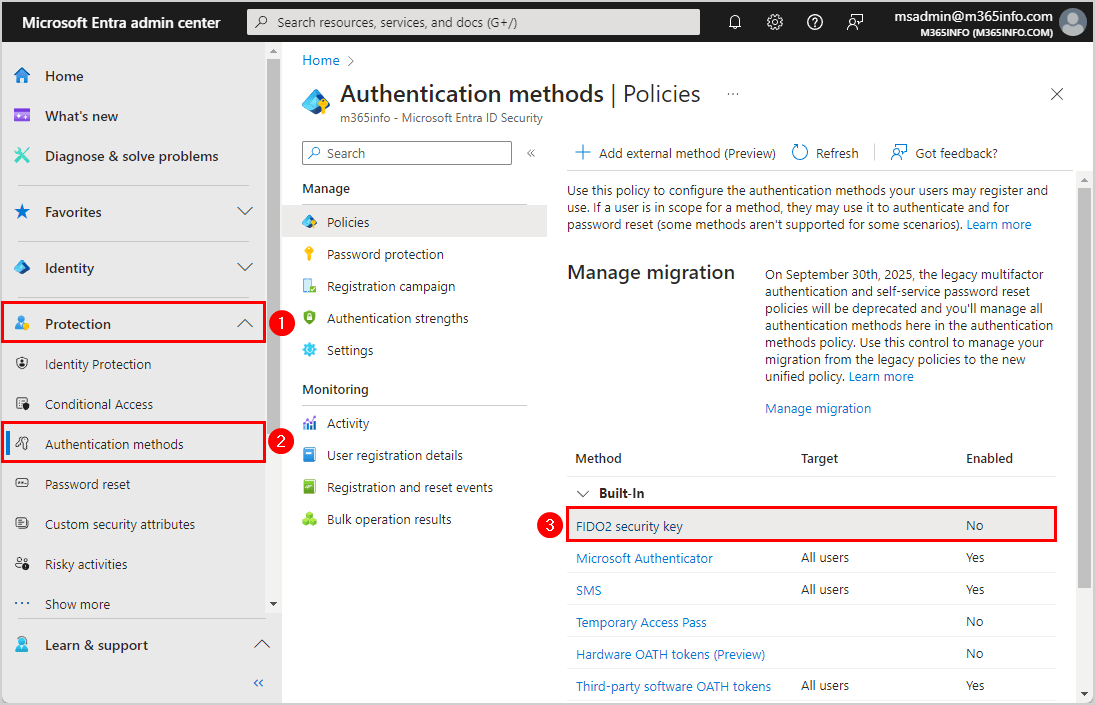
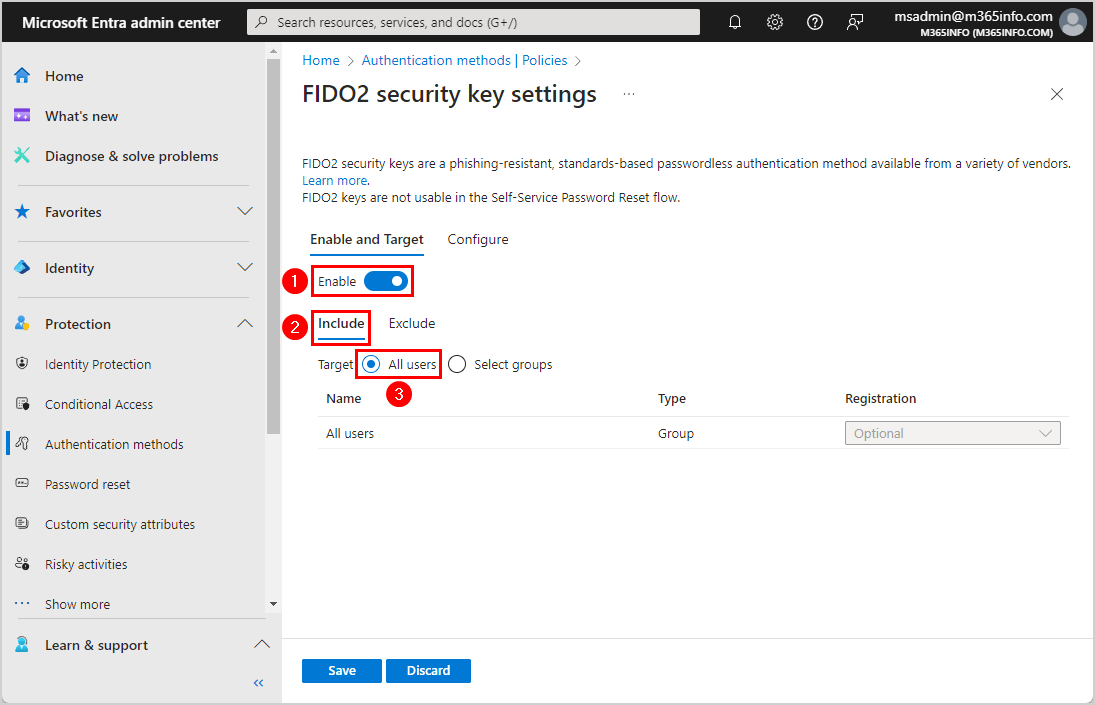
- Select Enable
- Include All Users
- Click Save
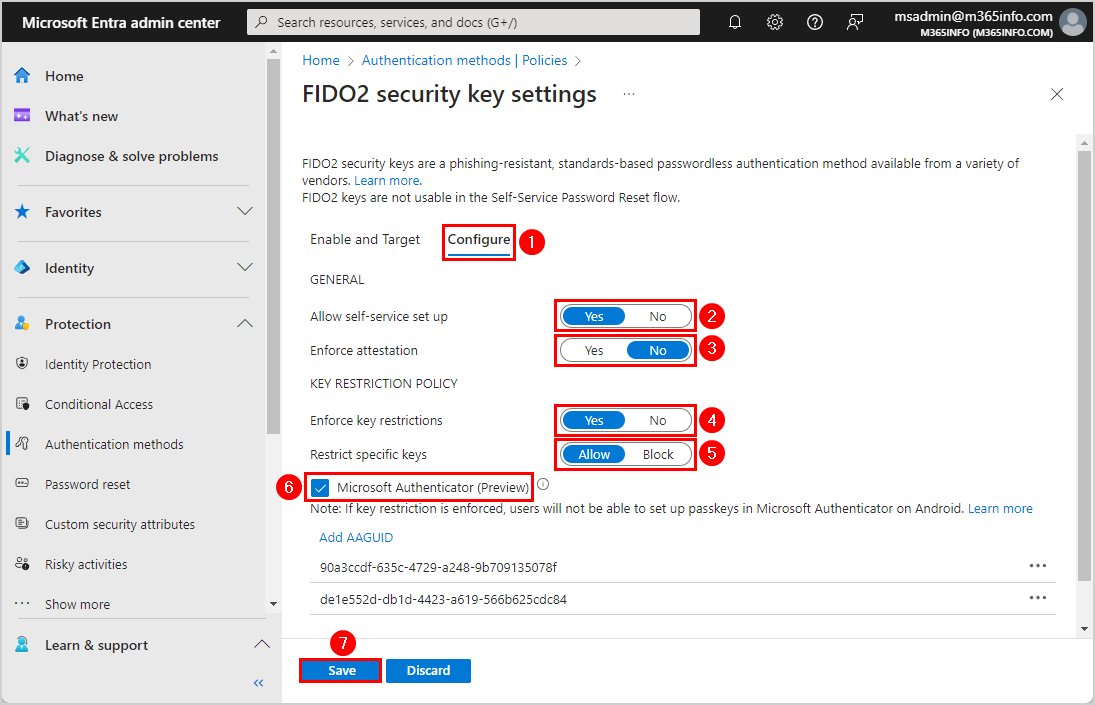
- Click Configure
- Allow self-service set up > Select Yes
- Enforce attestation > Select No*
- Enforce key restriction > Select Yes
- Restrict specific keys > Select Allow
- Select Microsoft Authenticator (Preview) and it will add both AAGUIDs for iOS and Android
- iOS: 90a3ccdf-635c-4729-a248-9b709135078f
- Android: de1e552d-db1d-4423-a619-566b625cdc84
- Click Save
*You must select No for Enforce attestation because Microsoft doesn’t support attestation for passkeys in Microsoft Authenticator. Otherwise, it will add the passkey to your Authenticator app, but it doesn’t add it to your Microsoft account Security Info. Also, the error below appears when you register a passkey for a user.
Error: An unknown error occurred during passkey registration. Try again or contact your administrator for support.
- The FIDO2 security key policy is successfully saved and enabled for the users
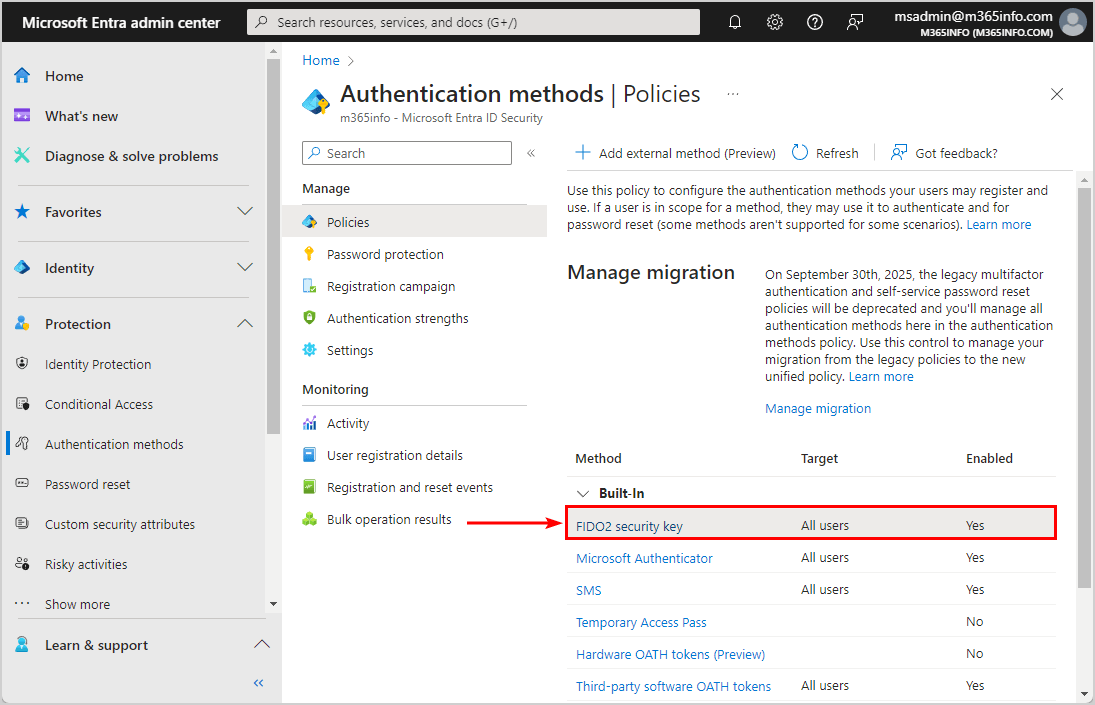
Everything is set up now in Microsoft Entra ID. The next step is what the user needs to do on their mobile device.
Method 2: Microsoft Graph PowerShell
To enable passkeys in Microsoft Entra ID with Microsoft Graph PowerShell, follow the steps below:
- Start Windows PowerShell as administrator and run the below command to Install the Microsoft Graph PowerShell module.
Install-Module Microsoft.Graph -ForceImportant: Always install the latest Microsoft Graph PowerShell module version before you run a cmdlet or script to prevent errors and incorrect results.
- Run the Connect-MgGraph cmdlet with the below scopes to authenticate with Microsoft Graph.
Connect-MgGraph -Scopes "Policy.ReadWrite.AuthenticationMethod"- Run the below PowerShell script.
Connect-MgGraph -Scopes "Policy.ReadWrite.AuthenticationMethod"

$params = @{
    "@odata.type"                    = "#microsoft.graph.fido2AuthenticationMethodConfiguration"
    id                               = "Fido2"
    state                            = "enabled"
    includeTargets                   = @(
        @{
            id         = "all_users"
            targetType = "group"
        }
    )
    excludeTargets                   = @(
    )
    isSelfServiceRegistrationAllowed = $true
    isAttestationEnforced            = $false
    keyRestrictions                  = @{
        isEnforced      = $true
        enforcementType = "Allow"
        aaGuids         = @(
            "90a3ccdf-635c-4729-a248-9b709135078f",
            "de1e552d-db1d-4423-a619-566b625cdc84"
        )
    }
}

Update-MgPolicyAuthenticationMethodPolicyAuthenticationMethodConfiguration -AuthenticationMethodConfigurationId "Fido2" -BodyParameter $params
4. Verify the Fido2 authentication method status and properties.
Get-MgPolicyAuthenticationMethodPolicyAuthenticationMethodConfiguration -AuthenticationMethodConfigurationId "Fido2" | Select-Object -ExpandProperty AdditionalPropertiesThe below output appears.
Key                              Value
---                              -----
@odata.context                   https://graph.microsoft.com/v1.0/$metadata#authenticationMethodConfigurations/$entity
@odata.type                      #microsoft.graph.fido2AuthenticationMethodConfiguration
isSelfServiceRegistrationAllowed True
isAttestationEnforced            False
keyRestrictions                  {[isEnforced, True], [enforcementType, allow], [aaGuids, System.Object[]]}
includeTargets@odata.context     https://graph.microsoft.com/v1.0/$metadata#policies/authenticationMethodsPolicy/authenticationMethodConfigurations('Fido2')/microsoft.graph.fido2AuthenticationMethodConfiguration/includeTargets
includeTargets                   {System.Collections.Generic.Dictionary`2[System.String,System.Object]}
Everything is set up now in Microsoft Entra ID. The next step is what the user needs to do on their mobile device.
Register passkey in Microsoft Authenticator app
The user needs to register the passkey in the Microsoft Authenticator app on their mobile device. In our example, we will register it on an iOS device, but this can also be done on an Android device.
Note: You can follow the steps to register Passkey from the desktop with your mobile device or only from your mobile device.
Follow these steps to register Passkey in Microsoft Authenticator:
- Sign in to Security Info
- Click Add sign-in method

- Select Passkey in Microsoft Authenticator (preview)
- Click Add

- Click Next

- Select your mobile device > iPhone or iPad

- Follow the steps on your iOS mobile device
- Click Settings > Passwords > Password Options
- Enable AutoFill Passwords and Passkeys > Select Authenticator
- Click Continue

- Click Next

- Click I Understand

- Select iPhone, iPad or Android device
- Click Next

- Scan the QR code with your mobile device

- On your mobile device you get the message > Create a passkey? A passkey for the user “Amanda.Hansen@m365info.com” will be saved and available on devices where Authenticator is installed.
- Click Continue
- On your desktop, this message appears > Device connected! Continue on your device

- Click OK

- Name your Passkey One
- Click Done

- You successfully created a passkey on your iOS device

Verify sign in with Passkey
Once you enable the passkeys in Microsoft Entra ID and register it with the Microsoft Authenticator app, you can use them in two ways:
- From your mobile device
- From your Windows desktop and mobile device (cross-device authentication)
Use passkey on mobile device
To sign in with passkeys from the mobile device, follow these steps:
- Go to Microsoft 365 portal
- Select Sign-in options

- Select Face, fingerprint, PIN or security key

- Select the passkey > Click Continue

Now you successfully signed in to your Microsoft 365 account.
Use passkey on desktop and mobile device
To sign in from the desktop with passkeys, follow these steps.
- Go to Microsoft 365 portal
- Click Sign-in Options

- Click Face, fingerprint, PIN, or security key instead

- Select iPhone, iPad, or Android device
- Click Next

- Scan the QR code with your mobile device
- Click on the link that appears on your mobile device

- On your mobile device > Click Continue to sign in with your passkey
- The following message appears on your desktop > Device connected! Continue on your device

That’s it!
Read more: Export all Microsoft 365 users MFA status report »
Conclusion
You learned how to configure passkeys in Microsoft Entra ID. First you have to set up the passkeys in Microsoft Entra ID. After that, the user needs to use their mobile device to register the passkey in the Microsoft Authenticator app. From now on, the user can sign in with their passkey instead of a username and password.
Did you enjoy this article? You may also like Manage Microsoft 365 users password. Don’t forget to follow us and share this article.
This Post Has 0 Comments