The current article is the first article of the five-article series, which is dedicated to…
Manage Email address using PowerShell | Office 365
The current article and the next article, created as a “PowerShell command reference”, for various tasks that relate to the subject of – “Managing E-mail address in Office 365 and Exchange Online based environment” using PowerShell.
Table of contents
- Adding E-mail address to the Exchange Online recipient using PowerShell
- Implementing Bulk operation using PowerShell | Prefix
- 1. Add an additional Alias E-mail address using a NEW Domain name suffix to all Mailbox recipients | Bulk Mode
- 2. Replace Primary E-mail Address Domain name suffix with a NEW Domain name suffix | Bulk mode
- 1. Update Primary + Proxy E-mail address by importing information from a CSV file | Bulk mode
- 2. Update Primary + Proxy E-mail address by importing information from a CSV file | Keep existing recipient E-mail addresses | Bulk mode
- 3. Add multiple Proxy E-mail address by importing information from a CSV file | Bulk mode
Adding E-mail address to the Exchange Online recipient using PowerShell
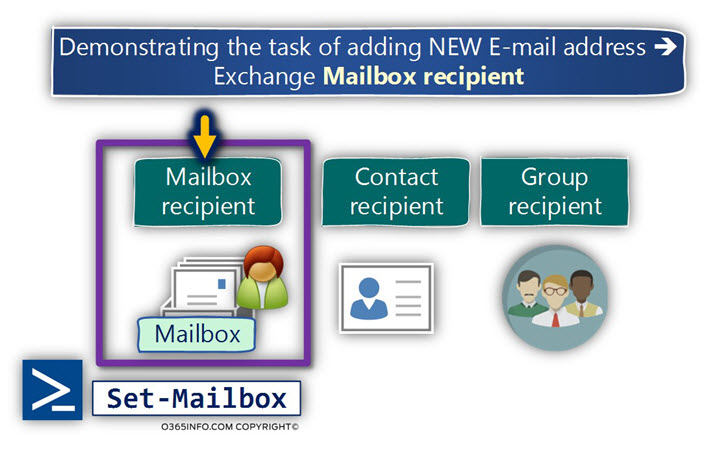
“Adding E-mail address by using the Set-Mailbox command | Mailbox recipient
Exchange Online includes many types of recipients such as “Mailbox recipient”, “Group recipient”, “Contact recipients”, “Public Folder recipient” and so on.
Most of the PowerShell command examples that relate to the task of adding the NEW E-mail address, will be related to the Exchange Online “Mailbox recipient”.
The PowerShell cmdlets that we use for adding or removing E-mail address of “Mailbox recipient” is the PowerShell command Set-Mailbox.
The properties that store information about E-mail addresses
The information about the E-mail addresses of Exchange Online “Mailbox recipient” (and other types of address), stored in the “EmailAddress property”, that serve as a logical container, for all the E-mail address that is associated with the of “Mailbox recipient”.
For example, the “EmailAddress property” contains information about the primary E-mail address, Proxy E-mail addresses, x500 address, SIP address and so on.
Additional “Mailbox recipient” property that includes information about the recipient. The primary E-mail address is the WindowsEmailAddress property.
Although the information about the primary E-mail address appears in the “EmailAddress property”, we will use the WindowsEmailAddress property for a task in which we need to update the Primary E-mail address.
Different type of Exchange Online user mailbox E-mail addresses
Most of the time, the term “E-mail address” is translated to “SMTP E-mail address”. The Exchange Online recipient can have an additional type of “address” such as x500 E-mail address and SIP address. We will relate to this type of “address” briefly.
The two methods of adding an E-mail address to the Exchange Online recipient
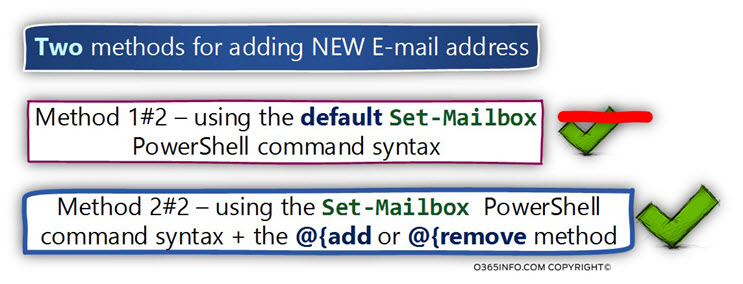
The task of adding the NEW E-mail address can be implemented by using two methods:
1. Using the default Set-Mailbox command syntax
This is the least preferred method because, when we use this option, the NEW E-mail address will “Runs over” existing E-mail address and remove the existing email address such as
Proxy E-mail addresses.
2. Using the Set-mailbox command + The “@{add” method
This is the more preferred method because, when we use the “@{add” method, the NEW E-mail address will “join” existing recipient E-mail addresses instead of replacing and removing existing E-mail addresses.
Replace/Update existing Primary E-mail address | Mailbox recipient
Method 1#2 – Adding (replacing) primary E-mail address | Using the default Set-Mailbox command syntax
In case we use the PowerShell Set-Mailbox with the parameter “-EmailAddress” and specify an E-mail address, PowerShell will use the E-mail address that was provided as a replacement for an existing primary E-mail address.
The previous Primary E-mail address will be saved as: Proxy E-mail address. All existing recipient E-mail address will be removed!
As mentioned, this is the least preferred method.
Replacing existing primary E-mail address | Method 1#2
PowerShell command syntax:
Set-Mailbox <Identity> -EmailAddress <NEW primary E-mail address>PowerShell command example:
Set-Mailbox "Bob" -EmailAddress BobNewEmail@o365info.comMethod 2#2 – Adding (replacing) primary E-mail address | Set the property – WindowsEmailAddress
This is the preferred method because, when using this method, the additional E-mail address of the Exchange Online recipient will not be removed.
In this method, we “address” other Exchange Online mailbox property named – WindowsEmailAddress.
The Exchange Online mailbox property – WindowsEmailAddress, “contain” the recipient Primary E-mail address.
In case that we set the value of the E-mail address stored in the WindowsEmailAddress property, the Exchange Online Recipient Primary E-mail address is also updated.
Replacing existing primary E-mail address | Method 2#2
PowerShell command syntax:
Set-Mailbox <Identity> -WindowsEmailAddress <NEW primary E-mail address>PowerShell command example:
Set-Mailbox "Bob" -WindowsEmailAddress BobNewEmail@o365info.comAdd an additional E-mail address (Proxy E-mail address) using the “@{add” method
When using the “@{add” PowerShell method, the E-mail address that we specify is added to the existing “E-mail addresses array” as – an additional E-mail address.
To add an additional E-mail address to a recipient without “impacting” existing e-mail addresses, we can use the following syntax:
Add Proxy E-mail address
PowerShell command syntax:
Set-Mailbox <identity> -EmailAddresses @{add="<E-mail address>"}PowerShell command example:
Set-Mailbox "Angelina" -EmailAddresses @{add="Angelina-Alias11@o365info.com"}Add multiple Proxy E-mail address
In case we need to add multiple E-mail addresses, we can separate each E-mail address with a comma.
PowerShell command example:
Set-Mailbox "Angelina" -EmailAddresses @{add="Angelina-Alias11@o365info.com","Angelina-Alias12@o365info.com"}Adding an additional type of address
Add or update SIP address | Mailbox recipient
In case we need to add SIP address or replace existing SIP address, we can use the following PowerShell command syntax:
PowerShell command syntax:
Set-Mailbox <identity> -EmailAddresses SIP:<SIP Address>PowerShell command example:
Set-Mailbox "Angelina" -EmailAddresses SIP:Angelina@o365info.comAdd or update x500 E-mail address | Mailbox recipient
PowerShell command syntax:
$User=Get-Mailbox <Identity>
$User.EmailAddresses+="<X.500 Email Address>"
Set-Mailbox <Identity> –EmailAddresses $User.EmailAddresses
PowerShell command example:
$User=Get-Mailbox John
$User.EmailAddresses+="X500:/O=ORG /OU=FIRST ADMINISTRATIVE GROUP/CN=RECIPIENTS/CN=XX"
Set-Mailbox John –EmailAddresses $User.EmailAddresses
Updating Exchange Online mailbox properties in the directory synchronization environment
In case that your infrastructure is based on Directory synchronization environment or the Exchange Hybrid environment, we cannot use “Exchange Online PowerShell” for implementing configuration updates of “cloud objects” such as – Exchange Online recipient mailboxes.
In this type of scenario, we need to run the various E-mail address management task from the on-Premises environment.
For example, in case that we have Exchange Hybrid environment and we need to update E-mail address of recipient such as “Remote mailbox recipient” (recipient that have Exchange Online mailbox), we will need to use the “Exchange on-Premises PowerShell console.”
To update the Primary E-mail address of Exchange Online mailbox recipient, which was synchronized from Exchange on-Premises, we will need to run the command from Exchange on-Premises PowerShell console using the following syntax:
PowerShell command syntax:
Set-RemoteMailbox <Mailbox> -EmailAddresses <Primary E-mail address> -EmailAddressPolicyEnabled $falsePowerShell command example:
Set-RemoteMailbox "John" -EmailAddresses John@o365info.com -EmailAddressPolicyEnabled $falseImplementing Bulk operation using PowerShell | Prefix
In the next sections, we review various scenarios in which we use “Bulk mode” for updating existing E-mail address or adding an additional E-mail address.
The bulk process can be considered as a very powerful tool but at the same, time can be considered as a “dangerous tool” because, the updates that we execute, could impact all the existing Exchange recipients.
For this reason, my recommendation is to test the Bulk operation using “Tests mailboxes”, and by using the PowerShell parameter “Whatif”.
Two methods of defining a “Recipients Array”
In the following section, we review two methods of using Bulk mode:
- Method 1 – Define the “Array” of recipients, by using a variable that store the content of PowerShell commands such as Get-Mailbox.
- Method 2 – Define the “Array” of recipients, by using a variable that stores the content that is “fetched” from a CSV file, that includes information about the recipients whom we want to update their E-mail address.
Scenario description.
The example that we review will be based on the following scenario:
- Our company uses the public domain name – o365info.com
- Our company purchased an additional domain name – o365pilot.com
At the current time, all the company users have E-mail addresses that use the domain
name suffix – “o365pilot.com”.
Our tasks are:
- Scenario 1 – Replace the existing Primary E-mail address to a NEW Primary E-mail address that uses the NEW domain name (o365pilot.com)
- Scenario 2 – Add an additional E-mail address (Proxy E-mail address) using the NEW domain name (o365pilot.com)
1. Add an additional Alias E-mail address using a NEW Domain name suffix to all Mailbox recipients | Bulk Mode
In the following section, we review the process of using PowerShell bulk script, that will perform the task of:
Adding a NEW Alias E-mail address, that uses a NEW domain name suffix, for each of our Exchange Online mailbox recipients.
In our scenario, the additional E-mail address (Proxy E-mail address), is based on the following structure:
- The NEW E-mail address “Alias” (the left part) will be identical to the Alias of the recipient Primary E-mail address.
- The E-mail address suffix (the right part of the E-mail address), will use the “NEW Domain
name suffix – “o365pilot.com“.
Add a new Proxy E-mail address using specific domain name suffix.
$Domainsuffix = Read-Host "Type the name of the Domain name suffix"
$AllMailboxes = Get-Mailbox -ResultSize Unlimited
Foreach ($Mailbox in $AllMailboxes) {
    # Creating NEW E-mail address that contracted in the following way: Take the existing recipient Alias name + use the NEW Domain name as a domain suffix + "Bind" the Alias name + the NEW Domain name suffix.
    $NewAddress = $Mailbox.Alias + "@$Domainsuffix"
    # "Store" all existing E-mail addresses + add the NEW E-mail address as an additional E-mail address.
    $Mailbox.EmailAddresses += $NewAddress
    # Assign the NEW E-mail address to the existing Exchange Online recipient
    Set-Mailbox -Identity $Mailbox.Alias -EmailAddresses $Mailbox.EmailAddresses #-whatif
}
2. Replace Primary E-mail Address Domain name suffix with a NEW Domain name suffix | Bulk mode
In the following section, we review the process of using PowerShell bulk script, that will perform the task of:
Replacing the existing Primary E-mail address with a NEW Primary E-mail address that uses a different domain name suffix for each of the Exchange Online mailbox recipients.
We were asked to implement the following tasks:
- Replace the current Primary E-mail address that uses the domain name – “o365info.com” with a NEW primary E-mail address, that uses the domain name suffix – o365pilot.com
- The Alias name of the Exchange recipient (the right part of the E-mail address) will stay the same. In other words, we would like to keep the existing Alias name from the current Primary E-mail address and replace the “left part” (domain name suffix) with a NEW domain name suffix.
- The previous Primary E-mail address, will not be deleted, but instead, saved as an Alias
E-mail address (additional E-mail address). - All the existing Alias E-mail addresses and other address such as SIP address, of the recipients, will be kept.
Replace Primary E-mail Address Domain name suffix with a NEW Domain name suffix.
Foreach ($Mailbox in $AllMailboxes) {
    # Creating NEW E-mail address that contracted in the following way: Take the existing recipient Alias name + use the NEW Domain name as a domain suffix + "Bind" the Alias name + the NEW Domain name suffix.
    $NewAddress = $Mailbox.Alias + "@o365pilot.com"
    Set-Mailbox -Identity $Mailbox.Alias -WindowsEmailAddress $NewAddress #-whatif
}
Implementing bulk operation – working with CSV file | Prefix
In the next section, we review a couple of scenarios in which we implement the task of managing “E-mail address” task, such as – adding E-mail address by importing the information from a CSV file.
The CSV file, serve as a “logical container” that held data.
In our scenario, the CSV serves as a container that holds data about – Exchange Online recipients, and their E-mail address that we would like to add.
The structure of a CSV file that we use in our scenario
Each of the columns in the CSV file has and Header name.
When we need to address information stored in a specific column, we provide the PowerShell command the name of the specific column header.
Technically speaking, the CSV file is just a Text file, and we can use a simple text editor for editing the file content.
Most of the time, we would use another application such as Microsoft Excel for editing a CSV file because editing the data using Excel, is furthermore comfortable.
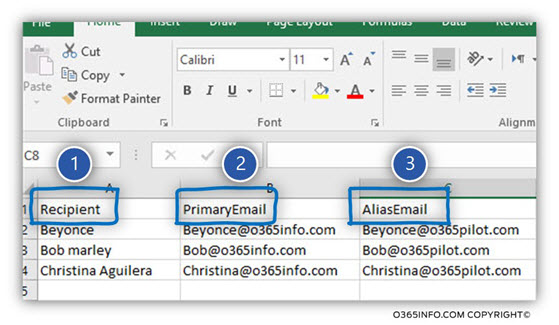
In the following screenshot, we can see an example of the CSV file that was opened in Excel.
CSV file column header names
When using a CSV file, we can “choose” any column header name who will suit our needs. It’s recommended to choose a meaningful column header name and doesn’t use any spaces.
The CSV file includes three columns:
- The column named – Recipient (number 1), contain our “recipient’s identity”. Technically speaking, we can use various recipient properties for defining the “recipient identity.”
For example, recipient Alias, recipient E-mail address, recipient Display name and more. In our specific example, we use the Recipient “Display name” as the recipient identity. - The column named – PrimaryEmail (number 2), contain a user E-mail address that we would like to set as a “Primary E-mail address.”
- The column named – AliasEmail (number 3), contain a user E-mail address that we would like to set as
an “Alias E-mail address.”
Import information from a CSV file
Most of the time, we “fetch” the information stored in the CSV file, by defining a variable that includes the content of the PowerShell command – Import-CSV.
In our example, we define a variable named – $Recipients, which will “contain” the content of the CSV file that we import.
$Recipients = Import-Csv C:\Temp\Recipient-E-mail-addresses.csvExport information from a CSV file
The operation of “import information from a CSV file” is based on a preliminary step in which we export the required information to a CSV file. You can read more information about the process of the PowerShell syntax that we use for exporting information to various types of file formats in the article Export and display information about Email addresses using PowerShell | Office 365 | Part 6#13.
Regarding the subject of “what is the information that we export to a file,” you can read the article Display information about E-mail Addresses using PowerShell | Customizing the output using Hash Table and Custom expressions | Office 365 | Part 7#13.
1. Update Primary + Proxy E-mail address by importing information from a CSV file | Bulk mode
In the next example, we need to fulfill the following requirements:
- Replace (remove) the existing primary E-mail address with a NEW Primary E-mail address stored in a CSV file.
- Replace (remove) the existing Alias E-mail with a NEW Alias E-mail address stored in a CSV file.
Replace Primary E-mail Address with a NEW Primary E-mail address stored in a CSV file.
$Recipients = Import-Csv C:\Temp\Recipient-E-mail-addresses.csv
Foreach ($Mailbox in $Recipients) {
    Set-Mailbox -Identity $Mailbox.Recipient -EmailAddresses $Mailbox.PrimaryEmail, $Mailbox.AliasEmail # -WhatIf
}
2. Update Primary + Proxy E-mail address by importing information from a CSV file | Keep existing recipient E-mail addresses | Bulk mode
In the next example, we need to fulfill the following requirements:
- Replace (remove) the existing Primary E-mail address with a NEW Primary E-mail address stored in a CSV file.
- Add NEW Alias E-mail address from a CSV file. The NEW E-mail address will be added to the existing recipient E-mail address as an additional E-mail address.
Notice that vs. the previous scenario, we don’t wish to remove existing Alias E-mail addresses that the recipient already has. Instead, we want to add an additional E-mail address to the existing “Array” of the recipient E-mail addresses.
Replace Primary E-mail Address Domain name suffix with a NEW Domain name suffix.
$Recipients = Import-Csv C:\Temp\Recipient-E-mail-addresses.csv
Foreach ($Mailbox in $Recipients) {
    Set-Mailbox -Identity $Mailbox.Recipient -EmailAddresses @{Add = $Mailbox.AliasEmail } # -WhatIf
}
3. Add multiple Proxy E-mail address by importing information from a CSV file | Bulk mode
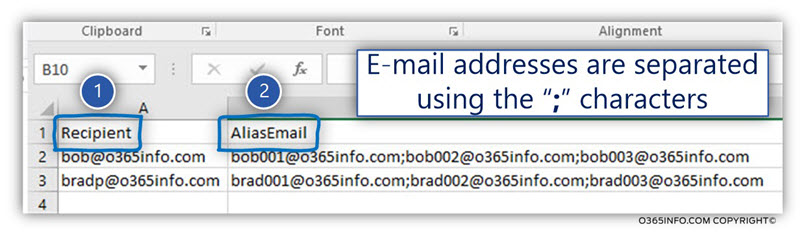
In the next scenario, we need to add to our recipients additional Proxy E-mail addresses that are stored in a CSV file.
- The CSV file stores the Proxy E-mail addresses in a column named – “AliasEmail”.
- The name of the recipients is stored in a column named – “Recipient.”
In the following screenshot, we can see the structure of the CSV file.
Add multiple Proxy E-mail address – importing from a CSV file.
Import-Csv C:\temp\Recipient-Proxy-E-mail-addresses.csv | ForEach-Object {
    $Recipient = $_.Recipient
    $ProxyAddresses = $_.AliasEmail -split ';'
    Set-Mailbox -Identity $Recipient -EmailAddresses @{add = $ProxyAddresses }
}
In the next article, we will look at Manage Email addresses using PowerShell | Office 365 | Command reference | Part 2#13.
What Others Are Reading

I am really delighted to glance at this website
posts which consists of lots of useful data, thanks for providing these information.
1.5 does not work
We should change -EmailAddress to -WindowsEmailAddress now.
e.g: Set-Mailbox username -WindowsEmailAddress username@domain.com
About the error on line 570:
The line has to be slit op in 2 like this:
$a = foreach ($mailbox in $mailboxes) { $newaddress = $mailbox.alias + “@$DomName”
$mailbox.EmailAddresses += $newaddress
Same error on line 570 character 86
I am having same difficult while running the script.
It doesn’t recognize the command ‘$mailbox’ Line:570 Char: 86
At C:\Manage Email Address.ps1:570 char:86
+ … + “@$DomName” $mailbox.EmailAddresses += $newaddress
+ ~~~~~~~~
Unexpected token ‘$mailbox’ in expression or statement.
+ CategoryInfo : ParserError: (:) [], ParseException
+ FullyQualifiedErrorId : UnexpectedToken
Please help us regarding that. I would highly appreciate that.
thanks.
I would like to know the powershell script to remove all the secondary(proxy) email addresses for all users.
Regards,
Ankur
I’m getting an error message when trying to launch the ‘Manage Email Address.ps1’ script. It doesn’t recognize the command ‘$mailbox’ Line:570 Char: 86
At C:\Manage Email Address.ps1:570 char:86
+ … + “@$DomName” $mailbox.EmailAddresses += $newaddress
+ ~~~~~~~~
Unexpected token ‘$mailbox’ in expression or statement.
+ CategoryInfo : ParserError: (:) [], ParseException
+ FullyQualifiedErrorId : UnexpectedToken
Any help on this?
The other script are working perfectly, this the only one I’m having issues with.
Thanks for help!
Hi
the post is not updated.
primary smtp can be set now through the web console .
Not in a hybrid environment – so these command lines are still valid to many.
is there a way to just add an Alias Email address without changing the current address? some users have multiple addresses like help@test.com has services@test.com and john@test.com using Import-CSV
Oops, your download link is wrong