The message trace report displays information about each incoming and outgoing mail sent over the…
Manage Send As Permissions using PowerShell
The Send As permission enables a recipient to send an email message using the identity of another recipient. You can assign, get, export, and remove Send As permissions on a Microsoft 365 mailbox. In this article, you will learn how to manage Send As permissions using Exchange Online PowerShell.
Table of contents
Send As permissions restrictions
Sometimes users need to hide their identity and present themselves using the identity of another recipient. This could be when an assistant sends an email using the identity of their manager.
There are several Send As permissions restrictions:
- Only admins can assign the Send As permission. A recipient can’t assign their selves the Send As permission to another recipient.
- You can’t assign the Send As permission to a recipient’s alias email address. Some recipients have an alias email address in addition to their primary email address (SMTP). In this case, the only solution is to create a distribution group that uses the alias email address and assign the recipient Send As permission to the distribution group.
- You can assign Send As permission on almost all the recipient types except a contact in the Exchange admin center.
- You can’t display and export information about Send As permissions in the Exchange admin center, only with PowerShell.
Send As permission and the trustee
The Send As permission lets a user send an email using another user’s identity (email address). The user who gets the Send As permission is defined as a Trustee.
In our example:
- Amanda is Ken’s personal assistant.
- We want to enable Amanda to send an email using Ken’s email address.
- To accomplish this requirement, we will assign Amanda with Send As permission to Ken’s mailbox.
- Amanda will be described as the Trustee of Ken.

Manage Send As permissions using PowerShell in Microsoft 365
We will show you how to manage Send As permissions in Microsoft 365 using PowerShell:
- Assign Send As permissions
- Display and Export Send As permissions
- Remove existing Send As permissions
Connect to Exchange Online PowerShell
To be able to run the PowerShell commands specified in the current article, you will need to Connect to Exchange Online PowerShell.
Start Windows PowerShell as administrator and run the cmdlet Connect-ExchangeOnline.
Connect-ExchangeOnline1. Assign Send As permissions
To assign Send As permission, we will use the Add-RecipientPermission PowerShell cmdlet.
Assign Send As permission to user mailbox
In our example, this is how it looks:
- Amanda is Ken’s personal assistant and wants to send an email using Ken’s email address (Identity)
- We would like to assign Amanda (Trustee) with Send As permissions to Ken’s mailbox
To suppress the confirmation prompt, we add the parameter -Confirm:$false.
See the below PowerShell command syntax.
Add-RecipientPermission "Identity" -AccessRights SendAs -Trustee "Identity" -Confirm:$falseRun the below PowerShell command example.
Add-RecipientPermission "Ken.Walker@m365info.com" -AccessRights SendAs -Trustee "Amanda.Hansen@m365info.com" -Confirm:$falseThe PowerShell output result.
Identity                             Trustee                              AccessControlType AccessRights Inherited
--------                             -------                              ----------------- ------------ ---------
12eefbb2-e5f4-4eec-bd18-df7ca2f1ee6b 41377e9c-dc47-46c0-b4a5-1d5bbdcb5cc5 Allow             {SendAs}     False
Assign user Send As permission to bulk all user mailboxes
We want to assign a user (Amanda.Hansen@m365info.com) with Send As permission to all user mailboxes in bulk.

The PowerShell script will consist of these parts:
- First, we want to get a list of all the existing mailboxes. The default PowerShell Get-Mailbox only displays the first 1,000 mailboxes. We need to add the -ResultSize Unlimited command to get a list of all the existing mailboxes.
- Then, we use the -Filter parameter to get a list of all the user mailboxes.
- We use the pipeline (|) to get the result from the first part to the second part of the PowerShell command.
- We assign Amanda (Trustee) Send As permission to each recipient in the filtered mailbox list.
- To suppress the confirmation prompts, we add the -Confirm:$false parameter at the end.
See the below PowerShell command syntax.
Get-Mailbox -ResultSize Unlimited -Filter { (RecipientTypeDetails -eq "Type of mailbox") } | Add-RecipientPermission -AccessRights SendAs -Trustee "Identity" -Confirm:$falseRun the below PowerShell command example.
Get-Mailbox -ResultSize Unlimited -Filter { (RecipientTypeDetails -eq "UserMailbox") } | Add-RecipientPermission -AccessRights SendAs -Trustee "Amanda.Hansen@m365info.com" -Confirm:$falseThe PowerShell output shows a list of all the user mailboxes with the AccessRights SendAs.
Identity                             Trustee                              AccessControlType AccessRights Inherited
--------                             -------                              ----------------- ------------ ---------
fa956d8c-87df-4cd4-ac2a-ac1f3d7cac8b 41377e9c-dc47-46c0-b4a5-1d5bbdcb5cc5 Allow             {SendAs}     False
b602b148-2fcf-435a-9d34-ce72c3a8c748 41377e9c-dc47-46c0-b4a5-1d5bbdcb5cc5 Allow             {SendAs}     False
12eefbb2-e5f4-4eec-bd18-df7ca2f1ee6b 41377e9c-dc47-46c0-b4a5-1d5bbdcb5cc5 Allow             {SendAs}     False
41377e9c-dc47-46c0-b4a5-1d5bbdcb5cc5 41377e9c-dc47-46c0-b4a5-1d5bbdcb5cc5 Allow             {SendAs}     False
1a1fd41c-ca5f-4432-8313-7a662576856b 41377e9c-dc47-46c0-b4a5-1d5bbdcb5cc5 Allow             {SendAs}     False
c32b2b27-d809-439a-a3e3-eb7a749eeb72 41377e9c-dc47-46c0-b4a5-1d5bbdcb5cc5 Allow             {SendAs}     False
Assign user Send As permission to bulk all mailboxes
We want to assign a user mailbox (Amanda.Hansen@m365info.com) to all recipients, including mailbox types (user, shared, room, and equipment).

Note: The term recipient relates to any mail-enabled object. There are many types of recipients, such as user mailbox, room mailbox, equipment mailbox, shared mailbox, contact, group, and Public Folder.
The PowerShell script consists of these parts:
- First, you need to get a list of all the existing recipients. The default PowerShell Get-Recipient only displays the first 1,000 mailboxes. You need to add the -ResultSize Unlimited command to get a list of all the existing mailboxes.
- Use the pipeline (|) to pipe the result from the first part of the PowerShell command to the second part.
- We will grant Amanda (Trustee) Send As permission to each recipient in the filtered list.
- To suppress the confirmation prompts, we add the -Confirm:$false parameter at the end.
See the below PowerShell command syntax.
Get-Recipient -ResultSize Unlimited | Add-RecipientPermission -AccessRights SendAs -Trustee "Identity" -Confirm:$falseRun the below PowerShell command example.
Get-Recipient -ResultSize Unlimited | Add-RecipientPermission -AccessRights SendAs -Trustee "Amanda.Hansen@m365info.com" -Confirm:$falseThe PowerShell output shows a list of all the recipients in your organization and assigns them with Send As permission.
Identity                             Trustee                              AccessControlType AccessRights Inherited
--------                             -------                              ----------------- ------------ ---------
0de964ae-f09a-4e65-bc8c-cbeac2745e4c 41377e9c-dc47-46c0-b4a5-1d5bbdcb5cc5 Allow             {SendAs}     False
41377e9c-dc47-46c0-b4a5-1d5bbdcb5cc5 41377e9c-dc47-46c0-b4a5-1d5bbdcb5cc5 Allow             {SendAs}     False
f8261d51-3df9-4f21-a6b1-533412669c11 41377e9c-dc47-46c0-b4a5-1d5bbdcb5cc5 Allow             {SendAs}     False
7bfec79d-7806-484a-ac83-133cd4cf5af5 41377e9c-dc47-46c0-b4a5-1d5bbdcb5cc5 Allow             {SendAs}     False
82cd0d62-e974-4892-aca6-e0387abc62be 41377e9c-dc47-46c0-b4a5-1d5bbdcb5cc5 Allow             {SendAs}     False
Catch All                            41377e9c-dc47-46c0-b4a5-1d5bbdcb5cc5 Allow             {SendAs}     False
Dynamic                              41377e9c-dc47-46c0-b4a5-1d5bbdcb5cc5 Allow             {SendAs}     False
Dynamic test 2                       41377e9c-dc47-46c0-b4a5-1d5bbdcb5cc5 Allow             {SendAs}     False
Finance1                             41377e9c-dc47-46c0-b4a5-1d5bbdcb5cc5 Allow             {SendAs}     False
Finance21                            41377e9c-dc47-46c0-b4a5-1d5bbdcb5cc5 Allow             {SendAs}     False
Projector 21                         41377e9c-dc47-46c0-b4a5-1d5bbdcb5cc5 Allow             {SendAs}     False
Projector 8                          41377e9c-dc47-46c0-b4a5-1d5bbdcb5cc5 Allow             {SendAs}     False
Room Group                           41377e9c-dc47-46c0-b4a5-1d5bbdcb5cc5 Allow             {SendAs}     False
RoomMail 8                           41377e9c-dc47-46c0-b4a5-1d5bbdcb5cc5 Allow             {SendAs}     False
RoomTest8                            41377e9c-dc47-46c0-b4a5-1d5bbdcb5cc5 Allow             {SendAs}     False
Sales99                              41377e9c-dc47-46c0-b4a5-1d5bbdcb5cc5 Allow             {SendAs}     False
Sales Norway                         41377e9c-dc47-46c0-b4a5-1d5bbdcb5cc5 Allow             {SendAs}     False
Sales Sweden                         41377e9c-dc47-46c0-b4a5-1d5bbdcb5cc5 Allow             {SendAs}     False
Assign multiple users Send As permission to single mailbox
You can assign multiple users Send As permission to a single mailbox.

In our example, we want to assign multiple users Send As permission to a user mailbox (Amanda.Hansen@m365info.com).
- Specify the UserPrincipalName of the users in line 1
- Specify UserPrincpalName of the single mailbox in line 4
- Run the below PowerShell script
$users = "Ken.Walker@m365info.com", "Brenda.Smith@m365info.com", "Stephen.Hunter@m365info.com"

ForEach ($user in $users) {
    Add-RecipientPermission "Amanda.Hansen@m365info.com" -AccessRights SendAs -Trustee $user -Confirm:$false
}
Assign user Send As permission to multiple users from CSV file
We want to assign a user mailbox (Amanda.Hansen@m365info.com) with Send As permission to multiple recipients from a list in a CSV file. You need to create a CSV file with a recipient list.
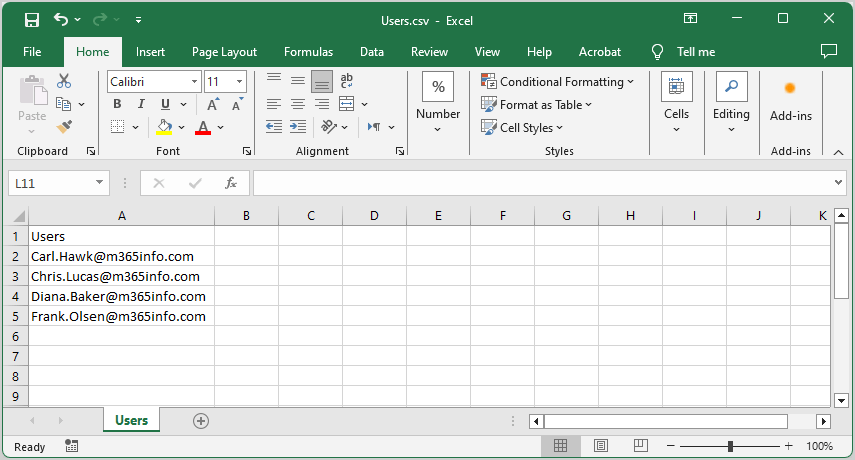
Create a CSV file with a list of users:
- Type Users at the top of the first column header
- List the UserPrincipalName in the first column
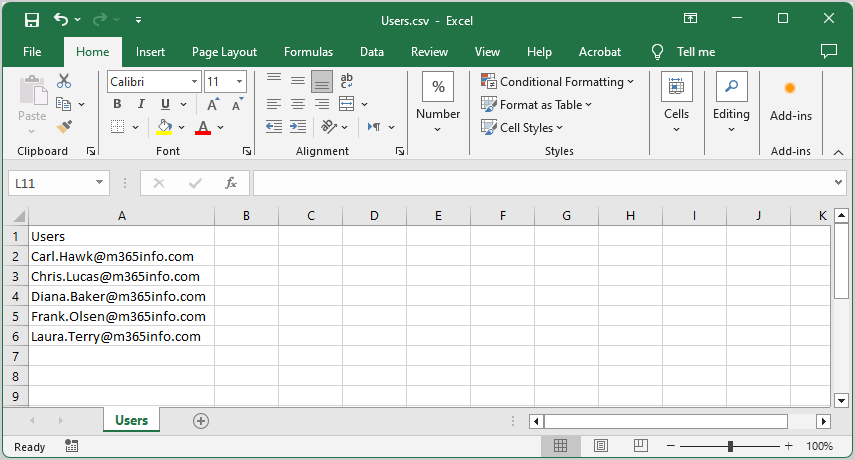
- Name the file Users
- Create a temp folder in the (C:) drive
- Save it as a CSV file
To import the list from the CSV file, you need to use the Import-Csv PowerShell cmdlet and provide the path and the file name.
Import-Csv "C:\temp\Users.csv"The PowerShell script will consist of these parts:
- You need to define a variable named $UserList, which will contain the output from a PowerShell command and import the information from the CSV file.
- The PowerShell ForEach operator will loop through the information from the CSV file (the information that is stored in the $UserList variable).
- Use the Add-RecipientPermission PowerShell cmdlet to grant the -Trustee (Amanda) with Send As permission for each username appearing under the Users column header from the CSV file.
- You need to define a variable $user that will serve as a container for each recipient on the list. Then, you will attach the Users property from the CSV file, like $user.Users. The meaning is that the ForEach loop will look at the column header Users and run the Send As mailbox permission for each username in the column list.
- Specify the Path in line 1
- Specify the Trustee in line 3
- Run the below PowerShell script
$UserList = Import-Csv "C:\temp\Users.csv"
ForEach ($User in $UserList) {
    Add-RecipientPermission $user.Users -AccessRights SendAs -Trustee "Amanda.Hansen@m365info.com" -Confirm:$false
}
It will assign each user with Send As permission to the Trustee Amanda.
Identity                             Trustee                              AccessControlType AccessRights Inherited
--------                             -------                              ----------------- ------------ ---------
52a6c1c7-77d2-4109-99b9-a4076167b6e2 41377e9c-dc47-46c0-b4a5-1d5bbdcb5cc5 Allow             {SendAs}     False
fa956d8c-87df-4cd4-ac2a-ac1f3d7cac8b 41377e9c-dc47-46c0-b4a5-1d5bbdcb5cc5 Allow             {SendAs}     False
b602b148-2fcf-435a-9d34-ce72c3a8c748 41377e9c-dc47-46c0-b4a5-1d5bbdcb5cc5 Allow             {SendAs}     False
29a12fd8-bbd2-440f-b457-8e304200a85d 41377e9c-dc47-46c0-b4a5-1d5bbdcb5cc5 Allow             {SendAs}     False
213a5a8b-0bcf-40cc-b114-edb1b2a423f4 41377e9c-dc47-46c0-b4a5-1d5bbdcb5cc5 Allow             {SendAs}     False
Assign user Send As permission to mailboxes from specific department
To assign a user with Send As permissions to multiple mailboxes, you need to use the -Filter parameter. In our example, we want to assign Amanda with Send As permission to all the recipients from the marketing department.
The PowerShell script will consist of these parts:
- You need to use the Get-Recipient PowerShell cmdlet to get a list of all the existing Exchange Online recipients.
- Use the -Filter parameter to get the recipients that belong to the marketing department.
- Add the pipeline (|) to pipe the output from the first command to the second part of the PowerShell command.
- Assign the Send As permission to the Trustee (Amanda) on each of the recipients from the marketing department.
- To suppress the confirmation prompts, we add the -Confirm:$false parameter at the end.
See the PowerShell command syntax.
Get-Recipient -ResultSize Unlimited -Filter { (Department -eq "department") } | Add-RecipientPermission -AccessRights SendAs -Trustee "Identity" -Confirm:$falseRun the below PowerShell command example.
Get-Recipient -ResultSize Unlimited -Filter { (Department -eq "marketing") } | Add-RecipientPermission -AccessRights SendAs -Trustee "Amanda.Hansen@m365info.com" -Confirm:$falseThe PowerShell output shows the recipients from the marketing department and assigns them Send As permission.
Identity                             Trustee                              AccessControlType AccessRights Inherited
--------                             -------                              ----------------- ------------ ---------
41377e9c-dc47-46c0-b4a5-1d5bbdcb5cc5 41377e9c-dc47-46c0-b4a5-1d5bbdcb5cc5 Allow             {SendAs}     False
0f38d53f-cbe0-4844-86e9-1032a45ba31b 41377e9c-dc47-46c0-b4a5-1d5bbdcb5cc5 Allow             {SendAs}     False
Assign Send As permissions to each distribution group member
We want to assign multiple recipients with Send As permission on a specific mailbox. You can create a security group where each member will have Send As permission on the specific mailbox. By default, you can only assign permission to a mail-enabled security group on other objects, such as Microsoft 365 mailboxes.
Assign permission to a group:
- Security group: assign permission on other objects
- Distribution group: can’t directly assign permission to other objects
We will use PowerShell to bypass this limitation and assign Send As permission to a specific distribution group on a user mailbox. Another option is to Convert Distribution List to Security Group.
Note: If you Add members to a distribution group, you need to rerun the PowerShell command to apply the changes. Otherwise, it will not assign permission for these new members by default.
In our example, we want to assign Send As permissions to each member of the distribution group (Finance1) on a specific user mailbox, Ken.Walker@m365info.com. This way, each distribution group member can send an email message using Ken’s email address.

The PowerShell script will extract each distribution group member (Finance1) and assign each member the Send As permission separately.
- To get the list of members of a specific distribution group (Finance1), you need to use the Get-DistributionGroupMember PowerShell cmdlet.
- Fetch and store all the members from the distribution group in a variable named $GroupMembers.
- You need to use the Foreach PowerShell cmdlet to loop through the list of all the distribution group members (Finance1).
- We will use the variable $Member for each distribution group member.
- The Add-RecipientPermission PowerShell cmdlet loops through the group member list and assigns each member the Send As permission on Ken’s mailbox.
- To define -Trustee, we need the variable $Member followed by the property name, such as $Member.name.
See the PowerShell command syntax.
- Type the Primary SMTP Address of the distribution group in line 1
- Type the UserPrincipalName of the user mailbox in line 3
- Run the below PowerShell script
$GroupMembers = Get-DistributionGroupMember -Id "Finance1@m365info.com"
ForEach ($Member in $GroupMembers) {
    Add-RecipientPermission -Identity "Ken.Walker@m365info.com" -AccessRights SendAs -Trustee $Member.name -Confirm:$false
}
The PowerShell output shows the list of distribution group members under Trustee with Send As permission on the Identity Ken Walker.
Identity                             Trustee                              AccessControlType AccessRights Inherited
--------                             -------                              ----------------- ------------ ---------
12eefbb2-e5f4-4eec-bd18-df7ca2f1ee6b c32b2b27-d809-439a-a3e3-eb7a749eeb72 Allow             {SendAs}     False
12eefbb2-e5f4-4eec-bd18-df7ca2f1ee6b a897304b-86c0-4f2c-8f2e-3061676e9571 Allow             {SendAs}     False
12eefbb2-e5f4-4eec-bd18-df7ca2f1ee6b 7bfec79d-7806-484a-ac83-133cd4cf5af5 Allow             {SendAs}     False
12eefbb2-e5f4-4eec-bd18-df7ca2f1ee6b 411a8f10-0dfa-4034-a1e3-a8b6e4cad2f6 Allow             {SendAs}     False
12eefbb2-e5f4-4eec-bd18-df7ca2f1ee6b 44a67976-90fd-42d5-a589-e724d17836f1 Allow             {SendAs}     False
12eefbb2-e5f4-4eec-bd18-df7ca2f1ee6b 0f38d53f-cbe0-4844-86e9-1032a45ba31b Allow             {SendAs}     False
Add-RecipientPermission: Ex9BC9DD|Microsoft.Exchange.Configuration.Tasks.ManagementObjectNotFoundException|User or group "Darren Parker" wasn't found.
Please make sure you've typed it correctly.
Add-RecipientPermission: Ex9BC9DD|Microsoft.Exchange.Configuration.Tasks.ManagementObjectNotFoundException|User or group "Cindy White" wasn't found.
Please make sure you've typed it correctly.
As said before, it will not assign Send As permissions to contacts, so you will get an error stating the object (user or group) is not found.
Assign distribution group members Send As permission to user mailbox
You can also assign a user mailbox with Send As permissions on a distribution group with PowerShell, which is the other way around.
In our example, we want to assign Send As permission to the user Amanda on a list of recipients from the distribution group (Finance1).

The PowerShell script will consist of these parts:
- You need to use the Get-DistributionGroupMember PowerShell cmdlet, which will get the list of members in a specific distribution group (Finance1).
- Use a variable named $GroupMembers which will contain the output from a PowerShell command that fetches all the members in the distribution group (Finance1).
- You need to use the Foreach PowerShell cmdlet to loop through the list of all the distribution group members (Finance1).
- The Add-RecipientPermission PowerShell cmdlet assigns the user Amanda (-Trustee) Send As permission.
- To add permission to each group member, you need to use the variable $Member with a combination of the property name such as $Member.name.
See the below PowerShell command syntax.
- Type the Primary SMTP Address of the distribution group in line 1
- Type the UserPrincipalName of the user mailbox in line 3
- Run the below PowerShell script
$GroupMembers = Get-DistributionGroupMember -Id "Finance1@m365info.com"
ForEach ($Member in $GroupMembers) {
    Add-RecipientPermission -Identity $Member.name -AccessRights SendAs -Trustee "Ken.Walker@m365info.com" -Confirm:$false
}
The PowerShell output shows a list of all the members of the distribution group under Identity on which the Trustee Ken has Send As permission.
Identity                             Trustee                              AccessControlType AccessRights Inherited
--------                             -------                              ----------------- ------------ ---------
c32b2b27-d809-439a-a3e3-eb7a749eeb72 12eefbb2-e5f4-4eec-bd18-df7ca2f1ee6b Allow             {SendAs}     False
a897304b-86c0-4f2c-8f2e-3061676e9571 12eefbb2-e5f4-4eec-bd18-df7ca2f1ee6b Allow             {SendAs}     False
7bfec79d-7806-484a-ac83-133cd4cf5af5 12eefbb2-e5f4-4eec-bd18-df7ca2f1ee6b Allow             {SendAs}     False
0de964ae-f09a-4e65-bc8c-cbeac2745e4c 12eefbb2-e5f4-4eec-bd18-df7ca2f1ee6b Allow             {SendAs}     False
411a8f10-0dfa-4034-a1e3-a8b6e4cad2f6 12eefbb2-e5f4-4eec-bd18-df7ca2f1ee6b Allow             {SendAs}     False
44a67976-90fd-42d5-a589-e724d17836f1 12eefbb2-e5f4-4eec-bd18-df7ca2f1ee6b Allow             {SendAs}     False
0f38d53f-cbe0-4844-86e9-1032a45ba31b 12eefbb2-e5f4-4eec-bd18-df7ca2f1ee6b Allow             {SendAs}     False
Add-RecipientPermission: ExD48BF8|Microsoft.Exchange.Configuration.ObjectModel.NotAcceptedDomainException|You can't use the domain fabrikam.com because it's not an
accepted domain for your organization.
Add-RecipientPermission: ExD48BF8|Microsoft.Exchange.Configuration.ObjectModel.NotAcceptedDomainException|You can't use the domain gmail.com because it's not an
accepted domain for your organization.
2. Display Send As permissions
To show all the Send As permissions, you must use the Get-RecipientPermission PowerShell cmdlet. It will display all the information on the PowerShell output.
Display recipients with Send As permission on specific user mailbox
Display information about the Send As permission of a specific user mailbox.

In our example, we want to show the Send As permission that other recipients have on a specific user mailbox (Ken.Walker@m365info.com).
Run the below PowerShell command example
Get-RecipientPermission "Ken.Walker@m365info.com"The PowerShell result shows a list of recipients with Send As permission to Ken Walker’s mailbox. It also shows the NT AUTHORITY\SELF.
Identity                             Trustee                      AccessControlType AccessRights Inherited
--------                             -------                      ----------------- ------------ ---------
12eefbb2-e5f4-4eec-bd18-df7ca2f1ee6b NT AUTHORITY\SELF            Allow             {SendAs}     False
12eefbb2-e5f4-4eec-bd18-df7ca2f1ee6b Stephen.Hunter@m365info.com  Allow             {SendAs}     False
12eefbb2-e5f4-4eec-bd18-df7ca2f1ee6b Donna.Hart@m365info.com      Allow             {SendAs}     False
12eefbb2-e5f4-4eec-bd18-df7ca2f1ee6b Andrea.Baker@m365info.com    Allow             {SendAs}     False
12eefbb2-e5f4-4eec-bd18-df7ca2f1ee6b Brian.Mill@m365info.com      Allow             {SendAs}     False
12eefbb2-e5f4-4eec-bd18-df7ca2f1ee6b Stephen.Lambert@m365info.com Allow             {SendAs}     False
12eefbb2-e5f4-4eec-bd18-df7ca2f1ee6b Brenda.Smith@m365info.com    Allow             {SendAs}     False
You can display a cleaner output without the information about the permission that the user has to his mailbox.
Run the below PowerShell command example to show a list of recipients with Send As permission without the authority self.
Get-RecipientPermission "Ken.Walker@m365info.com" | Where { -not ($_.Trustee -like "NT AUTHORITY\SELF") } | Select-Object Identity, Trustee, AccessRightsThe PowerShell output shows all the Send As permissions of the user mailbox Identity (Ken Walker).
Identity                             Trustee                      AccessRights
--------                             -------                      ------------
12eefbb2-e5f4-4eec-bd18-df7ca2f1ee6b Stephen.Hunter@m365info.com  {SendAs}
12eefbb2-e5f4-4eec-bd18-df7ca2f1ee6b Donna.Hart@m365info.com      {SendAs}
12eefbb2-e5f4-4eec-bd18-df7ca2f1ee6b Andrea.Baker@m365info.com    {SendAs}
12eefbb2-e5f4-4eec-bd18-df7ca2f1ee6b Brian.Mill@m365info.com      {SendAs}
12eefbb2-e5f4-4eec-bd18-df7ca2f1ee6b Stephen.Lambert@m365info.com {SendAs}
12eefbb2-e5f4-4eec-bd18-df7ca2f1ee6b Brenda.Smith@m365info.com    {SendAs}
Display all recipients with Send As permission
We will use the Get-RecipientPermission PowerShell cmdlet to view information about Send As permissions on other recipient mailboxes. Always add the -ResultSize Unlimited parameter to get all the results.
Run the below PowerShell command.
Get-RecipientPermission -ResultSize Unlimited | Where { ($_.Trustee -ne "NT AUTHORITY\SELF") } | Select-Object Identity, Trustee, AccessRightsThe PowerShell output result.
Identity                                                      Trustee                                           AccessRights
--------                                                      -------                                           ------------
0f38d53f-cbe0-4844-86e9-1032a45ba31b                          Carl.Hawk@m365info.com                            {SendAs}
ExchangeOnline-d3b52db6-ffb1-4b3c-82ba-f75a175936a2           NULL SID                                          {SendAs}
ExchangeOnlineDeskless-6f1bbbd6-1026-4b7d-9775-ed0f22322199   NULL SID                                          {SendAs}
ExchangeOnlineEnterprise-249eec09-6805-4118-b54d-e2e838d3ca9e NULL SID                                          {SendAs}
ExchangeOnlineEssentials-e5833e49-9ff1-4b3c-bbb5-e2d485674a53 NULL SID                                          {SendAs}
Finance USA                                                   Amanda.Hansen@m365info.com                        {SendAs}
Projector 8                                                   S-1-5-21-701439281-3420630407-1831248095-12986085 {SendAs}
Test SharedMailbox20231129082329                              Amanda.Hansen@m365info.com                        {SendAs}
Display Send As permission from specific recipient
You can display the Send As permission from a specific recipient. When a user has many permissions on different organization recipients, it’s hard to remember them all.
In our example, we want to display the Send As permission the user Amanda has on other users or groups.

To get that information, we need to use the Get-Recipient PowerShell cmdlet to get a list of all the existing recipients. Then, we will also use the Get-RecipientPermission PowerShell cmdlet and add the -Trustee (Amanda.Hansen@m365info.com).
See the below PowerShell command example.
Get-Recipient -ResultSize Unlimited | Get-RecipientPermission -Trustee "Amanda.Hansen@m365info.com" | Select-Object Identity, Trustee, AccessRightsThe PowerShell output shows the below result.
Identity                         Trustee                    AccessRights
--------                         -------                    ------------
Finance USA                      Amanda.Hansen@m365info.com {SendAs}
Test SharedMailbox20231129082329 Amanda.Hansen@m365info.com {SendAs}
3. Export Send As permissions
You can export the PowerShell output and save it as a file in different formats, such as CSV or TXT files. Another option is to export the Send As permission information to an Out-GridView format.
Export Send As permission for multiple users to TXT file
We want to export all Send As permissions of multiple users on all the recipients to a TXT file. The PowerShell parameter we use for exporting information to a text file is Out-File.
You need to create a folder named temp in the (C:) drive to provide the path where to export the txt file.
Run the PowerShell command example.
"Brenda.Smith@m365info.com", "Ken.Walker@m365info.com" | ForEach-Object {
    Get-RecipientPermission -Identity $_ } |
Out-File -FilePath "C:\temp\SendAsPermissions.txt" -Encoding UTF8
To remove irrelevant information from the output, we will change the above PowerShell command.
- Specify the TXT path in line 1
- Specify the UserPrincipalName of the users in line 2
- Run the below PowerShell command script
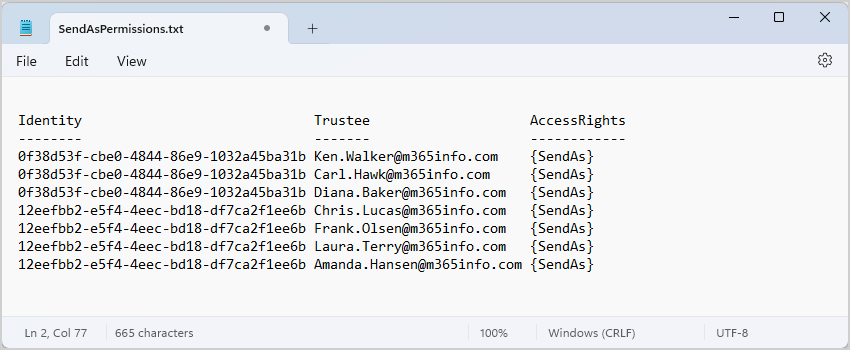
$TXTPath = "C:\temp\SendAsPermissions.txt"
"Brenda.Smith@m365info.com", "Ken.Walker@m365info.com" | ForEach-Object {
    Get-RecipientPermission -Identity $_ |
    Where-Object {
        ($_.IsInherited -eq $false) -and
        -not ($_.Trustee -like "NT AUTHORITY\SELF") -and
        -not ($_.User -like '*Discovery Management*')
    }
} | Select-Object Identity, Trustee, AccessRights |
Out-File -FilePath $TXTPath -Encoding UTF8
Go to the temp folder in your (C:) drive and open the TXT file. The file shows the Send As permissions of the users you provided in the PowerShell script.
Export Send As permission user has to Out-GridView and CSV file
We want to export all the Send As permissions a specific user has on other users and groups to an Out-GridView and CSV file.
The PowerShell parameter we use for exporting information to a text file is Export-Csv. You also need to create a temp folder and save it in the (C:) drive. When exporting information to a CSV file, a parameter that is recommended to add is -NoTypeInformation.
In our example, we would like to get information about the Send As permission the trustee (Amanda Hansen) has on other mailboxes.
- Specify the CSV path in line 1
- Specify the Trustee with the UserPrincipalName in line 2
- Run the below PowerShell command script
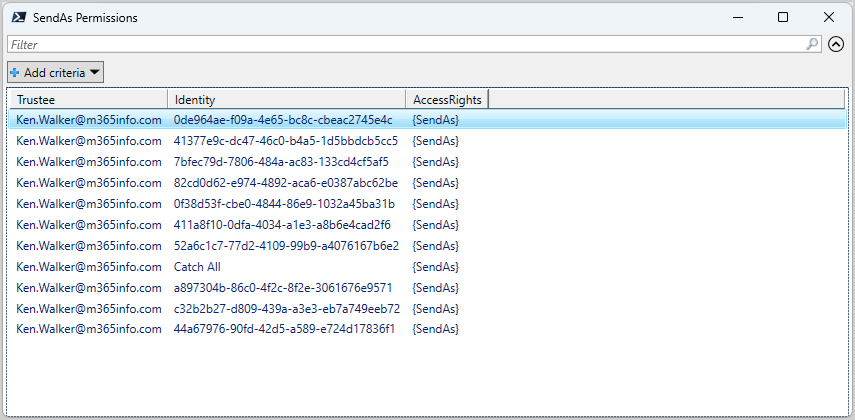
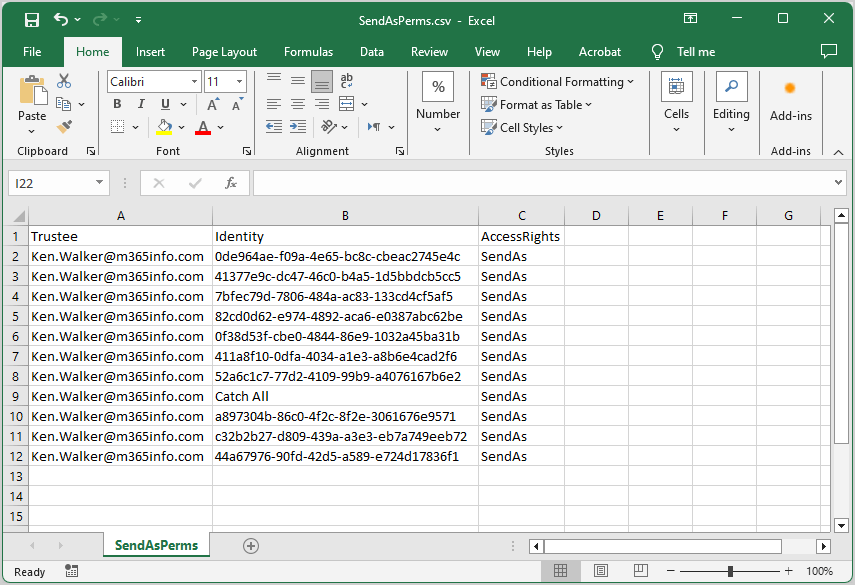
$CSVPath = "C:\temp\SendAsPerms.csv"
$RecipientPermissions = Get-Recipient -ResultSize Unlimited | Get-RecipientPermission -Trustee "Ken.Walker@m365info.com" | ForEach-Object {
    $mailbox = Get-Recipient $_.Identity
    [PSCustomObject]@{
        Trustee      = $_.Trustee
        Identity     = $_.Identity
        AccessRights = $_.AccessRights
    }
}

$RecipientPermissions | Select-Object Trustee, Identity, AccessRights | Export-Csv -Path $CSVPath -NoTypeInformation -Encoding UTF8
$RecipientPermissions | Out-GridView -Title "SendAs Permissions"- The Out-GridView appears with the Send As permissions
- Find the CSV file in the C:\temp folder
- Open the CSV file with an application like Microsoft Excel to see the results
Export list of mailboxes with Send As permission to CSV file
We want to export a list of all the recipients with Send As mailbox permission to a CSV file and Out-GridView. It shows every single mailbox with Send As mailbox permission to another licensed mailbox.
Follow the below steps to export a list of Send As permissions to CSV:
- Type the CSV path in line 2
- Run the below PowerShell script
# Set the path for the CSV file to store the permissions
$CSVPath = "C:\temp\SendAsPermissions.csv"
try {
# Get all the mailboxes with unlimited result size and retrieve their mailbox permissions
$permissions = Get-Recipient -ResultSize Unlimited | Get-RecipientPermission | Where-Object {
# Filter out permissions that are inherited, belong to "NT AUTHORITY\SELF", or belong to "Discovery Management"
($_.IsInherited -eq $false) -and -not ($_.Trustee -like "NT AUTHORITY\SELF") -and -not ($_.Trustee -like '*Discovery Management*')
} | ForEach-Object {
# For each permission, get the mailbox details
$mailbox = Get-Recipient $_.Identity
[PSCustomObject]@{
Identity = $mailbox.Identity
Trustee = $_.Trustee
AccessRights = $_.AccessRights
RecipientTypeDetails = $mailbox.RecipientTypeDetails
}
} | Select-Object Identity, Trustee, AccessRights, RecipientTypeDetails
# Display the permissions in Out-GridView
$permissions | Out-GridView -Title "Send As permissions"
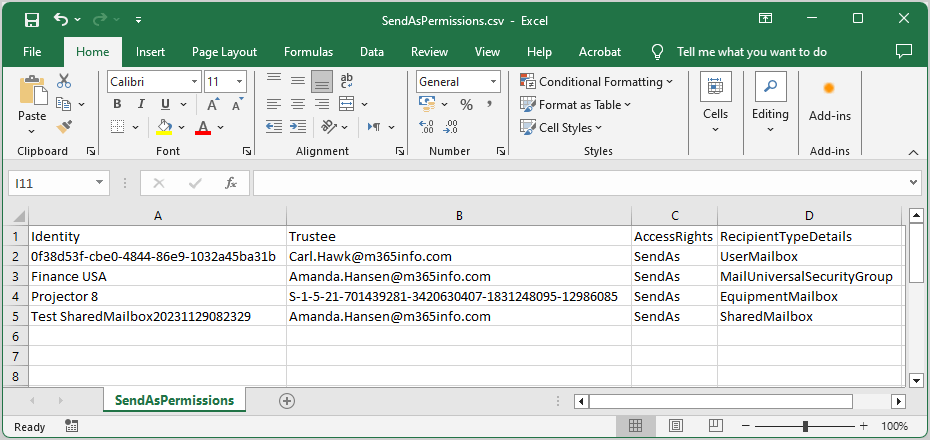
# Export the permissions to a CSV file
$permissions | Export-Csv -Path $CSVPath -NoTypeInformation -Encoding UTF8
# Display a success message if the export was successful
Write-Host "Exported permissions successfully to $CSVPath" -ForegroundColor Cyan
}
catch {
# Display an error message if there was an exception during the export
Write-Host "Error exporting permissions: $_" -ForegroundColor Red
}- It will export all the Send As permissions to an Out-GridView
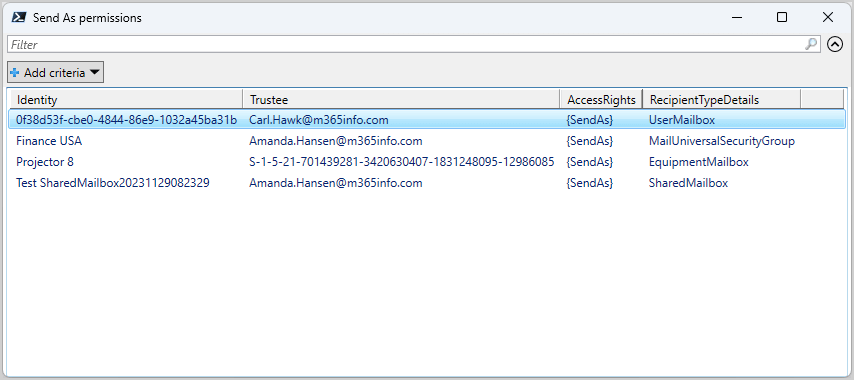
- Find the CSV file in the C:\temp folder
- Open the CSV file with an application like Microsoft Excel to see the results
4. Remove Send As Permissions
To remove the Send As permissions, you need to use the Remove-RecipientPermission PowerShell cmdlet.
Remove Send As Permissions from single mailbox
In our example, we will remove the Send As permission of a single user mailbox on another user mailbox.
- Amanda has Send As permissions on Ken’s mailbox.
- We would like to remove Amanda Send As permissions from Ken’s mailbox.
To suppress the confirmation prompt, we add the parameter -Confirm:$false.
See the below PowerShell command syntax.
Remove-RecipientPermission "Identity" -AccessRights SendAs -Trustee "Identity" -Confirm:$falseRun the PowerShell command example.
Remove-RecipientPermission "Ken.Walker@m365info.com" -AccessRights SendAs -Trustee "Amanda.Hansen@m365info.com" -Confirm:$falseRemove user Send As Permissions from all mailboxes
In our example, the user (Amanda.Hansen@m365info.com) has Send As permission on multiple mailboxes, and we want to remove all these permissions.
The PowerShell script will consist of these parts:
- You will use the Get-Recipient PowerShell cmdlet to get all the recipients. Then you will pipe the information to the second PowerShell command.
- The second PowerShell command will check if Amanda has Send As permission on a particular recipient, and if so, it will remove these permissions.
- To suppress the confirmation prompt, you can add the parameter Confirm:$false.
Run the below PowerShell command to remove Send As permission from all recipients.
Get-Recipient -ResultSize Unlimited | Remove-RecipientPermission -AccessRights SendAs -Trustee "Amanda.Hansen@m365info.com" -Confirm:$falseIf the user has no Send As permission on recipients, you will get the below warning.
WARNING: Can't remove the access control entry on the object "CN=Zgroup,OU=ms365info.onmicrosoft.com,OU=Microsoft
Exchange Hosted Organizations,DC=EURPR02A011,DC=PROD,DC=OUTLOOK,DC=COM" for attribute "ExtendedRight
(ObjectType: ab721a54-1e2f-11d0-9819-00aa0040529b)" because the ACE isn't present.
Remove user Send As Permissions from multiple users using a CSV file
If you have a user mailbox with many Send As permission on recipients, you can also remove some of them. We want to remove the Send As permission of the user mailbox (Amanda.Hansen@m365info.com) to multiple recipients. Therefore we will create a CSV file with a recipient list.
Create a CSV file with a list of users:
- Type Users at the top of the first column header
- List the UserPrincipalName in the first column
- Name the file Users
- Create a temp folder in the (C:) drive
- Save it as a CSV file
The PowerShell script will consist of these parts:
- Use the Import-Csv PowerShell command that will import the information from the CSV file and define it as a variable named $UserList.
- The PowerShell ForEach operator will loop through the information from the CSV file.
- Add the Remove-RecipientPermission PowerShell cmdlet to remove the -Trustee (Amanda) from the usernames.
- Specify the CSV path in line 1
- Specify the Trustee with the UserPrincipalName in line 3
- Run the PowerShell script
$UserList = Import-Csv "C:\temp\Users.csv"
ForEach ($User in $UserList) {
    Remove-RecipientPermission $user.Users -AccessRights SendAs -Trustee "Amanda.Hansen@m365info.com" -Confirm:$false
}
It will remove the Send As permission the Trustee (Amanda) has on all these users from the CSV list
Remove Send As Permissions from all recipients of specific department
In our example, we want to remove the Send As permission of a single user mailbox on other recipients from a specific department.
- Amanda has Send As Permissions to all the recipients from the marketing department
- We will only remove Amanda’s Send As permissions from these recipients
The PowerShell script will consist of these parts:
- You need to use the Get-Recipient PowerShell cmdlet to get all the recipients with the -Filter parameter to get the recipients from the marketing department.
- Add the pipeline (|) to remove the Send As permission of the -Trustee (Amanda) on each recipient from the marketing department.
Run the PowerShell command to remove the Send As permission from a specific department.
Get-Recipient -ResultSize Unlimited -Filter { (Department -eq "marketing") } | Remove-RecipientPermission -AccessRights SendAs -Trustee "Amanda.Hansen@m365info.com" -Confirm:$falseRemove Send As Permissions from each Distribution Group member
If you have a distribution group with members that have Send As permissions on a specific mailbox, you can remove them all.
In our example:
- The distribution group (Finance1) has members with Send As Permissions on Ken’s.
- We want to remove the Send As Permissions of each distribution group member from Ken.
Follow the below steps to remove the Send As permission from a distribution group:
- Type the Primary SMTP Address of the distribution group in line 1
- Type the UserPrincipalName of the user mailbox in line 3
- Run the PowerShell script
$GroupMembers = Get-DistributionGroupMember -Id "Finance1@m365info.com"
ForEach ($Member in $GroupMembers) {
    Remove-RecipientPermission -Identity "Ken.Walker@m365info.com" -AccessRights SendAs -Trustee $Member.name -Confirm:$false
}
Remove user Send As permissions from each Distribution Group member
If you have a specific mailbox with Send As permissions on a distribution group, you can remove these permissions.
In our example:
- The user Ken has Send As Permission on the distribution group (Finance1).
- We want to remove the Send As permissions Ken has on each member of the distribution group (Finance1).
Follow the below steps to remove the Send As permission from a distribution group:
- Type the Primary SMTP Address of the distribution group in line 1
- Type the UserPrincipalName of the user mailbox in line 3
- Run the PowerShell script
$GroupMembers = Get-DistributionGroupMember -Id "Finance1@m365info.com"
ForEach ($Member in $GroupMembers) {
    Remove-RecipientPermission -Identity $Member.name -AccessRights SendAs -Trustee "Ken.Walker@m365info.com" -Confirm:$false
}
That’s it!
Read more: How to assign Full Access mailbox permission »
Conclusion
You learned how to manage Send As mailbox permissions in Exchange Online PowerShell. There are many different tasks to manage Send As permissions with PowerShell. Use the PowerShell cmdlets to get, add, and remove Send As permissions for mailboxes.
Did you enjoy this article? You may also like Manage mailbox folder permission with PowerShell. Don’t forget to follow us and share this article.
This Post Has 0 Comments