The current article is the contention of the previous article, in which we review the…
Display information about E-mail Addresses using PowerShell | Customizing the output using Hash Table and Custom expressions | Office 365 | Part 7#13
In this article, we review that subject of – how to create a Hash table + Custom expressions as a “tool” that we can use for optimizing and manipulating the PowerShell output in scenarios of – Get information about recipient’s E-mail addresses.
We will learn how to create a Hash table + Custom expressions that performs the following tasks:
- Get information about specific types of E-mail address such as – Primary E-mail address, Proxy E-mail address, x500 E-mail address and SIP E-address.
- Remove the default SMTP prefix from the displayed results of SMTP E-mail addresses.
- Separate values in a multivalued attribute by using a “separator charter.”
- Filter results by define a search query.”
Table of contents
- Using PowerShell Hash table basic introduction
- Optimize the displayed results about – recipient E-mail addresses using Hash table
- Separate values in a multivalued attribute “EmailAddresses”
- Get information about recipients whom their Primary E-mail address includes a specific domain name suffix
- View information about Proxy E-mail address (Alias) that include a specific Domain name suffix
- The next article in the current article series
Using PowerShell Hash table basic introduction
What is the purpose of using Hash table and Custom expressions?
The PowerShell option which describes as – Hash table, is a very powerful option, that enables us to create a “NEW property” that is customized to our specific needs.
The custom property can be implemented in various ways, such as – calculated field, search query and so on.
For example, the PowerShell command Get-Mailbox, can be used for displaying the information stored in the EmailAddresses property.
The EmailAddresses property includes a list, of all the available addresses that specific Exchange recipient has.
By default, the PowerShell command Get-Mailbox doesn’t include a built-in parameter that enables us to “filter the search results,” and asks to get information only a specific type of E-mail address such as Proxy E-mail addresses.
The good news is, that by using the option of – PowerShell “Hash table,” we can create a “NEW recipient property,” that will include the specific information that we need.
In our case, all the Proxy E-mail addresses of a recipient. The creation of this “NEW recipient property” is implemented by “Hash table”.
The structure of “Hash table” (custom information fields)
The concept of “Hash table” (custom property) is implemented by using a syntax that includes two parts:
Part 1#2 – The Label part
This is the first part of the Hash table, in which we define the “Name” of the custom property.
The “Name” is just an arbitrary name whom we define.
Part 2#2 – The Expression part.
The is the second part of the Hash table, in which we define the Expression. The term Expression can be translated into various types of “PowerShell sentences” such as – a Filtered search query, calculated value and so on.
“Hash table” | Naming convection
There are two options of naming conviction that we can use for the writing Hash table.
Option 1#2
The naming convention that we use for defining the label part, is implemented by using the
letter L (Label).
The naming convention that we use for defining the expression part, is implemented by using the letter E (expression).

Option 2#2
The naming convention that we use for defining the label part, is implemented by using the term Name
The naming convention that we use for defining the expression part, is implemented by using the term Expression

“Extract” Proxy E-mail address using “Hash table” example.
To demonstrate the way that we use the Hash table (custom property), let’s use the following example: we want to display information about the Proxy E-mail address of the recipient.
In the following diagram, we can see the structure of the PowerShell command that we will use:

Part A: This is a standard PowerShell Get-Mailbox command, in which we ask from PowerShell, to get all the available information about the Exchange Online recipient mailbox.
Part B: In this part, we use the PowerShell parameter “select” for displaying only two properties of the recipients: the standard DispalyName property + NEW custom property that we define by using a Hash table.
The syntax of the Hash table
The syntax of the PowerShell Hash table that we use in our case for extracting information about
Proxy E-mail addresses is:
PowerShell command syntax
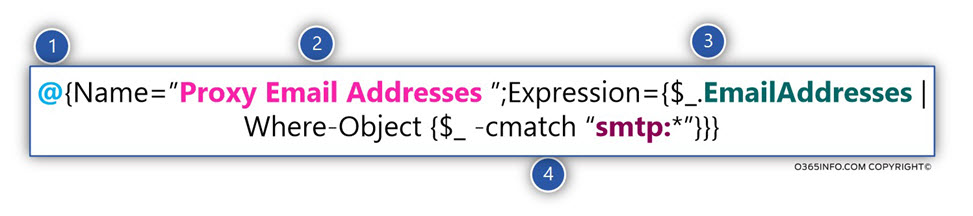
@{Name="Email Addresses";Expression={$_.EmailAddresses | Where-Object {$_ -cmatch "smtp:*"}}}In the following diagram, we can see the different part of the Hash table:
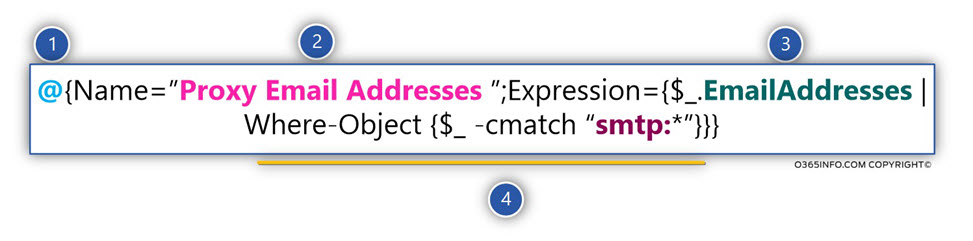
Number 1 – we use the @ character, for “declaring” that we create a special array (Hash table) that includes the Array name + PowerShell expression such as filtered search query, calculated value and so on.
Hash table – name
Number 2 – this is the “name” that we define for the Array. In our example, we define the Array name – “Proxy Email address.”
And again, this is just an arbitrary name whom I choose for my specific needs.
Hash table – Expression
Number 3 – in our example, we ask from PowerShell to create a “filtered search query,” that will be implemented in the following way:
We instruct PowerShell to query a recipient property named EmailAddresses. A quick reminder – this is the mailbox property, that store information about every existing E-mail address and other address.
Number 4 – we define a filter that will fetch information only about Proxy E-mail addresses.
The filter is based on the following structure:
We use the Where-Object PowerShell statement, to define a condition, that uses the logical
operator cmatch.
A quick reminder-
- Exchange stores information about SMTP E-mail address by using the smtp: prefix.
- Proxy E-mail addresses are represented by the smtp: prefix written in small caps.
- Primary E-mail address represented by the SMTP: prefix written in capital letters.
The condition that we define is actually based on two separated condition.
We ask from PowerShell, to “fetch” information only about E-mail address that starts with the prefix – smtp: and in addition, the smtp prefix must be written in small caps.
To fulfill this requirement, we use the PowerShell logical operator cmatch. PowerShell logical operator – cmatch was created for looking for a “perfect match” + performing a case-sensitive match.
Optimize the displayed results about – recipient E-mail addresses using Hash table
In this section, we review how to use Hash table and Custom expressions, for two main purposes:
- Enhance our capability to create a custom\ new recipient property that will enable us to view information about specific types of E-mail address such as – Proxy E-mail address, SIP address, x500 E-mail and so on.
- Optimizing the PowerShell output of recipient E-mail address by
- Removing “unnecessary data” from the output
- Adding “separation character,” that will enable us to work better with mailbox attribute that defined as a multivalued attribute that contains multiple E-mail addresses.
In the previous section, we review the way to create a PowerShell Hash table that “filter” the search result by displaying information about E-mail addresses that have a specific character such as Proxy E-mail addresses.
For this purpose, we use a PowerShell command such as:
Get-Mailbox Christina | Select-Object DisplayName,@{Name="Proxy Email Addresses";Expression={$_.EmailAddresses | Where-Object {$_ -cmatch "smtp:*"}}}In the following diagram, we can see the “output” that we got from the PowerShell command.
The result looks “ok” because we got the required information meaning – the Proxy E-mail
addresses of Christina

Issue 1 – The curly brackets
When Exchange Online recipient has more than one Proxy E-mail address, PowerShell will display the information using a curly bracket. In many scenarios in which we need to “work” with the “E-mail address information”, we will need to remove the curly bracket characters.
Issue 2 – The separation characters
When PowerShell “see” more than one E-mail address, PowerShell will use the comma (,) character for separating between the values (E-mail addresses in our case).
The “thing” is that when we export the information to a file such as a CSV file, PowerShell will not use the comma (,) character, but instead, will use a “space” to separate the values.
In case that we need to “manipulate” the data stored in a CSV, we need to use some “separation character,” that will enable us to address separately each value.
Issue 3 – Smtp prefix
PowerShell displays each E-mail address using a prefix, that defines the type of the E-mail address. In our example, each proxy E-mail address will be displayed using the prefix smtp: using small caps.
In case that we need to “do something” with the information about the “E-mail address,” we need to use the “clean” from the E-mail address the smtp: prefix.
Optimize the output of the Hash table using the parameters- Replace + Join.
To be able to solve the mentioned “issues” we will use two PowerShell parameters
- Replace
- Join

In the next section, we will add the additional parameter to the PowerShell Hash table, that will help us to improve the output of the Hash table.
In the following diagram, we can see the additional parameters that were added to the “original syntax” of the Hash table.
Remove the SMTP prefix | Using the Replace parameter
We will start with the mission of – removing the “smtp prefix,” from the information that is displayed about the Proxy E-mail addresses.
In our example, we use the following syntax -replace ‘smtp:’.
The purpose of the PowerShell command replace is, as the name implies, to replace an existing string with a “NEW string.”
In our example, we want to remove a string (“smtp prefix”), and not to “replace” the “smtp prefix.”
The trick that we use is, that we “tell” PowerShell, to replace the “smtp prefix” with “nothing.” In other words, we ask from the PowerShell “replace” parameter, to replace the “smtp prefix” and replace this text string with “empty space.”
To be able to fulfill the requirement of – removing the “smtp prefix” from the PowerShell output of the E-mail address, we use the following PowerShell command syntax:
Get-Mailbox Christina | Select-Object DisplayName,@{Name="EmailAddresses";Expression={ ($_.EmailAddresses | Where-Object {$_ -cmatch "smtp:*"} | ForEach-Object {$_ -replace 'smtp:' }) }}In the following box, we can see the result of the PowerShell output.
Notice that now, each E-mail address appears without the smtp prefix
PowerShell console output example:
PS C:\script> Get-Mailbox Christina | Select-Object DisplayName,@{Name="EmailAddresses";Expression={ ($_.EmailAddresses | Where-Object {$_ -cmatch "smtp:*"} | ForEach-Object {$_ -replace 'smtp:' }) }}

DisplayName                  EmailAddresses
-----------                  --------------
Christina Aguilera           {Christina-Alias02@o365info.com, Christina@o365pilot.com}
Using the Join parameter
Our journey didn’t end because we have an additional task – remove the “curly bracket” that surrounds the E-mail address “array.”
In addition, we want to add a “separator character” that will separate each “E-mail address value” when we export the data to file such as CSV file.
To add the separation character to the output, we will use the PowerShell parameter – Join and provide the “separation character.” In our example, we use the character – (;)
To be able to fulfill the requirements of:
- Removing the smtp prefix from the PowerShell output of the E-mail address.
- Removing the “curly bracket” the surround the E-mail address array.
- Add a separator character – in our example, we use the characters (;)
We use the following PowerShell command syntax:
Get-Mailbox Christina | Select-Object DisplayName,@{Name="EmailAddresses";Expression={ ($_.EmailAddresses | Where-Object {$_ -cmatch "smtp:*"} | ForEach-Object {$_ -replace 'smtp:' }) -join ';' }}In the following box, we can see the result of the PowerShell output.
Notice that now
- Each E-mail address appears without the smtp prefix.
- The “curly bracket” the surround the E-mail address array was removed.
- Each E-mail address is separated by the characters – (;).
PowerShell console output example:
PS C:\script> Get-Mailbox Christina | Select-Object DisplayName,@{Name="EmailAddresses";Expression={ ($_.EmailAddresses | Where-Object {$_ -cmatch "smtp:*"} | ForEach-Object {$_ -replace 'smtp:' }) -join ';' }}

DisplayName               EmailAddresses
-----------               --------------
Christina Aguilera        Christina-Alias02@o365info.com;Christina@o365pilot.com
Using Hash table for display information about – recipient e-mail address
In the following section, I would like to review a couple of examples to a scenario in which we use PowerShell Hash table, for getting information about specific Exchange recipient E-mail addresses.
Display only Primary E-mail address
The PowerShell command – Get-Mailbox, include a dedicated parameter that enables us to display information about a specific E-mail address that defines as – Primary E-mail address.
In other words, we don’t need to implement any sophisticated PowerShell command syntax such as using the Hash table for a display Primary E-mail address.
To be able to view only the Primary E-mail address, we can use the following PowerShell syntax:
Get-Mailbox Billy | Select Alias,PrimarySmtpAddressAlthough we don’t need to use a special command configuration, I would like to provide an example to the Hash table syntax, that we use displaying E-mail that defined as a Primary E-mail address.
In this example, we define a condition using the “cmatch” logical operator, that “fetch” information about E-mail address only if the prefix of the E-mail address include the string “SMTP:” using capital letters.
Get-Mailbox | Select-Object DisplayName,@{Name="Primary Email Address";Expression={$_.EmailAddresses |Where-Object {$_ -cmatch "SMTP:*"}}}Display only SIP address
In the current scenario, we want to view information only about recipient address, which described as “SIP address” (addresses that are used by Skype for business users).
SIP address begins with the prefix “sip:”
To be able to “fetch” information only about SIP addresses, we define the following Hash table Expression:
PowerShell command example
Get-Mailbox | Select-Object DisplayName,@{Name="SIP Email Address";Expression={$_.EmailAddresses |Where-Object {$_ -LIKE "sip:*"}}}Display only x500 E- address
In the current scenario, we want to view information only about the E-mail address, which described as “x500 E-mail address”.
X500 E-mail address begins with the prefix “x500:”
To be able to “fetch” information only about x500 addresses, we define the following Hash table Expression.
PowerShell command example:
Get-Mailbox | Select-Object DisplayName,@{Name="x500 Email Address";Expression={$_.EmailAddresses |Where-Object {$_ -cmatch "x500:*"}}}Creating more “advanced” PowerShell Hash table
In this section, I would like to demonstrate more “advanced” syntax that is used for a PowerShell Hash table
In our scenario, we ask from PowerShell, to display information about each type of E-mail address such as – Primary E-mail address, Alias E-mail address, SIP address and so on.
In addition, I add a new example of “custom result fields” (NEW property) that perform a calculation, in which we count the number of Proxy E-mail addresses that each Exchange recipient has.
The PowerShell syntax of the command is as follows:
@{Name="Number of Proxy Email";Expression={($_.EmailAddresses |Where-Object {$_ -cmatch "smtp:*"}).count}}The “complete” PowerShell command syntax that uses is:
Get-Mailbox | Select-Object DisplayName,@{Name="Primary Email Addresses";Expression={$_.EmailAddresses |Where-Object {$_ -cmatch "SMTP:*"}}} ,@{Name="Proxy Email Addresseses";Expression={$_.EmailAddresses |Where-Object {$_ -cmatch "smtp:*"}}} , @{Name=2Number of Proxy Email";Expression={($_.EmailAddresses |Where-Object {$_ -cmatch "smtp:*"}).count}} ,@{Name="SIP Email Addresseses";Expression={$_.EmailAddresses |Where-Object {$_ -LIKE "sip:*"}}} ,@{Name="X500 EmailAddresseses";Expression={$_.EmailAddresses |Where-Object {$_ -LIKE "x500:*"}}}PowerShell console output example:
PS C:\script> Get-Mailbox | Select-Object DisplayName,@{Name="Primary Email Addresses";Expression={$_.EmailAddresses |Where-Object {$_ -cmatch "SMTP:*"}}} ,@{Name="Proxy Email Addresseses";Expression={$_.EmailAddresses |Where-Object {$_ -cmatch "smtp:*"}}} , @{Name=2Number of Proxy Email";Expression={($_.EmailAddresses |Where-Object {$_ -cmatch "smtp:*"}).count}} ,@{Name="SIP Email Addresseses";Expression={$_.EmailAddresses |Where-Object {$_ -LIKE "sip:*"}}} ,@{Name="X500 EmailAddresseses";Expression={$_.EmailAddresses |Where-Object {$_ -LIKE "x500:*"}}}

DisplayName : admin
Primary Email Addresses : SMTP:admin@o365info.com
Proxy Email Addresseses : smtp:admin1948@o365info2.onmicrosoft.com
Number of Proxy Email : 1
SIP Email Addresseses : SIP:admin@o365info.com
X500 EmailAddresseses :

DisplayName : Alice Good
Primary Email Addresses : SMTP:Ayelet@o365info.com
Proxy Email Addresseses : smtp:Ayelet@o365info2.onmicrosoft.com
Number of Proxy Email : 1
SIP Email Addresseses : SIP:Ayelet@o365info.com
X500 EmailAddresseses :

DisplayName : Angelina Jolie
Primary Email Addresses : SMTP:Angelina-NEW01@o365info.com
Proxy Email Addresseses : {smtp:Angelina@o365pilot.com, smtp:kk@o365info.com, smtp:Angelina@o365info.com, smtp:Angelina-Alias03@o365info.com...}
Number of Proxy Email : 5
SIP Email Addresseses :
X500 EmailAddresseses :
Separate values in a multivalued attribute “EmailAddresses”
In this section, I would like to review additional “PowerShell method,” in which we “separate” values that appear in a multivalued attribute.
As mentioned, the Exchange Online mailbox attributes “EmailAddresses” considered as a multivalued attribute, because it stores a couple of values meaning, a couple of (multiple) E-mail address.
Our mission is to create a custom output that will display each of the Exchange recipient E-mail address is a “dedicated column.
In the following example, we use a PowerShell command that gets information about
Angelina E-mail addresses.
Get-Mailbox Angelina | Select-Object DisplayName -ExpandProperty EmailAddressesIn the output, we can see that the “EmailAddresses” property includes many E-mail addresses.
PS C:\script> Get-Mailbox Angelina | Select-Object DisplayName -ExpandProperty EmailAddresses

smtp:Angelina@o365pilot.com
smtp:kk@o365info.com
SPO:SPO_5b27dc17-68b0-442e-804b-aee5b4df9847@SPO_e95bcc9e-2927-483d-ad36-7311a7152bdd
smtp:Angelina@o365info.com
SMTP:Angelina-NEW01@o365info.com
smtp:Angelina-Alias03@o365info.com
smtp:Angelina-Alias02@o365info.com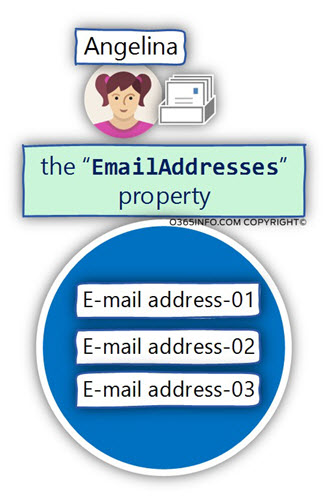
We can relate to the “EmailAddresses” property as an “Array” and to each E-mail address
as “Array member”.
Each value (member) that is included in the Array (array member) is represented by index number begging with “0” and so on.
To be able to address a specific Array member (specific E-mail address stored in the multivalued attribute “EmailAddresses”), we can define the specific index number that represents the member.
The specific index number is written by using the following naming convention:
- [0] for addressing the “first member” in the Array.
- [1] for addressing the “second member” in the Array.
And so on.
In our scenario, we want to create a display that will “fetch” the Array members, and display each member separately.
In our case, fetch each “E-mail address” stored in the multi-valued attribute “EmailAddresses” and display the information about the E-mail address in a dedicated column.
To implement this requirement, we define a custom information field (Hash Table), that includes a “dedicated column” for each E-mail address.
The syntax of the custom information field (Hash Table), is written by using the following PowerShell syntax:
@{Name= "E-mail address 01"; E={$_.EmailAddresses[0]}}- In the first part (label part) we define the column header name. in our example, we define the name – E-mail address 01.
- In the second part (Expression part), we ask PowerShell to fetch for us the first value in the multivalued attribute “EmailAddresses”. The first value is represented by the index number [0].
We add this syntax a couple of times, for each additional value that are included in the Array.
To “fetch” the second E-mail address in the Array we use the fowling syntax:
@{Name= "E-mail address 02"; E={$_.EmailAddresses[1]}}Notice that we don’t know what is the number of the “values” in the attribute “EmailAddresses”.
All we can do is just to “speculate” and define a dedicated custom information field (Hash Table) for each value (E-mail address).
In the following example, I have created five custom information field (Hash Tables) assuming that that maximum number of the average recipient is no more than “five E-mail addresses.”
Get-Mailbox | Select-Object DisplayName, @{Name= "E-mail address 01"; E={$_.EmailAddresses[0]}} , @{Name= "E-mail address 02"; E={$_.EmailAddresses[1]}} , @{Name= "E-mail address 03"; E={$_.EmailAddresses[2]}} , @{Name= "E-mail address 04"; E={$_.EmailAddresses[3]}} , @{Name= "E-mail address 05"; E={$_.EmailAddresses[4]}}PowerShell console output example
PS C:\script> Get-Mailbox | Select-Object DisplayName, @{Name= "E-mail address 01"; E={$_.EmailAddresses[0]}} , @{Name= "E-mail address 02"; E={$_.EmailAddresses[1]}} , @{Name= "E-mail address 03"; E={$_.EmailAddresses[2]}} , @{Name= "E-mail address 04"; E={$_.EmailAddresses[3]}} , @{Name= "E-mail address 05"; E={$_.EmailAddresses[4]}}

DisplayName : admin
E-mail address 01 : SIP:admin@o365info.com
E-mail address 02 : SMTP:admin@o365info.com
E-mail address 03 : smtp:admin1948@o365info2.onmicrosoft.com
E-mail address 04 :
E-mail address 05 :

DisplayName : Alice Good
E-mail address 01 : SIP:Ayelet@o365info.com
E-mail address 02 : SMTP:Ayelet@o365info.com
E-mail address 03 : smtp:Ayelet@o365info2.onmicrosoft.com
E-mail address 04 :
E-mail address 05 :

DisplayName : Angelina Jolie
E-mail address 01 : smtp:Angelina@o365pilot.com
E-mail address 02 : smtp:kk@o365info.com
E-mail address 03 : SPO:SPO_5b27dc17-68b0-442e-804b-aee5b4df9847@SPO_e95bcc9e-2927-483d-ad36-7311a7152bdd
E-mail address 04 : smtp:Angelina@o365info.com
E-mail address 05 : SMTP:Angelina-NEW01@o365info.com
Get information about recipients whom their Primary E-mail address includes a specific domain name suffix
In the following section, I would like to review more examples of scenarios in which use the PowerShell Hash Table, and “Custom expressions” with a combination of PowerShell Where statement.
In this scenario, we need to implement a PowerShell search query, that display information about the Exchange recipient E-mail address that answers the following condition:
We want to get information only about recipients whom their Primary E-mail address includes a specific domain name suffix.
In our example, the domain name suffix that we look for is – o365pilot.com.
The information about this Exchange recipient will include the recipient Display name, Primary E-mail address and his Proxy E-mail addresses.
The PowerShell syntax that we use is
Get-Mailbox -ResultSize Unlimited | Select-Object DisplayName, PrimarySMTPAddress, @{Name="Proxy Email Addresses";Expression={$_.EmailAddresses -cmatch "smtp"}} | Where-Object {($_.PrimarySMTPAddress -like "*o365pilot.com*") };PowerShell console output example
PS C:\temp> Get-Mailbox -ResultSize Unlimited | Select-Object DisplayName, PrimarySMTPAddress, @{Name="Proxy Email Addresses";Expression={$_.EmailAddresses -cmatch "smtp"}} | Where-Object {($_.PrimarySMTPAddress -like "*o365pilot.com*") }

Creating a new session for implicit remoting of "Get-Mailbox" command...

DisplayName              PrimarySmtpAddress                         Proxy Email Addresses
-----------              ------------------                         ---------------------
Beatles the              Beatles@o365pilot.com                      smtp:Beatles@o365info2.onmicrosoft.com
Britney spears           Britney@o365pilot.com                      {smtp:Britney@o365info.com, smtp:Britney@o365info2.onmicrosoft.com}
Craig David              Craig@o365pilot.com                        smtp:Craig@o365info2.onmicrosoft.com
Depeche Mode             Depeche@o365pilot.com
Elvis Preslay            Elvis@o365pilot.com
E-mail attachments       Mailbox E-mail-attachments@o365pilot.com   smtp:E-mail-attachments@o365info.com
Justin timberlake        Justin@o365pilot.com                       smtp:Justin@o365info2.onmicrosoft.com
Spoof E-mails MailBox    Spoof-E-mail-Mailbox@o365pilot.com         smtp:Spoof-E-mail-Mailbox@o365info2.onmicrosoft.com
An additional variation of this case is a scenario in which we want to get information about Exchange Online recipients whom they Primary E-mail address includes a specific domain name suffix OR “other” domain name suffix.
In our example the domain name suffix that we look for the recipient whom their Primary E-mail address includes the domain name suffix – o365pilot.com or o365info.com
PowerShell command example_
Get-Mailbox -ResultSize Unlimited | Select-Object DisplayName,PrimarySMTPAddress, @{Name="EmailAddresses";Expression={$_.EmailAddresses -cmatch "smtp"}} | Where-Object {($_.PrimarySMTPAddress -like "*o365pilot.com*") -or ($_.PrimarySMTPAddress -like "*o365info.com*")};View information about Proxy E-mail address (Alias) that include a specific Domain name suffix
In this scenario, we wish to get information about E-mail address that answers the following conditions:
- Condition 1#2 – Only Alias (Proxy) E-mail address
- Condition 2#2 – Only Alias (Proxy) E-mail address that uses a specific domain name suffix
The PowerShell syntax that we use is
$Array1 = DisplayName,@{Name="Primary Email Addresses";Expression={$_.EmailAddresses | Where-Object {$_ -cmatch "SMTP:*"}}}, @{Name="Proxy E-mail addresses";Expression={$_.EmailAddresses | Where-Object {$_ -cmatch "smtp:*"}}}, @{Name="Proxy Email addresses number";Expression={($_.EmailAddresses |Where-Object {$_ -cmatch "smtp:*"}).count}}

Get-Mailbox -ResultSize Unlimited | Where-Object {$_.emailaddresses -cmatch "smtp:*" -and $_.emailaddresses -like "smtp:*@o365pilot"} |select $Array1
The next article in the current article series
What Others Are Reading
This Post Has 0 Comments