
You can add multiple users to an existing distribution list or mail-enabled security group in…
Configure DKIM record for Microsoft 365
To prevent your organization from email spoofing and phishing attacks, it’s not enough to only configure SPF for Microsoft 365 domain. Therefore it’s essential to set up a DKIM record for Microsoft 365 to improve your mail security and deliverability. In this article, you will learn how to configure DKIM records for Microsoft 365.
Table of contents
What are SPF, DKIM, and DMARC?
DMARC, DKIM, and SPF are three email authentication methods. Together they help to prevent spammers, phishers, and other unauthorized parties from sending emails on behalf of a domain they do not own.
- Configure SPF record for Microsoft 365
- Configure DKIM record for Microsoft 365 (this article)
- Configure DMARC record for Microsoft 365
What is DKIM?
DKIM stands for Domain Keys Identified Mail and is an email authentication protocol. DKIM is a method to verify that the sender and message content are both authentic.
When a sender sends an email, it leaves a stamp (unique digital sign) to prove the message was sent from a legit domain. This way, the receiver can verify the email came from an authentic user from the same domain and that the original message was not changed after it was sent.
DKIM is based on a public key infrastructure that consists of the following:
- Private keys: Secret keys are only visible to the domain owner and are used to sign (proof of identity) messages digitally.
- Public keys: Available keys to everyone published in DNS (Domain Name System) records for verification.
Configure DKIM in Microsoft 365 Defender
We will show you how to set up DKIM for your Microsoft 365 domain.
Note: If you have registered multiple public domain names in Microsoft 365, you need to set up DKIM separately.
1. Get DKIM keys
To get DKIM keys in Microsoft 365 Defender, follow the below steps:
Time needed: 10 minutes
How to get Microsoft 365 DKIM Keys.
- Sign into Microsoft 365 Defender
Sign in with your admin credentials
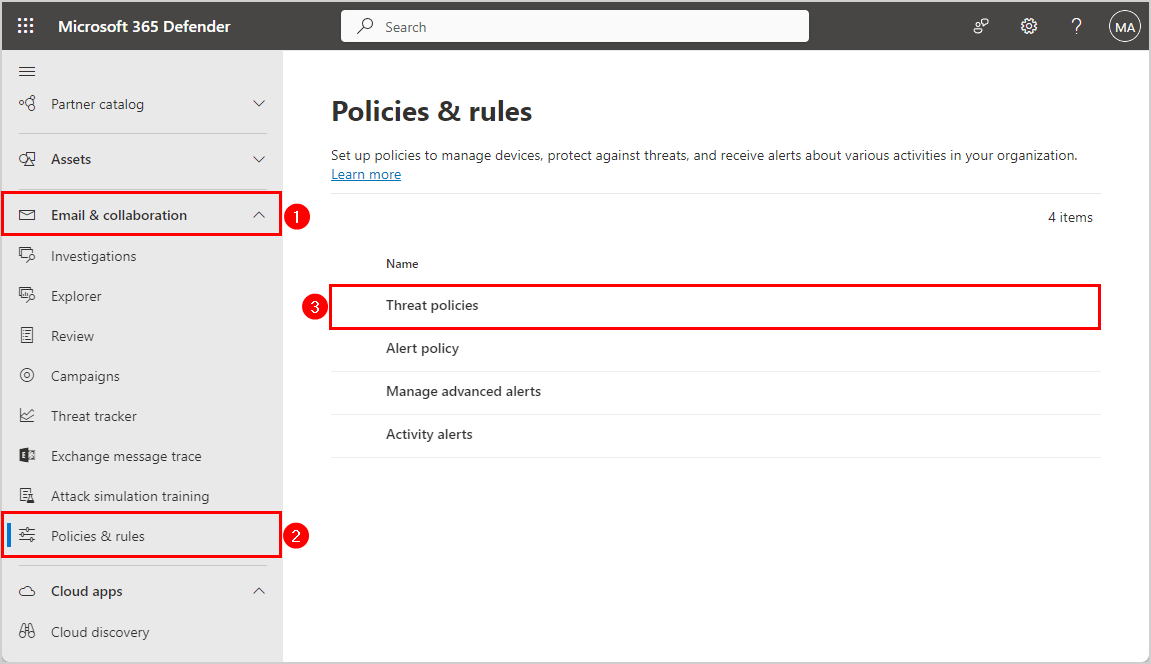
- Go to Policies & rules
Expand Email & collaboration
Click Policies & rules > Threat Polcies
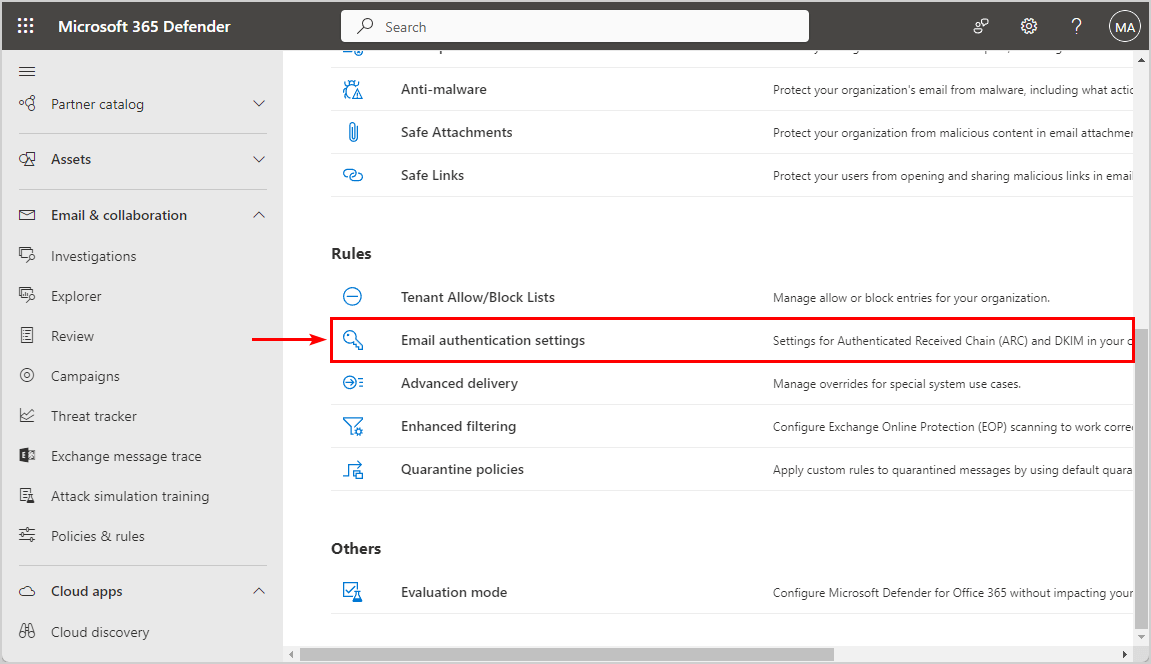
- Scroll down to Rules
Click Email authentication settings
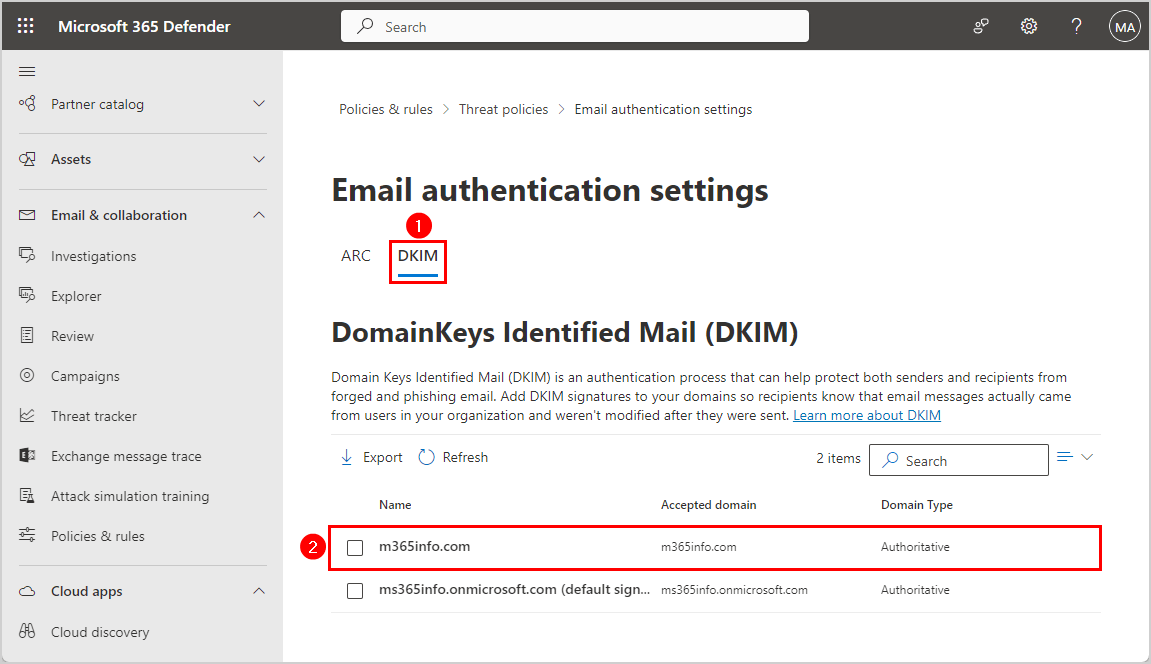
- Click on the DKIM tab
Click on the domain in the list m365info.com
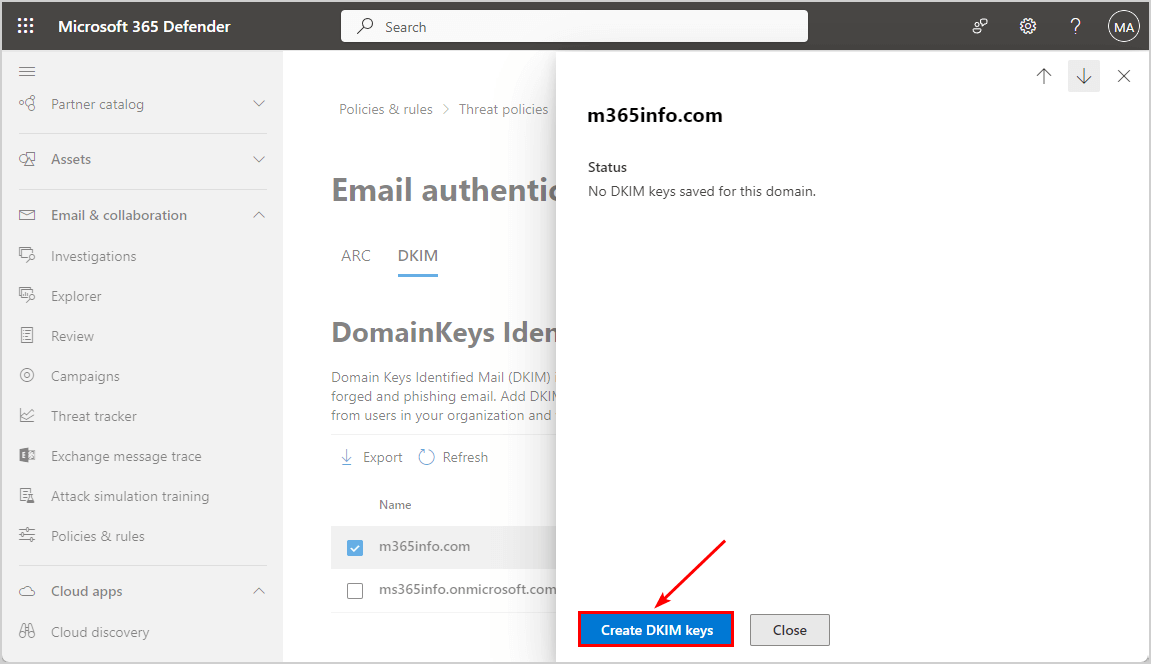
- No DKIM keys saved for this domain
Click Create DKIM keys
- Publish CNAMEs
Click Copy to publish the CNAMEs in your DNS. Return to the above page to enable DKIM.

Note: DKIM is disabled by default for every domain you add in Microsoft 365. Microsoft can’t automatically enable this as it depends on specific DNS records added to the server.
2. Add DKIM CNAME records to DNS server
Go to the domain registrar and add the two CNAME records you copied earlier to your public DNS (Domain Name System) server.
Note: If you use another DNS management infrastructure (like GoDaddy, etc.), the interface will differ, but the concept stays the same.
- Sign into your provider (Cloudflare) and go to the DNS records
- Click Add record
- Select CNAME
- Add both hostnames under Name
selector1._domainkey
selector2._domainkey- Add both DKIM selectors (see below) under Content
selector1-m365info-com._domainkey.ms365info.onmicrosoft.com
selector2-m365info-com._domainkey.ms365info.onmicrosoft.com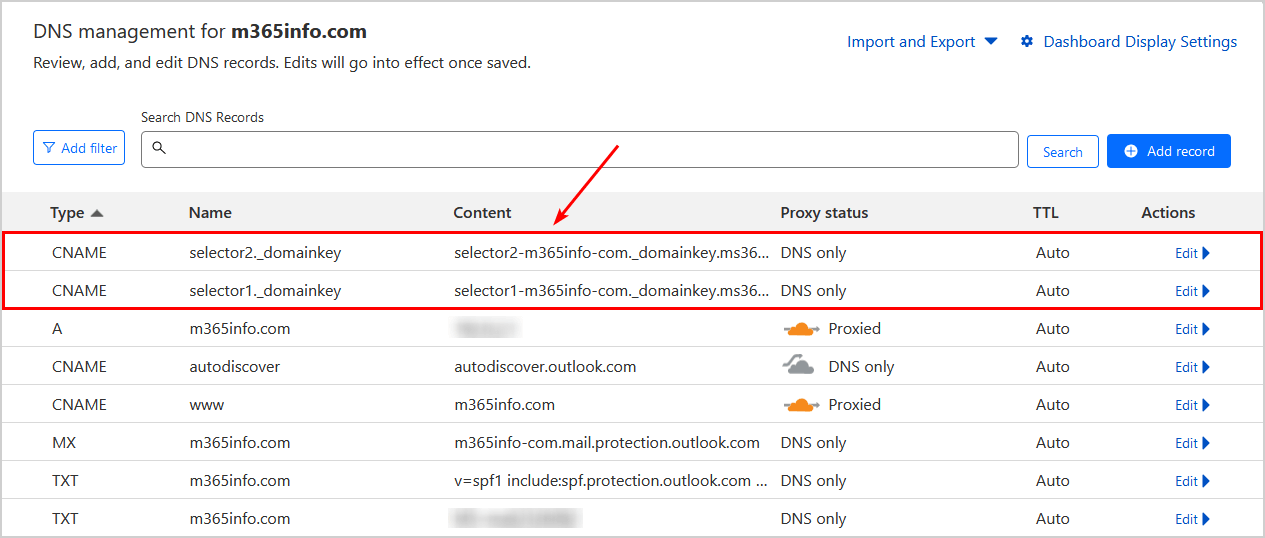
Note: Wait about 15 minutes to an hour before the changes take effect.
3. Enable DKIM keys
Return to the Microsoft 365 Defender to enable the DKIM keys for your domain:
- Click the toggle to Enabled
- Click OK
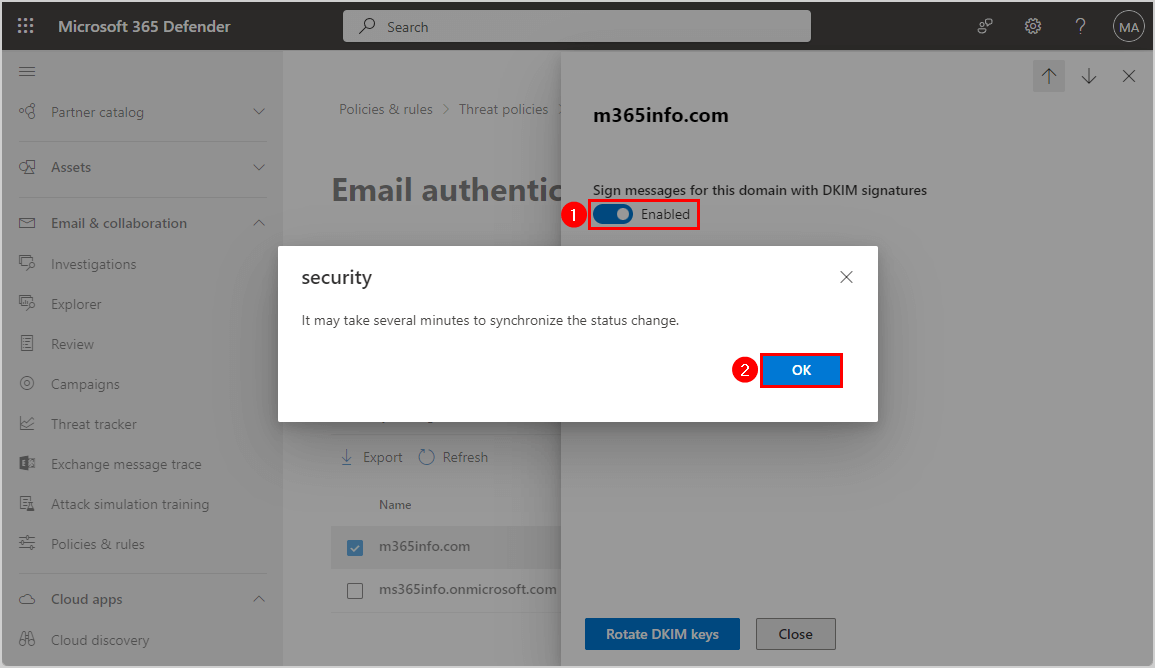
DKIM is enabled successfully for your Microsoft 365 domain.
Note: It’s recommended that you Rotate DKIM keys in Microsoft 365 every 6 months for security purposes.
Configure Microsoft 365 DKIM with PowerShell
Let’s see how to configure the DKIM record in your DNS with PowerShell.
First, you need to Connect to Exchange Online PowerShell.
Connect-ExchangeOnline -UserPrincipalName msadmin@m365info.com1. Get DKIM CNAME selectors
Another way to get your DKIM keys is with PowerShell.
The PowerShell syntax looks as follows.
Get-DkimSigningConfig <domain name> | FL *CNAMEIn our example, we want the DKIM CNAME for the domain m365info.com.
Get-DkimSigningConfig "m365info.com" | FL *CNAMEThe output shows both DKIM CNAME selectors.
PS C:\> Get-DkimSigningConfig "m365info.com" | FL *CNAME

Selector1CNAME : selector1-m365info-com._domainkey.ms365info.onmicrosoft.com
Selector2CNAME : selector2-m365info-com._domainkey.ms365info.onmicrosoft.com
2. Add DKIM CNAME selectors to DNS server
You must copy the above selectors and add the two CNAME records to your public DNS server.
This step is the same as explained previously for Microsoft 365. Add both hostnames and selectors to your DNS hosting provider.
3. Enable DKIM for Microsoft 365 domain
To enable DKIM for the domain, you need to run the Set-DkimSigningConfig cmdlet.
Use the below PowerShell syntax to enable DKIM.
Set-DkimSigningConfig -Identity <domain> -Enabled $trueIn our example, we use the same domain, m365info.com.
Set-DkimSigningConfig -Identity "m365info.com" -Enabled $trueDKIM is enabled successfully for your Microsoft 365 domain.
Note: It’s recommended that you Rotate DKIM keys in Microsoft 365 every 6 months for security purposes.
Verify DKIM record
You can check if the DKIM record is correctly set up in the DNS and does not include any errors. We will show you different methods to verify your DKIM. The MxToolBox or Dmarcian tests only show if you published the DKIM CNAMEs correctly into your DNS. It will not test if you have enabled the DKIM keys in Microsoft 365 Defender or with PowerShell. Therefore you should also send a test mail with Gmail, DKIMValidator, or CheckTLS to test if the message header includes DKIM authentication.
Check DKIM CNAME record with MxToolbox
Check if you configured DKIM CNAME records for your Microsoft 365 domain correctly. You can check both DKIM selectors in MxToolBox.
- Fill in the Domain Name
- Type selector1
- Click DKIM Lookup
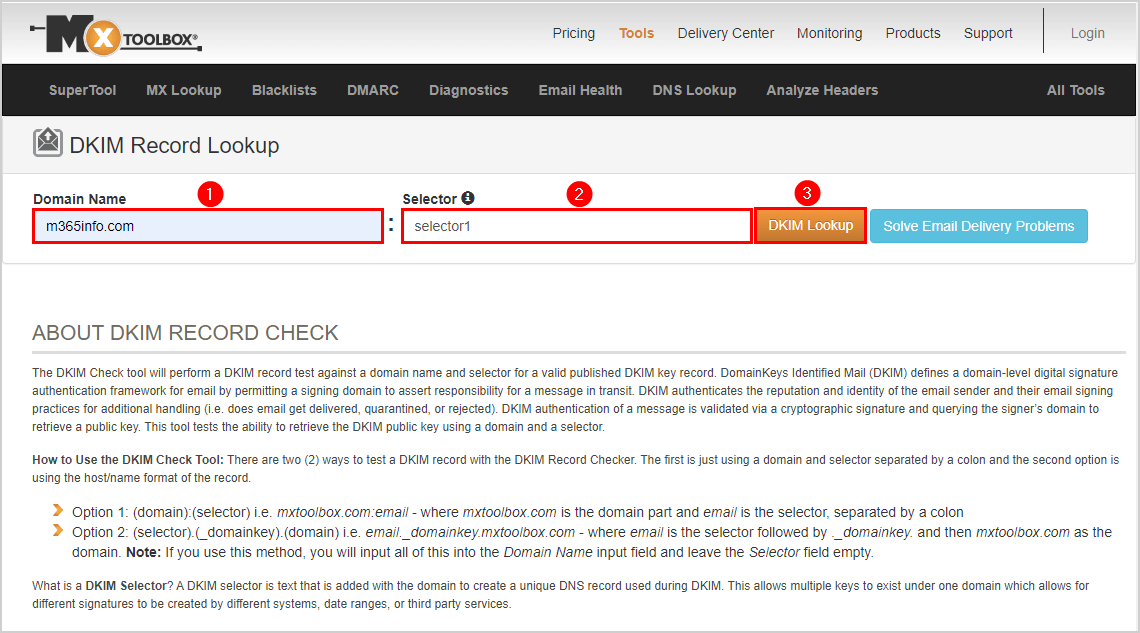
The DKIM selector1 is published correctly, as you can see in the below picture.

Check DKIM selector2 in MxToolBox.
- Change the name to selector2
- Click on DKIM Lookup
It shows that DKIM selector2 is valid.
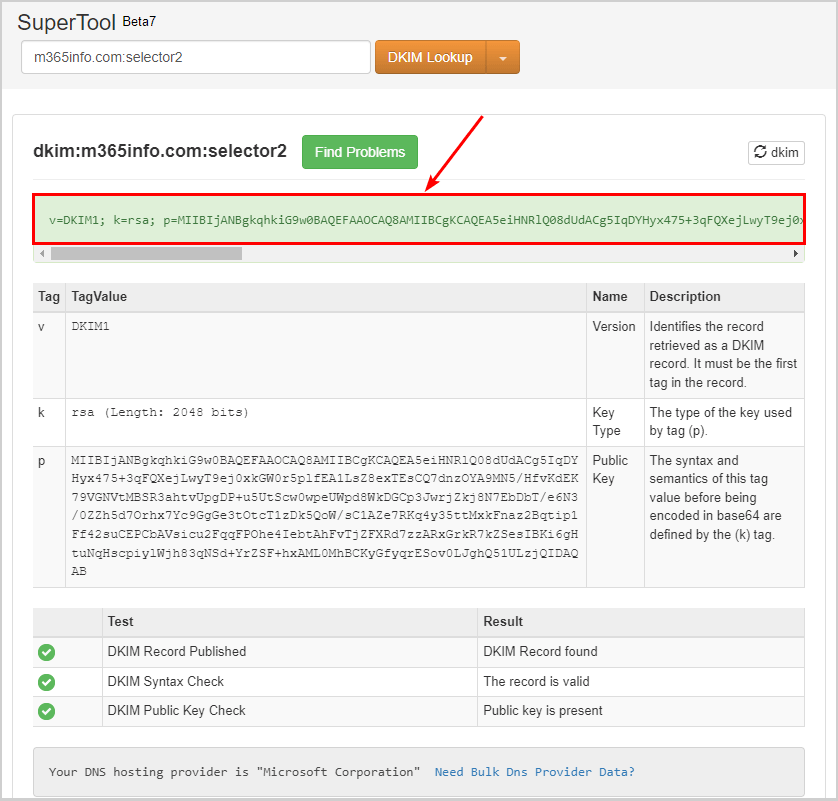
You did successfully configure the DKIM record for Microsoft 365 domain!
Sometimes the DKIM selector2 can’t be found, even though you published it correctly in your DNS. Let’s take a look at this in the next step.
No DKIM Record found
While checking the DKIM records for selector2, the result shows No DKIM Record found.
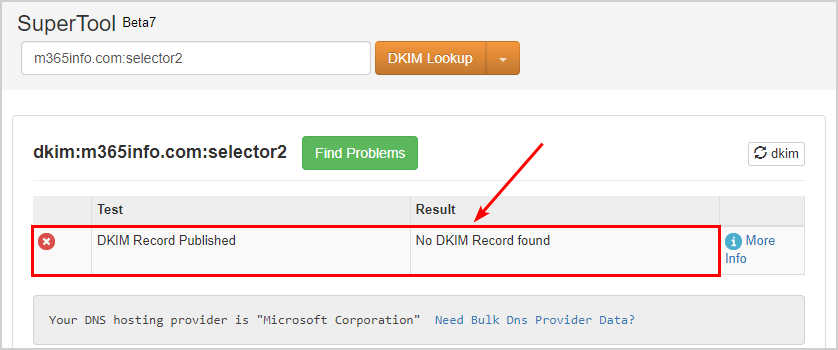
If you also run into this problem, it doesn’t mean your selector2 is wrong. The solution for No DKIM Record found for selector2 is to rotate the DKIM keys.
Rotate DKIM keys by following these steps:
- Go to Microsoft 365 Defender
- Expand Email & collaboration
- Click Policies & Rules > Threat policies
- Click Email authentication settings
- Click DKIM tab
- Click the domain m365info.com
- Click Rotate DKIM keys
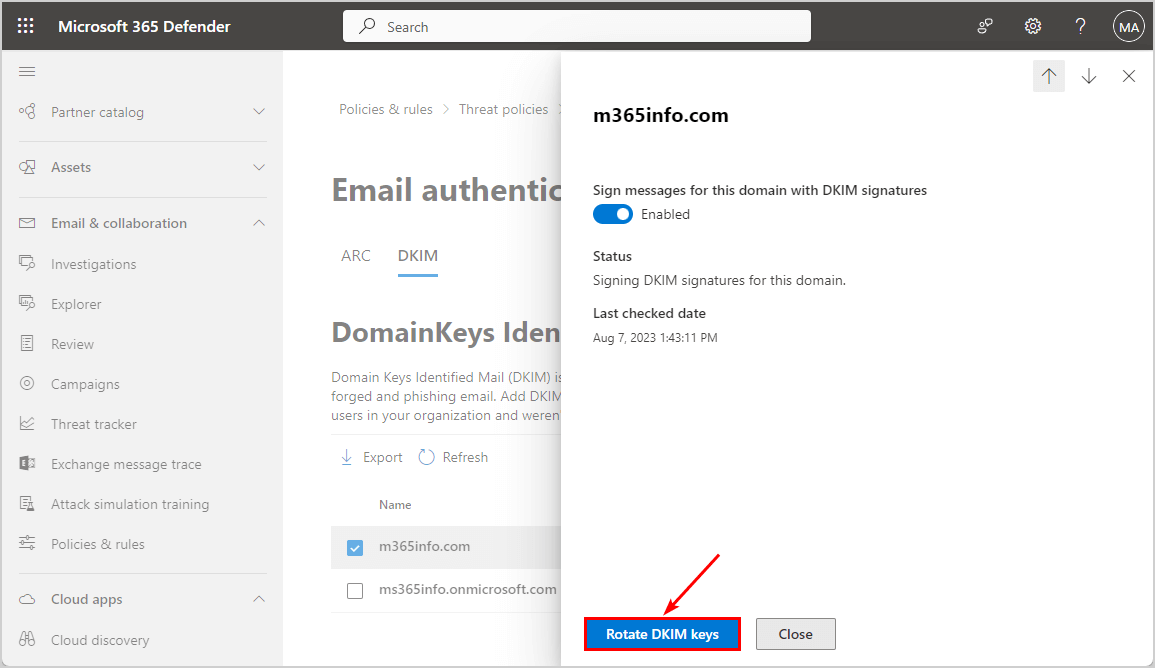
Note: Wait a few minutes and check DKIM selector2 in MxToolBox again. Now the results will show the DKIM Record found.
Check DKIM Record with Dmarcian
Check your DKIM record with Dmarcian DKIM:
- Enter your domain
- Type selector1
- Click Inspect DKIM

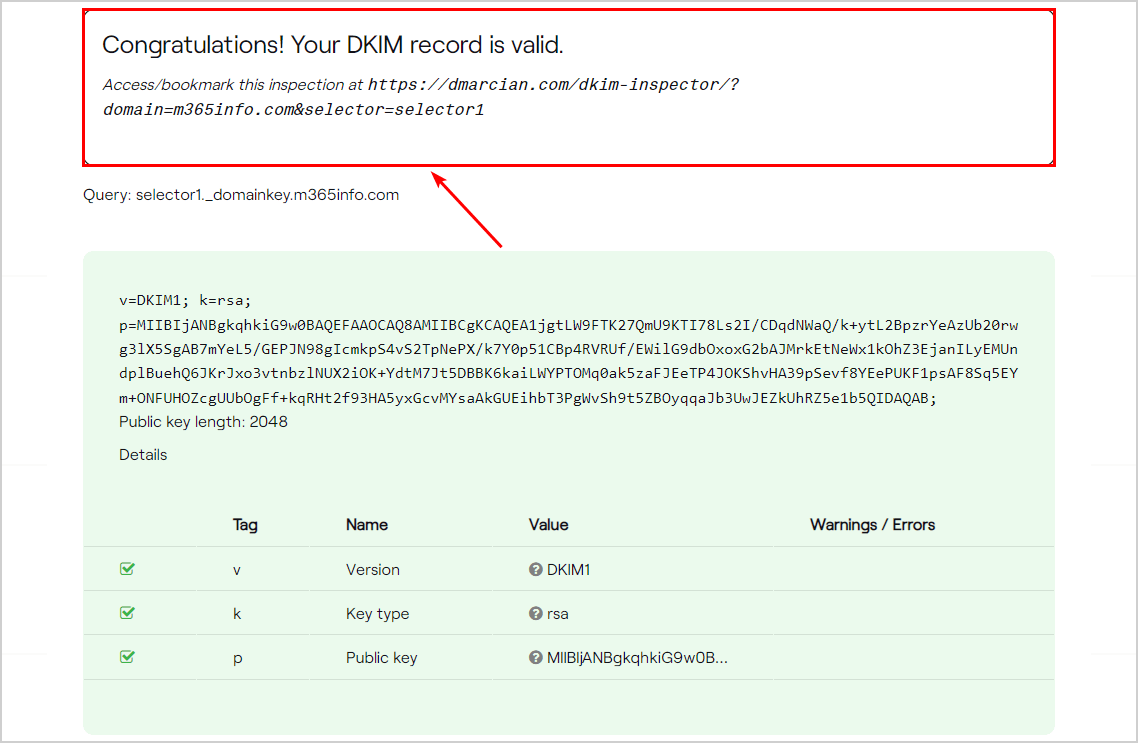
Scroll down to see the results of the DKIM selector1.
- The DKIM record is valid
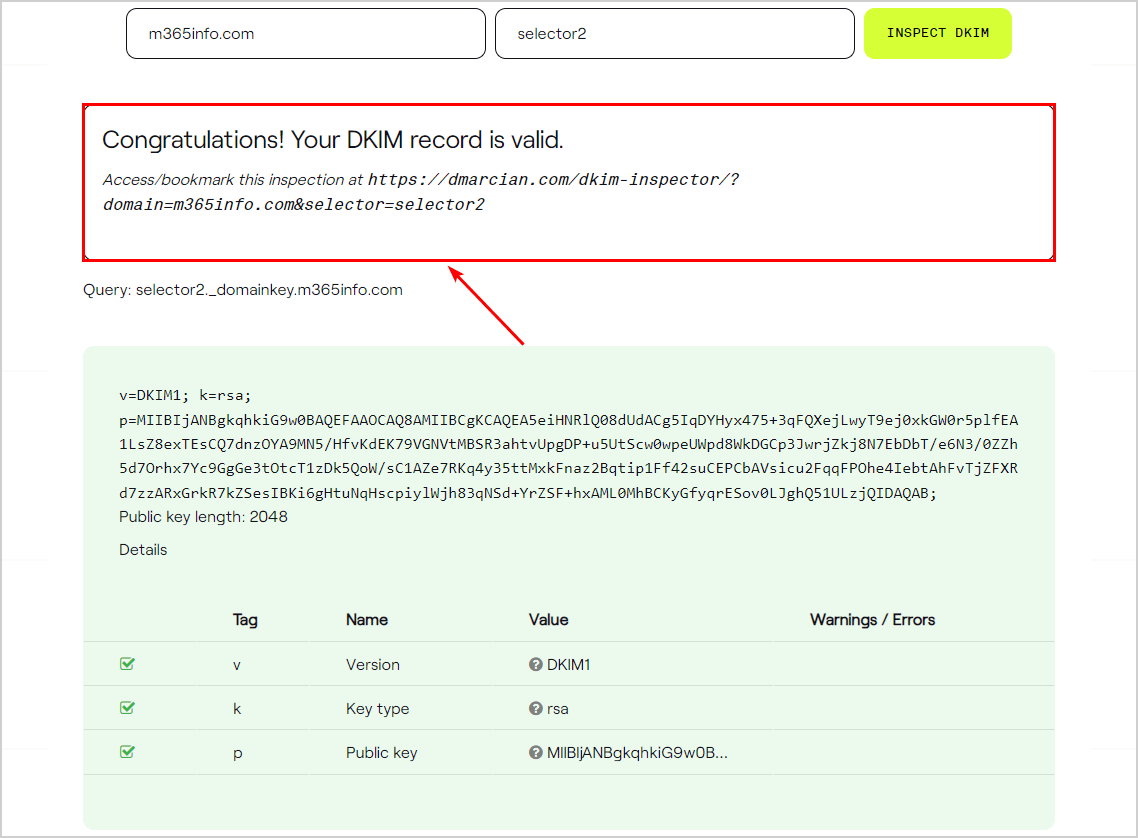
Check your DKIM selector 2 as well.
- Change the name to selector2
- Click Inspect DKIM
Scroll down to see the DKIM selector2 results.
- It shows that the DKIM record is valid
Note: The above tests (MxToolBox & Dmarcian) only show if you published the DKIM record correctly into your DNS. Even though the test results are green and the DKIM records are found, it doesn’t check if the DKIM keys are enabled. Therefore you need to verify the DKIM authentication with Gmail, DKIMValidator, and CheckTLS.
Verify DKIM with Gmail
To verify the email message sent to the destination recipient includes the DKIM authentication, we need to send a test mail and analyze the message header.
In our example, an organization sender with the email address amanda.hansen@m365info.com sends an email to an external recipient with a Gmail address.
Our example:
- Organization sender: amanda.hansen@m365info.com
- External recipient: bob.green@gmail.com
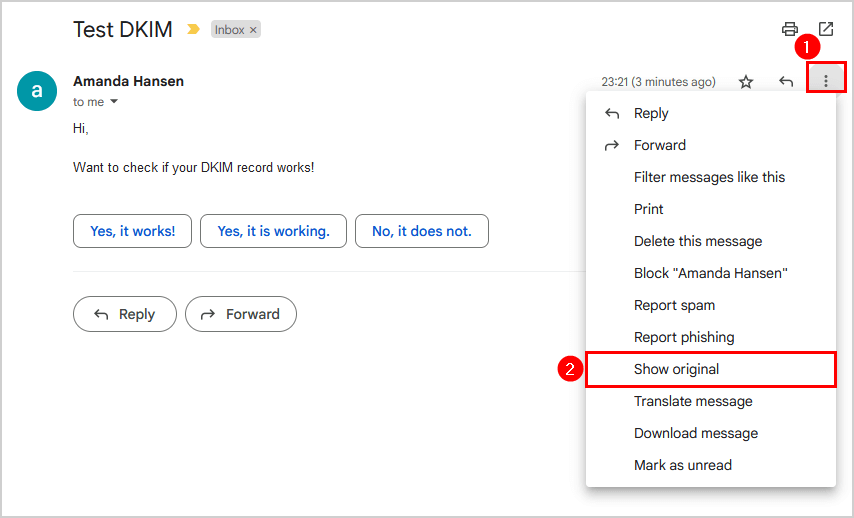
Go to the recipient inbox to view the email header:
- Open the email
- Click the three dots
- Click Show original
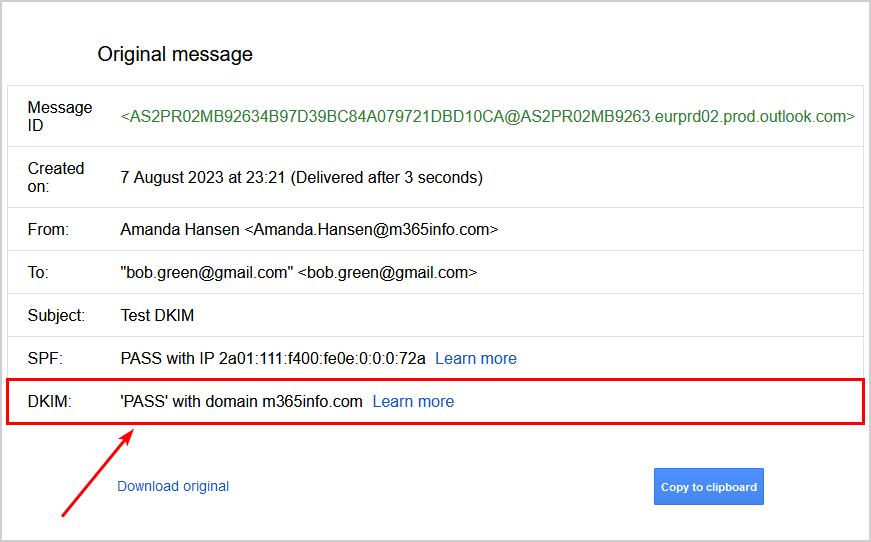
The information about the DKIM signature shows:
- PASS with domain m365info.com
The Gmail original message doesn’t show if DKIM failed the test but removes the entire DKIM row. So when you can’t find DKIM in the original message, it means you did not set it up, or it’s incorrectly configured.
Note: If you forgot to enable the DKIM keys in Microsoft 365 Defender, you will not see the DKIM row in the Gmail original message.
Verify with DKIMValidator
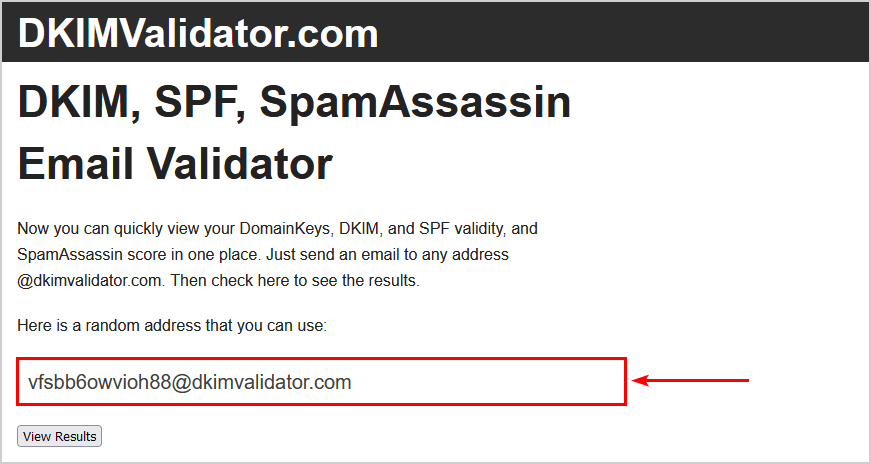
There are also DKIM validation sites to verify you configured DKIM correctly on the email server. With DKIMValidator, you can send a test mail to see if the DKIM results pass or fail the test.
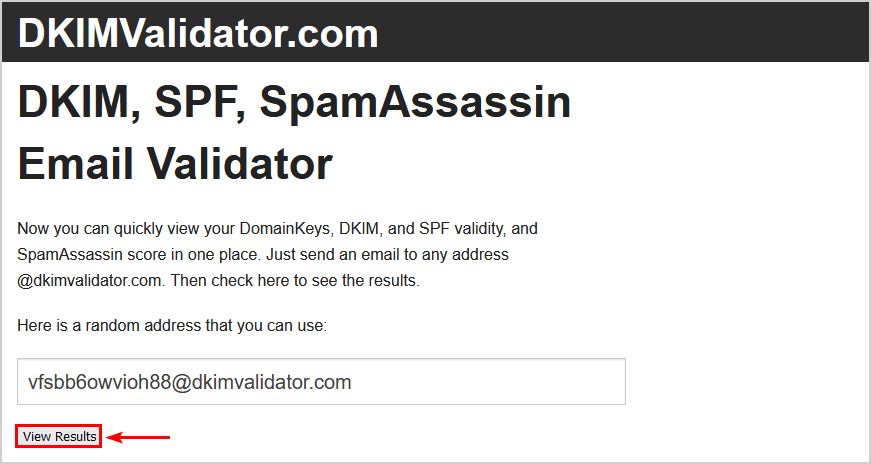
- Go to DKIMValidator
- Copy the email address
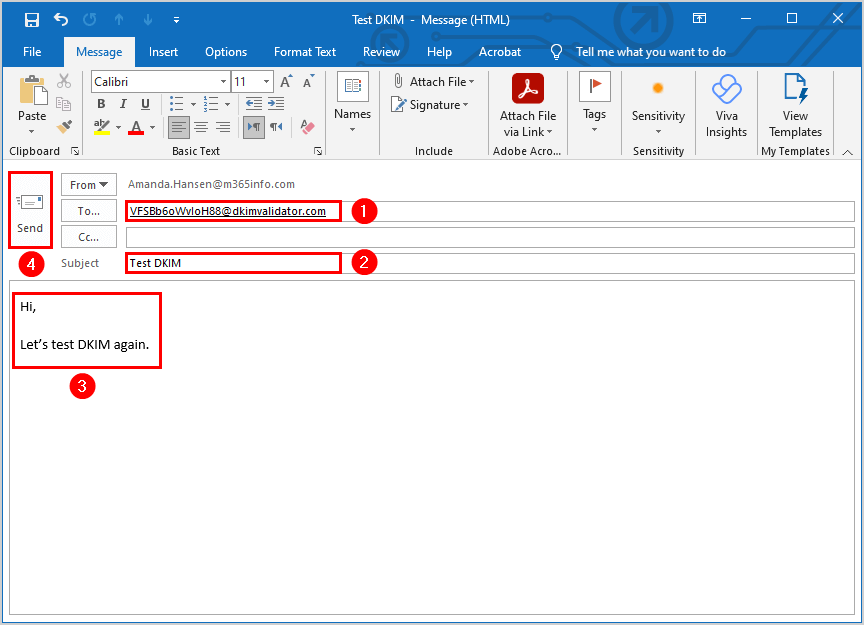
- Paste the email address in the recipient field
- Type the subject Test DKIM
- Type content
- Send the email
- Return to the DKIMValidator test
- Click View Results
- Verify you see the original message content
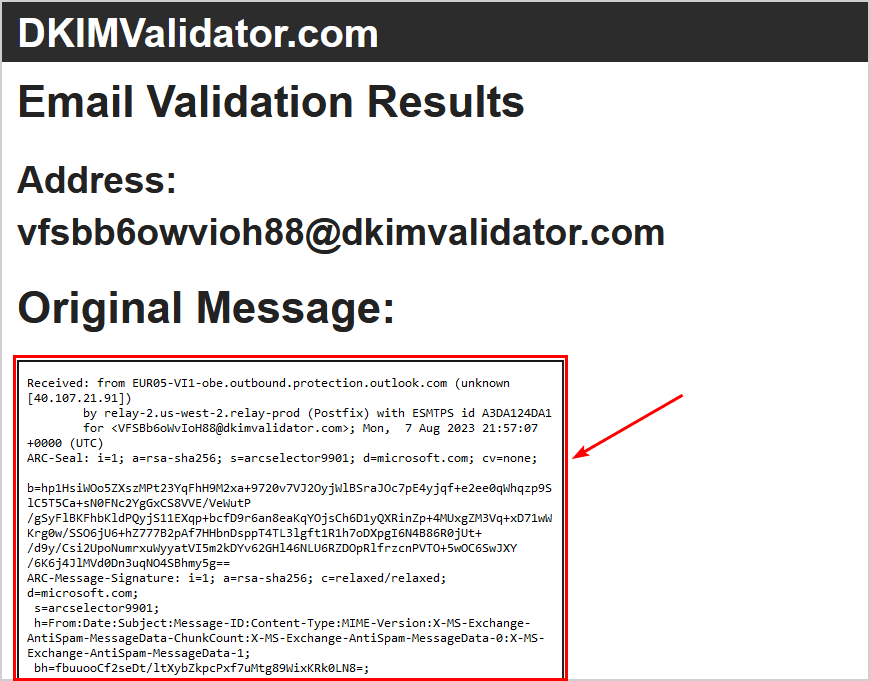
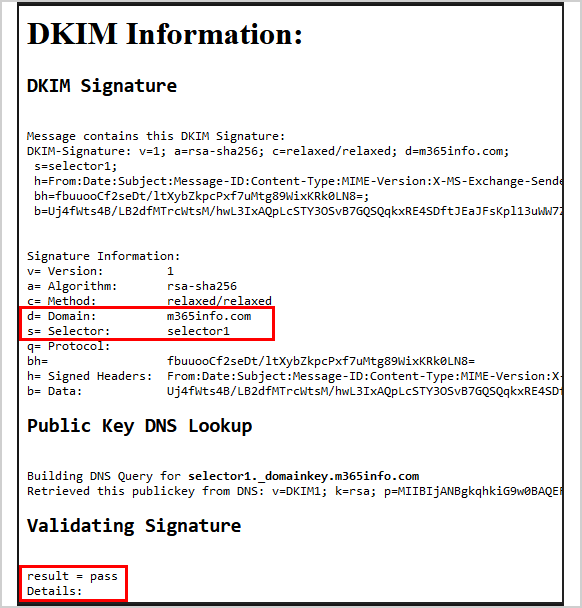
- Scroll down to DKIM Information – DKIM Signature
It shows the correct domain, m365info.com, and DKIM selector1 hostname, who signed the email message.
The Validating Signature at the bottom shows the result = pass.
Verify DKIM with CheckTLS
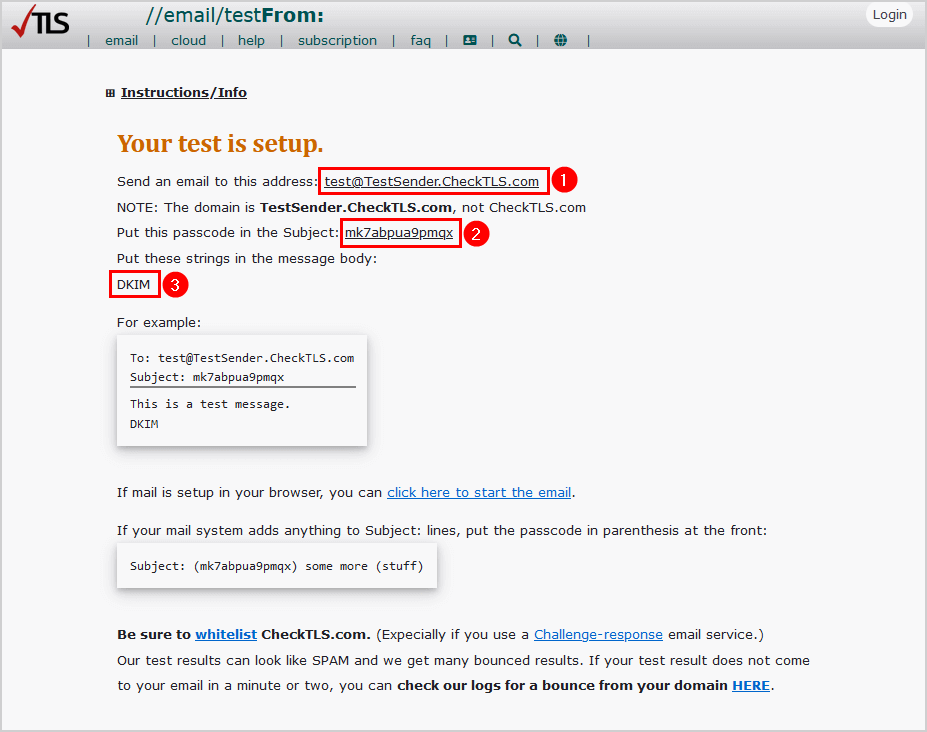
Test your DKIM authentication in the message header with the CheckTLS tool:
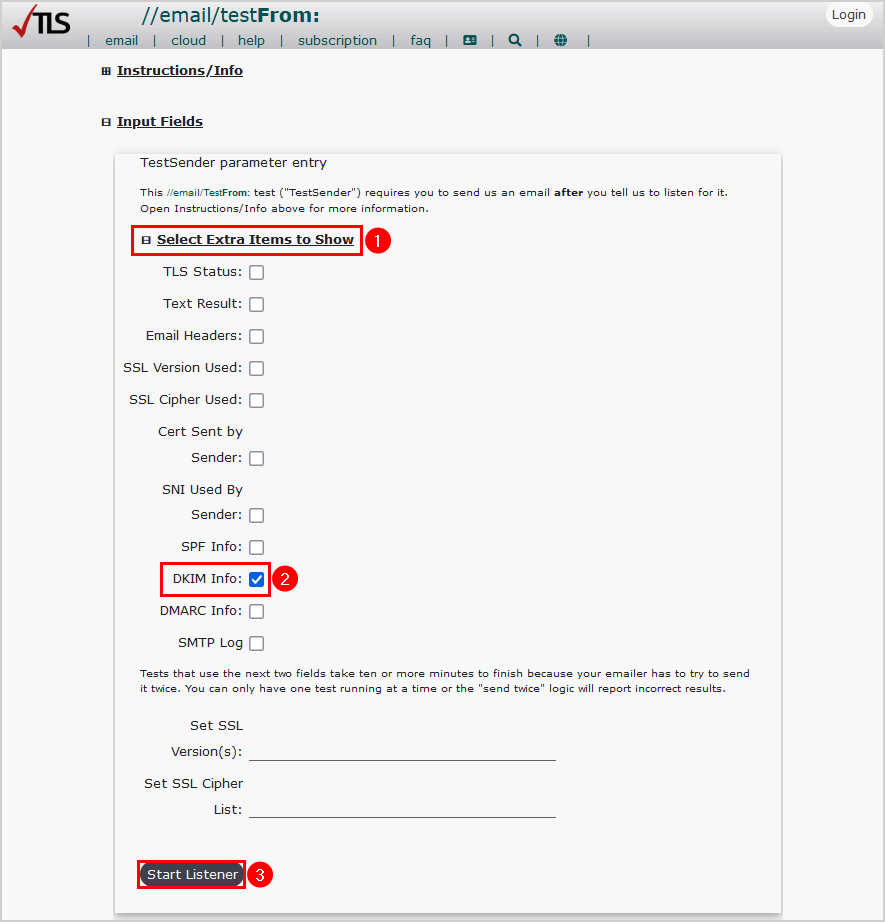
- Go to CheckTLS
- Click on Select Extra Items to Show
- Select DKIM Info
- Click Start Listener
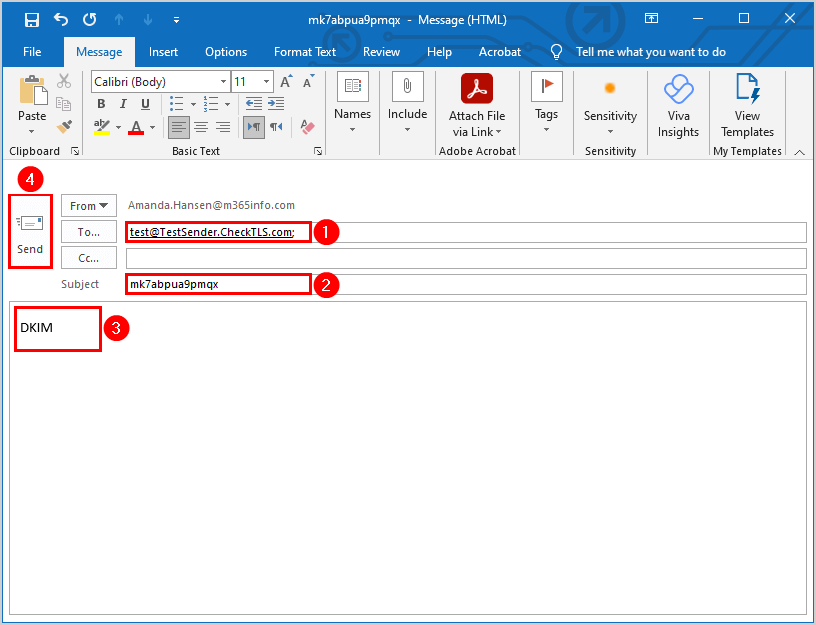
In our example, we will send an email from Amanda.Hansen@m365info.com.
How to send a test email:
- Copy and paste the address to test@TestSender.CheckTLS.com
- Copy and paste the passcode in the subject of the email
- Type DKIM in the message
- Create a new email with the required information
- Send the test email
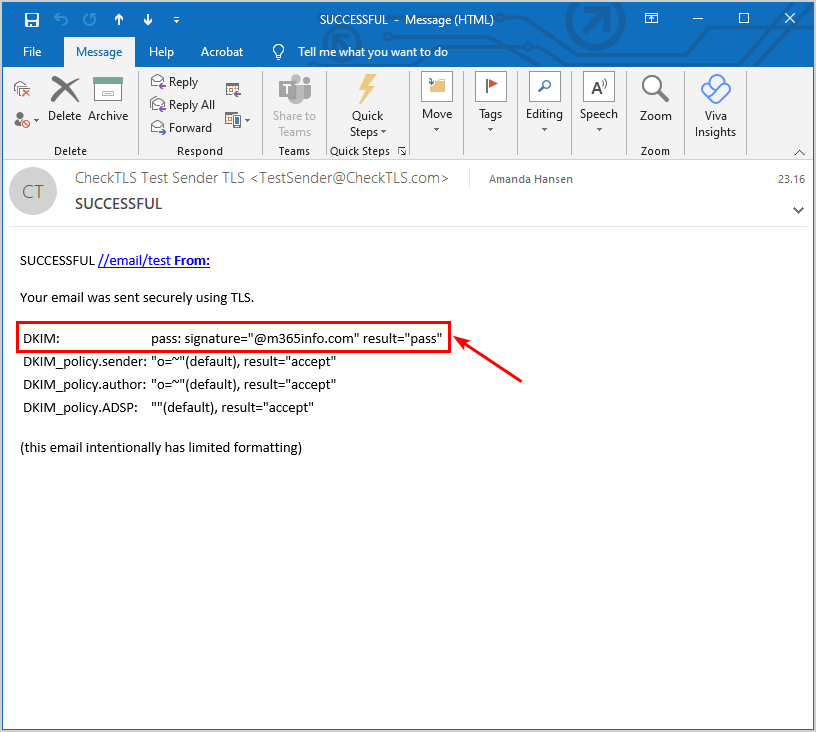
After you send the email, you need to check your inbox because you will get an email from CheckTLS.
- Open the email from CheckTLS to see the DKIM report
- The results show DKIM: pass: signature result=pass that the email was sent successfully
Frequently Asked Questions (FAQ)
Do I need to implement DKIM?
Yes, it’s essential to implement DKIM for your domain. The results of not using any protection for the public mail infrastructure could be severe and destructive. Your emails could have deliverability problems, be rejected, or go to the recipient’s junk folder.
What is a DKIM selector?
The DKIM selector is a string that consists of the tenant name and the onmicrosoft.com domain name.
What are DKIM CNAMEs?
When you set up DKIM for your domain, you must add CNAME records at your DNS hosting provider. For Microsoft 365, the selector1._domainkey and selector2._domainkey are host names used by the outbound DKIM signing email for your public domain.
Conclusion
You learned how to configure DKIM records for Microsoft 365. First, create DKIM keys for your domain in Microsoft 365 Defender or with PowerShell. Next, add and publish the CNAME records selector1 and selector2 in your DNS. After 15 minutes, enable the DKIM keys.
Verify you published a valid DKIM record by performing a DKIM test with MxToolBox or Dmarcian. Also, remember to check the DKIM authentication by sending an email to test the message header with Gmail, DKIMValidator, or CheckTLS.
Did you enjoy this article? You may also like Configure WordPress SMTP to send emails via Microsoft 365. Don’t forget to follow us and share this article.
This Post Has 0 Comments