When a Microsoft 365 user account is compromised, you must immediately block the user from…
Manage Microsoft 365 clutter using PowerShell
The clutter feature in Microsoft 365 mailbox lets the users focus on important mail. The low-priority emails are not deleted but removed from the inbox mail folder to the clutter folder. You can always disable the clutter feature for all users and remove the clutter folder from Outlook. In this article, you will learn to manage Microsoft 365 clutter feature using PowerShell.
Table of contents
Microsoft 365 clutter feature
Clutter is a feature in Outlook that moves less important emails out of your inbox and keeps you focused on what’s most important to you. We will show you how to enable and disable clutter for all mailboxes with PowerShell.
Once a user turns off the clutter feature in Outlook, they can use the new Focused Inbox feature. This is a new email sorting, where your inbox will be divided into two tabs. You can always Manage focused inbox in Microsoft 365 using PowerShell.
Connect to Exchange Online PowerShell
To be able to run the PowerShell commands specified in the current article, you will need to Connect to Exchange Online PowerShell.
Start Windows PowerShell as administrator and run the cmdlet Connect-ExchangeOnline.
Connect-ExchangeOnline1. Enable clutter for Microsoft 365 mailboxes
Enable clutter for a specific mailbox
PowerShell command syntax:
Set-Clutter -Identity -Enable $TruePowerShell command example:
Set-Clutter -Identity "Stephen.Hunter@m365info.com" -Enable $TruePowerShell result:
IsEnabled : True
MailboxIdentity : CN=ea2b7e6a-fb01-42e3-9fb8-ccf13a5f2e67,OU=ms365info.onmicrosoft.com,OU=Microsoft Exchange Hosted Organizations,DC=EURPR02A011,DC=PROD,DC=OUTLOOK,DC=COM
Identity :
IsValid : True
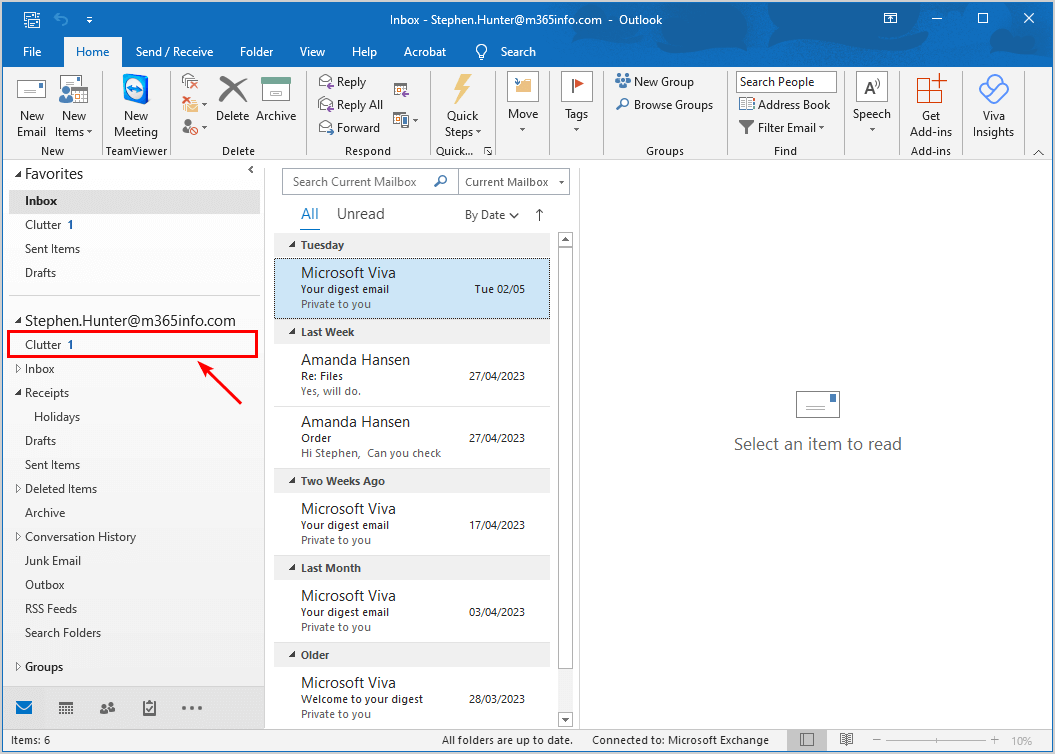
ObjectState : NewOnce this user signs in to Outlook, they will see the Clutter folder appear.
Bulk enable clutter for user mailboxes
Run the below PowerShell command to bulk enable clutter for user mailboxes.
$AllMailboxes = Get-MailBox -ResultSize Unlimited -Filter '(RecipientTypeDetails -eq "UserMailbox")' | Where-Object { (Get-Clutter -Identity $_.UserPrincipalName).IsEnabled -eq $False }

ForEach ($Mailbox in $AllMailboxes) {
    Set-Clutter -Identity $Mailbox.UserPrincipalName -Enable $True
}
Bulk enable clutter for Microsoft 365 mailboxes
Use the below PowerShell command to bulk enable clutter for all types of mailboxes.
Get-Mailbox -ResultSize Unlimited | Set-Clutter -Enable $True2. Display clutter information using PowerShell
Display clutter information of a single mailbox
PowerShell command syntax:
Get-Clutter -Identity | Select-Object IsEnabled,MailboxIdentityPowerShell command example:
Get-Clutter -Identity "Stephen.Hunter@m365info.com" | Select-Object IsEnabled,MailboxIdentitySee the below PowerShell result of a single mailbox:
IsEnabled MailboxIdentity
--------- ---------------
     True CN=ea2b7e6a-fb01-42e3-9fb8-ccf13a5f2e67,OU=ms365info.onmicrosoft.com,OU=Microsoft Exchange Hosted Organizations,DC=EURPR02A011,DC=PROD,DC=OUTLOOK,DC=COM
Display clutter for all user mailboxes
Show all user mailboxes that have enabled or disabled the clutter feature with the below PowerShell command.
$Results = @()

$AllMailboxes = Get-MailBox -Filter '(RecipientTypeDetails -eq "UserMailbox")'

ForEach ($Mailbox in $AllMailboxes) {
    $ClutterStatus = Get-Clutter -Identity $Mailbox.UserPrincipalName | Select-Object -ExpandProperty isEnabled
    $mailboxID = $Mailbox.UserPrincipalName
    $Properties = @{
        ClutterEnabled = $ClutterStatus
        Recipient      = $mailboxID
    }
    $Results += New-Object psobject -Property $properties
}

$Results | Select-Object Recipient,ClutterEnabled
The PowerShell outcome shows a list of all the user mailboxes that have clutter enabled (True) or disabled (False).
Recipient                   ClutterEnabled
---------                   --------------
Stephen.Hunter@m365info.com           True
Brenda.Smith@m365info.com            False
David.Kent@m365info.com              False
Susan.Brown@m365info.com             False
Chris.Lucas@m365info.com             False
George.Wilson@m365info.com           False
Jill.Bates@m365info.com              False
Diana.Baker@m365info.com             False
Mary.James@m365info.com              False
Amanda.Hansen@m365info.com           False
KellyTest@m365info.com               False
Display all Microsoft 365 mailboxes with clutter disabled
Show all Microsoft 365 mailboxes that have disabled clutter with the below PowerShell command.
$Results = @()

$AllMailboxes = Get-Mailbox -ResultSize Unlimited  | Where-Object { (Get-Clutter -Identity $_.alias).IsEnabled -eq $False }

ForEach ($Mailbox in $AllMailboxes) {
    $ClutterStatus = Get-Clutter -Identity $Mailbox.UserPrincipalName | Select-Object -ExpandProperty isEnabled
    $mailboxID = $Mailbox.UserPrincipalName
    $Properties = @{
        ClutterEnabled = $ClutterStatus
        Recipient      = $mailboxID
    }
    $Results += New-Object psobject -Property $properties
}
$Results | Select-Object Recipient,ClutterEnabled
PowerShell result:
Recipient                                                                              ClutterEnabled
---------                                                                              --------------
Amanda.Hansen@m365info.com                                                                      False
Brenda.Smith@m365info.com                                                                       False
Chris.Lucas@m365info.com                                                                        False
David.Kent@m365info.com                                                                         False
Diana.Baker@m365info.com                                                                        False
DiscoverySearchMailbox{D919BA05-46A6-415f-80AD-7E09334BB852}@ms365info.onmicrosoft.com          False
George.Wilson@m365info.com                                                                      False
InfoBox@m365info.com                                                                            False
Jill.Bates@m365info.com                                                                         False
KellyTest@m365info.com                                                                          False
Mary.James@m365info.com                                                                         False
Projector11@m365info.com                                                                        False
Projector21@m365info.com                                                                        False
Projector8@m365info.com                                                                         False
infoRESTORE@m365info.com                                                                        False
RoomTest8@m365info.com                                                                          False
Susan.Brown@m365info.com                                                                        False
Display all Microsoft 365 mailboxes with clutter enabled
It will display all Microsoft 365 mailboxes that have enabled clutter.
Use the below PowerShell command example:
$Results = @()

$AllMailboxes = Get-Mailbox -ResultSize Unlimited  | Where-Object { (Get-Clutter -Identity $_.alias).IsEnabled -eq $True }

ForEach ($Mailbox in $AllMailboxes) {
    $ClutterStatus = Get-Clutter -Identity $Mailbox.UserPrincipalName | Select-Object -ExpandProperty isEnabled
    $mailboxID = $Mailbox.UserPrincipalName
    $Properties = @{
        ClutterEnabled = $ClutterStatus
        Recipient      = $mailboxID
    }
    $Results += New-Object psobject -Property $properties
}
$Results | Select-Object Recipient,ClutterEnabled
See below for the PowerShell result:
Recipient                   ClutterEnabled
---------                   --------------
Stephen.Hunter@m365info.com           True
Display clutter folder with number of items and size
PowerShell command example:
$AllMailboxes = Get-Mailbox -ResultSize Unlimited
ForEach ($Mailbox in $AllMailboxes) {
    ForEach-Object { Get-MailboxFolderStatistics –Identity $Mailbox.UserPrincipalName } | Where-Object { $_.Name –Like "Clutter" } | Format-List Identity, ItemsInFolder, FolderSize
}
See the below PowerShell result:
Identity      : Stephen.Hunter@m365info.com\Clutter
ItemsInFolder : 1
FolderSize    : 6.555 KB (6,712 bytes)
3. Disable clutter for Microsoft 365 mailboxes
Disable clutter for a single mailbox
PowerShell command syntax:
Set-Clutter -Identity -Enable $FalsePowerShell command example:
Set-Clutter -Identity "Stephen.Hunter@m365info.com" -Enable $FalseSee the below PowerShell result example:
IsEnabled       : False
MailboxIdentity : CN=ea2b7e6a-fb01-42e3-9fb8-ccf13a5f2e67,OU=ms365info.onmicrosoft.com,OU=Microsoft Exchange Hosted Organizations,DC=EURPR02A011,DC=PROD,DC=OUTLOOK,DC=COM
Identity        :
IsValid         : True
ObjectState     : New
Note: Close the Outlook application so the changes take effect. You must also sign in the next time you open the Outlook application or use Outlook on the web.
It will disable the clutter function in the Microsoft 365 mailbox. However, when you open the Outlook application, you will still see the clutter folder in the Outlook mailbox. In the next step, we will show you how to remove the clutter folder from Outlook.
Turn on Focused Inbox
You can’t delete the clutter folder in Outlook, as it is grayed out. The solution to this problem is to turn on the focused inbox in your Outlook.
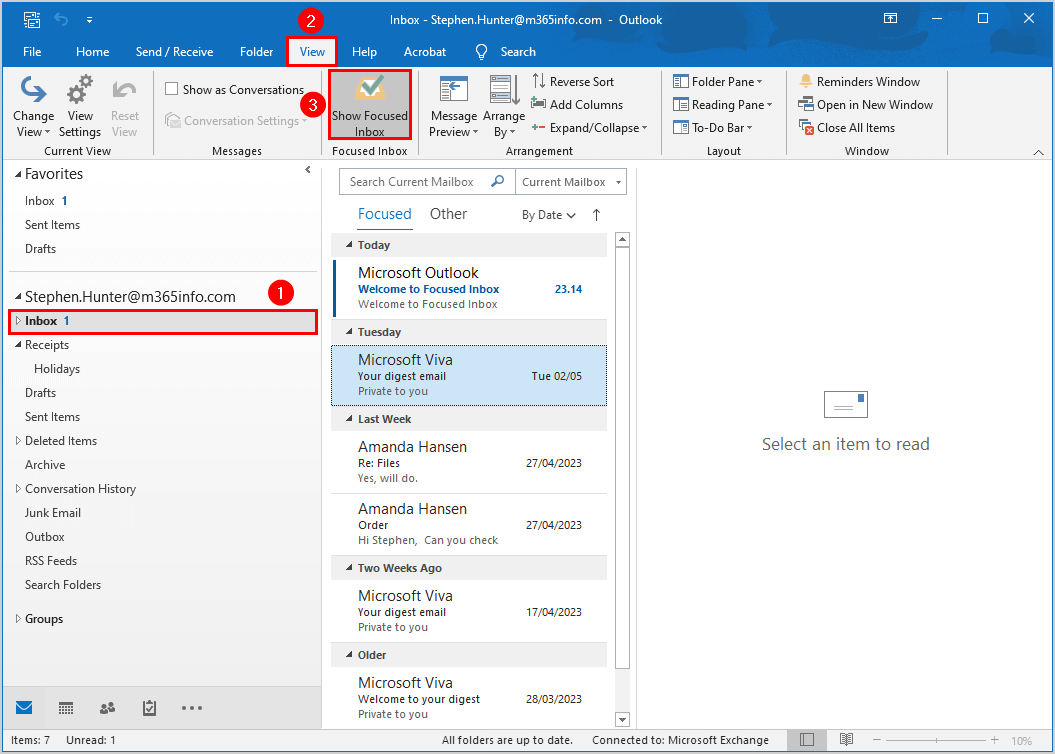
Follow the steps to turn on Focused Inbox in the Outlook application:
- Click on the Inbox folder
- Click on the View tab
- Click Show Focused Inbox
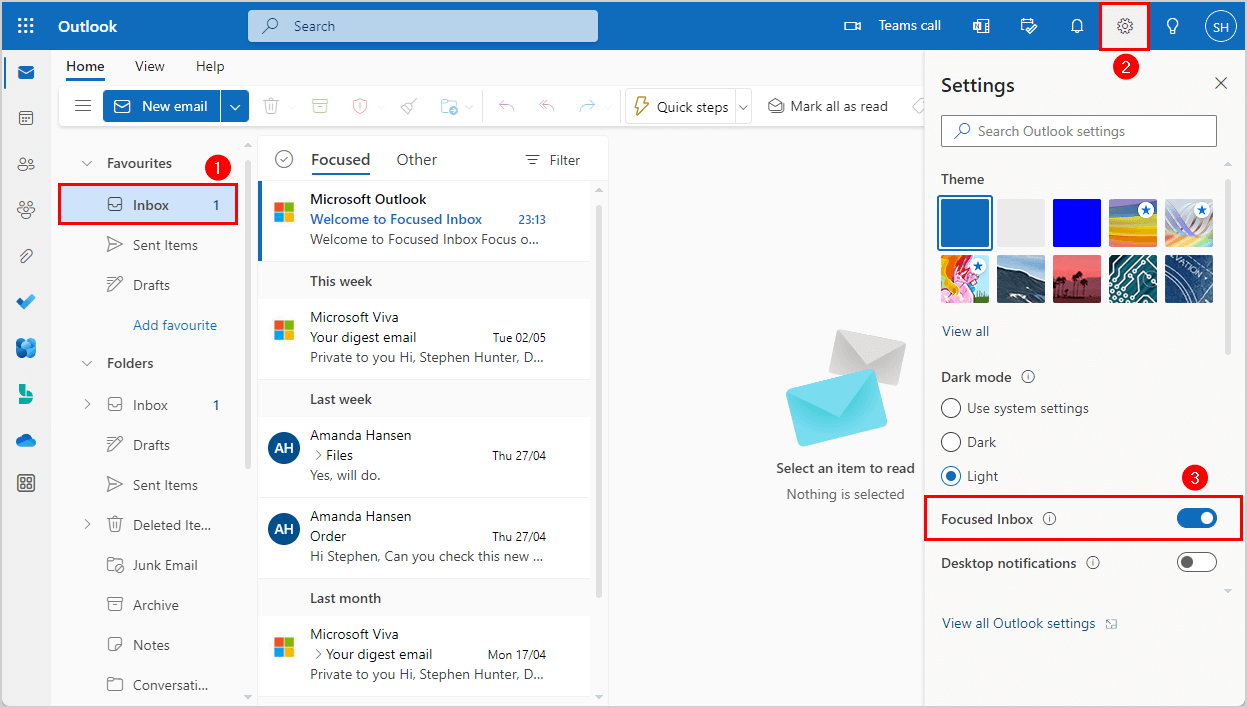
Turn on Focused Inbox in Outlook on the web:
- Click on the Inbox folder
- Click on Settings
- Select the toggle next to Focused Inbox
You will immediately get a mail from Microsoft Outlook to welcome you to the focused inbox. From now on, messages won’t be moved to the clutter folder anymore. Instead, the less important emails that would have been moved to Clutter now go to Other.
Bulk disable clutter for all mailboxes
To disable the clutter option for all existing Exchange Online mailboxes in the PowerShell console, run the following command.
Get-Mailbox -ResultSize Unlimited | Set-Clutter -Enable $False4. Export clutter information to CSV
Export clutter settings of a single mailbox to CSV file
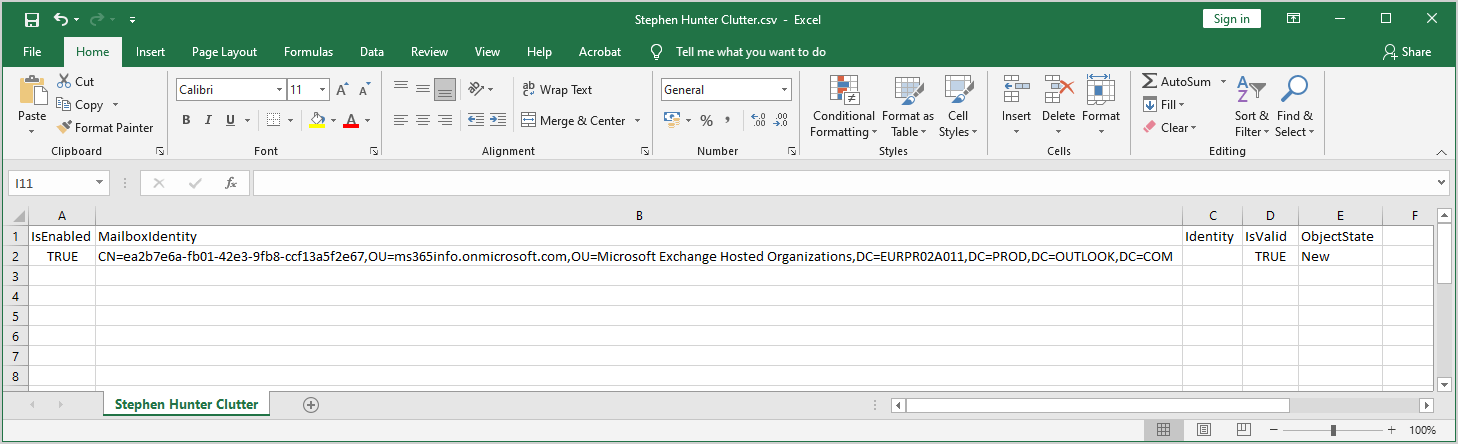
PowerShell command example:
Get-Clutter -Identity "Stephen.Hunter@m365info.com" | Export-Csv "C:\temp\Stephen Hunter Clutter.csv" -NoTypeInformation -Encoding UTF8It will export the CSV to the C:\temp folder. Open the CSV file with an application like Microsoft Excel to see the results.
Export user mailboxes with clutter enabled to CSV file
Run the below PowerShell command to export a list of all user mailboxes with clutter. This way, you can easily search for user mailboxes that have enabled or disabled clutter.
$Results = @()
$AllMailboxes = Get-MailBox -Filter '(RecipientTypeDetails -eq "UserMailbox")'
ForEach ($Mailbox in $AllMailboxes) {
$ClutterStatus = Get-Clutter -Identity $Mailbox.UserPrincipalName | Select-Object -ExpandProperty isEnabled
$mailboxID = $Mailbox.UserPrincipalName
$Properties = @{
ClutterEnabled = $ClutterStatus
Recipient = $mailboxID
}
$Results += New-Object psobject -Property $properties
$ExportData = $Results
}
$Results | Select-Object Recipient,ClutterEnabled
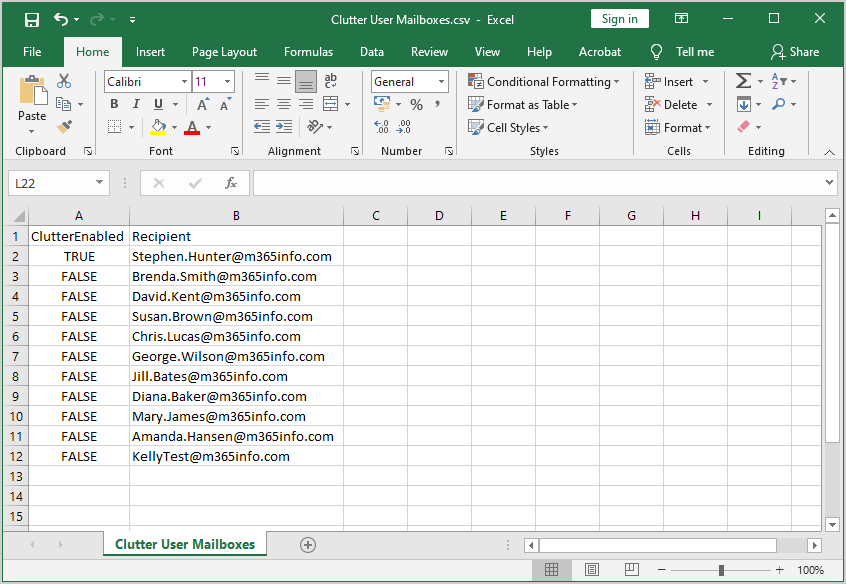
$ExportData | Export-Csv "C:\temp\Clutter User Mailboxes.csv" -NoTypeInformation -Encoding UTF8Open the CSV file with Microsoft Excel in the C: \temp folder. It shows the list of all user mailboxes with the clutter feature enabled or disabled.
Export all Microsoft 365 mailboxes with clutter disabled to CSV file
Run the below PowerShell command to export a list of all mailboxes with the clutter feature disabled.
$Results = @()
$AllMailboxes = Get-Mailbox -ResultSize Unlimited | Where-Object { (Get-Clutter -Identity $_.alias).IsEnabled -eq $False }
ForEach ($Mailbox in $AllMailboxes) {
$ClutterStatus = Get-Clutter -Identity $Mailbox.UserPrincipalName | Select-Object -ExpandProperty isEnabled
$mailboxID = $Mailbox.UserPrincipalName
$Properties = @{
ClutterEnabled = $ClutterStatus
Recipient = $mailboxID
}
$Results += New-Object psobject -Property $properties
$ExportData = $Results
}
$Results | Select-Object Recipient,ClutterEnabled
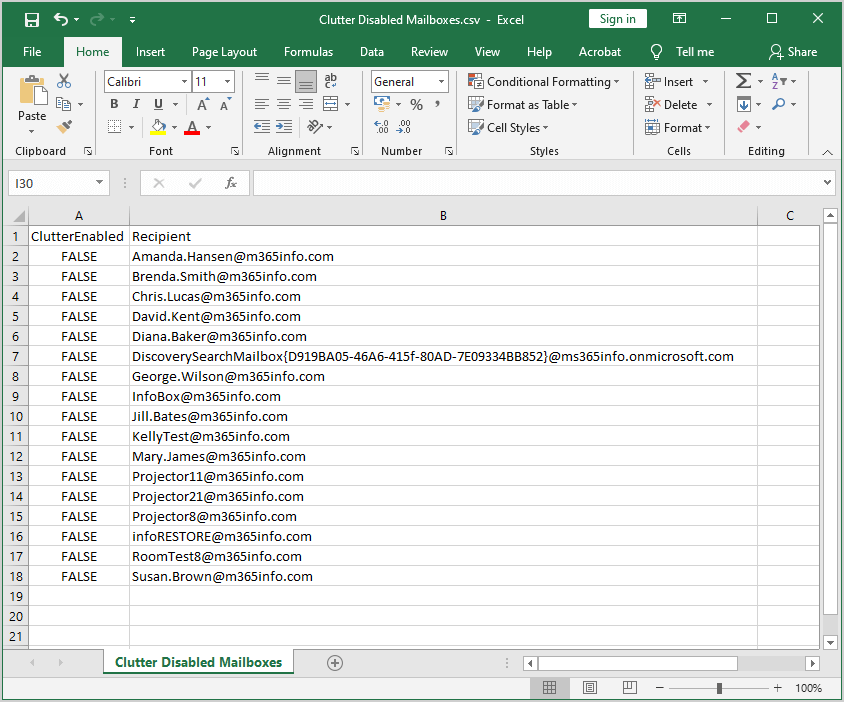
$ExportData | Export-Csv "C:\temp\Clutter Disabled Mailboxes.csv" -NoTypeInformation -Encoding UTF8It will export the CSV to the C:\temp folder, where you can open the CSV file with Microsoft Excel. You can easily see which Microsoft 365 mailboxes have clutter disabled.
Export mailboxes with clutter enabled to CSV file
Run the below PowerShell command to export a list of all mailboxes that have the clutter feature enabled.
$Results = @()

$AllMailboxes = Get-Mailbox -ResultSize Unlimited  | Where-Object { (Get-Clutter -Identity $_.alias).IsEnabled -eq $True }

ForEach ($Mailbox in $AllMailboxes) {
    $ClutterStatus = Get-Clutter -Identity $Mailbox.UserPrincipalName | Select-Object -ExpandProperty isEnabled
    $mailboxID = $Mailbox.UserPrincipalName
    $Properties = @{
        ClutterEnabled = $ClutterStatus
        Recipient      = $mailboxID
    }
    $Results += New-Object psobject -Property $properties
    $ExportData = $Results
}
$Results | Select-Object Recipient,ClutterEnabled

$ExportData | Export-Csv "C:\temp\Clutter Enabled Mailboxes.csv" -NoTypeInformation -Encoding UTF8
It will export the CSV to the C:\temp folder, where you can open the CSV file with Microsoft Excel. You will only see a list of mailboxes with the clutter feature enabled.

Export clutter folder items and size
$AllMailboxes = Get-Mailbox -ResultSize Unlimited
$results = foreach ($Mailbox in $AllMailboxes) {
Get-MailboxFolderStatistics –Identity $Mailbox.UserPrincipalName | Where-Object { $_.Name –Like "Clutter" } | Select-Object Identity, ItemsInFolder, FolderSize
}
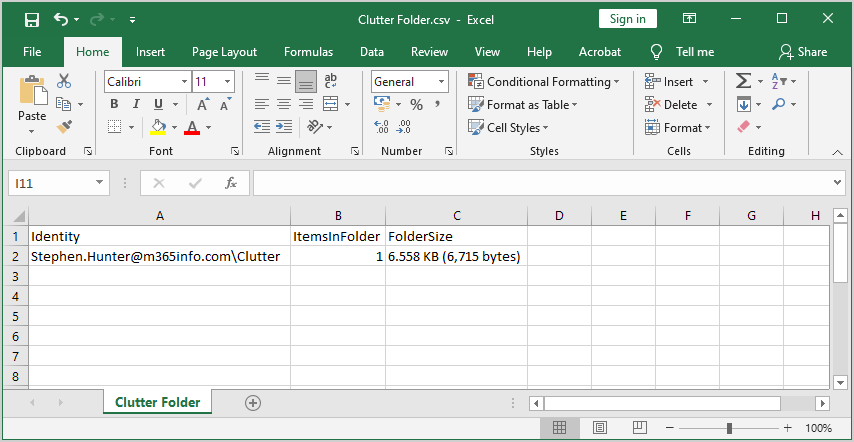
$results | Export-Csv "C:\temp\Clutter Folder.csv" -NoTypeInformation -Encoding UTF8It will export the CSV to the C:\temp folder, where you can open the CSV file with Microsoft Excel. You will see a list of folder item numbers and size.
5. Use Exchange Online rule to bypass clutter
When using the clutter feature, the Exchange server, which manages the user mailbox, decides according to an internal algorithm whether to move or not to move a specific email message to the clutter folder.
In some scenarios, the clutter algorithm can classify email messages as an email that will be sent to the clutter folder, and we would like to override this decision.
To inform the Exchange server that we would like to prevent that clutter process for specific mail items, we need to create an Exchange Online rule.
The Exchange rule is implemented by defining the characters of these specific emails and asking Exchange to add a specific mail field to the email message header.
This special mail filed is named X-MS-Exchange-Organization-BypassClutter.
We will need to add this mail field and set the value of this mail field to true.
For example:
X-MS-Exchange-Organization-BypassClutter = trueIf Exchange Server locates this mail field, it understands it must bypass the clutter process.
The Exchange rule can be created manually or via PowerShell.
In the following section, we review two examples of such an Exchange rule that will bypass the clutter of specific mail items.
Create Exchange rule to bypass clutter (specific text)
Create Exchange rule to bypass clutter for emails that include a specific text in the mail subject.
PowerShell command example:
New-TransportRule -Name -SubjectContainsWords "" -SetHeaderName "X-MS-Exchange-Organization-BypassClutter" -SetHeaderValue "true"PowerShell command example:
New-TransportRule -Name "Bypass Clutter – Subject important" -SubjectContainsWords "important" -SetHeaderName "X-MS-Exchange-Organization-BypassClutter" -SetHeaderValue "true"Create Exchange rule to bypass clutter (specific sender)
Create Exchange rule to bypass clutter for emails sent from a specific sender.
PowerShell command syntax:
New-TransportRule -Name -From "" -SetHeaderName "X-MS-Exchange-Organization-BypassClutter" -SetHeaderValue "true"PowerShell command example:
New-TransportRule -Name "Bypass Clutter – Email from Bob" -From Bob@o365info.com -SetHeaderName "X-MS-Exchange-Organization-BypassClutter" -SetHeaderValue "true"Did this help you to manage the clutter feature in Microsoft 365 with PowerShell?
Read more: Export Microsoft 365 user licenses »
Conclusion
You learned how to manage Microsoft 365 clutter using PowerShell. Once you enable the clutter feature for a user mailbox, you can display the information and export information to a CSV file. Remember that you can always disable the clutter function for all users with PowerShell and remove the clutter folder from Outlook.
Did you enjoy this article? You may also like Manage user mailbox with PowerShell. Don’t forget to follow us and share this article.
This Post Has 0 Comments