In this article, we review that basic PowerShell command syntax that we use for display…
How to use the PowerShell script – manage Email addresses in Office 365 | Part 13#13
In the current article, I would like to provide a basic review of the PowerShell script that I created that will help you to implement various tasks that relate to E-mail address management in Office 365 and Exchange Online based environment.
Table of contents
- The structure of the – “Manage E-mail addresses menu based PowerShell script”
- Connect to Exchange Online and Office 365 using Remote PowerShell
- Exporting information to various file types
- Menu 2 – Export information about – Exchange Online recipients grouped by recipient type
- Menu 3 – Export information about – Various type of E-mail addresses | All Exchange Online recipients
- Menu 4 – Export information about – recipient that was synchronized from Exchange on-Premises
- Menu 5 – Search for a Specific E-mail address
- Menu 6 – Search for an E-mail address with a specific Domain name suffix – Export results to a File
- Menu 7 – Add additional E-mail address (Alias) using a NEW Domain name to all recipients (Bulk Mode)
- The previous article in the current article series
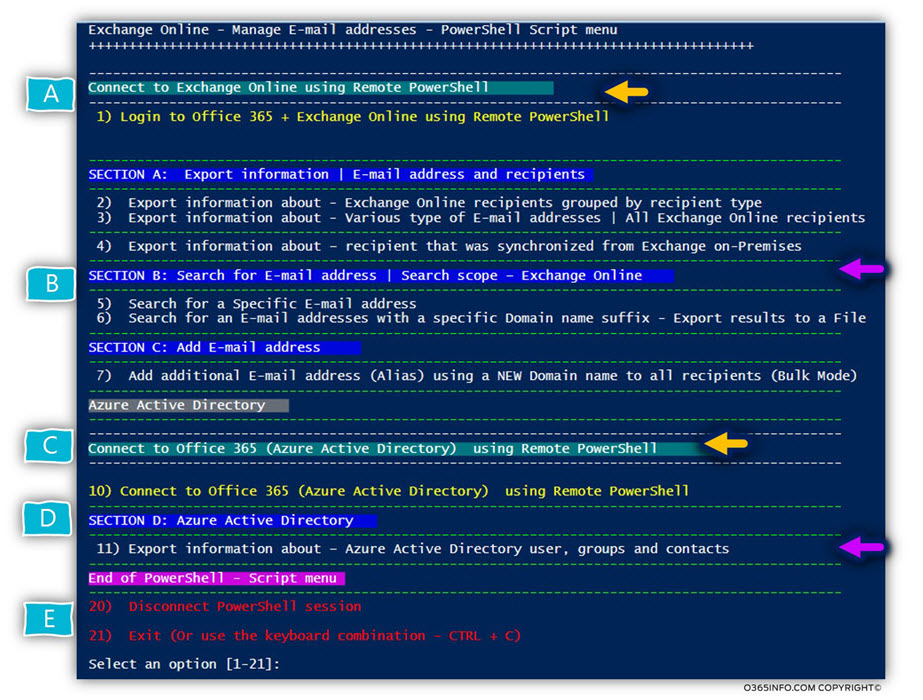
The structure of the – “Manage E-mail addresses menu based PowerShell script”
In the following screenshot, we can see the structure of the “Manage E-mail address” PowerShell script.
To be able to use each of the PowerShell script menu options you will need to start by connecting to Exchange Online.
Part A – using menu option 1, will initialize the remote PowerShell connection to Exchange Online and you will need to provide your Global administrator credentials.
Part B – this part includes all the menu option that relates to Exchange Online information and the various management tasks. In the next section, you can read more information about a specific menu option.
Part C, D – this part relates to Azure Active Directory infrastructure. In case we need to export information about Azure Active Directory infrastructure users, we will need to create a separated PowerShell session (using menu 11).
Part E – include a menu option that will help you to exit from the PowerShell script menu or disconnect the remote PowerShell session.
If you need more instructions about how to run PowerShell script, you can read the article How to run and use the o365info PowerShell menu script.
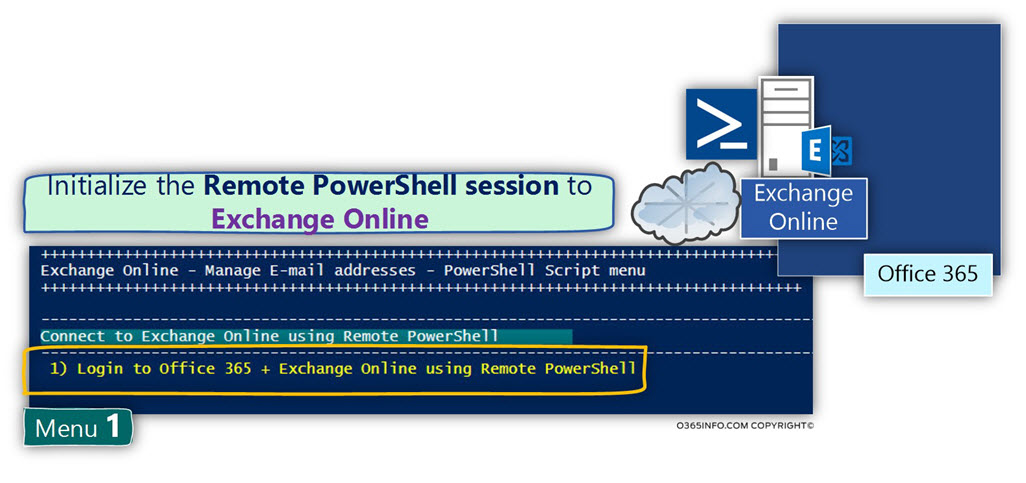
Connect to Exchange Online and Office 365 using Remote PowerShell
The PowerShell script includes two separate menus that will help you to create the remote PowerShell session too
- Exchange Online
- Office 365 (Azure Active Directory)
Menu 1 – Login to Office 365 + Exchange Online using Remote PowerShell
This is the menu that will help to create the remote PowerShell session to Exchange Online.
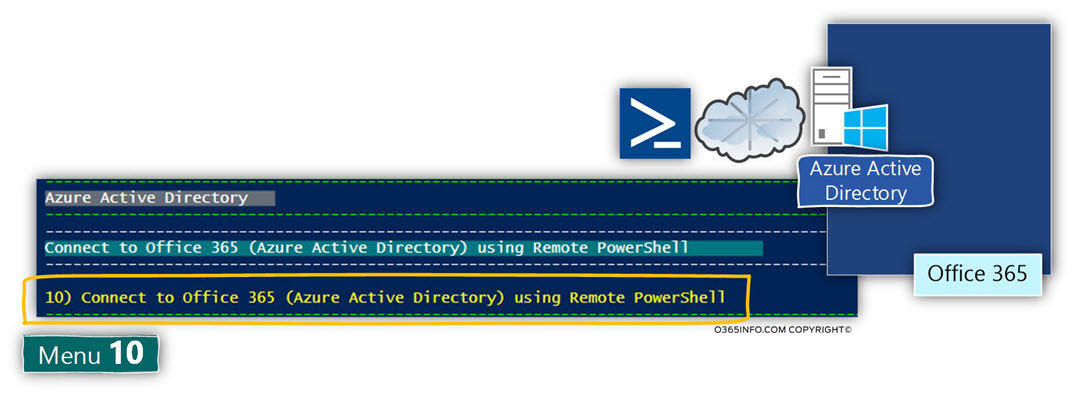
Menu 10 – Connect to Office 365 (Azure Active Directory) using Remote PowerShell
In case you need to connect to Office 365 (Azure Active Directory), you can use menu number “10”.
To be able to create a remote PowerShell session, you will need to install two software components.
Install the 64-bit version of the Windows Azure Active Directory Module for Windows PowerShell: Windows Azure Active Directory Module for Windows PowerShell (64-bit version).
Exporting information to various file types
Many of the menu options, export information about Exchange Online recipients and Azure Active Directory users to files.
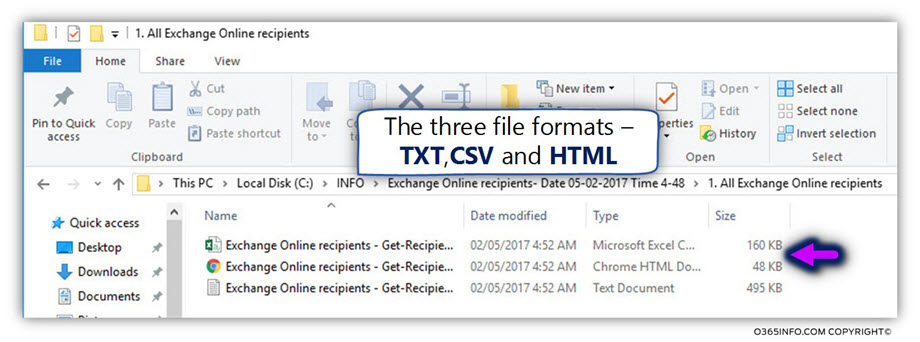
The exported information is implemented by using three different file types:
- TEXT
- CSV
- HTML
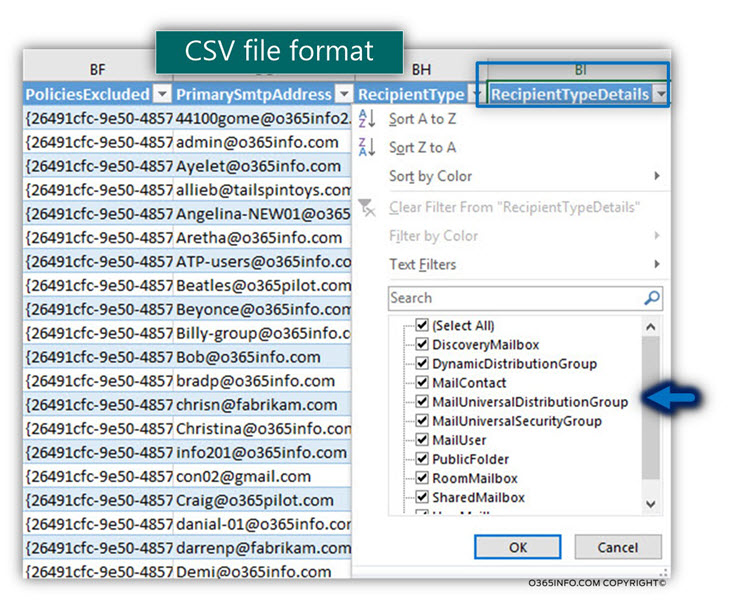
CSV file
When the information stored in a CSV file format, we can use an application such as – Microsoft Excel, that provides many tools for “manipulating” the data stored in the CSV file.
For example, format the information as a Table, sort data in a specific column, filter a specific column and so on.
In the following screenshot, we can see an example to the way that we can edit CSV file content using Microsoft Excel. The data in the CSV file were formatted as a “table” and each table column includes “sort” options and “filter” options.
HTML format
The HTML format is used most of the time for creating “Reports”.
The information in the HTML cannot be “manipulated” as the information stored in a CSV file, but, the presentation is more “easy to read”.
The PowerShell script that I created using additional HTML staying beyond the “stranded” PowerShell HTML output.
In the following screenshot, we can see an example of an HTML report that the PowerShell script creates.
Menu 2 – Export information about – Exchange Online recipients grouped by recipient type
When using this option, the script will execute the following tasks:
- Display information about the number of Exchange Online recipient by recipient type.
- Export the information to files.
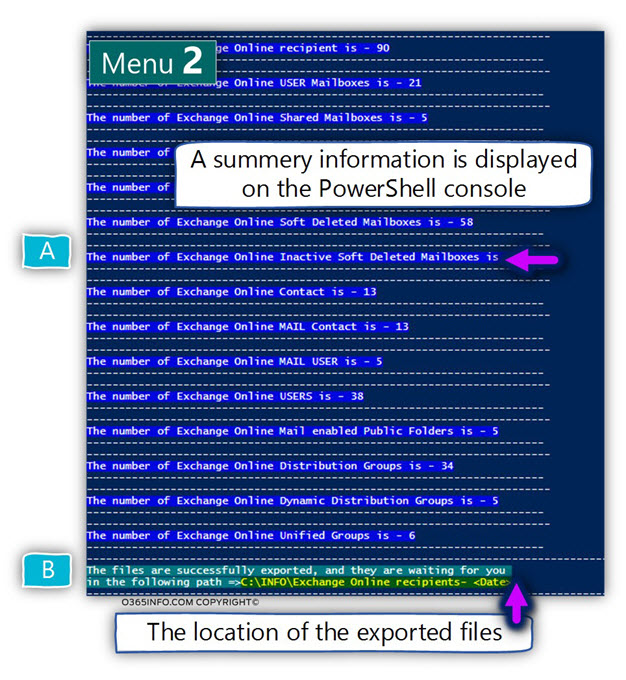
In the following screenshot, we can see the results
The files are exported to the following path – C:\INFO\Exchange Online recipients- <Date>
The script creates a dedicated folder for each type of Exchange Online recipient, such as User mailbox, groups and so on.
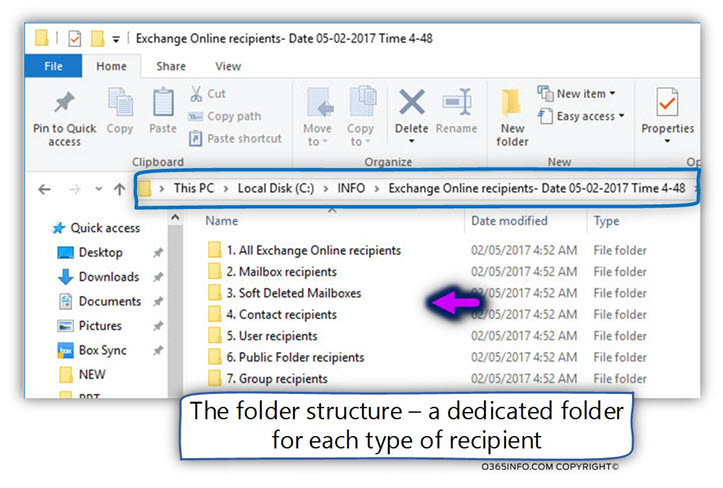
The information about the specific Exchange Online recipient type such as – “user mailbox recipient” is exported using three file formats: Text, CSV, and HTML.
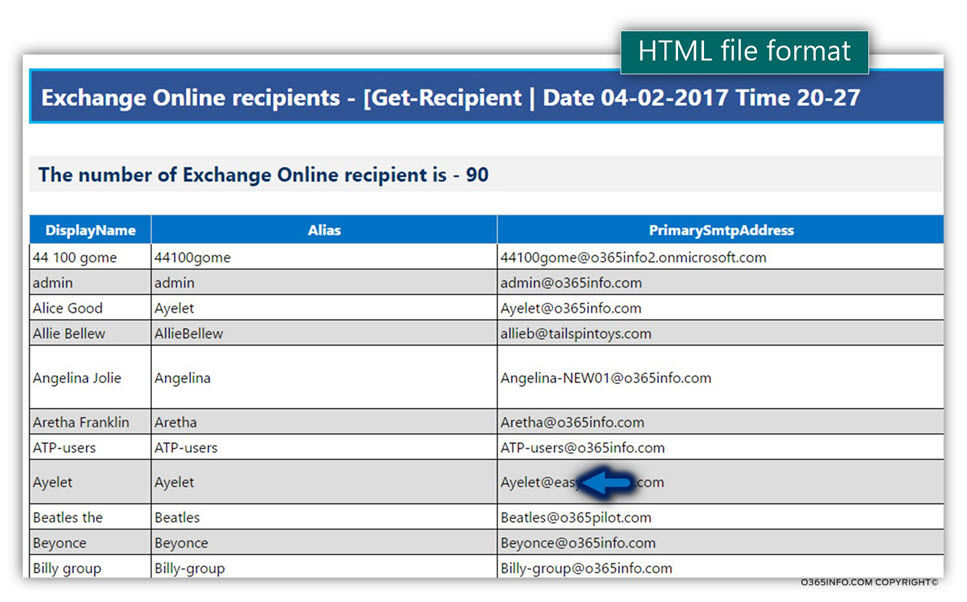
Menu 3 – Export information about – Various type of E-mail addresses | All Exchange Online recipients
The purpose of this menu is to provide a report about “ALL” of the Exchange Online recipients.
A quick reminder:
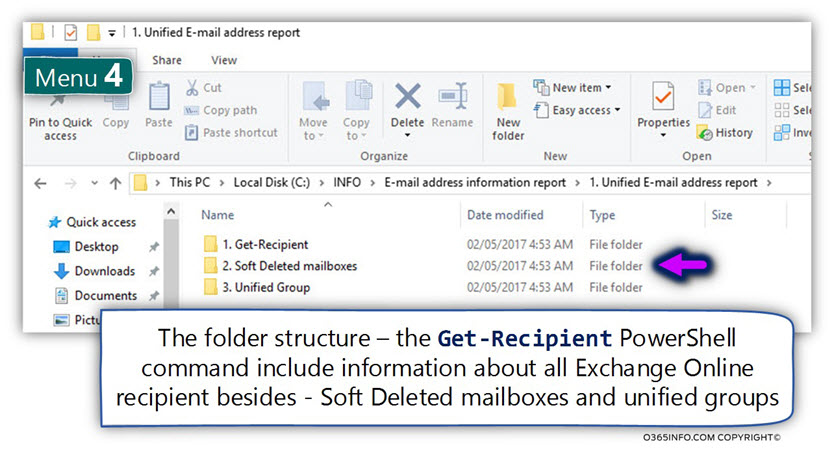
The Exchange Online PowerShell cmdlet Get-Recipient “get” information about all Exchange Online recipients besides – Unified groups, and Soft Deleted Exchange Online mailboxes.
For this reason, the “Full report” includes three reports that will cover all of the available Exchange Online recipients.
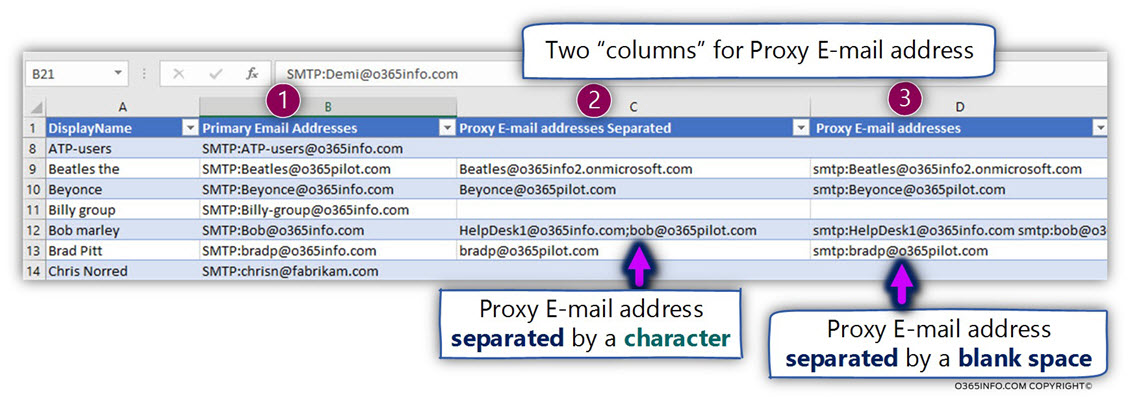
In the following screenshot, we can see the result of the CSV report that was created by using the PowerShell command Get-Recipient.
Number 1 – Primary E-mail address
This column includes information about the recipient Primary E-mail address.
Number 2 – proxy E-mail address separated
This column includes information about the recipient Proxy E-mail address separated by the “;” characters.
By default, PowerShell export the information about the Proxy E-mail address without a “separation character. The default PowerShell output will export the information about Proxy E-mail address separated by a “space”.
In some scenario, when we need to import the information from the CSV file or implement another type of “data manipulation”, the application that edits the data such as Microsoft Excel, need the “separation characters”.
In addition, I have “remove” the “smtp:” prefix from the results.
Number 3 – proxy E-mail address
This column includes the “standard” PowerShell output of Proxy E-mail address (without a separation character and with the “smtp:” prefix).
You can read more information about the way that we use to “manipulate” the output results in the article Display information about E-mail Addresses using PowerShell | Customizing the output using Hash Table and Custom expressions | Office 365 | Part 7#13.
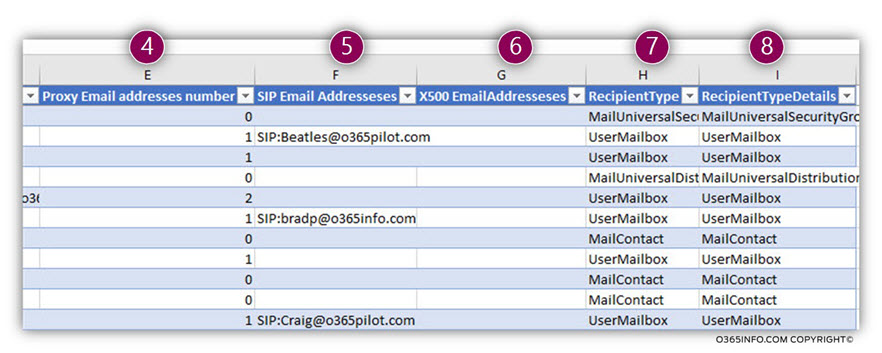
In the following screenshot, we can see the “rest” of the E-mail address that appears in the file such as – SIP address (number 4), x500 address (number 5).
In addition, the file includes information about the specific classification of the recipient, such as Mailbox user, group and so on (number 7,8).
Menu 4 – Export information about – recipient that was synchronized from Exchange on-Premises
This option will export information about the Exchange Online recipient that are “Exchange on-Premises recipients” that synchronized to the “cloud”.
You can read more information about the filter that we use in the article – xxx
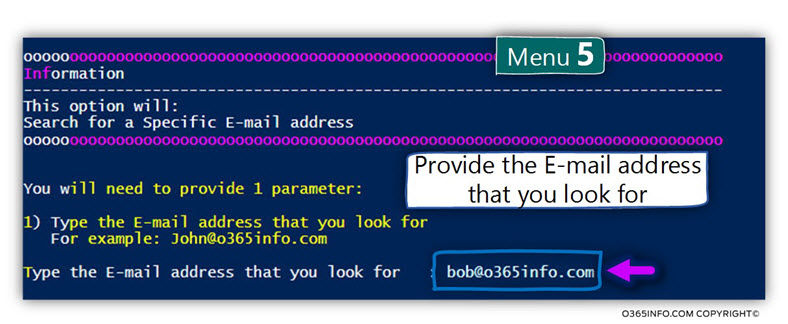
Menu 5 – Search for a Specific E-mail address
Using this menu, we can perform a search for a specific E-mail address.
In phase 1, we need to provide the E-mail address that we look for.
In the following screenshot, we can see the result- Bob is a “user recipient”.
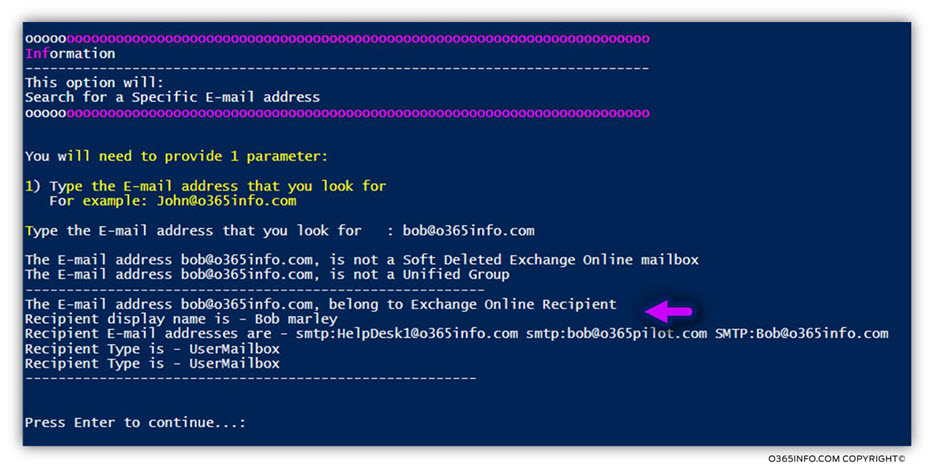
You can read more information about this subject in the article Searching “hidden” Email addresses Using PowerShell | Office 365 | Part 11#13.
Menu 6 – Search for an E-mail address with a specific Domain name suffix – Export results to a File
The purpose of this menu is to enable us to locate all the Exchange Online recipient that they’re
E-mail address includes a specific domain name suffix.
You will need to provide the domain name suffix you look for and the PowerShell command will export the information to three file types (TXT, CSV and HTML) that will be stored in the following path C:\INFO\Exchange Online recipients with a specific E-mail address.
You can read more information about this subject in the article Searching Email addresses with a specific domain name suffix Using PowerShell | Office 365 | Part 10#13.
Menu 7 – Add additional E-mail address (Alias) using a NEW Domain name to all recipients (Bulk Mode)
Using this option will enable us to perform a “bulk operation” off – adding an E-mail address with a specific domain name suffix for each of the Exchange Online recipients defined as “Mailbox recipients”. For example – user mailbox, Shared mailbox, etc.
The PowerShell script will use the command:
Get-Mailbox -ResultSize UnlimitedIn case you want to understand better the “logic” of the bulk task, read the articles:
- Adding Email addresses using PowerShell – Bulk mode | Office 365 | Part 4#13
- Adding Email addresses using PowerShell – Import from CSV file | Bulk mode | Office 365 | Part 5#13
The previous article in the current article series
Remove Email addresses using PowerShell | Office 365 | Part 12#13
What Others Are Reading
Do I have to use ‘-ModerationEnabled’ and ‘-ResourceDelegates’ in the ‘Set-CalendarProcessing’ command or can I only use one depending on the other policy attributes that need to be added?