To add a shared mailbox in Exchange Online, you can do this manually in Microsoft…
How to delete a Distribution Group
You must delete a distribution list in Microsoft 365 because the group is no longer used in the organization. To perform this task, we have Microsoft 365 admin center or Exchange Online PowerShell. The PowerShell method is better because you can quickly remove single or multiple distribution groups. In this article, you will learn how to delete a distribution group in Microsoft 365 admin center and PowerShell.
Table of contents
- Delete Distribution Group in Microsoft 365 admin center
- Connect to Exchange Online PowerShell
- Remove-DistributionGroup Error: You don’t have sufficient permissions
- Delete Distribution Group
- Delete multiple Distribution Groups
- Bulk delete Distribution List Groups
- Bulk delete Distribution List and Mail-Enabled Security Groups
- Conclusion
Delete Distribution Group in Microsoft 365 admin center
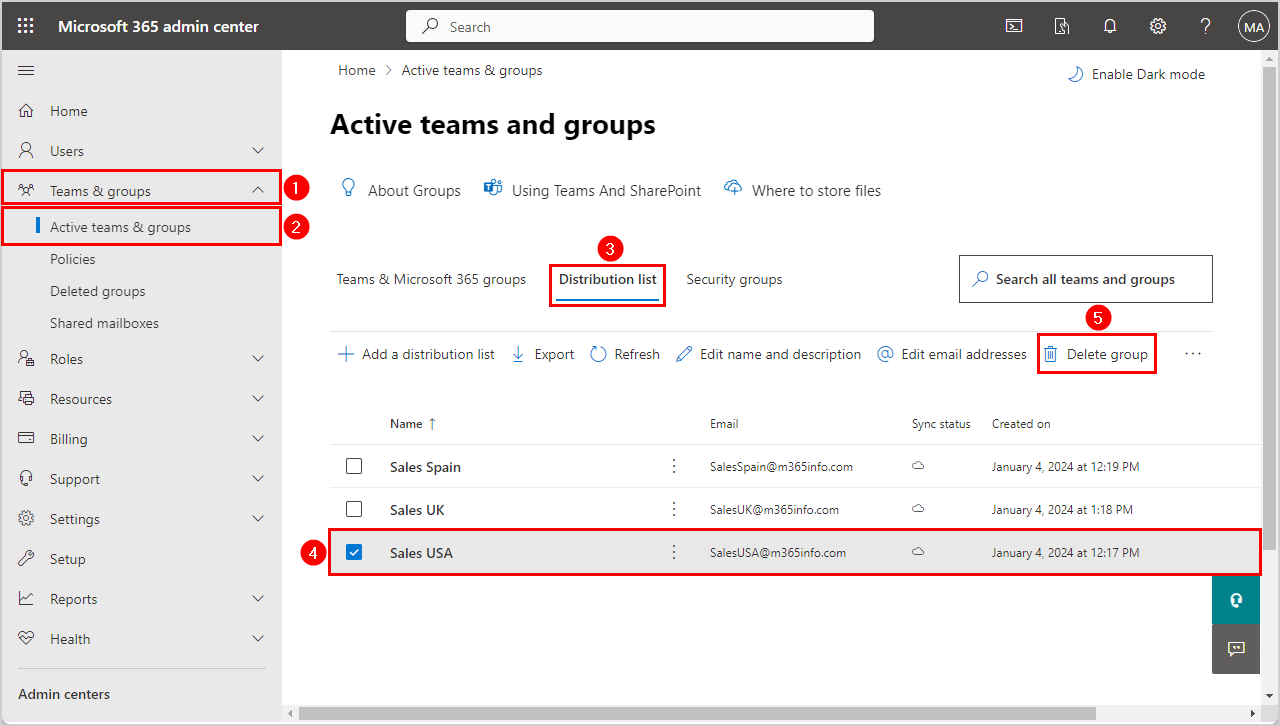
To delete a single distribution group in Microsoft 365 admin center, follow these steps:
- Sign into Microsoft 365 admin center
- Expand Teams & groups > Active teams & groups
- Click Distribution list
- Select the distribution group
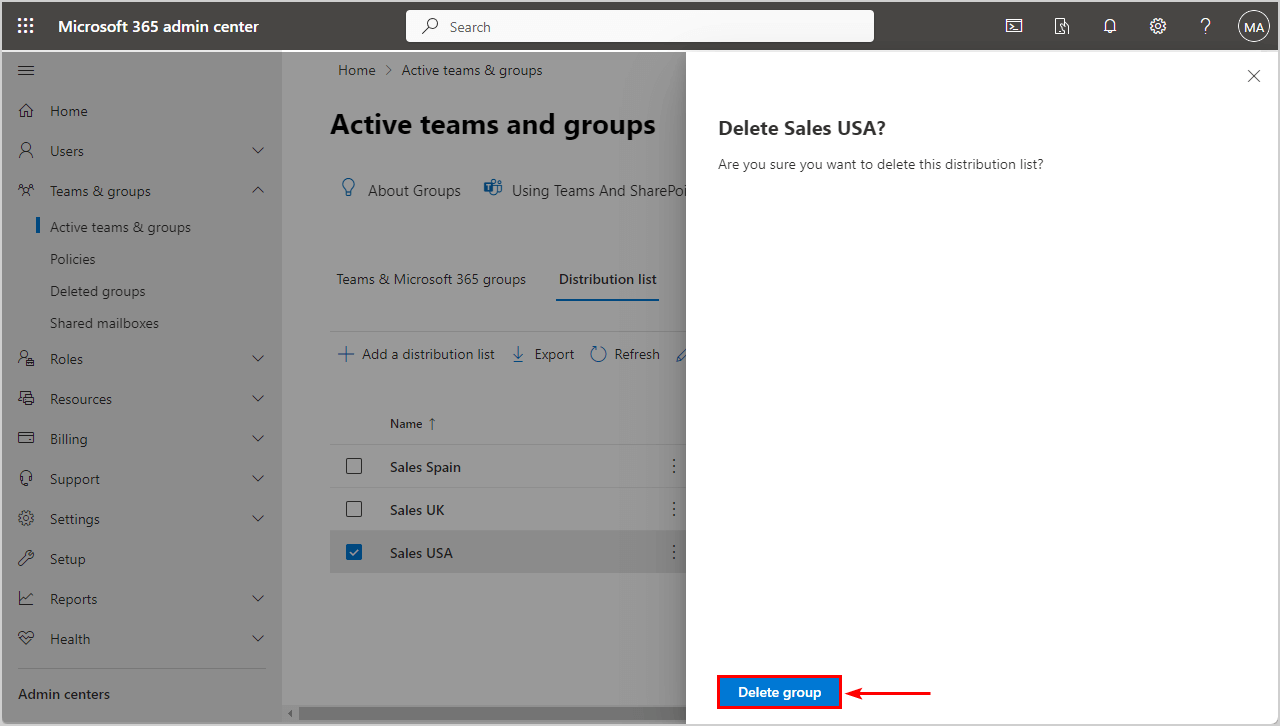
- Click Delete group
- Click Delete group to confirm
You have successfully deleted a distribution list in the Microsoft 365 admin center. You can also delete a distribution list or mail-enabled security group in the Exchange admin center. The disadvantage is that you can only delete a single distribution group at a time in these portals.
With PowerShell, you can delete single, multiple, and bulk all distribution groups, which we will show you in the next step.
Connect to Exchange Online PowerShell
To be able to run PowerShell commands, you must Connect to Exchange Online PowerShell. Open Windows PowerShell as administrator, run the below cmdlet, and sign in with your admin credentials.
Connect-ExchangeOnlineRemove-DistributionGroup Error: You don’t have sufficient permissions
Each distribution group has at least one manager (owner). It means only the distribution group manager is allowed to perform these management tasks. So when the Exchange Online administrator tries to update the properties of the distribution group with the Remove-DistributionGroup cmdlet, and it’s not the manager of this distribution group, the following error message appears.
Error: You don’t have sufficient permissions. This operation can only be performed by a manager of the group.
Notice that even a user with global administrator credentials can’t remove or make a change to a distribution group. The fact that you are not the distribution group manager could stop you from completing the required management task.
The PowerShell cmdlets you need to use for managing a distribution group include a parameter named -BypassSecurityGroupManagerCheck. So whenever you try to perform a management task, and the permission error appears, you can add the -BypassSecurityGroupManagerCheck parameter to the original PowerShell command.
See the below PowerShell command syntax example.
Remove-DistributionGroup -Identity "Distribution Group" -BypassSecurityGroupManagerCheckIn this case, you don’t have to be the manager (owner) of the distribution group to delete it.
Delete Distribution Group
To delete a distribution list or mail-enabled security group, use the Remove-DistributionGroup PowerShell cmdlet.
We will also add the -Confirm:$false parameter to suppress the confirmation prompt.
Note: You can’t restore a deleted distribution group, and it will be deleted permanently.
See the PowerShell command syntax.
Remove-DistributionGroup "Distribution Group" -BypassSecurityGroupManagerCheck -Confirm:$falseRun the below PowerShell command example.
Remove-DistributionGroup "SalesUSA@m365info.com" -BypassSecurityGroupManagerCheck -Confirm:$falseDelete multiple Distribution Groups
To delete multiple distribution groups, you need to use the PowerShell script below.
Note: It will remove all the distribution groups permanently, and you can’t restore them.
- List the distribution groups you want to remove
- Specify the distribution list group primary SMTP address from line 2
- Run the below PowerShell script
$DistributionGroups = @(
    "SalesSpain@m365info.com",
    "SalesUK@m365info.com"
)

foreach ($DistributionGroup in $DistributionGroups) {
    Remove-DistributionGroup $DistributionGroup -BypassSecurityGroupManagerCheck -Confirm:$false -WhatIf
}
Bulk delete Distribution List Groups
To bulk delete all the distribution list groups, you need to use a PowerShell script.
Note: It will remove all the distribution list groups and their members permanently.
First, the script will filter out the distribution list groups and then remove them.
Run the below PowerShell script.
$AllDistributionGroups = Get-DistributionGroup -ResultSize Unlimited -Filter { RecipientTypeDetails -eq "MailUniversalDistributionGroup" }

foreach ($DistributionGroup in $AllDistributionGroups) {
    Remove-DistributionGroup -Identity $DistributionGroup.DistinguishedName-BypassSecurityGroupManagerCheck -Confirm:$false
}
Bulk delete Distribution List and Mail-Enabled Security Groups
You can also bulk delete all distribution lists and mail-enabled security groups with PowerShell.
Note: It will remove all the distribution lists and mail-enabled security groups permanently.
Run the below PowerShell script.
$AllDistributionGroups = Get-DistributionGroup -ResultSize Unlimited

foreach ($DistributionGroup in $AllDistributionGroups) {
    Remove-DistributionGroup -Identity $DistributionGroup.DistinguishedName-BypassSecurityGroupManagerCheck -Confirm:$false
}
That’s it!
Read more: Force delete Microsoft 365 mailbox with PowerShell »
Conclusion
You learned how to delete a distribution group in Microsoft 365. Both the methods, Microsoft 365 admin center and PowerShell, are great for getting the job done. But with PowerShell, you can also bulk remove all distribution lists and mail-enabled security groups and tweak them to your very own preferences.
Did you enjoy this article? You may also like Manage Microsoft 365 users recycle bin. Don’t forget to follow us and share this article.
This Post Has 0 Comments