In the following article, I would like to review the subject Exchange on-Premise server, mail…
Set default calendar permission for all users with PowerShell
Each user can view free/busy status of another user mailbox calendar by default. This permission can be problematic for the users, because they can’t see the name or location of the meeting. That’s why most organizations want to set the calendar permissions to limitedRead for all the users. In this article, you will learn how to set default calendar permission for all users with Microsoft Graph PowerShell.
Table of contents
Calendar permission
The default calendar permission (freeBusyRead) is set for each Microsoft 365 mailbox. You can always change the default value or set another role for each mailbox.
The table below shows all the calendar role types.
| Member | Description |
|---|---|
| none | Calendar isn’t shared with the user |
| freeBusyRead | User is a recipient who can view free/busy status of the owner on the calendar |
| limitedRead | User is a recipient who can view free/busy status, and titles and locations of the events on the calendar. |
| read | User is a recipient who can view all the details of the events on the calendar, except for the owner’s private events. |
| write | User is a recipient who can view all the details (except for private events) and edit events on the calendar. |
| delegateWithoutPrivateEventAccess | User is a delegate who has write access but can’t view information of the owner’s private events on the calendar. |
| delegateWithPrivateEventAccess | User is a delegate who has write access and can view information of the owner’s private events on the calendar. |
| custom | User has custom permissions to the calendar. |
If you want to know the calendar permission of all the mailboxes, you can Export Microsoft 365 calendar permissions with PowerShell.
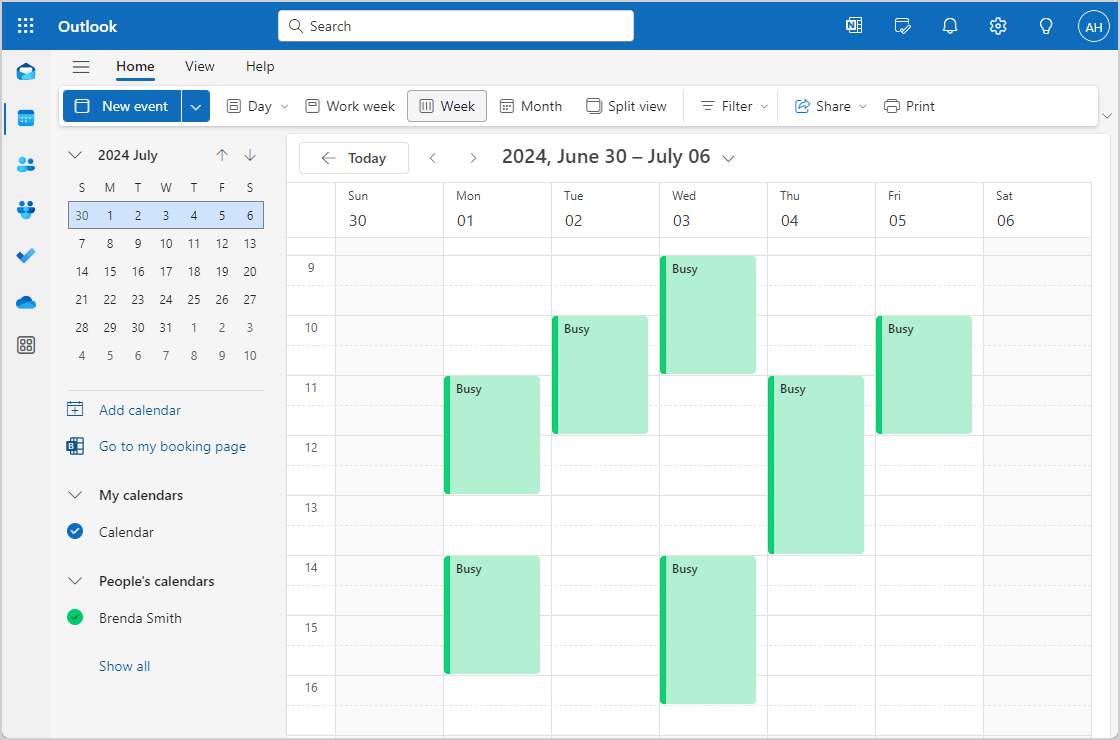
The screenshot below shows the calendar freeBusyRead permission for the appointments and meetings in Outlook or OWA.
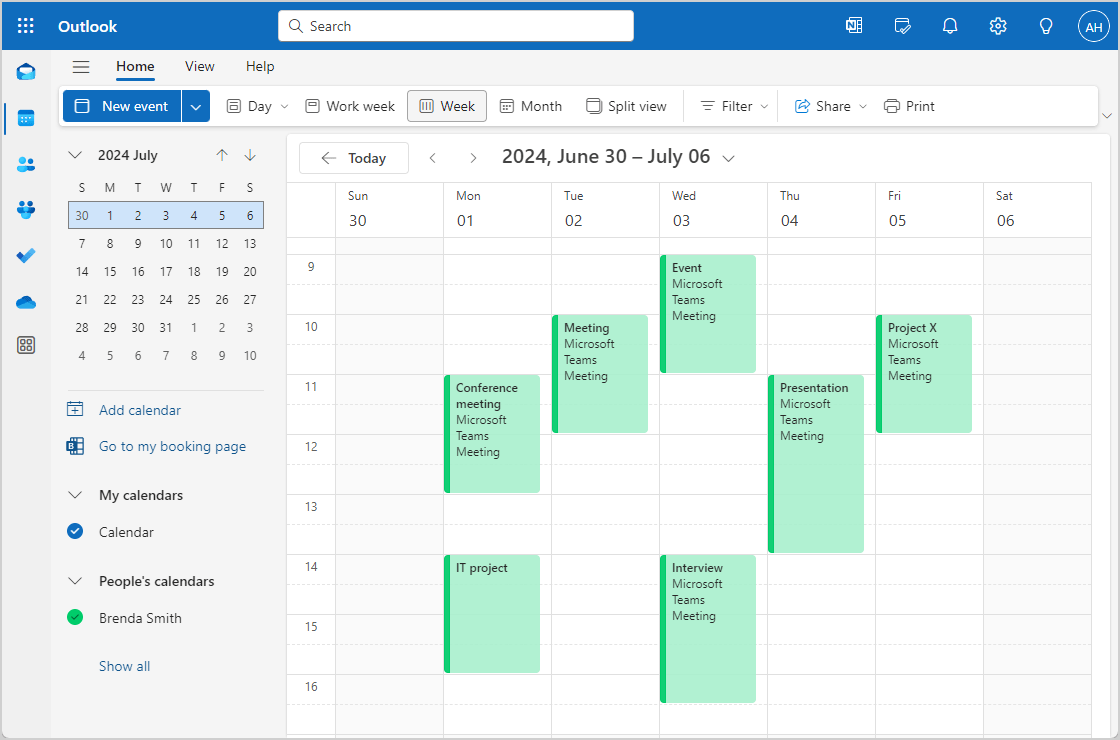
Once you set the limitedRead permission for the calendar, you can see the title and location of each appointment and meeting in Outlook or OWA.
Configure app registration in Microsoft Entra
To be able to run the PowerShell script you first need to create app registration with the correct permissions and a client secret to authenticate with Microsoft Graph PowerShell.
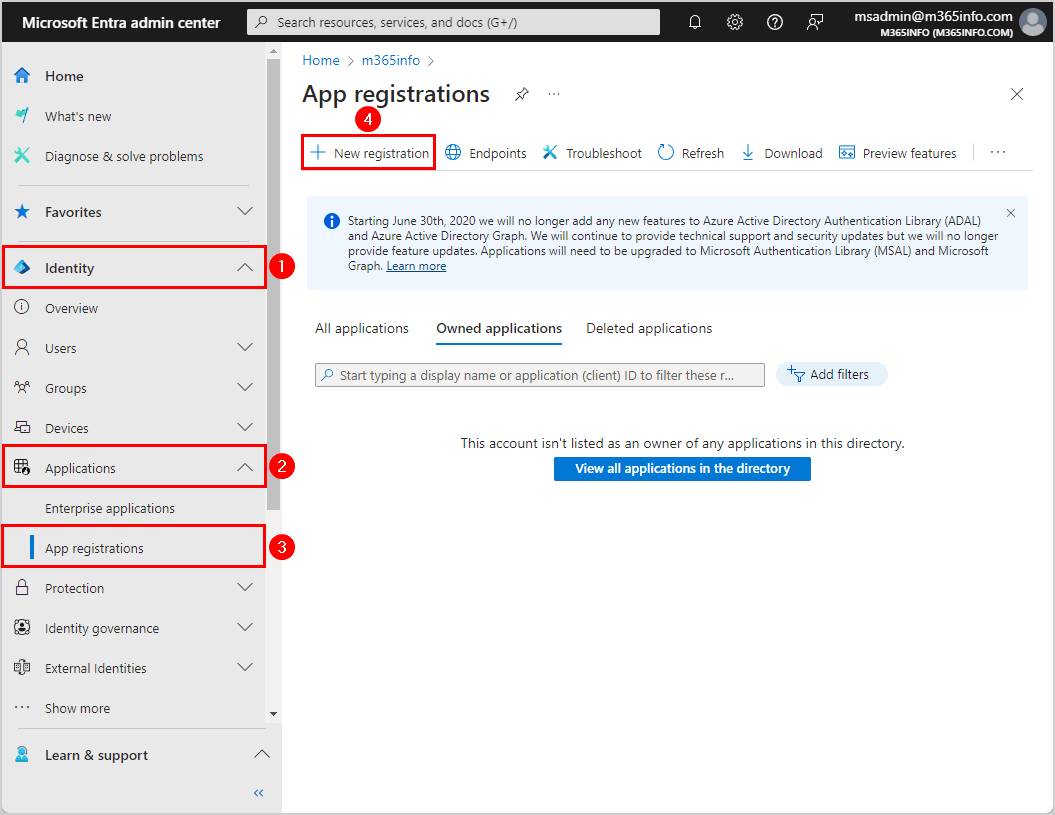
1. Register new application
- Sign in to Microsoft Entra admin center
- Click Identity > Applications > App registrations
- Click New Registration
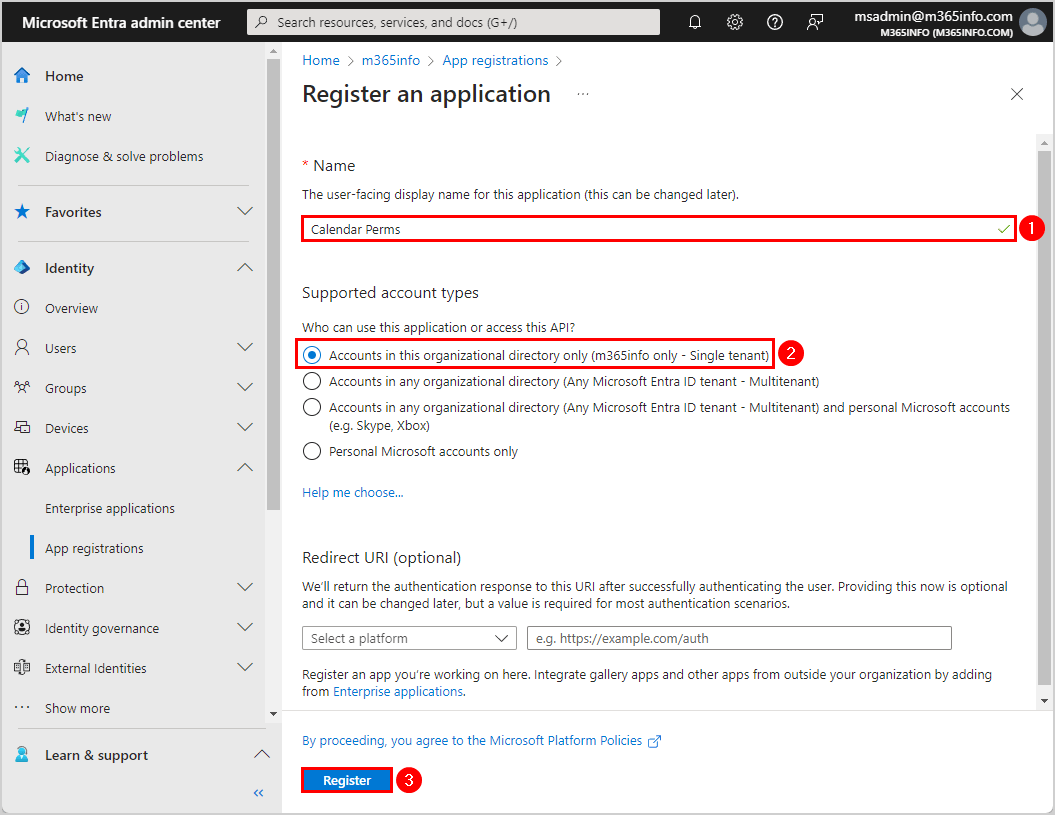
- Name the application Calendar Perms
- Select Accounts in this organizational directory only (m365info only – Single tenant)
- Click Register
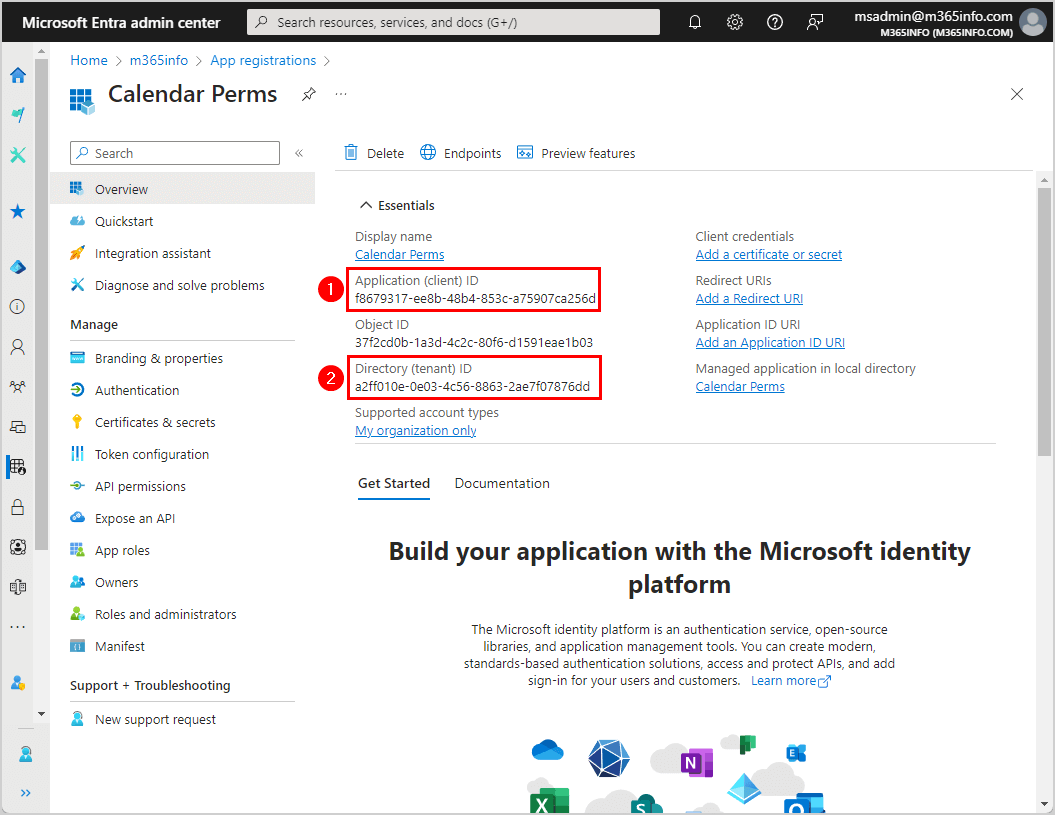
It successfully created the application Calendar Perms. You need to copy the values and paste them into Notepad because you will need them later when connecting to Microsoft Graph.
- Copy the Application (client) ID
- Copy the Directory (tenant) ID
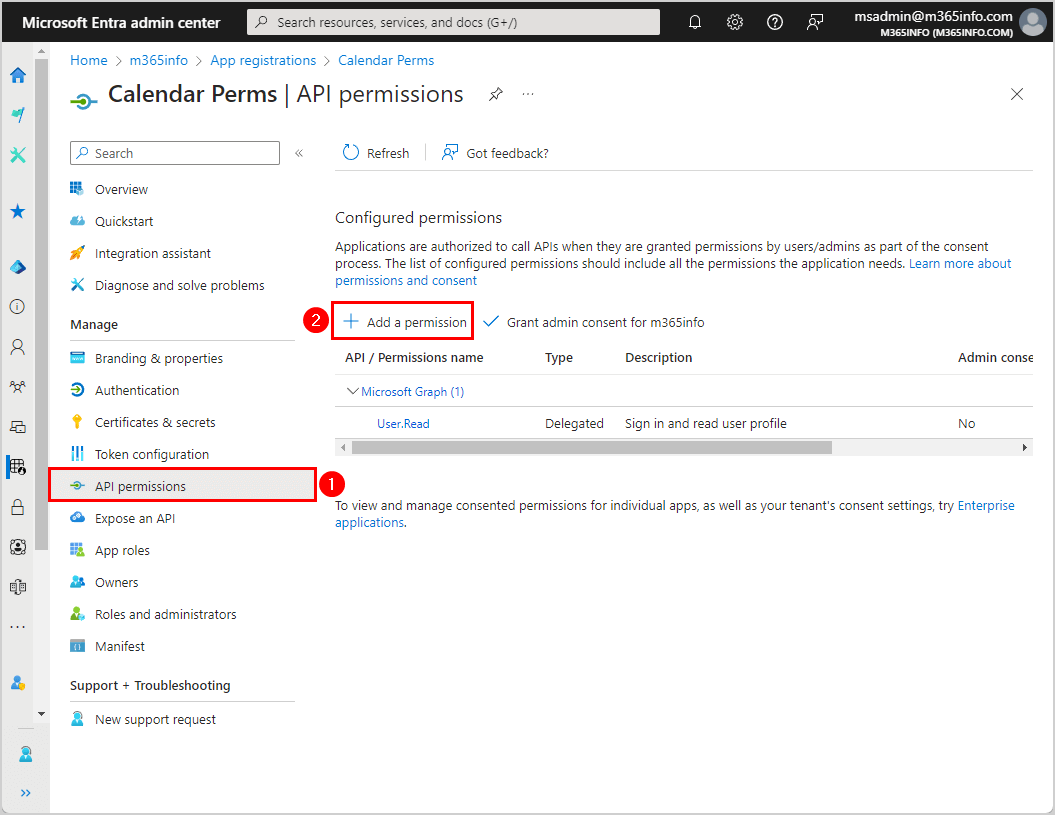
2. Assign API permissions
You must assign API permissions to the Calendar Perms application you created.
- Click API permission
- Click Add a permission
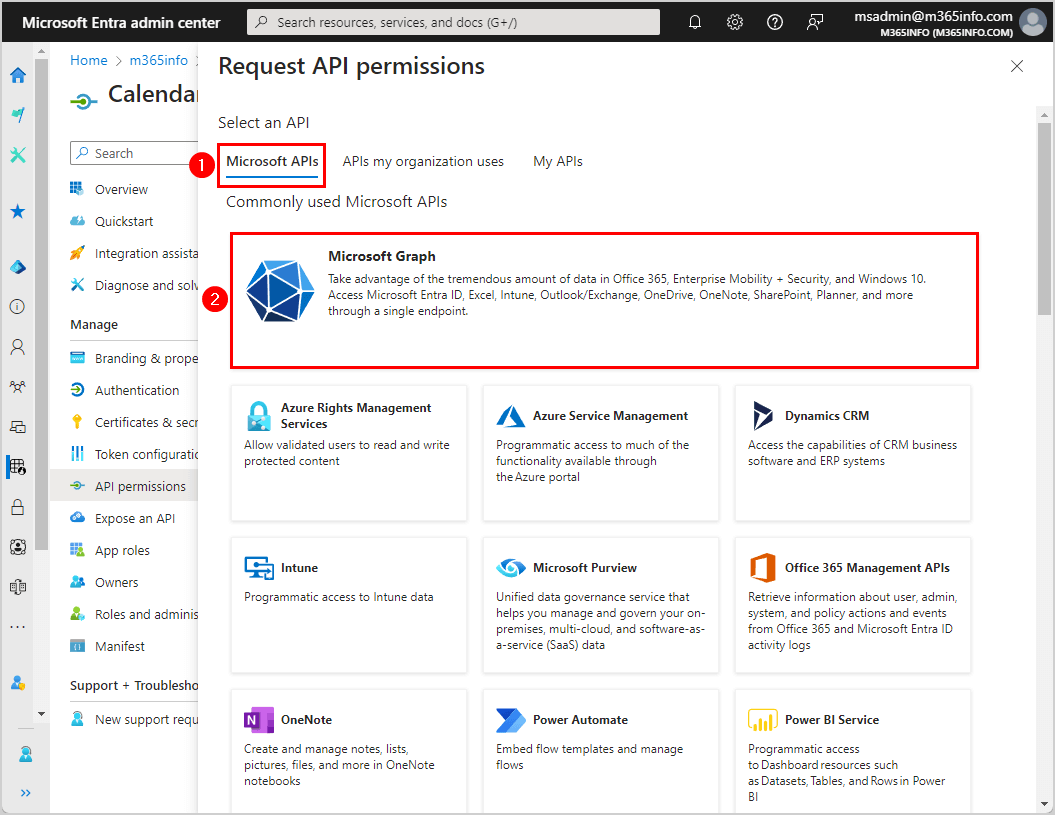
- Click Microsoft APIs
- Click Microsoft Graph
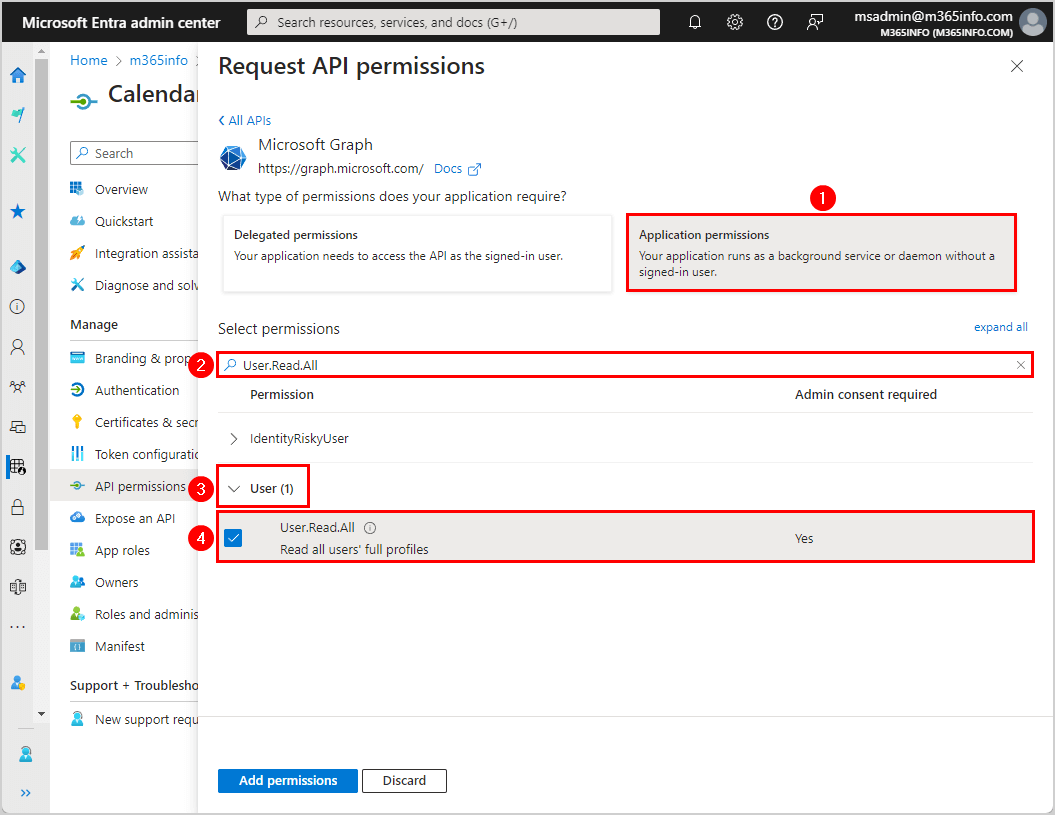
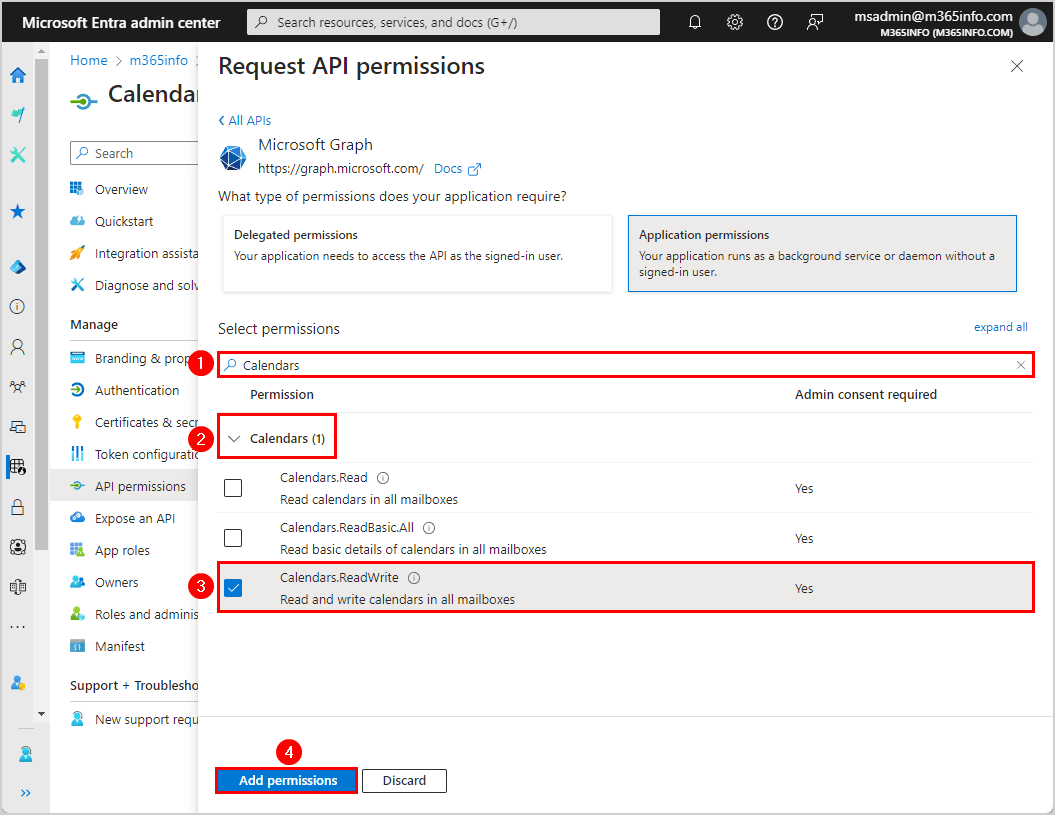
- Click Application permissions
- Search for User.Read.All
- Select User > User.Read.All
- Search for Calendars
- Select Calendars > Calendars.ReadWrite
- Click Add permissions
You successfully added API permissions, and the next step is to grant admin consent.
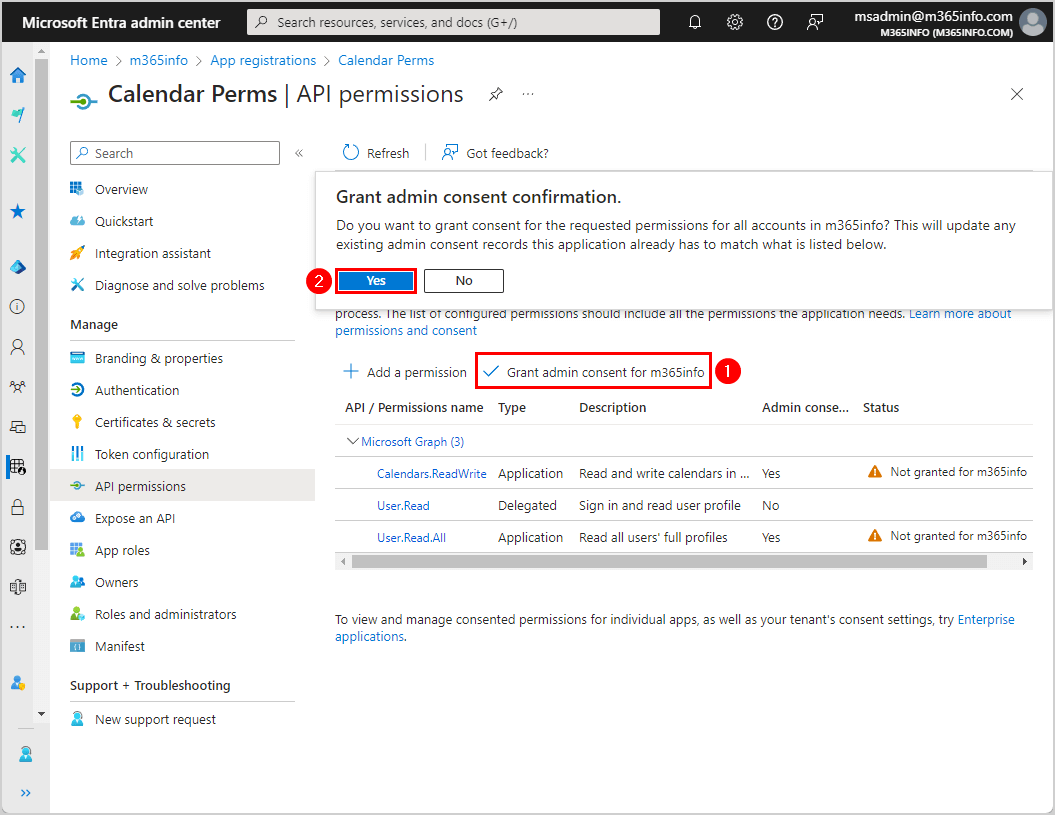
3. Grant admin consent
- Click Grant admin consent for m365info
- Click Yes
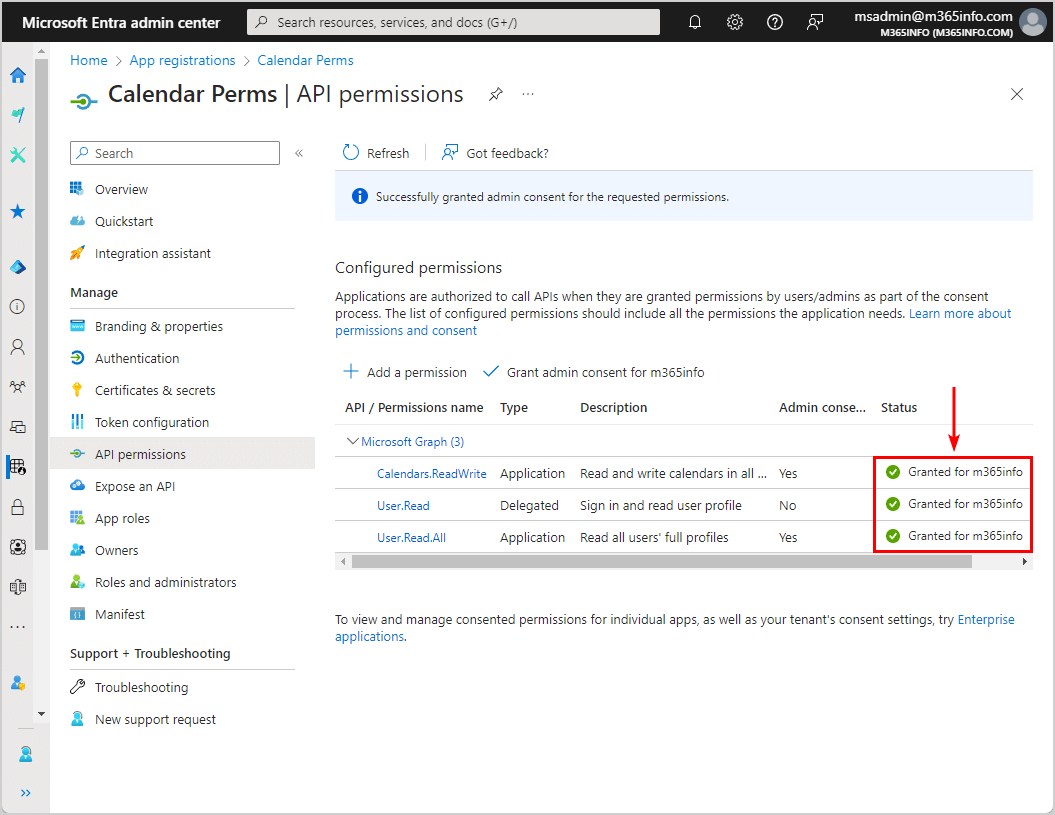
- The green check mark shows that you granted admin consent successfully
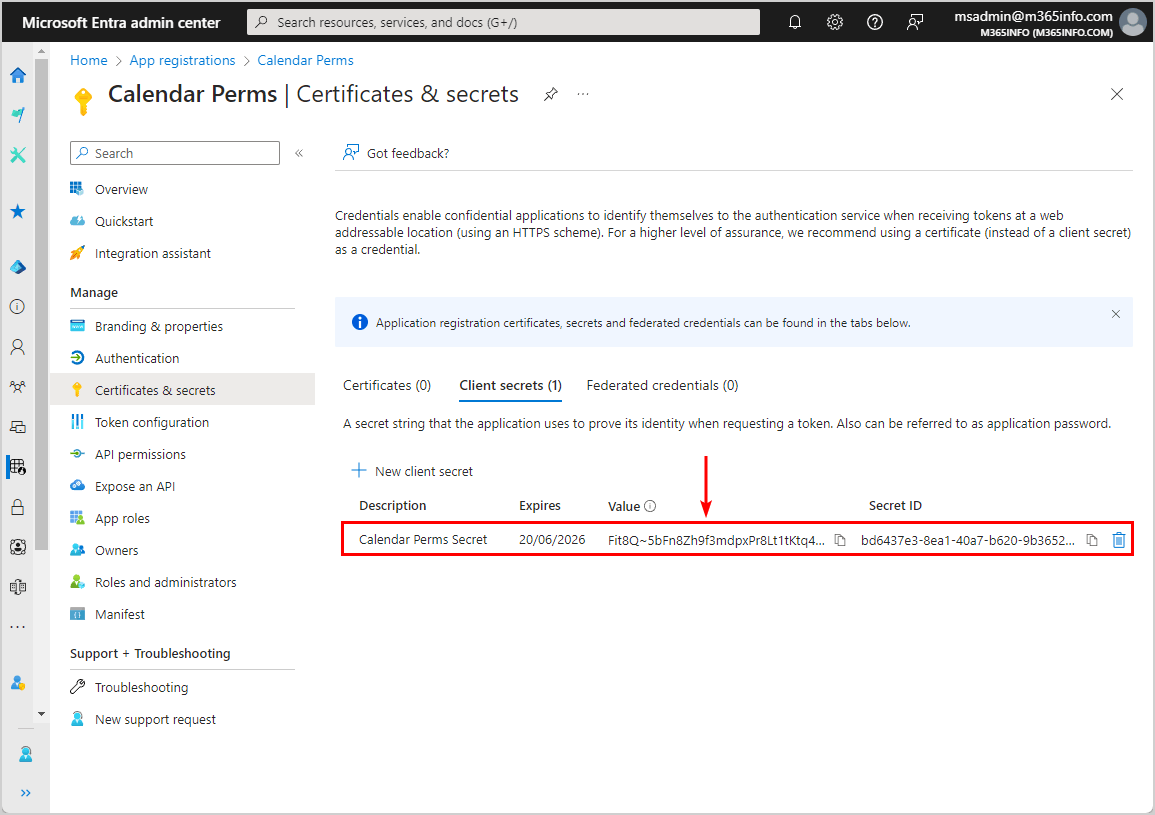
4. Create Client Secret
After you register a new application in Microsoft Entra and assign API permissions and grant admin consent, you need to create a client secret.
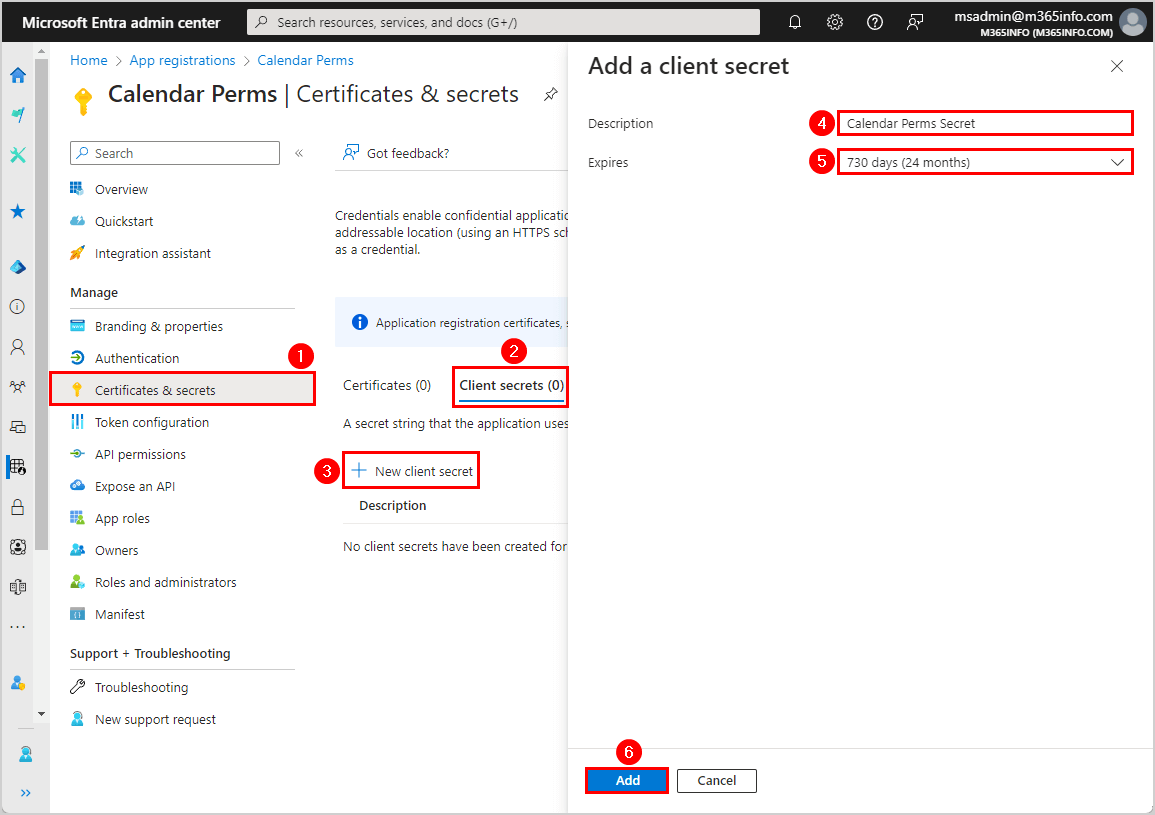
To create a Client Secret for your application in Microsoft Entra ID, follow these steps:
- Click Certificates & secrets
- Click Client secrets > New client secret
- Type Description
- Select an Expiration date
- Click Add
Note: The Client Secret expiration date has a maximum of 24 months (2 years). You can Create unlimited Client Secret in Microsoft Entra ID with PowerShell.
- Copy the client secret Value and save it in Notepad
Connect to Microsoft Graph with Client Secret
You need to change the below parameters values to connect to MS Graph with Client Secret:
- Type the Application Client ID value in line 2
- Type the Directory Tenant ID value in line 3
- Type the Client Secret Value value in line 4
Run the below PowerShell script.
# Configuration application
$ClientId = "f8679317-ee8b-48b4-853c-a75907ca256d"
$TenantId = "a2ff010e-0e03-4c56-8863-2ae7f07876dd"
$ClientSecret = "Fit8Q~5bFn8Zh9f3mdpxPr8Lt1tKtq4r2TRyUc~p"

# Convert the client secret to a secure string
$ClientSecretPass = ConvertTo-SecureString -String $ClientSecret -AsPlainText -Force

# Create a credential object using the client ID and secure string
$ClientSecretCredential = New-Object -TypeName System.Management.Automation.PSCredential -ArgumentList $ClientId, $ClientSecretPass

Connect-MgGraph -TenantId $TenantId -ClientSecretCredential $ClientSecretCredential
You are connected to Microsoft Graph, and in the next step, you will set the calendar permissions for all users.
Set default calendar permission for all users
To set the calendar permission for all users in your organization, you must first go through all the above steps. This is to create an application in Microsoft Entra, including the granted permissions Calendar.ReadWrite and User.Read.All. Then, connect to Microsoft Graph using the Client Secret.
To set the default calendar permission for all users, follow these steps:
- Set the calendar permission level in line 2
- Run the PowerShell script
# Set the permission level to be set on the calendars.
$Permission = "limitedRead"

# Define the properties to retrieve from the user
$Properties = @(
    'Id',
    'AssignedLicenses',
    'DisplayName',
    'Mail',
    'UserPrincipalName'
)

# Generates a list of all users in the Microsoft 365 organization
$users = Get-MgUser -All -Property $Properties | Where-Object { $_.AssignedLicenses.Count -gt 0 -and $_.Mail -ne $null }

# Sets default access to limitedRead for all calendars in each user's mailbox
foreach ($user in $users) {

    # Prints the user currently in focus
    Write-Host "Going through the user $($user.UserPrincipalName)" -ForegroundColor Cyan

    # Initializes the variables to store calendar permissions
    $CalenderPermissions = @()
    $CalenderPermissions = Get-MgUserCalendarPermission -UserId $user.id

    # If the user has any calendar permissions, update them
    if ($CalenderPermissions) {
        $CalenderPermissionsMyOrg = @()
        $CalenderPermissionsMyOrg = $CalenderPermissions | Where-Object { $_.EmailAddress.Name -eq "My Organization" }

        # Updates the calendar permissions for the user
        if ($CalenderPermissionsMyOrg.Role -ne $Permission) {
            $null = Update-MgUserCalendarPermission -UserId $user.id -Role $Permission -CalendarPermissionId $CalenderPermissionsMyOrg.id
            # Prints the user whose calendar permissions are being set
            Write-Host "Setting permission on calendar for $($user.userprincipalname)" -ForegroundColor Green
        }
        else {
            Write-Host "Permission already set on calendar for $($user.userprincipalname)" -ForegroundColor Yellow
        }
    }
}
The PowerShell output shows the below result. All the existing user mailboxes in your organization have the default calendar permission set.
Going through the user Amanda.Hansen@m365info.com
Setting permission on calendar for Amanda.Hansen@m365info.com
Going through the user Andrea.Baker@m365info.com
Setting permission on calendar for Andrea.Baker@m365info.com
Going through the user Brenda.Smith@m365info.com
Setting permission on calendar for Brenda.Smith@m365info.com
Going through the user Carl.Hawk@m365info.com
Setting permission on calendar for Carl.Hawk@m365info.com
Going through the user Chris.Lucas@m365info.com
Setting permission on calendar for Chris.Lucas@m365info.com
Going through the user Diana.Baker@m365info.com
Setting permission on calendar for Diana.Baker@m365info.com
Going through the user Laura.Terry@m365info.com
Setting permission on calendar for Laura.Terry@m365info.com
Going through the user Stephen.Hunter@m365info.com
Setting permission on calendar for Stephen.Hunter@m365info.com
You can always combine those two scripts and create a scheduled task that runs every day. This way, you don’t need to do anything if a new user is created.
That’s it!
Read more: Configure Certificate-Based Authentication to run automated PowerShell scripts »
Conclusion
You learned how to set default calendar permission for all users with Microsoft Graph PowerShell. You need to configure an application with the correct permissions in Microsoft Entra ID. After that you can connect to Microsoft Graph with the client secret and run the PowerShell script. This way, you can easily set the default calendar permission for all users in your organization.
Did you enjoy this article? You may also like Manage mailbox folder permission with PowerShell. Don’t forget to follow us and share this article.
What Others Are Reading

This Post Has 0 Comments