In this article, we review that subject of – how to create a Hash table…
Adding Email addresses using PowerShell – Import from CSV file | Bulk mode | Office 365 | Part 5#13
In the current article, we review the way we use PowerShell for – adding and updating Exchange recipient’s E-mail address, by importing the information stored in a CSV file.
Table of contents
- Manage E-mail address by using CSV file | Bulk mode
- 1. Update Primary + Proxy E-mail address by importing information from a CSV file | Bulk mode
- 2. Update Primary + Proxy E-mail address by importing information from a CSV file | Keep existing recipient E-mail addresses | Bulk mode
- 3. Add multiple Proxy E-mail address by importing information from a CSV file | Bulk mode
- The next article in the current article series
Manage E-mail address by using CSV file | Bulk mode
In the next section, we review a couple of scenarios in which we implement the task of managing “E-mail address” task, such as – adding E-mail address by importing the information from a CSV file.
The CSV file, serve as a “logical container” that held data.
In our scenario, the CSV serves as a container that holds data about – Office 365 users, and their E-mail address that we would like to add to the Exchange recipients.
The structure of a CSV file that we use in our scenario
Each of the columns in the CSV file has and Header name.
When we need to address information stored in a specific column, we provide the PowerShell command the name of the specific column header.
In the following screenshot, we can see an example of a CSV file that we use in our demonstration.
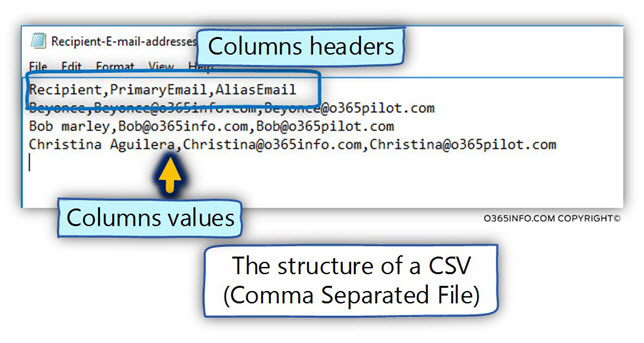
Technically speaking, the CSV file is just a Text file, and we can use a simple text editor for editing the file content.
Most of the time, we would use another application such as Microsoft Excel for editing a CSV file because editing the data using Excel, is furthermore comfortable.
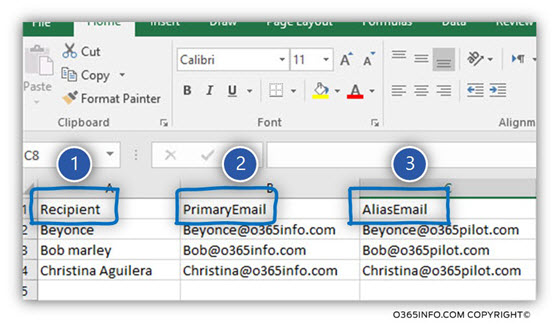
In the following screenshot, we can see an example of the CSV file that was opened in Excel.
The CSV file includes three columns:
- The column named – Recipient (number 1), contain our “recipient’s identity”. Technically speaking, we can use various recipient properties for defining the “recipient identity.”
For example, recipient Alias, recipient E-mail address, recipient Display name and more. In our specific example, we use the Recipient “Display name” as the recipient identity. - The column named – PrimaryEmail (number 2), contain a user E-mail address that we would like to set as a “Primary E-mail address.”
- The column named – AliasEmail (number 3), contain a user E-mail address that we would like to set as
an “Alias E-mail address.”
CSV file column header names
When using a CSV file, we can “choose” any column header name who will suit our needs.
It’s recommended to choose a meaningful column header name and doesn’t use any spaces.
Import information from a CSV file
Most of the time, we “fetch” the information stored in the CSV file, by defining a variable that includes the content of the PowerShell command Import-CSV.
In our example, we define a variable named $Recipients, which will “contain” the content of the CSV file that we import.
$Recipients = Import-Csv C:\Temp\Recipient-E-mail-addresses.csvExport information from a CSV file
The operation of “import information from a CSV file” is based on a preliminary step in which we export the required information to a CSV file. You can read more information about the process of the PowerShell syntax that we use for exporting information to various types of file formats in the articles – Export and display information about Email addresses using PowerShell | Office 365 | Part 6#13
Regarding the subject of “what is the information that we export to a file,” you can read the article – Display information about E-mail Addresses using PowerShell | Customizing the output using Hash Table and Custom expressions | Office 365 | Part 7#13
1. Update Primary + Proxy E-mail address by importing information from a CSV file | Bulk mode
In the next example, we need to fulfill the following requirements:
- Replace (remove) the existing primary E-mail address with a NEW Primary E-mail address stored in a CSV file.
- Replace (remove) the existing Alias E-mail with a NEW Alias E-mail address stored in a CSV file.
It’s important to emphasize, that in a scenario in which the CSV file includes the name of Exchange Online recipients who already have E-mail addresses, the “import process” from the CSV file will impact existing
E-mail address in the following way:
- The existing Exchange Online recipient Primary E-mail address, will be saved as a Proxy E-mail address.
- The “primary E-mail address” from the CSV file will replace the existing primary E-mail address.
- Any existing Proxy E-mail address will be “removed” (deleted).
If you feel that you are confused by this “PowerShell logic,” please read the section –
Replacing existing E-mail address with a NEW E-mail address.
Notice that in this scenario, the existing E-mail address will be “removed” (deleted) and replaced by the E-mail address that appears in the CSV file, under the columns: PrimaryEmail and AliasEmail.
In our example, we ask from PowerShell, to set two E-mail addresses for each of the recipients.
- The first E-mail address” defined as – $Mailbox.PrimaryEmail and will be “treated” by PowerShell as the primary E-mail address.
- The “second E-mail address” defined as – $Mailbox.AliasEmail and will be “treated” by PowerShell as the Alias E-mail address.
Just a quick reminder, PowerShell will relate to the First E-mail address as the primary E-mail address, and to all the rest of E-mail addresses as – Alias (Proxy) E-mail addresses.
The PowerShell command syntax that we use in our examples is:
$Recipients = Import-Csv C:\Temp\Recipient-E-mail-addresses.csv
Foreach ($Mailbox in $Recipients)
{
Set-Mailbox -Identity $Mailbox.Recipient -EmailAddresses $Mailbox.PrimaryEmail,$Mailbox.AliasEmail #-WhatIf
}
2. Update Primary + Proxy E-mail address by importing information from a CSV file | Keep existing recipient E-mail addresses | Bulk mode
In the next example, we need to fulfill the following requirements:
- Replace (remove) the existing Primary E-mail address with a NEW Primary E-mail address stored in a CSV file.
- Add NEW Alias E-mail address from a CSV file. The NEW E-mail address will be added to the existing recipient E-mail address as an additional E-mail address.
Notice that vs. the previous scenario, we don’t wish to remove existing Alias E-mail addresses that the recipient already has. Instead, we want to add an additional E-mail address to existing “array” of the recipient E-mail addresses.
Step 1: The information about the Exchange Online recipient + the additional E-mail addresses stored in the CSV file.
We will populate the variable named $Recipients with the information stored in the CSV file by using the PowerShell command Import-CSV.
In our example, the information about the Alias E-mail address is saved in a column with the header name AliasEmail.
Step 2: in this step, we ask PowerShell, to add an additional E-mail address (Alias E-mail address) to the existing “array of E-mail addresses”, for each recipient that appears in the CSV file, by using the method @{Add.
$Recipients = Import-Csv C:\Temp\Recipient-E-mail-addresses.csv
Foreach ($Mailbox in $Recipients)
{
Set-Mailbox -Identity $Mailbox.Recipient -EmailAddresses @{Add=$Mailbox.AliasEmail} # -WhatIf
}
3. Add multiple Proxy E-mail address by importing information from a CSV file | Bulk mode
In the next scenario, we need to add to our recipients additional Proxy E-mail addresses that are stored in a CSV file.
- The CSV file stores the Proxy E-mail addresses in a column named – “AliasEmail”.
- The name of the recipients is stored in a column named – “Recipient.”
In the following screenshot, we can see the structure of the CSV file.
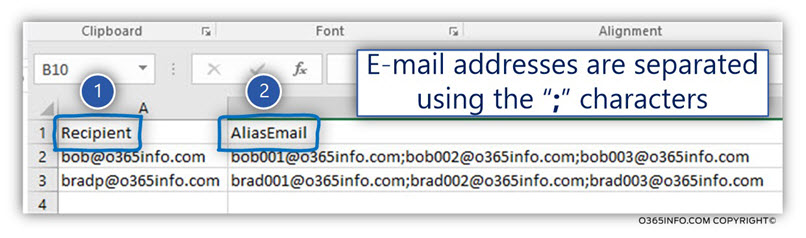
The “AliasEmail” column, includes multiple E-mail addresses that are separated by the semicolon ; character.
We need to use a PowerShell command, that will fetch each of the E-mail addresses that are stored in the column named AliasEmail and add them as a Proxy E-mail address to the recipient.
To be able to “tell” the PowerShell command that the information in the AliasEmail include multiple values separated by the semicolon ; character, we use the PowerShell parameter -split.
The PowerShell command syntax that we use is:
Import-Csv C:\temp\Recipient-Proxy-E-mail-addresses.csv | ForEach-Object{
$Recipient = $_.Recipient
$ProxyAddresses = $_.AliasEmail -split ';'
Set-Mailbox -Identity $Recipient -EmailAddresses @{add= $ProxyAddresses}
}
The next article in the current article series
Export and display information about Email addresses using PowerShell | Office 365 | Part 6#13
What Others Are Reading
This Post Has 0 Comments