We like to add new contacts, also known as external contacts in Microsoft 365. These…
Export Microsoft 365 calendar permissions with PowerShell
The Availability Only role is set for each user mailbox calendar by default. This means that the other users have permission to view only the free or busy time in the calendar folder. Some users have other permissions that allow them to see additional information in the calendar folder. It’s best to get an overview of the calendar folder permissions of each mailbox. In this article, you will learn how to export Microsoft 365 calendar permissions with PowerShell.
Table of contents
Microsoft 365 mailbox calendar permissions
Each user can share their calendar folder and set the level of permissions with single or multiple users. The users can have different levels of permissions on their calendar folder.
The -AccessRights parameter specifies the permissions for the user with the roles. The list below shows all the calendar roles with the permissions that come along when you assign access rights to the mailbox folder.
| Roles | Permissions |
|---|---|
| AvailabilityOnly (Default value) | View only availability data (Free/Busy time) |
| None | No permission to access folders and files |
| LimitedDetails | View availability data with subject and location (Free/Busy time, subject, location) |
| Owner | CreateItems, ReadItems, CreateSubfolders, FolderOwner, FolderContact, FolderVisible, EditOwnedItems, EditAllItems, DeleteOwnedItems, DeleteAllItems |
| PublishingEditor | CreateItems, ReadItems, CreateSubfolders, FolderVisible, EditOwnedItems, EditAllItems, DeleteOwnedItems, DeleteAllItems |
| Editor | CreateItems, ReadItems, FolderVisible, EditOwnedItems, EditAllItems, DeleteOwnedItems, DeleteAllItems |
| PublishingAuthor | CreateItems, ReadItems, CreateSubfolders, FolderVisible, EditOwnedItems, DeleteOwnedItems |
| Author | CreateItems, ReadItems, FolderVisible, EditOwnedItems, DeleteOwnedItems |
| NonEditingAuthor | CreateItems, ReadItems, FolderVisible |
| Reviewer | ReadItems, FolderVisible |
| Contributor | CreateItems, FolderVisible |
To get all calendar folder permission for a user, use the Get-MailboxFolderPermission PowerShell cmdlet.
Note: Users from other countries with languages other than English have different names for Calendar. Therefore, we will always add the Get-MailboxFolderStatistics PowerShell cmdlet in our commands and scripts to retrieve the correct name.
Connect to Exchange Online PowerShell
Before you start, you need to Install Exchange Online PowerShell module. Then run the below PowerShell cmdlet to Connect to Exchange Online PowerShell.
Connect-ExchangeOnlineGet calendar permissions for single mailbox
You can export all the mailboxes that have access rights on the calendar folder of a specific user mailbox.

In our example, we want to export the calendar permission of a single user (Brenda.Smith@m365info.com).
- Specify the user mailbox in line 1
- Run the PowerShell script
$mailbox = "Brenda.Smith@m365info.com"

$folder = (Get-MailboxFolderStatistics -Identity "$($mailbox)" | Where-Object { $_.FolderType -eq "Calendar" }).Name
Get-MailboxFolderPermission "$($mailbox):\$($folder)" | Select-Object FolderName, User, AccessRights
The PowerShell output shows the calendar folder permissions for the single user.
FolderName User           AccessRights
---------- ----           ------------
Agenda     Default        {AvailabilityOnly}
Agenda     Anonymous      {None}
Agenda     Stephen Hunter {AvailabilityOnly}
Agenda     Amanda Hansen  {Reviewer}
Export calendar permissions for all mailboxes to CSV
Depending on the calendar folder settings, some mailboxes have different calendar permissions than others. Therefore, you can view the access rights of the calendar folder for each mailbox.
To export calendar folder permissions for all the Microsoft 365 mailboxes to an Out-GridView and CSV file, follow these steps:
- Create a temp folder in your (C:) drive
- Specify the CSV path file in line 2
- Run the below PowerShell script
# CSV file export path
$Csvfile = "C:\temp\MailboxCalendarPerms.csv"
# Get all mailboxes
$mailboxes = Get-Mailbox -ResultSize Unlimited
# Count the total number of mailboxes
$totalMailboxes = $mailboxes.Count
$currentMailboxIndex = 0
# Array to store the results
$calendarPermissions = @()
foreach ($mailbox in $mailboxes) {
$currentMailboxIndex++
# Update the progress bar
$progressParams = @{
Activity = "Processing Mailboxes"
Status = "Processing mailbox $currentMailboxIndex of $totalMailboxes ($($mailbox.UserPrincipalName))"
PercentComplete = ($currentMailboxIndex / $totalMailboxes) * 100
}
Write-Progress @progressParams
# Get the Calendar folder for the current mailbox
$folder = (Get-MailboxFolderStatistics -Identity $mailbox.UserPrincipalName | Where-Object { $_.FolderType -eq "Calendar" }).Name
if ($folder) {
# Get permissions for the Calendar folder
$permissions = Get-MailboxFolderPermission "$($mailbox.UserPrincipalName):\$($folder)" | Select-Object FolderName, User, AccessRights
# Add the permissions to the array with user principal name and display name
$permissions | ForEach-Object {
$calendarPermissions += [PSCustomObject]@{
UserPrincipalName = $mailbox.UserPrincipalName
DisplayName = $mailbox.DisplayName
FolderName = $_.FolderName
User = $_.User
AccessRights = $_.AccessRights
}
}
}
}
# Clear progress bar
Write-Progress -Activity "Processing Mailboxes" -Completed
# Display the results
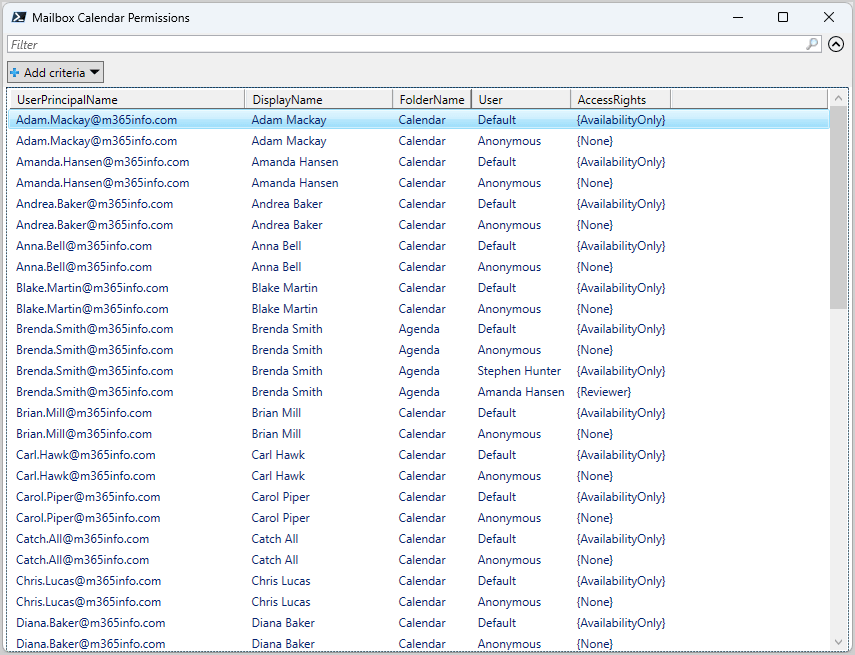
$calendarPermissions | Out-GridView -Title "Mailbox Calendar Permissions"
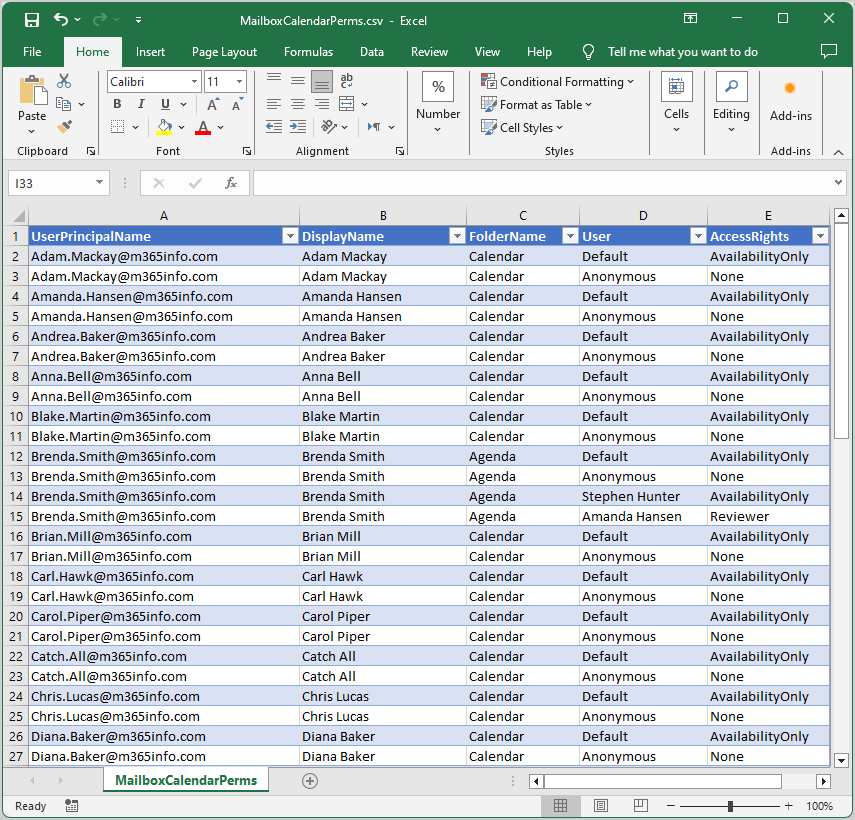
$calendarPermissions | Export-Csv -Path $Csvfile -NoTypeInformation -Encoding utf8- The Out-GridView result appears
- Open the CSV file with Microsoft Excel to see the results
That’s it!
Read more: Manage mailbox folder permission with PowerShell »
Conclusion
You learned how to export Microsoft 365 calendar permissions for all mailboxes with PowerShell. While it’s possible to sign in as the user and check the calendar permission from the Outlook app or Outlook on the web (OWA), it’s time consuming. It’s best to use PowerShell to get and export the calendar permissions for all user mailboxes to a CSV file.
Did you enjoy this article? You may also like Manage mailbox permissions with PowerShell. Don’t forget to follow us and share this article.
This Post Has 0 Comments