To be able to understand the different “Exchange clients” connectivity protocol flow in Exchange 2013/2010…
Exchange 2013 coexistence and Outlook infrastructure | Part 2/2 | 14#23
In the current article, we will continue to review the subject of the Outlook client protocol connectivity flow in an Exchange 2013 coexistence environment. In this article, we will have a closer look at the specific charters, which build the Outlook and the Exchange relationship in this environment.
The parts which we will review are:
- The relationships between Exchange 2013 CAS and legacy Exchange CAS servers in Exchange 2013 coexistence environment
- The relationships between Exchange 2013 CAS and legacy Outlook Exchange clients in Exchange 2013 coexistence environment
- The required configuration setting that needed for “CAS to CAS communication” meaning:
1. Outlook Anywhere (RPC\HTTP) support and setting on the legacy Exchange CAS servers – The requirement of enabling the option of Outlook Anywhere (RPC\HTTP) on the legacy Exchange CAS servers
2. The authentication protocol settings-
The required setting of the authentication protocol that is involved in the Outlook client protocol connectivity flow:
- The authentication protocol that is used by Outlook client when he needs to provide his identity to the Exchange CAS server.
- The authentication protocol that is used by Exchange 2013 CAS when he proxy the Outlook user credentials to the Exchange CAS server legacy infrastructure.
In the last part of the article, we will provide a brief example of the implementation of the required configurations setting using PowerShell.
Table of contents
- Exchange 2013 coexistence environment and Outlook client | The required configuration settings
- RPC Endpoint name vs. Exchange host name
- Outlook client protocol connectivity flow | The two interfaces
- Exchange 2013 coexistence environment | Outlook client | Required preparations check list
- Manage Exchange Outlook Anywhere settings
Exchange 2013 coexistence environment and Outlook client | The required configuration settings
To be able to demonstrate the flow in an Exchange 2013 coexistence environment, let’s use the following scenario:
Exchange site, which include Exchange CAS 2013 server + Exchange 2010 infrastructure (Exchange 2010 CAS server + Exchange 2010 Mailbox server).
An Exchange, Outlook client that his mailbox hosted at the Exchange 2010 Mailbox server, need access to his mailbox.
Note: We use an Exchange 2013/2010 coexistence environment for the demonstration, but the same logic is also implemented in Exchange 2013/2007 coexistence environment.
The Outlook client protocol connectivity flow, will be implemented as follows:
- Outlook client communication requests will be “pointed” to the Exchange 2013 CAS server.
- The communication channel between Outlook mail client and the Exchange 2013 CAS server must be implemented as “Outlook Anywhere” (RPC/HTTP/S).
RPC over HTTP/s is the default method for Outlook client connections – there are no more direct RPC connections to the servers for Outlook clients. - The Outlook client will provide the user credentials using an authentication protocol that is supported by the “server side”. The available options are: Basic, NTLM or negotiation.
- Because the user mailbox hosted at a “legacy Exchange infrastructure” (Exchange 2010 CAS server), Exchange 2013 CAS server, will proxy the Outlook communication request to the suitable legacy Exchange CAS server.
- In the process of “proxying” the request to the “legacy Exchange infrastructure” (Exchange 2010 CAS server), the Exchange CAS 2013 server will “forward” the user credentials to the “destination” legacy Exchange 2010 CAS server.
- To be able to “forward” the user credentials to the “legacy Exchange infrastructure” (Exchange 2010 CAS server), the authentication protocol settings for the Exchange 2013 CAS server + the “legacy Exchange infrastructure” (Exchange 2010 CAS server), must be set to NTLM.

RPC Endpoint name vs. Exchange host name
The flow of legacy Exchange, Outlook client in an Exchange 2013 coexistence environment, could be sometimes confusing.
The general concept of this flow is that legacy Exchange, Outlook clients, will need to address the Exchange 2013 CAS as their “RPC Endpoint” server and in his turn, the Exchange 2013 CAS will need to proxy their request to the appropriate legacy Exchange CAS server.
We have mentioned before that in an Exchange 2013 coexistence environment; we will need to enable the Outlook Anywhere (RPC\HTTP) on each of the legacy Exchange CAS servers.
The primary configuration parameter that when enabling Outlook Anywhere (RPC\HTTP) on the Exchange CAS server is: the “external hostname.”
The external hostname is the RPC Endpoint name who “represent” the Exchange CAS server which provides the Outlook Anywhere (RPC\HTTP) services.
When Outlook client address Exchange CAS server, looking for Autodiscover information, part of the Autodiscover information that Exchange CAS server will provide, include a “reference” to the “Exchange CAS server” that is dedicated to serving the Outlook Anywhere client or in other words, can act as the RPC Endpoint server.
In the following screenshot, we can see an example of an “Autodiscover answer” that sent to the Outlook client by the Exchange CAS server.
In our example, the Exchange CAS server “tell” Outlook client that is the RPC Endpoint server name is: europe.mail.o365info.com
The information about the RPC Endpoint server appears in the section:
Protocol: Exchange HTTP under the server parameter.

In the Exchange 2013 coexistence environment, we need to change the default Outlook client protocol connectivity flow.
Instead of the configuration in which legacy Outlook client will connect a legacy Exchange CAS server which serves as an RPC Endpoint, in the Exchange 2013 coexistence environment, we need to implement a new configuration in which native Outlook client and legacy Outlook client will address only the Exchange 2013 CAS as – RPC Endpoint server.
Additionally, we need to enable the Outlook Anywhere service on each of the legacy Exchange CAS servers.
In our scenario, we want to use the following namespace: mail.o365info.com as the name if the RPC Endpoint that will be “published” to all the Outlook clients (native Exchange 2013 client and legacy Exchange clients such as 2007/2010).
When a legacy Exchange Outlook client addresses the Exchange 2013 CAS as the: “RPC Endpoint”, the Exchange 2013 CAS will know how to proxy the legacy Exchange Outlook client request to the proper legacy Exchange CAS server.
For this reason, when we enable the Outlook Anywhere service from a legacy Exchange CAS server, such as Exchange 2007/2010 CAS, we will need to set the value of the “external host name” using the “primary namespace” such as: mail.o365info.com
The namespace (mail.o365info.com in our scenario) will point to the Exchange 2013 CAS.
Outlook client will refer to the Exchange 2013 CAS as an RPC Endpoint using the name: mail.o365info.com
When the Exchange 2013 CAS needs to Proxy the request for the legacy Exchange CAS server, he will address the legacy Exchange CAS server\s by using the server “standard host name.”
In the following diagram, we can see an example of an Exchange 2010 Outlook client protocol connectivity flow.
Exchange 2010 client address the Exchange 2013 CAS using the host name: mail.o365info.com
Exchange 2013 CAS will proxy the Outlook client request to the Exchange 2010 CAS and address the Exchange 2010 CAS using the server name: Exc2010.o365info.com

In the following screenshot, we can see an example of the configuration setting that relates to the “external host name” in Exchange 2010 CAS.
In our example, we enable the Outlook Anywhere on the Exchange 2010 CAS + configure the value of the “external host name” to: mail.o365info.com

In case that you are wondering: what will happen if I use a different “external host name” for each of the existing Exchange CAS servers, the answer is that the Exchange 2013 CAS will provide a different RPC Endpoint name to Outlook client based on their “Exchange version.”
Outlook client protocol connectivity flow | The two interfaces
In the Exchange 2013 coexistence environment, Outlook client protocol connectivity flow is consisted of two parts:
- Outlook Exchange 2013 CAS communication
- Exchange 2013 CAS and Exchange CAS server legacy communication.
By looking at the following diagram, we can see the concept of the “two interface” or “two parts” that building the Outlook client protocol connectivity flow.
- The “A Part” is the area that describes the relationships between the Exchange 2013 CAS server and his Outlook client.
- The “B Part”, is the area that describes the relationships between the Exchange 2013 CAS server and the legacy Exchange CAS server infrastructure.

PART A| Outlook client and the “user credentials”
The “A part” of the Outlook client protocol connectivity flow is the “circle” that exists between the Outlook client and the Exchange 2013 CAS server.
The first part of the Outlook client protocol connectivity flow, start with the “authentication” in which Outlook client will need to provide the user credentials to Exchange CAS server.
Note: If we want to be more accurate, the Outlook client protocol connectivity flow start with the Autodiscover process in which Outlook client get the name of the Exchange CAS server which serves as RPC Endpoint.
In an Exchange environment, Outlook client can provide the user credentials using one of the following authentication protocols:
- NTLM
- Basic
- Negotiate
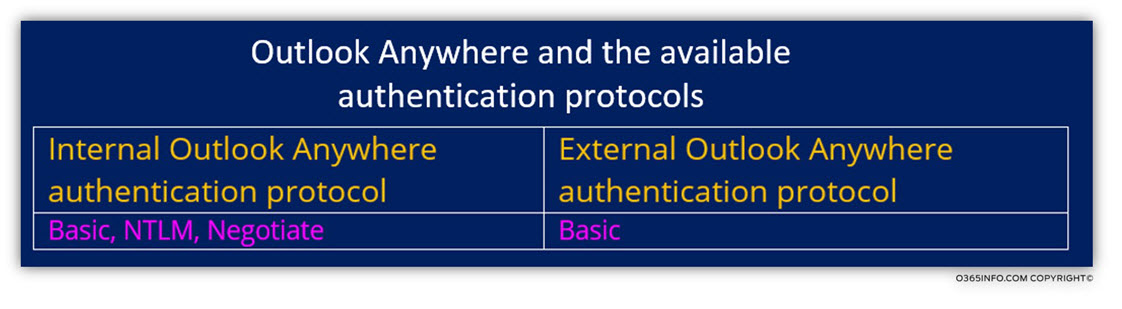
Just to make it more complicated, Exchange 2013 CAS server support to Outlook Anywhere interface: internal Outlook Anywhere interface + external Outlook Anywhere interface.
Each of these “interface”, can be configured using a different setting such as different authentication configuration.
In the Exchange 2013 environment, the “outcome” is that technically we can set two “sets” of Outlook Anywhere configuration settings:
One set of internal Outlook Anywhere client and another set for external Outlook Anywhere client while each of these “sets” uses the different authentication protocol.
To required Outlook Anywhere configuration setting implemented by using one of the following options:
- Exchange 2013 – Web-based management interface
- Exchange 2013 – PowerShell interface
The Exchange 2013 CAS server graphical (web) interface, enable us to choose the required authentication protocol. The authentication protocol that we will choose will apply to the booth of the Exchange 2013 CAS interfaces”: internal Outlook Anywhere interface + external Outlook Anywhere interface.
The disadvantage of the Exchange 2013 web-based management interface is, when we select a particular authentication protocol, the setting will apply to the booth of the Outlook Anywhere interface: the internal Outlook Anywhere interface + external Outlook Anywhere interface.
In other words, the Exchange 2013 CAS server graphical (web) interface doesn’t include an option for selecting a different authentication protocol for internal Outlook Anywhere interface vs. the external Outlook Anywhere interface.
In the following screenshot, we can see that the Exchange 2013 CAS server management interface enables us to set the required authentication protocol, but the setting applied to the booth, of the “Outlook Anywhere client” (the internal + external Outlook Anywhere).

Q1: What is the recommended authentication protocol?
A1: The most simple and if I may say recommended way, is to choose the same authentication protocol for the internal + external Outlook Anywhere client.
Note that an external Outlook Anywhere client supports only the option of basic authentication.
Technically, we can set a different authentication method for internal Outlook Anywhere client vs. an external Outlook Anywhere client. My mantra is: KIS – keep is the simple meaning, I like to keep it simple and use the same authentication protocol (Basic) for the both of the Outlook Anywhere client (internal + external)
PART B | Outlook client Proxy process and the “user credentials”
The “second part” of the Outlook client protocol connectivity flow relates to the part which can be described as: CAS to CAS communication. In this part, the Exchange 2013 CAS “forward” (Proxy) the Outlook client requites to the legacy Exchange CAS server.
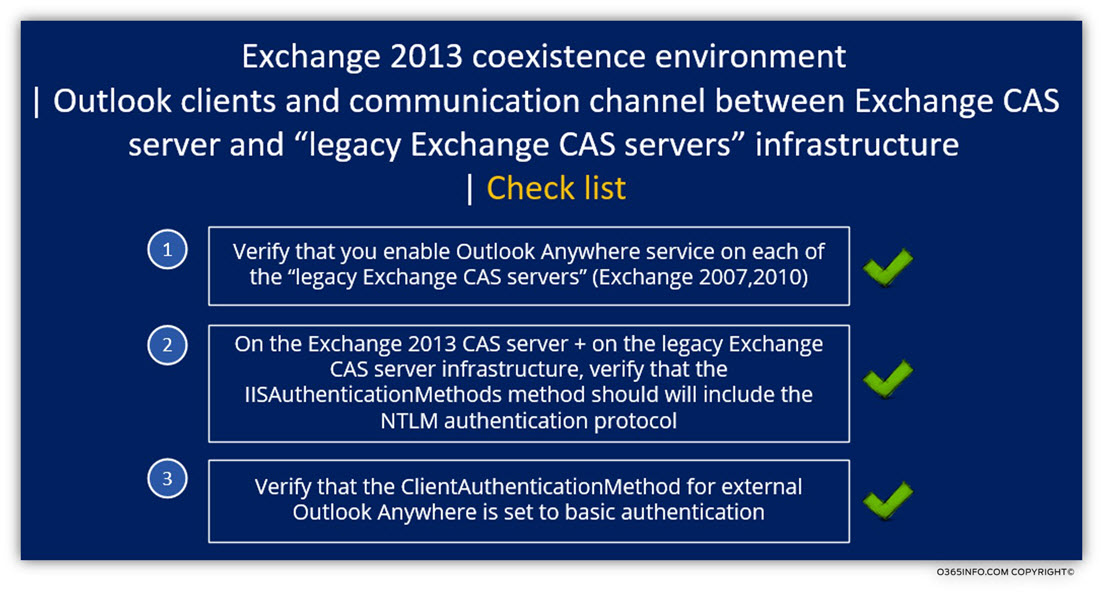
To be able to complete the communication channel successfully, two conditions will need to fulfil:
- The legacy Exchange CAS server should be configured to support Outlook Anywhere.
- The Exchange 2013 CAS + the legacy Exchange CAS server should be configured to support IIS Authentication Method using NTLM ( IISAuthenticationMethods: {Basic, Ntlm})
Exchange 2013 CAS and the process of Proxy the Outlook user credentials
Don’t forget the simple fact: when a “legacy Exchange server” such as Exchange 2010 CAS server, get the “proxy request” from the Exchange CAS 2013 server, he doesn’t “see” the Outlook user or directly communicate with the Outlook client.
This is a classic scenario of “man in the middle”. The “legacy Exchange server” cannot “trust” the Outlook user, or “understand” how to route the communication request until he gets the required user credentials.
To the solution for this “trust” problem, is implemented by using an “authentication proxy mechanism” in which the Exchange 2013 CAS server “forward” (Proxy) the user credentials to the required legacy Exchange CAS server.
In theory, the process of “forwarding” the user credentials can be implemented by a variety of authentication protocols, but in reality, the only supported authentication protocol that could use for “forwarding the user credentials” is the NTLM protocol.
In simple words: to be able to implement the communication channel between the Exchange CAS 2013 server and the legacy Exchange CAS servers, we will need to verify that both of the sides support the use of the authentication protocol: NTLM
In the following diagram, we can see the Outlook client protocol connectivity flow that relates to the subject of user credentials.
- The Outlook client authentication protocol is: Basic
- When Exchange 2013 CAS Proxy the user credentials to Exchange 2010 CAS, the authentication protocol is: NTLM

Exchange 2013 coexistence environment | Outlook client | Required preparations check list
Ok, I exhaust myself with the boring talks about Exchange, authentication protocol and more. So… just a quick recap:
Manage Exchange Outlook Anywhere settings
In the following section, we will review the way that we use PowerShell commands for creating the required configuration of the Exchange 2013 coexistence environment and the Outlook Anywhere infrastructure.
1. Viewing an existing configuration settings
The first step is to view the existing configuration setting and based upon the information, create the required configuration updates.
Example 1 : Get information about the Outlook Anywhere settings of a particular Exchange CAS server
To be able to see the Outlook Anywhere settings on the Exchange 2013 CAS server, we can use the PowerShell command:
Get-OutlookAnywhere -Server <Exchange CAS server>Note – use the following command from the Exchange 2013 CAS server PowerShell console.
In the following screenshot, we can see the information about the Outlook Anywhere setting of Exchange 2013 CAS server named: STS

The following values relate to the authentication protocol that the Outlook Anywhere client will use when they provide the user credentials to the Exchange 2013 CAS server.
In our scenario, the server setting configured as follows:
- External Outlook Anywhere are instructed to use the basic authentication protocol: ExternalClientAuthenticationMethod: Basic
- Internal Outlook Anywhere clients are instructed to use the NTLM authentication protocol: InternalClientAuthenticationMethod: NTLM
- The Exchange 2013 CAS server IIS component supports the following authentication protocols: basic, NTLM and Negotiate: IISAuthenticationMethods: {Basic, Ntlm, Negotiate}
Example 2: Get a list of all the available Exchange 2010 CAS server, display the information about the Outlook Anywhere settings.
Get-ExchangeServer | Where {$_.AdminDisplayVersion -like "*14.*" -and $_.IsClientAccessServer} | Get-OutlookAnywhere | fl servername,externalhostname,*auth*2. Configure Exchange CAS server Outlook Anywhere settings
The following PowerShell command syntax is an example of “all the available settings”, that relate to Exchange 2013 CAS server Outlook Anywhere settings:
Get-OutlookAnywhere –Server <Exchange 2013 CAS server>| Set-OutlookAnywhere
-InternalHostname <Domain name> -InternalClientAuthenticationMethod NTLM
-InternalClientsRequireSsl $true -ExternalHostname <Domain name>
-ExternalClientAuthenticationMethod Basic -ExternalClientsRequireSsl $true
-IISAuthenticationMethods NTLM,Basic -ssloffloading:$false
3. Enable NTLM on the IIS /RPC directory of your Exchange 2007/2010 servers
Example 1: Get a list of all of the available Exchange CAS servers beside Exchange 2013 CAS servers, enable (set) the Outlook Anywhere option and configure the required IIS authentication protocol
Get-OutlookAnywhere | ?{ $_.AdminDisplayVersion -notlike "Version 15.*"} | Set-OutlookAnywhere -IISAuthenticationMethods NTLM,BasicExample 2: configure the Outlook Anywhere authentication settings of a specific Exchange CAS server (configure the required IIS authentication protocol + the Client Authentication Method).
Set-OutlookAnywhere -Identity '<ServerName>\Rpc (Default Web Site)' -ClientAuthenticationMethod Basic -IISAuthenticationMethods NTLM, BasicExample 3: enable the Outlook Anywhere of a specific Exchange CAS server + configure the Outlook Anywhere authentication settings of a specific Exchange CAS server (configure the required IIS authentication protocol + the Client Authentication Method).
Set-OutlookAnywhere -Identity '<ServerName>\Rpc (Default Web Site)' -ClientAuthenticationMethod Basic -SSLOffloading $False –ExternalHostName <Exchange 2013 CAS server> -IISAuthenticationMethods NTLM, BasicWhat Others Are Reading
Incredible article ! I definitively love it 🙂
Hi,
Great article. However, there is one thing seems not correct. It is not true that “an external Outlook Anywhere client supports only the option of basic authentication”. We recommend to configure externalclientauthentication to basic is because some Reverse Proxy is not able to proxy NTLM authentication flow. If you use Microsoft TMG to publish your Exchange 2013/2016 server, then leaving the externalclientauthentication to NTLM is fine.
For your reference:
RPC over HTTP Authentication and Security
https://technet.microsoft.com/en-us/library/aa996225(v=exchg.65).aspx/