In this article, we review in detailed step by step description of the process of…
Using Office 365 content search for exporting deleted mail items to a PST file – prefix | 1#3
In the current article series, we review how to use the Office 365 Search Content feature, as a tool, that we can use for exporting the content of Exchange Online mailbox to a PST file.
Table of contents
- Office 365 content search | The article series
- Office 365 Search Content option
- Soft Delete, Hard Delete, “Recoverable items” folder and deleted mail item retention policy
- The method that we can use to view the content of the Recovery mail items” folder
- Office 365 “Content Search”
- Office 365 Security and Compliance portal and the Content Search option
- Our scenario description
- Export PST file and save the file on a local Hard disk The client desktop | Pre-requirements.
- The task list of actions that we need to perform
Office 365 content search | The article series
The article series includes the following articles:
- Using Office 365 content search for exporting deleted mail items to a PST file – prefix | 1#3 (this article)
- Export the content of Exchange mailbox “Recoverable items” folder to PST using the Office 365 content search | Step by step guide | 2#3
- Import PST file that was exported by Office 365 Content Search to Outlook | View “Recoverable items” folder | 3#3
One of the most popular scenarios in which we need to export the content the Exchange Online mailbox to a PST file is, for backup purpose. However, in this article series, I would like to review a different type of scenario, in which we use to Office 365 Search Content feature for exporting a special Exchange Online mailbox folder – the “Recoverable items” folder.
For example, organization user report that some email items were “disappeared” from his mailbox. In such scenario, a sensible option is that someone or something deletes these mail items (Intentionally or unintentionally).
Every mail item that was Soft Deleted or Hard deleted will automatically be saved in the Exchange Online mailbox special folder – the “Recoverable items” folder.
To be able to display the content of the “Recoverable items” folder, or save a copy of mail items stored in the “Recoverable items” folder (export to PST), we need a tool that will help us to accomplish this task.
And the tool that we can use in such as scenario is – the Office 365 Search Content feature.
Office 365 Search Content option
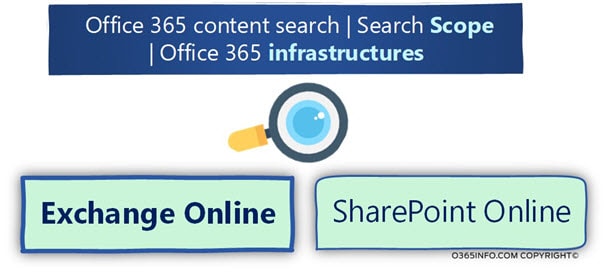
Generally speaking, the Office 365 Search Content option is a very powerful and useful tool, that was created for enabling Office 365 Administrator (or user with the required permissions) to search information that is located in:
- Exchange Online infrastructure (All Exchange Online existing mailboxes)
- SharePoint Online infrastructure (All existing SharePoint Online sites)
The interesting thing about the Office 365 Search Content option is that the term “search results,” is that we ask from Office 365 Search Content, to export the actual files and mail items that were found (the search results).
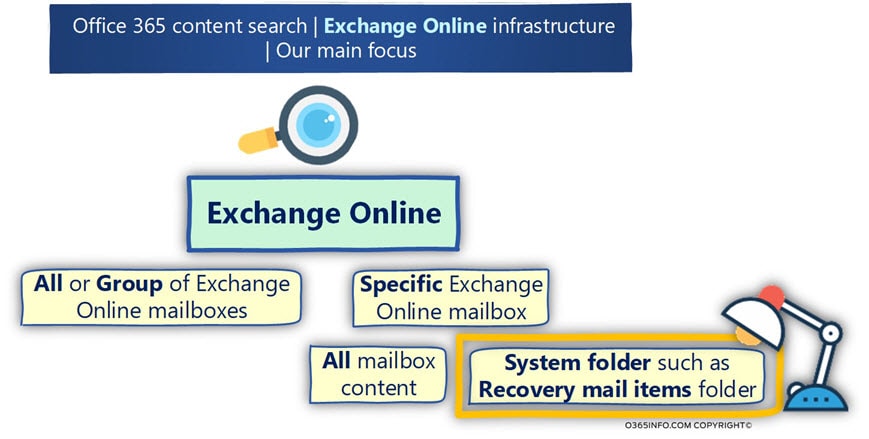
In our specific scenario, we would like to export to a PST file the content of Exchange Online mailbox “Recoverable items” folder. To be able to fulfill this requirement, we will use the Office 365 Search Content feature as a tool that will search and export the search results of the whole content of a specific Exchange Online mailbox.
A question that can appear in your mind is, why do we have to export ALL of Exchange Online mailbox content, instead just the content of this special folder that was mentioned, the “Recovery items” folder?
The answer is that unfortunately, at the current time, the Office 365 Search Content option doesn’t include an option to restrict the search only for this specified folder.
Using the Office 365 Search Content report option
In addition, it is important to mention that in a case in which we want to investigate a scenario in which mail items were “disappeared,” we don’t have to export the data itself.
Instead, we can use the 365 Search Content search to perform a search query that will create a list (report) of all the existing data (mail items) in a specific Exchange Online mailbox, including the mail items stored in the “Recoverable items” folder.
Then, we can get the report that includes the name of each mail item, location and so on.
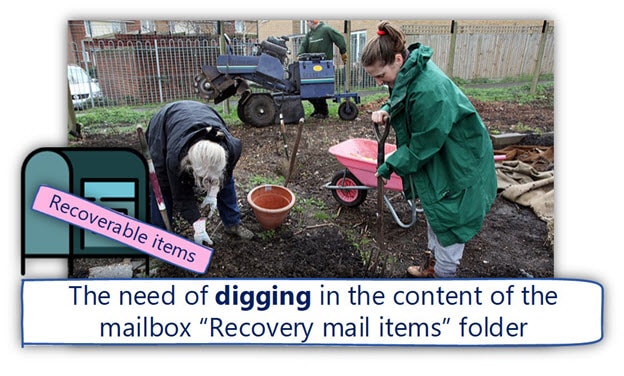
From my experience, the option of using a “report,” is not so not adequately suited for our specific scenario because most of the times, we (or the user) will need to have the ability to manually browse and “dig” inside the search results that will be exported to PST file.
Soft Delete, Hard Delete, “Recoverable items” folder and deleted mail item retention policy
In our scenario, we want to check of specific mail items were deleted meaning located in the “Recoverable items” folder.
Before we dive into the specific instruction of – how to use the Office 365 Search Content option, let’s briefly review the concept of – how Exchange based environment relates to a “deleted mail items”.
Standard mail deletion.
When a user deletes a mail item, the mail items are moved to the mailbox folder – “Deleted items” (the recycle bin). The mail items will stay forever in the “Deleted items” folder.
Soft Deleted mail items
If the user deletes mail items that were stored in the “Deleted items” folder, the deletion described as “Soft Delete” (Shift + Delete).
Mail items that defined as “Soft Deleted,” are not actually deleted, but instead, sent to the special hidden mailbox folder named – “Recoverable items” folder.
Although we use the term “Recoverable items” folder (Single and not plural) in reality, the “Recoverable items” folder is implemented through a set of system folders.
In a scenario of Soft Deleted mail items, the mail item will be stored in the “Recoverable items” folder, in a dedicated sub folder named – Deletion.
Although the user cannot see the Deletion folder, the user has the ability to restore mail items that stored in the Deletion folder (Soft Deleted mail items).
The restore procedure can be implemented by the user himself, by using the GUI interface of Outlook or OWA mail clients.
Hard Deleted mail items
The term “Hard Deleted,” describe a deletion of Soft deleted mail items. For example, a scenario in which Exchange user deletes a specific mail item, then delete the mail from the “Deleted items” folder (Soft Delete) and in addition, delete the mail item from the “Recovery store.”
The result is that the specific mail items will be considered as “Hard Deleted mail items.” In this case, the Hard-deleted mail items will be moved from the subfolder named – Deletion to an additional subfolder named “Purges.”
In other words, the Exchange mailbox owner does not have access permissions for the Purges folder which store the Hard-Deleted mail items.
Deleted mail items retention policy
Mail items that were Soft deleted or Hard Deleted, will be kept by default in the “Recoverable items” folder for a period of 14 days. This time limitation is determined by the deleted mail retention policy.
After the end of the “14-day period,” the mail will be will be permanently deleted, without the ability to restore the specific mail items.
Only in case that the option of – Litigation Hold or the option of – in-place eDiscovery & hold was used, mail items stored in the “Recoverable items” folder, will be kept for longer time periods (the time period that was defined when using one of this option).
In case that you want to get more information about the concepts of Soft Deleted mail items vs. Hard Deleted mail items and the concept of “Recoverable items” folder, you can read the following articles:
- Recover deleted mail items in the Exchange Online environment | Single item recovery | 2#7
- Recover deleted mail items in the Exchange Online environment | Deleted mail flow | 3#7
The method that we can use to view the content of the Recovery mail items” folder
Technically speaking, there are a couple of methods that we can use for viewing and access information stored in the “Recoverable items” folder of a specific Exchange mailbox.
For example:
1. The Search-Mailbox PowerShell command
We can use the PowerShell command Search-Mailbox for search and export the content of the “Recoverable items” folder.
You can read more information in the article Recover mail items from Recovery mail folder (the Dumpster) using PowerShell | Part 3#5.
2. Recover Soft deleted mail items | Mailbox owner
The mailbox owner (the user himself) can recover Soft deleted mail items by using OWA and Outlook client interface
3. Using MFCMAPI utility
We can use System utilities such as MFCMAPI to access the content of specific Exchange mailbox and browse through the content of the systems hidden folder “Recoverable items.”
You can read more information in the article Recover deleted mail items – Office 365 | 4#7.
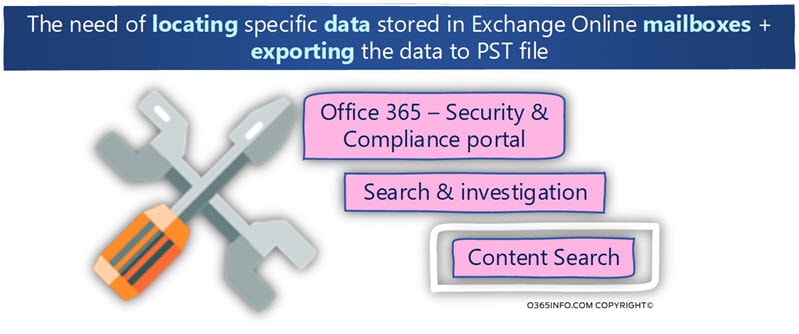
4. Office 365 Security and Compliance portal – Content Search
The additional method that we will review in this article is the Office 365 technologies, which describes as “Content Search.”
Office 365 “Content Search”
The technology or the feature which describes as “Content Search,” is a very powerful option, that enables us to look for a specific information that is located in Exchange Online infrastructure or SharePoint Online infrastructure and in addition, export this data to a file.
In our scenario, our main focus is looking for information that is stored in an Exchange Online mailbox and if to be more specific, we are interested in information that is stored in a special Exchange Online mailbox folder – the “Recoverable items” folder.
The advantages of Office 365 – Content Search
The use of Office 365 Content Search, is implemented very easily by using the Office 365 Security and Compliance portal web-based interface.
All we need to do is just “point” the specific Exchange mailbox name, and the Content Search service will do for us all to hard work of – searching the data and optionally export the data of PST file.
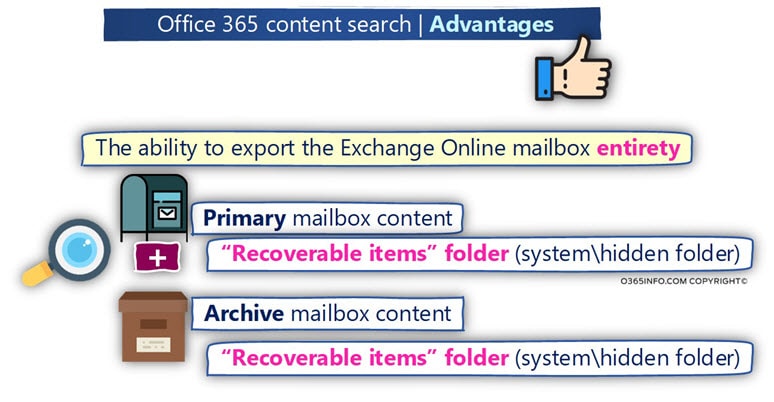
When we search for information that is stored in an Exchange Online mailbox, the Content Search process is able to “see” all the different parts of an Exchange Online mailbox.
For example, in case that the Exchange Online mailbox has Exchange Online Archive mailbox that is “attached” to the primary Exchange Online mailbox, the Content Search will fetch for us the information that is located in the primary Exchange mailbox and in addition, information stored in the Archive mailbox.
Another advantage of the Content Search is that the search can “view” and export information that is located in a special system mailbox folder such as the – “Recoverable items” folder.
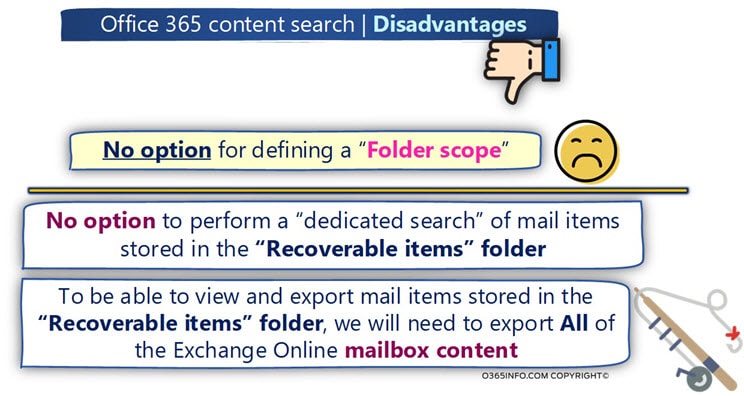
The disadvantages of Office 365 – Content Search
Office 365 Content Search includes the ability to define “search conditions” (filters) for the search query such as – specific date range, specific text string, a specific type of mail items and so on.
Regarding our specific scenario, one of the main conditions (search filter) which is missing is, the ability to define Exchange mailbox Folder scope. The term “folder scope” translates into our ability to define a search query that will look for data only in a specific Exchange mailbox folder.
The need to define a specific folder scope is realized in a scenario in which we want to use Office 365 Content Search as a tool that will help us to “scan” a specific Exchange Online mailbox, and search or export only mail items that stored in “Recoverable items” folder.
Because this lack of ability, in a scenario in which we want to export the content of “Recoverable items” folder, we will need to perform a “full search” that will scan and export ALL the Exchange Online mailbox content to a PST. After the PST file was successfully created, we will need to “dig” from the PST file that contains all the Exchange Online mailbox content, the information that is located in the “Recoverable items” folder.
Office 365 Security and Compliance portal and the Content Search option
The use of Office 365 Content Search can be implemented via PowerShell, but the simplest and easy access is implemented via the Office 365 Security & Compliance admin portal.
365 Security & Compliance portal, serve as a focal point for many different services for Office 365 customers.
One of these services defined as “Search & Investigation,” and under this category, one of the options is the – “Content Search.”
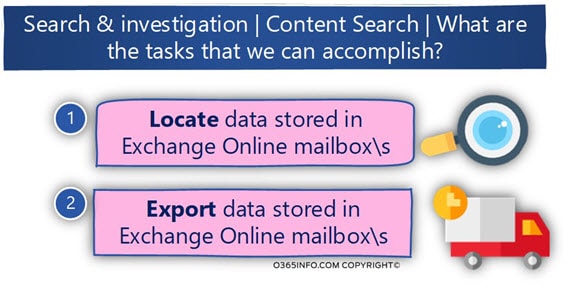
The Content Search feature enables us to “view” the content all the data that is stored in our SharePoint Online infrastructure and Exchange Online infrastructure (Exchange Online mailbox).
After the Content Search tool to locate the specific data that we look for, we can decide what to “do” with the results (the search results).
For example, we can ask to get a report that includes detailed information about each item that was found; we can use the Content Search tool web interface, to view the result, or we can ask from the Content Search tool to export the search results to a PST file.
In our scenario, our wish is to perform a complete mailbox search that will include all the data stored in a specific Exchange Online mailbox + export the search result (the mailbox content) to a PST file.
Our scenario description
The characters of our scenario are as follows:
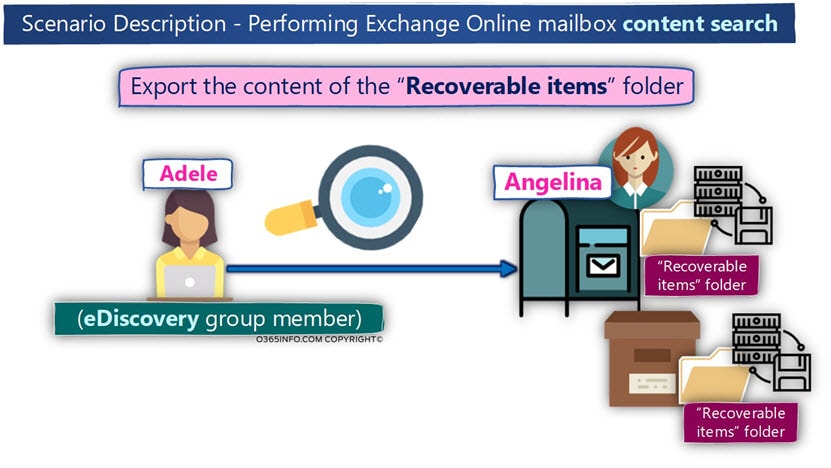
- Adele is an Office 365 Global Administrator.
- Adele got a request to help Office 365 user named – Angelina to locate mail items that were “disappeared.” Adele suspects that these mail items were Hard Deleted.
- To be able to view the content of the special system folder: “Recoverable items” folder, Adele needs to restore the “whole” Angelina Exchange Online mailbox, and then, try to find this mail item in the “Recoverable items” folder.
- Angelina has also an archive mailbox in addition to the primary mailbox.
Export PST file and save the file on a local Hard disk The client desktop | Pre-requirements.
To be able to export the Content Search results to a PST file and saved into the local Hard disk, we will need to download + install a small software component, that serves as a “Download manager” (the eDiscovery PST Export Tool).
The thing that we need to know is that to be able to install the eDiscovery PST Export Tool, we need to fulfill the following requirements:
Scenario 1: You’re using Internet Explorer 9.0 or later, and you don’t have the .NET Framework 4.5 or later installed
In case that your OS doesn’t include installation of .NET Framework 4.5 you will need to download and install the required software.
Scenario 2: You’re using a third-party (non-Microsoft) browser, and you don’t have the ClickOnce browser extension installed.
Install the ClickOnce extension. The extension can be found on the add-on webpage for that browser:
- Mozilla Firefox: Breez ClickOnce
- Google Chrome: Meta4 ClickOnce Launcher
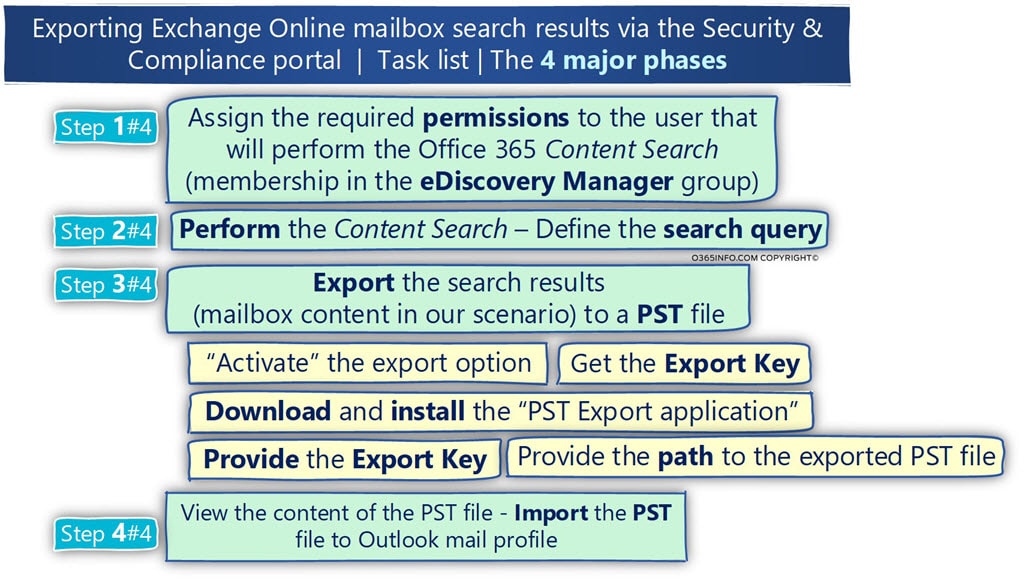
The task list of actions that we need to perform
In the next article, provide a detailed step by step guide for all the steps that we need to perform for accomplishing the task of exporting Exchange Online mailbox to a PST file.
In this section, I would like to provide a brief review of the major steps that involved throughout the process, so you will be able to get the big picture.
Step 1#4 – Assign the required permissions to the user who will perform the Office 365 Content Search (membership within the eDiscovery Manager group)
The ability to view the content of Exchange mailbox + export the data stored in the mailbox to a PST file requires a special permission. The important thing that I would like to emphasize is, that even the user who has the rule of the Office 365 Global Administrator, doesn’t have these permissions by default.
To be able to use the Office 365 Content Search option, we need to assign the required permissions to the user that will perform the search. This user will need to be added as a member of the eDiscovery Manager group.
You can read more information about how to assign these permissions in the next article.
Step 2#4 – Perform the Content Search – Define the search query
The Office 365 Content Search, perform the search based on a search query we need to define. The search scope can be implemented by searching information in Exchange Online + SharePoint Online infrastructures.
In addition, we can define very specific search parameters such as specific date range, a specific type of document and so on.
In our case, we are interested in information stored in Exchange Online infrastructure in a specific Exchange Online mailbox. The search query that we define will be considered as a simple search query because we will not define any condition. Instead, we will just need to provide the name of the required Exchange Online mailbox.
You can read more information about how to Define the search query in the next article.
Step 3#4 – Export the search results (mailbox content in our scenario) to a PST file
After the Office 365 Content Search finds the required information, we can decide what to do with the search results. In our scenario, we would like to get a copy of mail items that were found by the Office 365 Content Search (the search results).
The “export to file” scenario includes a couple of substeps:
- “Activate” the export option – we will need to “inform” Office 365 Content Search that we would like to export the search results (Office 365 Content Search needs to prepare the data and makes the required arguments).
- Get the Export Key – we will need to copy the value of the exported key for the next step, in which the Export to PST application will request from us the value of the export key.
- Download and install the “PST Export application” – the export process to a PST file is implemented by installing a small application on our desktop, that serves as a “Download manager.” manager”.
- Provide the Export Key – we will need to provide to the “PST Export application” the Export Key.
- Provide the path to the exported PST file – we will need to provide the “PST Export application” the path to the folder which will be used for storing the exported PST file.
You can read more information about how to start the Export the search results in the article.
Step 4#4 – View the content of the PST file – Import the PST file to Outlook mail profile
After the PST file was successfully exported, the last phase begins. In this phase, we will need to import the PST file to an existing Outlook mail profile. We can relate to Outlook mail client as a “browser” that will help us to view the content of the PST file.
You can read more information about how to import PST file to Outlook mail profile in the following article.
In the next article, we will look at Export the content of Exchange mailbox “Recoverable items” folder to PST using the Office 365 content search | Step by step guide | 2#3.
What Others Are Reading

This Post Has 0 Comments