Sometimes, you must delete members from a distribution list because they don't belong there anymore.…
Manage Microsoft 365 users recycle bin
A deleted user account will be kept in the Microsoft Entra ID recycle bin for 30 days by default. It’s described as soft-delete because you can restore a Microsoft 365 user account. After 30 days, Microsoft will permanently remove any deleted user account from the recycle bin, which is known as hard-delete. In this article, you will learn how to manage deleted Microsoft 365 users in the recycle bin.
Table of contents
- Soft-delete vs. Hard-delete Microsoft 365 users
- Manage Microsoft 365 recycle bin deleted users
- Connect to Microsoft Graph PowerShell
- Find deleted Microsoft 365 users in recycle bin
- Restore deleted Microsoft 365 users from recycle bin
- Remove deleted Microsoft 365 users from recycle bin
- Export information deleted Microsoft 365 user accounts
- Conclusion
Soft-delete vs. Hard-delete Microsoft 365 users
When we delete a user account, it will move to the recycle bin for 30 days in Microsoft Entra ID. There are two ways of deleting Microsoft 365 users:
- Soft-delete user is when you delete a user, and it moves to the Microsoft Entra ID recycle bin
- Hard-delete user is when you delete a user permanently, also removed from the Microsoft Entra ID recycle bin
Note: Hard-delete should only be used as a last alternative when no other option is available. Once you hard-delete a user, there is no opportunity to restore this user or any data associated with that user.
Manage Microsoft 365 recycle bin deleted users
Let’s look into different ways to manage Microsoft 365 deleted users:
- Find deleted users in the recycle bin
- Restore deleted users up to 30 days
- Remove deleted users from the recycle bin
- Export information deleted user accounts
Connect to Microsoft Graph PowerShell
To be able to run the PowerShell commands specified in the current article, you will need to Install Microsoft Graph PowerShell.
Start Windows PowerShell as administrator and run the below PowerShell cmdlet.
Install-Module Microsoft.Graph -ForceThen, Connect to Microsoft Graph PowerShell with the below permissions.
Connect-MgGraph -Scopes "User.ReadWrite.All"Now, you are all set to use the Microsoft Graph PowerShell commands.
Find deleted Microsoft 365 users in recycle bin
We will show you how to find the deleted users in the recycle bin in the Microsoft Entra admin center and with PowerShell.
Find all deleted users in Microsoft Entra
To find deleted user accounts in the Microsoft Entra admin center, follow the below steps:
- Sign in to Microsoft Entra admin center
- Expand Identity
- Click on Users > Deleted users
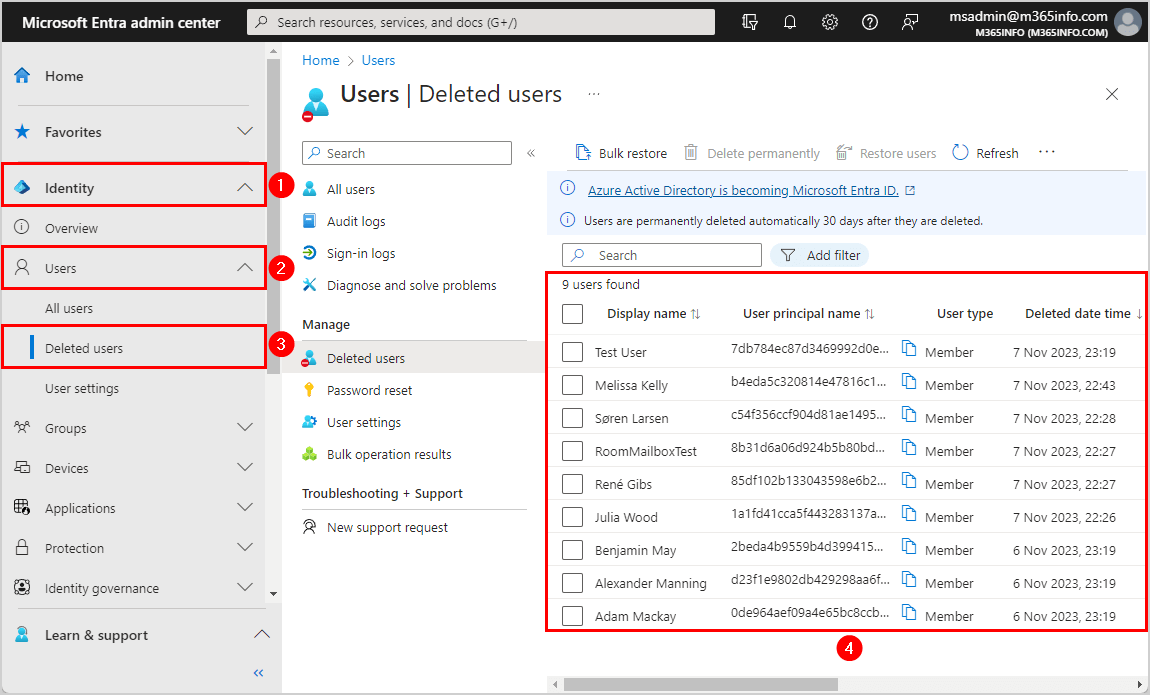
It shows a list of all Microsoft 365 deleted users.
Get specific Microsoft 365 deleted user account
After connecting to Microsoft Entra ID with PowerShell, you can get Microsoft 365 deleted users. We will use the Get-MgDirectoryDeletedItemAsUser cmdlet to get information about a single user.
See the below PowerShell command syntax. You should use the Object ID number.
Get-MgDirectoryDeletedItemAsUser -DirectoryObjectId "Object ID Number"Run the below PowerShell command example to show information about a deleted user.
Get-MgDirectoryDeletedItemAsUser -DirectoryObjectId "b4eda5c3-2081-4e47-816c-1e3270be079a"The PowerShell output shows information about a specific user.
DisplayName   Id                                   Mail UserPrincipalName
-----------   --                                   ---- -----------------
Melissa Kelly b4eda5c3-2081-4e47-816c-1e3270be079a      b4eda5c320814e47816c1e3270be079aMelissa.Kelly@m365info.com
Get list of all Microsoft 365 deleted user accounts
Find all the Microsoft 365 deleted users with the below script using the Get-MgDirectoryDeletedItemAsUser cmdlet.
# Connect with privileges
Connect-MgGraph -Scopes "User.ReadWrite.All"

# Retrieve deleted directory items
$DeletedItems = Get-MgDirectoryDeletedItemAsUser -All -Property 'Id', 'userPrincipalName', 'displayName'

# Check if there are no deleted accounts
if ($DeletedItems.Count -eq 0) {
    Write-Host "No deleted accounts found in the recycle bin." -ForegroundColor Cyan
}
else {
    # Create an array to store the report
    $Report = @()

    # Loop through the deleted items
    foreach ($Item in $DeletedItems) {

        # Create a custom object for each item and add it to the report
        $ReportLine = [PSCustomObject]@{
            Id                    = $Item.Id
            UserPrincipalName     = $Item.UserPrincipalName
            'Display Name'        = $Item.DisplayName
        }
        $Report += $ReportLine
    }

    # Sort the report by 'Display Name'
    $Report | Sort-Object 'Display Name' | Ft Id, UserPrincipalName, 'Display Name'
}
In our example, the PowerShell output looks like this.
Id                                   UserPrincipalName                                              Display Name
--                                   -----------------                                              ------------
0de964ae-f09a-4e65-bc8c-cbeac2745e4c 0de964aef09a4e65bc8ccbeac2745e4cAdam.Mackay@m365info.com       Adam Mackay
d23f1e98-02db-4292-98aa-6f511c433f1b d23f1e9802db429298aa6f511c433f1bAlexander.Manning@m365info.com Alexander Manning
2beda4b9-559b-4d39-9415-51ce47f2963f 2beda4b9559b4d39941551ce47f2963fBenjamin.May@m365info.com      Benjamin May
1a1fd41c-ca5f-4432-8313-7a662576856b 1a1fd41cca5f443283137a662576856bJulia.Wood@m365info.com        Julia Wood
b4eda5c3-2081-4e47-816c-1e3270be079a b4eda5c320814e47816c1e3270be079aMelissa.Kelly@m365info.com     Melissa Kelly
85df102b-1330-4359-8e6b-240677b26454 85df102b133043598e6b240677b26454Rene.Gibs@m365info.com         René Gibs
8b31d6a0-6d92-4b5b-80bd-a4029e641d35 8b31d6a06d924b5b80bda4029e641d35RoomMailboxTest@m365info.com   RoomMailboxTest
c54f356c-cf90-4d81-ae14-9523adf09084 c54f356ccf904d81ae149523adf09084Soren.Larsen@m365info.com      Søren Larsen
7db784ec-87d3-4699-92d0-e4206d0ab44c 7db784ec87d3469992d0e4206d0ab44cTest.User@m365info.com         Test User
Restore deleted Microsoft 365 users from recycle bin
You can restore deleted users in the Microsoft Entra admin center and with PowerShell.
- You can restore deleted users and recover their data, except for calendar items and aliases, for up to 30 days from the deleted users list.
- Restoring a deleted user will restore all associated data, assign product licenses, and give access to all services they could access before they were deleted.
Restore deleted users in Microsoft Entra
To restore the users in Microsoft Entra admin center, follow the below steps:
- Sign in to Microsoft Entra admin center
- Expand Identity
- Click Users > Deleted users
- Select the users (select one, multiple, or all deleted mailboxes)
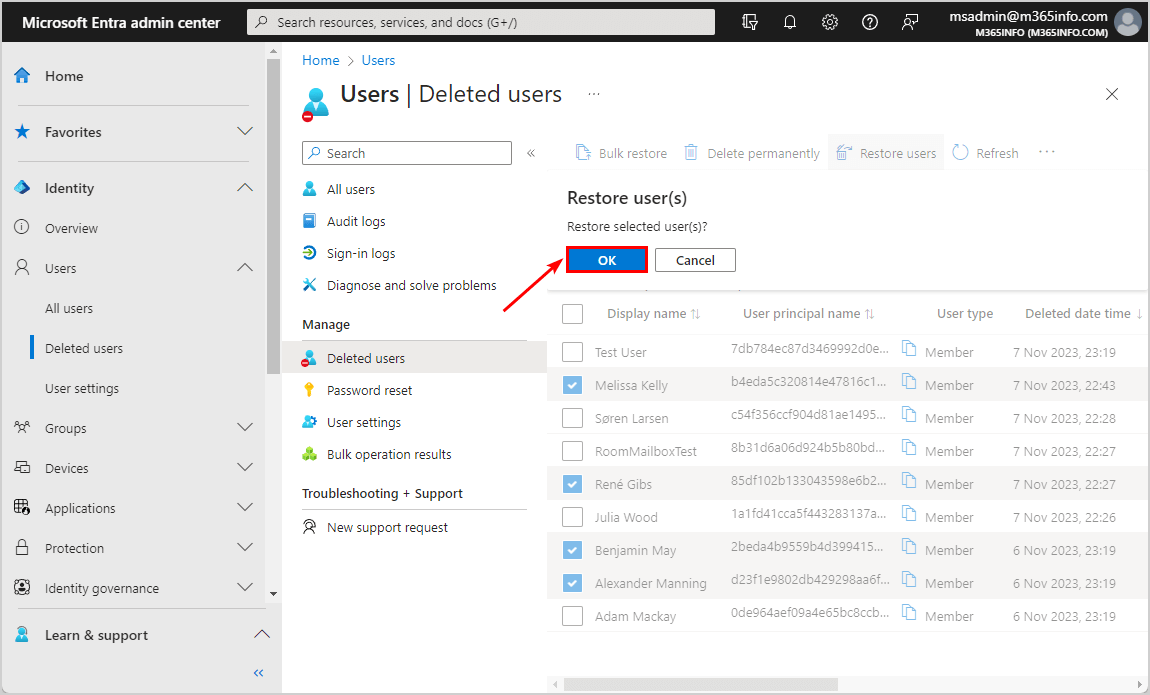
- Click Restore users
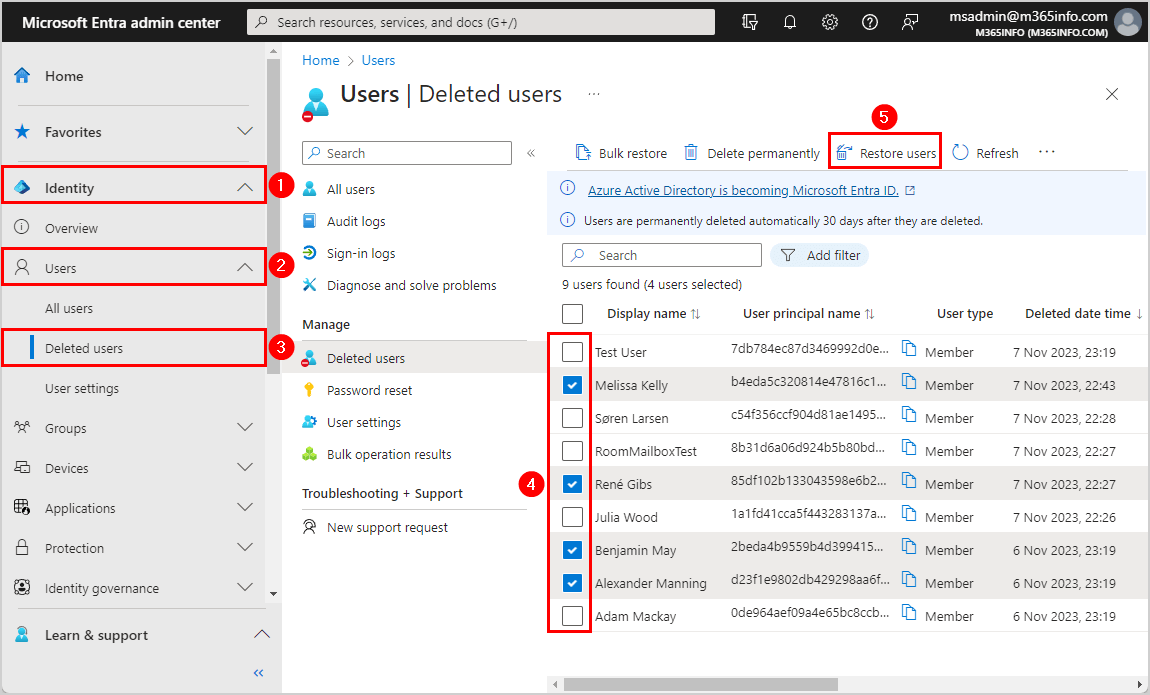
- Click OK
Restore single deleted Microsoft 365 user account
To restore a user account, we will use the Restore-MgDirectoryDeletedItem cmdlet and specify the Object ID number.
In our example, we want to restore the user account Rene.Gibs@m365info.com.
See the below PowerShell command syntax.
Restore-MgDirectoryDeletedItem -DirectoryObjectId "Id Number"Restore a deleted user with the below PowerShell command.
Restore-MgDirectoryDeletedItem -DirectoryObjectId "85df102b-1330-4359-8e6b-240677b26454"After running the above command, you will find the user in the Microsoft Entra admin center under Identity > Users > All users.
Bulk restore all deleted Microsoft 365 user accounts
In the Microsoft 365 admin center, you can only restore one user at a time. With the PowerShell script, you can bulk restore all deleted Microsoft 365 users using the Get-MgDirectoryDeletedItemAsUser and Restore-MgDirectoryDeletedItem cmdlets.
Run the below PowerShell script to bulk restore deleted Microsoft 365 users.
# Connect with privileges
Connect-MgGraph -Scopes "User.ReadWrite.All"

# Retrieve deleted directory items
$DeletedItems = Get-MgDirectoryDeletedItemAsUser -All -Property 'Id', 'displayName'

# Check if there are no deleted accounts
if ($DeletedItems.Count -eq 0) {
    Write-Host "No deleted accounts found in the recycle bin." -ForegroundColor Cyan
}
else {
    # Restore deleted users
    foreach ($Item in $DeletedItems) {
        # Restore the user by ID
        Restore-MgDirectoryDeletedItem -DirectoryObjectId $Item.Id #-WhatIf
        Write-Host "Restored user $($Item.DisplayName)" -ForegroundColor Green
    }

    Write-Host "Restoration process completed." -ForegroundColor Cyan
}
Remove deleted Microsoft 365 users from recycle bin
You can permanently remove deleted Microsoft 365 users from the Microsoft Entra ID recycle bin with PowerShell.
Permanently delete users in Microsoft Entra
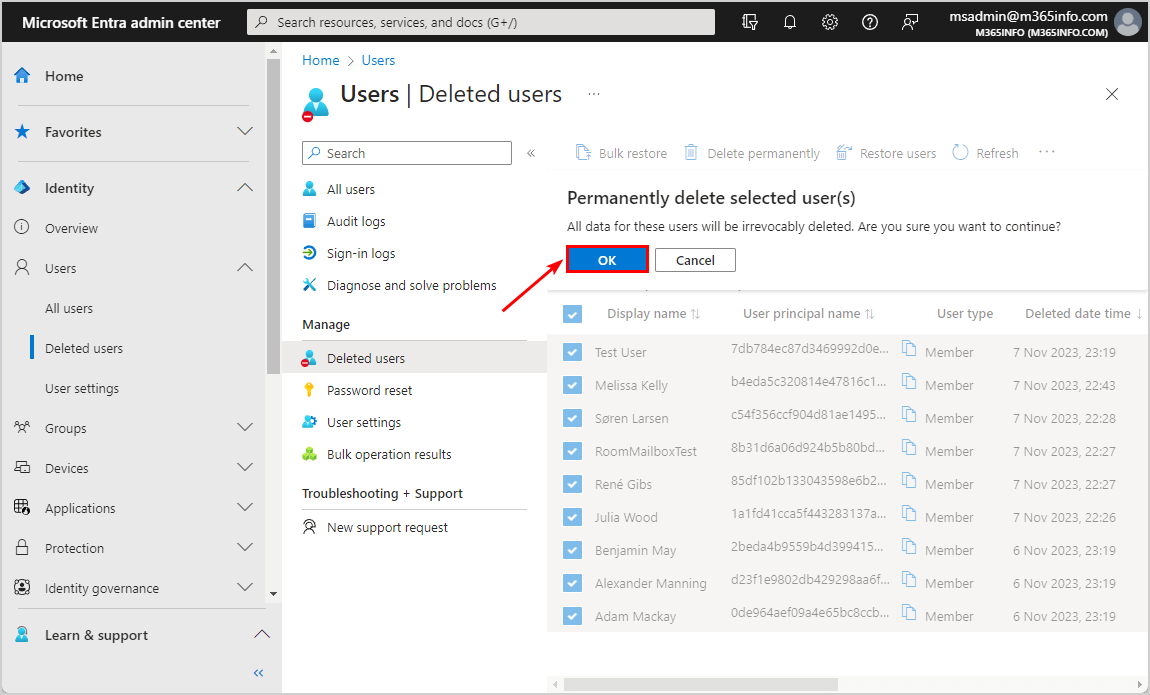
To remove the users permanently from Microsoft Entra admin center, follow the below steps:
- Sign in to Microsoft Entra admin center
- Expand Identity
- Click Users > Deleted users
- Select the users (select one, multiple, or all deleted mailboxes)
- Click Delete permanently

- Click OK
Remove single deleted user account from recycle bin
To hard-delete a user account, we will use the Remove-MgDirectoryDeletedItem cmdlet and specify the Object ID number.
In our example we will permanantly remove the user account Adam.Mackay@m365info.com.
Use the below PowerShell command syntax.
Remove-MgDirectoryDeletedItem -DirectoryObjectId "Id Number"Run the below PowerShell command to remove a single deleted user permanently.
Remove-MgDirectoryDeletedItem -DirectoryObjectId "0de964ae-f09a-4e65-bc8c-cbeac2745e4c"After running the above command, you can verify that the deleted user is not in the deleted users list.
Bulk remove all deleted user accounts from recycle bin
Remove all deleted users from the recycle bin permanently with the below PowerShell script.
# Connect with privileges
Connect-MgGraph -Scopes "User.ReadWrite.All"

# Retrieve deleted directory items
$DeletedItems = Get-MgDirectoryDeletedItemAsUser -All -Property 'Id', 'userPrincipalName', 'displayName'

# Check if there are no deleted accounts
if ($DeletedItems.Count -eq 0) {
    Write-Host "No deleted accounts found in the recycle bin." -ForegroundColor Cyan
}
else {
    # Create an array to store the deleted user IDs
    $DeletedIds = @()

    # Loop through the deleted items
    foreach ($Item in $DeletedItems) {
        $DeletedIds += $Item.Id

        # Display the name of the item being deleted
        Write-Host "Deleted $($Item.DisplayName)" -ForegroundColor Green

        # Hard-delete the items
        Remove-MgDirectoryDeletedItem -DirectoryObjectId $Item.Id #-WhatIf
    }
}
Note: Do you get an error or want to delete a mailbox permanently? Read the article Force delete Microsoft 365 mailbox with PowerShell.
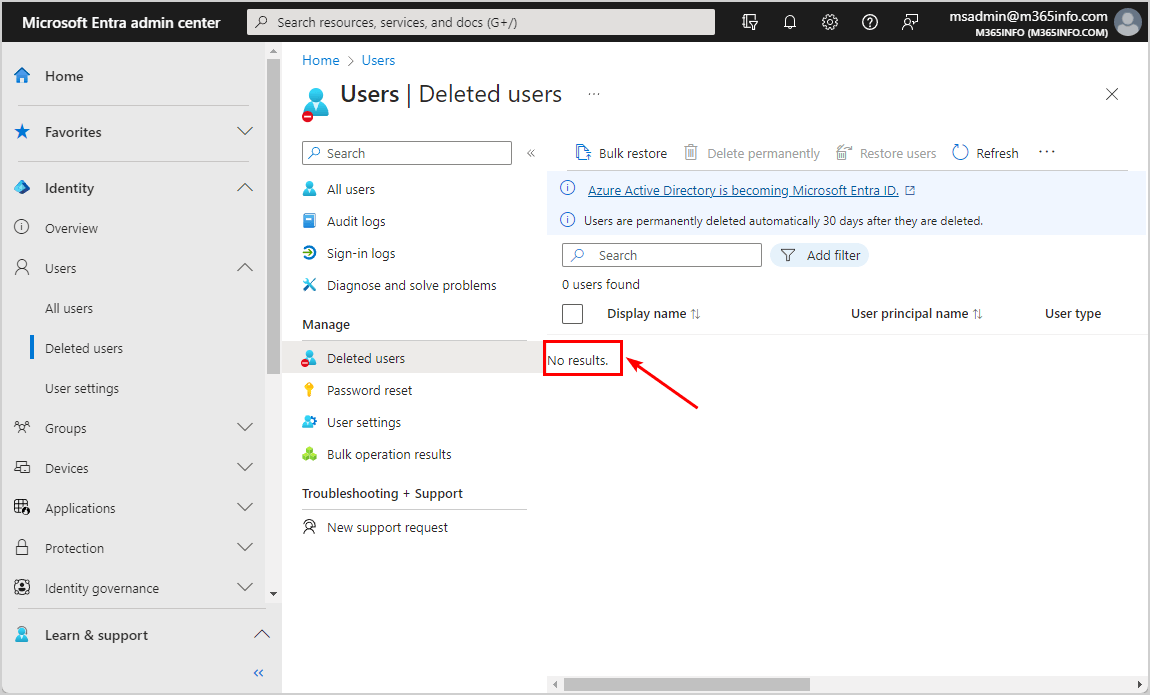
Check if you permanently removed the deleted users from the recycle bin. Go to Microsoft Entra admin center > Identity > Users > Deleted users. The list should be clear, as shown in the below picture.
Export information deleted Microsoft 365 user accounts
You can export information about all the Microsoft 365 deleted users in the recycle bin to a single CSV file. This way, you can search for the different users and see when they were deleted.
Export soft-deleted Microsoft 365 users to CSV
We will export all deleted Microsoft 365 users in the recycle bin to a CSV file and Out-GridView. To bulk export the list of soft-deleted users, follow the below steps:
- Create a temp folder and save it in your (C:) drive
- Run the below PowerShell script
# Connect with privileges
Connect-MgGraph -Scopes "User.ReadWrite.All"
# Retrieve deleted directory items
$DeletedItems = Get-MgDirectoryDeletedItemAsUser -All -Property 'Id', 'userPrincipalName', 'displayName', 'isLicensed', 'deletedDateTime', 'userType'
# Check if there are no deleted accounts
if ($DeletedItems.Count -eq 0) {
Write-Host "No deleted accounts found in the recycle bin." -ForegroundColor Cyan
}
else {
# Create an array to store the report
$Report = @()
# Loop through the deleted items
foreach ($Item in $DeletedItems) {
$DeletedDate = Get-Date($Item.DeletedDateTime)
$DaysSinceDeletion = (New-TimeSpan $DeletedDate).Days
# Create a custom object for each item and add it to the report
$ReportLine = [PSCustomObject]@{
Id = $Item.Id
UserPrincipalName = $Item.UserPrincipalName
'Display Name' = $Item.DisplayName
Deleted = $DeletedDate
'Days Since Deletion' = $DaysSinceDeletion
Type = $Item.UserType
}
$Report += $ReportLine
}
# Sort the report by 'Display Name'
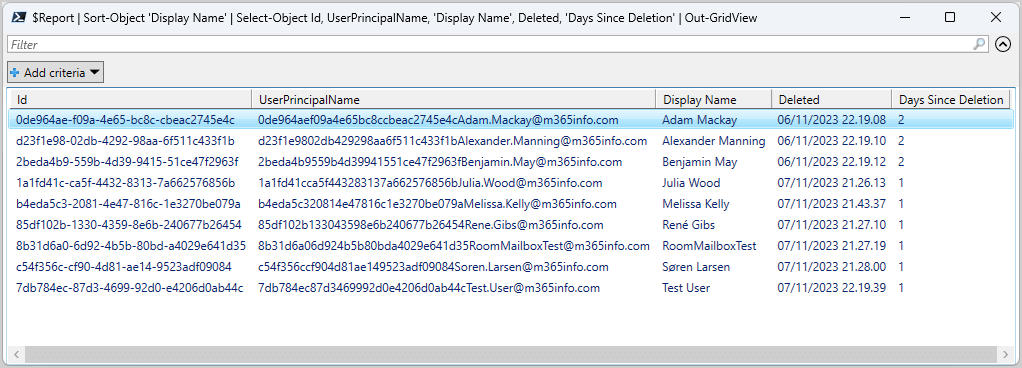
$Report | Sort-Object 'Display Name' | Select-Object Id, UserPrincipalName, 'Display Name', Deleted, 'Days Since Deletion' | Out-GridView
$Report | Sort-Object 'Display Name' | Select-Object Id, UserPrincipalName, 'Display Name', Deleted, 'Days Since Deletion' | Export-CSV "C:\temp\DeletedMicrosoft365users.csv" -NoTypeInformation -Encoding UTF8
}- After you run the above script, the Out-GridView appears
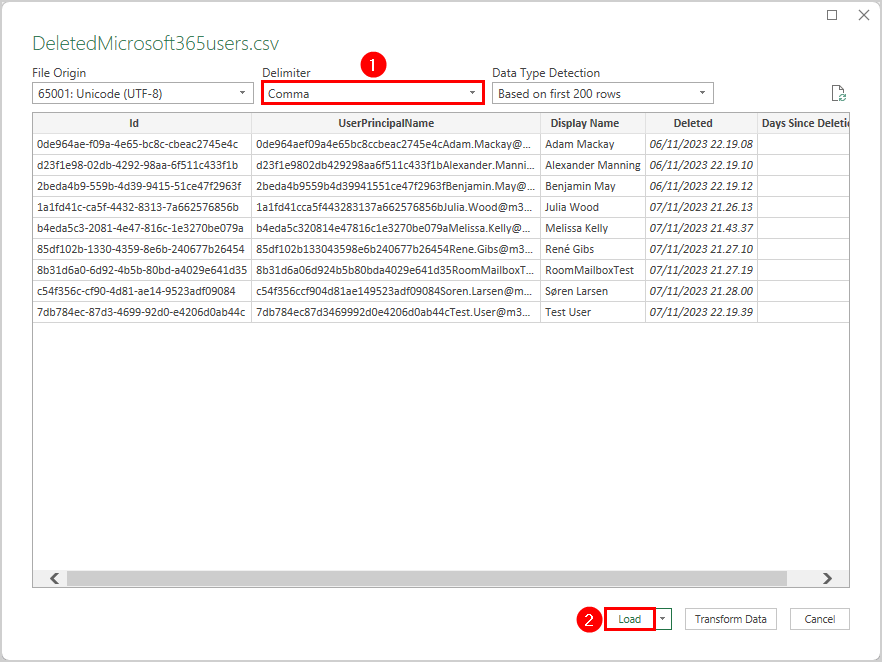
- Open the CSV file with an application like Microsoft Excel
- Go to Data > From Text/CSV and select the CSV file in the C:\temp folder
- Check if the delimiter is set to Comma and click on Load
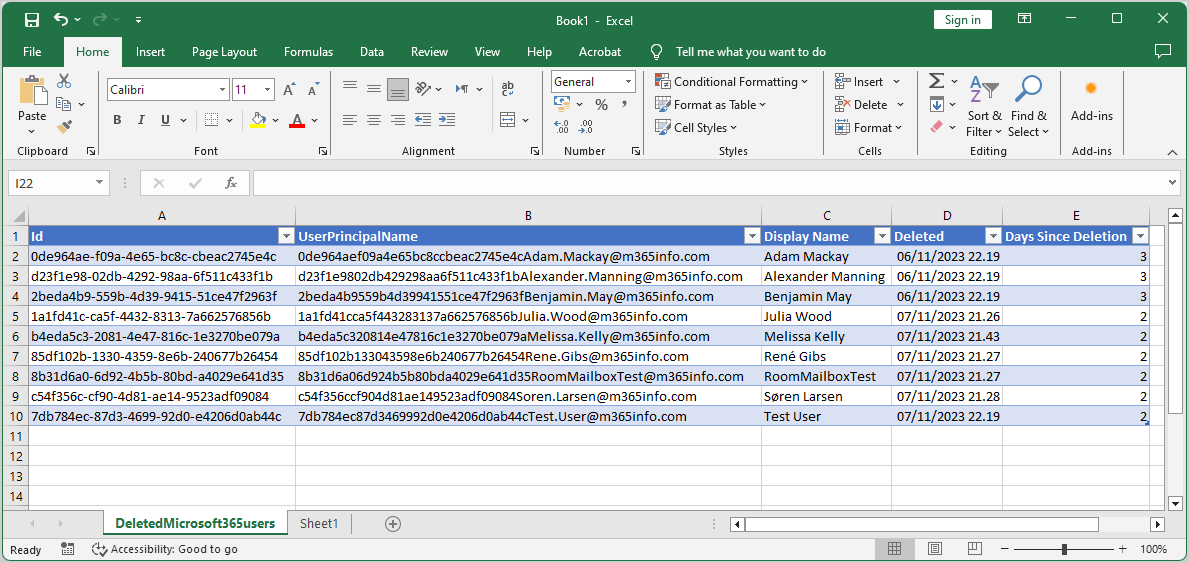
- See the detailed list of all the soft-deleted Microsoft 365 users from the recycle bin
Did this help you to manage Microsoft 365 users?
Read more: Reset MFA for Microsoft 365 user »
Conclusion
You learned how to manage the Microsoft 365 users in the Microsoft Entra ID recycle bin. Microsoft will automatically remove deleted users after 30 days (hard-delete). You can bulk restore soft-deleted users or permanently delete users from the Microsoft Entra ID recycle bin. Also, you can export information about all deleted Microsoft 365 users to a CSV file with PowerShell.
Did you enjoy this article? You may also like Export Microsoft 365 users licenses. Don’t forget to follow us and share this article.
This Post Has 0 Comments