In the current article, we review the implementation of an Automatic Reply mailbox rule using…
Setting up an Automatic Reply in Office 365 using mailbox rule and Shared mailbox | Part 6#7
In the current article, we continue to review the steps that are needed for completing the tasks of creating an Exchange Online shared mailbox that will serve as a “service mailbox” for the service request tickets that will be opened by our organization users.
Table of contents
- Step 5#8 – Creating a new security group for the Help Desk team
- Step 6#8 – Assign the required permissions to the Help Desk group on the shared mailbox
- Step 7#8- Add the Shared mailbox to a Help Desk user Outlook mail profile
- Step 8#8 – Testing the Send as permission assign to Help Desk members
- The next article in the current article series
In the previous article , we reviewed the process of creating the Help Desk Shared mailbox + created the required Automatic reply mailbox rule.
In the current article, we review the rest of the administrative tasks of our scenario.
The tasks that we need to complete are as follows:
- Creating a new security group for the Help Desk team and Assign the required permissions to the Help Desk group on the shared mailbox.
- Add the Shared mailbox to a Help Desk user Outlook mail profile
- Testing the Send As permission assigned to Help Desk members.
Step 5#8 – Creating a new security group for the Help Desk team
Technically speaking, this step is not a mandatory step because theoretically, we can start with the process of creating a new “Help Desk shared mailbox” and then in the second phase, provide the required permissions for each of the Help Desk members separately.
Although we can assign permissions for each of the Help Desk members separately, the more efficient and the more “right” administrative method is – to provide permissions to a “Group”, instead of providing permissions individually for each user.
When providing permissions to a group, each time that a new Help Desk member is accepted or each time that a Help Desk member is leaving the company, all we need to do is add or remove the user from the security group.
When we want to assign permissions to a “Group,” the Exchange Online group should be created as a “Security group” and not as a standard Distribution group.
An Exchange Online Security Group serve as a “security group” + Distribution group that uses for mail purposes.
Creating new Exchange Online security group
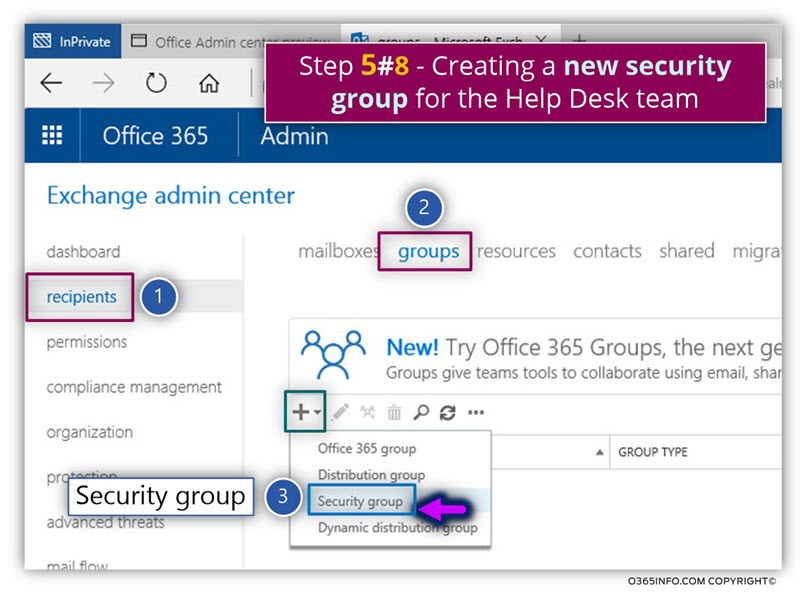
- Log in to the Exchange Online admin center
- On the left menu bar, select the recipients menu
- On the top menu bar, select the groups menu
- Click on the Plus sign and choose the option of Security group
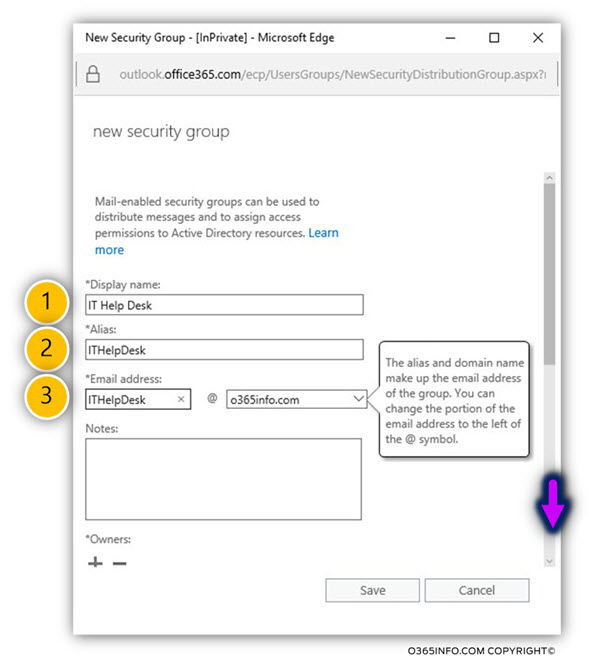
Fill in the required information
- *Display name: – in our example, the Security Group display name is – IT Help Desk
- *Alias: – in our example, the Security Group display name is – ITHelpDesk
- *Email address – in our example, the Security Group E-mail address is – ITHelpDesk@o365info.com
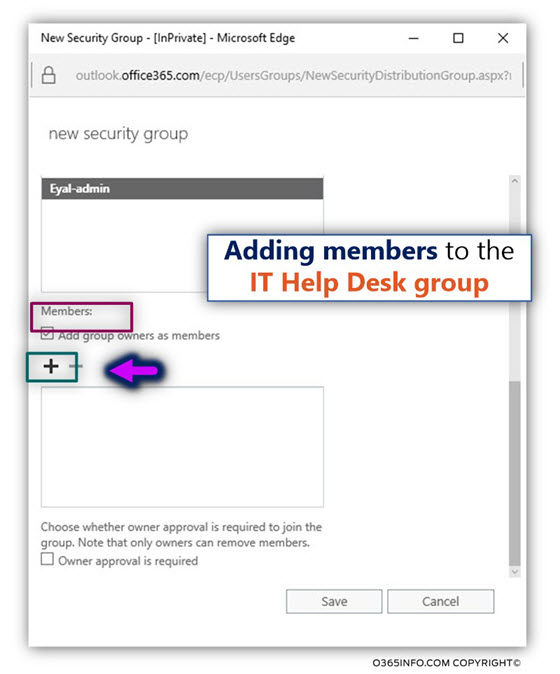
In the next step, we will add some members to the security group.
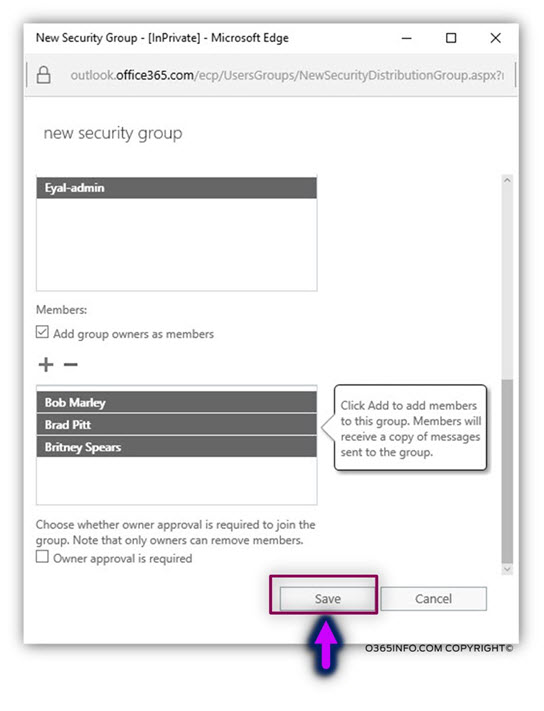
- Scroll down and under the Members: section, click on the Plus icon
In our example: there are three members in the Help Desk: John, Bob, and Alice.
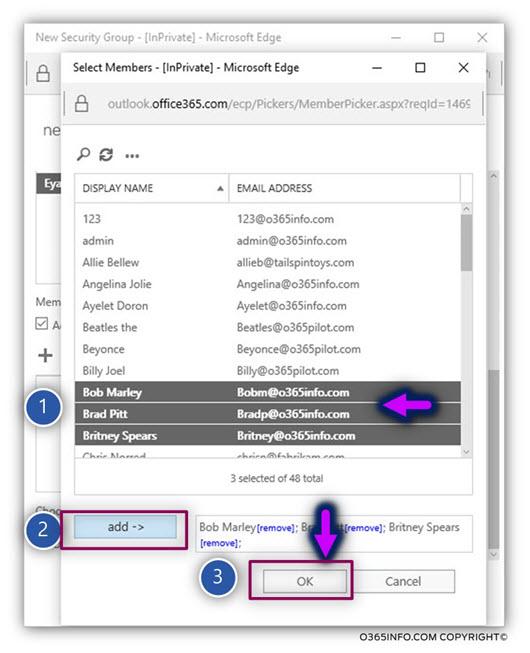
- In our example, we select the Help Desk team members from the recipient list
- Click on the add -> button
- Click OK
- Click – Save
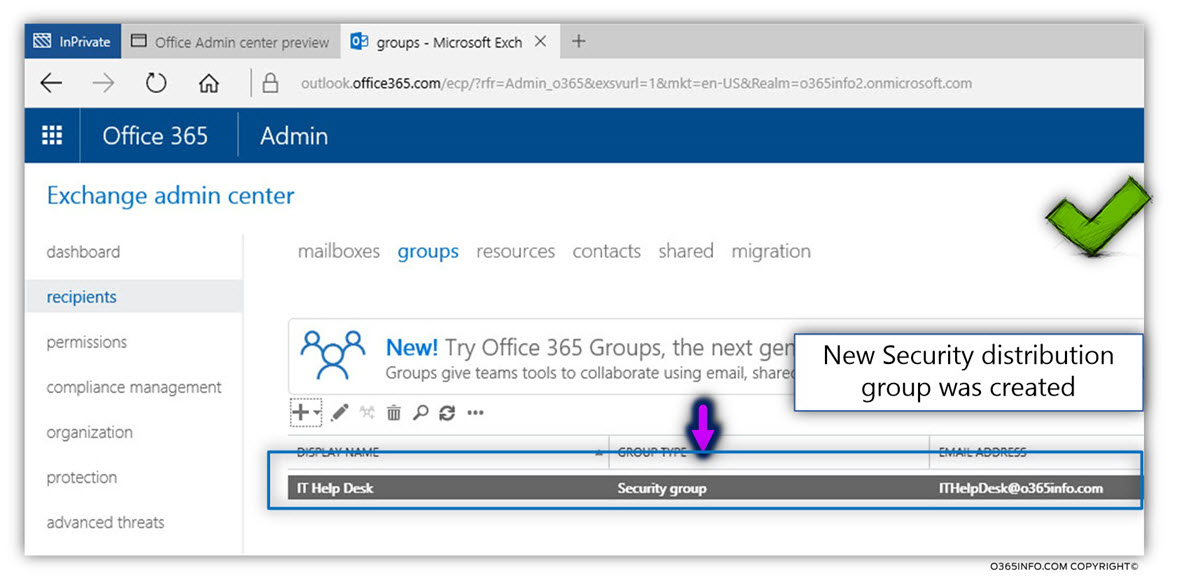
In the following screenshot, we can see that a new Security distribution group was created.
Step 6#8 – Assign the required permissions to the Help Desk group on the shared mailbox
In this step, we assign the required permissions to the Help Desk security group (IT Help Desk) to the Help Desk Shared mailbox (Help desk support tickets).
The permissions that will be assigned are – Full access + Send As
- Log in to the Exchange Online admin center
- On the left menu bar, select the recipients menu
- On the top menu bar, select the shared menu
- Select the mailbox to which you are requesting to assign permissions
- Click on the Pencil icon to edit the settings
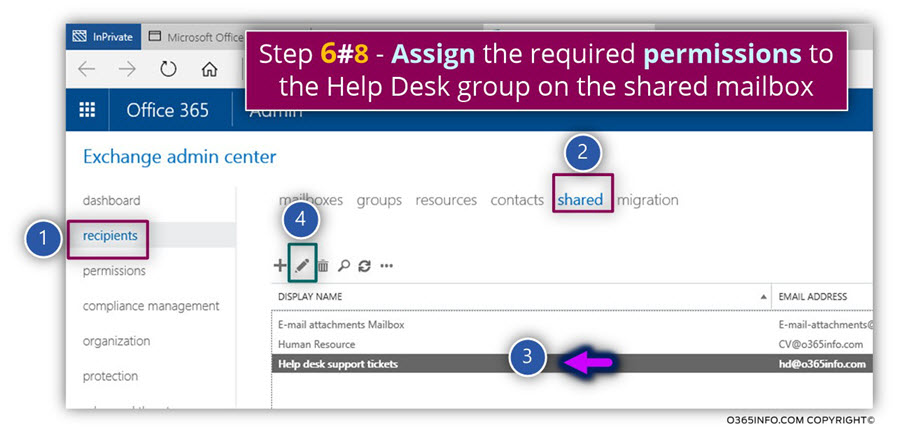
Select the mailbox to which you are requesting to assign permissions
- Select the mailbox delegation menu
In the following screenshot, we can see that at the current time, a user named Bob has
Full Access + Send As permissions on the shared mailbox.
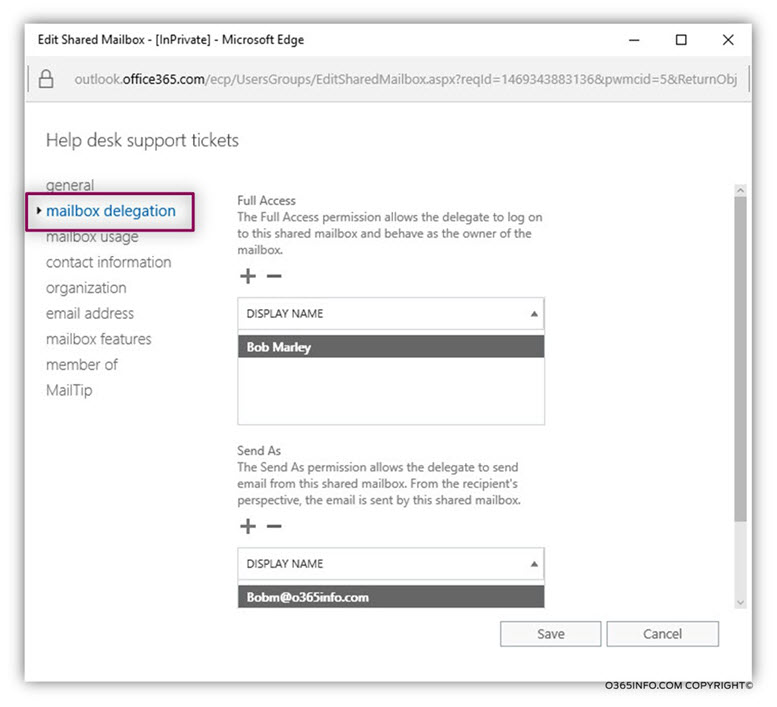
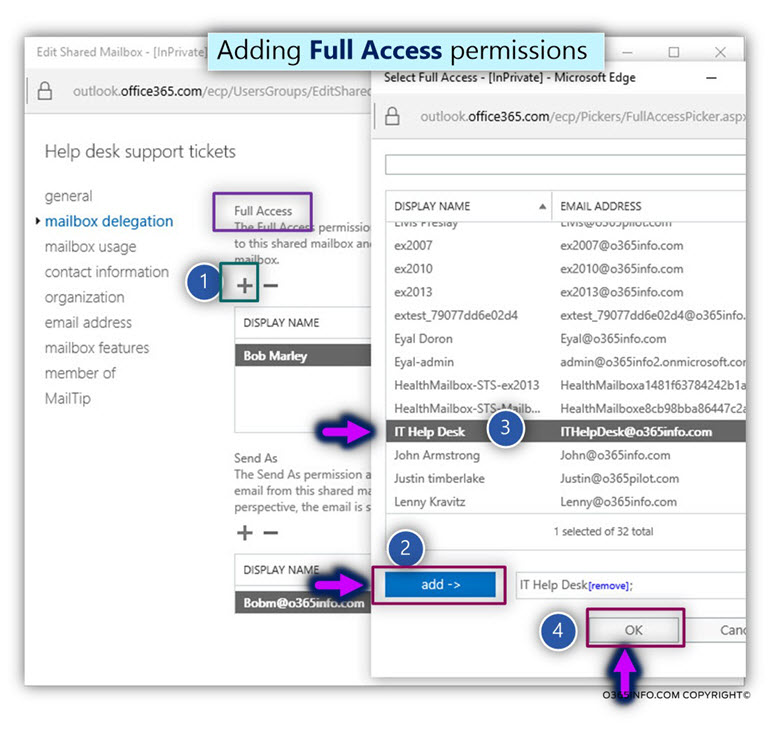
In this step, we will assign the Full Access permissions to the Help Desk security group (IT Help Desk). The Help Desk members need to have the Full Access permissions, so they will be able to add the Help Desk Shared mailbox as an additional mailbox to their Outlook mail profile.
- Under the Full Access section, click on the plus icon
- From the recipient list, select the recipient that will be assigned with the Full Access permissions. In our scenario, we select the IT Help Desk security group.
- Click add -> and OK
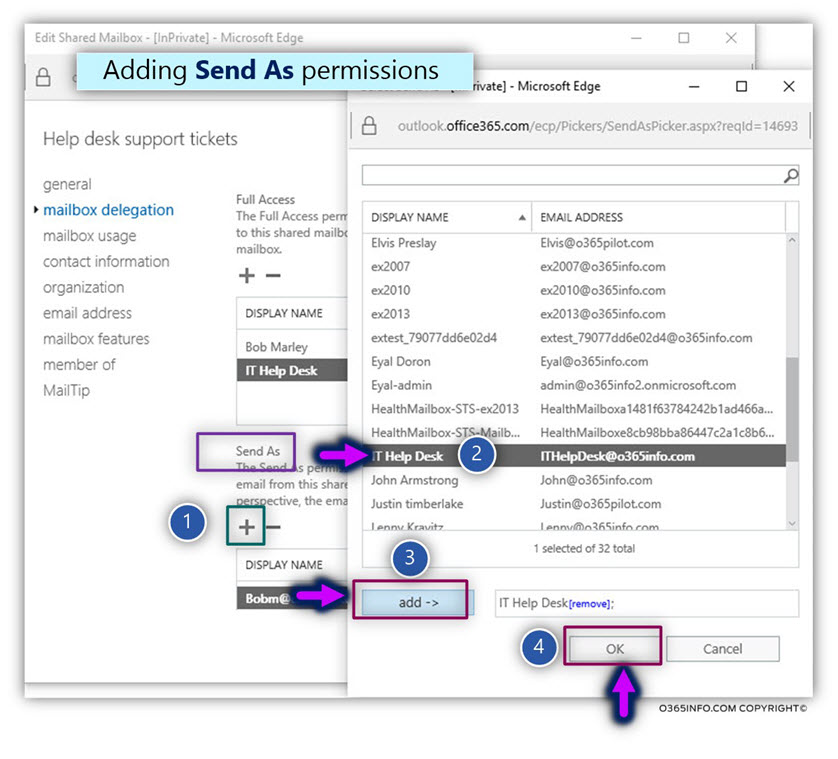
In this step, we will assign the Send As permissions to the Help Desk security group (IT Help Desk). The Help Desk members, need to have Send As permissions, so they will be able to send E-mail using the “identity” of the Help desk shared mailbox (hd@o365info.com).
- Under the Send As section, click on the plus icon
- From the recipient list, select the recipient that will be assigned with the Send As In our scenario, we select the IT Help Desk security group.
- Click add -> and OK
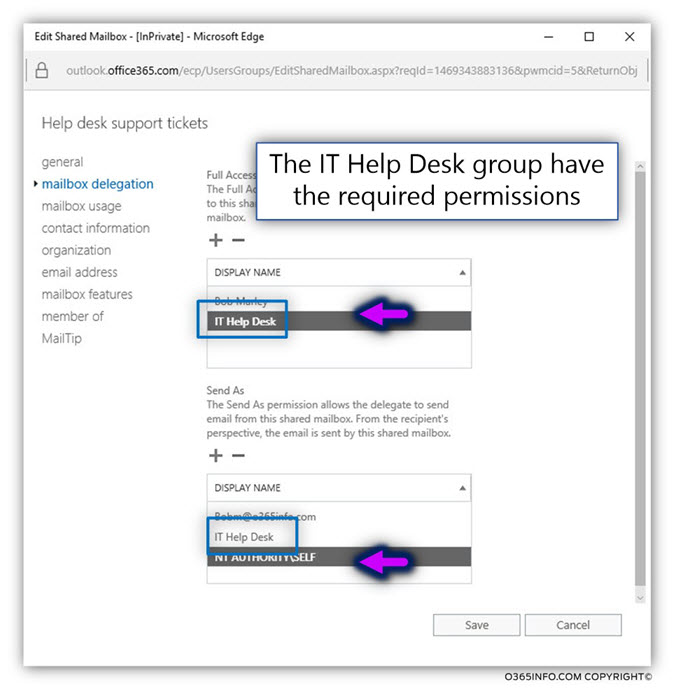
In the following screenshot, we can see that the Help Desk security group (IT Help Desk) have Full Access and Send As permissions on the shared mailbox.
- Click Save
Step 7#8- Add the Shared mailbox to a Help Desk user Outlook mail profile
When we assign the Full Access permissions to recipient A on the mailbox of recipient B, the mailbox of recipient B will be automatically added to the Outlook mail profile of recipient A.
This “magic” happened because of the special Exchange feature named – AutoMapping.
The exception is – a scenario in which we assign the Full Access permissions to a security group and not for the individual user.
In this case, the member of the specific security group inherits the Full Access permissions from the security group, but the AutoMapping option will not be activated for each of the security group members.
In other words, in a scenario in which we assign the Full Access permissions to a security group, we will need to add the mailbox which they have Full access permissions onto the Outlook mail profile manually.
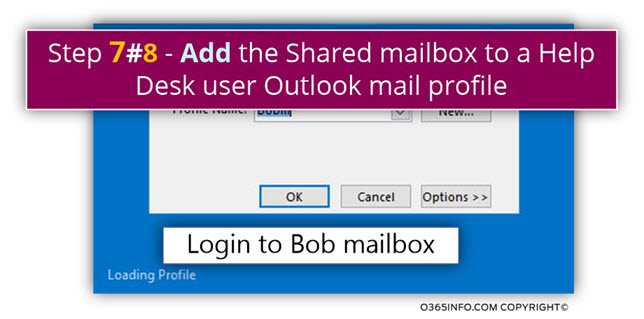
In the following example, we will add the Help Desk Shared mailbox to Bob’s Outlook mail profile (Bob is a member of the Help Desk security group).
- Log in to the Outlook mail profile of the specific user. In our example, we log in to Bob Outlook mail profile.
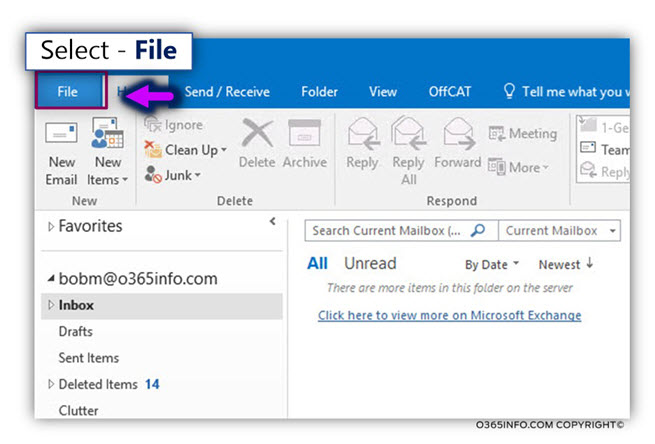
- Open Outlook and choose the File menu
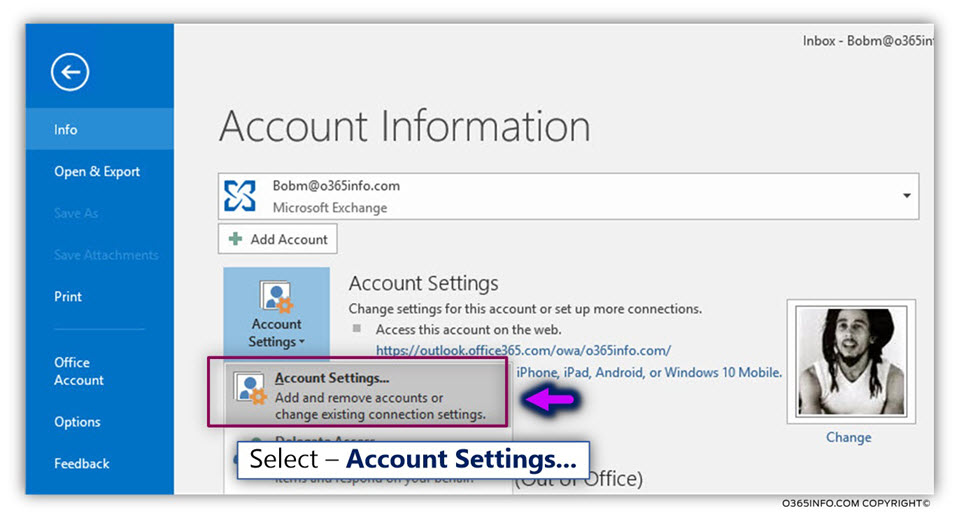
- Choose the Info menu and then Account Settings and then again Account Settings…
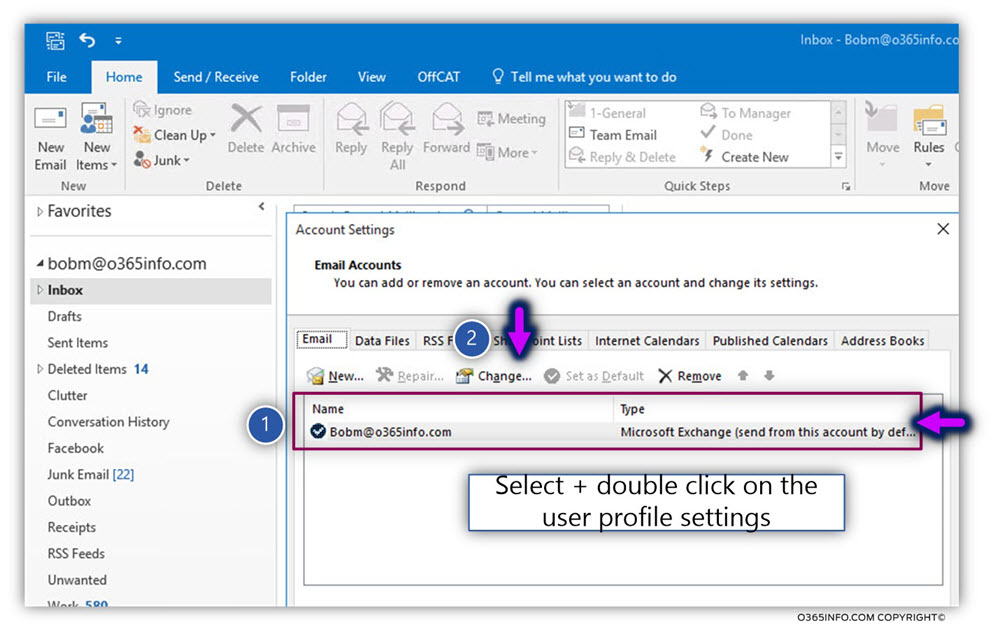
- Choose the recipient profile (John in our example) and click the Change… icon
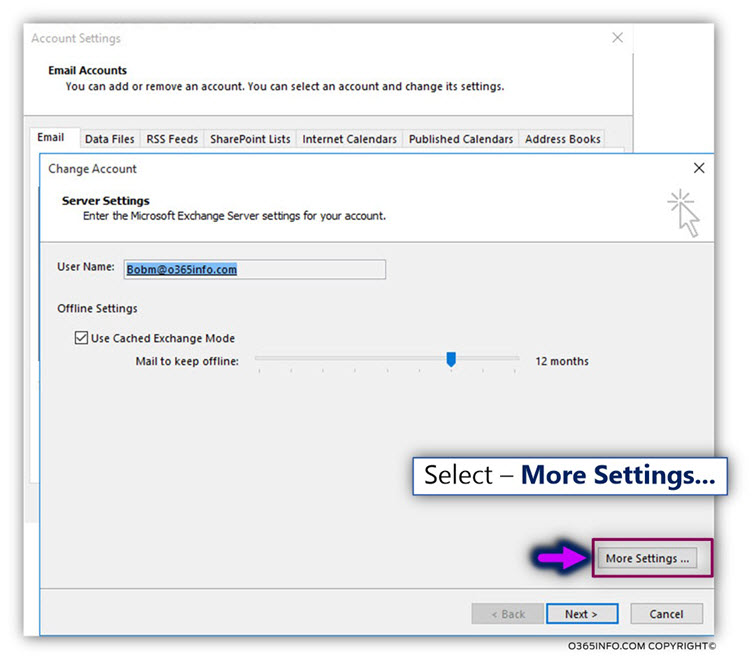
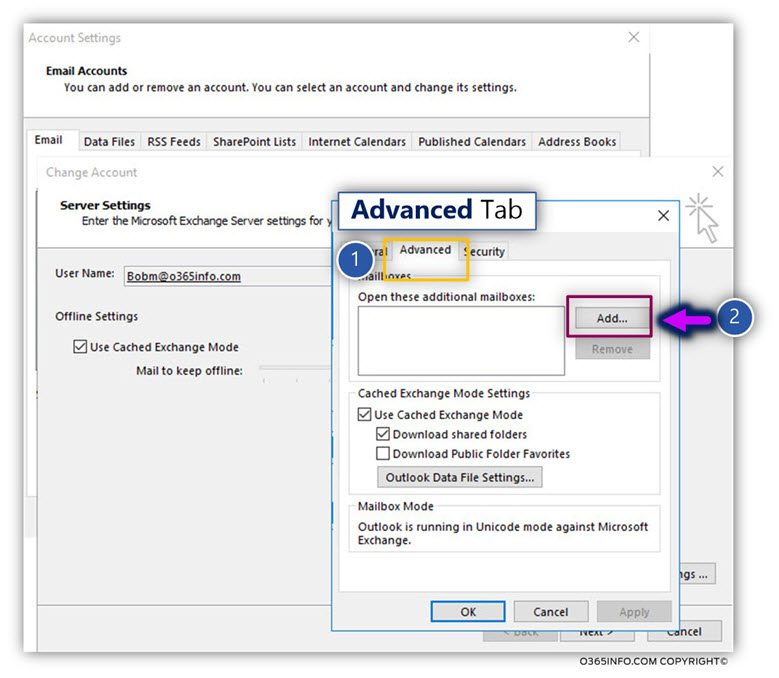
- Click on the More Settings … button
- Select the Advanced tab
- Click on the Add… button
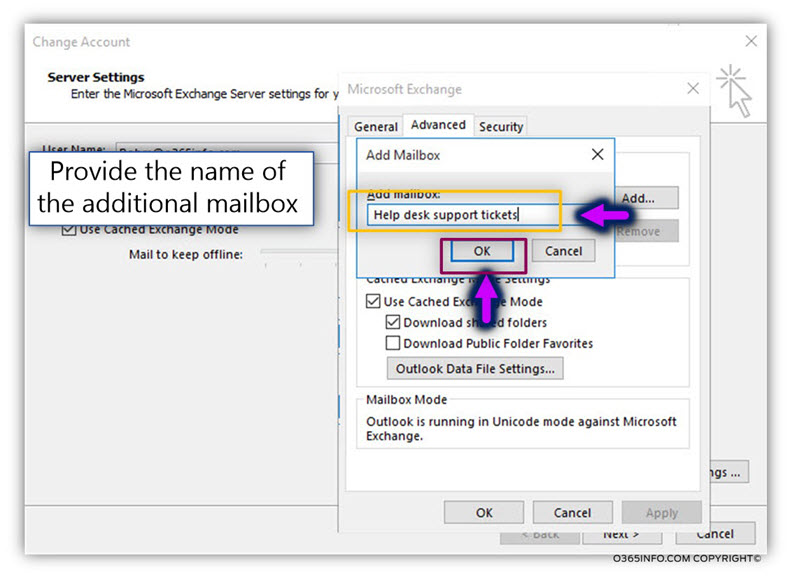
- In the Add mailbox window, write down the Alias of the mailbox that you want to add.
In our example, the Shared mailbox alias is – Help Desk support tickets
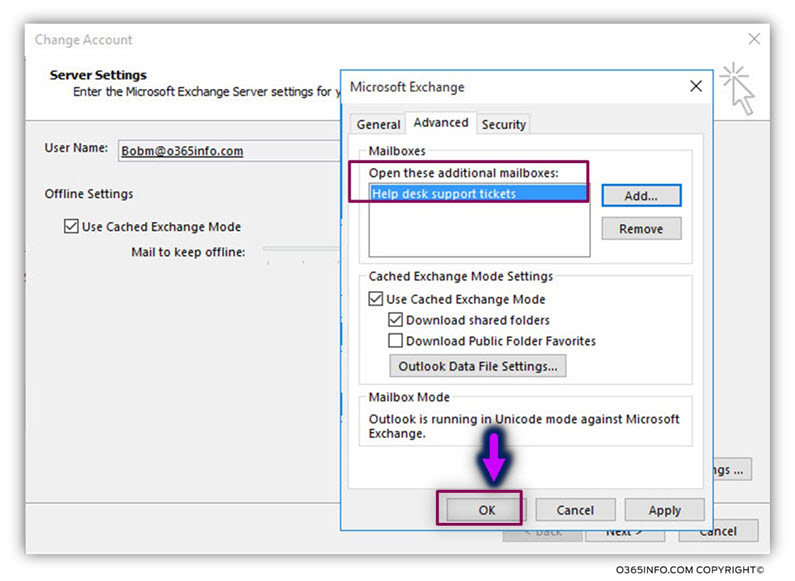
- The process will take a couple of seconds and in the end, we can see that the mailbox was added.
- Click OK
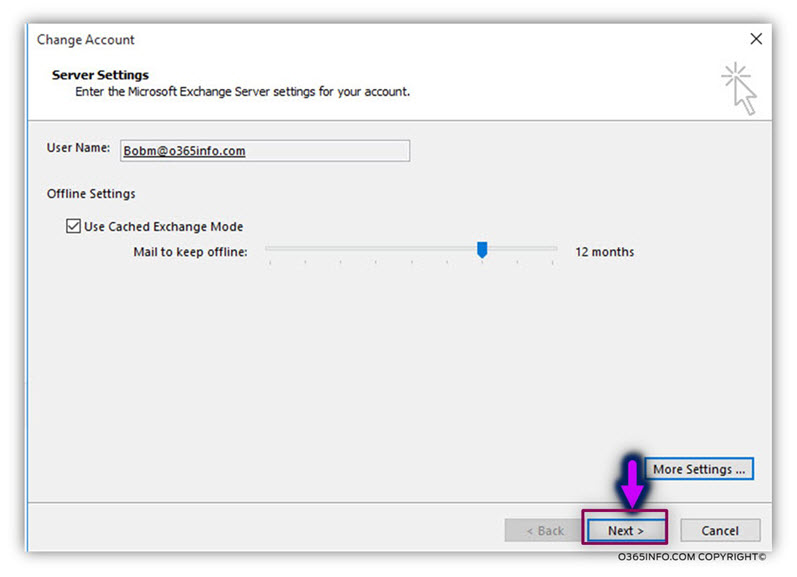
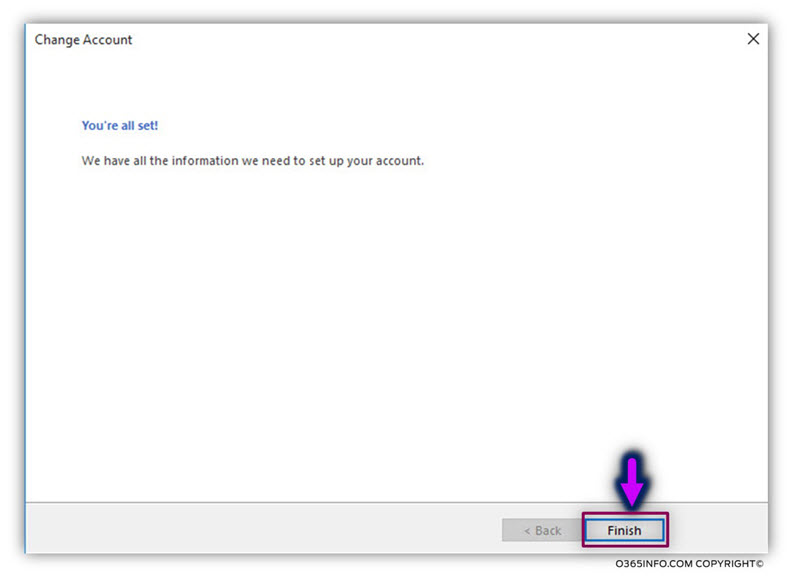
- Click on the Next button to finish the task
- Click – Finish
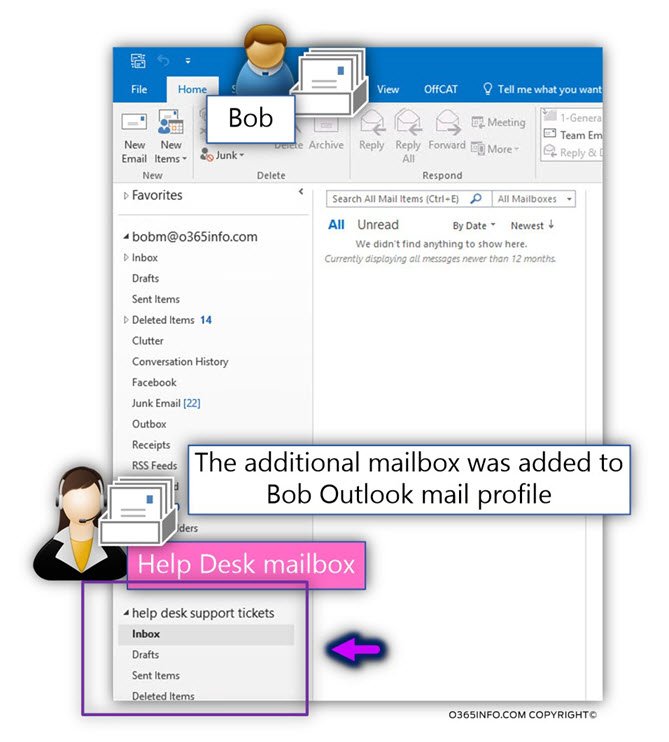
In the following screenshot, we can see that now, “Bob Outlook mail profile” included two mailboxes -Bob mailbox + the Shared mailbox (Help desk support tickets)
Step 8#8 – Testing the Send as permission assign to Help Desk members
In the current section, we would like to verify that the Help Desk team members, can use the option of “Send As” and send E-mail by using the E-mail address of the Help Desk shared mailbox.
To verify the Send As an option, we will use Bob’s mailbox to verify if the permissions are assigned correctly.
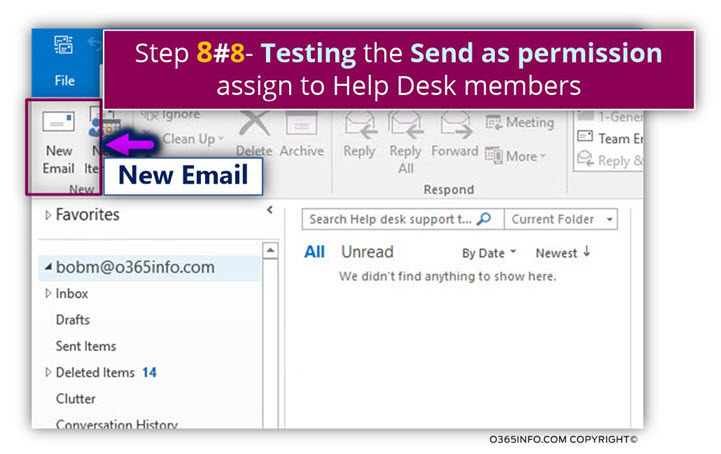
- Open the Outlook and create a New Email
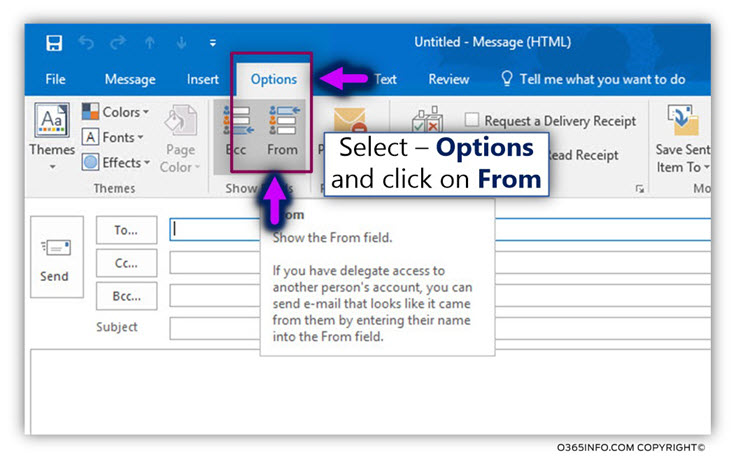
- Select the Options menu
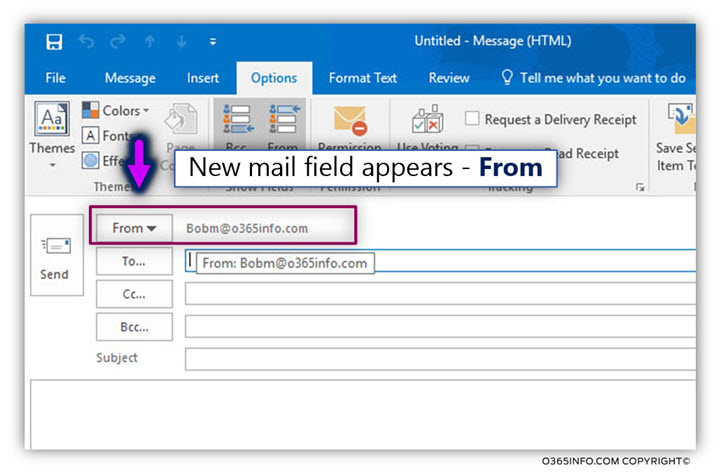
- Click on the From icon
By default, the “Send As” E-mail address is the E-mail address of the mailbox owner (in our example Bob).
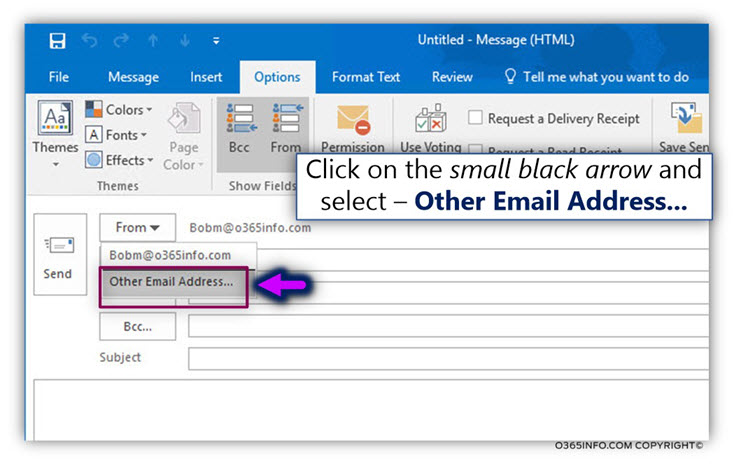
To be able to send E-mail address using another recipient identity, click on the small black arrow
Select the menu – Other Email address…
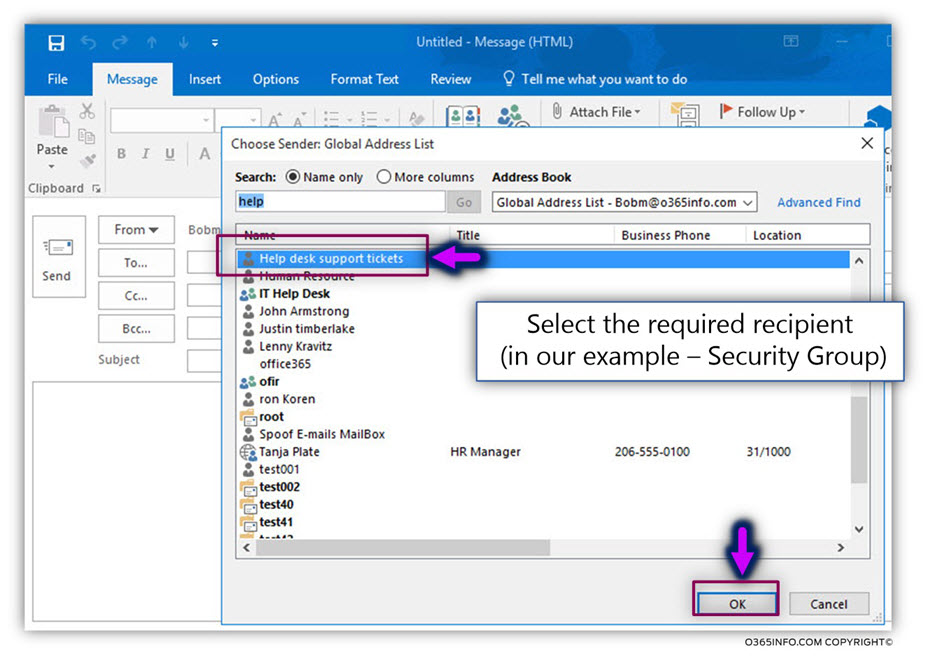
From the recipient list, select the required recipient whom you want to send E-mail using his “identity.” In our example, we select the recipient – “Help Desk Support tickets” recipient (security – distribution group).
- Click – OK
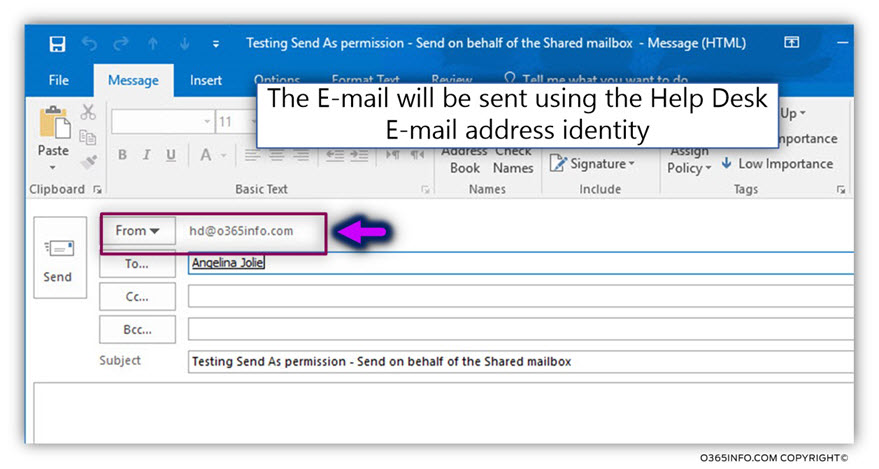
In the following screenshot, we can see that the From the mail field is populated with the E-mail address of the “Help desk E-mail address” (in our example – hd@o365info.com).
We will send the E-mail to another organization recipient, and verify if we manage to send the
E-mail address using the Help Desk identity + if the mail successfully sent to the destination recipient.
In our example, the destination recipient is Angelina.
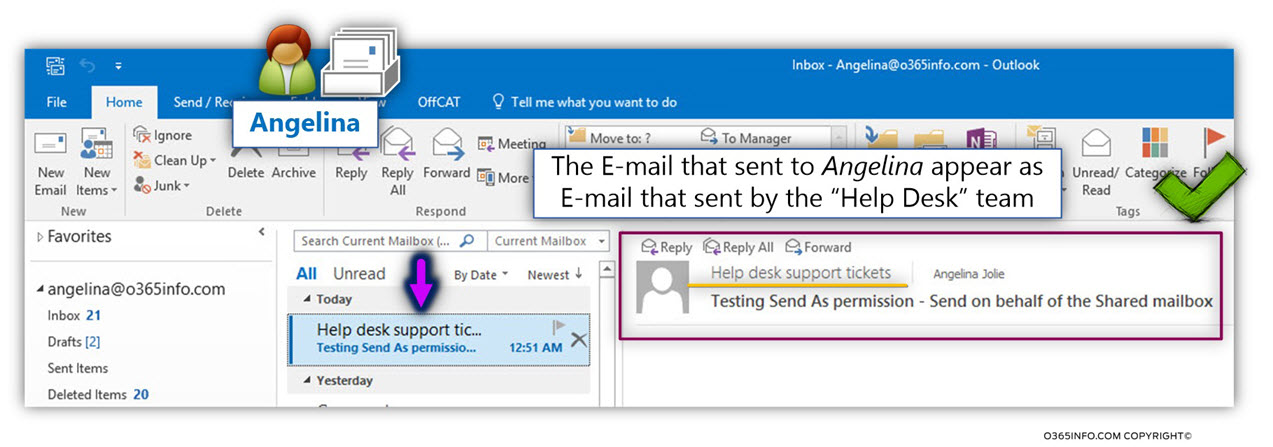
In the following screenshot, we can see that the E-mail was successfully sent to the destination recipient.
From Angelina perspective, the E-mail was sent by the “Help Desk” team.
The next article in the current article series
Automatic Reply in Office 365 -Dealing with mail loop (mail storm) scenarios |Part 7#7

This Post Has 0 Comments