The article is all about the subject of the security mechanism that is implemented as…
Outlook Test E-mail AutoConfiguration | Autodiscover troubleshooting tools | Part 1#4 | Part 21#36
In the current article, we will review one of the most useful and “strongest” Autodiscover troubleshooting tools, Outlook client built-in tool named: Test E-mail AutoConfiguration.
Table of contents
Q: What is the purpose of the Outlook Test E-mail AutoConfiguration tool?
A: The Outlook Test E-mail AutoConfiguration tool, enable us to view the “behind the scene” of the Autodiscover process.
By using the option of- “Test E-mail AutoConfiguration”, we can get a clear view of
- The methods that the Autodiscover client (Outlook) use such as LDAP query, DNS query by using Root domain name and so on
- The content of the Exchange server Autodiscover response that includes different type of information such as – information about the available Exchange web services URL addresses and more.
Outlook Test E-mail AutoConfiguration tool | charters advantages and disadvantages
Advantages
The Outlook Test E-mail AutoConfiguration tool has two main prominent advantages:
1. Outlook built-in tool
The Test E-mail AutoConfiguration is part of the Outlook client meaning, there is no need to download dedicated tools or access an external website (such as in the ExRCA scenario).
All we need to do is just – on the click on the Outlook icon on the bottom taskbar while we press the CTRL key on the keyboard. I have no idea for the mandatory requirement of pressing the CTRL key because, if we wouldn’t press the CTRL key, the option of Test E-mail AutoConfiguration will not appear.
2. Inspect Autodiscover session in Active Directory environment and a non-Active Directory environment
This is the charter, which distinguishes the Outlook Test E-mail AutoConfiguration from the rest of the Autodiscover troubleshooting tools.
As far as I know, the only tool that enables us to inspect the Autodiscover process in an Active Directory environment is – the Outlook Test E-mail AutoConfiguration.
All the rest of the Microsoft Autodiscover troubleshooting tools we will review in the next articles are built for analyzing the Autodiscover process that is implemented in a non-Active Directory environment.

Disadvantages
1. Non-complete description of the Autodiscover process
The results are, the output that we get from Outlook Test E-mail AutoConfiguration tool doesn’t include the complete information about all the steps that were involved in the Autodiscover flow.
For example, we cannot see “Autodiscover flow” in which the Autodiscover client addresses the local Active Directory by using an LDAP query. Also, we can see the flow in which the Autodiscover client address the DNS server – we cannot see to which DNS server the Outlook client access, what was the IP address that was returned by the DNS server to the Outlook client, etc.
2. The chicken and the egg syndrome
One of the most popular scenarios in which we would need to use the Outlook
Test E-mail AutoConfiguration toll is the scenario, which can be described as – “cannot create a new Outlook mail profile”.
In this case, we would like to analyze the Autodiscover workflow so; we would be able to find the cause of the problem that prevents us from completing the task of- “cannot create a new Outlook mail profile.”
The funny thing is that in this scenario, the option of – Outlook Test E-mail AutoConfiguration tool is unavailable because we don’t have an Outlook mail profile.
We will review a little trick that will help us to overcome this limitation.
Scenario + infrastructure configuration
To demonstrate the use of Outlook Test E-mail AutoConfiguration option, we will base our test of the following scenario:
We want to be able to get a look at the Autodiscover flow that is implemented between the Autodiscover client (Outlook client in our scenario) and Autodiscover Endpoint (Exchange CAS server).
The organization mail infrastructure details are:
- On-Premise Active Directory domain name –o365info.local
- Organization public domain name – o365info.com
- Exchange On-Premise servers – the organization Exchange environment includes three Exchange CAS servers. The FQDN of these servers is – o365info.local, ex02.o365info.local and sts.o365info.local
In our scenario, we will like to check the Autodiscover process of a user named John that uses the E-mail address- john@o365info.com
The desktop that we use for performing the Outlook Test E-mail AutoConfiguration is a domain member is located at the company internal network.

Using the option of Outlook Test E-mail AutoConfiguration
To be able to use the option of Test E-mail AutoConfiguration, use the following instructions:
- On the right bottom of the task bar, click on the small arrow
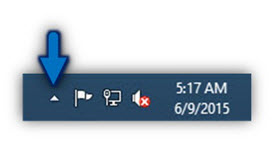
- Choose the CTRL Key
- Click on the Outlook icon
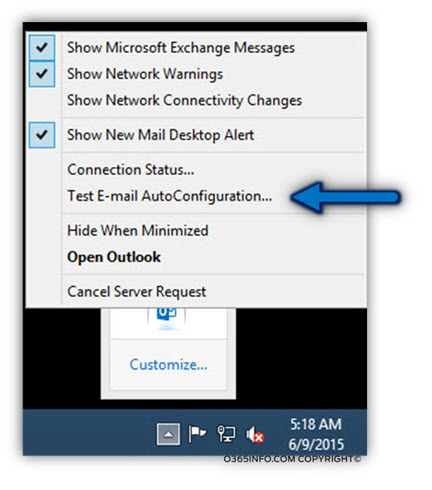
- Choose the option of Test E-mail AutoConfiguration….
- Type the email address of the recipient, which we want to check his ability to access the Autodiscover services
- Type the recipient password (number 1 in the screenshot)
- Un-check the option of – Use Guessmart
- Un-check the option of – secure Guessmart Authentication (number 2 in the screenshot)
- Click on the Test option
Note: The option of the Guessmart is an old method that is not used anymore.
For my opinion, this option should have been removed a long time ago, but at the current time, it’s important to uncheck this option to avoid a “mess” of the test results.
Analyzing the test results of the Outlook Test E-mail AutoConfiguration
The result of the Outlook Test E-mail AutoConfiguration is displayed using three different tabs.
Just a quick reminder, in our scenario, the Desktop from which we execute the Outlook
Test E-mail AutoConfiguration is a domain joined desktop.
The meaning is that – Outlook client will start with an Autodiscover method that should implemented in an “Active Directory-based environment.”
Log tab
The Log tab “tell us” what was the Autodiscover method that was used by the Autodiscover client (Outlook) for finding the required Autodiscover Endpoint (Exchange CAS On-Premise server).
In our scenario, Outlook finds the required Exchange server\s list by sending an LDAP query to local Active Directory.
The method is described as SCP (number 2).
The Autodiscover address the Autodiscover Endpoint by using the following URL –
https://autodiscover.o365info.com/Autodiscover/Autodiscover.xml
In the Log result (number 2), we can see that the “mission complete successfully” meaning that
- Outlook managed to locate a local Exchange CAS server
- Outlook managed to address the Exchange server
- Outlook managed to complete all of the required steps such as authentication
- The Exchange server sends to the Autodiscover client the required information (the Autodiscover.xml file).

Results Tab
The result tab includes information about the “Exchange services” that are available for the Exchange client.
1. Exchange availability services (number 1)
The Exchange Availability services (Free\Busy time) are provided by Exchange server named – mail.o365info.com and, the URL address for accessing this service is – https://mail.o365info.com/EWS/Exchange.asmx
2. Automatic reply or OOF (Out Of Office)
The Exchange service is provided by Exchange server named – ex02.o365info.local and, the URL for accessing this service is –
https://mail.o365info.com/EWS/Exchange.asmx
Note: At first glance is look like a mistake, because the OOF URL is identical to the Exchange Availability services. The reason for the “identical URL” is that Exchange uses the EWS (Exchange Web Services) URL as a “focal point” for providing a couple of services such as Availability serviced (Free\Busy time) services, OOO, Mail tips and so on.
3. Unified message
Anther capability of Exchange server is to provide the services of – Unified messaging.
We can see the URL that the client will need to use in case that he needs to use unified messaging.

On the next “section” we can see the Exchange server setting that sent to the Outlook client that required for the configuring the Outlook Anywhere settings.
The feature of “Outlook Anywhere”, enable the Outlook client to get access to “internal Exchange services” when the client located on a public network.
The “client” (Outlook) needs to have details such as:
Protocol name – in our scenario the protocol is HTTP (number 4)
Exchange server name (number 5) – usually this is the “public name” of the Exchange server which configured as “RPC proxy server” that provides the “server side” of the Outlook Anywhere services. In our scenario, the server name is – mail.o365info.com
Encryption requirement (number 6) – The Outlook Anywhere service mandatory requirement is to encrypt the communicating channel.
The encryption implemented by using the SSL protocol
Authentication (number 7) – this is the section that describes the “Type of Authentication”. Outlook Anywhere service based on a mutual authentication process, in which the Autodiscover client needs to identify the Autodiscover Endpoint (the server will provide a public certificate), and after the identification process successfully completed, the Autodiscover client will need to provide his credentials to the “server.”
Certificate principal name- msstd (number 8) – the client (Outlook) that is configured to use the Outlook Anywhere service, will look for the “server name” in the certificate that the server sends to the Autodiscover client.

XML Tab
The XML tab includes the content of the Autodiscover response that was sent to the Autodiscover client (Outlook).
Using the XML tab, we can see the information that was sent from the Autodiscover Endpoint to the Autodiscover client using the Autodiscover communication channel.
The Autodiscover response includes many details.
In our example, we will review only a sample of the information that appears in the XML Autodiscover response.
Note: XML format is based on a concept of opening and closing tag () that defines the type of information and, the “information” is included between the opening and closing tags.
1. Action tag (number 1)
In the <Action> tag, we can see that the value is – settings.
The meaning is that – the information that appears in this section should be used for “creating a new Outlook mail profile).
2. Type (number 2)
The <Type> tag “instructs” Outlook client about the configuration setting of a specific Outlook provider. In the specific section, the information is relevant for the EXCH Outlook provider.

Continuing our “walk” in the XML log, we can see additional parts of information.
3. AD (number 3)
Under the <AD> XML tag, we can see the name of the DC server that serves as a “source of information” for the Exchange server list.
As mention before, in On-Premise Active Directory environment, the Autodiscover client will try to connect to the local Active Directory and use an LDAP query asking to available Autodiscover Endpoints (Exchange CAS server\s).
In our scenario the DC name who provides the client the required information is –
DC01.o365info.local
4. Exchange web services (number 4) – this is the section that includes information about all the available Exchange web services.
When using the XML format, a “dedicated tag” is allocated for each of the Exchange services. For example:
- The <ASUrl> tag is used for “holding” the URL address for Exchange available service (Free/ Busy time).
- The <EwsUrl> tag is used for “holding” the URL address of – Exchange Web services

Saving the test results
The Outlook Test E-mail AutoConfiguration is not included by default an option for saving the information from the test results.
In case that we want to save the content of the Autodiscover response, we can bypass this limitation by copy the information to a Text editor such as – notepad.
In the XML tab, choose all the content by using the CTRL+ A keyboard key combination, and then use the CTRL+ C keyboard key combination to copy the data.
Open a notepad and paste the information.
To be able to read the information more comfortably, we will save the information as an XML file.
Save the file name using any name whom you prefer, but it’s important to use the .xml suffix in the file name.
In the Save as type box, use the option of – All Files
In the following screenshot, we can see an example in which we use an advanced TXT editor such as Notepad++ for displaying the content of the XML file that we saved in the previous section.

Tip – Outlook Test E-mail AutoConfiguration , creating a demo Outlook profile
1. The user credentials
The “Outlook Test E-mail AutoConfiguration” tool, does not depend on the user who is logged-in at the current time to the Outlook mail profile.
For example, in case that in the current time, the user who is logged in to the Outlook mail profile is – Bob@o365info.com, we can use the “Outlook Test E-mail AutoConfiguration” for testing the Autodiscover process of other recipients named – John@o365info.com
2. Using the Outlook Test E-mail AutoConfiguration interface
In a scenario in which, for some reason, we cannot create a new Outlook mail profile, technically; we cannot use the Outlook Test E-mail AutoConfiguration because, the “activation” of this option, is from Outlook mail profile (the chicken and the egg syndrome).
In this case, in case that we want\need to use the option of –
Outlook Test E-mail AutoConfiguration, we can use a little trick.
Instead of connecting to the Exchange server using the standard Outlook protocol such as RPC, we can bypass this challenge by creating a new POP\IMAP mail profile using “non-existing mail servers”. The purpose is just to create a temporary Outlook mail profile that will enable us to use the feature or the option of “Outlook Test E-mail AutoConfiguration.”
We will start to create a new Outlook mail profile and choose the option of “manual settings” (Manual setup or additional server types).

On the next screen, we will choose the option of -POP or IMAP.

In the details box such as incoming mail server or E-mail address, you can put any details that you want.

The final result will be a demo Outlook mail profile that is not connected to a “real mail server” but the option of Outlook built-in tool – the Test E-mail AutoConfiguration.
What Others Are Reading

I had to disable autodiscovery for Outlook as it kept flipping between internal and external mail servers– depending if I was in the office or out of the office.