In this article, I would like to review the secret romance of Exchange mail clients…
Outlook Autodiscover decision process | Choosing the right Autodiscover method | Part 14#36
Outlook client entirely depends on the Autodiscover service as an infrastructure for his relationship with the Exchange server.
This dependence relates to the initial phase in which Outlook needs to get the required information for creating a new mail profile and later the ongoing communication process with the Exchange infrastructure.
Table of contents
It all begins with the step in which Outlook needs to locate the entity that serves as Autodiscover Endpoint or in other words – the Exchange CAS server.
The good news is that the Autodiscover protocol could describe as “self-maintain”. The reason for this description is that we as Exchange administrators are required to lay the “Autodiscover foundations” and the Autodiscover protocol will handle all the rest.
The Autodiscover protocol knows how to find his “Autodiscover Endpoint” how to get the required information and so on.
The ability of the Autodiscover protocol to “automatically locate” his Autodiscover Endpoint, is based on a “Toolbox” of Autodiscover methods that can be used by the Autodiscover client.
The primary task of the Outlook client (the Autodiscover client) is just to choose the “right” method that will achieve the required results meaning – locating and contacting Autodiscover Endpoint.
Q1: Why does Outlook client need to use a variety of Autodiscover methods?
A1:
Reason 1 – there is a major difference between the Autodiscover methods that implemented in Active Directory environment vs. non-Active Directory environment. Outlook client needs to identify the environment in which it located and based on this information, choose the required Autodiscover method.
Reason 2 – in a scenario which described as – non-Active Directory environment, the Autodiscover process can be implemented in a couple of ways. Each of these “ways” created as a solution for a particular organization network environment. Even after an Outlook client identifies that he located in non-Active Directory environment, he has a couple of options for finding the Autodiscover Endpoint.
Q2: How does Outlook choose the “right” Autodiscover method?
A2: The most necessary “decision” that Outlook will need to make is to decide if he located in Active Directory-based environment or not.
In case that Outlook “decide” that he located in a non-Active Directory environment, Outlook has a “list” of methods that he can use and a preconfigured order for using each of the different Autodiscover methods.
Q3: Is there a specific scenario in which we need to intervene in the process of “selecting a particular Autodiscover method”?
A3: The answer is “Yes”. In some scenarios, we need to cancel specific Autodiscover methods for improving the performance of the Outlook client or, to enable Outlook client to complete the Autodiscover process successfully.
In the current article, we will review the following subjects:
- The algorithm which is used by Outlook (Autodiscover client) for choosing the specific Autodiscover method.
- The ways for “controlling” Outlook behavior relating to the process of -” Choosing the Autodiscover method” by adding a registry key.
Autodiscover method classification and workflow
Outlook Autodiscover method in Active Directory-based environment.
Let’s start with a high-level classification of Autodiscover method that are used by the Outlook client.
The first or the “top list” Autodiscover method that the Outlook client is programmed to use is the “Active Directory Autodiscover process”.
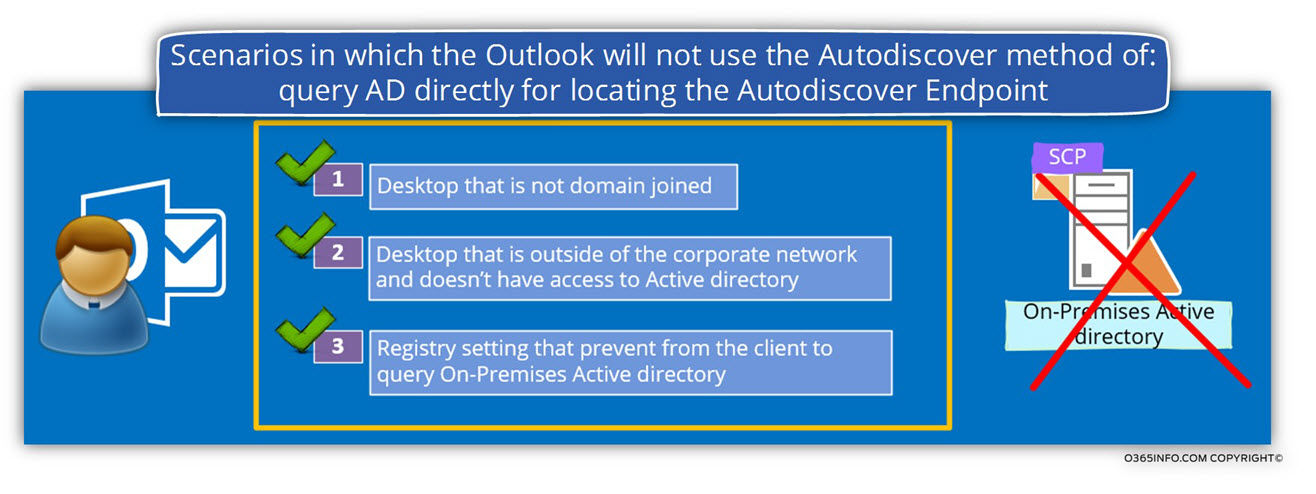
In case that the Outlook installed on a desktop that configured as a domain joined + the Outlook client located in a domain based environment (can access Active Directory on-Premise), Outlook will use the Autodiscover method that based on – querying the Active Directory for a list of available Exchange CAS server\s.
In case that one of these conditions cannot fulfill, Outlook client will “failback” to the “additional Autodiscover methods.
In the following diagram, we can see the scenario that “prevent” from the Outlook mail client to use the Active Directory Autodiscover method.
Note – in the following article, we will mention the term – “Autodiscover Endpoint” many times. The meaning of this term translated into an “entity” (Exchange server most of the times) that can provide to the Autodiscover client the required Autodiscover information.
The available Autodiscover methods for Outlook
As mentioned, Outlook has a “suite” of Autodiscover methods that he can use for finding available Autodiscover Endpoint.
Note: It’s important to emphasize that although the Outlook can utilize many Autodiscover methods, some of these Autodiscover methods are not supported and cannot use in the Office 365 and Exchange Online environment.
- Active Directory environment
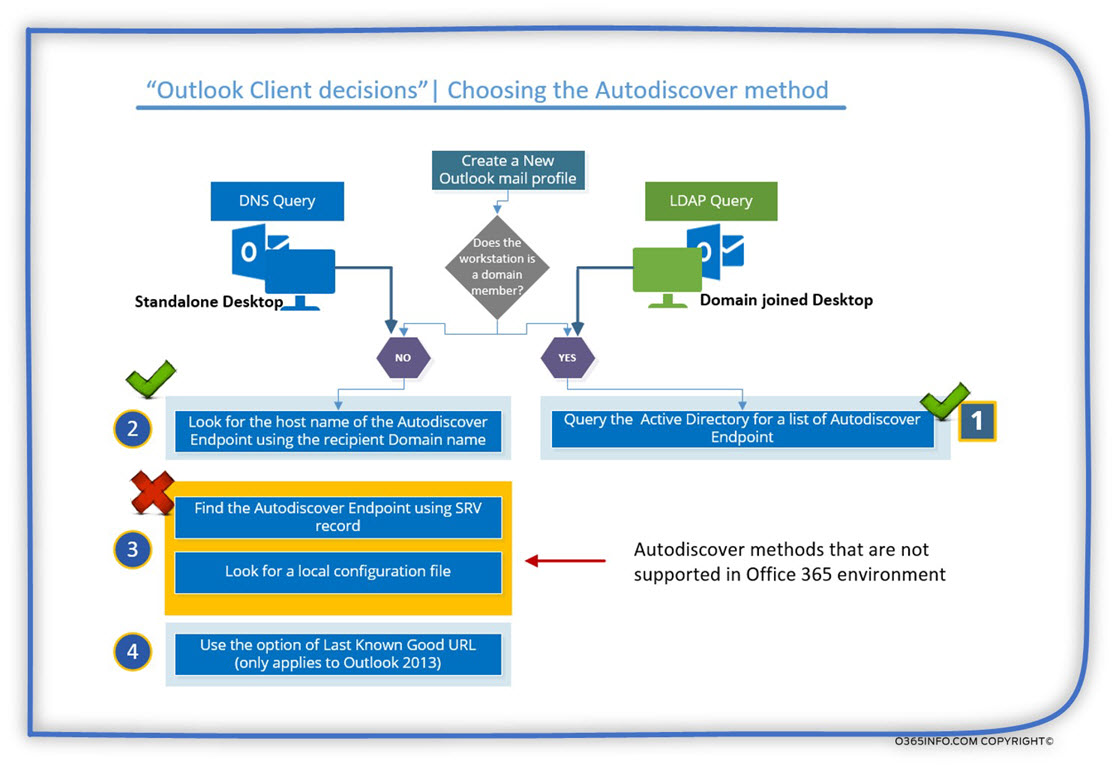
As mentioned, Outlook will prefer to access Active Directory for getting a list of available Exchange CAS server (number 1 in the diagram). - Non-Active Directory environment
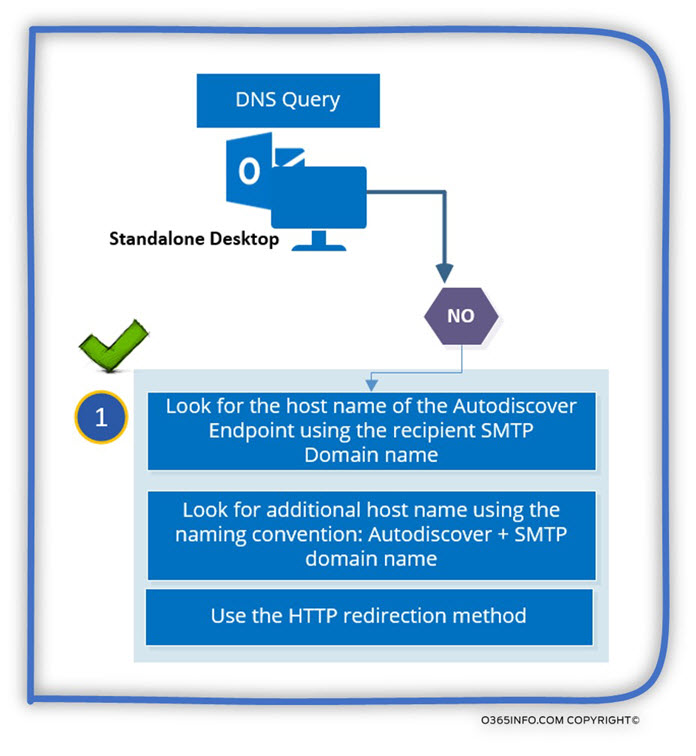
In a non-Active Directory environment, the first Autodiscover method that is used by Outlook is the method in which Outlook will “extract” to SMTP domain name from the recipient E-mail address and query the DNS server for the IP address that is “mapped” to the hostname.
For example, in case that the recipient name is – John@o365info.com, Outlook will query the DNS server looking for an Autodiscover Endpoint named – autodiscover.o365info.com
In case that there is no IP address for this hostname or in the case that the host doesn’t “respond” to the Outlook connection attempt, Outlook will try to look for the additional hostname using the naming convention – Autodiscover + SMTP domain name.
In our example – autodiscover.o365info.com (number 2 in the diagram).
In case that the host response but cannot communicate using the HTTPS protocol, Outlook will try to use the HTTP redirection method.
In case that Outlook couldn’t find the host name using the Autodiscover + SMTP domain name, or if the host is not an Autodiscover Endpoint, the next method is looking for an SRV record that will contain the name of the Autodiscover Endpoint.
In case that Outlook could not find the host name using the SRV record method, Outlook will check for a local Autodiscover configuration file – static file that is located on the specific desktop (number 3 in the diagram).
Note: The two Autodiscover method (number 3 in the diagram) is not supported in Office 365 and Exchange Online environment.
The last Autodiscover method that can be used only by an Outlook 2013 client described as- Last Known Good URL
In this Autodiscover method, in case that the Outlook mail client manages to find “in the past” the name of an Autodiscover Endpoint, Outlook will try to use the name who saved in his “cache” (number 4 in the diagram).
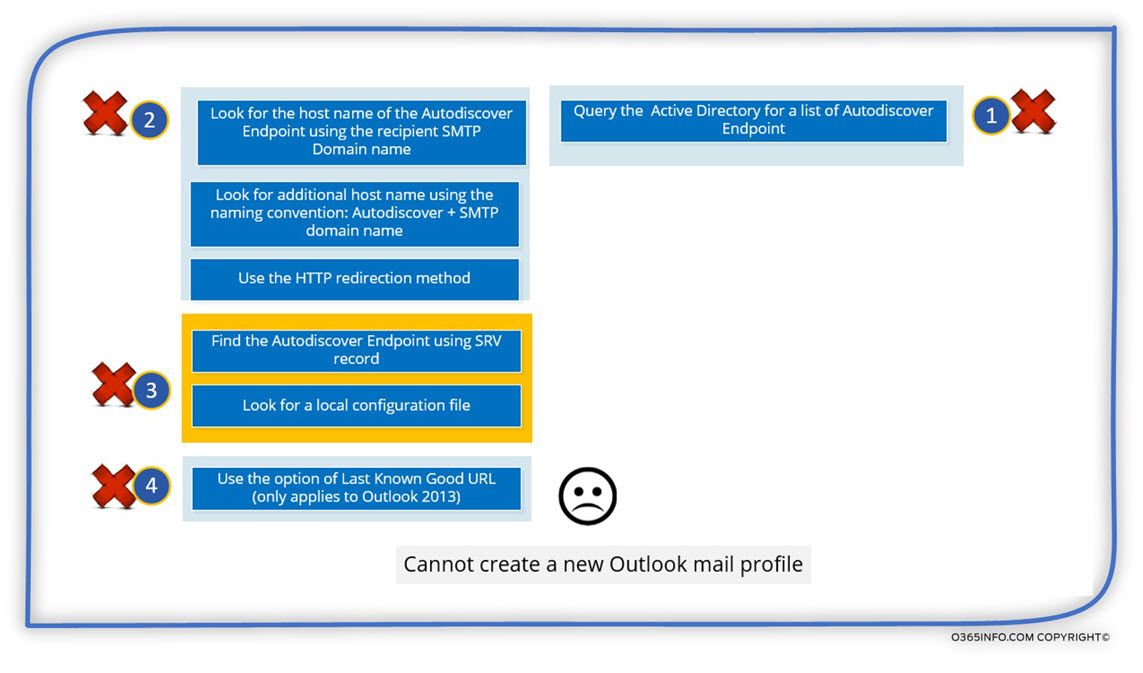
Cannot create a new Outlook mail profile.
In case that we need to “use” the Autodiscover services for creating a new Outlook mail profile, and none of the Autodiscover methods that described doesn’t provide the required result – locating and connecting Autodiscover Endpoint, the outcome is – Inability to create a new Outlook mail profile.
In a scenario of – “troubleshooting a problem in which we cannot create new Outlook mail profile”, the Outlook “error message” is not so clear.
In this case, the error message that Outlook display is:
An encrypted connection to your mail server is not available. Click next to attempt to use an unencrypted connection
In the following screenshot, we can see an error message in Outlook 2013
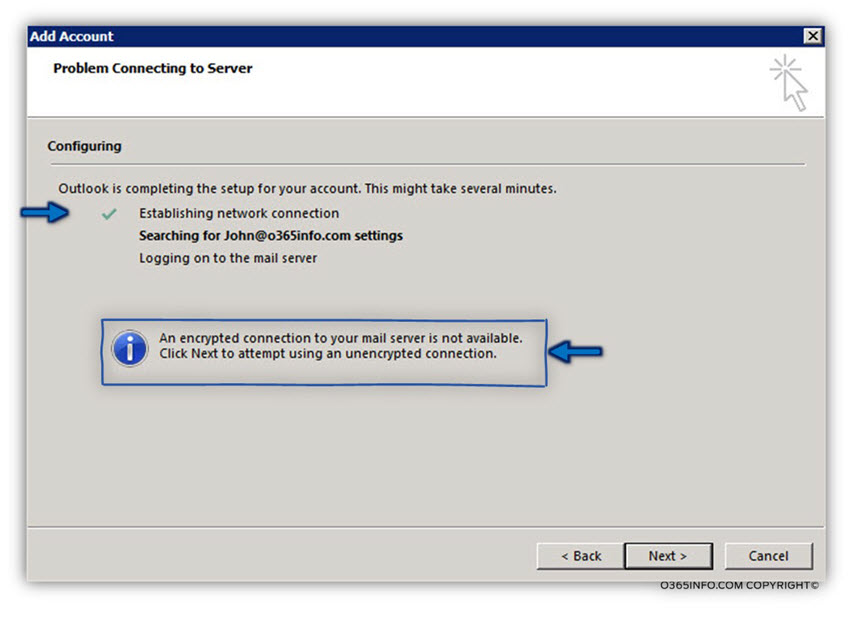
The “problem” in the Outlook error message is that there are not helping us to know or to understand what is the real cause of the problem.
Note – In a troubleshooting scenario of “cannot create a new Outlook mail profile” we will need to use tools such as the ExRCA that will be reviewed in the article: Microsoft Remote Connectivity Analyzer (ExRCA) | Autodiscover troubleshooting tools | Part 2#4 | Part 22#36
Scenarios in which we would like to control Outlook Autodiscover settings.
The Autodiscover methods that can be used by the Outlook mail client are pre-programed into Outlook. In some scenarios, we will need to disable a specific Outlook Autodiscover method.
Technically, there could be coupled if scenarios in which we will want to change the default Autodiscover process or methods that are used by the Outlook client.
Scenario 1: migration to Office 365 | Stage migration
A cloud migration scenario, in which some of the Exchange On-Premise mailboxes were migrated to the cloud (Exchange Online) in, we want to prevent from an internal mail client to connect to their “old mailbox” located at the Exchange On-Premise server.
We can see scenarios like this in case that we migrate Exchange On-Premise mailboxes to the cloud (Exchange Online) using the option of Stage migration.
During this migration, the user mailbox is not “moved” to the cloud, but instead, the mailbox is copied to the cloud. The result is that the user will have two mailboxes – one mailbox in the Exchange on-Premises server, and an additional mailbox located at Exchange Online.
In this scenario, we need to implement a solution that will prevent the Outlook client from connecting to their Exchange on-Premises mailbox and instead, “direct” then to their Exchange Online mailbox.
The formal way to implement this “redirection” is by using a PowerShell script, which will convert the Exchange on-Premises server into a contract and add to the “new contact” that represents the recipient the on Microsoft’s email address of the recipient.
When we create a new Outlook mail profile, the Autodiscover process will “lead” Outlook client to the Exchange on-Premise server, and the Exchange on-Premise server will redirect the Outlook client to the cloud (Exchange Online).
The main issue is that if some reason we cannot activate or use the particular PowerShell; we will need another method that will enable us to “tell” Outlook how to address the Exchange Online server instead of the Exchange on-Premise server.
The workaround that we can use in this scenario implemented by preventing from Outlook mail client to connect Exchange on-Premise server.
If we want to be more processes, prevent from Outlook to a to use the option of LDAP query in which the Outlook asks for a list of existing Exchange CAS server\s and then accesses the Exchange on-Premises server.
The process in which we want to prevent from Outlook to perform the SCP Autodiscover method will be applied only to recipients whom their mailbox was already migrated to the cloud and, not for an existing organization Exchange client that still needs access to their Exchange On-Premise mailbox.
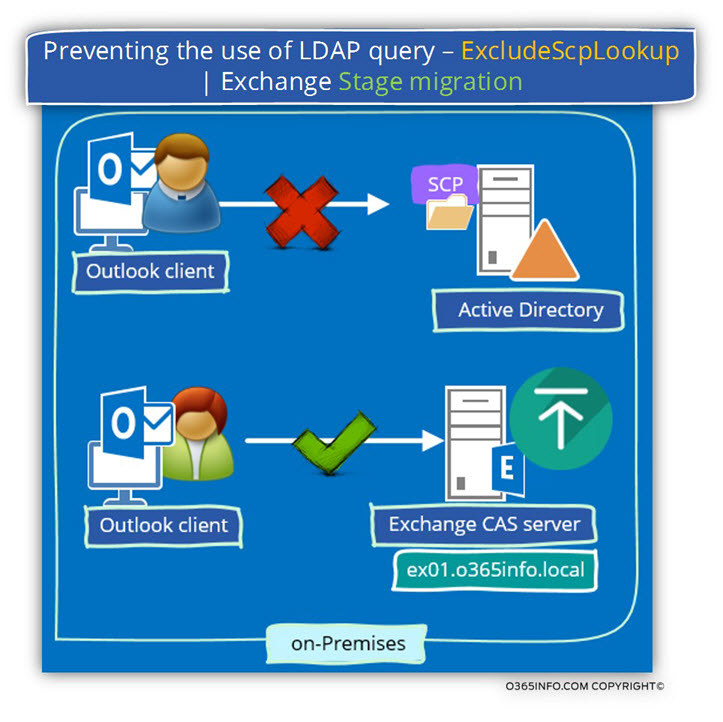
Note: The formal solution for this problem is using a Microsoft PowerShell script that converts the Exchange On-Premise mailbox to contact the redirect Outlook mail client Autodiscover request to his “cloud mailbox” but many times, this solution is not implemented.
Scenario 2: migration to Office 365 | Cutover migration
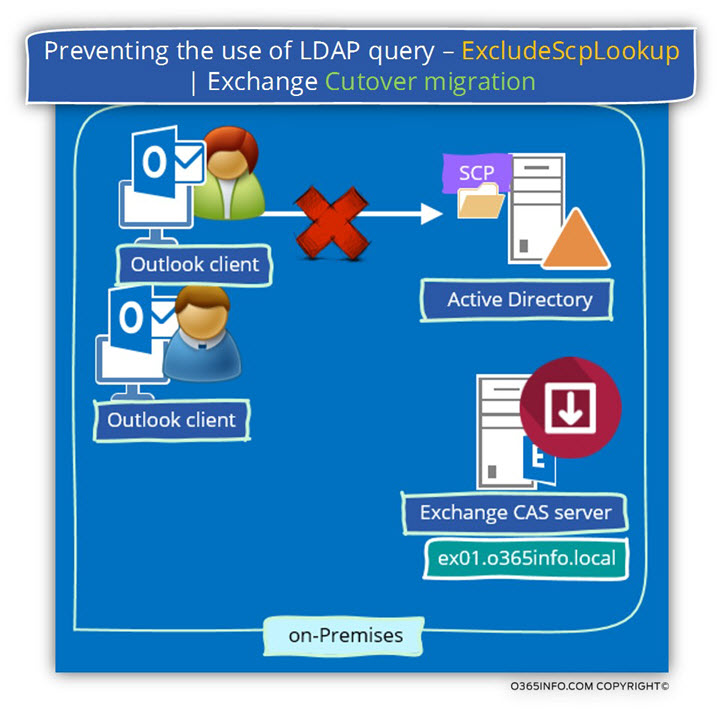
In a mail migration, such as Cutover migration, 100% of the Exchange On-Premise mailboxes migrate to the cloud.
The little secret that most of us don’t know is that the internal Outlook mail client will allow starts the Autodiscover process using an LDAP query, asking for a list of existing Exchange CAS server and in the next step, try to communicate with the host names who sent from the Active Directory as an answer.
In most of the scenarios the “previous Exchange On-Premise” is down or not connected, and the Outlook mail client will waste precious time implemented this “useless process”.
In this case, we can set a particular registry key that will prevent from the Outlook mail client to perform the default Autodiscover method that based on the LDAP query.
Scenario 3: prevent the Autodiscover method of accessing the Root Domain name
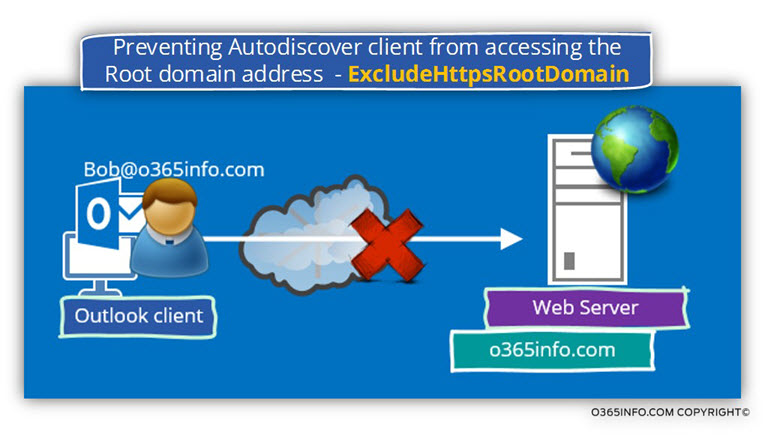
The Autodiscover method that implemented by an “external Autodiscover client” or Outlook client that are not domain joined is “extracting” the SMTP domain name of the recipient
E-mail address and look for an Autodiscover Endpoint using this SMTP domain as a host name.
For example, in case that the receipt E-mail address is – Bob@o365info.com, the Outlook client, will try to look for an Autodiscover Endpoint named – o365info.com
In some scenarios, we want to prevent this Autodiscover method because the hostname is already “attached” to a company website, and we want to prevent from the Outlook client from wasting precious time implemented this “useless process”.
Outlook Autodiscover settings registry keys.
Using the OS Registry, we can control the Autodiscover methods that are implemented by the Outlook mail client.
In the current section, we will review these registry keys and how to add and update this key manually or by using a simple batch file and in the next section, we will examine how to control these registry keys by using Group Policy and Office ADMX files.
The Autodiscover methods employed by Outlook are:
- SCP lookup
- HTTPS root domain query
- HTTPS Autodiscover domain query
- HTTP redirect method
- SRV record query
- Local XML file
- Cached URL in the Outlook profile (new for Outlook 2013)
Each of these Autodiscover methods can be controlled by using a registry setting.
Default does not configure the registry key that relates to the Outlook Autodiscover methods, and we will need to add this registry key.
Each of this registry key\value created for preventing or disabling a particular Outlook Autodiscover method.
Registry Key path
The registry path that we need to use for adding the required Outlook registry key is:
HKEY_CURRENT_– USER\Software\Microsoft\Office\x.0\Outlook\Autodiscover
The X.0 folder represents a particular Outlook version.
In the following diagram, we can see the Outlook version that supported in Office 365 environment.
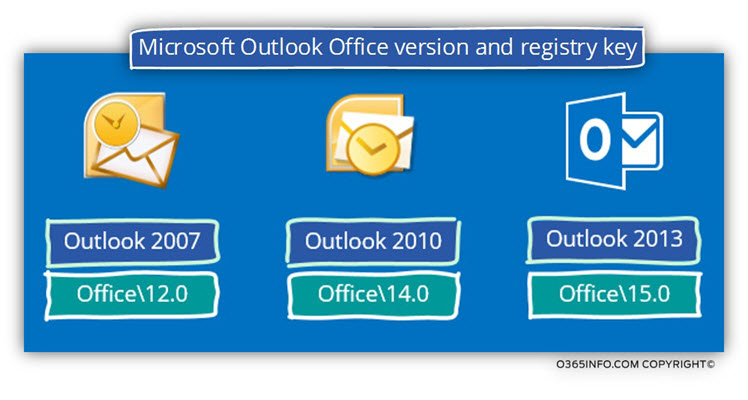
For example, in case that we need to add a registry key that will change the default Autodiscover method for Outlook 2013, we will need to use the following registry path:
HKEY_CURRENT_– USER\Software\Microsoft\Office\15\Outlook\Autodiscover
Outlook Autodiscover available registry keys
The available registry key that we can use are:
- ExcludeScpLookup
- ExcludeHttpsRootDomain
- ExcludeHttpsAutodiscoverDomain
- ExcludeHttpRedirect
- ExcludeSrvRecord
- PreferLocalXML
- ExcludeLastKnownGoodURL (only applies to Outlook 2013)
I have attached the description for each of these Outlook registry options as it appears in the Group policy description:
- “Exclude the SCP object lookup” – Outlook does not perform Active Directory queries for Service Connection Point (SCP) objects with Autodiscover information.
- “Exclude the root domain query based on your primary SMTP address” – Outlook does not use the root domain of your main SMTP address to locate the Autodiscover service.
For example, you select this option Outlook does not use the following URL:
https://<smtp-address-domain>/autodiscover/autodiscover.xml - “Exclude the query for the AutoDiscover domain” – Outlook does not use the Autodiscover domain to locate the Autodiscover service. For example, Outlook does not use the following URL:
https://autodiscover.<smtp-address-domain>/autodiscover/autodiscover.xml - “Exclude the HTTP redirect method” – Outlook does not use the HTTP redirect method in the event it is unable to reach the AutoDiscover service via either of the HTTPS URLs:
https://<smtp-address-domain>/autodiscover/autodiscover.xml or https://autodiscover.<smtp-address-domain>/autodiscover/autodiscover.xml - “Exclude the SRV record query in the DNS” – Outlook does not use an SRV record lookup in DNS to locate the AutoDiscover service.
- “Exclude the last known good URL” – Outlook does not use the last known good Autodiscover URL.
In the following screenshot, we can see an example of a scenario in which I have added all the available registry keys that relate to the Outlook Autodiscover method.
Note that this registry key will be implemented only in the Outlook 2013 client because the registry folder version is “15.0.”
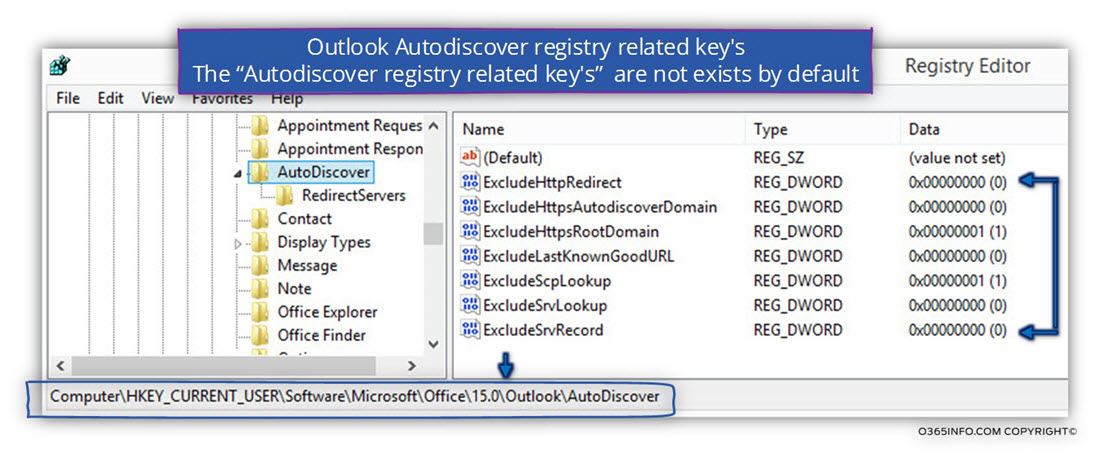
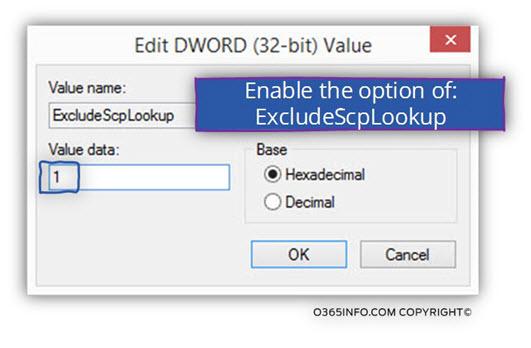
In the following screenshot, we can see an example of the registry key that relates to the SCP Autodiscover method.
The value that we see is the – ExcludeSCPlookup
The number “1” is for activating the option (if we use the value of “0” this will turn off the particular registry setting).
Using a batch file for Adding\updating Autodiscover registry settings
To make your life simpler, I have created a batch file that will automatically create and add Autodiscover registry settings, for all the Outlook supported version: Outlook 2007, Outlook 2010 and Outlook 2013.
For your convenience, I have prepared a batch file, which can update the registry.
The advantage of using a batch file is that we can add additional configuration settings, for example – add the required configuration for all the Microsoft Office versions such as – Office 2007, 2010 and 2013.
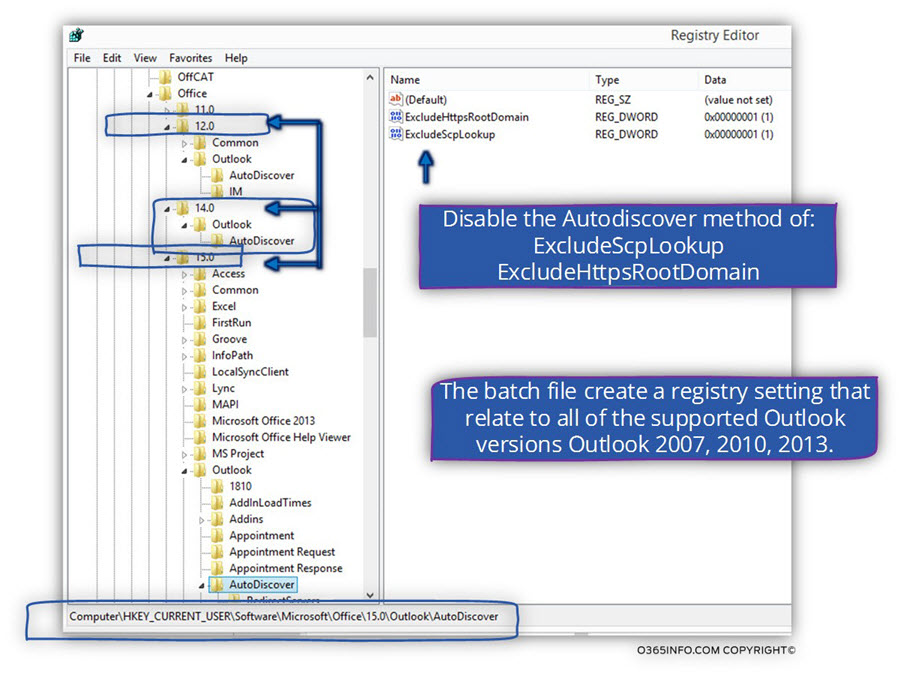
The batch file that I have created – Add-Outlook-reg-All-Office-versions.bat will update the registry by adding the required key for all the available office versions such as 12.0 key for the Microsoft Office 2007, 14.0 key for Microsoft Office 2010, etc.
The batch file uses the OS built-in command – REG ADD
In our example, I use the batch file to add only two registry keys:
- ExcludeSCPlookup
- ExcludeHttpsRootDomain
I have created two batch files:
1. Add-Outlook-reg-All-Office-versions.bat
This batch file will add the required registry key that will prevent the Outlook client from using the Autodiscover method of SCP and Root Domain name.
2. Remove-Outlook-reg-All-Office-versionsns.bat
The additional batch file- Remove-Outlook-reg-All-Office-versionsns.bat will “revert back” the configuration setting that we add by using the previous batch file.
In the following screenshot, we can see the content of the Add-Outlook-reg-All-Office-versions.bat file.

The activation of the batch file that will add the required registry key is quite simple:
All you need to do is save the batch file- Add-Outlook-reg-All-Office-versions.bat on the local disk, and drop the batch file to a CMD.
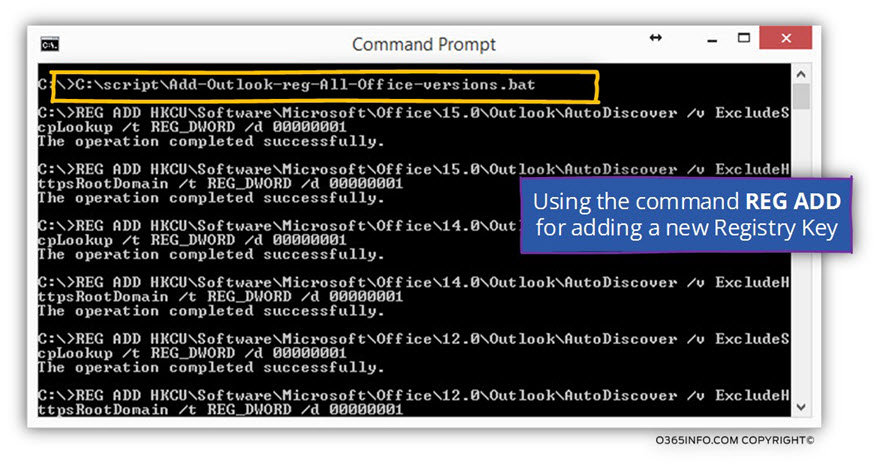
After we run the Add-Outlook-Reg-All-Office-versions.bat batch file, we can see that now, three “registry folder” was created: 12.0, 14.0, 15.0 and 16.0
Each of this folders includes the Outlook Autodiscover keys
- ExcludeSCPlookup
- ExcludeHttpsRootDomain
Group policy and Autodiscover setting
In the previous section, we have reviewed the option of adding Outlook Autodiscover key’s manually or by using a batch file.
This method is adequate to a small environment or, for a particular user’s desktop.
In an enterprise environment or in case that we want to update the Autodiscover setting for a significant amount of users’ desktop, we need a more efficient method.
In the case, we can use the powerful option of the Active Directory Group policy.
By default, the Active Directory Group policy doesn’t include a group policy that is related to the particular Outlook mail client settings.
The good news is that Microsoft enables us to download and install and Office ADMX files that include an enormous amount of office settings for each of the Microsoft Office different applications such as – Word, Outlook, etc.
Using the Microsoft Office ADMX files
Step 1: Download the ADMX file
The first step is to download the required ADMX files.
Each of the Microsoft Office versions uses an addicted version of ADMX files.
You can download the required ADMX files based on your office version by using the following links:
- Office 2021/2019/2016 Administrative Template files (ADMX/ADML) and Office Customization Tool
- Office 2013 Administrative Template files (ADMX/ADML) and Office Customization Tool
- Office 2010 Administrative Template files (ADM, ADMX/ADML) and Office Customization Tool download
Step 2: copy the ADMX file to the Active Directory GPO folder
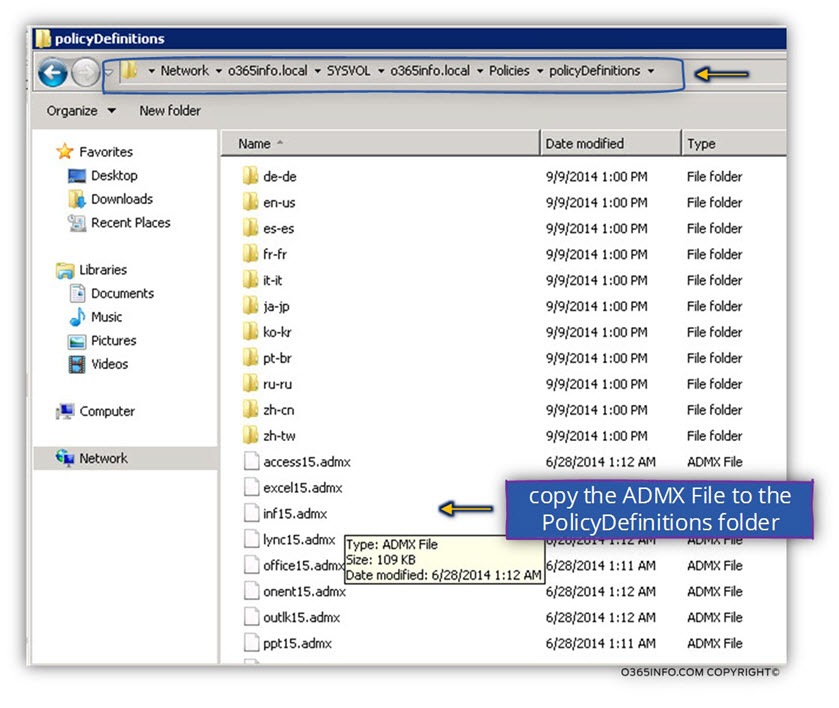
We will need to copy the ADMX file to a special SYSVOL folder. The ADMX file that we will copy to this specific folder will be replicated to all the rest of the domain controllers.
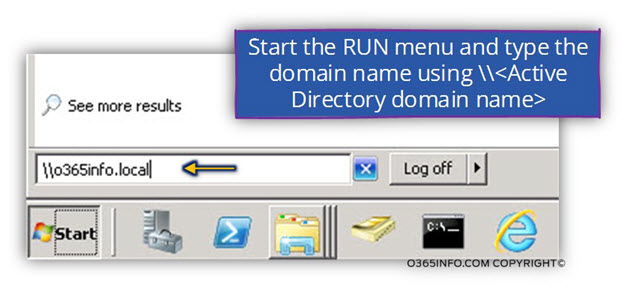
To be able to find this “GPO folder”, in the RUN menu type the name of the internal Active Directory domain name. In our example – o365info.lcoal
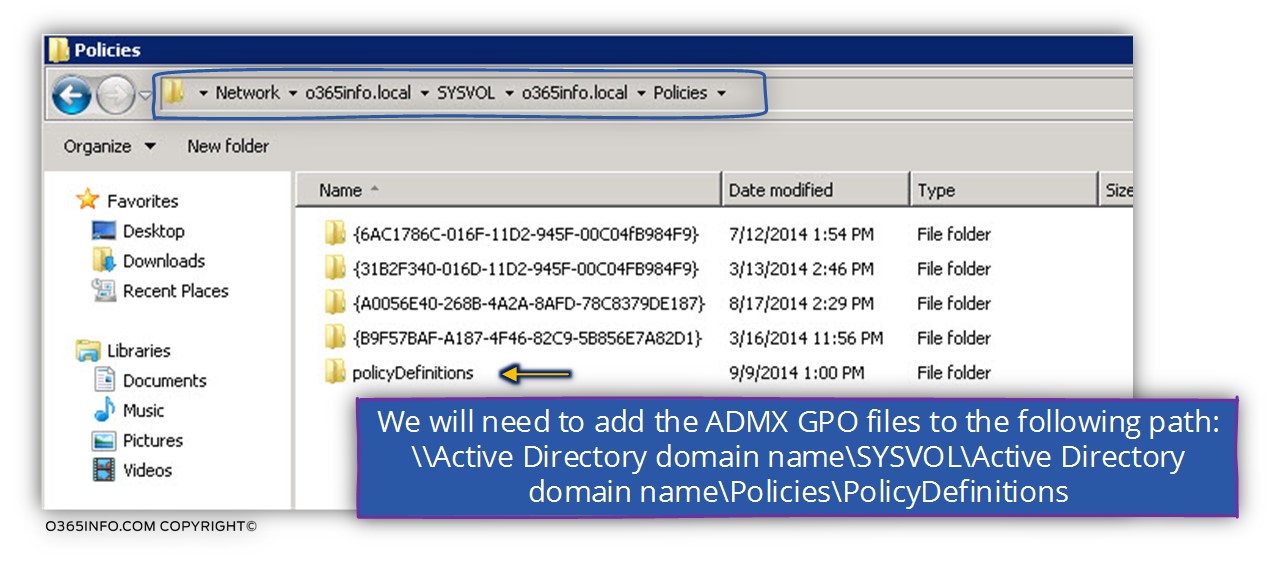
Use the following path for locating the required GPO folder:
\\Active Directory domain name\SYSVOL\Active Directory domain name\Policies\
For example:
\\o365info.local\SYSVOL\o365info.local\Policies\
The ADMX file should be saved in a special folder named- PolicyDefinitions
Create a new folder in the path and name it – PolicyDefinitions
The last step is to copy the ADMX File to the PolicyDefinitions folder
Step 3 – choosing the required Autodiscover values
After all the steps are complicated, the “content” of the ADMX file will appear as part of the Outlook existing GPO (Group policy).
To be able to manage the Outlook Autodiscover setting using GPO, edit, and existing Group Policy or create a new Group Policy.
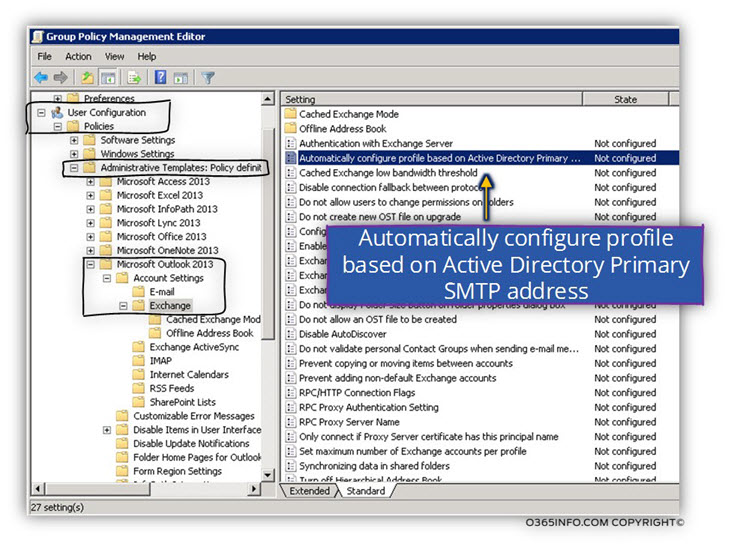
Under – User configuration ==> Administrative templates: Policy definitions (ADMX files) retrieved from a central store (Microsoft Outlook 2013 –Account Settings > Exchange)
The first GPO setting that we can choose to disable named – “Automatically configure profile based on Active Directory Primary SMTP address“
This policy setting controls whether users who joined to a domain in an Active Directory environment can change the primary SMTP address that used when they set up accounts in Outlook.
If this policy setting is enabled, users can create a new profile by entering a profile name. The profile created without using the New Account wizard. No user interface appears as the profile created, which might cause users to think that the computer has crashed.
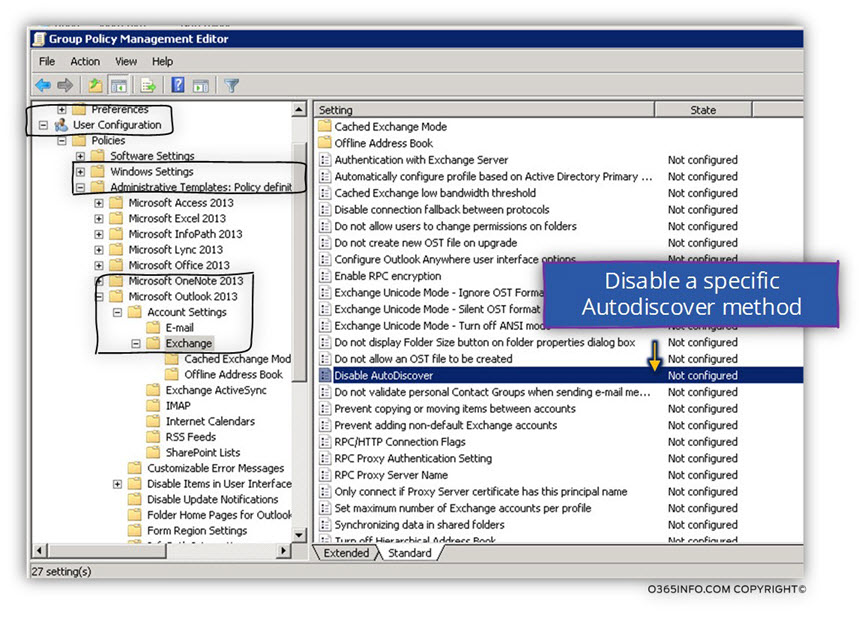
The GPO setting that contains all the existing Outlook Autodiscover methods named: Disable Autodiscover
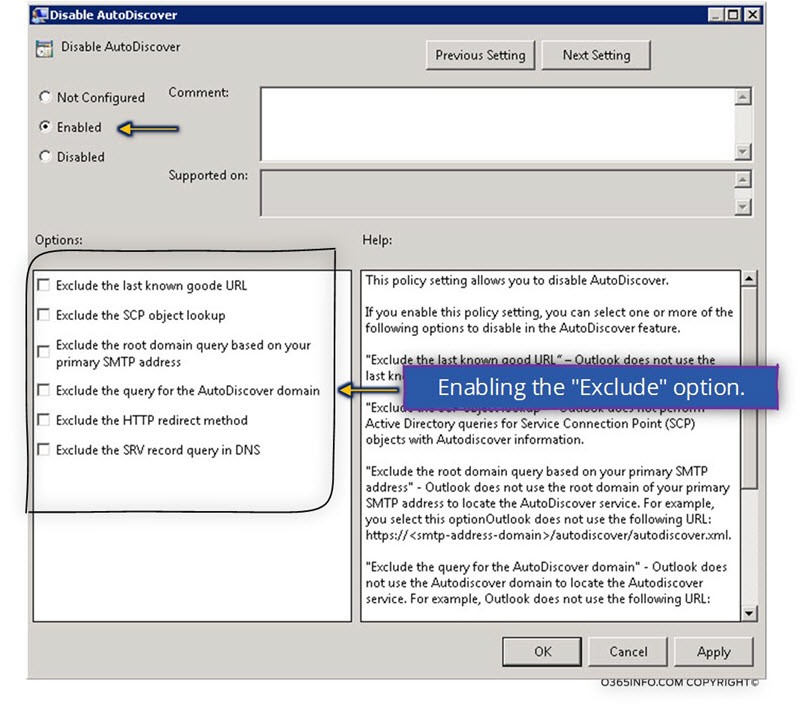
In the following screenshot, we can see all the available options that we can choose from.
Note that the setting that appears, we created for disabling the default behavior of the Outlook Autodiscover process. Selecting the required configuration is a little confusing because we are actually “enabling” a setting that will “disable something.”
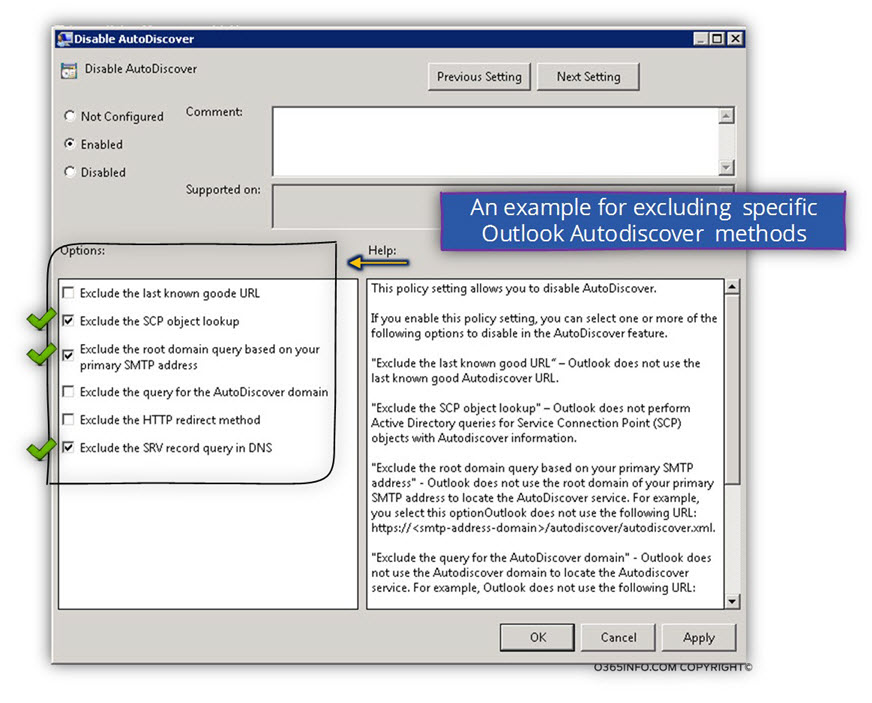
In the following screenshot, we can see an example to a scenario in which we want to turn off the following Outlook Autodiscover methods:
- Exclude the SCP object lookup (ExcludeScpLookup)
- Exclude the Root Domain query based on your primary SMTP address (ExcludeHttpsRootDomain)
- Exclude the SRV record in the DNS (ExcludeSrvRecord)

Clear and simple. Thank you very much.
Very good document!!