

In the following article and the next article (My E-mail appears as spam | The…
My E-mail appears as spam | Troubleshooting – Mail server | Part 15#17
In the current article, we will review the rest of the steps in our troubleshooting journey that relates to a scenario in which we think or suspect that:
The cause of the problem, in which “our E-mail” was identified as spam/Junk mail, is because our Exchange Online IP address paper was blacklisted. In the previous article My E-mail appears as spam | Troubleshooting – Mail server | Part 15#17, we have reviewed the required steps for “fetching” the Exchange Online IP address from the E-mail message.
The current article is dedicated to step “B”, Step “C” and step “D”.
Table of contents
- Step B – Get information about your Exchange Online infrastructure
- Step C – Fetch the information about the Exchange Online IP address
- Step D – verify if the “formal “Exchange Online IP address appear as blacklisted
- How do I know, if the IP address of the “mail server” is Office 365 Exchange Online IP address?
Step B – Get information about Exchange Online infrastructure
Get the required information about the Exchange Online server that represents our domain name (the Exchange Online hostname + IP address)
Step C – Fetch the information about the Exchange Online IP address
In this step, we will need to locate the Exchange Online server IP address. The IP address could appear as part of the NDR E-mail message or, in the case of a scenario in which we get a copy of the E-mail that sent to the junk mail folder of the destination recipient, fetch the required information from the E-mail header.
Step D – verify if the “formal “Exchange Online IP address appear as blacklisted.
This step builds on the information; we have obtained three previous steps.
Given that we have the IP address of the Exchange Online server which appears in the NDR E-mail message + that we know what is the IP address of our Exchange Online server that represents our domain name in Office 365, we can verify if the IP address that appears in the NDR is the IP address of our Exchange Online server.
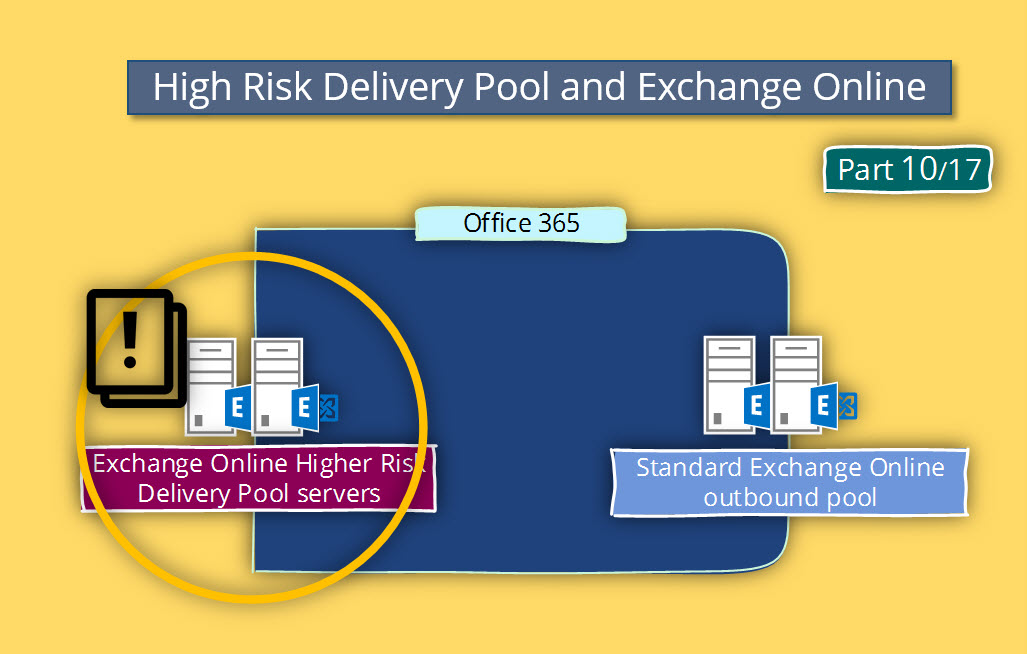
In case that the IP address is not the IP of our Exchange Online server (this is the most common scenario), it’s probably one of the IP addresses that belong to the Exchange Online High Risk Delivery Pool.

Step B – Get information about your Exchange Online infrastructure

Step 1 – get the host name of the Exchange Online server who represents our domain in Office 365.
To be able to answer the question: what is the IP address of the Exchange Online server which represents our domain? We will first need to know the “FQDN” (host name) of the Exchange Online server that serves our tenant in Office 365.
There are a two ways that we can use to get information about the FQDN of the Exchange Online that “send E-mail for our domain.”
Option 1: Office 365 administrate portal
- Login on to Office 365 administrate portal
- On the left sidebar – choose the domain menu
- Choose – Manage DNS

Under the Exchange Online section, look for information about the MX record host name (POINTS TO ADDRESS). In our scenario, the Exchange Online server who will “represent” our organization is: o365info-com.mail.protection.outlook.com
Option 2: using the nslookup tool
Another option for getting information about the “Hostname” of the Exchange Online mail server that “represent” our organization is: by using the nslookup tool.
- Open the command prompt
- Type the command: Nslookup
- Type the command: set type=mx
- Type the name of the domain that you want to display his MX record. In our scenario: com
In the following screenshot, we can see the result of our MX query.
In our example, the host name of the Exchange Online server who represents our domain is: o365info-com.mail.protection.outlook.com

Step 2 – Get the IP address of the Exchange Online server who represent our domain.
A couple of notes regarding the subject of Exchange Online and his Public IP address:
- The Exchange Online (that host name who appears in our domain MX record) is mapped to more than one IP address.
- This “IP address” represent additional Office 365 tenants besides our domain.
- In case that we suspect that our Exchange Online mail server appears as blacklisted, we will need to verify information about each of the public IP addresses that are “bind” to the Exchange Online server who represents our domain name.

To be able to get information about the IP address that is “mapped” to the hostname of the Exchange Online server which represents our domain, we can use an option such as the nslookup tool.
- Open the command prompt
- Type the command: Nslookup
- Type the host name of the Exchange Online server who represents your domain. In our example: o365info-com.mail.protection.outlook.com
In the following screenshot, we can see the results.
In our example, the “answer” is the IP address of the Exchange Online servers who represent our domain are: 213.199.154.87 and 213.199.154.23
Step C – Fetch the information about the Exchange Online IP address
In the phase, our mission is to get the IP address of the Exchange Online server who appear in the E-mail message.
The Exchange Online IP address could appear in the NDR message or in the E-mail header of the E-mail that saved in the junk mail folder of the external destination receipt.

The information about the Exchange Online mail server that sent the E-mail appears in the content of the E-mail header.
Technically speaking, we get the required information from the “raw data” in the mail header text, but this is not an easy task.
The preferred option is to use a mail header analyzer, which will help us view the information.
In our example, we will use the Microsoft tool named Microsoft Message Header Analyzer.
- Access the Microsoft Remote Connectivity Analyzer (MRCA) website
- Copy the information from the mail header.
- Choose the Message Analyzer tab
- In the section: “Insert the message header you would like to analyze” paste the information from the mail header

In the following screenshot, we can see the results. The information in the Received headers, displays a clear path through the mail flow.
We can see the Exchange Online servers that accept the E-mail from the Office 365 recipients, but this is not the “final node” in our mail flow.

The Exchange Online server (10.255.179.24) forward the E-mail message to the additional Exchange Online server (10.255.179.23) and the Exchange Online server the “deliver” the E-mail to the external recipient, is an Exchange Online server who is represented by the IP address: 157.55.234.141
Conclusion from the Message Analyzer
By analyzing the information in the E-mail header, we can see the flow of the E-mail “inside Exchange Online infrastructure.”
We can see that the E-mail “travel” between a couple or more than one Exchange Online server. The “most critical” Exchange Online server in our scenario is the “last Exchange Online server”, who is responsible for delivering the E-mail message to “her destination” (the mail server that represents the target recipient).
If you notice, in our example, the IP address of the Exchange Online server that sent out the E-mail message is – 157.55.234.141.
As mentioned, from my experience, this IP address is “belong” to the Exchange Online Higher Risk Delivery Pool.
Step D – verify if the “formal “Exchange Online IP address appear as blacklisted
In this phase, we want to verify if the IP address that appears in the NDR message that we got (or the E-mail message that sent to the junk mail folder of the destination recipient) is the “formal IP address” of the Exchange Online server which represents our domain.
Note – the scenario in which the Exchange Online IP address that represents our domain name blacklisted, is relatively rare. A more typical scenario is a situation in which the IP address that appears in the E-mail message belong to the Exchange Online- High Risk Delivery Pool IP address range.

After we got the IP address that mapped to the Exchange Online server which represents our domain, the next step is – use online tools, which will help us to check if one of the IP addresses of our Exchange Online mail server name appears as blacklisted.
In the following example, we will use a free online tool that is offered by MxToolbox.
1. Go to the MxToolbox site and choose the Blacklists menu.
2. In our example, our Exchange Online host name is mapped to the following IP address: 213.199.154.87 and 213.199.154.23
In the box: Server IP or domain we will enter the IP: 213.199.154.87
Choose: Blacklists check.

In the following screenshot, we can see the result. In our scenario, it appears that the IP address of our mail server (o365info-com.mail.protection.outlook.com) is “green and clean” meaning; the domain IP Address doesn’t appear in well-known blacklists.

The scenario in which the “formal IP address” of the Exchange Online server which represents our domain name could consider as a rare situation.
In case that you experienced the above scenario, the only available option is to report this problem to the Office 365 technical support.
Get more information about the Exchange Online IP address
Just a short recap about the troubleshooting path that we’ve been through so far:
- We got an NDR message which informs us that our mail server is blacklisted.
- We have already verified that our “formal Exchange Online IP address” doesn’t appear as blacklisted.
- We have “fetch” from the NDR message the IP address that is blacklisted.
- We want to get more detailed information about this particular IP address.
In this phase, we can assume that the IP address that appears in the NDR belong to the Exchange Online- High Risk Delivery Pool IP range. To be able to validate our hypothesis, we can use the information about the public IP range of Office 365 and Exchange Online that was published by Microsoft.
How do I know, if the IP address of the “mail server” is Office 365 Exchange Online IP address?
Microsoft publishes a set of articles that include detailed information about the public IP range and the URL address of all Office 365 infrastructures.
The main article or the index for all the different Office 365 infrastructure is an article: Office 365 URLs and IP address ranges
This article includes detailed information about all the “different parts and infrastructures” of Office 365 such as – Exchange Online, EOP (Exchange Online Protection), SharePoint Online, Lync Online, etc.
In our scenario, our main interest is regarding the Exchange Online public IP range and the EOP (Exchange Online Protection) public IP range.
In the following screenshot, we can see an example of the information about the public IP range of EOP (Exchange Online Protection).

In case that the IP address that displayed in the NDR is not our “formal Exchange Online IP address”, and in event that the IP address appears in the “Office 365 and Exchange Online” public IP range, you cannot be sure 100 percent that the IP address belongs to the Exchange Online High Risk Delivery Pool, but It is very likely to assume.
In this case, we already know, that the issue is not related to a problem with the IP address of the Exchange Online server, but instead, to the E-mail message content that was sent by our organization user.
The E-mail address in the NDR doesn’t appear in the Office 365 public IP range.
This scenario is relatively rare, but I think that it’s important that you will be aware of all the possible scenario and tools that you can use in the different scenarios.
The charters of this scenario are as follows:
- The NDR message that we got informed us that our mail server is blacklisted. The IP address in the NDR is not the formal IP address of the Exchange Online that Representative our domain.
- We have performed a search for the IP address in the NDR in the public IP address range of Office 365 and Exchange Online by using the article Office 365 URLs and IP address ranges
- And we didn’t find the IP address.
The main question now is: who is the “owner” of the IP address that appears in the NDR message?
To be able to get the required answers, we can use a public site that can provide us information about the owner of the public IP address.
Using a public website that can provide is information about the “owner” of a Public IP address.
As mentioned, an additional option that we can use to get information about a particular public IP address is by using different free services.
In the following example, we will use a website named: https://db-ip.com/
In the following screenshot, we can see the result of the query for the IP address that appears in our results when using the mail header analyzer forms the previous step:
What Others Are Reading


This Post Has 0 Comments