The article is all about the subject of the security mechanism that is implemented as…
Microsoft Remote Connectivity Analyzer (ExRCA) | Autodiscover troubleshooting tools | Part 2#4 | Part 22#36
In the current article, we will learn to know the ExRCA also known as Microsoft Remote Connectivity Analyzer (MRCA) web-based tool, that serves as the name implies for testing and analyzing information that is related to “relationships” of different Exchange clients with their Exchange server.
Table of contents
- Microsoft Remote Connectivity Analyzer (MRCA)
- Autodiscover in Active Directory environment vs. Autodiscover in a non-Active Directory environment
- Exchange On-Premise infrastructure vs. Exchange Online and Office 365 infrastructure
- Microsoft Connectivity Analyzer Tool | Testing different Exchange services
- Performing – Microsoft Office Outlook Connectivity Tests | Outlook Autodiscover
- Analyzing the results from the – Outlook Autodiscover test
- An Autodiscover flow – mixture of events of success and failure | Reviling the mystery
- Saving the ExRCA test results for further Analysis
Microsoft Remote Connectivity Analyzer (MRCA)
Q: What is the purpose of the – Microsoft Remote Connectivity Analyzer (MRCA)?
A: The Microsoft Remote Connectivity Analyzer is actually a “collection of web-based tools” that enable us to simulate the communication channel between the different Exchange client and a different environment. For example – Exchange on-Premises vs. Exchange Online and additional troubleshooting tools that are not directly real ties to the Exchange client such as the message analyzer tool.
Over the years, the Microsoft Remote Connectivity Analyzer web-based tool evolved into a very useful and “must know” tool, which every Exchange on-Premises or Exchange Online administrator should be familiar with.
In the current article, we will learn to know and understand the interface and the logic, if the Microsoft Remote Connectivity Analyzer Tool but it’s important to emphasize that we will use only a very particular tool from the variety of the tools that the Microsoft Remote Connectivity Analyzer includes.
Our main focus is on the specific test named – Microsoft Office Outlook Connectivity Tests | Outlook Autodiscover
In the current article, we will not review in details the Autodiscover flow details that appear in the Microsoft Remote Connectivity Analyzer Tool test results, but instead, I will examine only the general concepts such as – how to read the results, the logical structure of the test results, etc.
Autodiscover in Active Directory environment vs. Autodiscover in a non-Active Directory environment
Vs. an Autodiscover troubleshooting tool such as the Outlook Test E-mail AutoConfiguration tool that knows how to “perform” in the two different environments, the Microsoft Remote Connectivity Analyzer Tool as the name implies (Remote Connectivity), know how to inspect and analyze the Autodiscover flow that is implemented in a non-Active Directory environment.
In simple words, we can use the Microsoft Remote Connectivity Analyzer Tool for Autodiscover troubleshooting scenario in case of an “external mail client” that tries to access a Public facing Exchange server.

Exchange On-Premise infrastructure vs. Exchange Online and Office 365 infrastructure
The Microsoft Connectivity Analyzer Tool can be used for testing Exchange client remote access in a scenario in which the user mailbox hosted on Exchange on-Premises infrastructure or, Exchange Online infrastructure.
In the following screenshot, we can see the web interface of the Microsoft Connectivity Analyzer Tool.
1. Different Exchange environments
The test that offered by the Microsoft Connectivity Analyzer Tool can implemented by testing an Exchange on-Premises environment vs. Office 365 (Exchange Online) environment.
We can see that the test different options are “grouped” by using a different tab.
- A – Under the “Exchange Server” tab, we can find all the available tests that can be used when we need to test the Exchange On-Premise services.
- B – Under the “Office 365” tab, we can find all the available tests that can be used when we need to test the Exchange Online infrastructure.

2. Different type of remote connectivity test
In the following screenshots, we can see that the Autodiscover connectivity test appears under the “Exchange server” tab (Exchange on-Premises).
For example, we can implement a connectivity test for Outlook (RPC\HTTPS) mail client, ActiveSync (mobile Exchange client), etc.

Note that under the section – “Microsoft Office Outlook Connectivity Tests”, we have two different connectivity tests.
For example, there are two different types of – Outlook connectivity tests.
- Outlook Autodiscover – test the Autodiscover flow and infrastructure that is implemented by Outlook client.
- Outlook Connectivity – a “combined” test that includes the Autodiscover remote connectivity test + the RPC\HTTPS remote connectivity test.

3. Microsoft Connectivity Remote Analyzer Tool and Office 365 environment
As mentioned, Microsoft Connectivity Remote Analyzer Tool enables us to test the Office 365 environment and the Exchange on-Premises environment.
The test that can implement in the Exchange on-Premises environment also exists for the Office 365 environment but, the Microsoft Connectivity Analyzer Tool includes additional tests that are relevant only to Office 365 environment.
Microsoft Connectivity Analyzer Tool | Testing different Exchange services
As mentioned, the Microsoft Connectivity Analyzer Tool includes many types of “Exchange tests.”
For example:
- Microsoft Office Outlook Connectivity Tests – a connectivity test that inspects Outlook client session that uses the Outlook Anywhere service. This test examines the complete communication process that based on the Autodiscover services and then moves on to the “next layer”, to the course of creating the RPC\HTTPS communication link.
- Microsoft Exchange ActiveSync Connectivity Tests – enable us to simulate the connectivity session between mobile clients that use the ActiveSync protocol.

In the following screenshot, we can see that the “interface” of Office 365 environment include seven different connectivity test vs. the Exchange on-Premises tab that includes four connectivity tests.

4. Another type of connectivity tests
The Microsoft Remote Connectivity Analyzer Tool includes a test for additional Microsoft infrastructures such as – Lync On-Premise, Lync Online and, SSO (Single Sign-on) services such as ADFS.

In the following screenshot, we can see that there are additional “tabs” beside the test that relate to Exchange.

5. The “test client” Microsoft Remote Connectivity Analyzer Tool | The “Host” that perform the test
The subject of the “Host who performs the test” is an imperative issue and a little confusing.
The Microsoft Remote Connectivity Analyzer Tool is a Microsoft public server whom we can use for simulating access to various exchange services such as Autodiscover.

It is paramount that we understand the specific charters of the Microsoft Remote Connectivity Analyzer Tool because, the way that the Microsoft Remote Connectivity Analyzer Tool performs the Autodiscover test will not cover every possible scenario.
When we face an Autodiscover troubleshooting scenario, we cannot be sure if the problem is related to:
- A particular user’s desktop from which the user tries to access the Autodiscover Endpoint.
- A particular network from which the user attempts to access the Autodiscover Endpoint.
- A “general problem” in the Autodiscover infrastructure that affects all the “external mail client” that needs to access their Autodiscover Endpoint.
The Microsoft Remote Connectivity Analyzer Tool implemented by using a public Microsoft server that performs the different connectivity tests.
The “Public server” server for simulating Exchange client sessions with the Exchange server.
We should be aware of the important fact that the Microsoft Remote Connectivity Analyzer Tool Autodiscover test can be used only for testing a very specific scenario, a scenario in which the Exchange client (Autodiscover client) is addressing the “public interface” of the Exchange server.
In other words, a scenario in which the Exchange client located on a public network and the Exchange server configured as Public facing Exchange server.

The option of testing the Autodiscover flow from “external Exchange client” is suitable for many scenarios, but in some Autodiscover troubleshooting scenarios, we will need to perform the Autodiscover connectivity test from a “different direction”.
The meaning is – performing the Autodiscover test by using a particular user desktop or performing the Autodiscover test from a specific network such as the organization’s private network.
In case that we want to perform the Autodiscover test from an internal network or, from a specific network in which the Exchange client located, we can download and install the – “Microsoft Connectivity Analyzer client”.
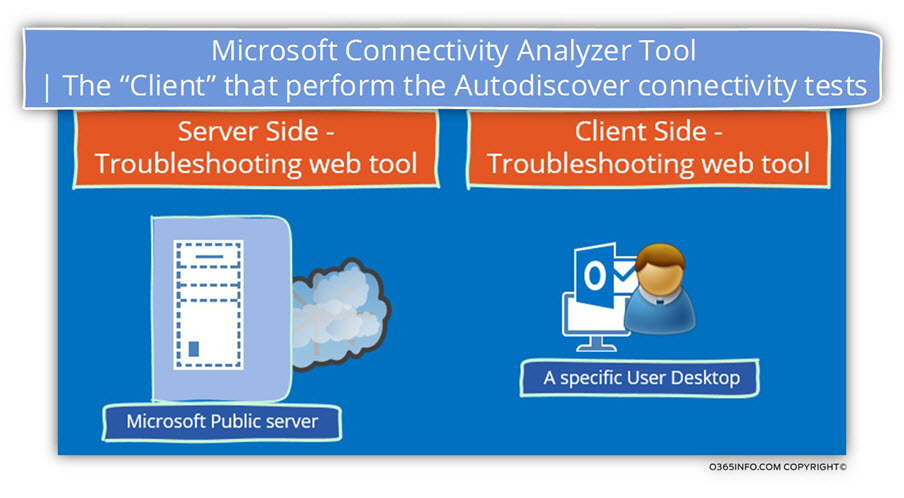
In the following screenshot, we can see the “client tab” that we can use for downloading the: Microsoft Connectivity Analyzer client.

Performing – Microsoft Office Outlook Connectivity Tests | Outlook Autodiscover
To be able to demonstrate the use of Microsoft Remote Connectivity Analyzer Tool, we will choose to perform the Outlook Autodiscover test.
Scenario description
The characters of our scenario are as follows:
The public domain name of the organization is – o365info.com
A user named John that is located in the external\public network, wish to create a new Outlook mail profile. The John E-mail address is – John@o365info.com
We want to verify that the Exchange On-Premise server was “published” correctly, and that is accessible and available for “external client.”

Performing the Outlook Autodiscover test
To verify the required Autodiscover setting in our Exchange On-Premise server we will use the following steps:
1. Access the Microsoft RCA – Remote Connectivity Analyzer Tool by using the following URL: https://testconnectivity.microsoft.com/
Small tip – if you if you have trouble remembering the “complete URL address” you can open any search engine and type the word – ExRCA.
The first result that will appear in the search result will “lead you” to the Microsoft RCA – Remote Connectivity Analyzer page.

2. Click on the Exchange Server tab and under the Microsoft Office Outlook connectivity test, choose the option – Outlook Autodiscover
3. On the bottom right corner, click on the Next option

In the following screen, we will need to provide the “user credentials”.
The credentials will used by the ExRCA for “impersonating himself” to an Exchange client, try to connect the Exchange On-Premise server, complete the Autodiscover process and get the required Autodiscover response.
1. Email address – enter the recipient E-mail address. In our scenario, the recipient E-mail address is – John@o365info.com
2. Domain \User name (or UPN) – in this box we need to provide the On-Premise Active Directory or domain user credentials. Most of the time, the “standard convention” is based on the format of – <Domain name>\<User name>
(To be more accurate only the left part of the internal Active Directory domain name).
In case that the On-Premise Active Directory user account was also configured with a public domain name suffix, the authentication can be performed by using the UPN (User Principal Name) naming convention. For example – John@o365info.com
In our scenario we will use the standard naming convention – o365info\john
3. Password – this is the “domain user password”, meaning the password that the user use when he login to the corporate domain.
4. Approval for the Autodiscover test – choose the option of:
I understand that I must use the credentials of a working account from my Exchange domain to be able to test connectivity with it remotely. I also acknowledge that I am responsible for the management and security of this account.
This is a mandatory requirement.
When choosing this option, we are approving that we “trust Microsoft” (we provide the ExRCA server our “secret” the private domain user credentials).
5. Verification – we will need to complete the verification process by re-type the letters that appear (this is how Microsoft verifies that we are a human factor and not a malicious code).
To complete the process click on the verify button

In the next screenshot, we can see that the verification process completed successfully.
To start that Autodiscover test, click on the Next option

Analyzing the results from the – Outlook Autodiscover test
This is that part in which the ExRCA “shine”.
I know that it may be sound “Geek” but, I think that the ExRCA is doing an excellent job in presenting the “findings” in a very clear a “human-like” way.
For myself, I have solved many “Autodiscover problems” using these tools that provide me a clear and informative information about the Autodiscover process.
RCA – Remote Connectivity Analyzer Tool results structure and logic
At first glance, the result that provides by the – Remote Connectivity Analyzer Tool, look a little messy.
For this reason, it’s important that we will understand the way that the ExRCA use for displaying the results.
An Autodiscover process consists of several parts.
The results include a dedicated part for each of the “part” or the “step” that involved in the Autodiscover process.
In the begging of each “section”, we can see the task and the result (success or failure) and beneath the header, we can see a detailed description for each of the “sub-steps” that implemented and the result (success or failure).
ExRCA Results interface
This part in which we review “how to read” the displayed results of the ExRCA Autodiscover connectivity test, can seem “unnecessary” but despite the fact that everyone knows to use the result, it’s important to spend a minute on understanding the way that the ExRCA Results are displayed.
Because the Autodiscover process or flow can be relatively straightforward or contain an enormous amount of information, the ExRCA uses the method of – “expand and collapse”.
The logic is based on a “Hierarchy concept” starting with the “first level” of information and the ability to view (expand) each of the sub-processes or tests that implemented in the Autodiscover test.

A metaphor that we can use is the “Russian babushka”.
The first “babushka” can be open and inside, we can find another babushka when we open the babushka that is inside, we can get another babushka and so on.
The same logic implemented on the ExRCA Autodiscover test result.
Each of the steps can expanded so we can see the content of the additional steps that included in the “father step” and so on.
To demonstrate the “Hierarchy concept” of the ExRCA Results interface, let’s use an example of ExRCA Autodiscover test results that simulate Autodiscover access to an
on-Premises, Public facing Exchange CAS server.
Level 1
At this level, we can see a “clear answer” for the ExRCA Results. In our example, the test completes successfully.

Level 2
When choosing the option of -”expand” under the Test Steps, we can see “additional level” of information.
In our example, we can see that the Autodiscover test was started by looking for the host named o365info.com and, the result is – failure.
The next Autodiscover test, was performed using the host named
autodiscover.o365info.com and the result is – Success

Level 3
The next level (“Level 3”) is the level in which we can review all the steps that included in the Autodiscover flow.

In the following diagram, we can see the logic of the displayed results.
In the following screenshot, we can see a short description for each of the steps that included in the Autodiscover process.
Step 1: described as – Attempting to resolve the host names autodiscover.o365info.com in DNS.
Step 2: described as – Testing TCP port 443 on host autodiscover.o365info.com to ensure its listening and open”.
Step 3: described as – Testing the SSL certificate to make sure it’s valid.
Step 4: described as – Checking the IIS configuration for client certificate authentication.
Step 5: described as – Attempting to send an Autodiscover POST request to potential Autodiscover URLs.

Level 4
This is the “deepest level” of information that enables us to take a more in-depth look at the particular Autodiscover step.
In the following example, we have expanded the “Name resolution” steps in which the Autodiscover client accesses the DNS server and asks for the IP address of the Autodiscover Endpoint.
In our scenario, we can see that the IP address that returned to the client is: 212.25.80.239 and, the “round trip” time that took to complete the process is: 221 ms

An Autodiscover flow – mixture of events of success and failure | Reviling the mystery
One of the most confusing issues in a standard Autodiscover flow can described as – the mixture of events of success and failure.
An additional confusing issue is – the ExRCA result which can describe as – “Connectivity Test Successful with Warnings.”
The “confusion” is that it’s not clear if the test was completed successfully or not. In other words, no option of getting a clear white\black answer.
When looking at the screenshot, we can see that the icon of the test result is green, but at the same time, we can see that we see a yellow icon with an exclamation mark.
So the most obvious question is – is it good or bad?
Can we understand that our Autodiscover infrastructure configured correctly or, we need to fix some issues?
The simple answer is – “Yes, this is good”.
The reason for the notification of – “Test Successful with Warnings” is that the Autodiscover process based on a concept of trial and error.

While looking for the “final result”, the Autodiscover client is programmed to execute a couple of methods and 99% of the time, some of this “methods” or tests will fail.
What matter is the “result” that answers the question – did the client was able or not able to find the “answer,” meaning – the Autodiscover response.
The reason for the yellow icon with an exclamation mark are as follows:
1. Root domain
The most popular cause for the result – “Test Successful with Warnings” is, that be default, the Autodiscover client is programmed to look for the Autodiscover Endpoint by “extracting” the domain name from the recipient E-mail address (the “right part” that includes the recipient SMTP domain name) and create a DNS query using the “domain name” as the Host name.
For example, in the case that the recipient name is – John@o365info.com, the Autodiscover client such as Outlook, will create a DNS query looking for the hostname – o365info.com
Most of the time, this method will fail, because it’s a very rare scenario in which the organization public domain name is “mapped” in the DNS for the IP address of the Exchange server.
The outcome is the most of the time the first step in the Autodiscover process will appear as “failed”.
Generally speaking, the method of – “looking for the hostname of the Autodiscover Endpoint using the root domain name” can even cause minor or major problem.
In case that the organization uses a public website and additionally maps the address of the domain name of the website, the Autodiscover client will get a “positive answer” from the DNS regarding the IP address of the Root domain name. When he tries to communicate with the “Apparent Autodiscover Endpoint” using HTTPS, the communication will fail.
So, besides of the time that spent in implementing this method, there’s no harm.
In fewer good scenarios, in case that the “destination host” (the website) has a problematic certificate such as a certificate that her date was expired and so on, the Autodiscover client will stop the Autodiscover process because the Autodiscover client “understand” that there is a problem with the Autodiscover Endpoint.
To be honest, I think that the Autodiscover method of – “looking for the hostname of the Autodiscover Endpoint using the root domain name” should removed because, for myself, I cannot see any advantage to using this method.
An example of looking for the hostname of the Autodiscover Endpoint using the root domain name
In the following screenshot, we can see an example of the ExRCA test results:
The Autodiscover client connects the DNS server looking for the IP address of the root domain name (o365info.com in our example), get the IP address of the hostname-
Attempting to resolve the host name o365info.com in DNS. The host name resolved successfully. IP addresses returned: 104.28.12.85, 104.28.13.85
When the Autodiscover client tries to check if the host is “listing” to HTTPS communication, the test fails, because the destination host, cannot communicate using HTTPS.
The results in the ExRCA appear as-
Testing TCP port 443 on host o365info.com to ensure it’s listening and open. The specified port is either blocked, not listening, or not producing the expected response.

2. Certificate chains
An additional reason for the result of – “Test Successful with Warnings” is the process that described as – ”testing the Certificate chains”
The Autodiscover client, request from the Autodiscover Endpoint to prove his identity, by providing a certificate.
The public certificate infrastructure built upon a hierarchical concept.
The public server certificate provided by a “higher authority” and, many times, the “higher authority” is a subordinate of additional “higher authority”.
In this scenario, there at least “two elements” that are involved – the element that provides the certificate (described as CA- Certificate Authority) and the “client that uses the certificate” (Exchange server for example).
Part of the security test that Autodiscover client will perform is – check the “element” which provides the certificate meaning the CA and the CA certificate.
The ability of the Autodiscover client of – verifying the CA certificate, is based on the assumption that the CA is “well know” and that the client (the Autodiscover client) has the CA certificate in his certificate store.
When we perform the Autodiscover test by using the ExRCA tool, even when the phase of – “testing the Certificate chains” is completed successfully, the ExRCA tool notifies us that the fact the “he” (the ExRCA), manage to verify the certificate chains. This doesn’t mean that a “user desktop” will also manage to complete the certificate chains test successfully because these depend on the particular desktop certificate store.
When looking at the ExRCA test results, we can see this type of notification:
Analyzing the certificate chains for compatibility problems with versions of Windows. Potential compatibility problems identified with some versions of Windows. Additional Details
The Microsoft Connectivity Analyzer can only validate the certificate chain using the Root Certificate Update functionality from Windows Update. Your certificate may not be trusted on Windows if the “Update Root Certificates” feature isn’t enabled.
Just to recap, despite the fact that the Autodiscover phase of testing the certificate chains appears with a yellow exclamation mark, the issue is not a problem, and there is nothing that we can do to avoid from this information to appear in the Autodiscover test results.
Saving the ExRCA test results for further Analysis
The test result that we get from using the ExRCA tool can be used for real-time analyses or, for sending the data to a technical support team that (such as the Office 365 support team) for continued analysis.
The ExRCA tool, enable us to save the result from the Autodiscover test, using three different options:
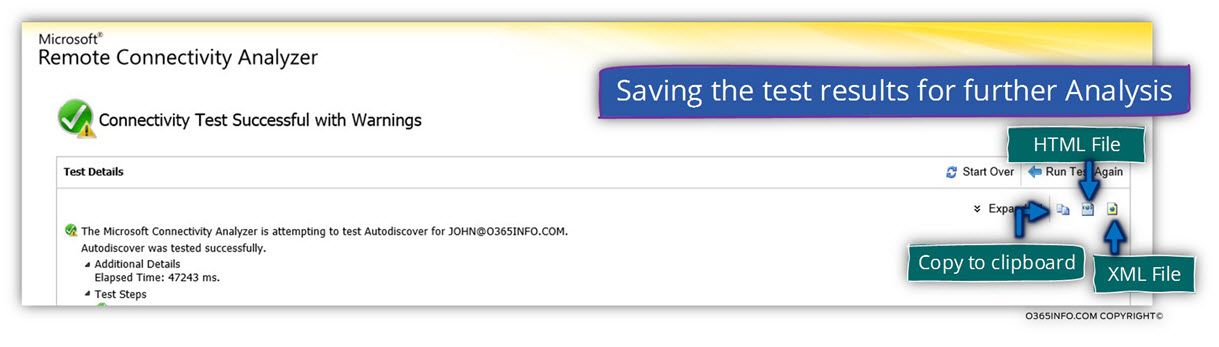
1. Copy to clipboard
This option will copy the ExRCA test result to the local desktop clipboard using an XML format. Personally, I prefer the other method such as – saving the Autodiscover test result, to an HTML format because the reading of the result is much clearer.
2. Save the result to HTML file
This is my prefer method. The option of saving the ExRCA test result HTML file is identical to the result that appears on the screen. The use of the green and red icons, unable to find “area of problems” very easily and additionally, the option of “expand and collapse” enable us to navigate through the data very easily.
3. Save the result to XML file
The possibility of saving the data into an XML format is interesting because when using the option of XML, we can use tools such as Microsoft Excel for “presenting” the data in a custom format.
In case that we save the ExRCA Autodiscover test result in an XML file format, and we use Excel for opening the XML file, the following message will appear – “please select how you would like to open this file.”
We will choose the option of – As an XML table

In the next popout window click OK

In the following screenshot, we can see the results.
Excel “know” how to put the XML data in a table format, and, we can use Excel option such as Filter for showing or hiding specific “data.”

An additional option is to open the XML file using an advanced text editor such as Notepad++
In the following screenshot, we can see the result of opening an XML file with Notepad++. We can see that the Text editor “understand” the particular XML format and display the data using a color, Hierarchy of XML tags, etc.

What Others Are Reading

This Post Has 0 Comments