You can manually assign licenses to single or multiple users in the Microsoft 365 admin…
Import PST file into Microsoft 365
Your organization has switched to Exchange Online and needs to migrate its old emails to the new Microsoft 365 account. To get the old emails, we need to create a PST file and import it into the cloud-based Microsoft 365 mailbox. This article will show you how to import a PST file using the Azure Storage Explorer tool into Microsoft 365 mailbox.
Table of contents
How to import PST files into Microsoft 365 account
We want to move multiple mailboxes from an organization server to the new cloud-based Microsoft 365. There are different methods, depending on the size (GB) and how many PST files you need to migrate to Microsoft 365.
We will show you the steps to import multiple PST files (max. 20 GB) into Microsoft 365 mailboxes.
1. Assign Mailbox Import Export role
You must assign the Mailbox Import Export role in Exchange Online to import PST files into user mailboxes. Otherwise, you cannot create a new import job in the Microsoft Purview compliance portal.
Assign Mailbox Import Export role in Exchange Online:
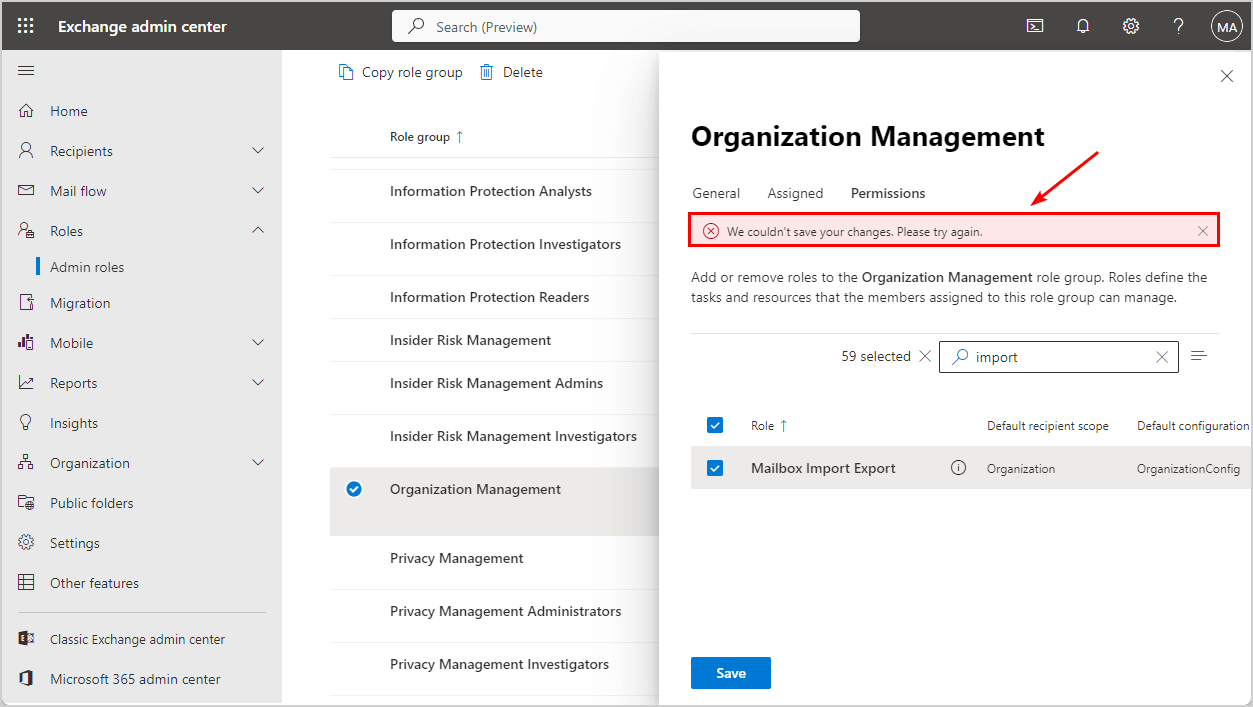
- Sign in to Exchange Admin Center
- Click on Roles > Admin roles
- Select Organization Management
- Click on the tab Permissions
- Type import in the search bar
- Select Mailbox Import Export role
- Click Save

Note: Once you save, the changes can take up to 24 hours to apply. Most of the time, it will work within 1 hour.
Suppose you get the below error after clicking Save.
We couldn’t save your changes. Please try again.
The best alternative way to assign the Mailbox Import Export role is with PowerShell.
1. Connect to Exchange Online PowerShell and sign in with your Microsoft 365 global administrator credentials.
2. Run the Enable-OrganizationCustomization cmdlet.
Enable-OrganizationCustomizationSuppose your organization already has customization enabled, you get an error message that the operation is not required.
PS C:\> Enable-OrganizationCustomization
Write-ErrorMessage : |System.InvalidOperationException|This operation is not required.
Organization is already enabled for customization.
At C:\Users\Admin\AppData\Local\Temp\tmpEXO_si2e2btd.nw1\tmpEXO_si2e2btd.nw1.psm1:1120
char:13
+             Write-ErrorMessage $ErrorObject
+             ~~~~~~~~~~~~~~~~~~~~~~~~~~~~~~~
    + CategoryInfo          : NotSpecified: (:) [Enable-OrganizationCustomization], InvalidOperationException
    + FullyQualifiedErrorId : [Server=DB9PR02MB7211,RequestId=5c81aa66-1041-a480-31fa-1dd2bf91e3c5,TimeStamp=Fri, 14 Apr 2023 08:58:26 GMT],Write-ErrorMessage
Note: Wait a few minutes before the above change is applied to the Exchange Online servers. Otherwise, the next command will fail.
3. Run the New-ManagementRoleAssignment cmdlet.
New-ManagementRoleAssignment -Role "Mailbox Import Export" -SecurityGroup "Organization Management" -Name "Import Export Org Management"PowerShell result:
PS C:\> New-ManagementRoleAssignment -Role "Mailbox Import Export" -SecurityGroup "Organization Management" -Name "Import Export Org Management"

Name                          Role                   RoleAssigneeName         RoleAssigneeType  AssignmentMethod  EffectiveUserName
----                          ----                   ----------------         ----------------  ----------------  -----------------
Import Export Org Management  Mailbox Import Export  Organization Management  RoleGroup         Direct
2. Create new PST import job
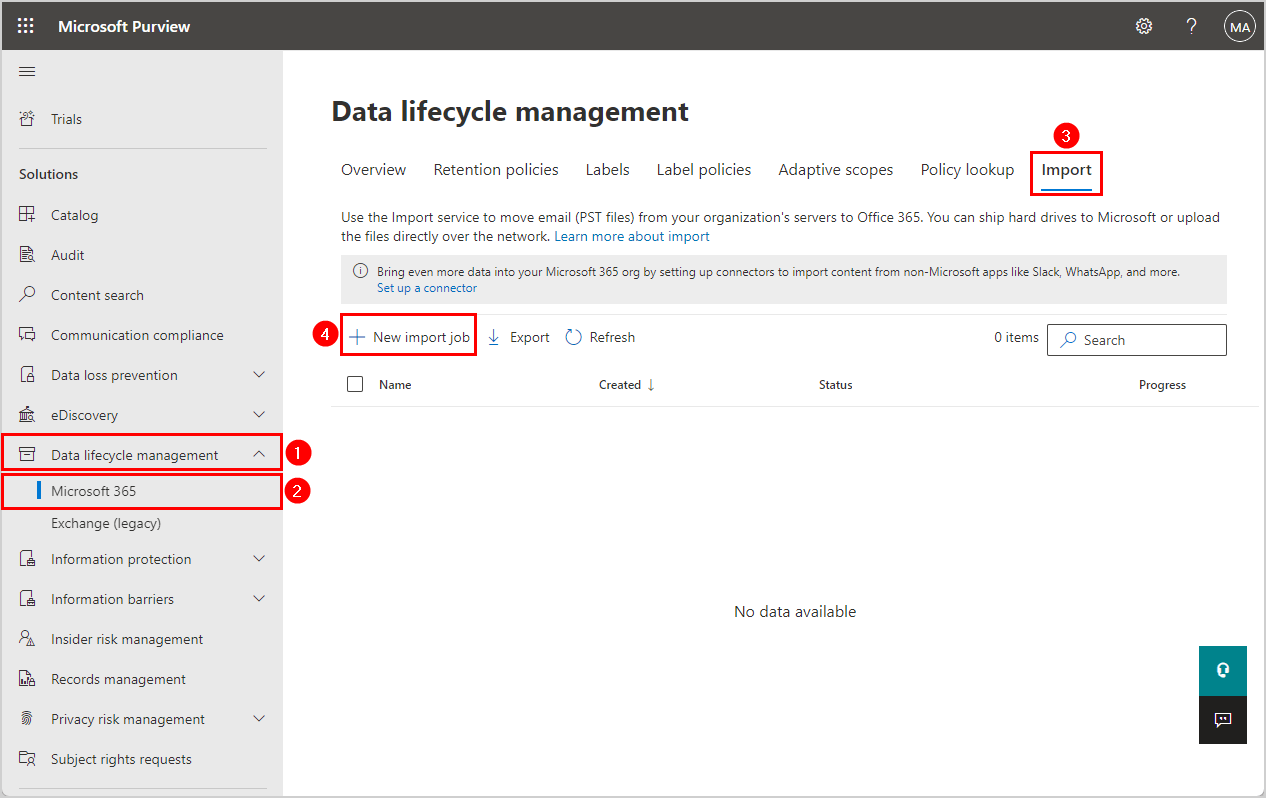
To create a PST import job in the Microsoft Purview compliance portal, follow these steps:
- Sign in to Microsoft Purview compliance portal
- Click on Data lifecycle management > Microsoft 365
- Choose Import
- Click New Import Job
If you don’t see a New import job, then the changes in the previous steps are not yet applied. There will be a yellow message like the one below.
Note: To create import jobs, you must be assigned the Mailbox Import Export role in Exchange Online. After this role is assigned, it might take up to 24 hours before you can start creating jobs.
Wait until the above warning removes so you can perform the above step.
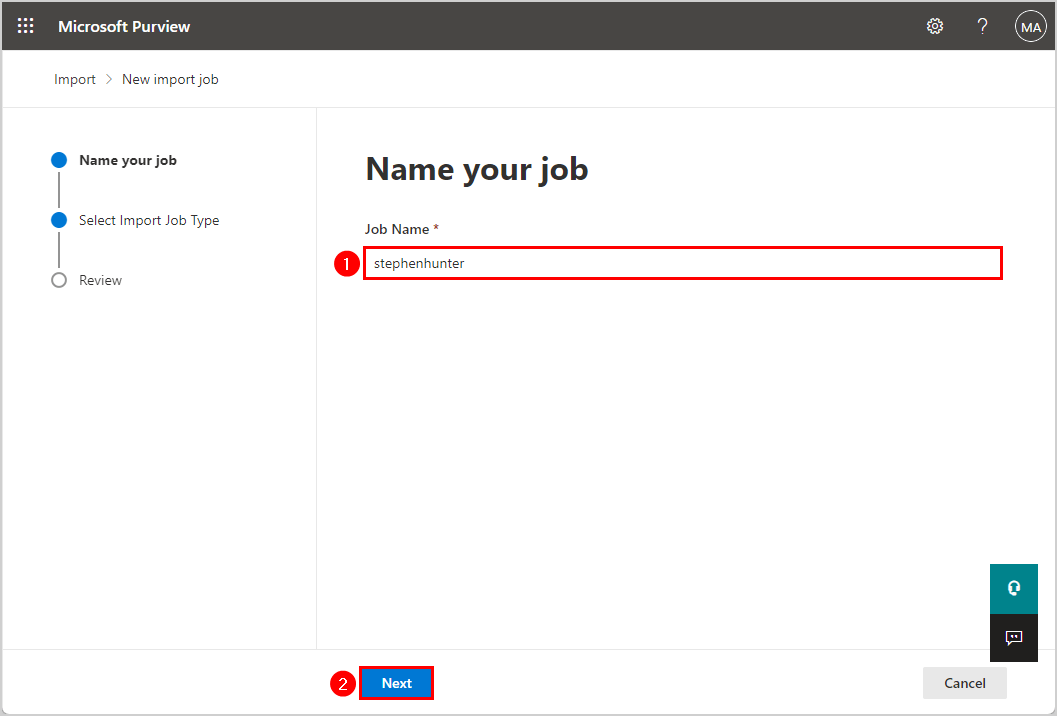
- Give the import job a name, e.g. stephenhunter
- Click Next
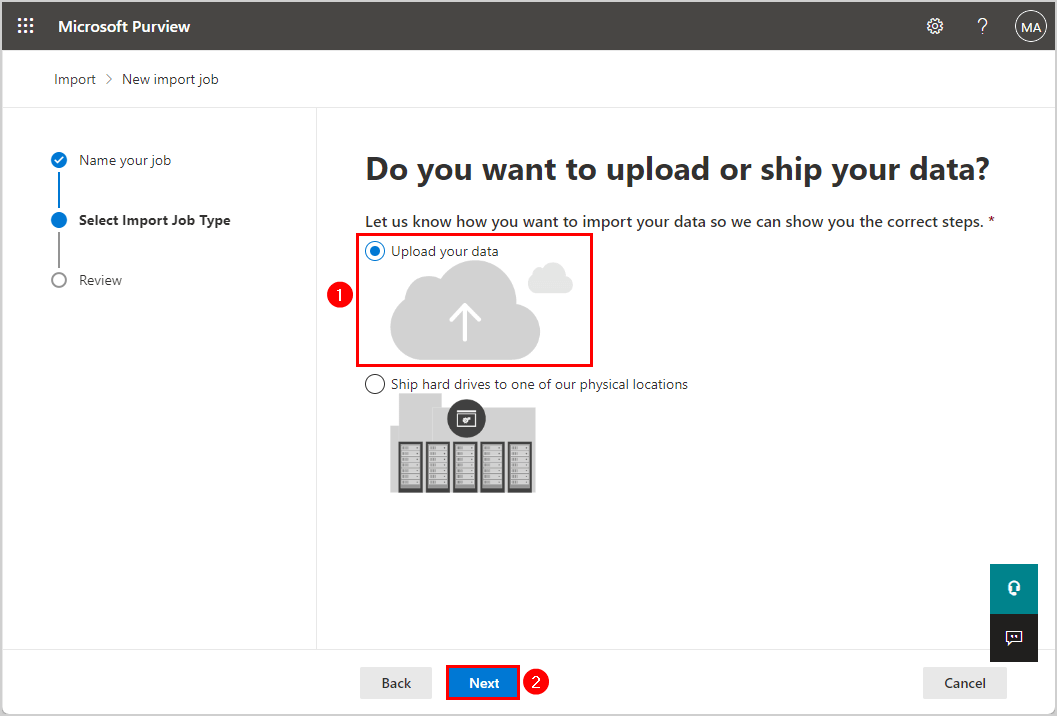
- Select Upload your data
- Click Next
- Click on Show network upload SAS URL
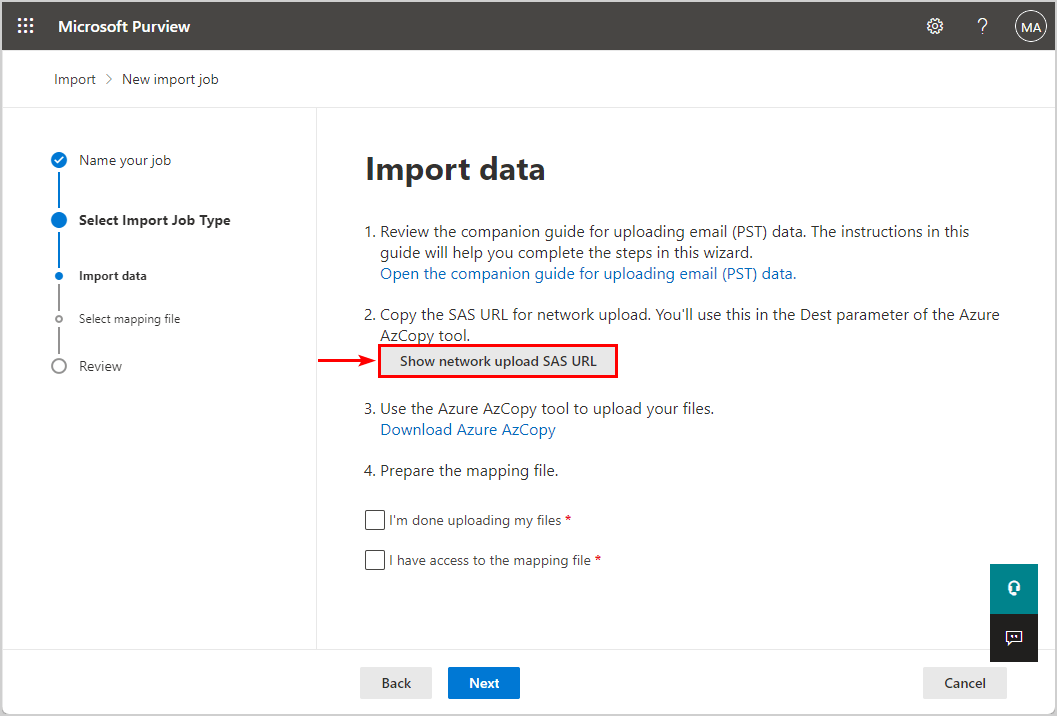
- Click on Copy to clipboard
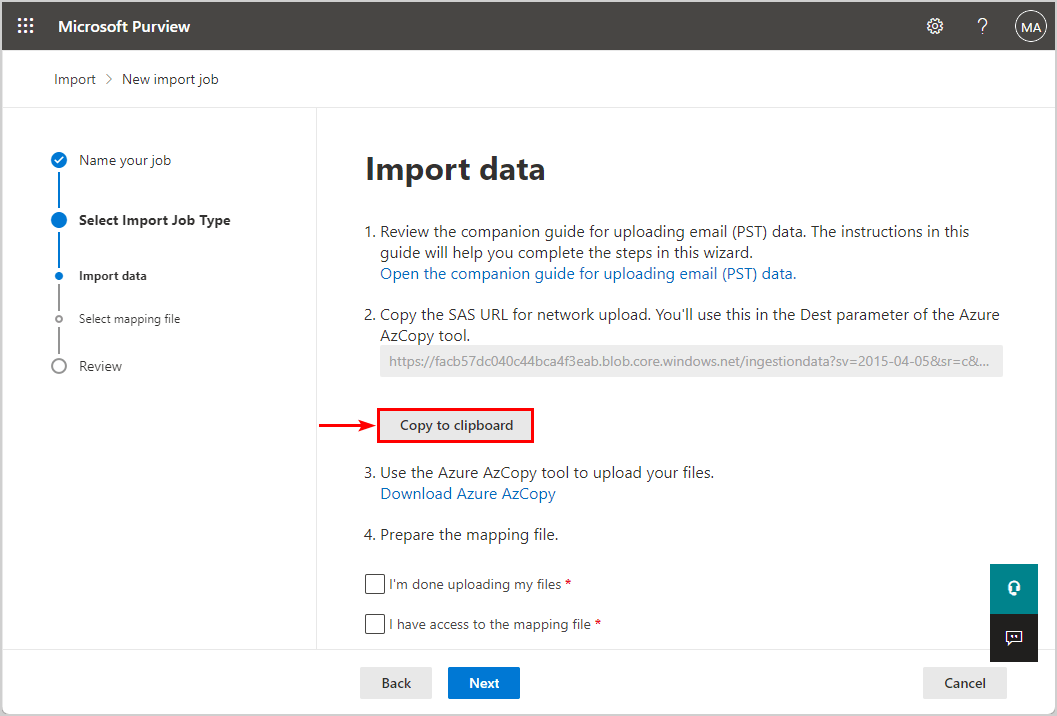
In the next step, you will upload the PST file to Microsoft 365 using Azure Storage Explorer.
Note: Keep the Microsoft Purview > New import job window open because you will return to complete the last steps. Don’t cancel the import data, or you will start from the beginning.
3. Install Azure Storage Explorer
We need to download and install the Microsoft Azure Storage Explorer.
- Go to the Azure Storage Explorer (GitHub)
- Select the Windows-StorageExplorer.exe to download it
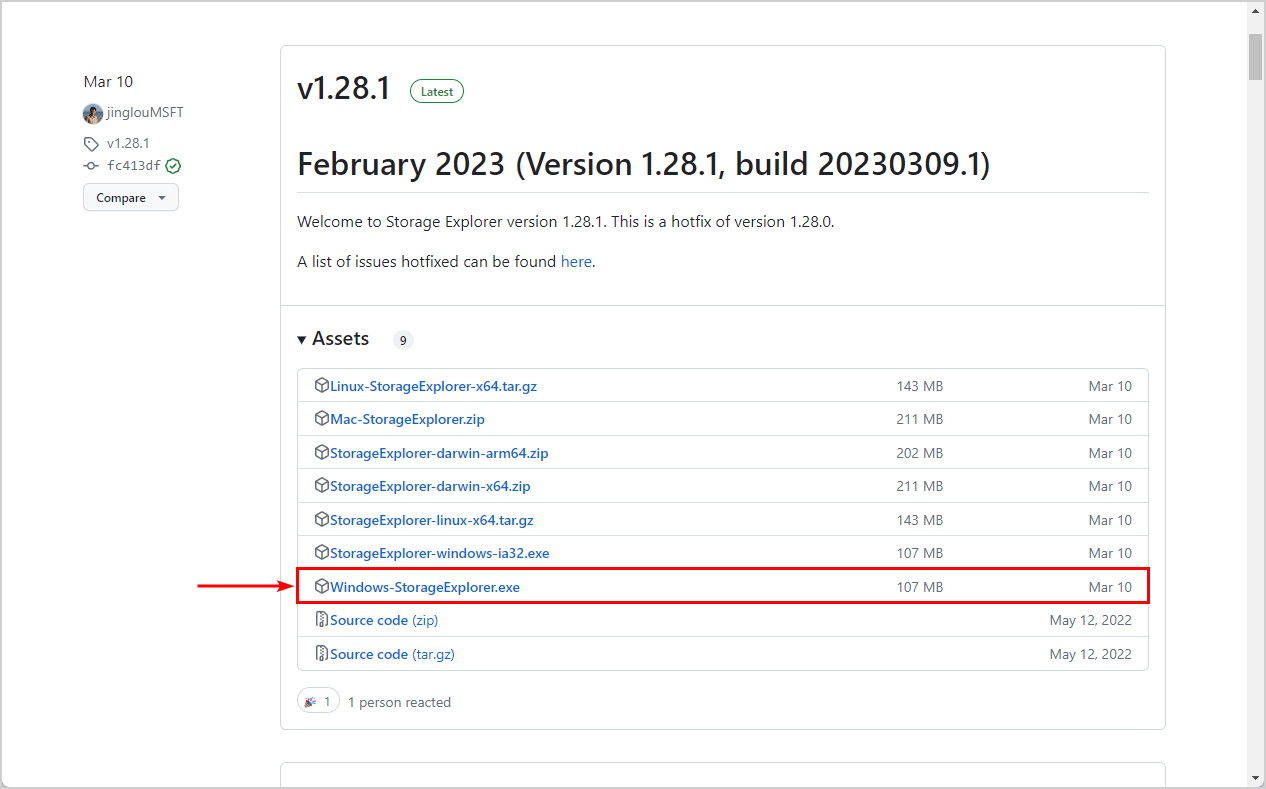
- Run the application and keep the default settings to install the Microsoft Azure Storage Explorer

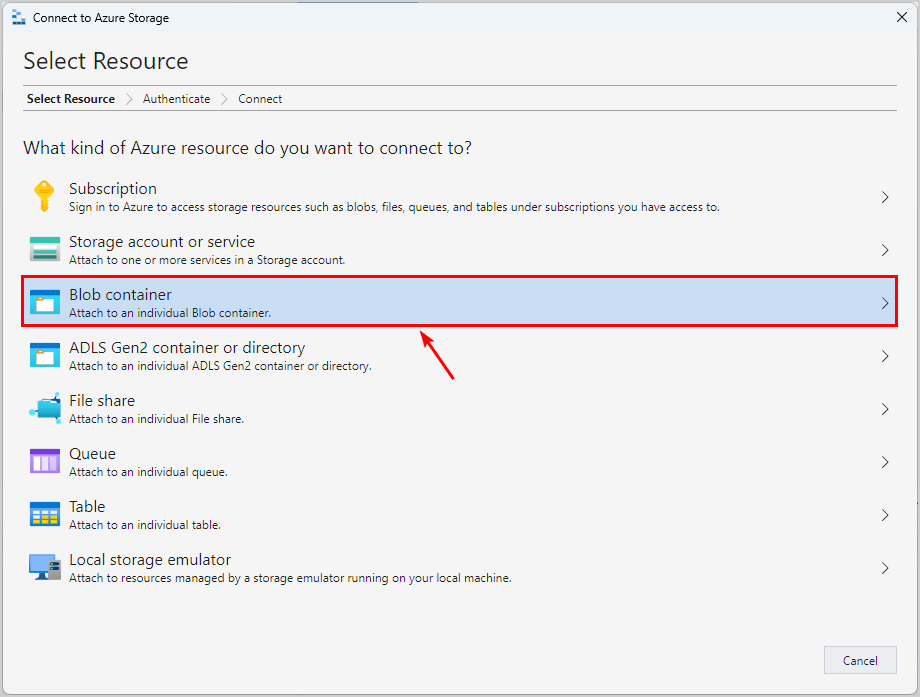
4. Upload PST files uploaded to Microsoft 365
- Open Microsoft Azure Storage Explorer
- Click on the Connect Dialog icon
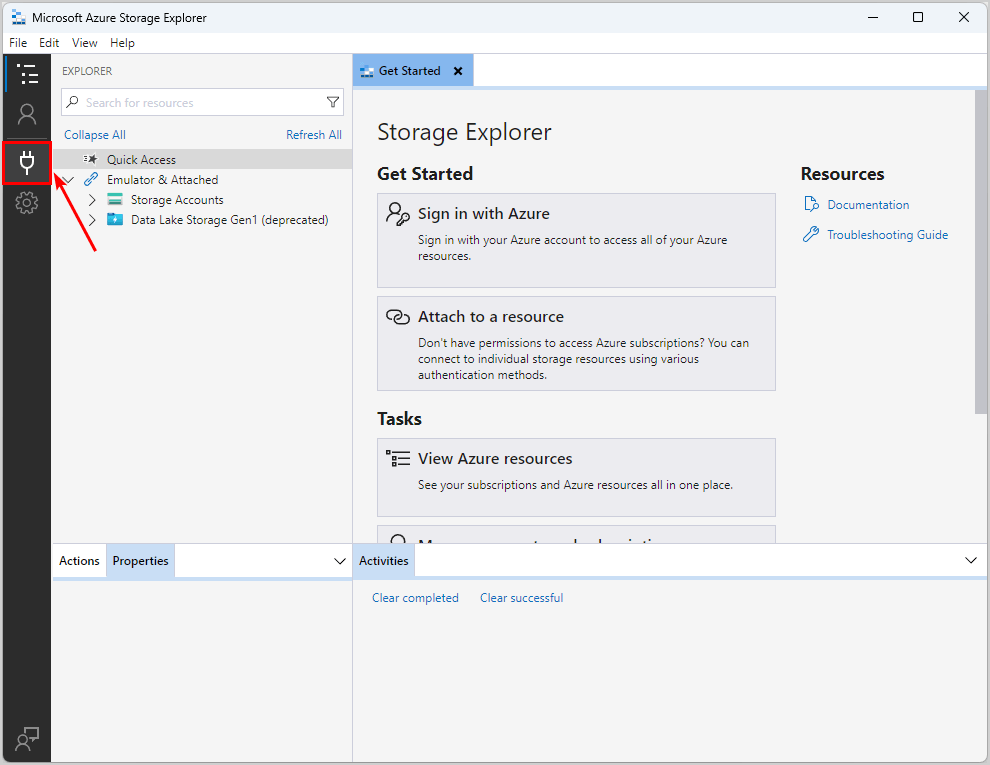
- Click on Blob container
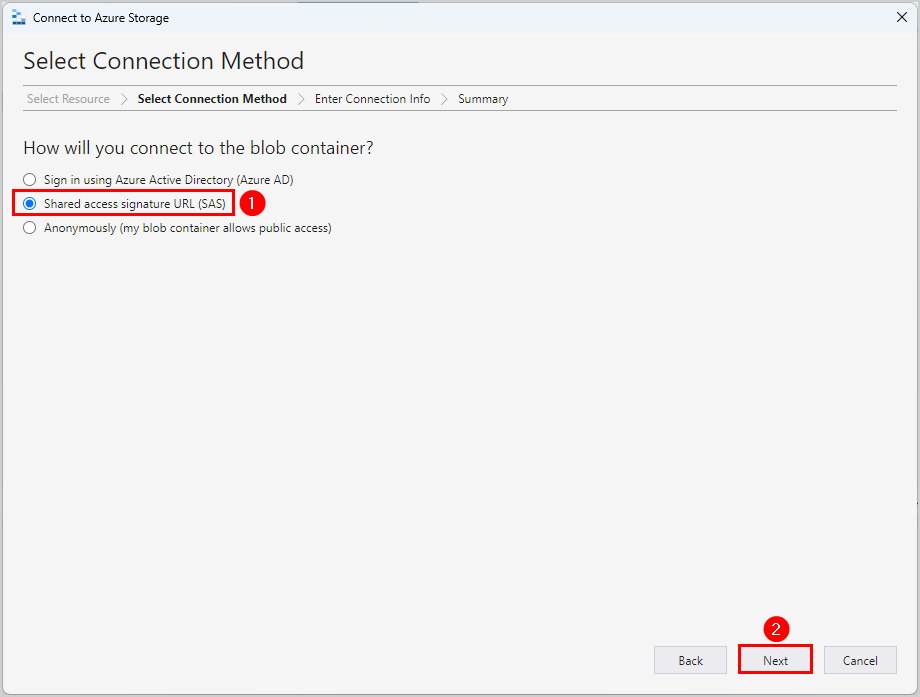
- Select Shared access signature URL (SAS)
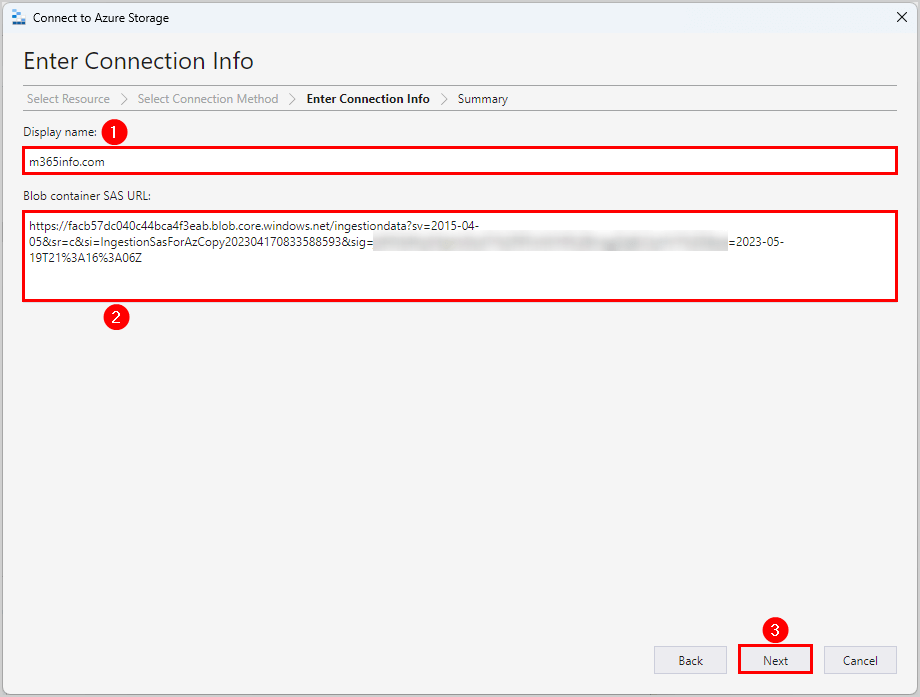
- Insert Display name
- Paste the SAS URL you copied from the previous step in the Blob container SAS URL
- Click Next
- Click Connect
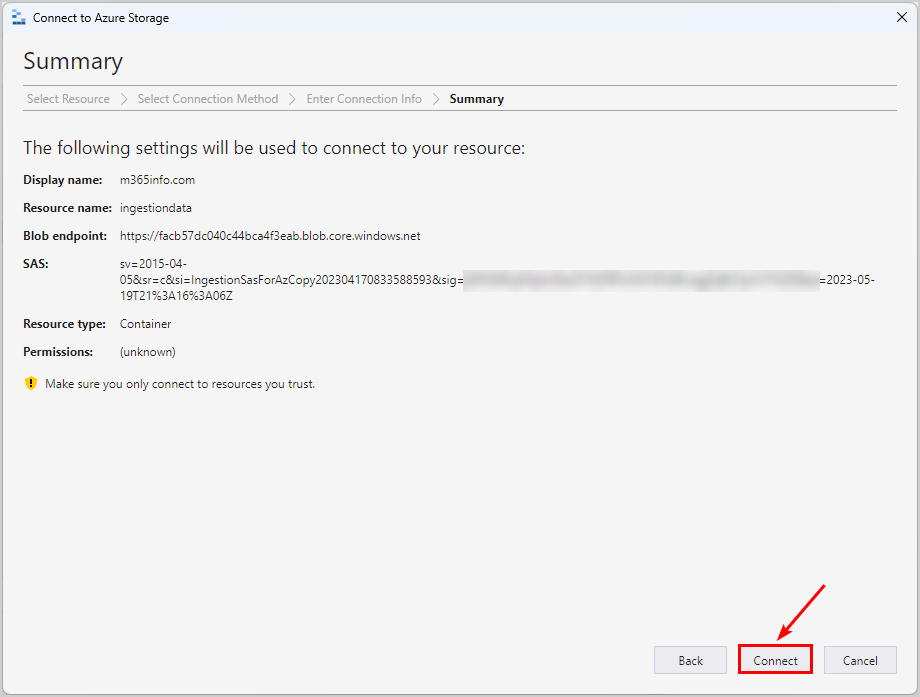
In Microsoft Azure Storage Explorer, you can see the display name of your SAS. Now we need to create a new folder.
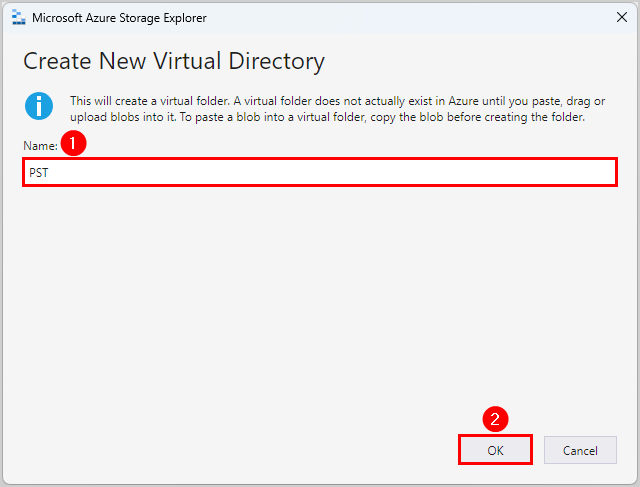
- Click on New Folder
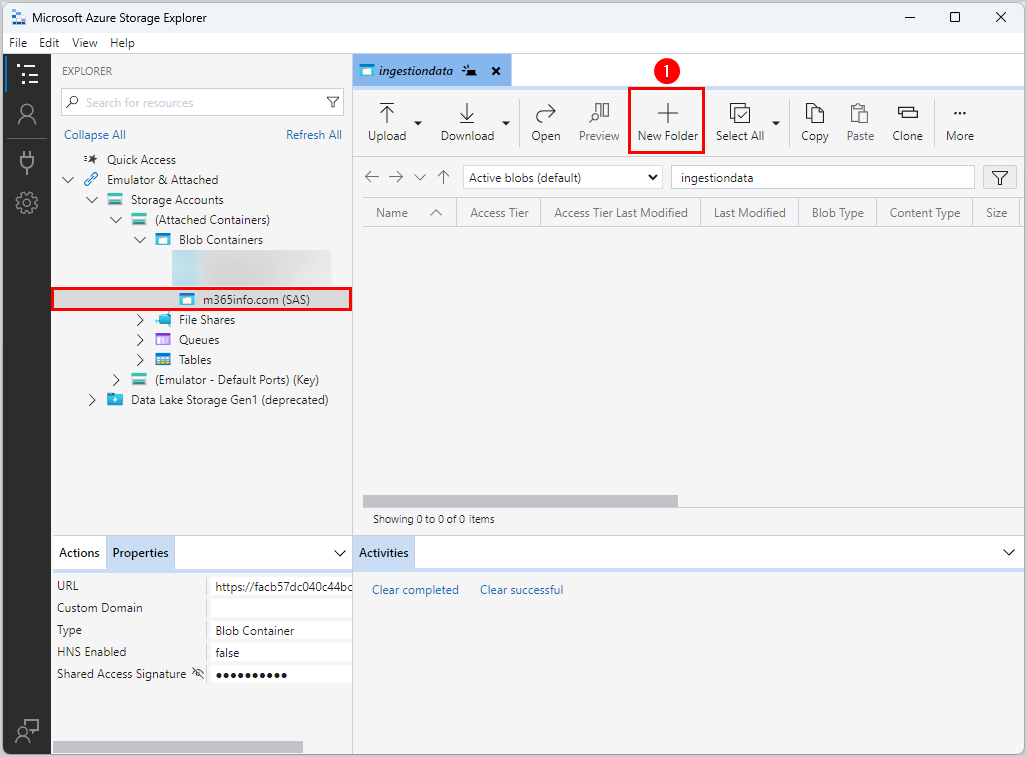
- Give the folder a Name, e.g. PST
- Click OK
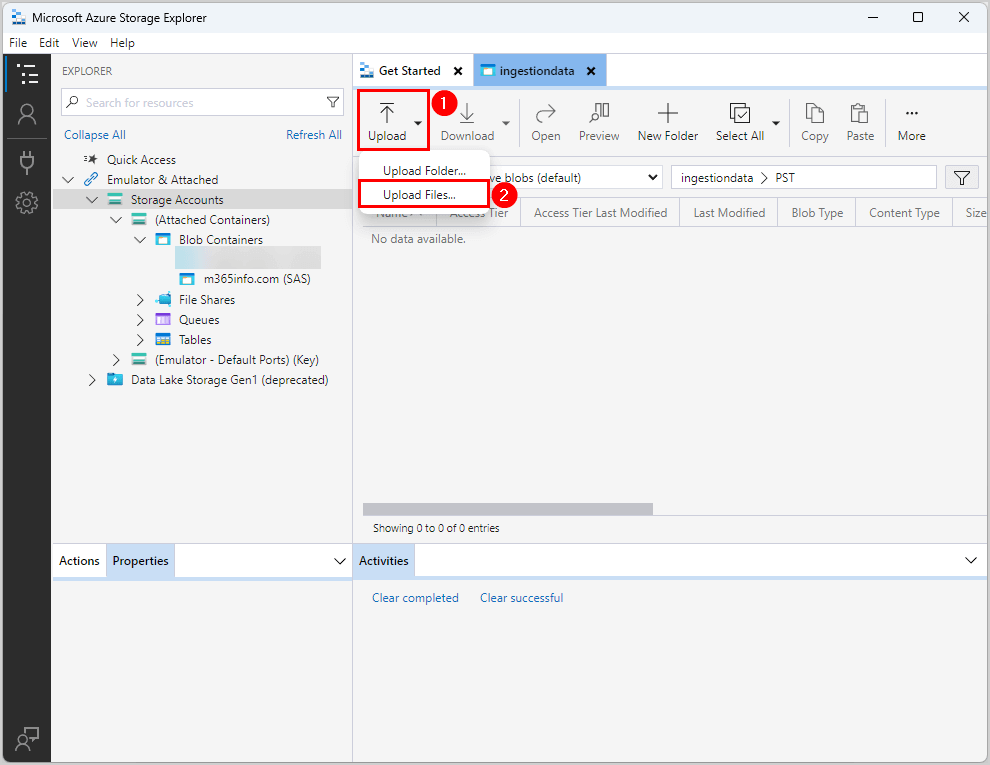
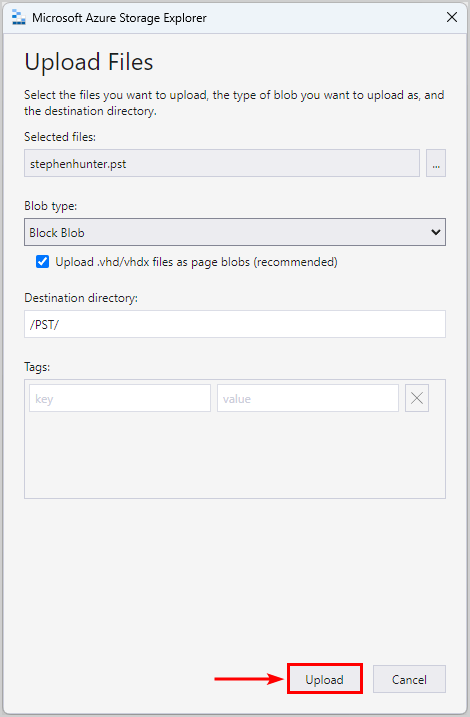
- Click Upload
- Select Upload Files
- Click on No files selected
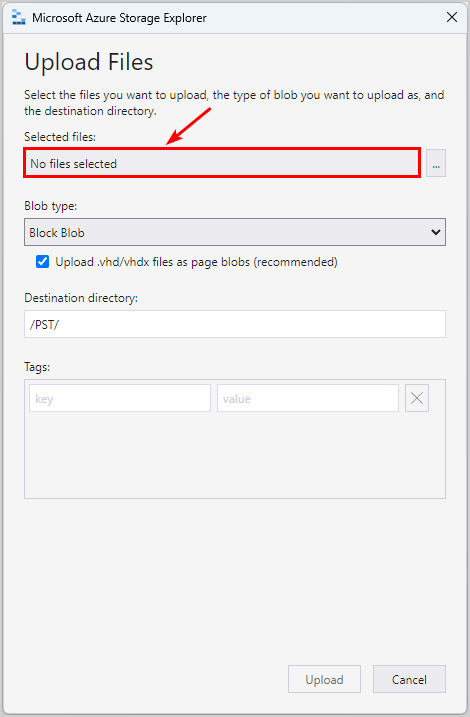
- Select the PST file and click Open
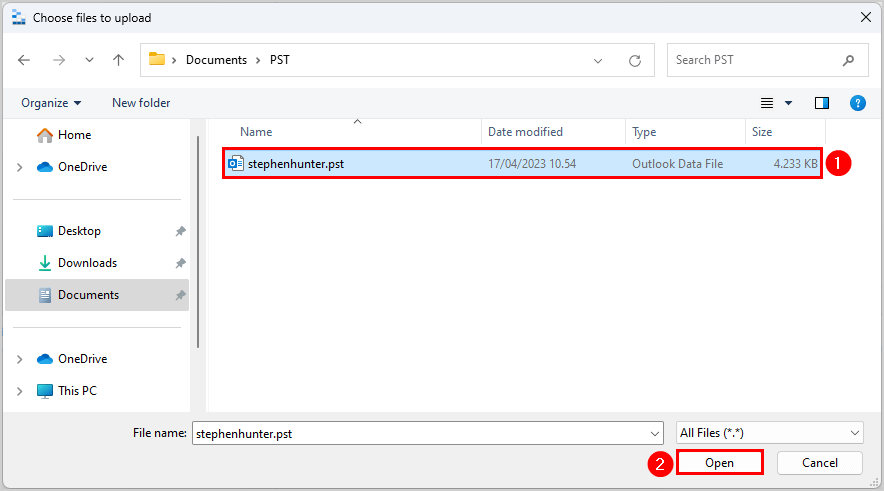
Check if you selected the correct file. Also, see if the directory path is your created folder (PST).
- Click Upload
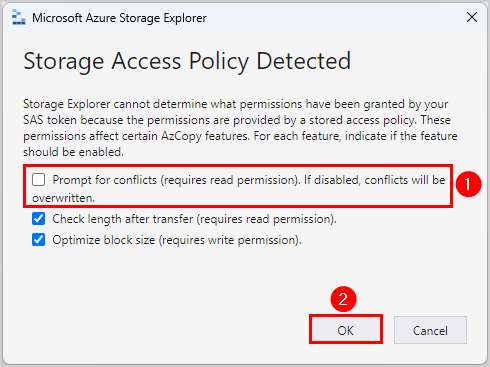
- Clear Prompt for conflicts (requires read permission). If disabled, conflicts will be overwritten.
- Click OK
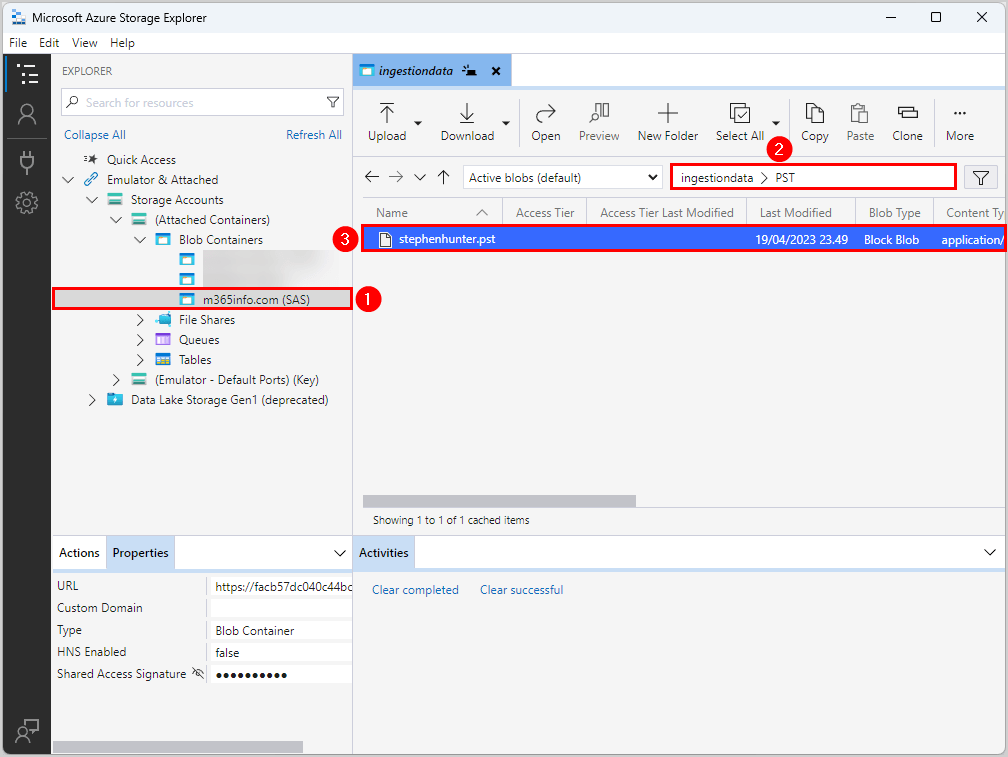
You will see the .pst file in the PST folder under the Blob Containers in the Microsoft Azure Storage Explorer.
Next time you want to view the PST files you uploaded, you only need to open Azure Storage Explorer and type the display name of the PST file in the search bar.
Note: All PST files are automatically deleted from your Azure storage. The PST files in the ingestiondata container are deleted after 30 days, if no import job is in progress. You can’t delete a PST file or folder under Blob Container in Microsoft Azure Storage Explorer.
You can close the Microsoft Azure Storage Explorer and continue to the next step.
5. Create PST import mapping file
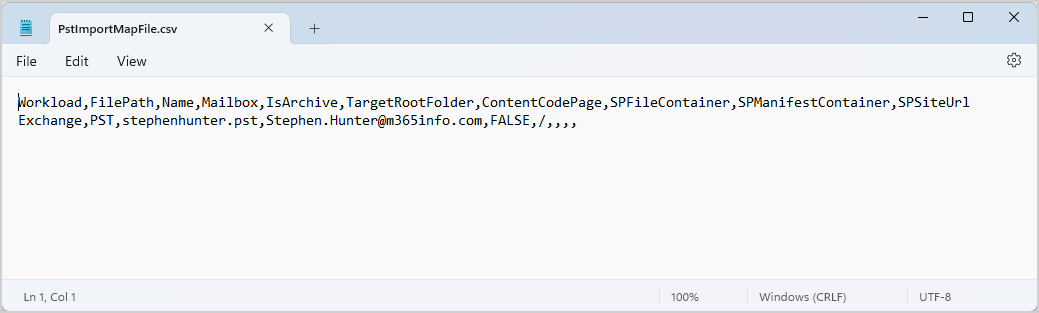
You need to download and save the PstImportMapFile.csv file.
The CSV file includes the following values:
- Workload: Specifies the service that data will be imported to. It should be set to Exchange to import PST files to user mailboxes.
- FilePath: Specifies the name of the folder path in the Azure Storage location to which you uploaded the PST files.
- Name: Specifies the name of the PST file that will be imported to the user mailbox. The value for this parameter is case-sensitive.
- Mailbox: Specifies the mailbox’s email address to which the PST file will be imported.
- IsArchive: Specifies whether to import the PST file to the user’s archive mailbox. Set the value TRUE or FALSE. If you choose TRUE, ensure the user’s archive mailbox is enabled.
- TargetRootFolder: Specifies the mailbox folder that the PST file is imported to. If you leave this parameter blank, the PST file will be imported to a new folder named Imported at the root level of the mailbox (the same level as the Inbox folder and the other default mailbox folders). If you specify /, the folders and items in the PST file are imported to the top of the folder structure in the target mailbox or archive. If you specify /newfoldername, items, and folders in the PST file are imported to a folder named newfoldername.
- The other fields in the CSV file are optional, so you can leave them empty.
In the next step, we will show you how to edit the CSV file with the Microsoft Excel application.
6. Edit CSV file in Excel
To save the Excel file as CSV comma delimited, you need to make Excel use a comma for the list separator.
- Open Microsoft Excel
- Click Options
In the Excel Options, you need to make some changes:
- Click Advanced
- Under Editing options > Clear System separators
- Set Decimal separator to period (.)
- Set Thousands separator to comma (,)
- Click OK
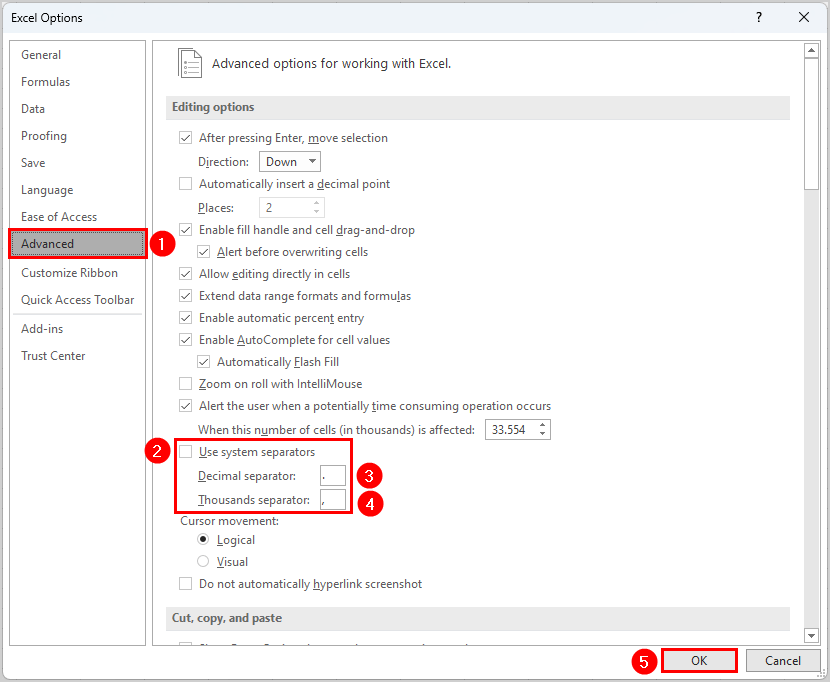
Note: Close the Microsoft Excel application to save the changes.
To load data into Microsoft Excel, follow the below steps:
- Open Microsoft Excel again
- Select New blank workbook
- Click on Data > From Text/CSV
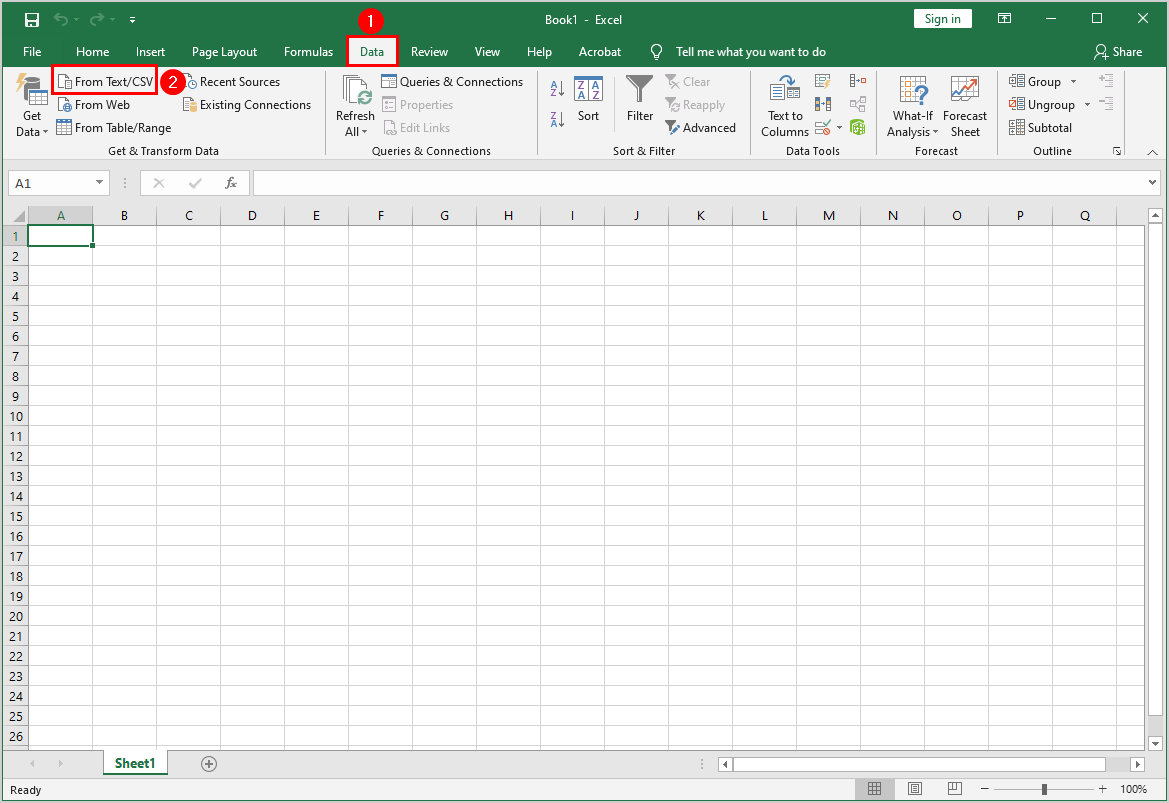
- Find and select PstImportMapFile.csv
- Click Import
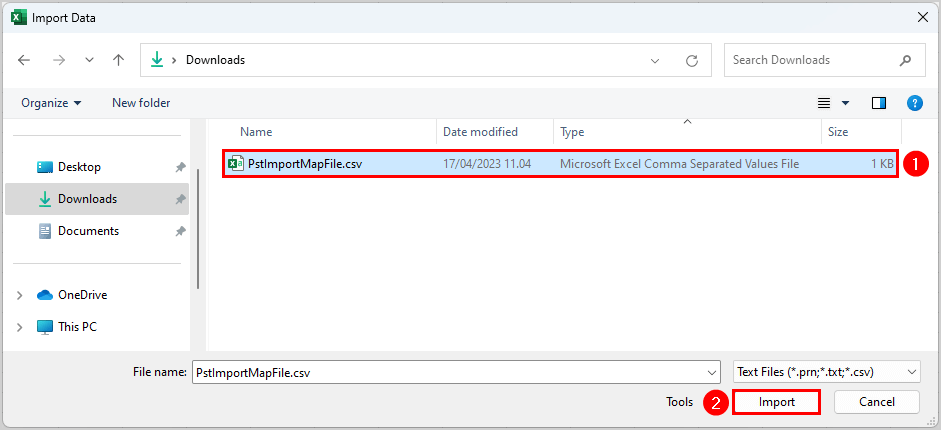
- Set the delimiter to Comma
- Click Load
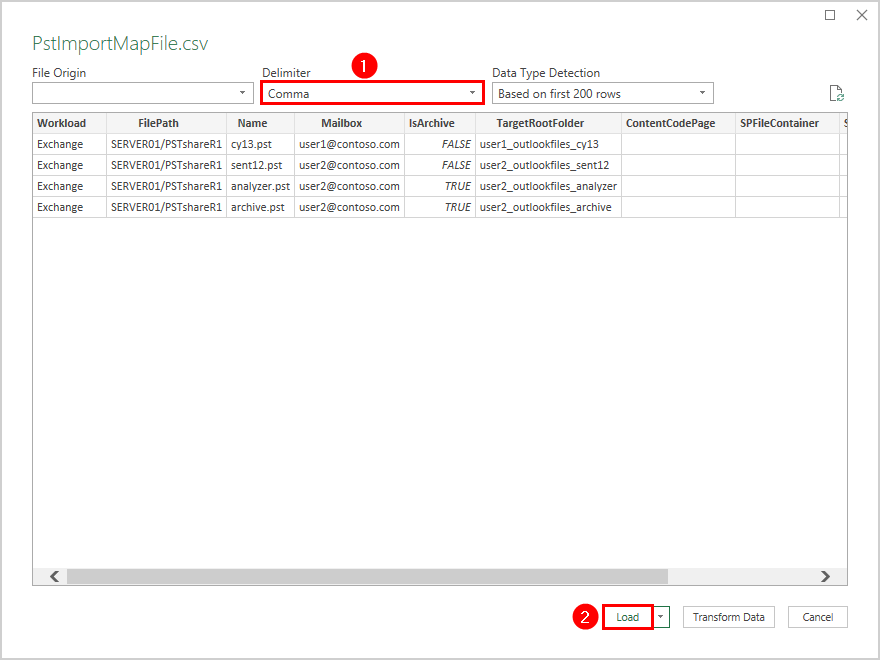
Microsoft Excel loads and formats the data from the CSV file.
- Edit the values like the below example
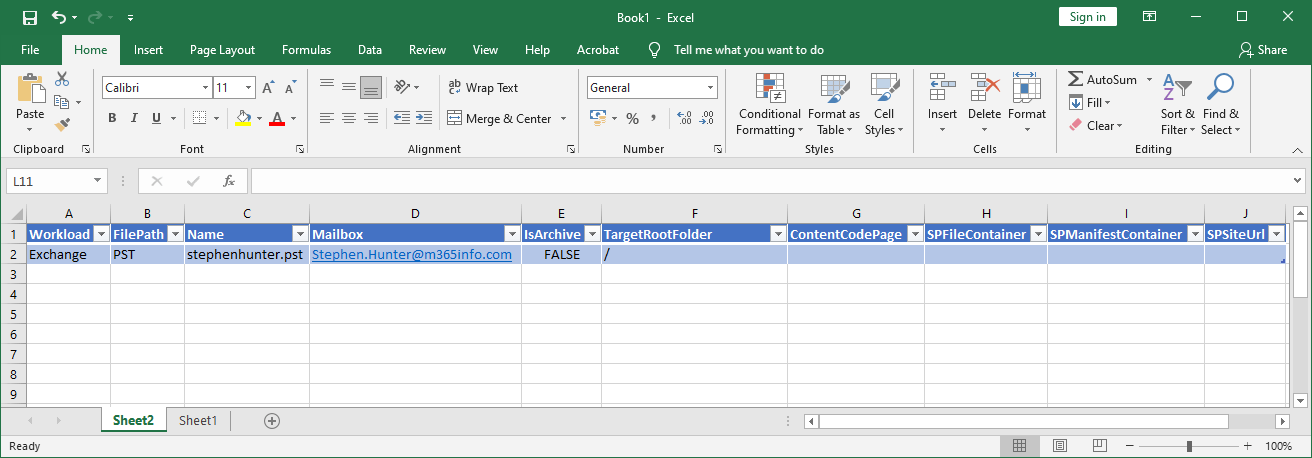
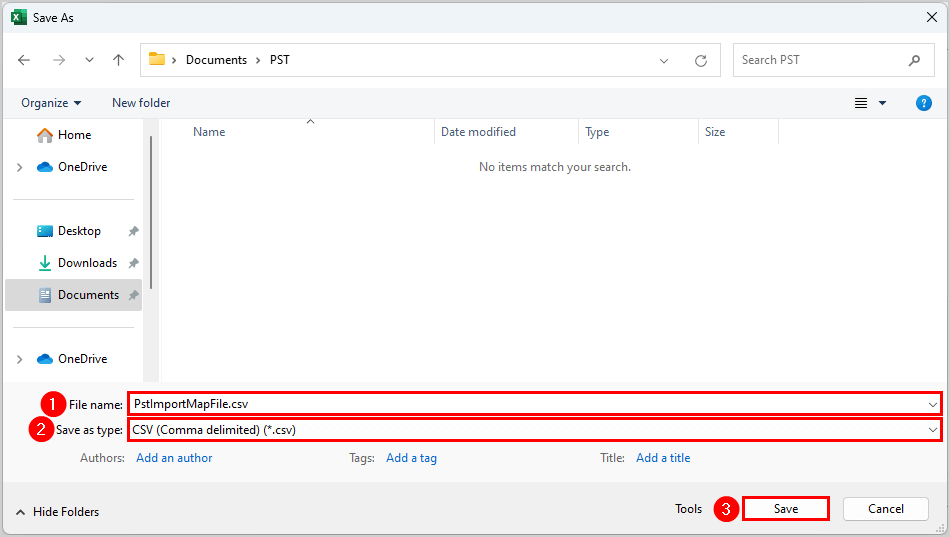
Once you have made your changes, save the file as .csv.
- Type the File name
- Save the file type as CSV (Comma delimited)
- Click Save
- Open the file with Notepad to double-check if the CSV file is comma delimited
7. Select CSV mapping file
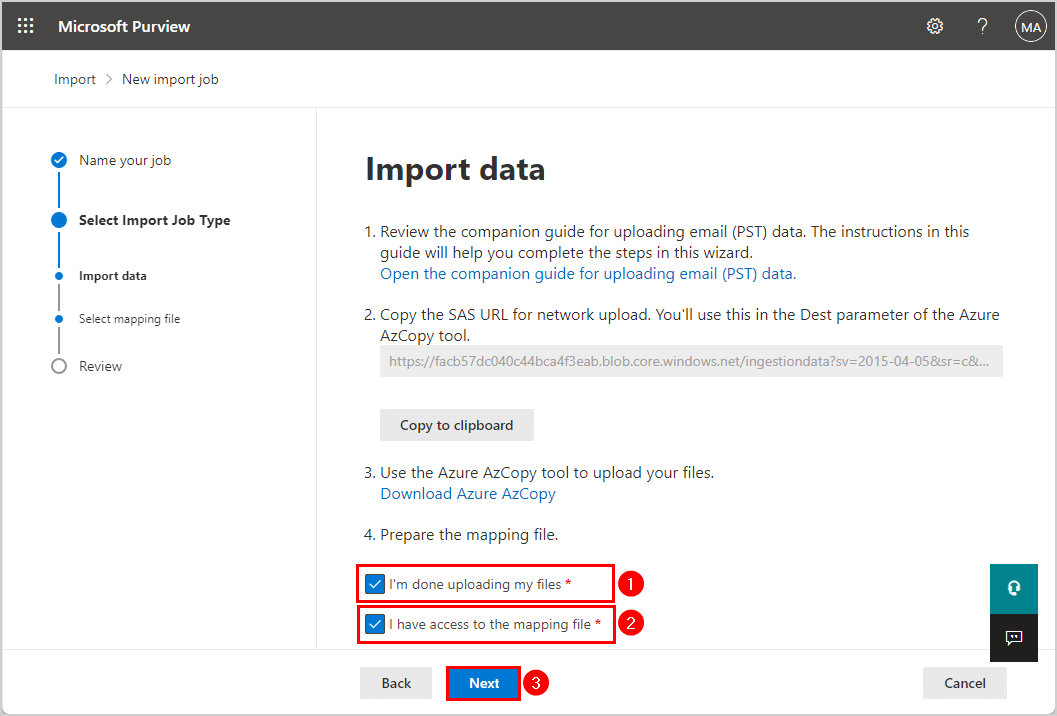
Go back to the Microsoft Purview > New import job window
- Select I’m done uploading my files
- Select I have access to the mapping file
- Click Next
- Click on Select mapping file
- Browse and select the PstImportMapFile.csv file
- Click on Validate
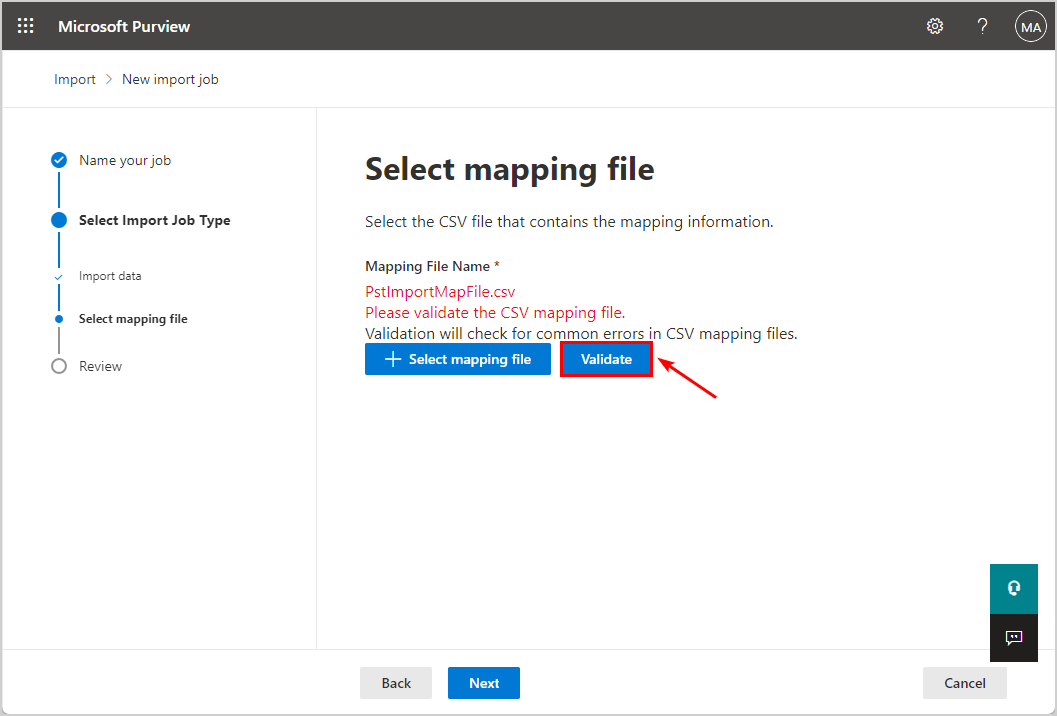
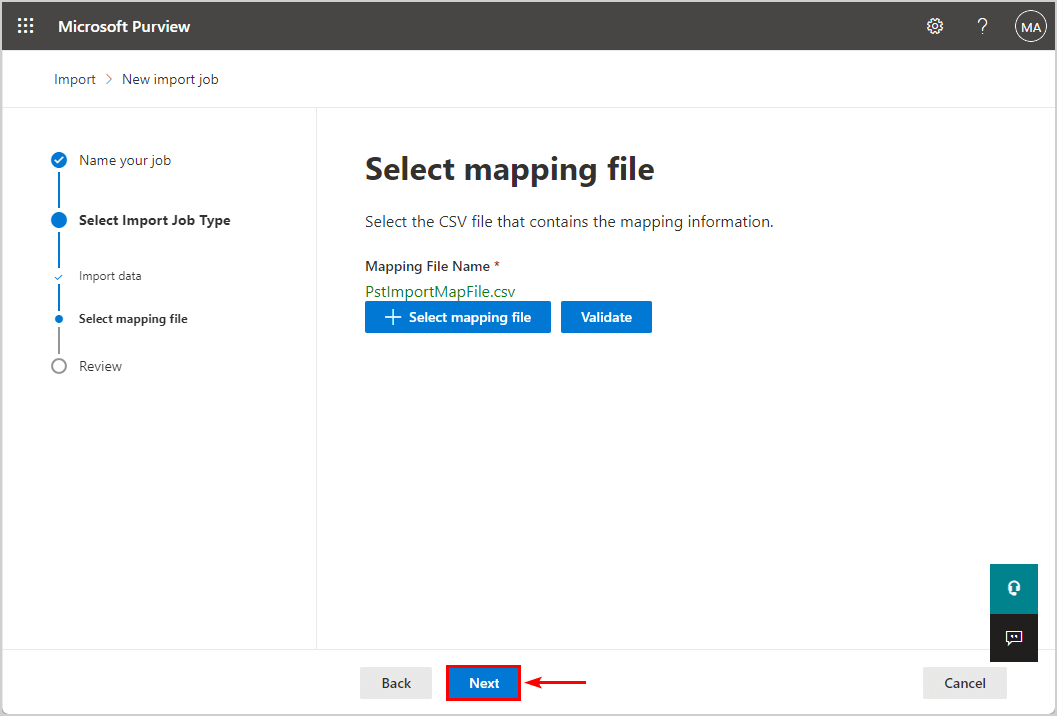
It shows a green text, which means that it’s valid.
- Click Next
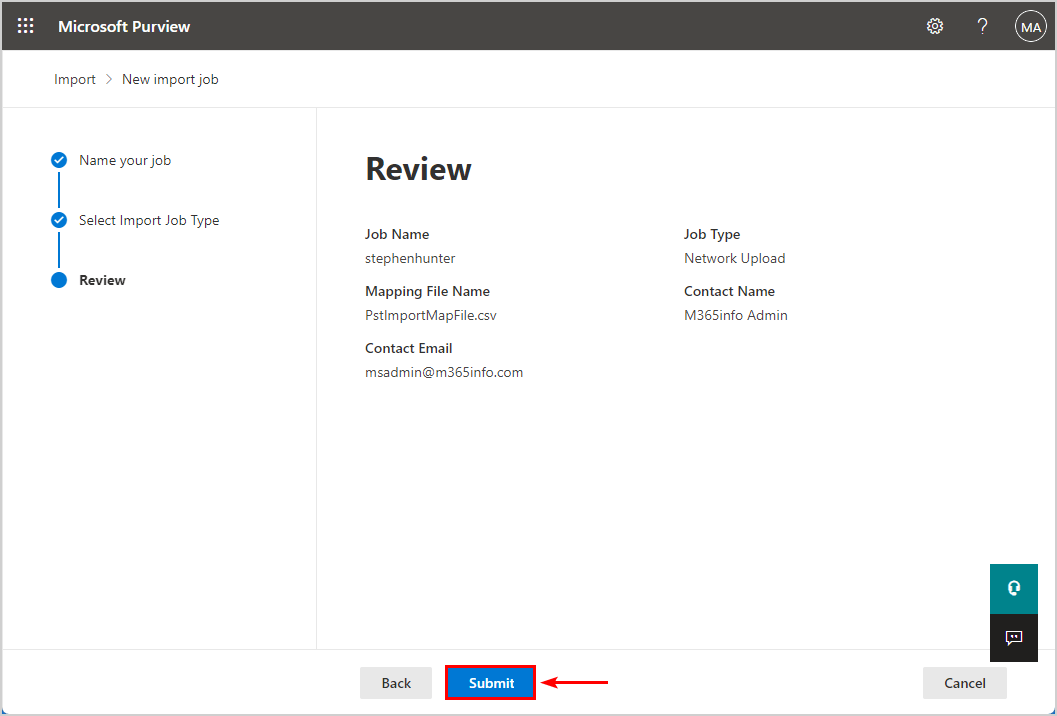
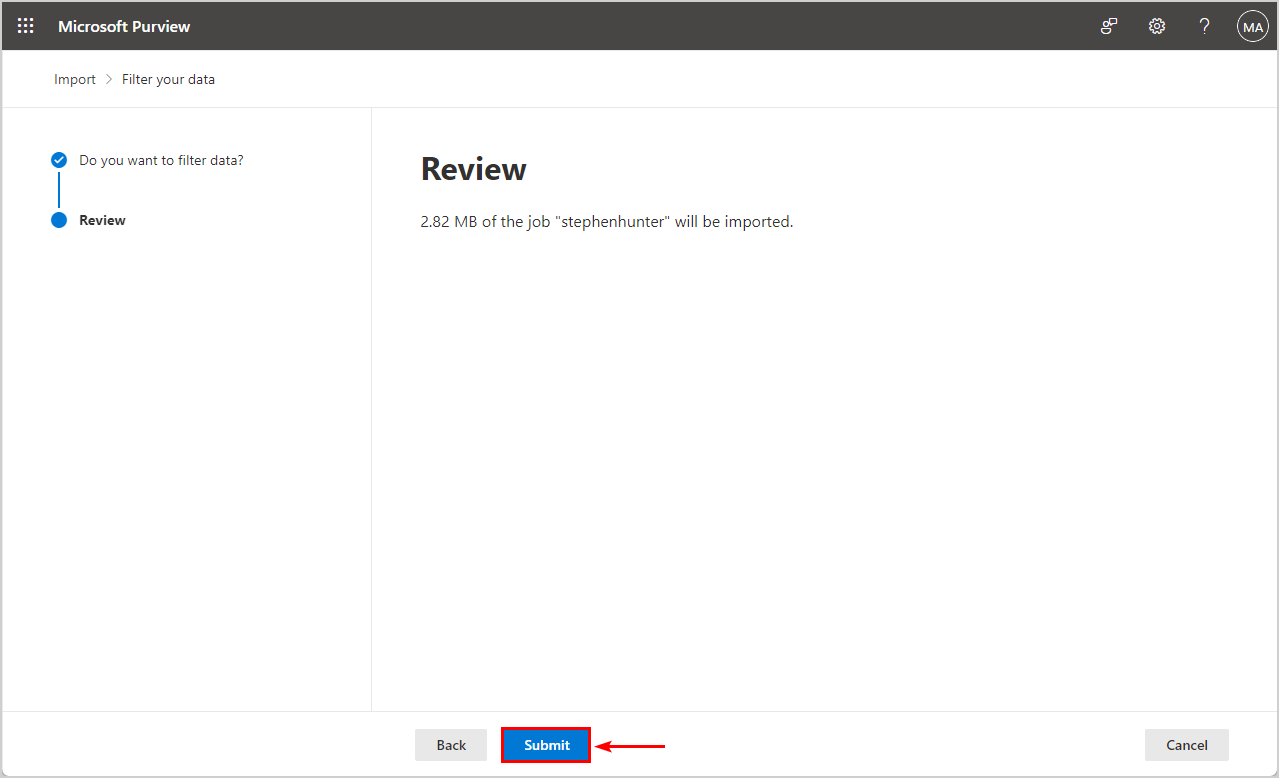
Review the PST import job.
- Click Submit
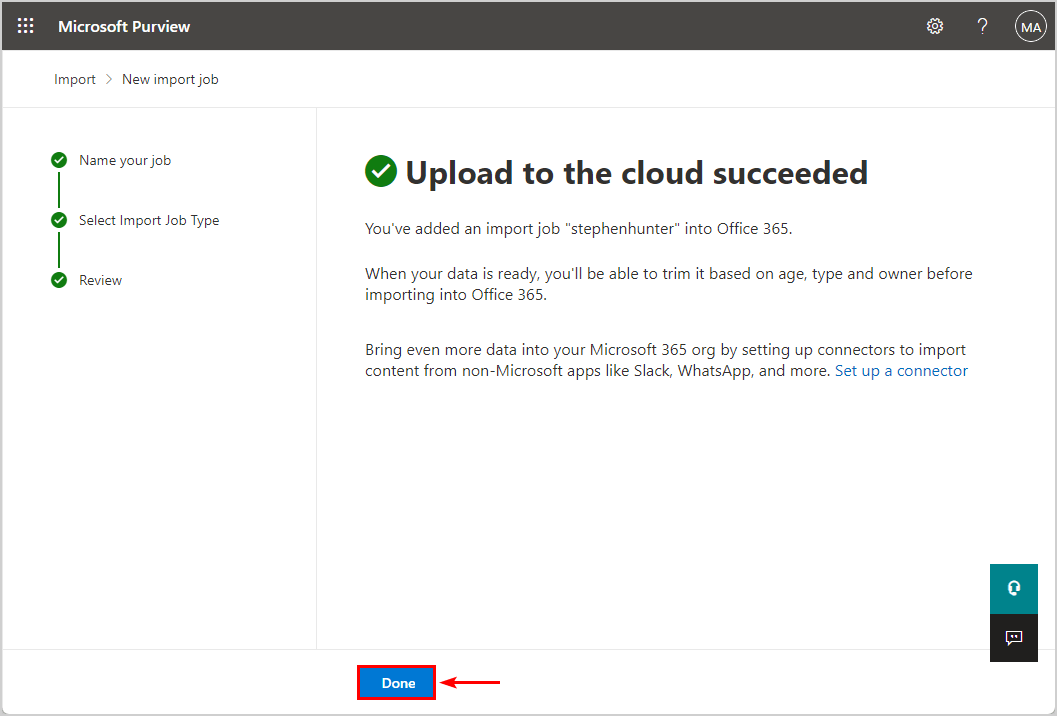
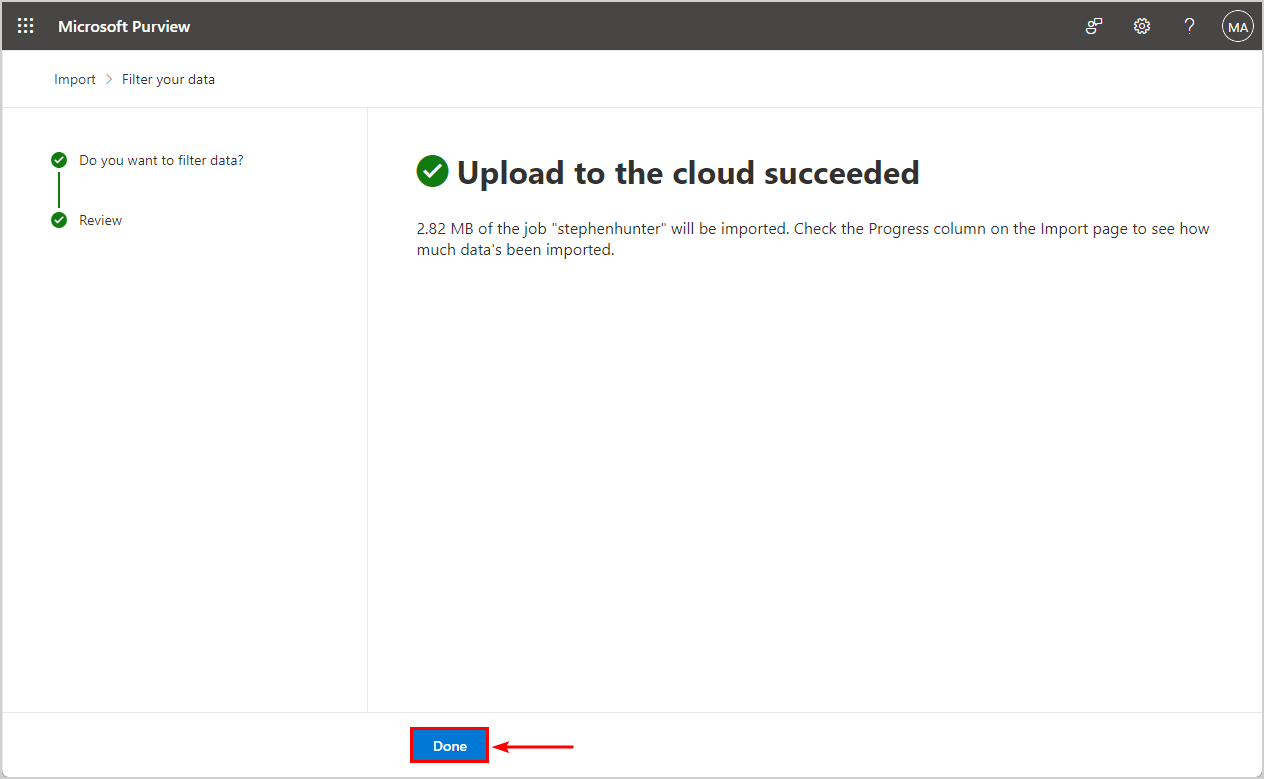
Upload to the cloud succeeded.
- Click Done
You are not finished yet, because the analysis is in progress. The last step is where we will start the PST import into Microsoft 365.
Note: Wait for the analysis to complete, which can take several minutes or an hour. You can safely close the Microsoft Purview window.
8. Import PST into Microsoft 365
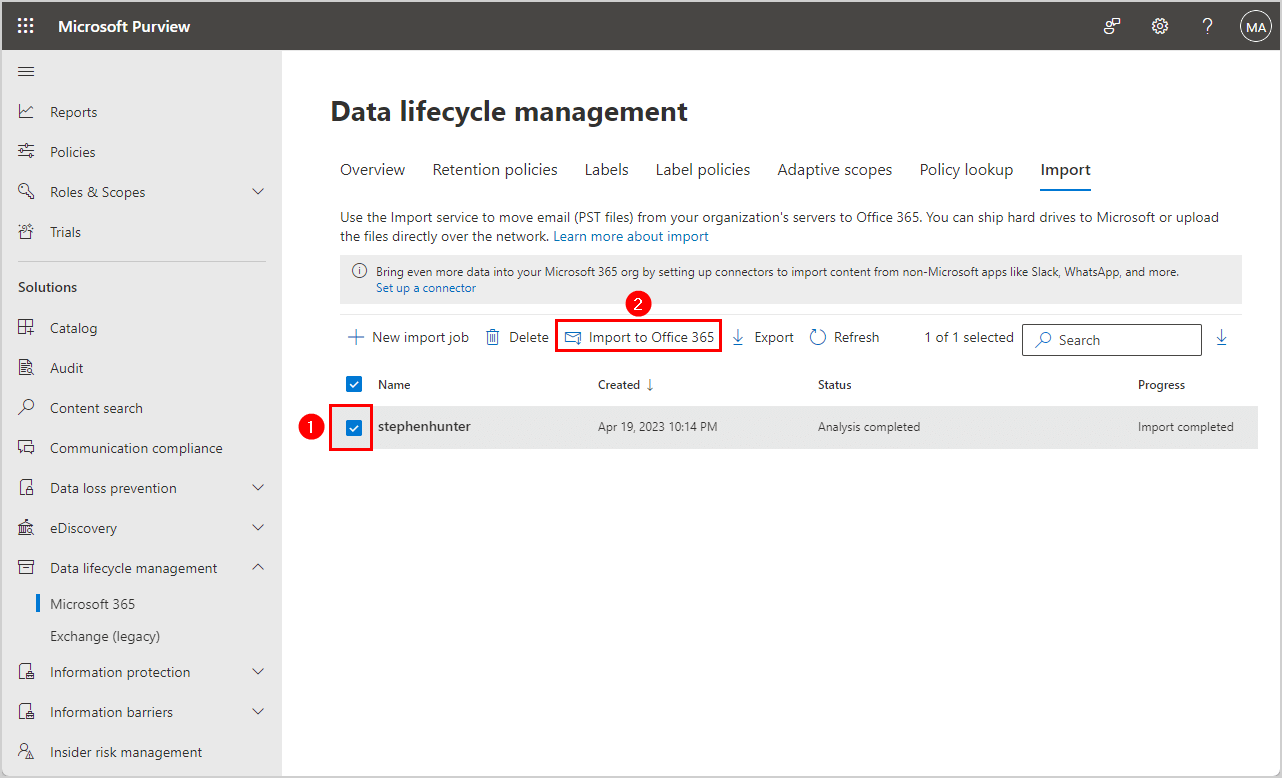
Once it shows Status > Analysis completed and Progress > Import completed, you can start to import the PST file into Microsoft 365.
- Select the checkbox in front of the Import Job, e.g., stephenhunter
- Click on Import to Office 365 icon
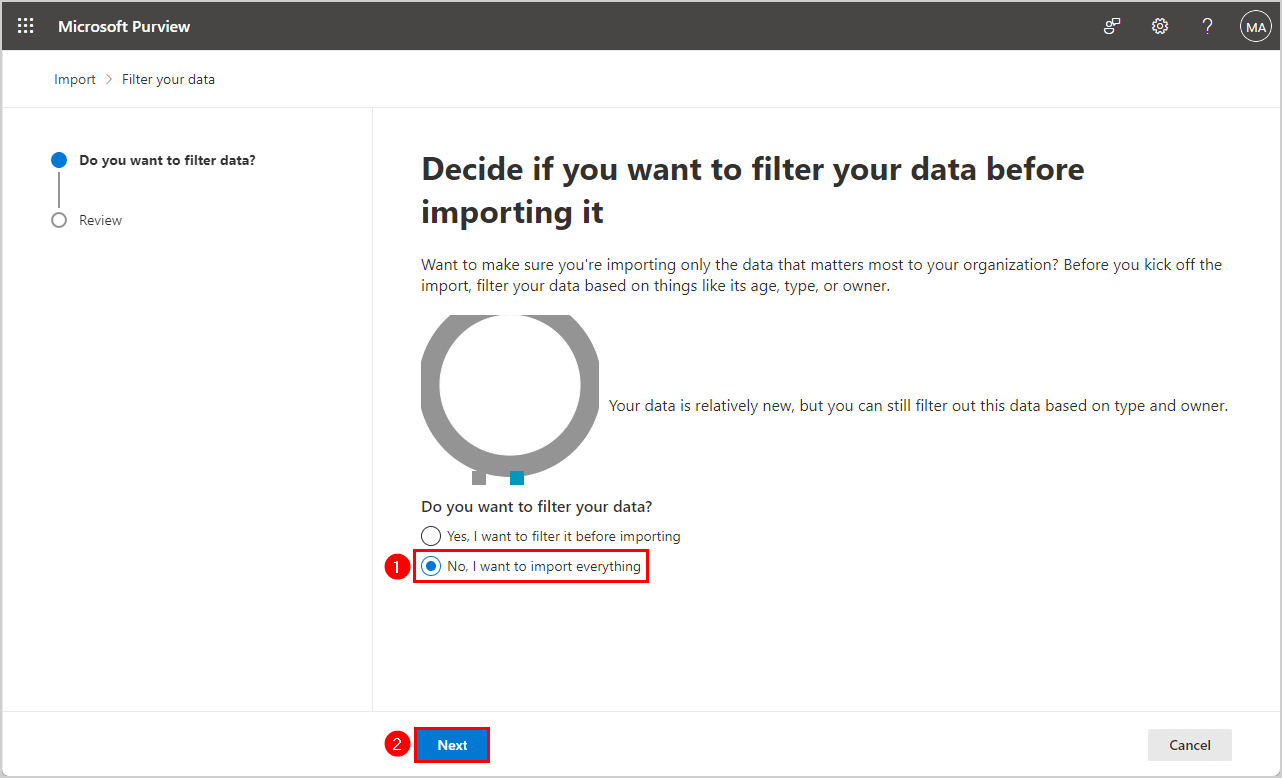
- Select No, I want to import everything
- Click Next
- Click on Submit
Upload to the cloud succeeded.
- Click Done
The status of the import job shows Import in progress, so you must wait until all the data has been imported. It’s not possible to force the PST import into Microsoft 365.
Note: The PST import can take one hour to complete. You can safely close the Microsoft Purview window and wait until the import completes.
9. Verify PST import job status completed
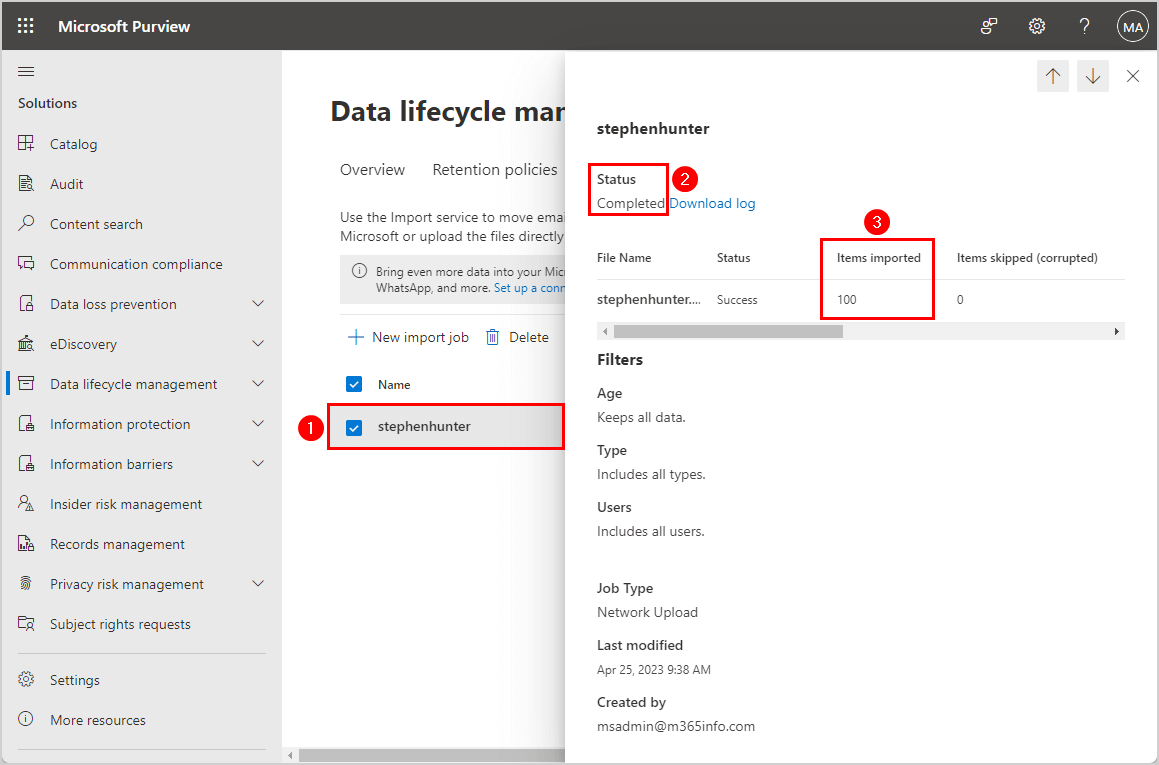
You can verify that the PST import job is completed.
- Click on the Import Job (e.g. stephenhunter) from the list view
It shows Status completed and all Items imported.
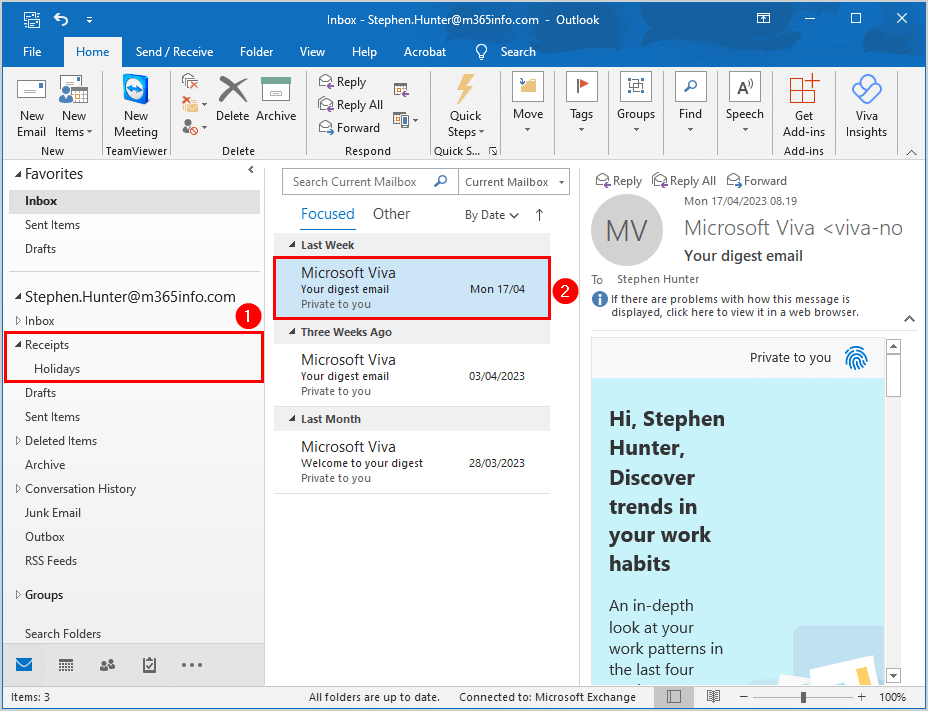
You should find all the emails and folders you created to verify the PST imported correctly into Outlook.
- Folder and subfolder
- Inbox old email
This is how you successfully import a PST file into Microsoft 365.
Read more: Export Microsoft 365 users licenses »
Conclusion
You learned how to import a PST file into Microsoft 365 mailbox. Using the Azure Explorer Tool and Microsoft Purview compliance portal is an excellent way to import PST files into Microsoft 365 mailboxes. It’s faster than importing the PST into each Outlook user.
Did you enjoy this article? You may also like Reset MFA for Microsoft 365 user. Don’t forget to follow us and share this article.
This Post Has 0 Comments