The last article serves a recap and summary for all the Exchange hybrid environment Pre-requirements.To…
Hybrid deployment in Office 365 | Checklist and pre requirements | Part 2/3
The following article is part 2 of the Hybrid configuration checklist and pre-requirements article series.In the following article, we review the additional “components” that are involved and relate to the Hybrid environment:
- Exchange on-Premises server EWS services
- Exchange on-Premises server AutoDiscover services
- Exchange on-Premises server and Public Certificate
Table of contents
- Hybrid deployment Office 365 – The article series
- 7. Exchange On-Premise Hybrid server | Autodiscover service
- 1. Autodiscover record and Public Network
- Verify successful operation of Exchange On-Premise Autodiscover process
- Verify the availability of the Exchange On-Premise Autodiscover service
- 3. Autodiscover and Exchange On-Premise server version
- 4. Autodiscover record pointing to the Exchange On-Premise server
- 8. Exchange On-Premise Hybrid server | EWS service
- 9. Exchange On-Premise Hybrid server | Public Certificate
- 10. Microsoft MFG server and the proof of the ownership process
- 11. Direct communication channel | Exchange on-Premises server to Exchange Online
Hybrid deployment Office 365 – The article series
The article series includes the following articles:
- Hybrid deployment in Office 365 | Checklist and pre requirements | Part 1/3
- Hybrid deployment in Office 365 | Checklist and pre requirements | Part 2/3
- Hybrid deployment in Office 365 | Checklist and pre requirements | Part 3/3
7. Exchange On-Premise Hybrid server | Autodiscover service
The Autodiscover service serves as a “foundation” for the “Hybrid relationships” between the Exchange On-Premise and the Exchange Online and vice versa.
Autodiscover service will be used for the first-time configuration of the Hybrid environment (when using the HCW) and for ongoing communication between the On-Premise and the cloud environment.
For this reason, it is critical to verify and check the following sections that relate to the Autodiscover services:
1. Autodiscover record and Public Network
We will need to verify that the Autodiscover record for the organization public domain is published and pointing to Exchange On-Premise server.
The Autodiscover record based on a reserved naming convention Implemented in the following way: Autodiscover
For example- the Autodiscover record for the public domain o365info.com is: Autodiscover.o365info.com
We will need to check and verify that the Autodiscover record published correctly and that the Autodiscover record is point to the Exchange On-Premise server
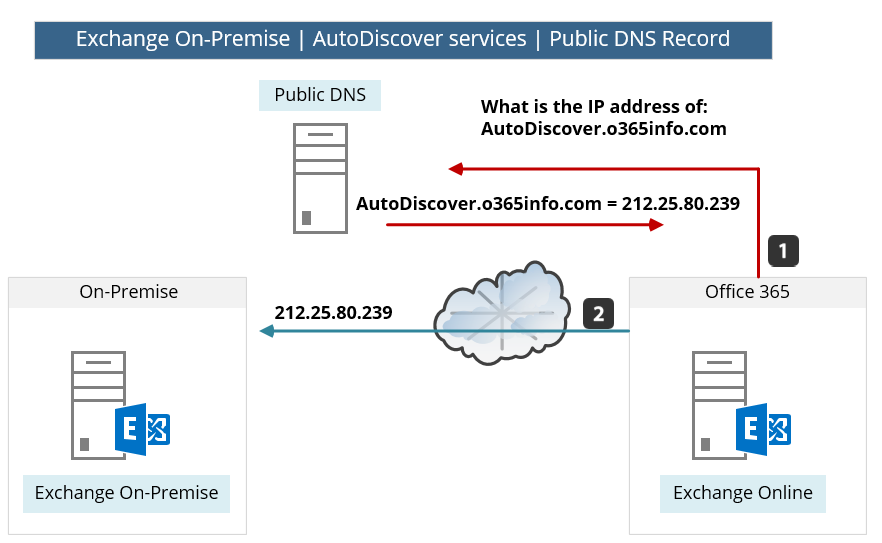
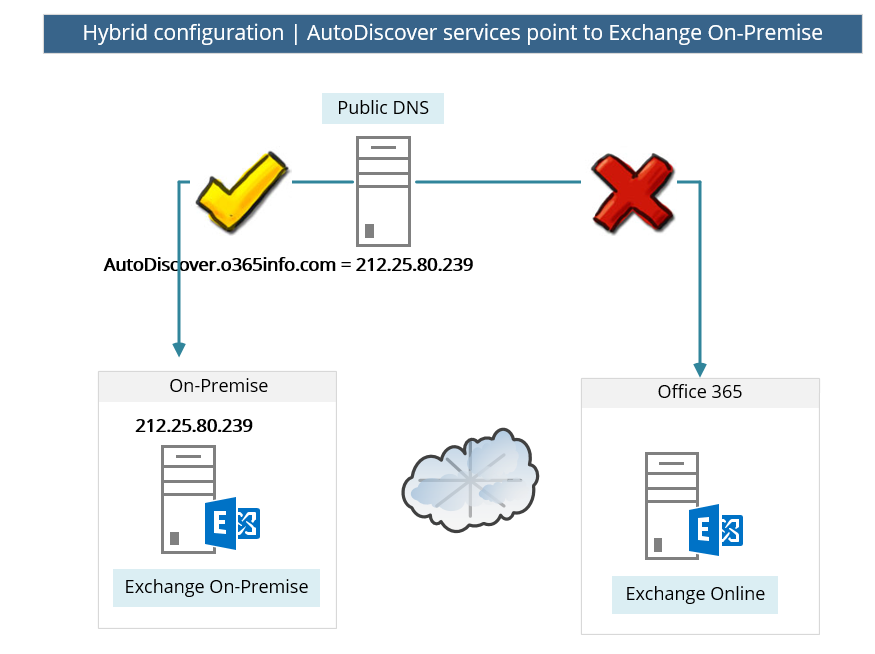
In the following diagram, we can see a description of the Autodiscover process.
In our example, Exchange Online needs to get information about o365info.com organization.
To get the required information, Exchange Online access a public DNS and query about the Autodiscover.o365info.com record.
In case that the Autodiscover DNS record configured correctly, the DNS provides the Public IP and, Exchange Online use this IP for contacting the Exchange On-Premise Autodiscover services.
Note: In this section we relate only to the DNS settings for the Autodiscover service and the rest of the section, we review other aspects the Autodiscover service that we need to verify and check.
Autodiscover DNS record | A record
In a hybrid environment, the Autodiscover should be implemented as an A record that is published through the Public DNS server.
In some scenarios, the Exchange On-Premise Autodiscover configuration is based on SRV record. This scenario is not supported in Hybrid environment.
In other words: in case that the current Exchange On-Premise Autodiscover is based on an SRV DNS record, you will need to change/update this configuration to a “standard AutoDiscover configuration” that is implemented by using A record that points to the public IP address of the Exchange On-Premise server.
You’d also need to include these records in the SAN certificate. You could use CNAME records for Autodiscover redirection, but that wouldn’t change the fact that you have to add all Autodiscover records to the SAN certificate. Also, Exchange hybrid deployments don’t support SRV-based Autodiscover redirection.
Verify successful operation of Exchange On-Premise Autodiscover process
The fact that the Autodiscover services Record and the Public IP is published is only the first part of the required settings. In the next step, we need to verify that we can access Exchange On-Premise Autodiscover service + gets the required information (Exchange On-Premise will provide the required information using an XML file).
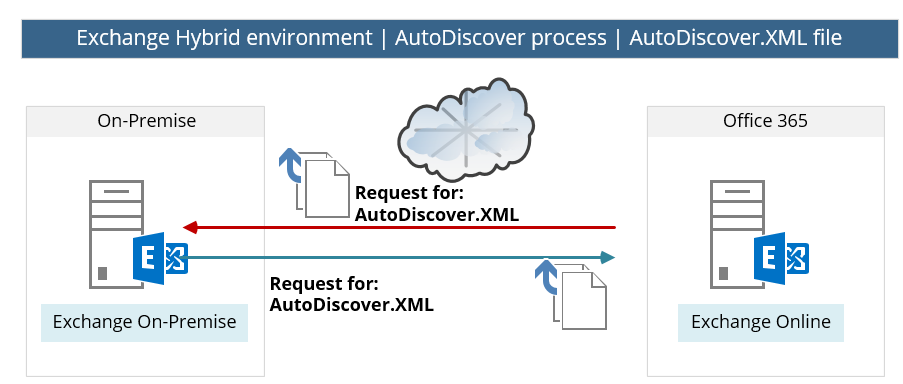
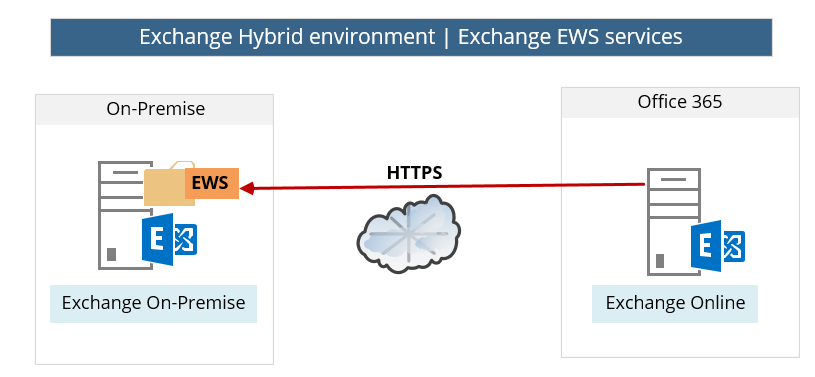
In the following diagram, we can see that external host (such as Exchange Online) tries to connect the local Exchange On-Premise (the AutoDiscover services of the Exchange on-Premises server).
In case the Exchange on-Premises server “respond”, the Exchange Online will need to identify and after a successful authentication, the Exchange On-Premise provides the required information using a file named – autodiscover.xml
Verify the availability of the Exchange On-Premise Autodiscover service
The verification of Exchange On-Premise Autodiscover service can be implemented by using a very powerful and recommended tool named Microsoft Remote Connectivity Analyzer (MRCA).
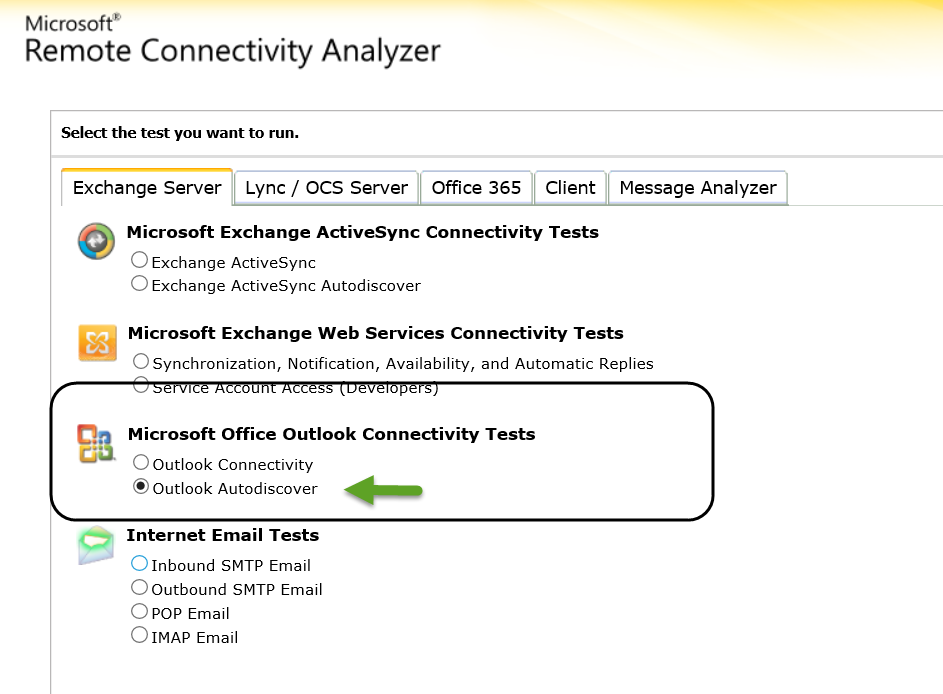
In the following section, we review an example of the required steps that we need to implement to verify the availability of the Exchange On-Premise AutoDiscover service.
- Choose the Exchange server tab, and then under the “Microsoft Office Outlook Connectivity Tests” choose the option: Outlook Autodiscover
- Provide Exchange On-Premise user credentials.
To be able to get the required information, we will need to provide user credentials of users who have Exchange On-Premise mailbox.
In our example, we use the credentials of users named: User2

- In the result screen, we can see that the header is: “Connectivity Test Successful with Warning.”
This is the “required result”, despite that the result includes a “Yellow exclamation mark”. The Autodiscover test will include by default some minor errors, that caused by the “trial and error” mechanism of the Autodiscover process.
The fact that we get the “Green icon” is the Indication for the successful implementation of the Autodiscover process.
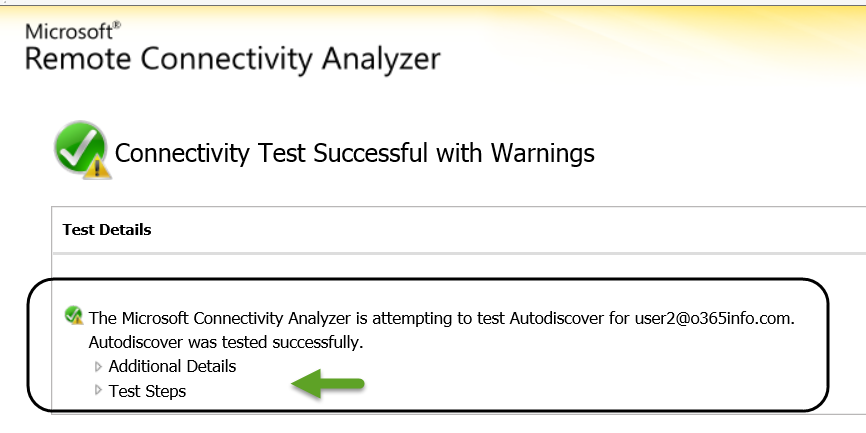
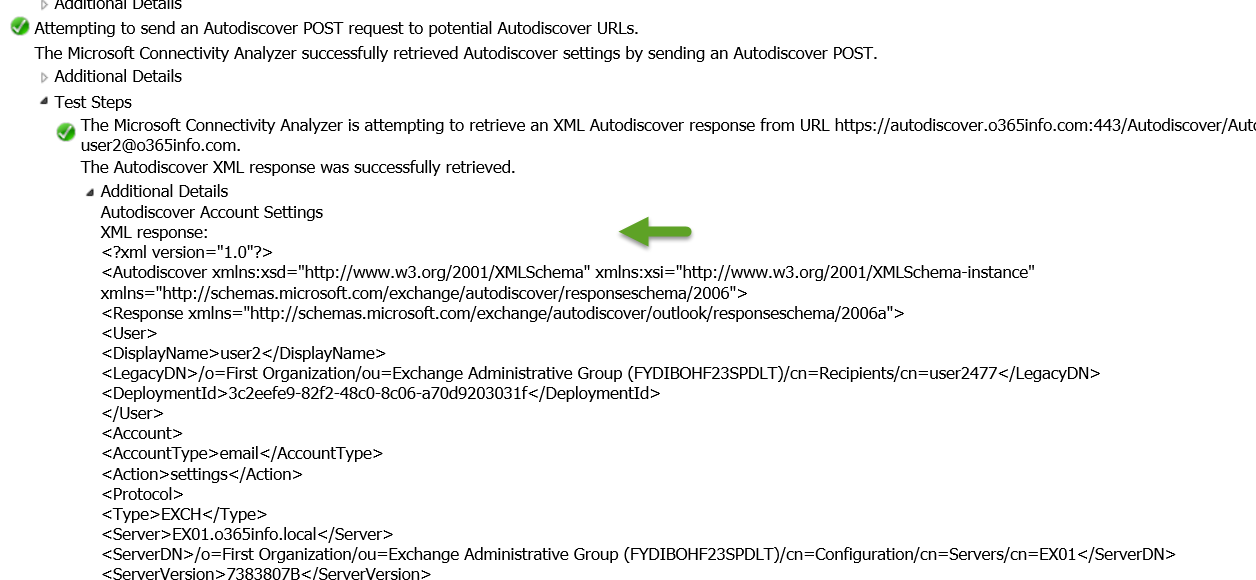
- In case that we want to get more detailed information, we can click on the “Test Step.”
In the following screenshot, we can see the content of the Autodiscover XML file.
3. Autodiscover and Exchange On-Premise server version
In a mixed Exchange On-Premise environment, that includes a couple of Exchange On-Premise versions, we will have to verify that the Autodiscover record is “pointing” to the most updated Exchange On-Premise server version.
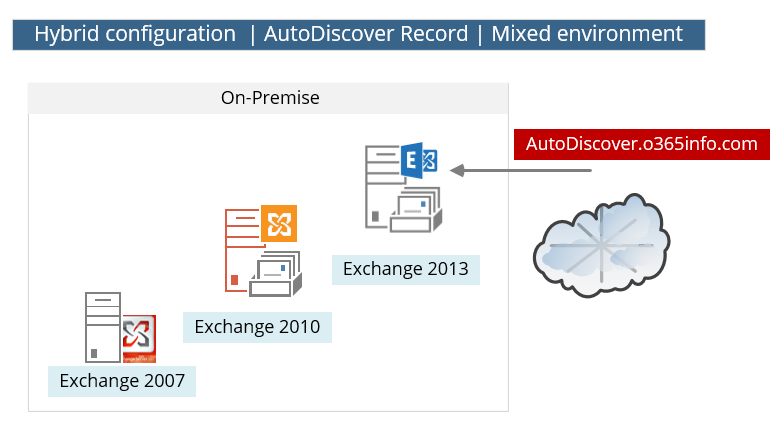
Technically, each of the Exchange servers since Exchange version 2007 can provide Autodiscover services, but the why that Exchange server “prepare” the required data (the XML file), and the content of the “Autodiscover file,” is created and implemented in a different way in each of the Exchange server versions.
In a mix Exchange environment, the “backward computability” concept is implemented.
The “latest” Exchange server version can get queries for AutoDiscover information and “understand” how to format the required answer.
For example, in case that we point the Autodiscover record to the Exchange 2013 server, and external client asks for the Free\busy time of a recipient (Availability services) who is hosted on the Exchange 2007 server, the Exchange 2013 “knows” how to format the request and the answer that is sent from the Exchange 2007 server in a proper way.
4. Autodiscover record pointing to the Exchange On-Premise server
One of the most common mistakes related to Autodiscover record and Hybrid implementations is: updating the Autodiscover record to point the “cloud” (autodiscover.outlook.com).
This assumption may seem logic, but this update should not be implemented.
In a Hybrid configuration, the Autodiscover record that “represent” the Public domain name should point to the Exchange On-Premise server.
Note – we don’t need to configure or update any of the Autodiscover settings that related to the “cloud” because in Office 365, all the required configurations of the Autodiscover services are configured automatically by using the “service domain” or the Tenet Office 365 domain such as o365info.mail.onmicrosoft.com
8. Exchange On-Premise Hybrid server | EWS service
The hybrid environment is based on the concept in which two separated Exchange organization operates as one entity. For example, enable Exchange on-Premises users to see Free/Busy time information about Exchange Online recipients, get Out of office messages and much more.
The infrastructure for this “collaboration” between the Exchange on-Premises server and Exchange Online is based on the Exchange EWS (Exchange Web Services) service.
The meaning is that:
- Exchange On-Premise will have to be accessible from the public network.
- Exchange On-Premise EWS services must be configured correctly.
Note – the Hybrid configuration is based on a “two-way relationship” in which the Exchange On-Premise will also need to access the Exchange Online EWS but the basic assumption is that the “cloud infrastructure” (Exchange Online) is configured correctly and besides of a very rare events, we assume that the cloud side allows available and configured correctly.
Verify – check the availability of: Exchange On-Premise Hybrid server EWS service
We can check or verify the availability of Exchange On-Premise and EWS service by using one of the following options:
Option1: Verify\check the availability of Exchange On-Premise and EWS service using the EWS URL
In this option, we can simply try to access the URL of the Exchange On-Premise Web services (EWS).
The default URL is based on the following naming conversation: https:/<Exchange public name>/ews/exchange.asmx
In our scenario, the Public name of the Exchange On-Premise is: mail.o3655info.com
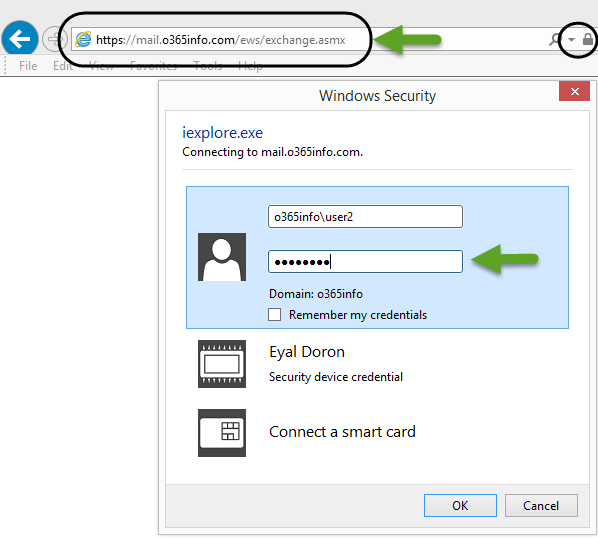
We will open a web browser and use the following URL address: https:/mail.o365info.com/ews/exchange.asmx
In the following screenshot, we can see that we can successfully connect the EWS services of the Exchange On-Premise.
As a response, Exchange on-Premises server sends a requirement for authentication.
Additionally, we can see that the server certificate is “proper” because the Lock icon has no errors.
The credentials that we will need to provide are just a simple user credential of any recipient who has a mailbox on the Exchange On-Premise server.
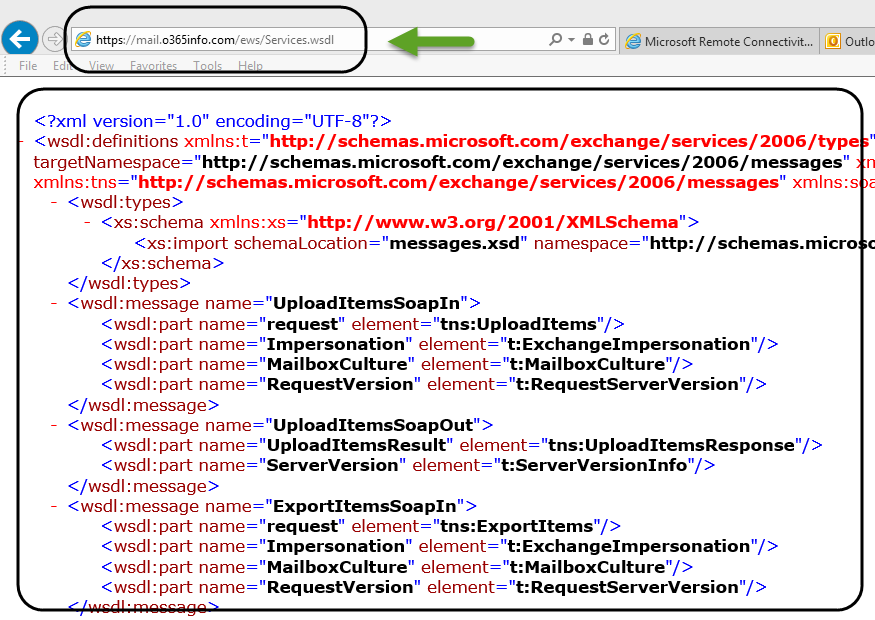
The Exchange On-Premise “answer” is an XML file that includes the required information or description about the Exchange On-Premise Web Services.
There is no actual meaning for us. The only meaning is that we could access the Exchange On-Premise EWS service and get the Exchange server response.
Option 2: Verify/check the availability of Exchange On-Premise and EWS service by using the Microsoft Remote Connectivity Analyzer
The Verification of Exchange On-Premise EWS service can be implemented by using a very powerful and recommended tool named Microsoft Remote Connectivity Analyzer (MRCA).
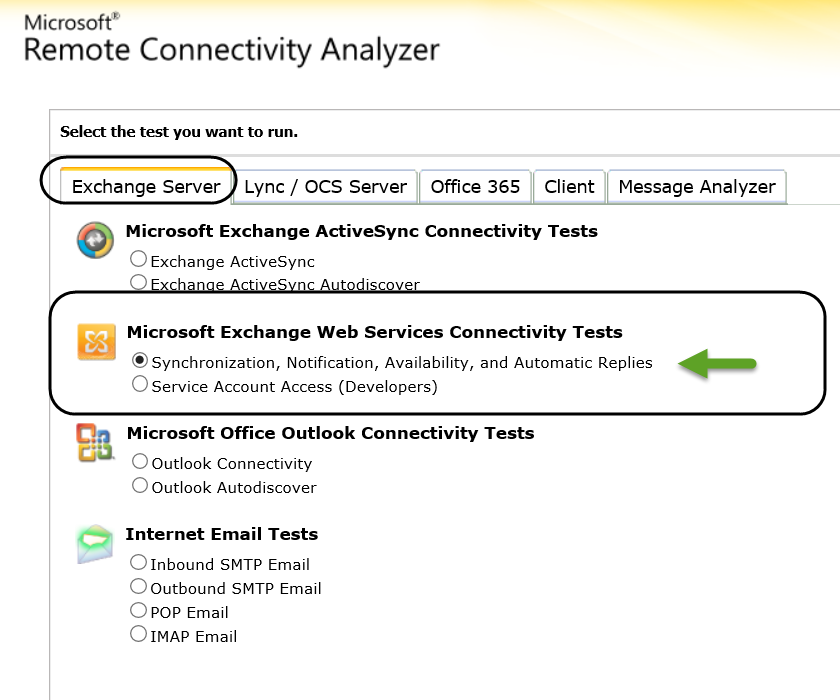
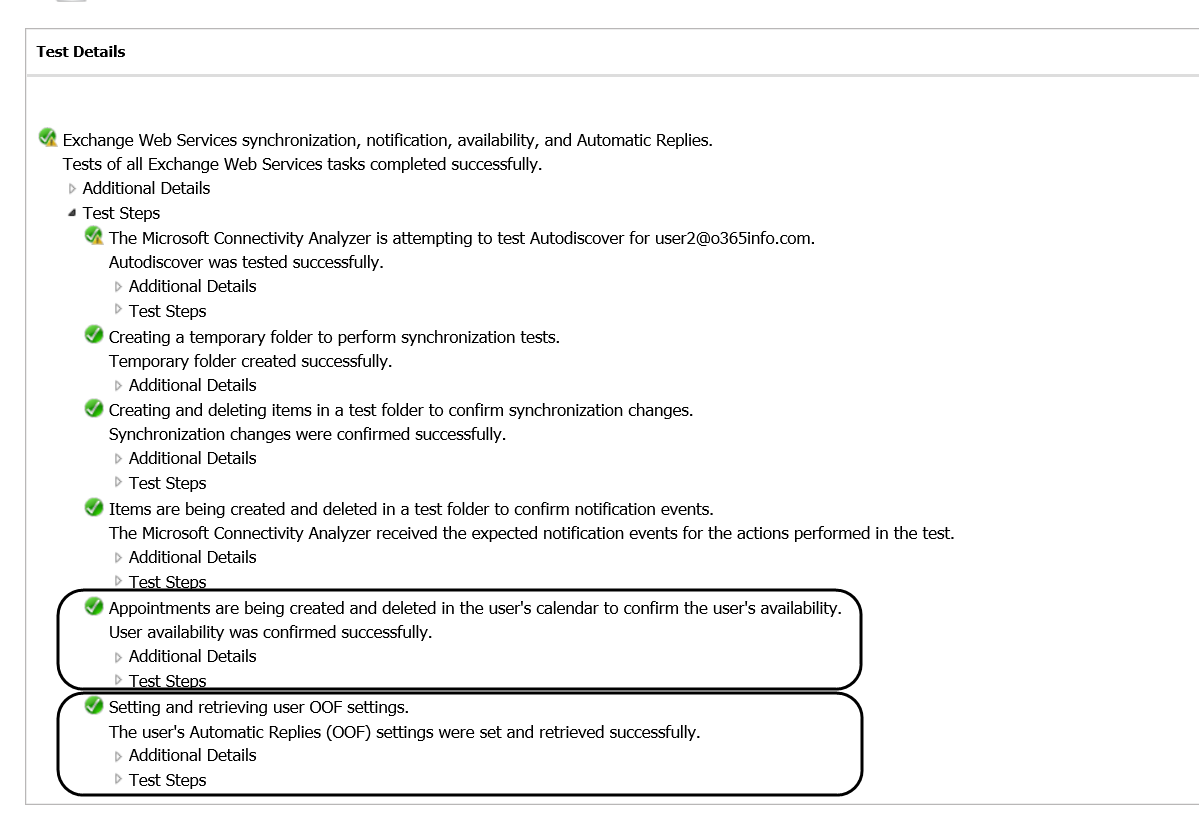
In the following screenshot, we can see an example of the required steps that we need to implement to verify the availability of the Exchange On-Premise EWS service.
1. Choose the Exchange server tab and then under the “Microsoft Exchange Web Services Connectivity Tests” choose the option: Synchronization, Notification, availability and Automatic reply
2. Provide Exchange On-Premise user credentials
To be able to get the required information, we will need to provide user credentials of users that have Exchange On-Premise mailbox.
In our example, we use the credentials of users named: User2

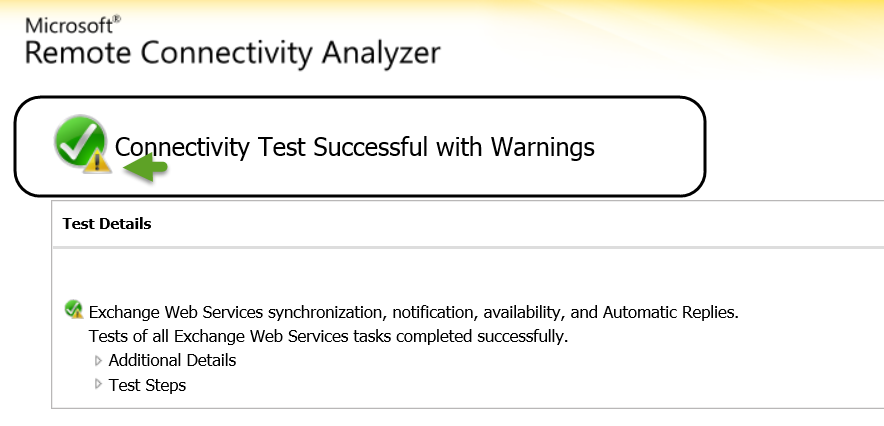
3. In the result screen, we can see that the header is: “Connectivity Test Successful with Warning.”
This is the “required result” despite that the result includes a “Yellow Exclamation mark.”
The Exchange On-Premise Web service test will include by default some minor errors that caused by the “trial and error” mechanism of the AutoDiscover process.
The fact that we get the “Green icon” is the Indication for the successful implementation of the Exchange On-Premise Web service process.
4. In case that we want to get more detailed information, we can click on the “Test Step“.
In the following screenshot, we can see the content of the AutoDiscover XML file.
9. Exchange On-Premise Hybrid server | Public Certificate
The communication channel between the Exchange Online and Exchange On-Premise, is based on the basic assumption that the communication channel is “secured”. The need for securing the communication channel, is because the fact that the information between the two endpoints is transferred over the public network.
The creation of the secure communication channel implemented by using a secure protocol such as HTTPS and SMTP\TLS and the component that used for creating data encryption. Data integrity, mutual authentication and so on, is based on a Public certificate that is the use of both sides (Exchange Online and Exchange On-Premise).
The underlying assumption is that the Exchange Online Public certificate configured correctly and available.
In our scenario, we will need to verify the subject of the Public certificate on the “Exchange On-Premise server side.”
Note – we will not get into details about how to create a certificate request install a public certificate on the Exchange On-Premise and so on.
The underlying assumption is that the Exchange On-Premise includes an insulation of Public certificate, and we just want to verify that the Public certificate is installed and include the required information.
The Exchange On-Premise public certificate will be used as part of the AutoDiscover service and actually for the encryption of the mail flow (SMTP/TLS) between the Exchange On-Premise Server and Exchange Online server.
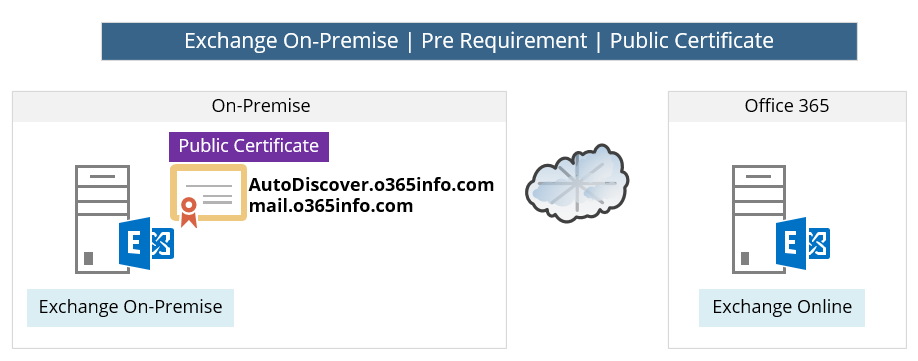
In the following diagram, we can see an example for the “Hosts names” that will need to include in the Exchange On-Premise public certificate.
In our scenario, the Exchange On-Premise public certificate should include the host’s name: Autodiacover.o3655info.com for the Autodiscover services and additional hostname – mail.o3655info.com
this is the hostname which will be used by Exchange Online server for addressing Exchange On-Premise server (creating a secure communication channel to the Exchange On-Premise server).
Public certificate types
There is a couple of Public certificate types. The most common types are:
Wildcard certificate and SAN (Subject Alternative Name) certificate.
The major difference between this two type is: that the wildcard certificate doesn’t include information about a specific host’s name vs. the SAN certificate that need to include a specific name of the “Host” that are allowed to use the certificate.
Public certificate requirements
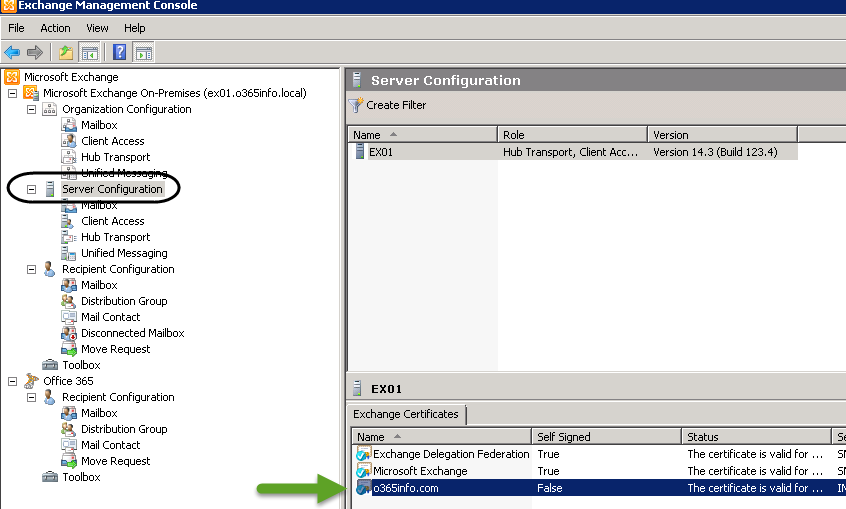
To be able to check\verify the Public certificate setting in Exchange On-Premise, use the Exchange MMC, Server configuration, choose the Hybrid server name (EX01 in our scenario) by looking at the Exchange Certificate Tab.
Note: these instructions are relevant for the Exchange 2010 interface.
There are three main requirements that relate to the Exchange On-Premise certificate:
1. Public certificate
The meaning of the term “Public certificate” is that the certificate created by a Public CA (Certificate Authority).
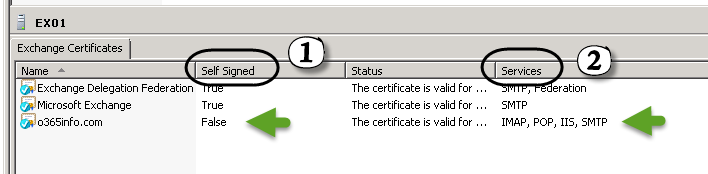
In the following screenshot, we use the Exchange 2010 On-Premise MMC interface for getting information about the Public certificate.
We can see that under the section of “self-Signed,” the value of the certificate is: False (number 1 in the screenshot).
The meaning is that this certificate was not created by the Exchange On-Premise server (self- Signed but instead was created by a Public Certificate provider.
2. Certificate assignment
The Public Certificate should be assigned to the following Exchange services: IIS and SMTP (number 2 in the screenshot).
3. SAN Public certificate
A SAN (Subject Alternative Name) certificate includes the name of the hosts who “allowed” to use the certificate. The term “Subject” describes the Hostname that could be implemented as a simple hostname such as SRV1 or FQDN such as mail.o3655info.com.
When Exchange on-Premises server “present” his public certificate to Exchange Online, Exchange Online will need to check that the mail server name configured in the Exchange Online receives connector, is included in the Public certificate that the Exchange on-Premises server provide.
(In our scenario: the Public certificate that Exchange on-Premises server provider will need to include the hostname: mail.o3655info.com.
We recommend that you provide all the necessary DNS names in the same certificate by using a Unified Communications certificate that supports the Subject Alternative Name field. Using a Unified Communications certificate reduces the complexity of configuring and managing the Autodiscover service and Exchange services URLs. However, using a Unified Communications certificate may increase the cost, as this kind of certificate can be more expensive than the single-name certificates that you already may own.
Certificates – the digital certificate used for secure mail transport between the on-premises and Exchange Online organizations must be installed on all on-premises Client Access servers, must be issued from a third-party certificate authority (CA), must not be expired, and must have the IIS and SMTP services assigned. If these certificate requirements are not met, secure mail transport from the Exchange Online organization to the on-premises organization will not function correctly.
Read more: Troubleshoot a hybrid deployment.
Verify-Check the content of the Exchange on-Premises server Public certificate
Option 1: get information about the Pubic Certificate using Exchange MMC
To be able to verify the hosts named that are included in the Public certificate, double-click on the public certificate and on the detail’s tab look for the field – Subject Alternative Name
In the following screenshots, we can see that the public certificate includes all of the required host’s names.
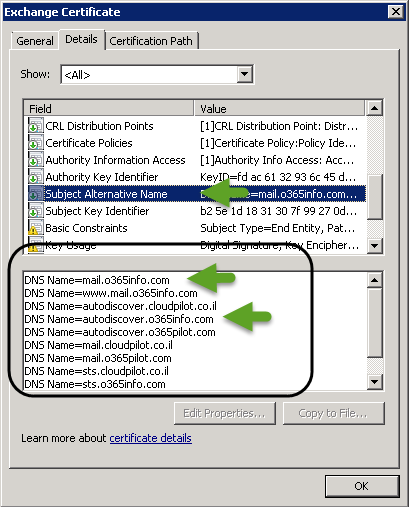
Note: the subject of including host’s names in a Public certificate is not relevant when we use a wild-card certificate because in this scenario, the certificate relates to “all the of the hosts” under a specific domain.
Option 2: check the Exchange On-Premise Public certificate by access the OWA URL
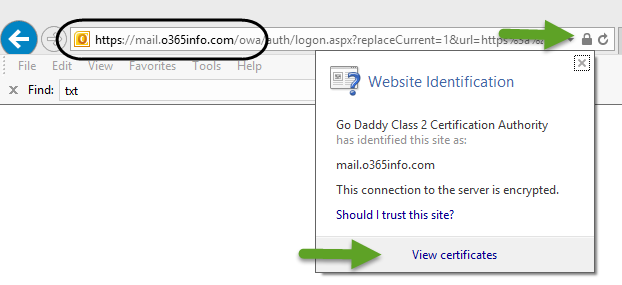
Another option to check the Exchange On-Premise public certificate is to access the Exchange On-Premise URL that is used for the OWA access.
In our scenario, the OWA URL is: https://mail.o365info.com/owa
In the following screenshot, we can see that we use the URL, on the right corner of the URL Bar, we can see the lock icon that represents the fact that the site provides a certificate.
When we double-click on the lock icon, we will be able to see the “content” of the public certificate that the Exchange on-Premises server provides.
10. Microsoft MFG server and the proof of the ownership process
The first step when we need to create a Hybrid configuration is the step in which the Exchange On-Premise server creates trust relations” with the Microsoft Federation Gateway (MFG).
This trust relationship described as Federation trust
Note – when using hybrid configuration both of the sides (Exchange On-Premise and Exchange Online) need to “trust” the MFG. The Office 365 cloud infrastructure is set to automatically trust the MFG server so the only requirement is to “build” a new trust between the Exchange On-Premise and MFG.
The “creation” of the Federation trust with the Microsoft MFG server, is created by implementing a “proof of ownership” process for the public domain that we use.
For example: in case that we want to configure Hybrid configuration using the public domain name: o3655info.com, we will need to prove that we own this domain.
The “proof of ownership” process implemented in the following way: when using the HCW, Exchange On-Premise contacts the Microsoft MFG server.
The MFG server replies with a “TXT string.”
We will need to copy this text string, go to our public DNS server, add a new TXT record that includes the value that was provided by the MFG server and only after we have created the “proof,” MFG servers will access our public DNS server looking for this TXT string.
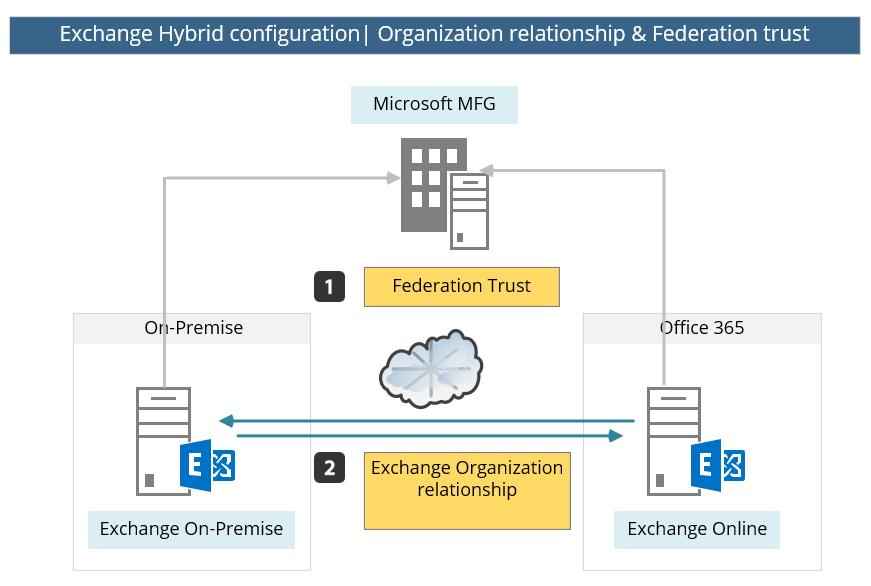
In the following diagram, we can see a description of the flow or the steps that are required for building the trust with the Microsoft MFG server.

When using the HCW (Exchange Hybrid Configuration wizard), the required TXT string that sent from the MFG server will be displayed on the screen.
In case that from some reason the required TXT string is not shown, we can use a PowerShell command for displaying the TXT string (the TXT Domain Proof).
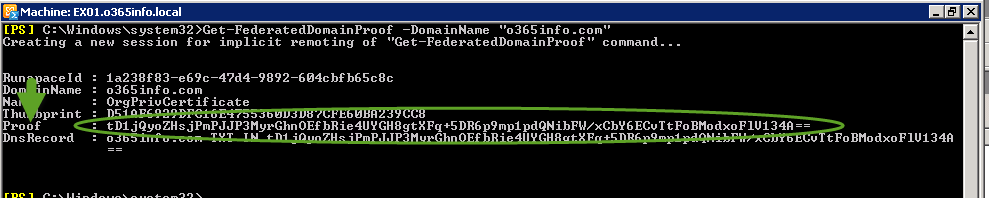
The PowerShell that we use is based on the following syntax:
Get-FederatedDomainProof -DomainName "<Domain name>"In the following screenshot, we can see the Domain Proof Text string.
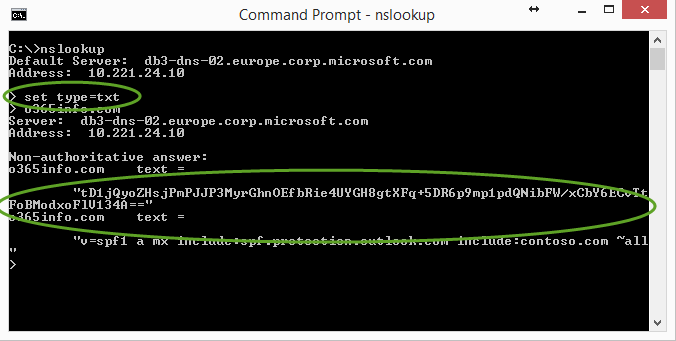
Option 1: Verify that the TXT record is configured correctly in the Public DNS using a Nslookup command tool
In case that we want to verify that the TXT record (TXT Domain Proof) was configured correctly in the Public DNS, we can create a query for a TXT record.
To verify that the TXT record (TXT Domain Proof) configured in the Public DNS, you can check the information by using the NSLOOKUP command.
For example – we can use the NSLOOKUP tool for getting information about the TXT record that are configured in the domain: o3655info.com
from the command prompt we type:
Nslookup
Set type=txt
Next we will type the name of the domain name which we want to query.
o365info.com
In the following screenshot, we can see the result of the Nslookup command
Option 2: Verify that the TXT record is configured correctly in the Public DNS using web tool.
There are many free web tools that can help us to query DNS server.
In the following example, we will use the site MxToolbox.
- Choose the More menu
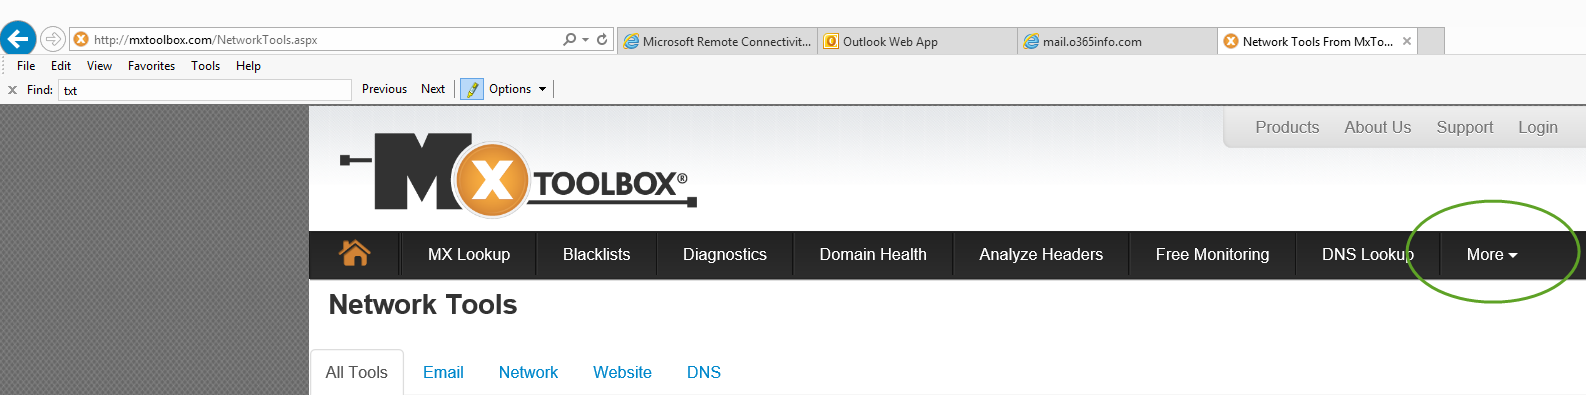
- Choose the TXT option and type the domain name that you want to query.
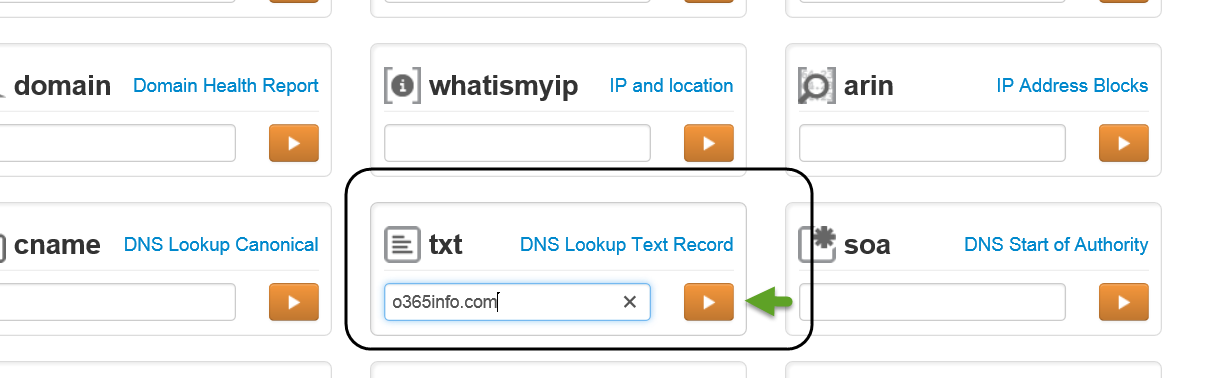
In our example, we would like to get information about all the TXT records in the domain o365info.com
In the following screenshot, we can see the result of the query. There is a two TXT record under the o365info.com domain.
One of this TXT record is the Text string that was provided by the Microsoft MFG server and updated in the o365info.com domain as a TXT record.

11. Direct communication channel | Exchange on-Premises server to Exchange Online
The subject of mail flow in Hybrid configuration relates to many scenarios of incoming mail flow and outgoing mail flow.
For example –
- Mail that is sent from “cloud infrastructure” to the public network.
- Mail that is sent from “cloud infrastructure” to the Exchange on-Premises recipients.
- Mail that is sent from Exchange on-Premises to the public network.
- Mail that is sent from Exchange on-Premises to Office 365 recipients.
We will not get into details of all the available mail flow scenario, but instead, I would like to emphasize only the mail flow between the Exchange on-Premises server and the Exchange Online and vice versa.
As mentioned before, in Hybrid configuration the Exchange on-Premises Server and Exchange Online, act as one unit or one entity.
The configuration implemented by creating a direct communication path between the Exchange on-Premises Server and Exchange Online that based on SMTP\TLS and HTTPS protocol.
All the mail flow between Exchange on-Premises Server and Exchange Online is passing through this secure communication channel.
For example, in case that Bob’s mailbox is located on the Exchange on-Premises server and, Bob send mail to Alice that her mailbox is located on the Exchange Online server, the mail will be “transferred” by the Exchange on-Premises server to the Exchange Online using the “direct secure communication link” that exists between Exchange on-Premises Server and Exchange Online (this “secure channel” is created by the HCW – Exchange Hybrid Configuration wizard)
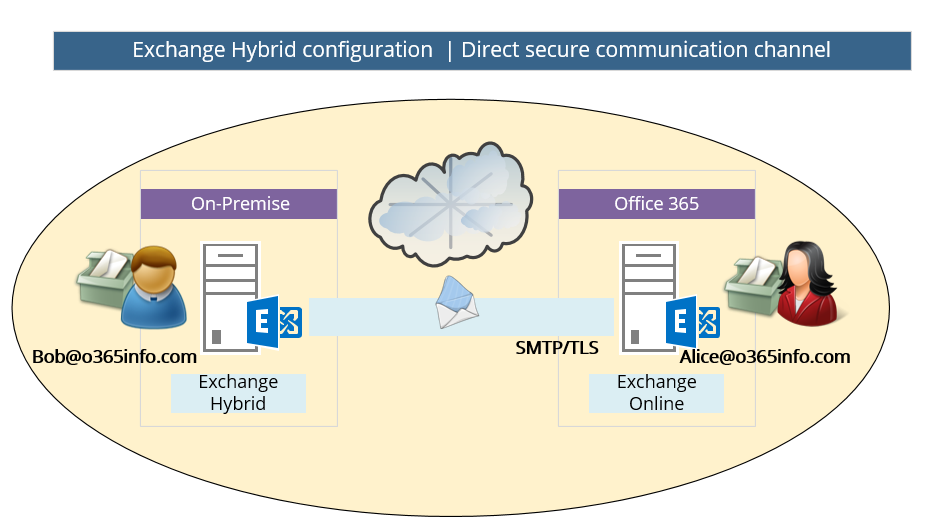
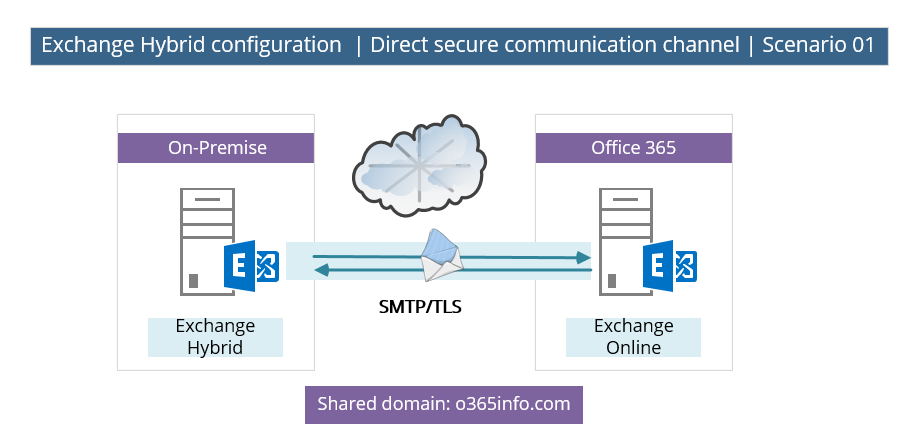
In the following diagram, we can see an example of the required configuration for the secure communication link between the Exchange On-Premise and the Exchange Online server.
In our scenario, the shared domain is – o365info.com
Each of the mail that will be sent from Exchange On-Premise recipient to “cloud recipient” (Exchange Online) and vice versa, that include the domain name: o365info.com, will be routed through the direct secure communication channel that exists.
Note: the “direct secure communication channel” is implemented by a set of four connectors:
1 send connector, and 1 receive connector that created on the Exchange On-Premise hybrid server and the same on the “Exchange Online side.”
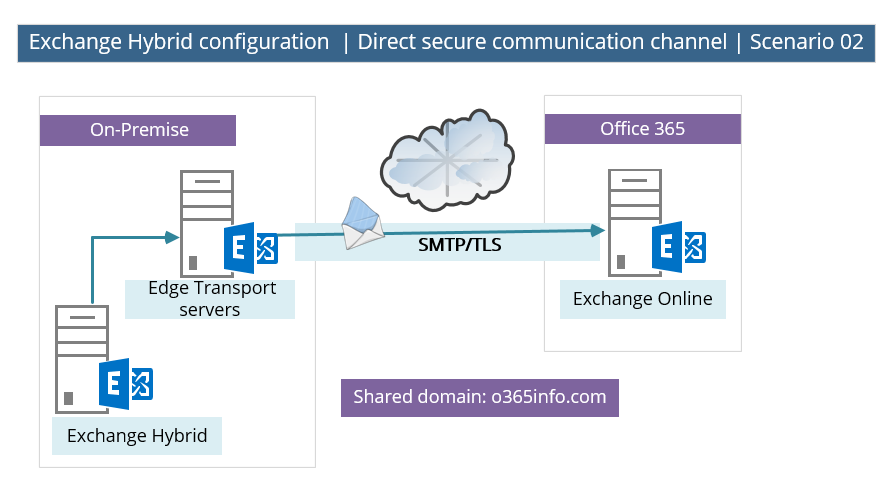
Another supported scenario could be a scenario in which the Exchange On-Premise environment includes an Edge Transport server. In this situation, the direct secure communication channel will be created by using the Edge Transport server as an “end-point” or gateway on the On-Premise side.
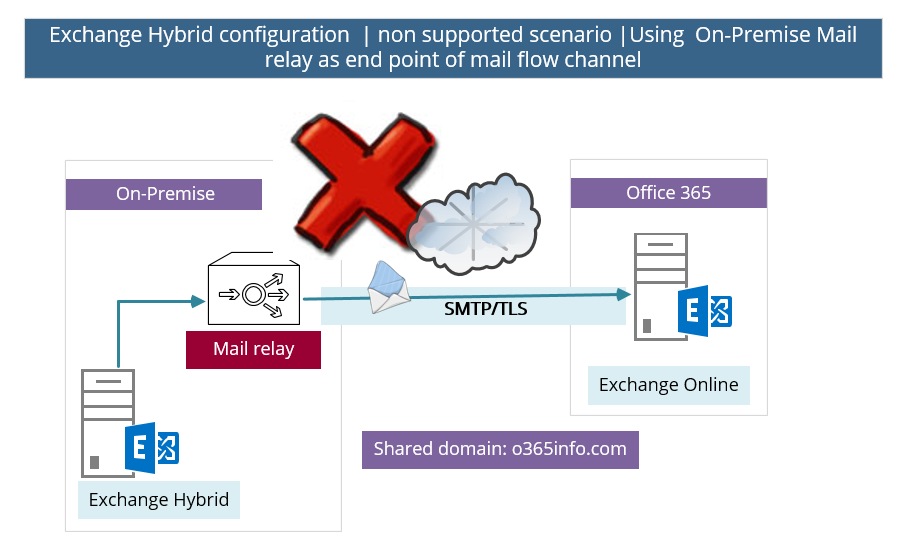
A non-supported scenario | using non-Exchange server as “On-Premise End-point”
A non-supported scenario that we need to avoid is: a scenario in which we use “non-Exchange server” as an endpoint in the On-Premise environment.
For example: in the following diagram, we can see a scenario in which the direct secure communication channel created between a mail security gateway (“non-Exchange server”) and Exchange Online.
Technically speaking, we can implement this scenario, but this configuration is not supported, and there is a reasonable chance (if not a certain chance) that you will experience many types of problems.
The reason that this scenario is not supported is because the “direct secure communication channel” in a hybrid environment is not just a simple connector between two separated mail servers, but instead, a communication channel that includes many configuration settings and parameter that relate directly to “Exchange servers.”
There can be no other SMTP hosts or services between the on-premises Exchange 2013 Client Access servers or an Exchange 2013/2010 SP3 Edge Transport server and EOP. Information added to messages that enables hybrid transport features is removed when they pass through a non-Exchange 2013 server, pre-Exchange 2010 SP3 servers, or an SMTP host.
Read more: Transport options in Exchange hybrid deployments.
What Others Are Reading
This Post Has 0 Comments