It's important to configure technical contact details in Microsoft 365. Suppose there are technical issues…
Exchange Online historical message trace report
The message trace report displays information about each incoming and outgoing mail sent over the last 90 days in Exchange Online. In this article, you will learn how to export a message trace report in Exchange admin center and with the HistoricalSearch PowerShell cmdlet.
Table of contents
Exchange message trace
Exchange Online has information about each mail flow transaction in our mail infrastructure that passes via the server and is kept for 90 days.
You can get message trace information for up to 90 days in the Exchange admin center and with Exchange Online PowerShell. We will show you how to export the message trace report to a CSV file with the HistoricalSearch PowerShell cmdlet.
Suppose you want to get faster results and export information on each mail sent and received in Exchange Online for up to 10 days, you can read the article Get Message Trace in Exchange Online.
Get-HistoricalSearch PowerShell cmdlet
First, we will look at the advantages and disadvantages of the Get-Historical PowerShell cmdlet.
Advantages:
- Exchange Online server log files register detailed information about each mail transaction.
- Exchange Online provides us with an extended time range of 90 days. It allows you to retrieve mail transaction information for a longer duration. There is no 10-day limitation like when using the PowerShell command Get-MessageTrace.
Disadvantages:
- Exchange Online registers the request for information as a task and executes it after several hours.
- The information you get can be overwhelming, and it’s not easy to read and understand.
- The information is only available in a CSV report.
If you require information about a mail transaction older than 10 days, use the PowerShell command Get-HistoricalSearch. Also, when you want to investigate a specific mail transaction registered in the Exchange Online log file.
Message trace reports
You can view and export the log information using the message trace in the Exchange admin center.
There are 3 types of reports in the Exchange admin center.
Summary report:
- Instant online access.
- The information is displayed in an HTML window, but you export results.
- Shows data of mail messages up to 10 days old.
- The log data only includes essential information.
Enhanced summary report:
- Export and download the information to a CSV (Comma Separated Values) file.
- Shows data of mail messages up to 90 days old.
- The log data includes more detailed information.
Extended report:
- You can export and download the information to a CSV file.
- Shows data of mail messages up to 90 days old.
- The log data is very comprehensive and with more detailed information.
Note: With the PowerShell cmdlet Historical Search, you can only export the enhanced summary report.
Export extended message trace report in EAC
Requirements to export an extended message trace report in the Exchange admin center.
- Fill in one of the following fields: Sender, Recipient, or Message ID.
- To ensure all messages are returned, you need to specify the recipient.
- You must select a date range of more than 10 days.
Time needed: 15 minutes
Prepare message trace extended report in Exchange admin center:
- Go to Exchange admin center
Sign in to the Exchange admin center with your admin credentials.
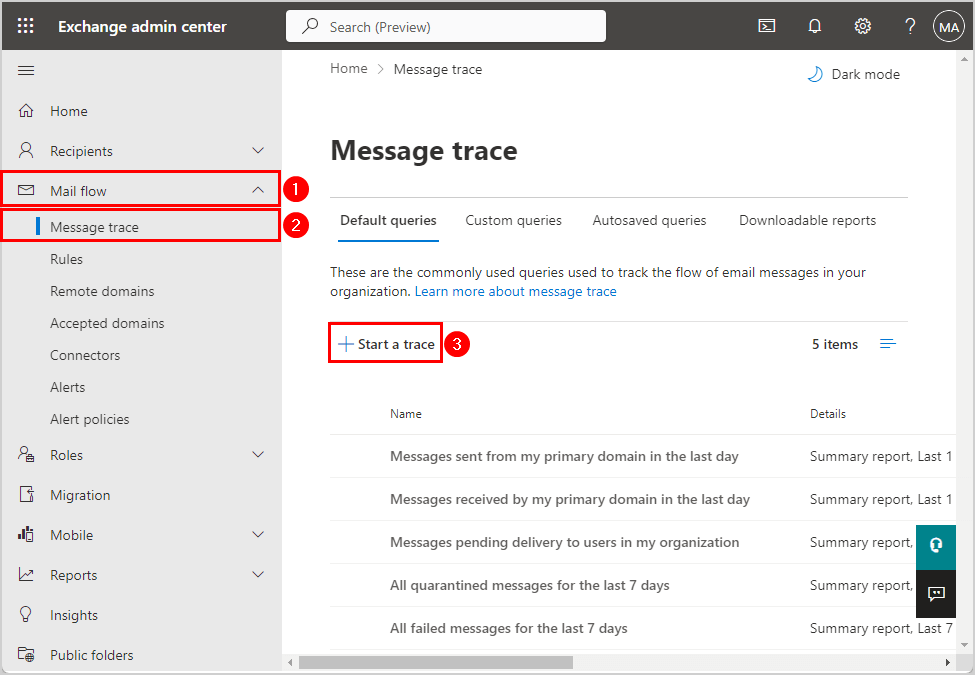
- Start a trace
Click on Mail flow > Message trace > Start a trace.

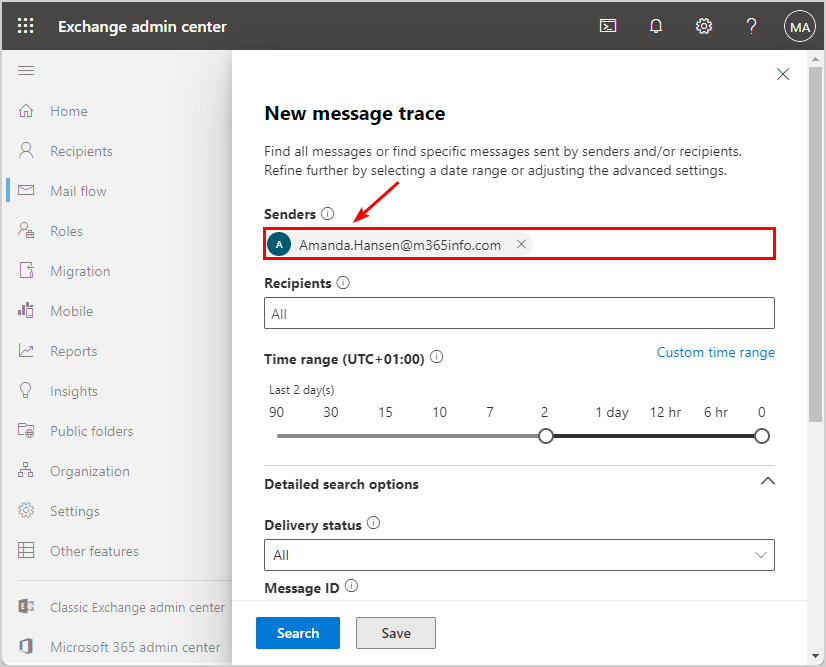
- Add senders
Add a specific sender. Put an asterisk * before the domain name to include all organization senders.

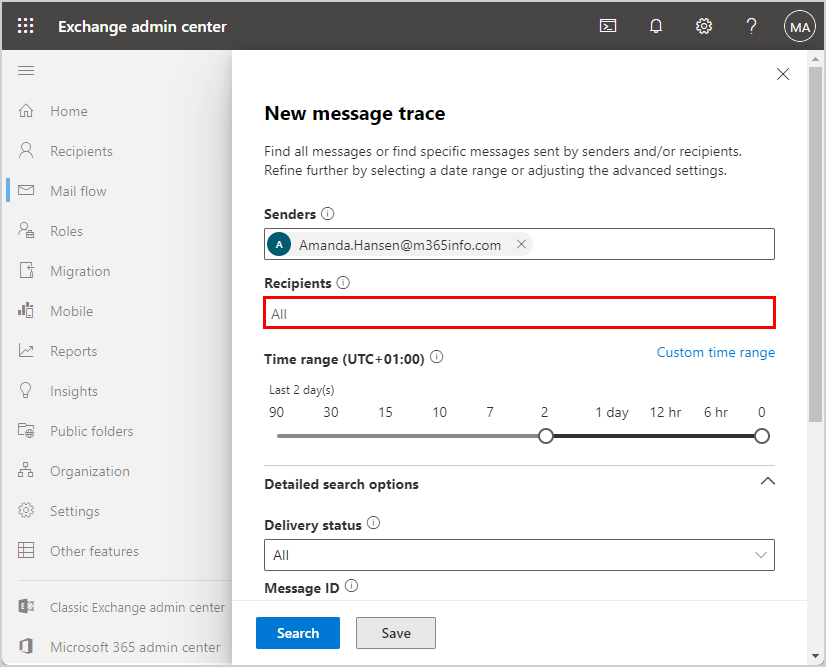
- Add recipients
Add a specific recipient and select it from the suggested results. Put an asterisk * before the domain name if you only want to include all organization recipients.
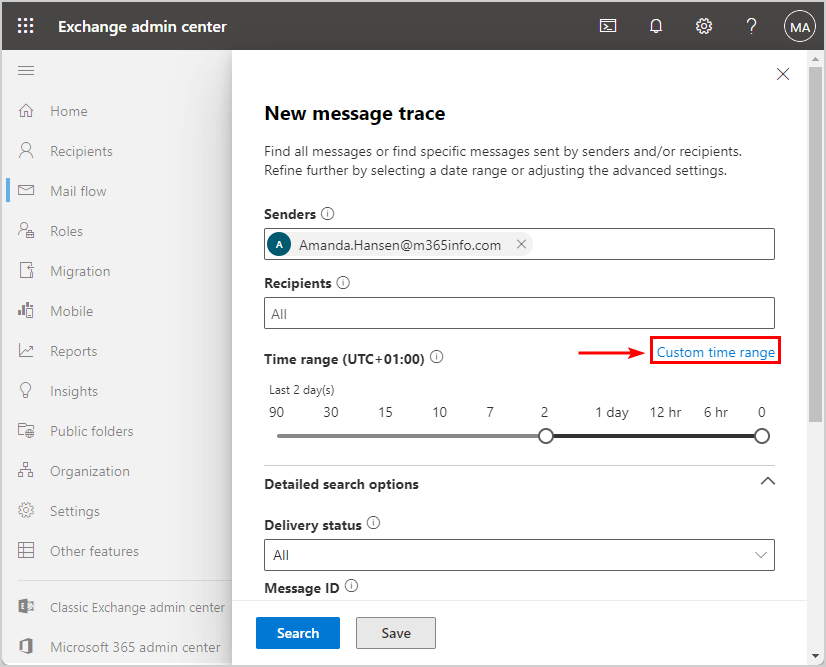
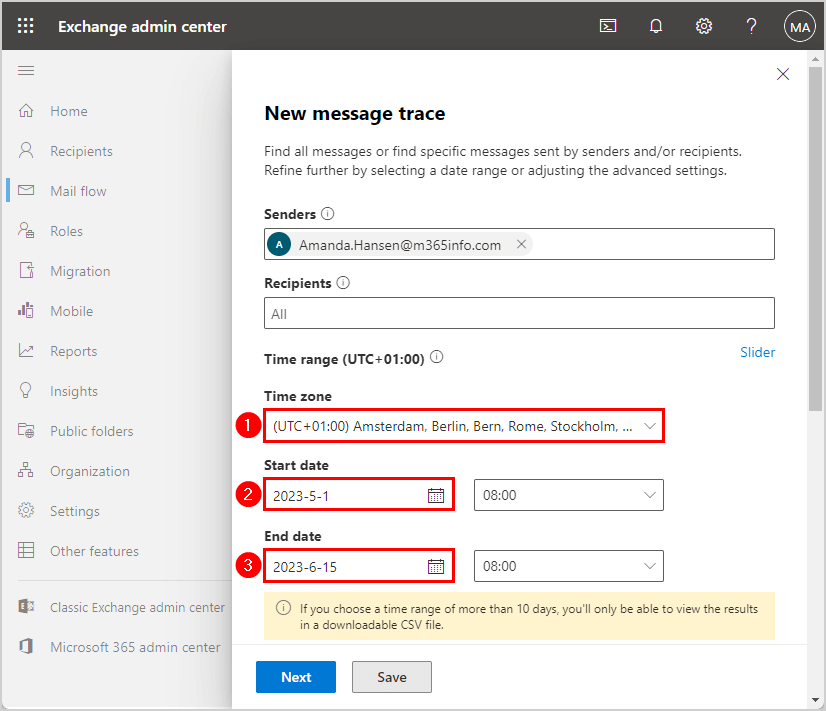
- Custom time range
Click on Custom time range.
- Start and End date
Change the Time Zone to your country.
Choose a Start date and End date.
The time range must be more than 10 days.
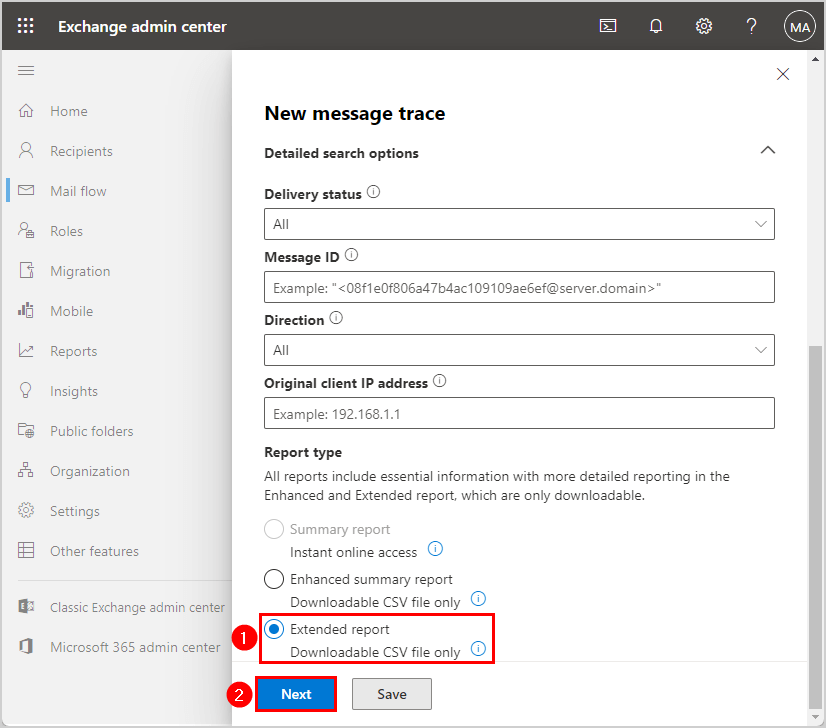
- Report type
Select the Extended report and click Next.

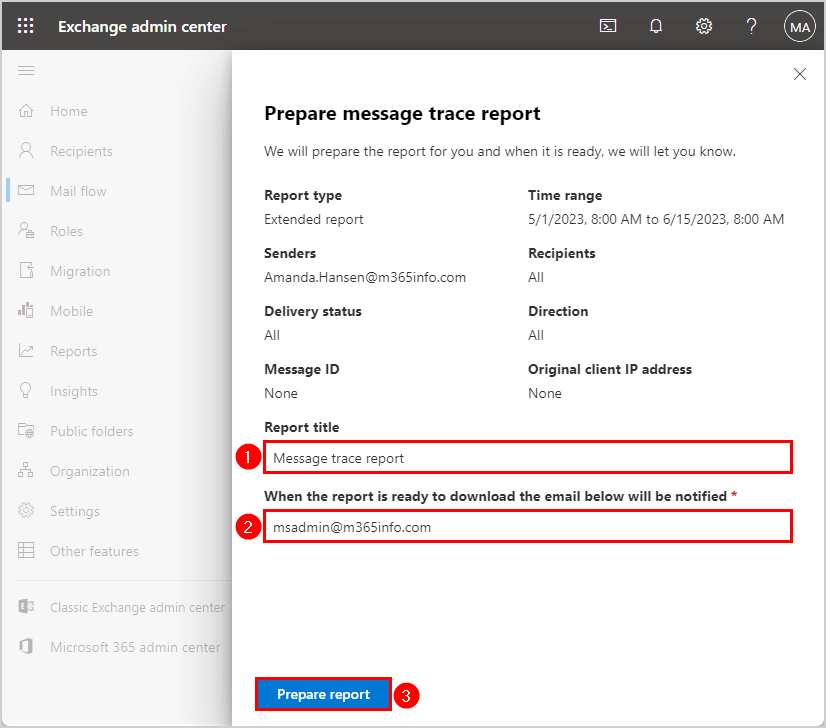
- Prepare message trace report
Change Report title (optional)
Specify your email to be notified
Click Prepare report.
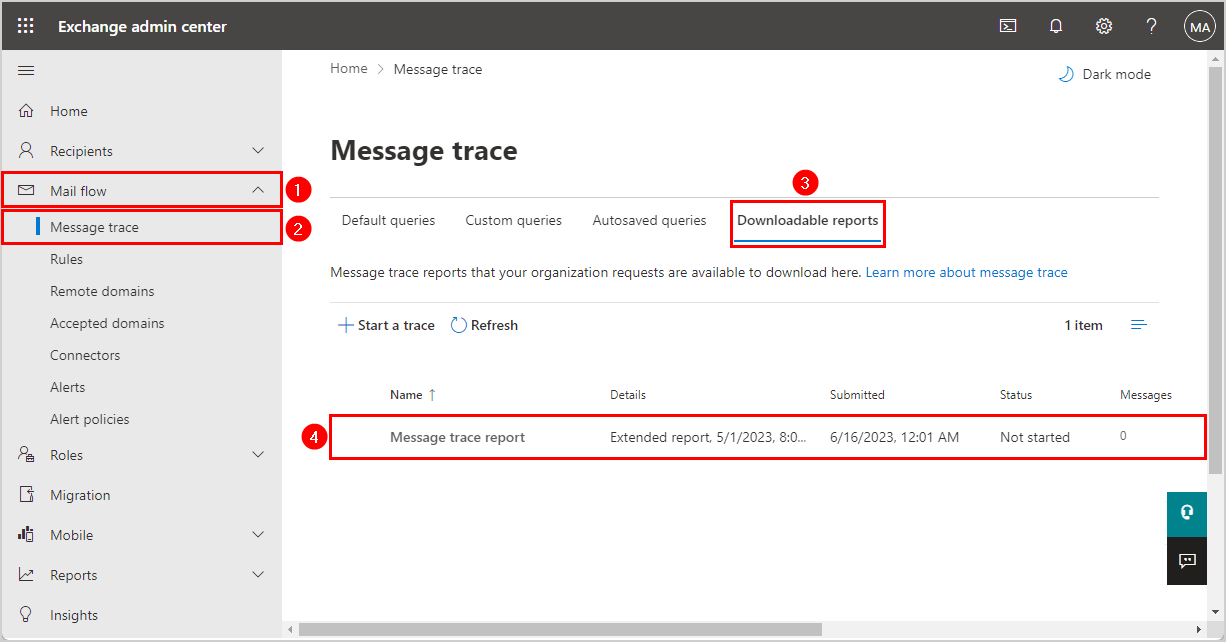
Check message trace report status
Next, you can check the status of the message trace report in the Exchange admin center: Go to Mail flow > Message trace > Downloadable reports.
At first, the status shows Not started.
After a couple of minutes, the status changes to In progress.
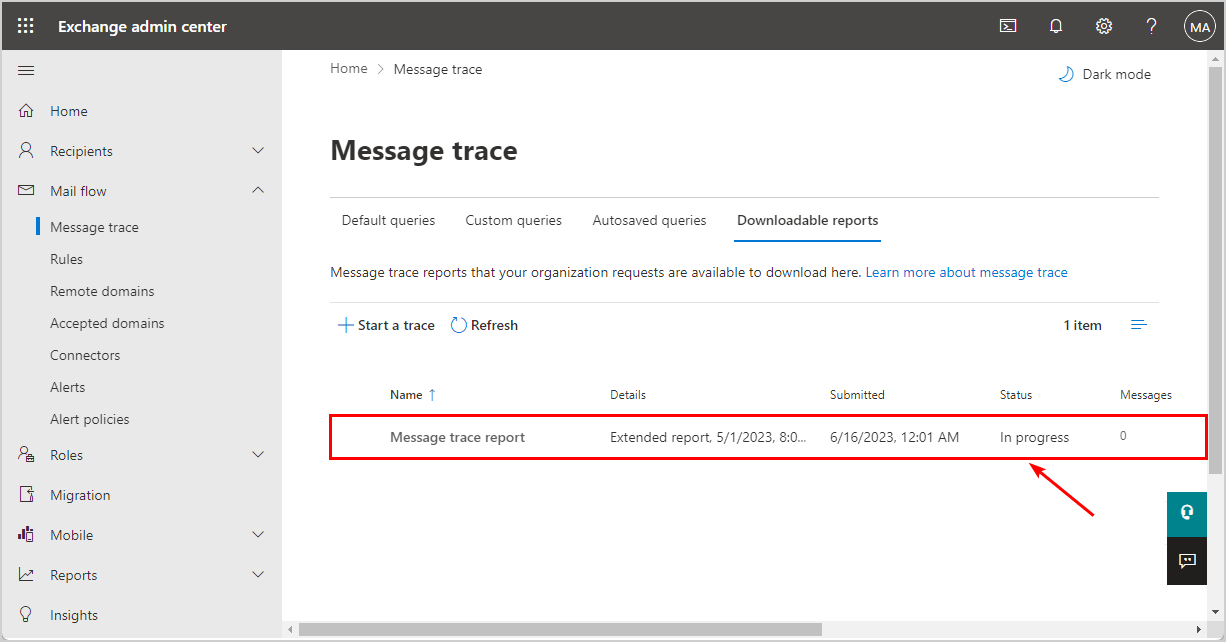
It can take a couple of hours for the report to be completed. Once the report is finished, you will be notified by the email you provided. This email must have a license assigned, or you can’t access emails in Outlook.
Note: There is a limit of 250 historical searches you can submit in one day. The CSV file will not exceed 100,000 lines or results.
Export enhanced message trace report with PowerShell
You can also use the Exchange Online PowerShell cmdlet HistoricalSearch to export message trace results for up to 90 days. It can only export an enhanced summary report.
1. Start HistoricalSearch
Start a new historical search for messages less than 90 days old.
To use the PowerShell Start-HistoricalSearch cmdlet to create an enhanced message trace summary report, you need to fill in these parameters:
- Date range: StartDate 05/01/2023 to EndDate 06/14/2023.
- Report Type: Name the file “Report Amanda“
- Sender Address: Amanda.Hansen@m365info.com
- Notification email address: admin@m365info.com
PowerShell command example:
Start-HistoricalSearch -ReportTitle "Report Amanda" -SenderAddress "Amanda.Hansen@m365info.com" -ReportType MessageTrace -StartDate 05/01/2023 -EndDate 06/01/2023 -NotifyAddress admin@m365info.comThe PowerShell output shows this result below.
PS C:\> Start-HistoricalSearch -ReportTitle "Report Amanda" -SenderAddress "Amanda.Hansen@m365info.com" -ReportType MessageTrace -StartDate 05/01/2023 -EndDate 06/14/2023 -NotifyAddress admin@m365info.com

JobId                                SubmitDate          ReportTitle   Status     Rows ErrorCode ErrorDescription
-----                                ----------          -----------   ------     ---- --------- ----------------
5f2cf07a-294b-4d86-8170-2d4b11536551 14/06/2023 10.35.59 Report Amanda NotStarted 0
After a couple of minutes, the status changes to In Progress.
PS C:\> Start-HistoricalSearch -ReportTitle "Report Amanda" -SenderAddress "Amanda.Hansen@m365info.com" -ReportType MessageTrace -StartDate 05/01/2023 -EndDate 06/14/2023 -NotifyAddress admin@m365info.com

JobId                                SubmitDate          ReportTitle   Status     Rows ErrorCode ErrorDescription
-----                                ----------          -----------   ------     ---- --------- ----------------
5f2cf07a-294b-4d86-8170-2d4b11536551 14/06/2023 10.35.59 Report Amanda InProgress 0
Suppose you want to select all users in your organization as senders. Put an asterisk * before the domain name in the -SenderAddress.
Start-HistoricalSearch -ReportTitle "Report All Organization Senders" -SenderAddress "*m365info.com" -ReportType MessageTrace -StartDate 05/01/2023 -EndDate 06/01/2023 -NotifyAddress admin@m365info.onmicrosoft.com2. Get HistoricalSearch
Use the PowerShell Get-HistoricalSearch to view information about historical searches performed within the last 10 days.
Get-HistoricalSearchThe PowerShell result shows all the reports that are Not Started, In Progress, Cancelled, and Done.
PS C:\> Get-HistoricalSearch

JobId                                SubmitDate          ReportTitle          Status    Rows ErrorCode ErrorDescription
-----                                ----------          -----------          ------    ---- --------- ----------------
277856a3-2e43-476c-b243-ec7d7537d56d 14/06/2023 08.25.54 Message trace report Done      41
5f2cf07a-294b-4d86-8170-2d4b11536551 14/06/2023 10.35.59 Report Amanda        Cancelled 0
0fed916e-794a-448d-9cf3-1897798f4543 14/06/2023 10.39.51 Report Amanda        Done      41
You can also check the progress of your report in the Exchange admin center under Downloadable reports. You will get a notification mail once the status changes to Done.
Use the PowerShell Get-HistoricalSearch cmdlet to check the status of a single JobId.
Get-HistoricalSearch -JobId 5f2cf07a-294b-4d86-8170-2d4b11536551The PowerShell result shows that the status value is Cancelled for this particular JobId.
PS C:\> Get-HistoricalSearch -JobId 5f2cf07a-294b-4d86-8170-2d4b11536551

JobId                                SubmitDate          ReportTitle   Status    Rows ErrorCode ErrorDescription
-----                                ----------          -----------   ------    ---- --------- ----------------
5f2cf07a-294b-4d86-8170-2d4b11536551 14/06/2023 10.35.59 Report Amanda Cancelled 0
Note: There is a limit of 250 historical searches that you can submit in a 24-hour period. So you will get a warning if you are near the daily quota.
You can get the below error if your historical search crosses the limit.
The Hygiene DAL retried a transient condition the maximum number of times.3. Stop HistoricalSearch
Let’s say you made a mistake in the SenderAddress or StartDate and want to cancel the historical search.
Note: You can stop queued historical searches where the status value is Not Started.
Use the PowerShell cmdlet Stop-HistoricalSearch to stop a specific historical search.
The PowerShell command syntax.
Stop-HistoricalSearch -JobId <JobId value>This PowerShell example stops the historical search.
Stop-HistoricalSearch -JobId 5f2cf07a-294b-4d86-8170-2d4b11536551Download message trace report
There are two ways to download the extended message trace CSV file report:
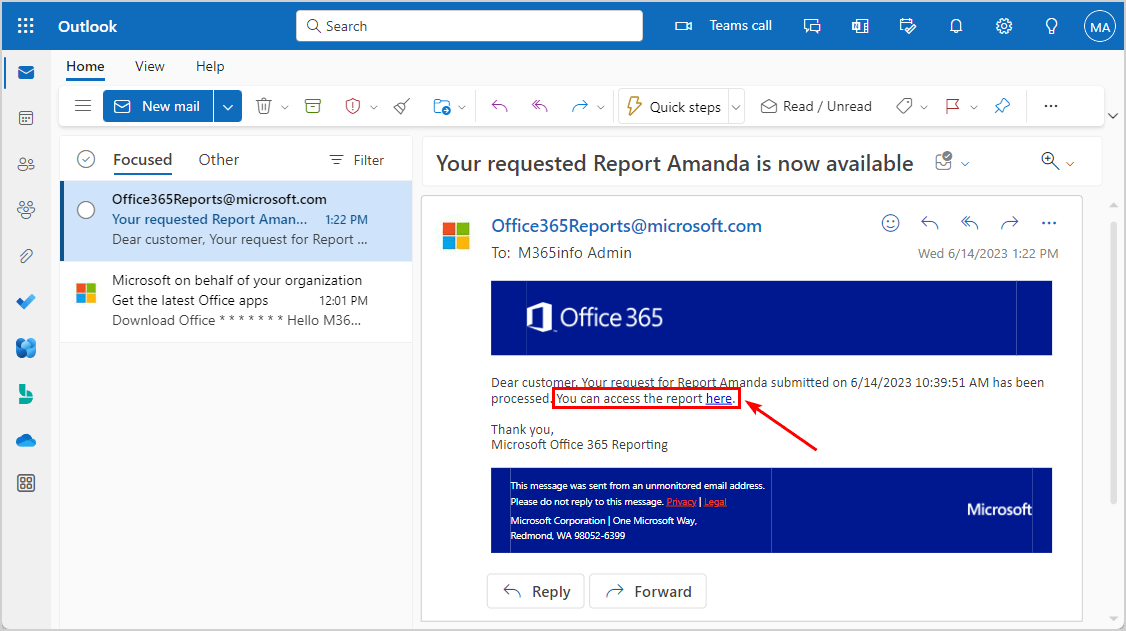
- Click the hyperlink in the mail you get when the report is ready
- Download the report in the Exchange admin center
Once the report is completed, you can open the mail and click here. It will open a new pane to download the report.
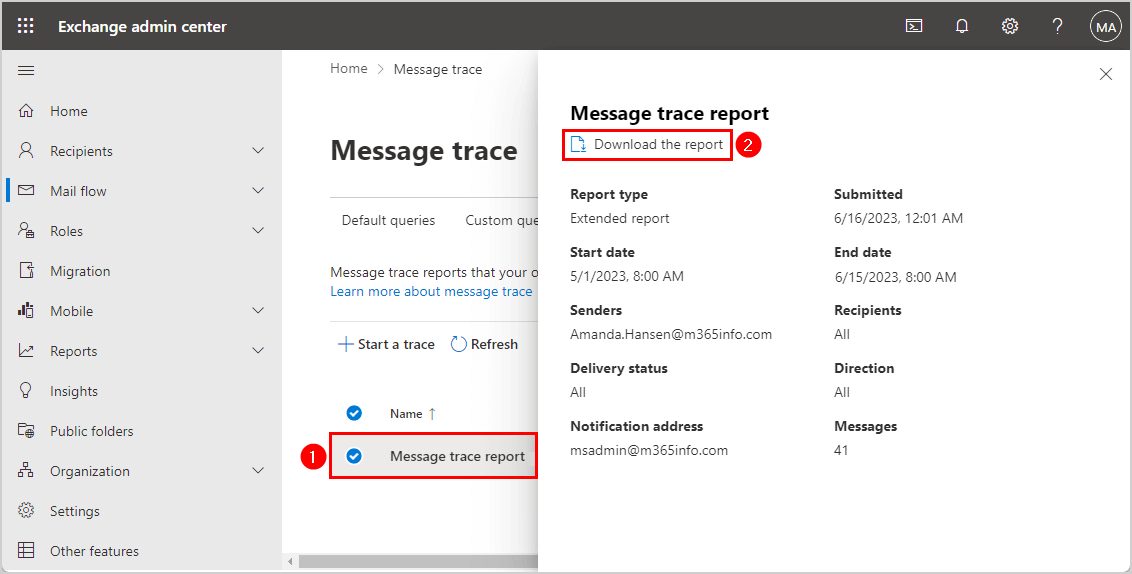
Or download the report in the Exchange admin center. Go to Mail flow > Message Trace > Downloadable reports.
Click on the report from the list so the pane opens up, and Download the report.
Open message trace report CSV file in Excel
Once you download the file, you can save it as .csv with UTF-8 encoding. If you immediately open the message trace report with an application like Microsoft Excel, the information will be incorrect.
The date and time information is not understandable, and the report looks unstructured. Also, all non-English characters are not readable and look like symbols. Luckily there is a way to fix this.
Before opening the message trace report, we need to make a few changes in Excel.
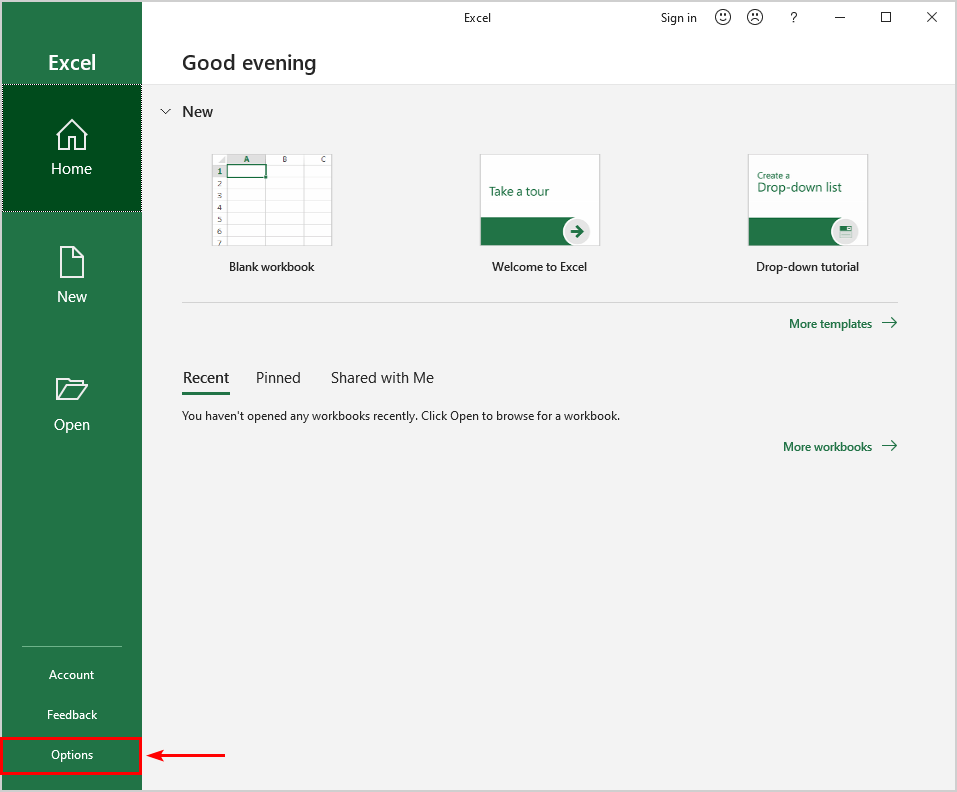
First, you need to make Microsoft Excel use a comma for the list separator:
- Open Microsoft Excel
- Click Options
Go to the Excel Options to save changes:
- Click Advanced
- Under Editing options > Clear System separators
- Set Decimal separator to period (.)
- Set Thousands separator to comma (,)
- Click OK
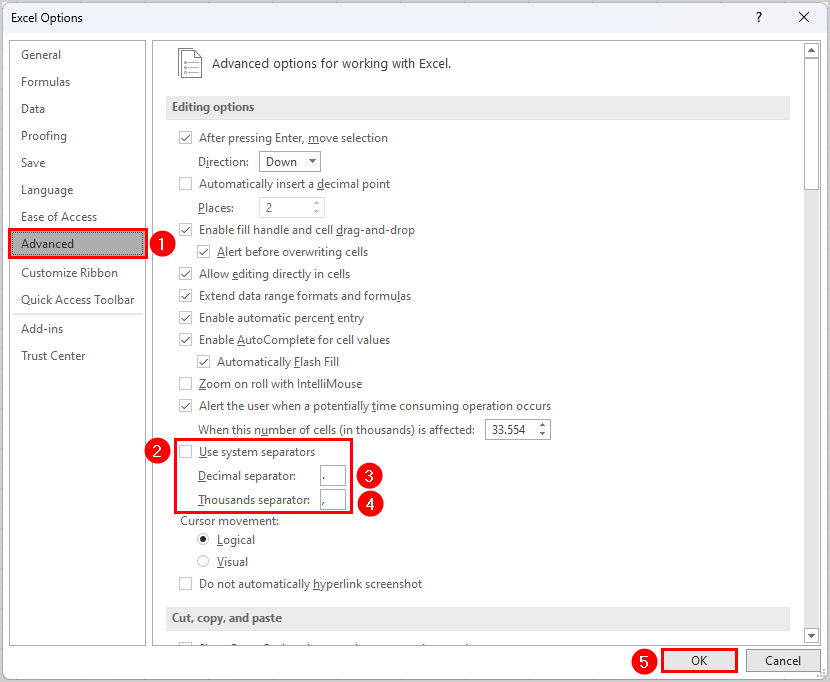
Note: Close the Microsoft Excel application to save the changes.
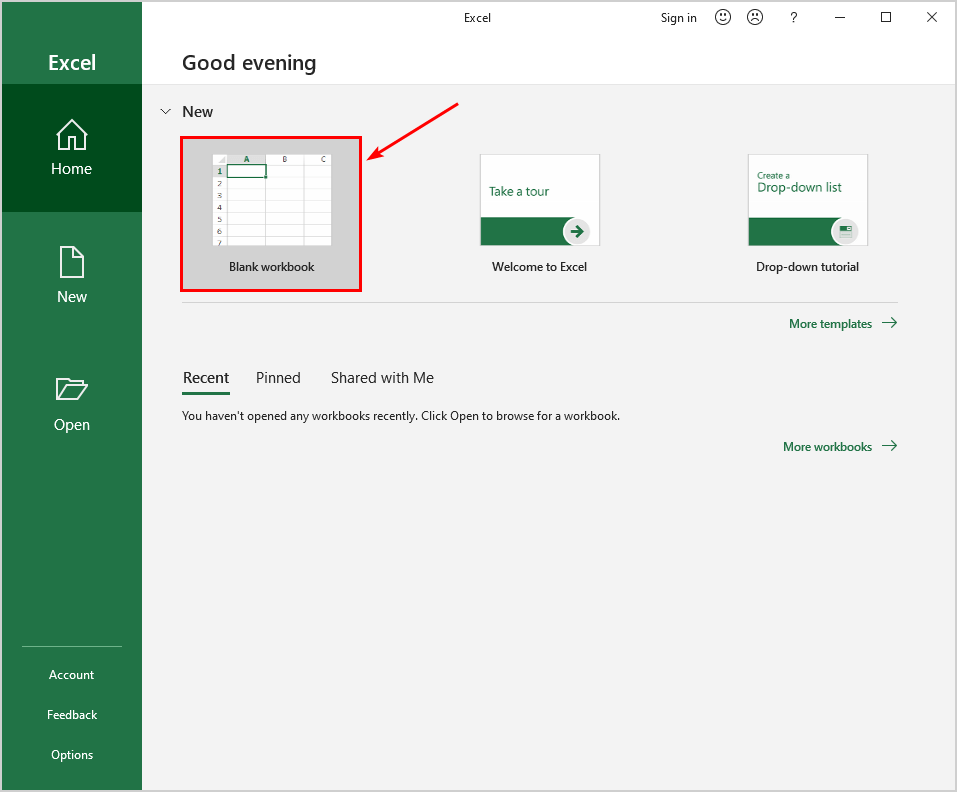
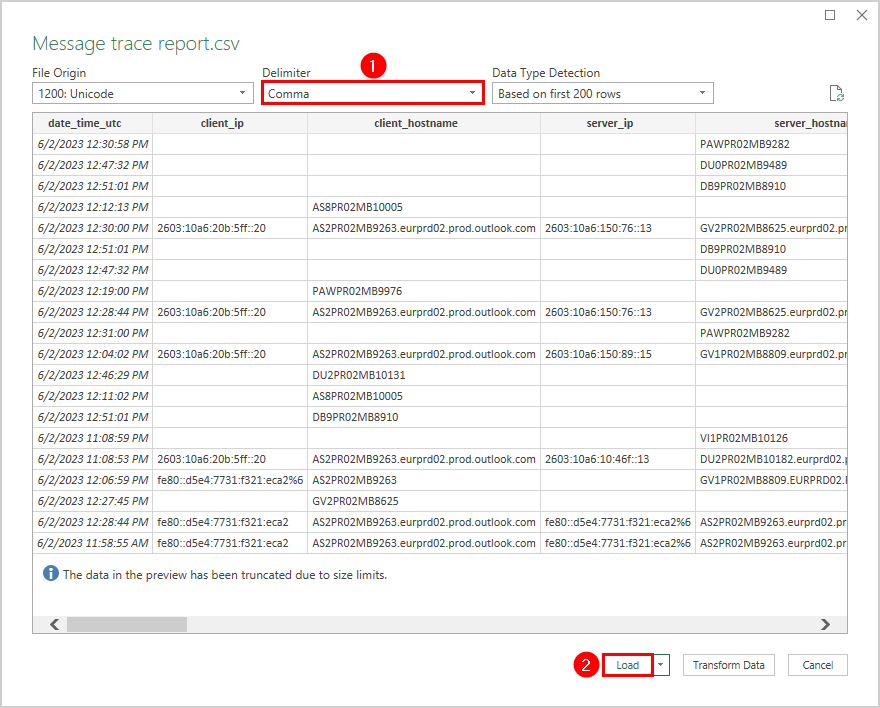
Next, we are going to load the message trace report in Microsoft Excel:
- Open the application Microsoft Excel
- Select New blank workbook
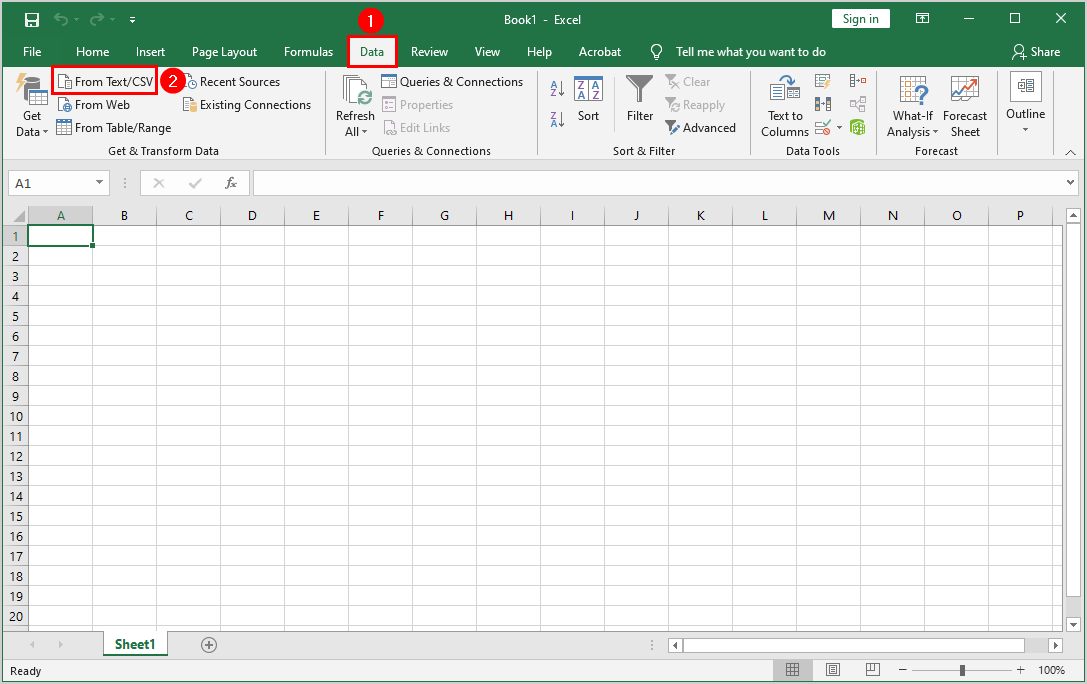
- Click on Data > From Text/CSV
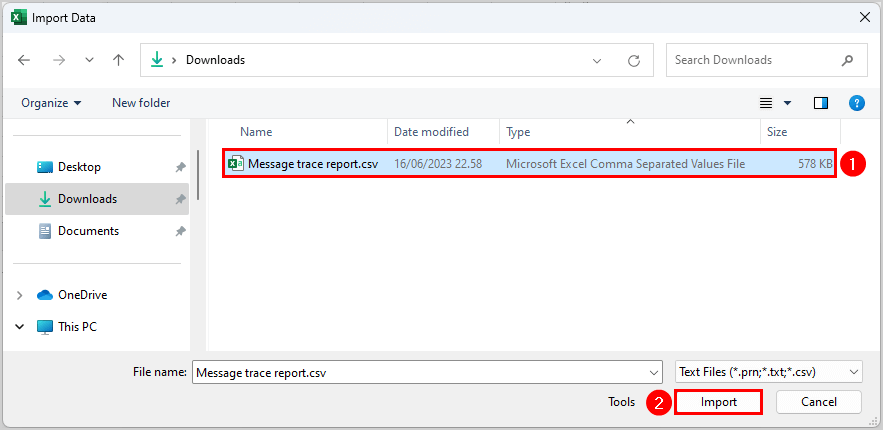
- Find and select Message trace report.csv
- Click Import
- Set the delimiter to Comma
- Click Load
Microsoft Excel loads and formats the data from the CSV file. The message trace report results are structured and correct. Now you will also be able to read non-English characters like Arabic, Chinese, etc.
- Sort and filter the columns by clicking on the arrows in the first row
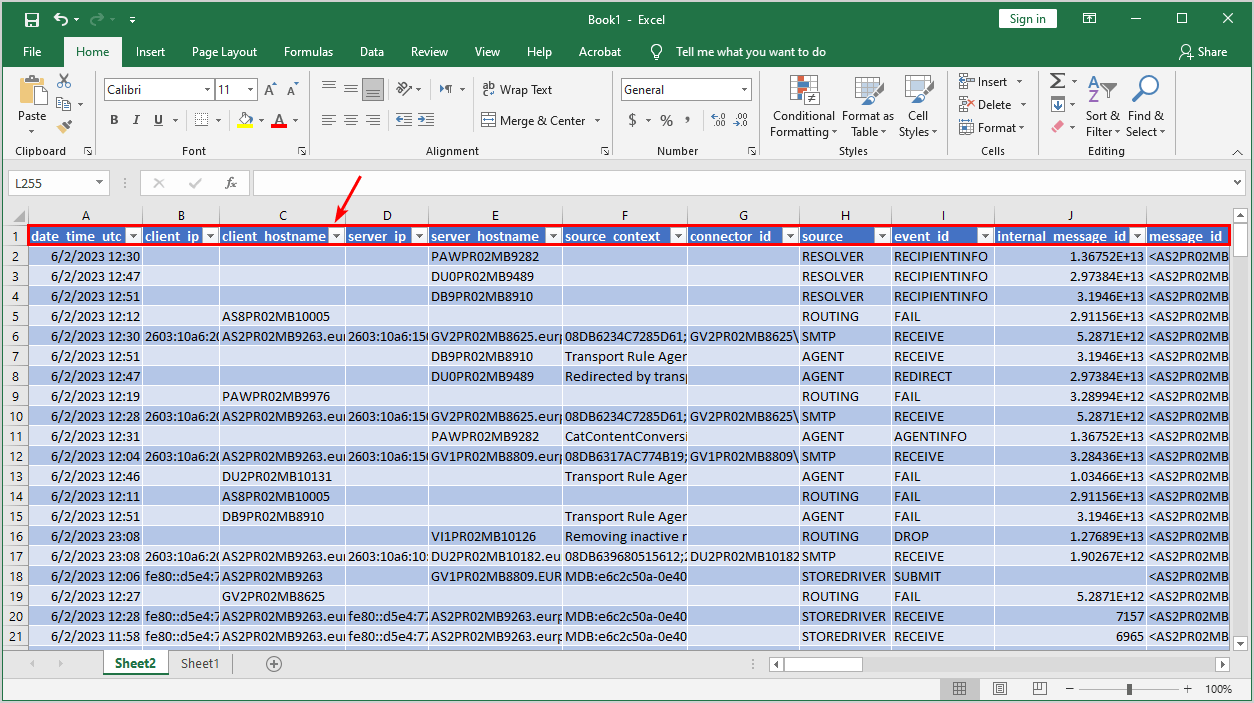
That’s it!
Read more: Export Microsoft 365 mailbox to PST file »
Conclusion
You learned how to export a message trace report in Exchange admin center and with the HistoricalSearch PowerShell cmdlet. The message trace report shows detailed information about messages in Exchange Online for up to 90 days. This way, you can adjust the CSV file and search for specific details of messages.
Did you enjoy this article? You may also like Export Microsoft 365 mailbox size report with PowerShell. Don’t forget to follow us and share this article.
This Post Has 0 Comments