The catch all mailbox is a special mailbox that receives all the email messages that…
How to create & publish Organizational Forms in Office 365
Organizational Forms are a very useful organization tool, can streamline and improve many repetitive processes. For example a prepared in advance templates, that used as a reply template for customers, applying for a holiday and much more.
Table of contents
- Outlook Forms and Organizational Forms
- The concept of Outlook Forms and Organizational Forms
- Creating the Organizational Forms library store using PowerShell
- Exchange Online Organizational Forms Library | The type of permissions
- 1#4 – Creating the Organizational Forms Public Folder in Exchange Online
- 2#4 -Creating the Outlook Form
- 3#4 – Publishing the Form in the Exchange Online Organizational Forms library
- 4#4 – Using a Form as an E-mail template
Outlook Forms and Organizational Forms
The first secret that most of us do not know is, that Outlook includes powerful built-in tools that can help us to create this Forms, and send them to required recipients.
The second secret that most of us do not know is that Exchange server include a built-in solution that created for the purpose of – storing this Forms, and share them between our organization users.
The “store” that Exchange server provides is implemented via Exchange system Public folder.
In the current article, we will learn how to create the “server-side side store” for Organizational Forms.
In the second part, we will review how to build this “Outlook forms,” how to publish the Form publicly, and how to send E-mail message based on a particular Form.
The concept of Outlook Forms and Organizational Forms
As mentioned, Outlook includes a very useful tool that enables each user, to create for himself a custom temple that described as a “Form”.
The Outlook Form based on Outlook well knows items such as “standard E-mail template,” a “Task template,” calendar meeting template” and so on.
The user can use one of these “Outlook templates” as a baseline and add many times of customization to the baseline template.
The customization of the Form can be minimal such as – adding a predefined text to the E-mail message, predefined recipients or a very advanced and sophisticated customization that includes calculated values, code and so on.
The custom Form that created can save in the user mailbox or, stored in a central location (Exchange server) which is available other Exchange recipients.
The store that Exchange server allocates to this “Form central store”, is implemented by using a specific system Public folder – EFORMS REGISTR, which is usually named – Organizational Forms.
In Exchange Online based environment this “particular Public folder”, need to be created by the Exchange Online administrator.
Also, the Exchange Online administrator, need to assign the required permissions to the Exchange recipient, which are going to save the custom Forms in the Organizational Forms store (The Form Manager).
When Exchange recipient keeps a Form in the Organizational Forms store, we use the term “publish”, because the recipient is storing a Form that will be shared (published) with of the rest of the Exchange recipients.
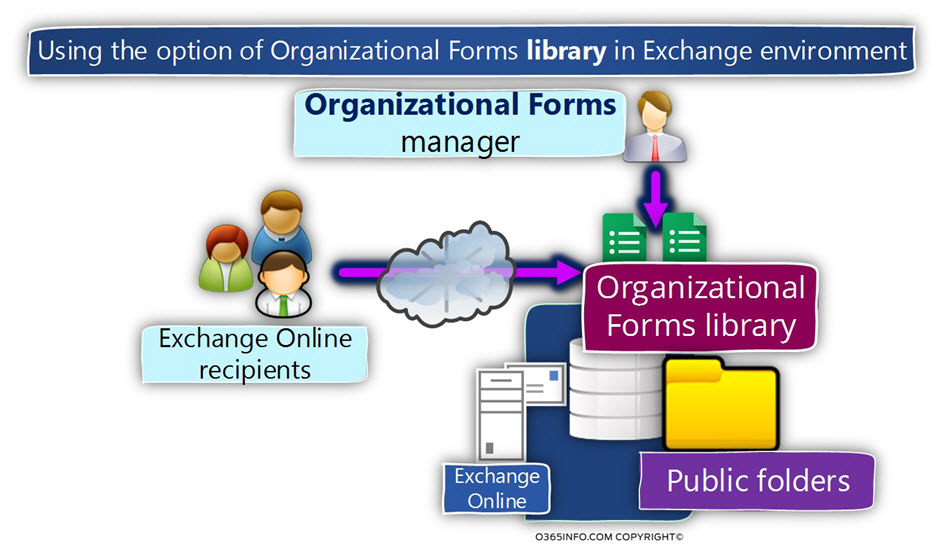
In a scenario in which we want to use Organizational Forms store; we will need to complete the following steps:
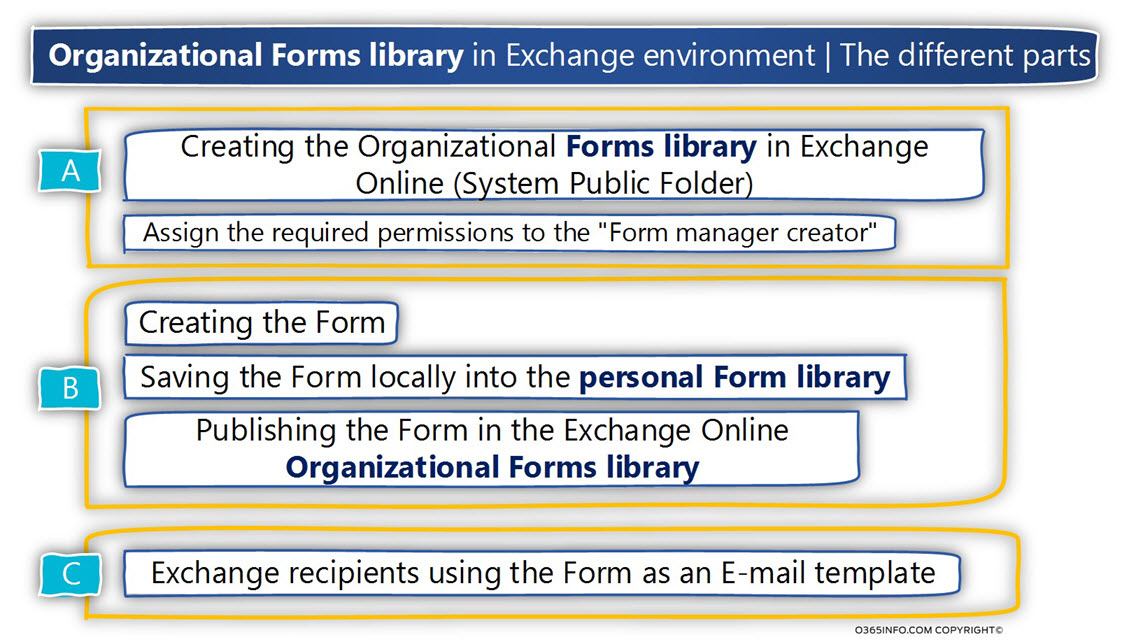
Phase Server-side preparations
- Creating the Organizational Forms library store – this is a “one-time step,” in which we create the required store for the Forms, that shared between our organization users. The creation of the Organizational Forms library is implemented by using PowerShell for creating the particular System Public Folder.
- Assign the required permissions to the “Form Manager creator” – technically speaking, there is no such role. Most of the time, only specific users will be assigned with the required permissions that will enable them to publish (save) a Form that they have created in the Organizational Forms library store. The user who will publish the Form will need Read + Write permissions to the Organizational Forms library store.
Phase B – Creating + publishing the Organizational Forms
- Creating the Form – the step in which a particular user creates and designs a Form for a specific organizational need.
- Saving the Form in the personal form library – in the first step, the creator of the Form will need to save the Form locally in his mailbox.
- Publishing the form in the Exchange Online Organizational Forms library – after the Form saved locally, the Form creator will need to save the Form in the public store meaning – publish the Form to the Organizational Forms library store.
Phase C – using the Organizational Forms
- Using the Form as E-mail template – when the organization user needs to use a specific Form that was published, he will use Outlook to “fetch” and select the required Form that they want to use.
Creating the Organizational Forms library store using PowerShell
The basic assumption is that you have already created the required infrastructure of a Public folder in the Exchange Online server.
Given that your Exchange Online infrastructure had already Public folder infrastructure, we will need to create the special system Public folder that will serve as a storage for the Organizational Forms.
This step is implemented by the Exchange Online administrator using PowerShell commands.
Exchange Online Organizational Forms Library | The type of permissions
Technically speaking, the best practice is to create a hierarchy of permissions.
For example, a structure of three layers
Layer 1 – the Exchange Online administrator will have the Owner permissions to the Organizational Forms store.
Layer 2 – The Organizational Forms library store “creator.” These are the users who will have the required permissions of storing (publishing) Forms in the Organizational Forms library. This user needs to have the Publishing Editor permissions.
Layer 3 – The Organizational users – the user who will have the permissions to use the Forms that stored in the Organizational Forms library store. The permissions to “all Exchange Online user” are configured by using the “default” object. The permissions that are assigned to the “Default recipient” are Author permissions.
Note – In case that you need more information about the different type of Exchange Online Public folder permissions you can read the article Add-PublicFolderClientPermission.
1#4 – Creating the Organizational Forms Public Folder in Exchange Online
Generally speaking, the task of creating a “new Public folder” is implemented by the Exchange Online administrator using the Exchange Online web admin interface or, by a user who has the required permissions using Outlook mail client.
The Organizational Forms Library is a special case because, the Organizational Forms Library implemented by using a particular system Public Folder, which can be created and managed only by using PowerShell.
Organizational Forms Library | Pre requirement’s task list
1. Existing Public Folder infrastructure
The Organizational Forms library store is a sub-Public folder in the existing Public Folder infrastructure.
In case that your Exchange Online was not configured to use Public Folder infrastructure, you can create the “Root Public Folder” mailbox using the Exchange Online web management interface or, use the following PowerShell command syntax:
New-Mailbox -PublicFolder -Name <Name>PowerShell command example:
New-Mailbox -PublicFolder -Name PFHierarchy2. Creating remote PowerShell session to Exchange Online
The creation of the Organizational Forms library store + the assignment of the required permissions is implemented using PowerShell commands.
Note – the basic assumption is that you know how to create a remote PowerShell for connecting Exchange Online. In case that you are not familiar with this process, you can read the article Connect to Exchange Online using PowerShell.
Our tasks in a nutshell
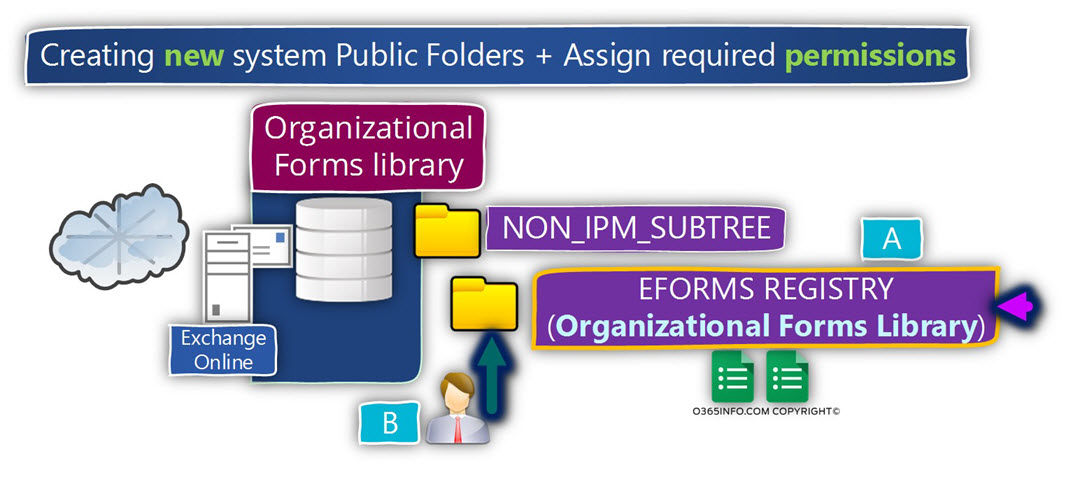
1. Create new System Pubic folders
We will need to create new system Public folders using a special type,
described as – EFORMS REGISTRY. The special Public folder that will store the Forms will be named as – Organizational Forms Library. (A)
2. Assign the required permissions
To be able to manage the Organizational Forms library (store/publish Forms), we will need to assign the required permissions to the – Organizational Forms library. (B)
Phase 1#2 – Creating the Exchange Online Organizational Forms Library
1. Creating the Exchange Online Organizational Forms Library
The PowerShell command syntax that we use for creating the new Organizational Forms library store is:
New-PublicFolder -Path "\NON_IPM_SUBTREE\EFORMS REGISTRY" -Name "Organizational Forms Library"2. Define the Language code of the Organizational Forms library store
We will need to set the language setting of the Exchange Online Organizational Forms Library.
In the following example, we set the language code to en-US.
Set-PublicFolder "\NON_IPM_SUBTREE\EFORMS REGISTRY\Organizational Forms Library" -EformsLocaleID en-US3. View the Exchange Online Organizational Forms Library Public Folder
If you want to view the “new Online Organizational Forms Library Public Folder” that you have created in the previous step, you can use the following PowerShell command:
Get-PublicFolder -Identity "\NON_IPM_SUBTREE\EFORMS REGISTRY\Organizational Forms Library" -Recurse | Format-List NamePhase 2#2 – Assign the required permissions to Organizational Forms Library Public Folder
As mentioned, the recommendation is to assign the required permissions to the Organizational Forms Library Public Folder, by implementing a “permissions hierarchy.”
In the following screenshot, we can see that by default, the existing permissions for the Organizational Forms Library Public Folder include the Author permissions to the default user (authenticated user), and the None permissions for anonymous users (non-authenticated user).

1.1 Assign the Owner permissions to Organizational Forms Library Public Folder | Exchange Online administrator
In this step, we assign the required permissions, to Exchange Online Administrator Brad.
The permissions that we assign to Brad are the “owner” permissions on the Organizational Forms Library Public Folder.
PowerShell command syntax:
Add-PublicFolderClientPermission -identity "\NON_IPM_SUBTREE\EFORMS REGISTRY\Organizational Forms Library" -user <Identity> -AccessRights <permissions>PowerShell command example:
Add-PublicFolderClientPermission -identity "\NON_IPM_SUBTREE\EFORMS REGISTRY\Organizational Forms Library" -user Bradp@o365info.com -AccessRights OWNERIn the following screenshot, we can see the results:

1.2 Assign the Publishing Editor permissions to Organizational Forms Library Public Folder | Forms manager
In our scenario, the Forms Manager is a user named – Eyal.
We will assign Eyal the Publishing Editor permissions to the Organizational Forms Library Public Folder:
Add-PublicFolderClientPermission -identity "\NON_IPM_SUBTREE\EFORMS REGISTRY\Organizational Forms Library" -user "Eyal@o365info.com" -AccessRights PublishingEditorIn the following screenshot, we can see the results:

2. View Public Folder permissions
In case that you want to view permissions assigned to a specific Public Folder, we can use the following PowerShell command:
PowerShell command syntax:
Get-PublicFolderClientPermission "<Public Folder name>"PowerShell command example:
Get-PublicFolderClientPermission "\NON_IPM_SUBTREE\EFORMS REGISTRY\Organizational Forms Library"In the following screenshot, we can see the results:

3. Remove the required permissions to Organizational Forms Library Public Folder
In case you need to remove existing permissions, you can use the Remove-PublicFolderClientPermissions cmdlet.
PowerShell command example:
Remove-PublicFolderClientPermission -identity "\NON_IPM_SUBTREE\EFORMS REGISTRY\Organizational Forms Library" -user Bradp@o365info.com2#4 -Creating the Outlook Form
The current section is dedicated to the user whom we describe as the “Form manager.”
The responsibilities of these users are
- Creating and design the required Outlook Form.
- Publishing the Form to the Organizational Forms Library Public Folder.
2.1 Add the developer ribbon to Outlook
The creation, design and the publishing of the Organizational Forms, is implemented by using the Outlook developer ribbon.
The Outlook developer ribbon is not added by default to the standard Outlook ribbon.
In the following section, we will review how to add the Outlook developer ribbon to the Outlook client.
- In Outlook, select the File
- On the left menu bar, select the menu – Options
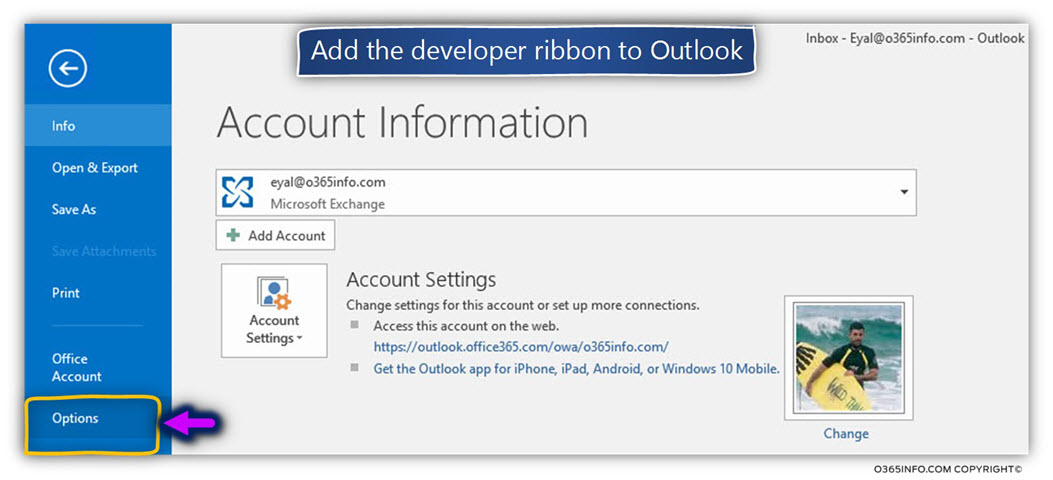
- Select the Customize Ribbon menu
- Select the option box – Developer
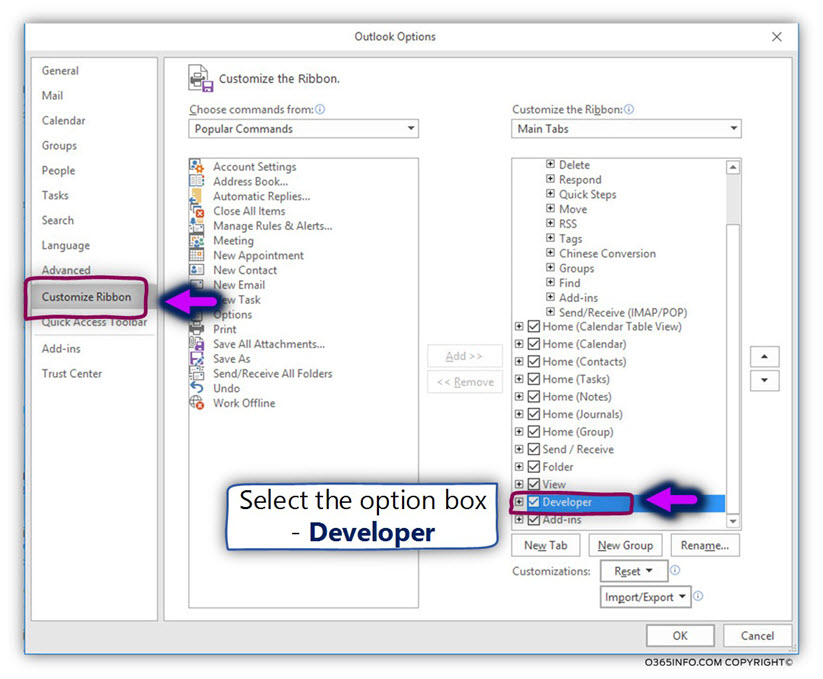
In the following screenshot, we can see a “new ribbon” appear on the Outlook interface.

In the following sections, we will review how to create a new Outlook Form.
We will examine two ways that we can use for creating Outlook Forms that will be published (saved) in the Organizational Forms Library Public Folder.
2.2 – Creating a new Form based on Outlook pre-defined template
To create a new Form that based on a predefined Outlook template, use the following steps:
- Select the Developer menu
- Click on the Design a Form icon
- In the section- “Look in:”, select Standard Form Library
- In our scenario, we will select a “message template“
- Select Open
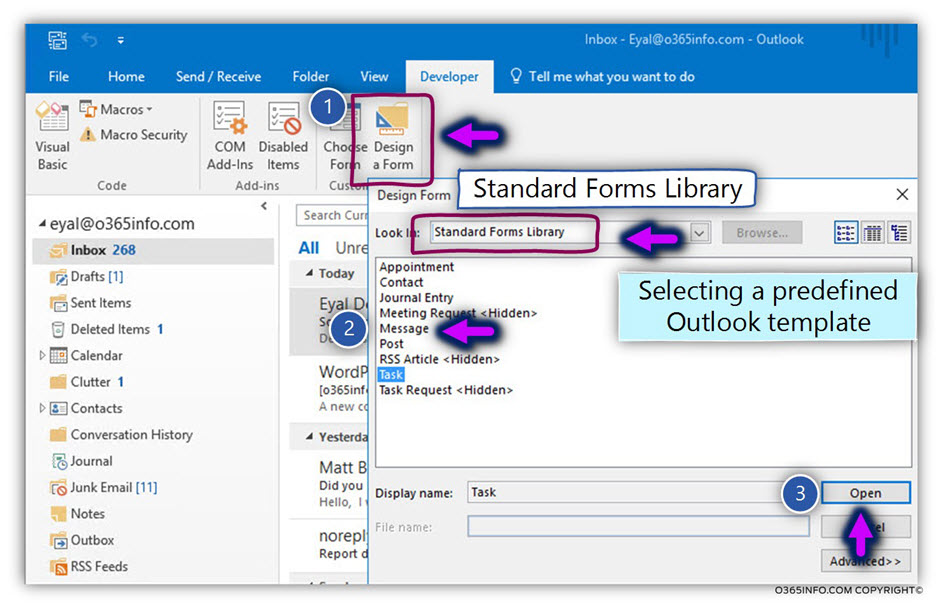
In the following screenshot, we can see the E-mail message template.
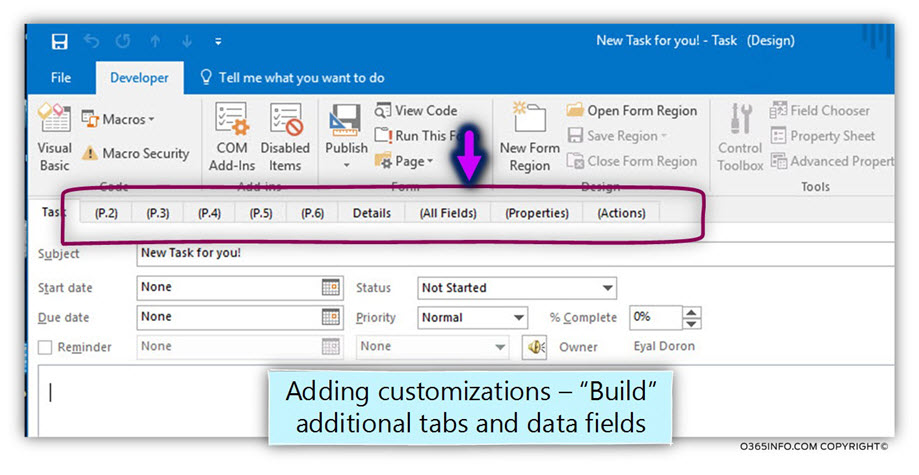
We can add additional Tabs to the E-mail Form, other mail fields, add custom code and so on.
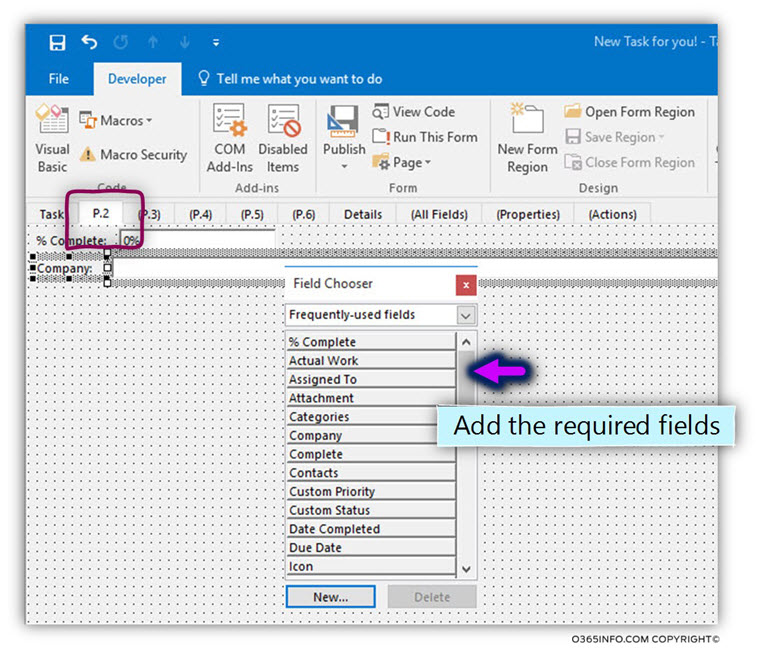
After we have finished adding all the required customizations to the E-mail Form, we need to save the Form.
When relating to Outlook Forms, instead of using the term “save to” or “store in,” we use the term – “Publish.”
In the first phase, we will save (publish) the Form locally in the user Mailbox.
Later, we will copy the Form, to the Organizational Forms Library Public Folder, by publishing the Form.
- To save the Form locally, click on the Publish icon
- Select the sub menu – Publish Form
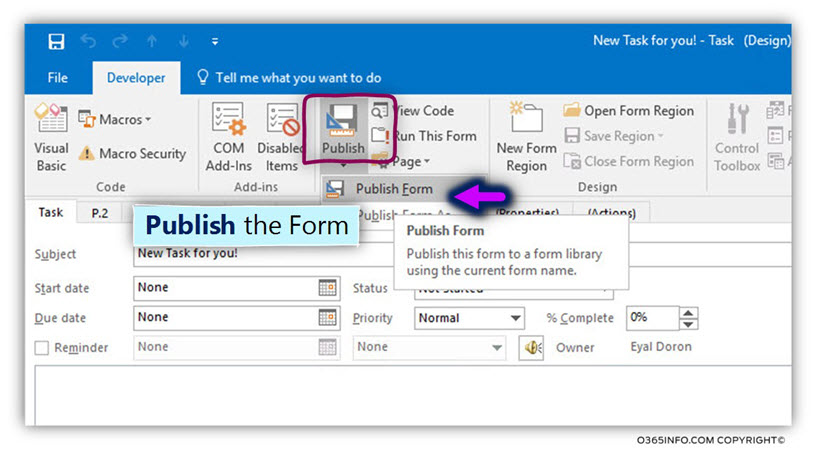
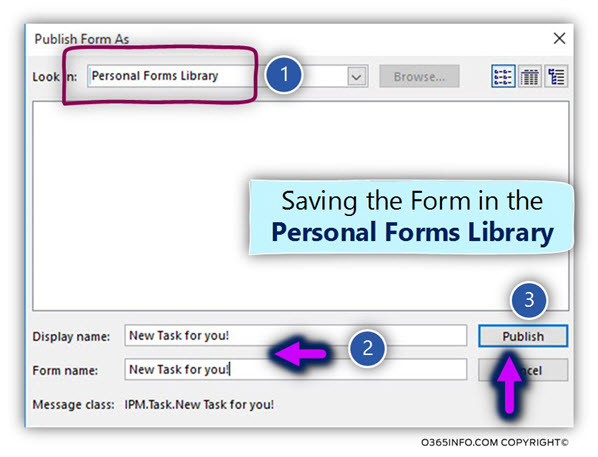
We will save the “New Form” in the Personal Forms Library.
- In the “Look in:” box, select – Personal Forms Library
- Choose the name whom you want to assign to the Form.
- Click – Publish to save the Form in the Personal Forms Library
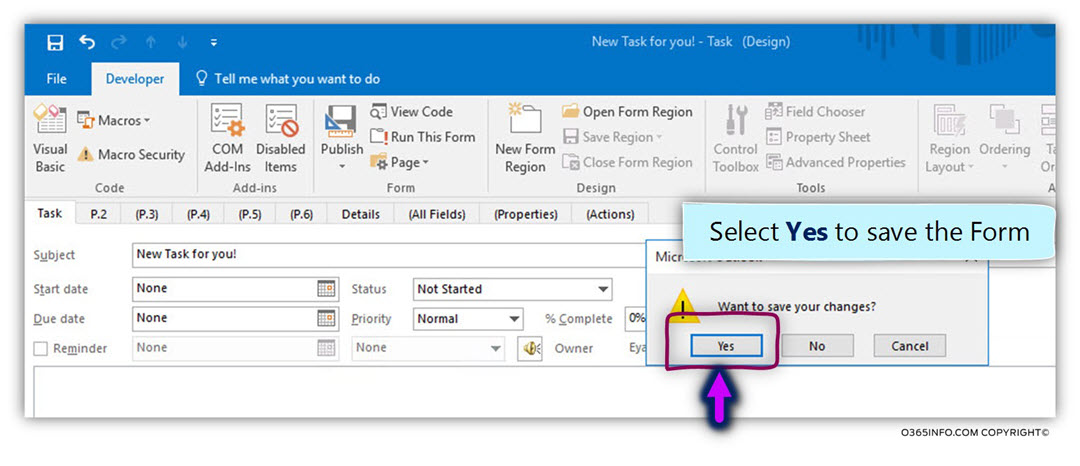
When we wish to close the Form window, we need to click “Yes” for saving the Form settings.
2.3 – Creating a new Form using an HTML template
In the following section, I would like to briefly review the additional method of creating a custom Outlook Form that is based on an HTML template.
To be able to create a Form that based on HTML code, we need to use some “workaround.”
The steps that we need to implement are as follows:
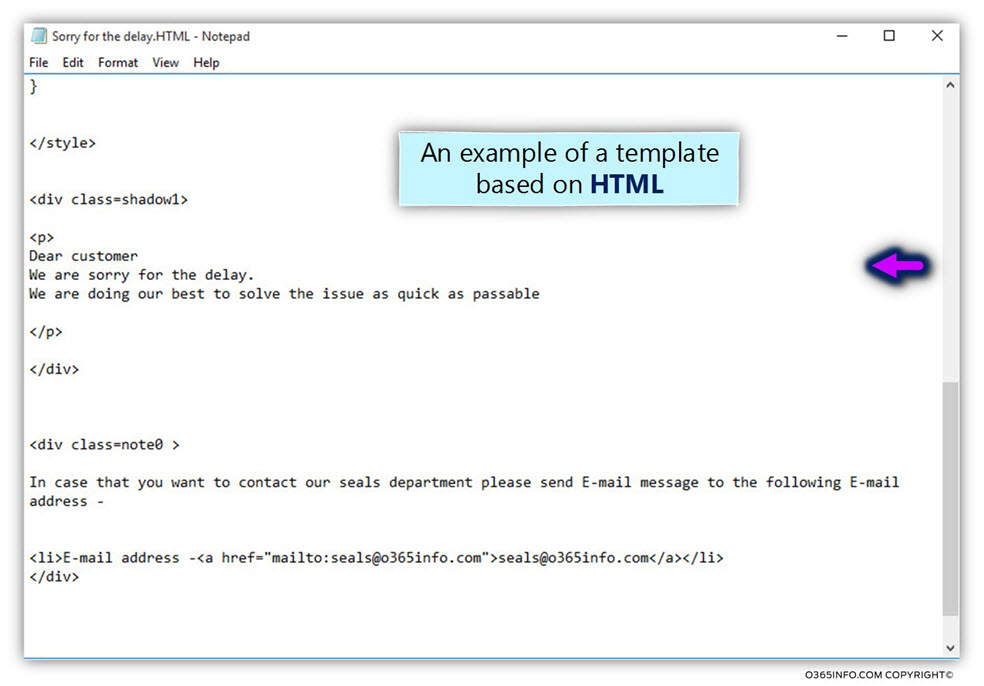
Create the required HTML code that includes the necessary TEXT (the content) + the necessary CSS style.
In the following screenshot, we can see an example, in such HTML code (you can download the sample by using the following link).
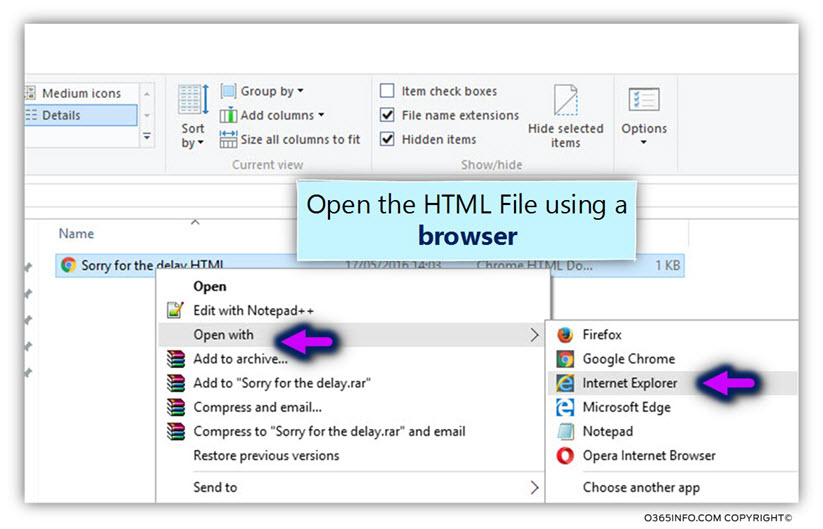
To be able to use the HTML code as a Form, we will need to open the HTML file using a browser.
In the following example, we use Internet Explorer to open the HTML file.
- Right click on the HTML file
- Select the menu – Open with…
- Select – Internet Explorer.
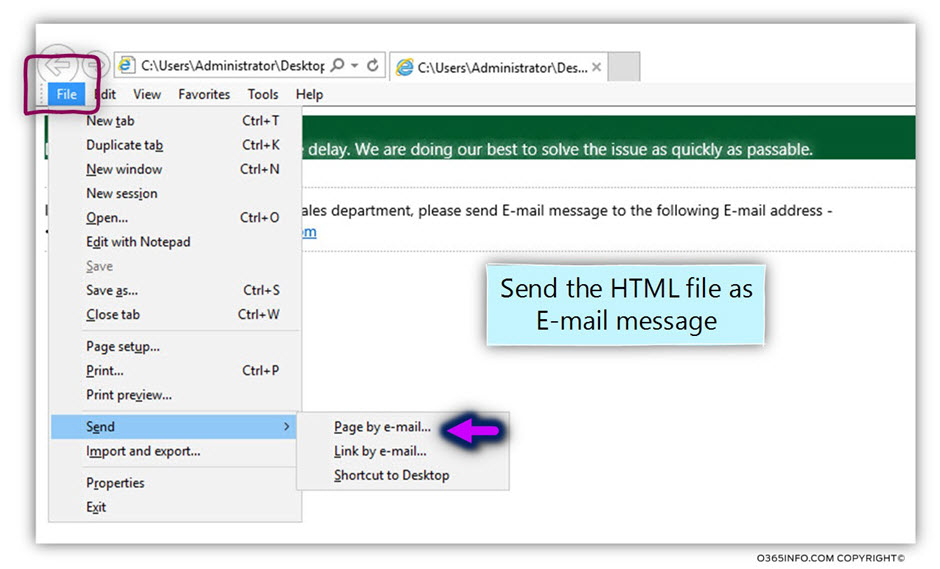
- Select the File menu and the menu – Send
- Select the option – Page by e-mail…
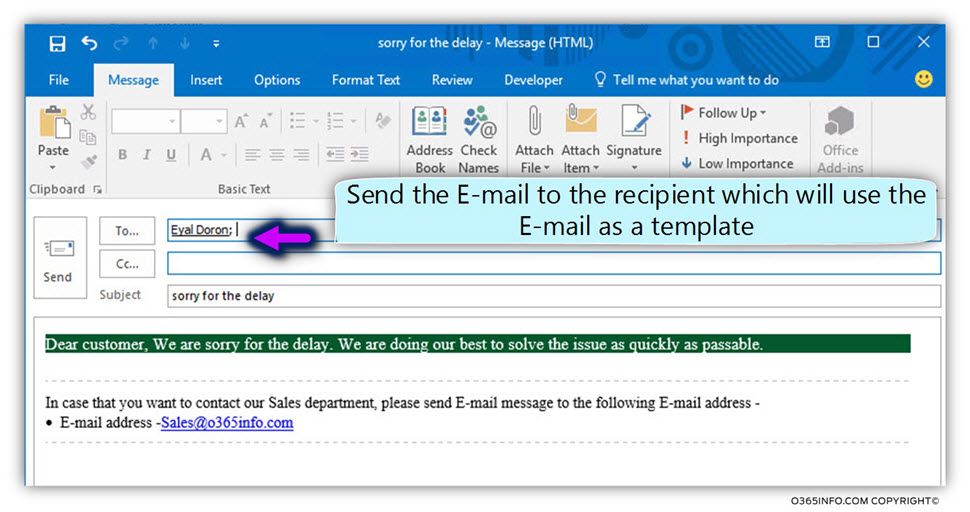
Send the E-mail to the recipient who acts as the “Form Manager”.
In the following screenshot, we can see that the E-mail reached to our “Form Manager.”
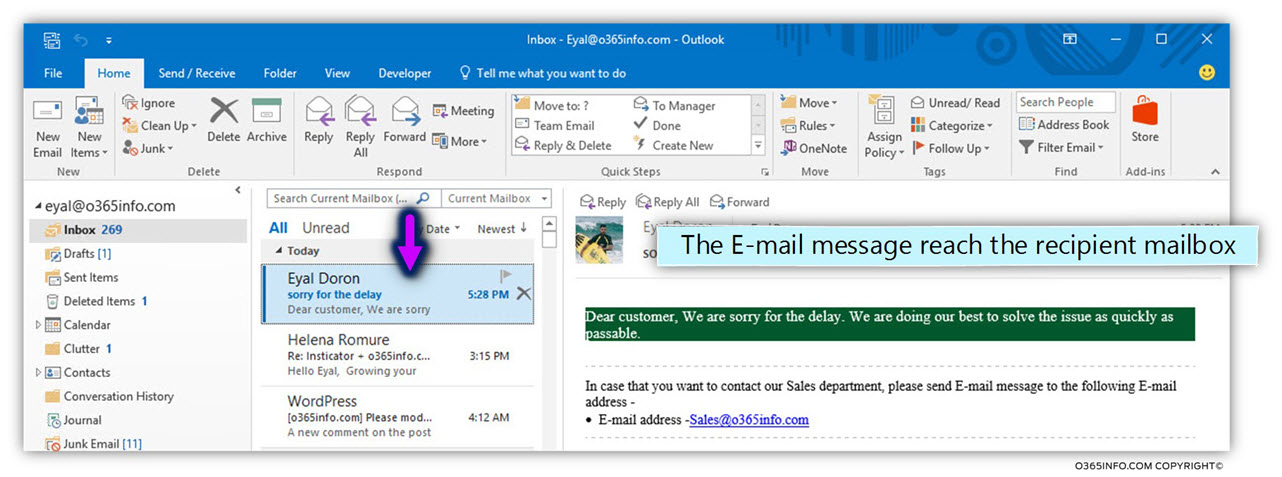
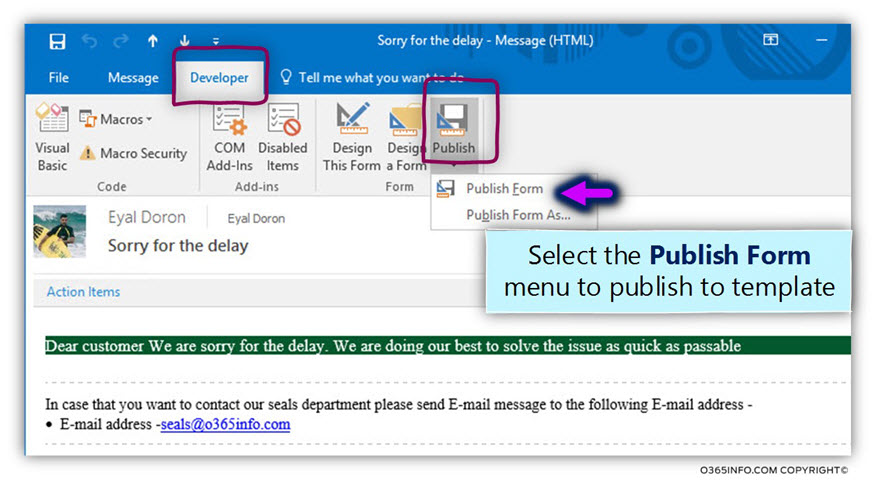
To publish the E-mail as a “Form,”
- Select the E-mail message
- Select the Publish icon
- Click on the Publish Form icon
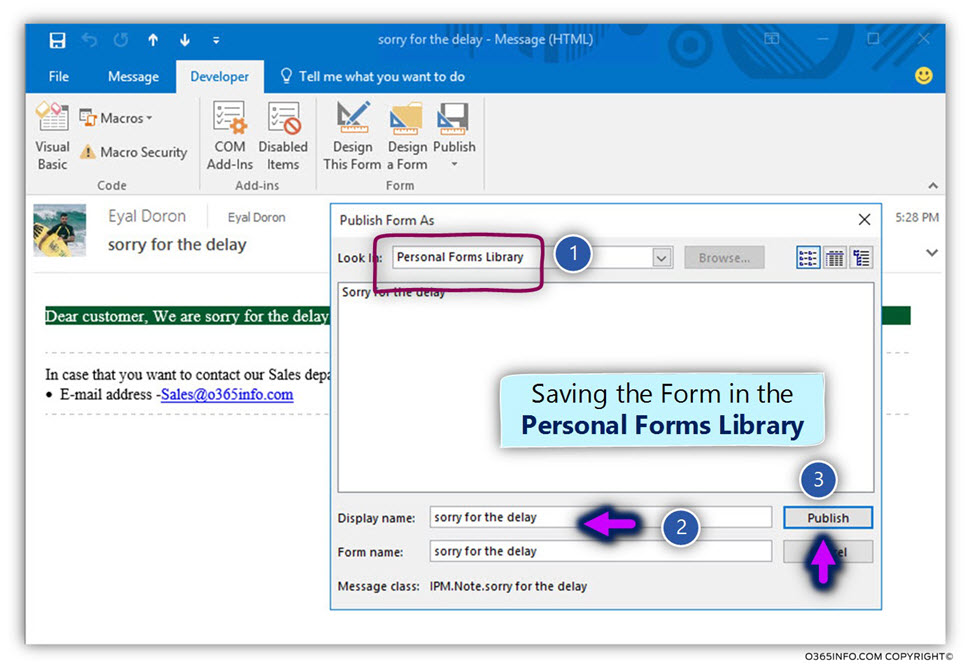
In the first phase, we will save the “New Form” in the Personal Forms Library
- In the “Look in:” box, select – Personal Forms Library
- Choose the name which you want to assign to the New Form.
- Click – Publish to save the Form in the Personal Forms Library
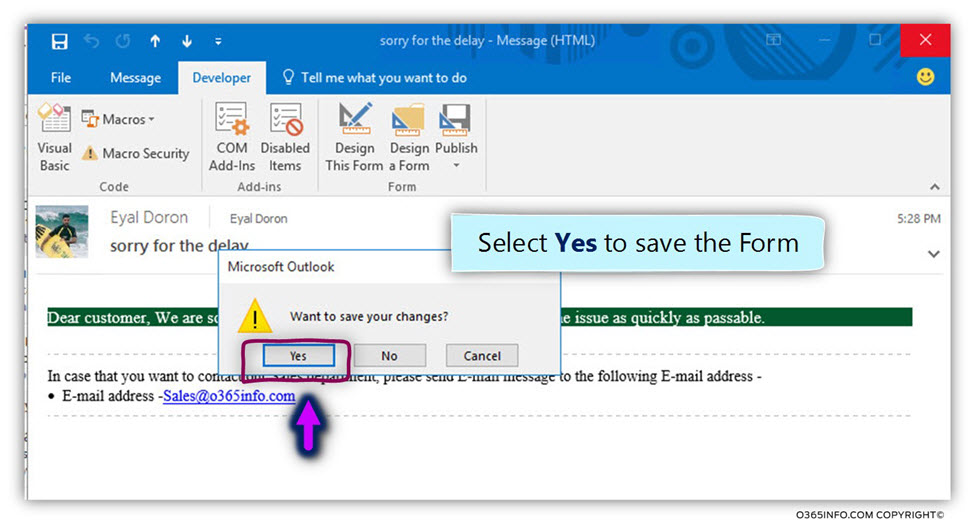
When we wish to close the Form window, we need to click “Yes” for saving the Form settings.
3#4 – Publishing the Form in the Exchange Online Organizational Forms library
In the following section, we review the process of publishing the Form that created in the previous section, and how to manage the Exchange Online Organizational Forms library store.
In the following step, we will copy the Form that was stored in the Personal Forms Library in the Exchange Online Organizational Forms library store.
The “transfer” process implemented in the following way:
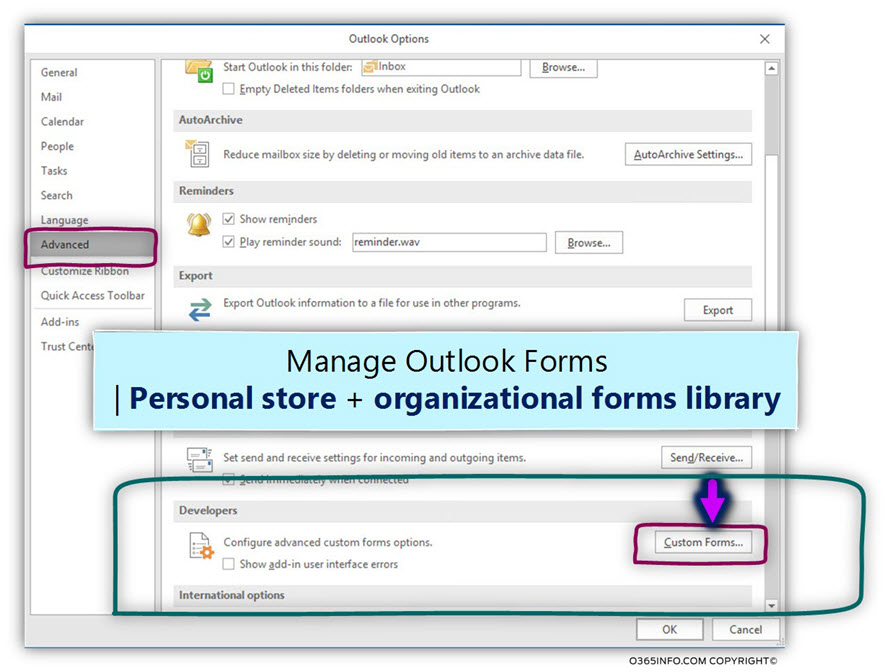
- In Outlook, select the File menu and the select – Options
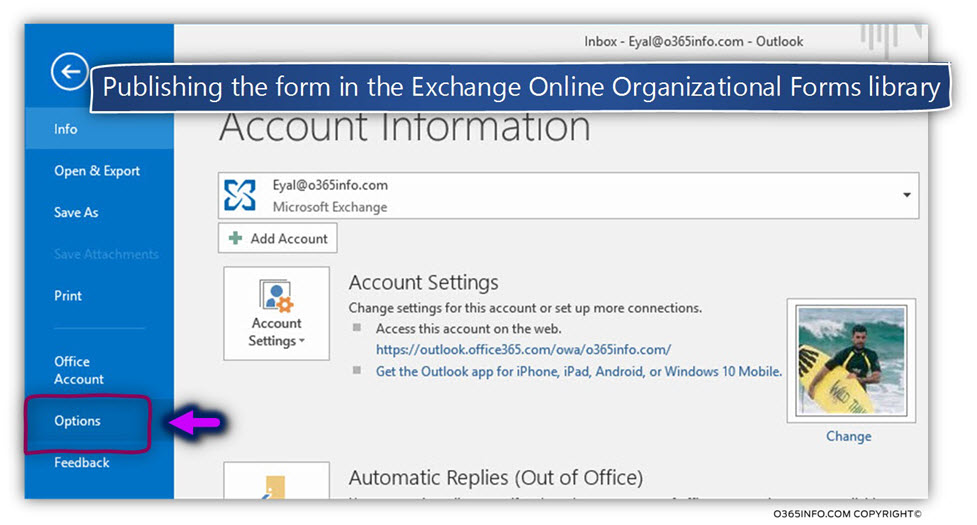
- On the left menu bar select – Advanced
- In the Developers section, click on the Custom Forms… button
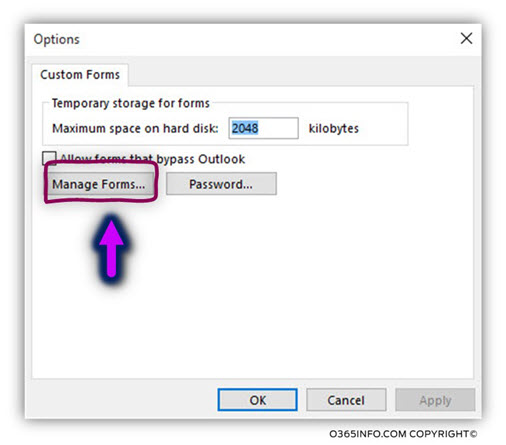
- Click on the Manage Forms… button
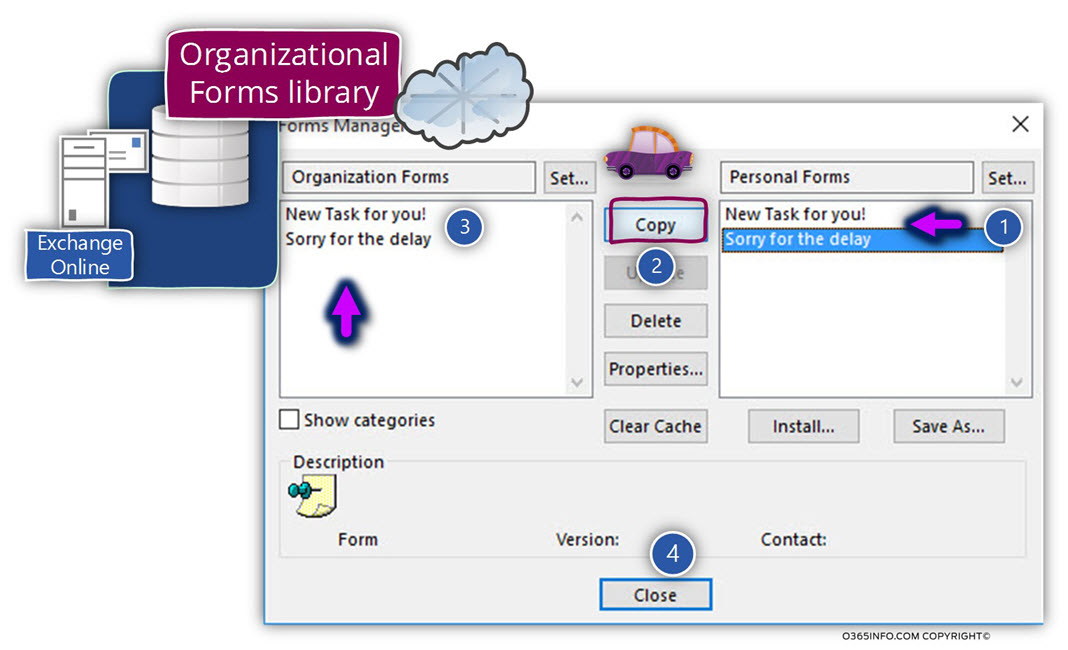
On the “right side” the content of the Personal Forms library (the personal user store).
To copy the custom Forms stored locally (number 1) to the Organizational Forms library store, we need to select the name of the required Form and click on the Copy button (number 2).
In the following screenshot, we can see the Forms copied to the organizational Form store (number 3).
- Click – Close (number 4)
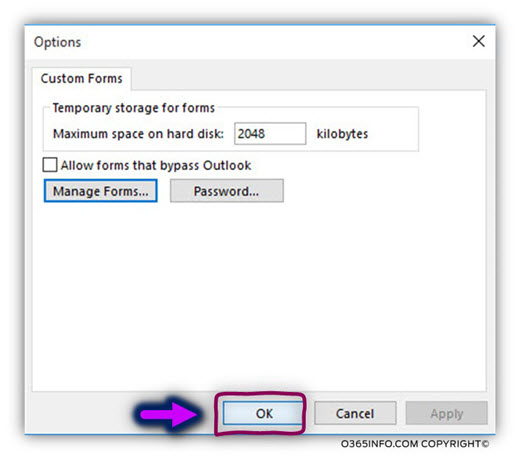
- Click – OK
4#4 – Using a Form as an E-mail template
This is the “last step” in our Organizational Forms library store journey.
In this phase, the custom Forms were already created and published by the “Forms Manager” to the Organizational Forms library store.
Now, we will review how an organization’s user can use the Form when using Outlook.
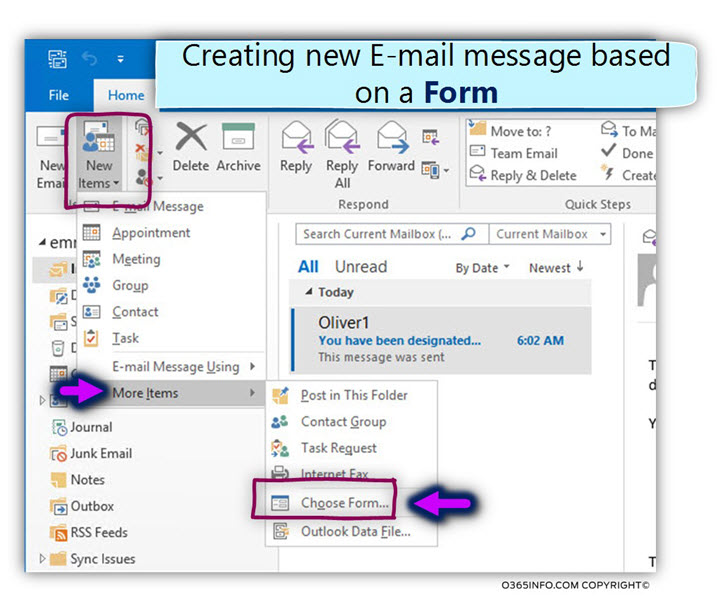
- To use a Form, in the Home menu, click on the New Items icon
- Select the menu – Choose Form…
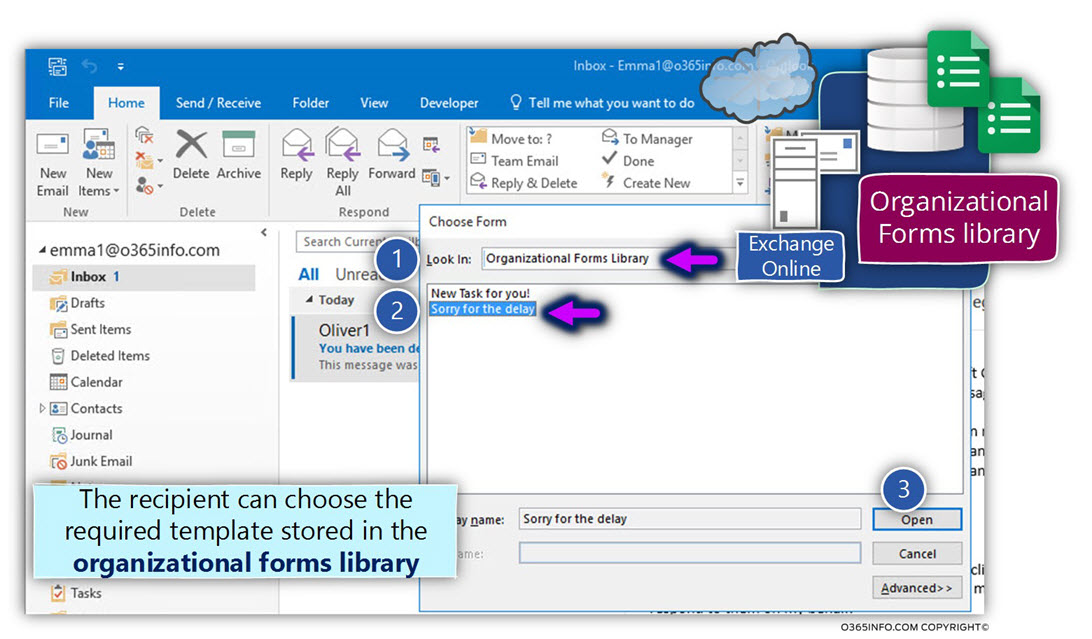
- In the “Look in:” box, select the option – Organization Forms Library
- In our scenario, the user selects from the Form list, a Form named – Sorry for the Delay
- Click – Open
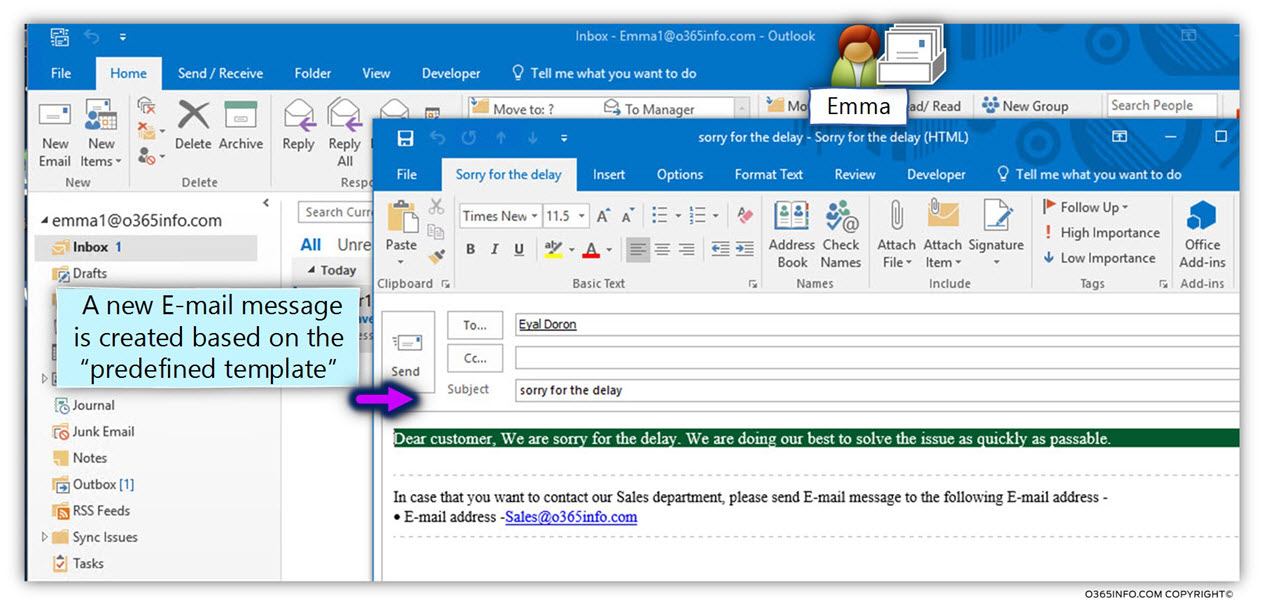
In the following screenshot, we can see that the “new E-mail message” is based on the Form that serves as a Template.

This Post Has 0 Comments