In the current article, I would like to review the chain of events that occurs…
Configure Force TLS in Exchange Online environment | Settings of outbound connector | Part 6#12
In the current article, we will review the required configuration settings for implementing Force TLS in Exchange Online based environment. In our specific scenario, we need to configure the Force TLS option for the “outgoing mail flow”.
The meaning is – mail that is sent by the Exchange Online server to a specific external domain name (that is represented by external mail server).
The Force TLS configuration setting will be applied to the outbound connector.
Table of contents
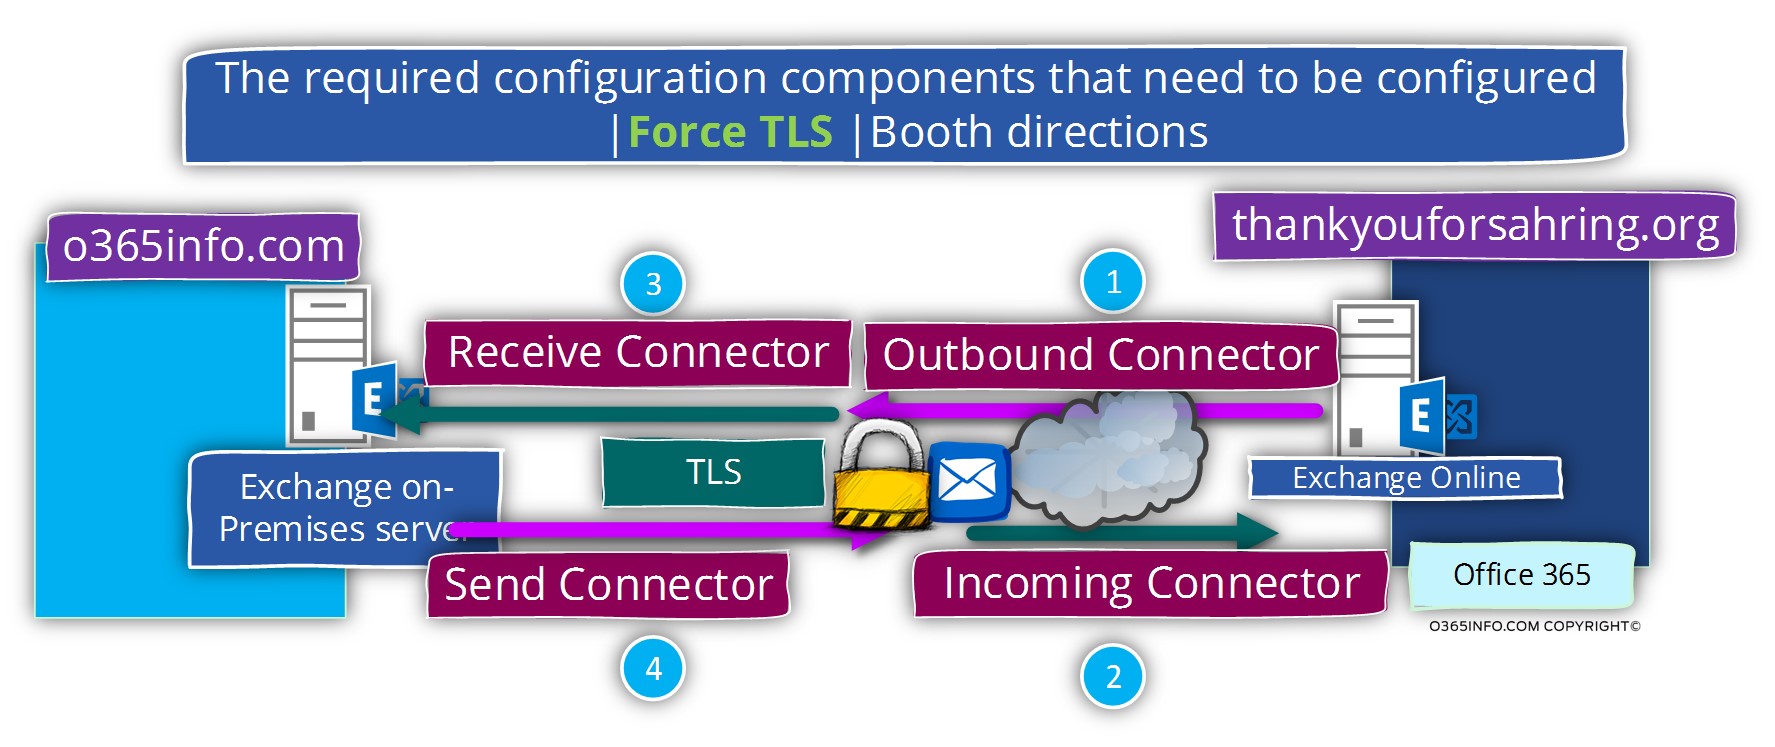
Scenario requirements | Exchange Online | Outgoing mail
The complete scenario description appears in the previous article
In this article, we will implement the following part from the complete scenario:
When the Exchange Online server needs to send E-mail message to a recipient with a domain name – thankyouforsharing.org (a recipient who is hosted on Exchange on-Premises), the Exchange Online server will agree to create the mail flow only when the following terms will be fulfilled:
- The mail communication will need to be implemented by using encrypted communication line (TLS).
- The “external server” (Exchange on-Premises) must support TLS.
- The “external server” (Exchange on-Premises) must identify himself using a trusted public certificate.
- The public certificate of the “external server” must include a specific host name who will approve the identity of the mail server – o365pilot.com
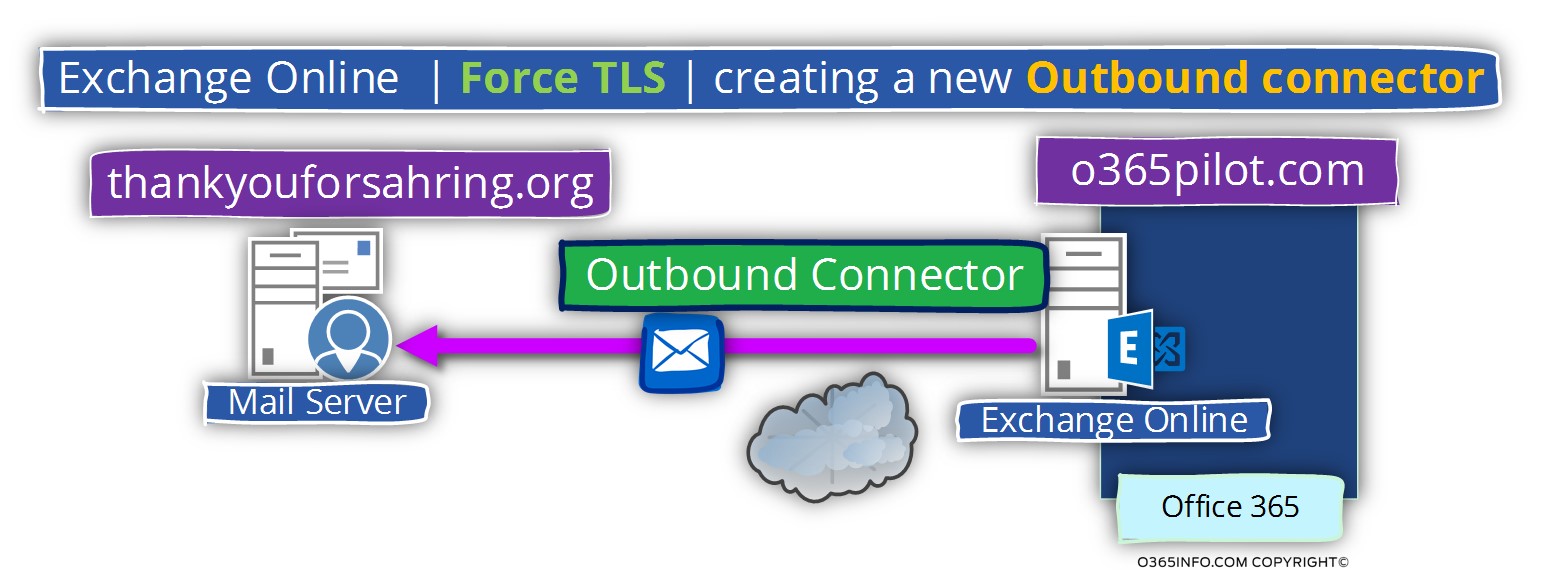
In the following diagram, we can see an illustration for the business requirement – using the option of Force TLS for mail that sent from Exchange Online to the domain thankyouforsharing.org that is hosted on the Exchange on-Premises.
Exchange Online | Creating and configuring Outbound connector | Using force TLS
To be able to fulfill the requirement, in which each E-mail message sent by Exchange Online to Exchange on-Premises that represent the domain name – thankyouforsharing.org will be encrypted, we will create a new Outbound mail connector
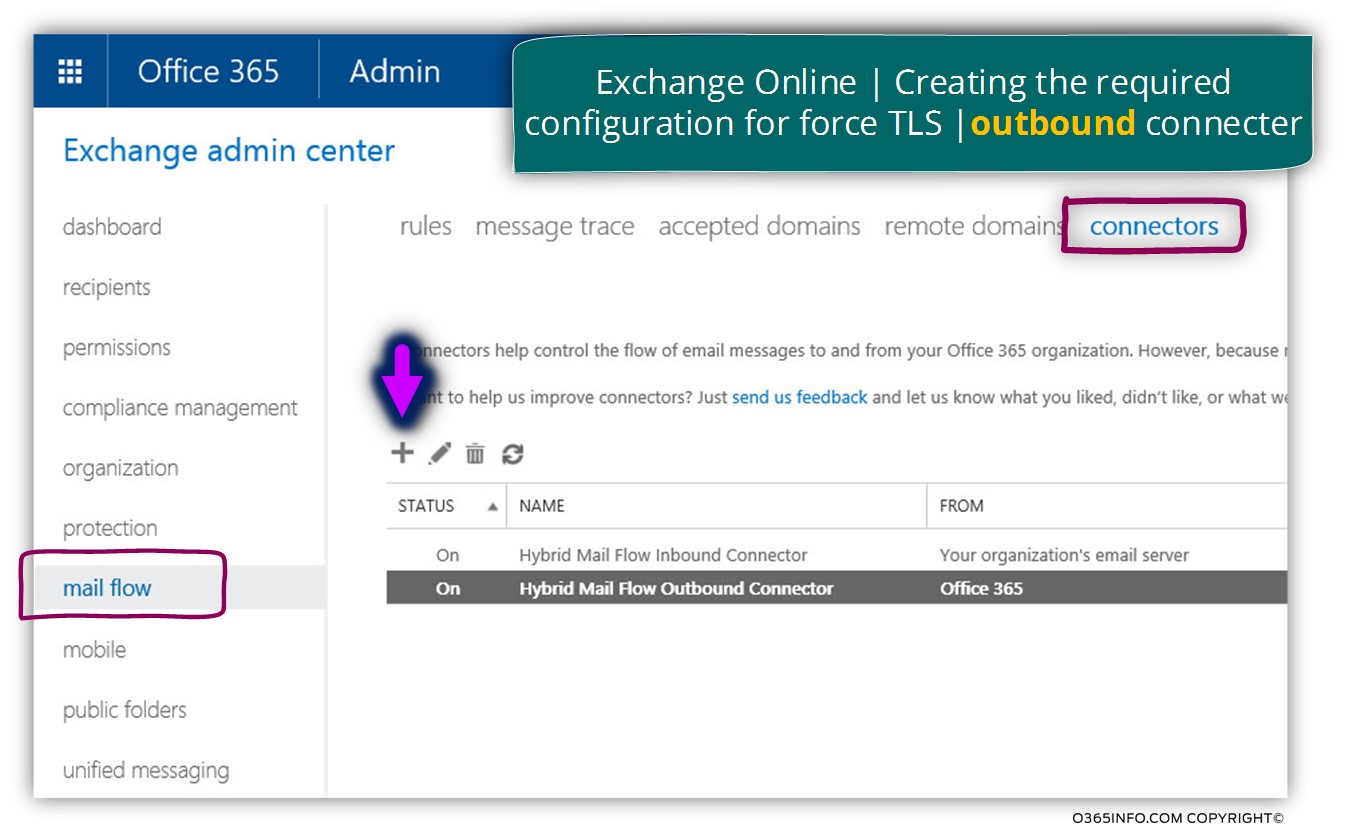
- Login to Exchange Online admin center
- On the left bar menu, choose the mail flow menu
- On the top bar menu, choose the connectors menu
- Click on the plus sign to create a new mail connector
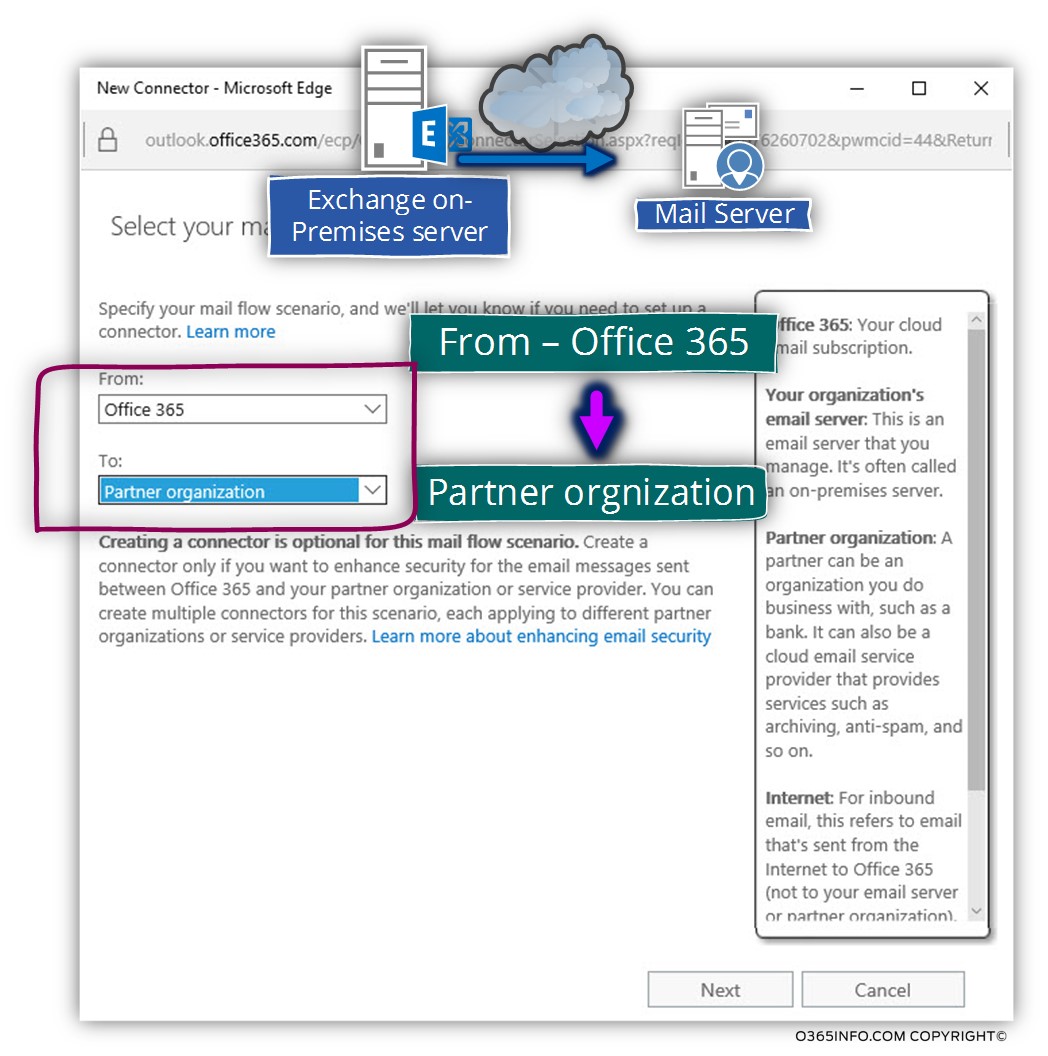
We need to configure the mail flow, of the mail that is sent from Exchange Online to “the other side”.
In the From: option box choose – Office 365
In the To: option box choose – Partner organization
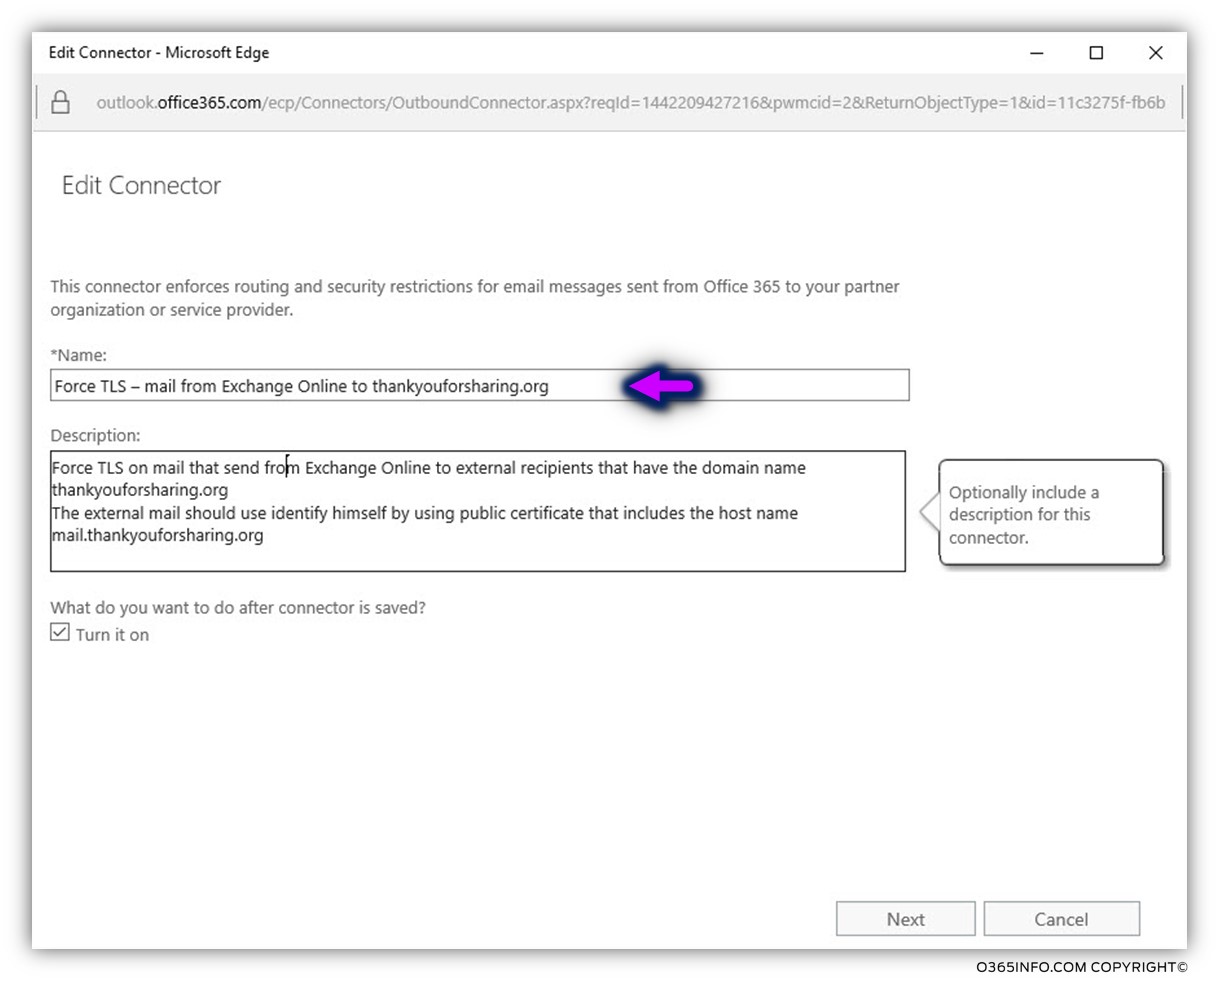
In the *name text box, write the name that is suitable to your needs.
My recommendation is, to use a descriptive name + description so in the future, in case of a troubleshooting process, it would be easy to understand the purpose of a specific mail connector.
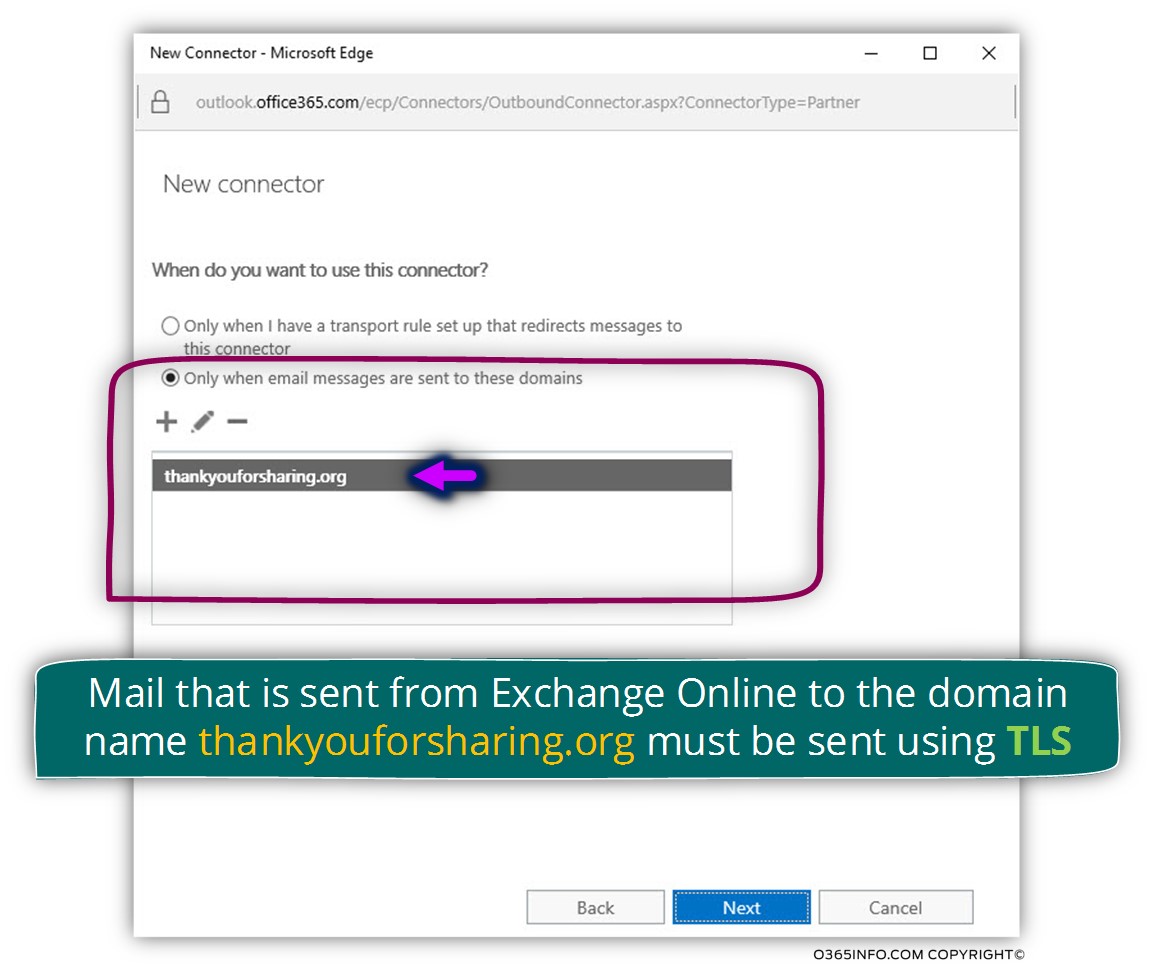
In the next step, we will defend the condition that will “activate” the Exchange Online outbound connector.
Generally, the outbound connector can be “activated” by a transport rule or, by a specific address space (domain name) of the destination recipient.
In our scenario, we would like to activate the Exchange Online outbound connector each time that a mail will be sent to a recipient whom his domain name is thankyouforsharing.org.
Note – in the article xx we will review the Exchange Online feature that enables us to activate mail connector by using a Transport rule.
- Choose the option – only when email messages are sent to these domains
- Click on the plus sign and add the required domain name. In our specific scenario, the “destination domain name” is thankyouforsharing.org
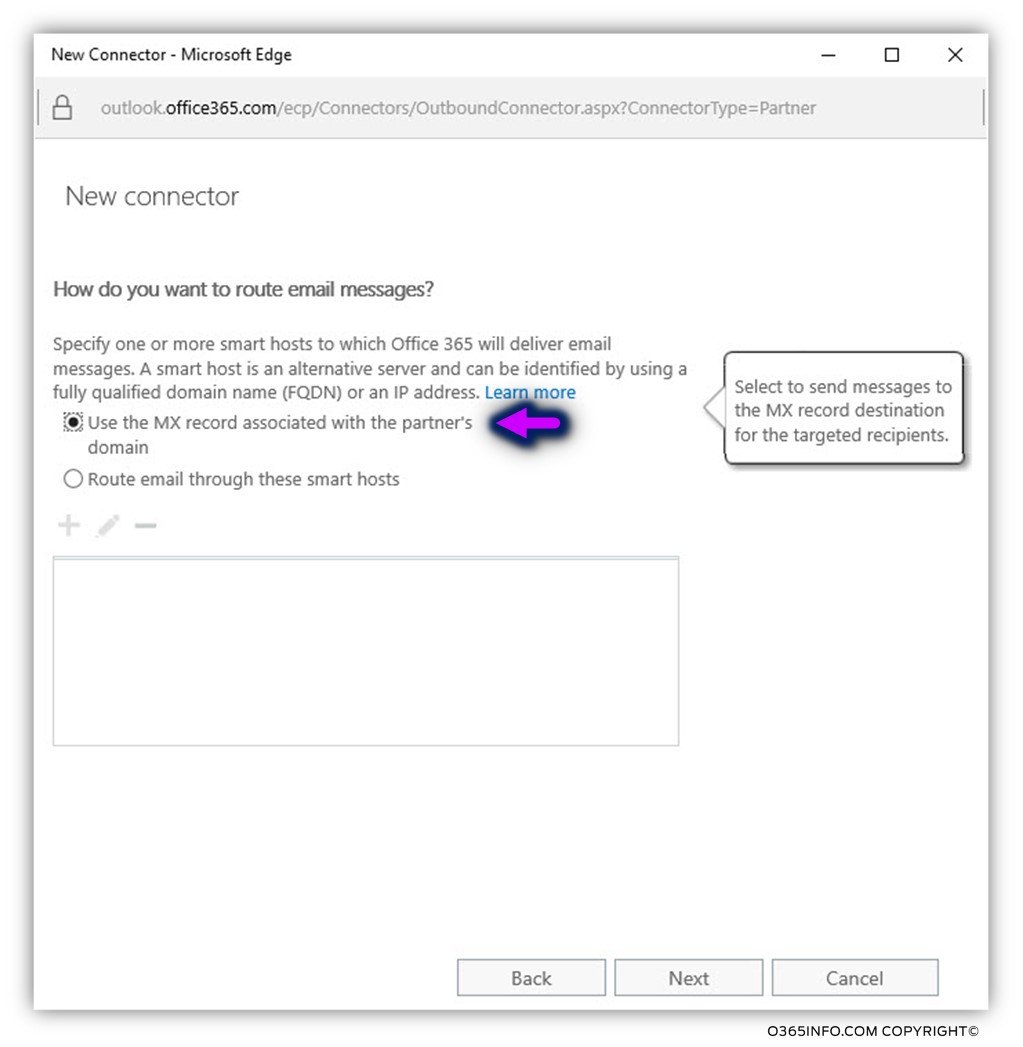
In the next screen, we will need to decide, how does Exchange Online “locate” the destination mail server.
We can choose between two options
- MX record – a method in which the Exchange Online server, will query DNS server looking for an MX record of the specific destination domain name.
- Smart host – a method in which we “enforce” our mail server to address a specific IP address or specific host name.
In our scenario, we will choose the option of MX record: Use the MX record associated with the partner’s domain.
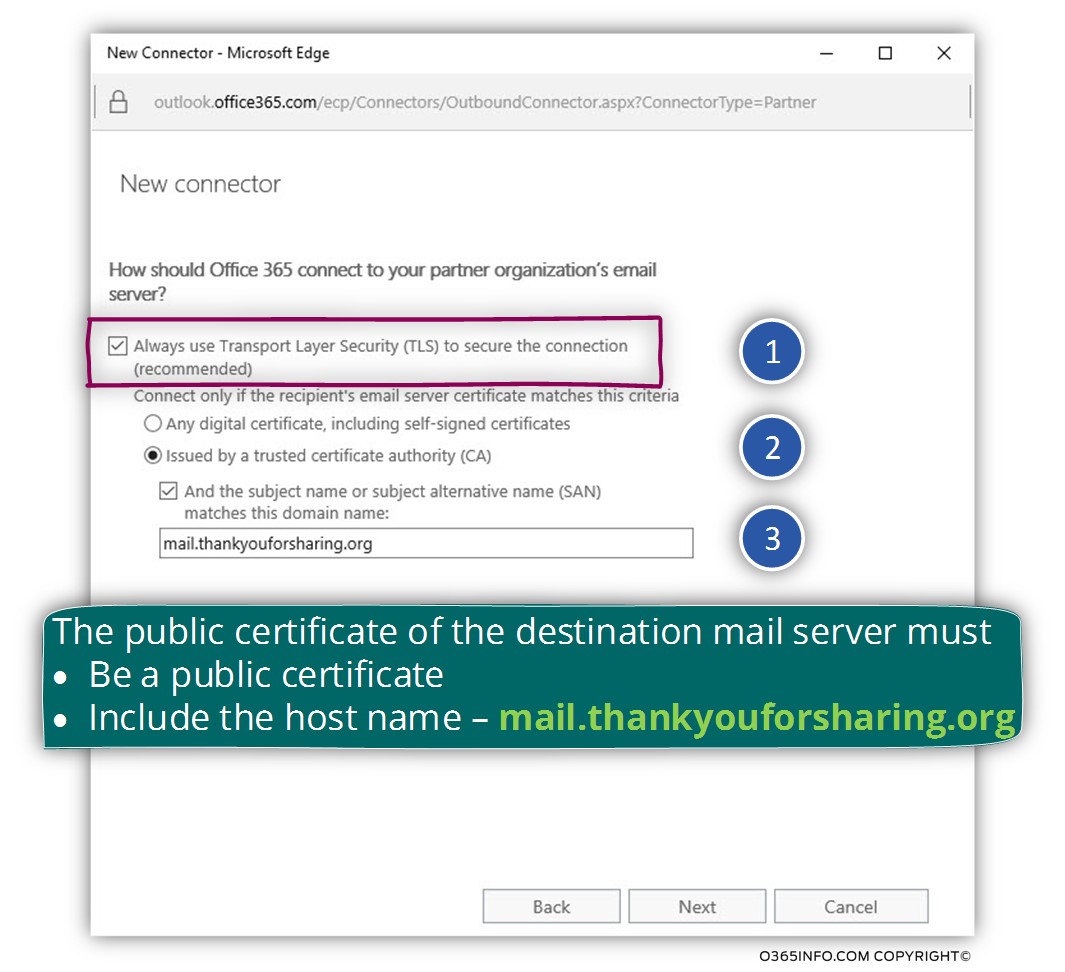
In the next screen, we will configure the option of Force TLS + decide how Exchange Online should identify the “destination mail server”.
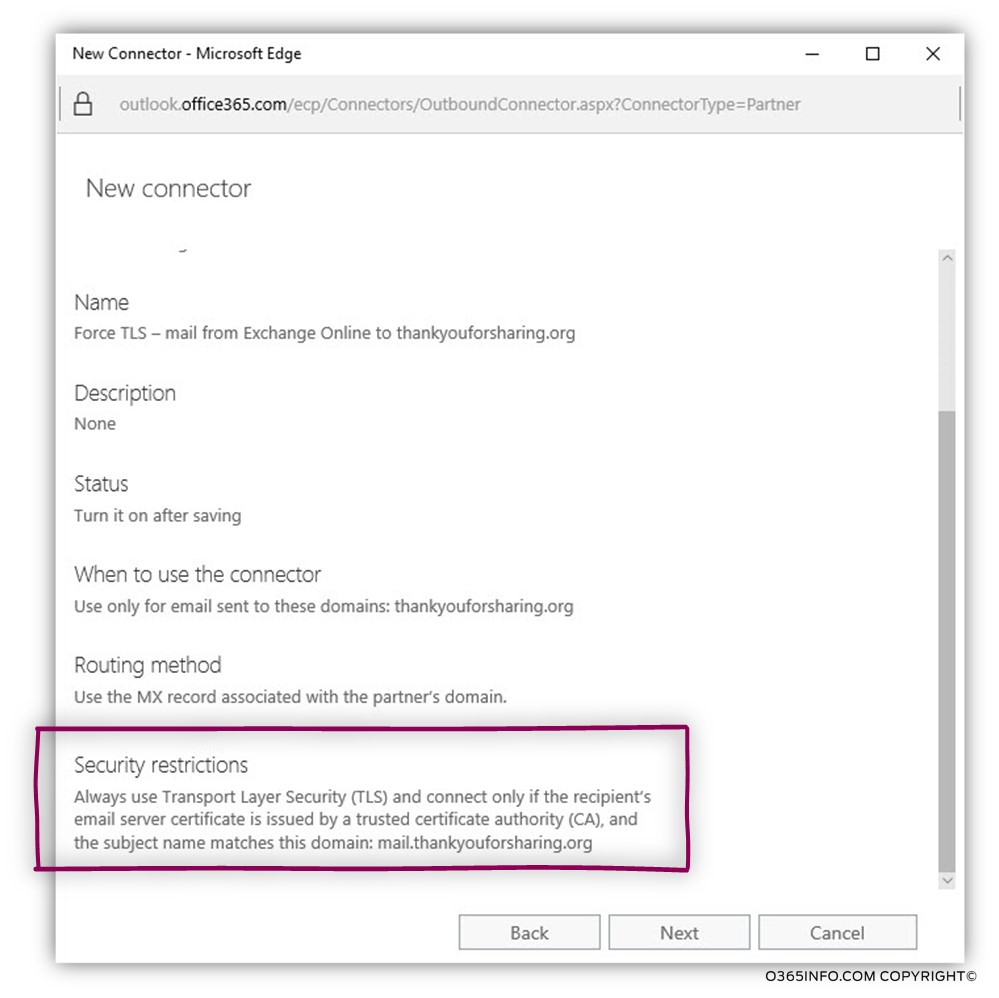
In our scenario, we need to implement the most restrictive security requirements that include the following parameters:
- The mail flow must be implemented by using TLS.
- That the “other mail server”, will need to prove his identity by providing a public certificate that was created by a trusted CA.
- The certificate that the “other mail server” provides, must include a spam\junk mail host name – thankyouforsharing.org
1. Choose the option – Always use Transport Layer Security (TLS) to secure the connection (recommended).
This is the part in which we instruct Exchange Online to use Force TLS
2. In the section Connect only if the recipient’s email server certificate matches these criteria, we will choose the option of – Issued by a trusted certificate authority (CA)
This is the part in which we instruct Exchange Online, to approve the mail communication only if the “other mail server” can provide a public certificate.
3. In addition, we will choose the option:
And the subject name or subject alternative name (SAN) matches this domain name
In our specific scenario, the destination mail server that represents the domain name – thankyouforsharing.org, we have to provide a pubic certificate that includes the host name – thankyouforsharing.org
This is the part in which we instruct Exchange Online, to approve the mail communication only if the certificate that the “other mail server” provide includes a specific host name.
On the next screen, we can see a summary of the configuration settings.
Notice the section of – Security restriction, which highlights the fact that the mail flow implemented, only if the destination mail server answers the “mandatory requirements.”
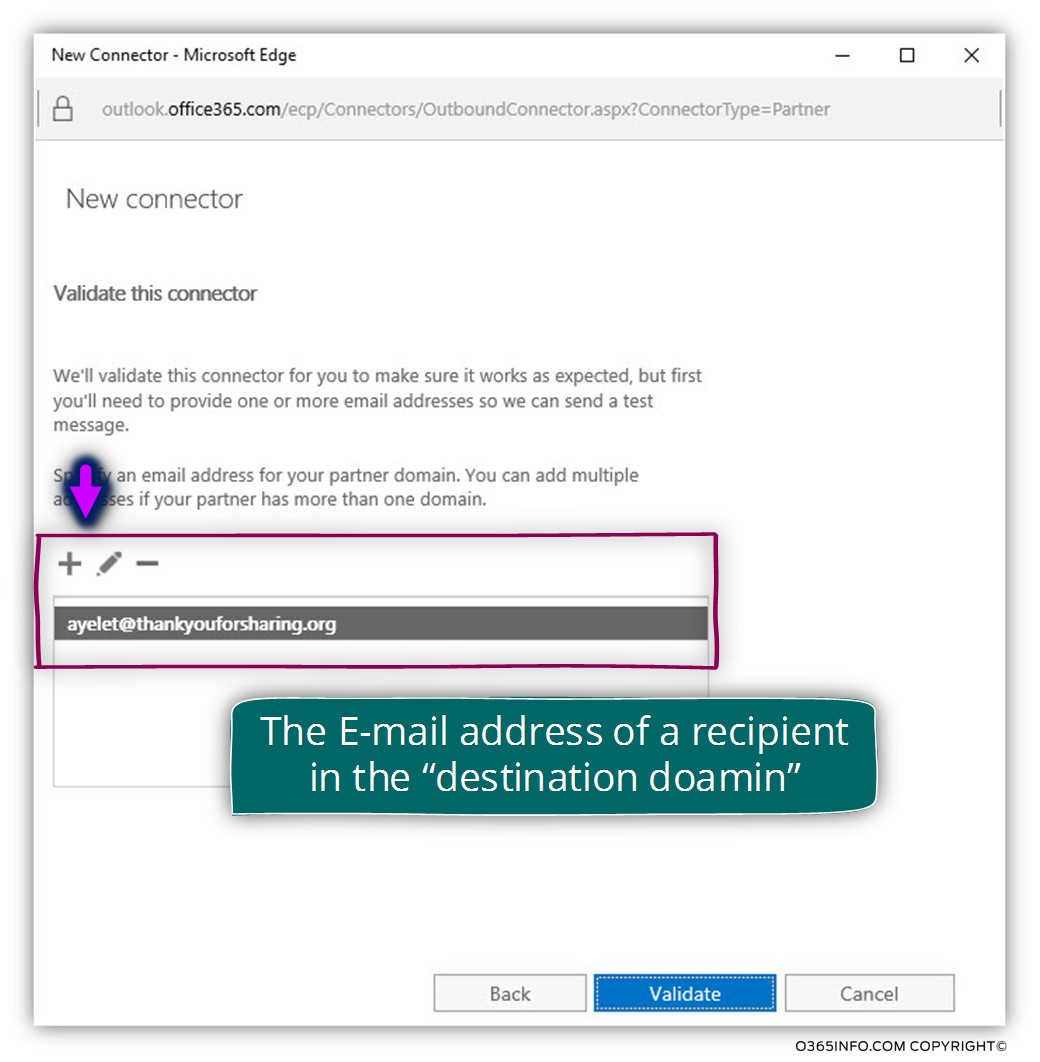
The next window, serves for “executing” a test mail to a destination recipient who belongs to the domain name – thankyouforsharing.org.
Click on the plus sign and add the E-mail address of a recipient from the destination domain.
In our specific scenario, we will use the E-mail address – Ayelet@thankyouforsharing.org
Notice that the requirement for creating the test E-mail is “mandatory.”
You cannot complete the outbound connector configuration without completing the test mail.
For me, I found it a little strange because the need for implementing test mail should not be mandatory.
My advice – complete the mail test even of you don’t have a known E-mail address, just add an arbitrary E-mail address.
After the completion of the “test phase,” you would be able to save the outbound connector setting and later, we can re edit a specific configuration setting or use a “real E-mail address”.
Click on the plush sign and add the E-mail address of the “destination recipient”.
Exchange Online will try to verify if he can send an E-mail to the “destination recipient” using TLS and try to check if the mail server of the “target recipient” meets the conditions of the identification.
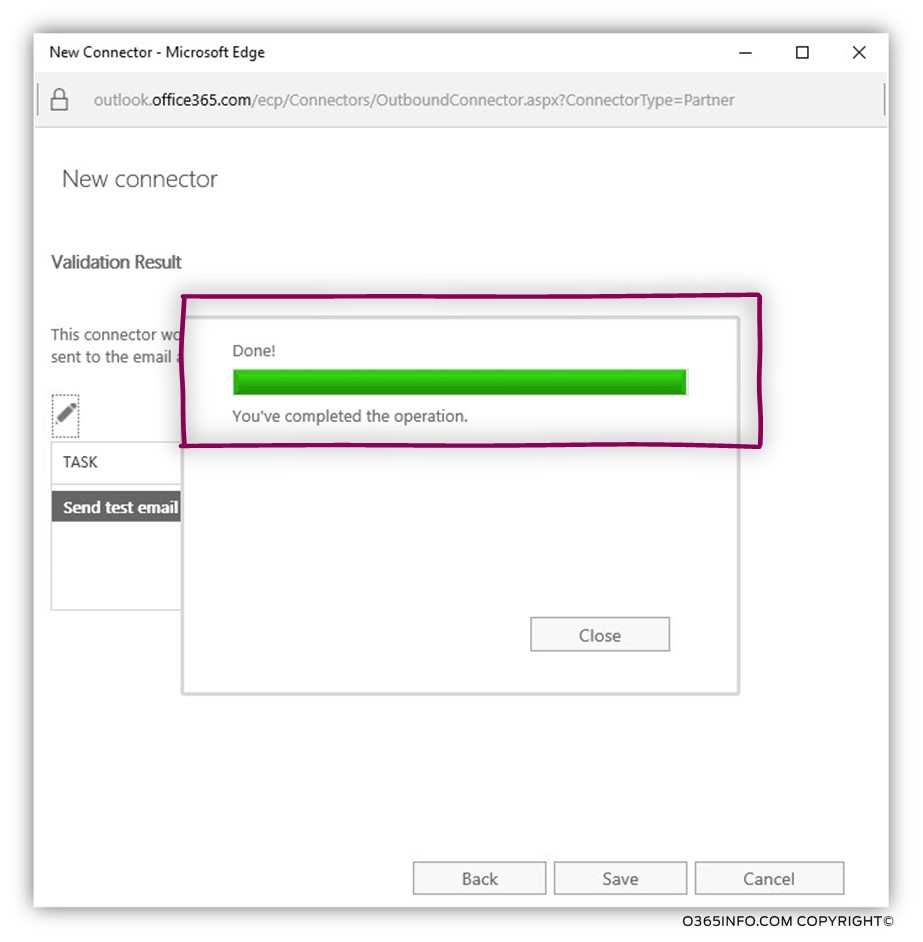
On the next screen, we can see that the “test E-mail” was completed.
Note that even if the “test E-mail” phase completed, it does not mean that the E-mail sent successfully to the destination recipient.
On the next screen, we will be able to know if the E-mail message reaches his destination or not.
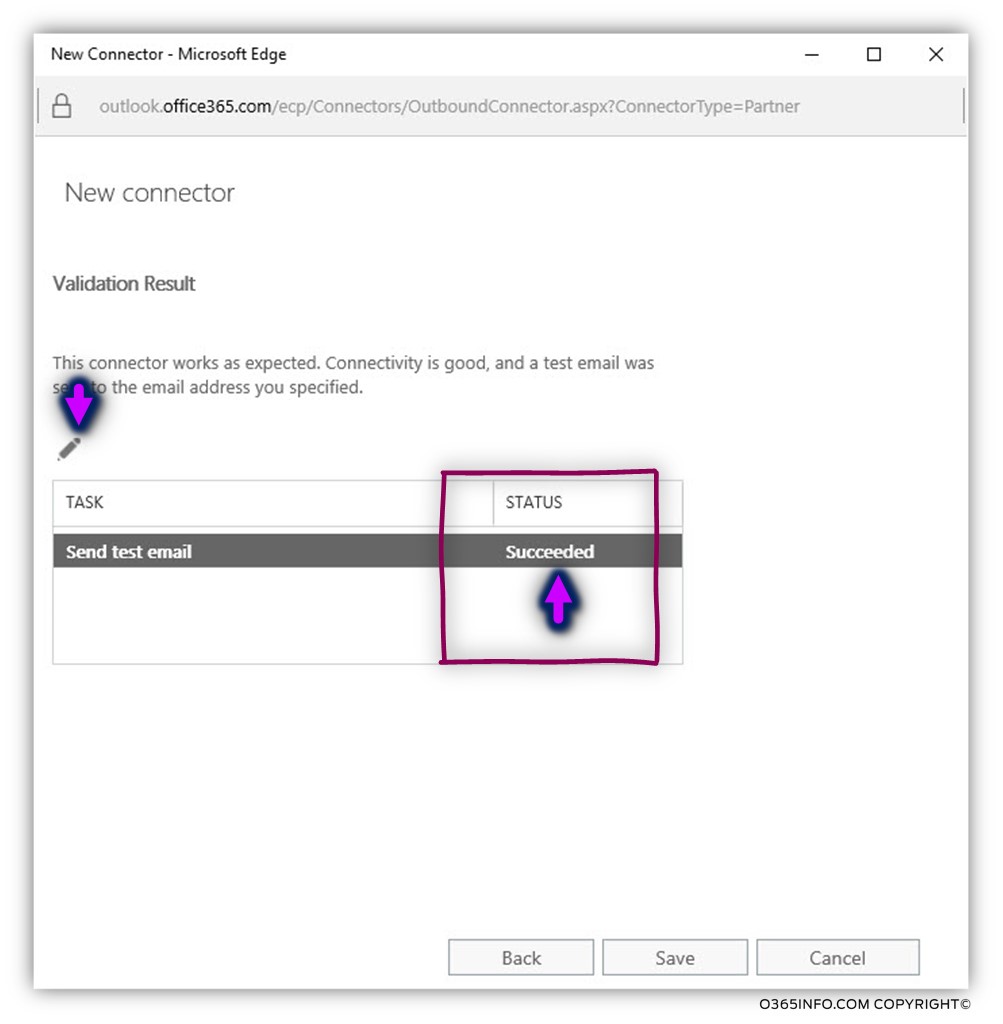
On the next screen, we can see that the “mail test” was successfully completed (Succeeded).
The meaning is that:
- The destination mail server that represents the domain name thankyouforsharing.org was located by using the MX record.
- The destination mail server that represents the domain name thankyouforsharing.org support TLS.
- The destination mail server that represents the domain name thankyouforsharing.org has a valid public certificate + the certificate includes the required host name (thankyouforsharing.org).
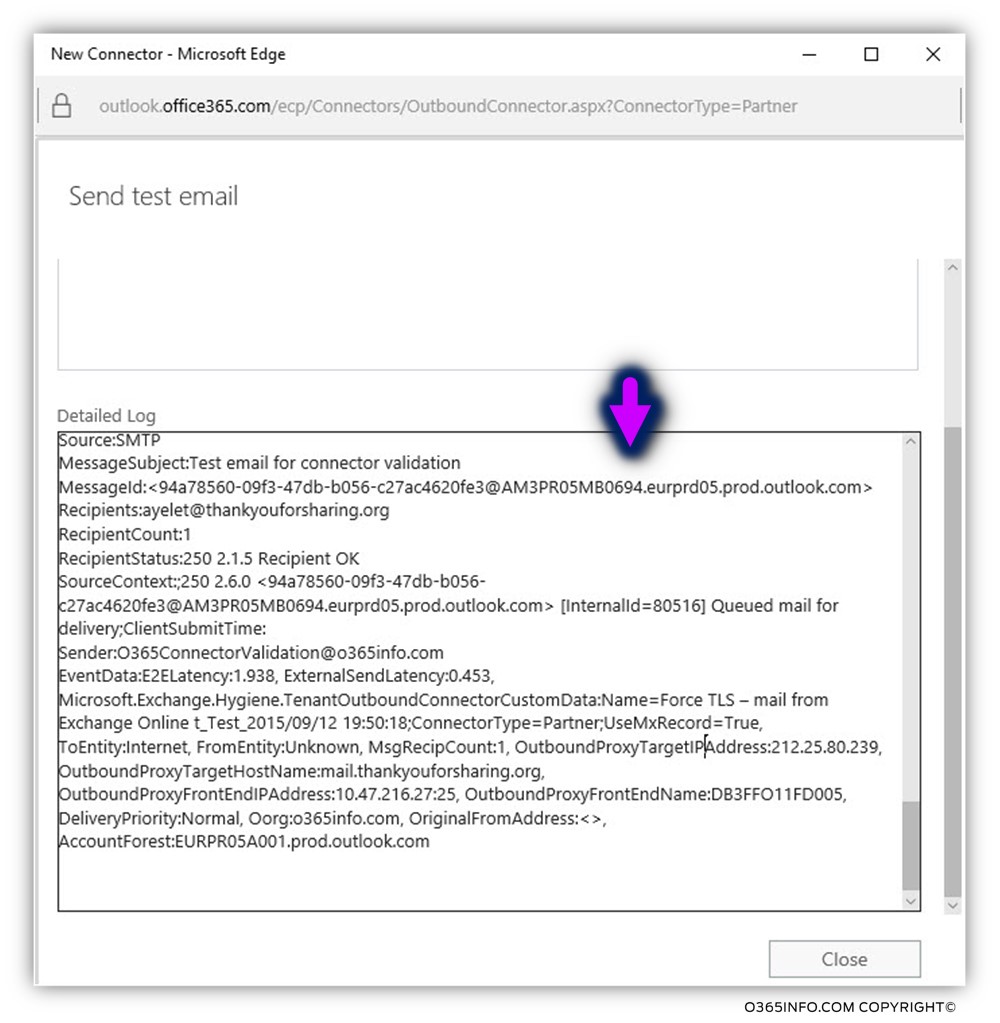
In case that we want to get additional details about the mail flow, we can choose the pencil icon.
In the following screenshot, we can see the log that includes the specific details of the mail flow in which Exchange Online sent an E-mail message to the destination recipient hosted at – thankyouforsharing.org.
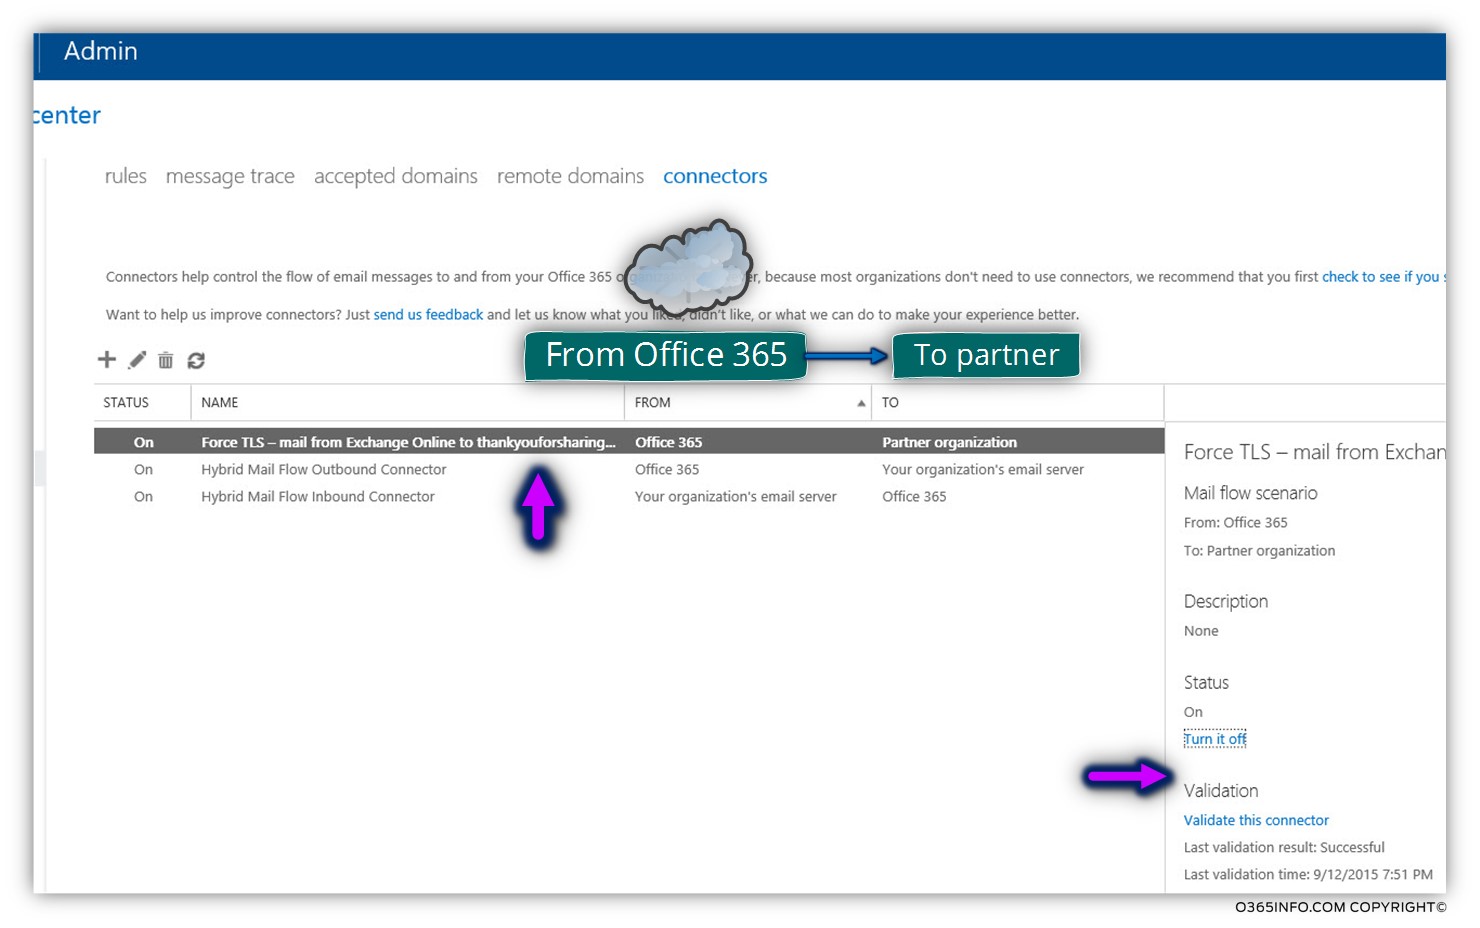
In the following screenshot, we can see the result – a new outbound connector was created.
We can understand that this is an “outbound connector” because, under the “FROM” section, we can see that the source is – Office 365 and the “TO” is partner organization.
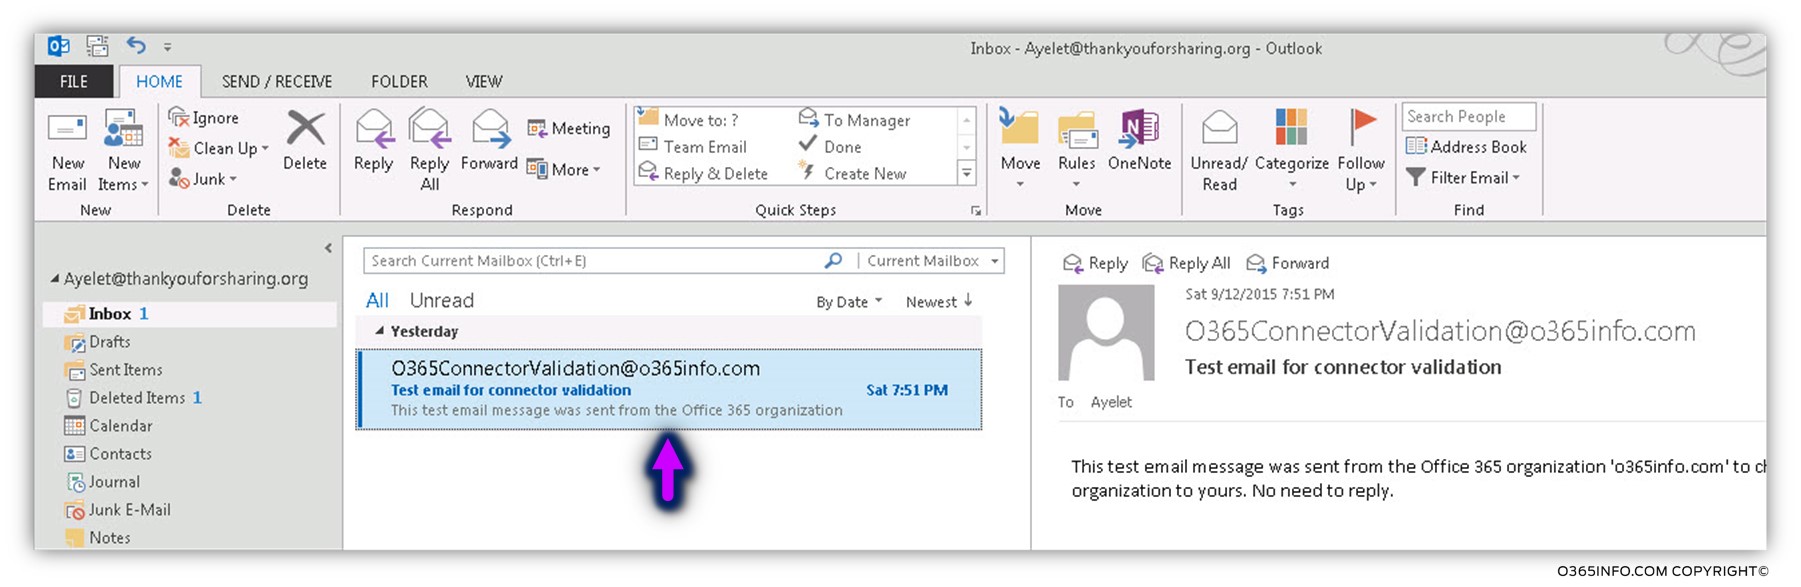
In the following screenshot, we can see the “test mail” that sent to the destination recipient.
Recap and next article
In the current article, we have reviewed the required configuration setting that we need to implement for configuring the option of Force TLS in the Exchange Online Outbound connector.
The Force TLS setting that will be “activated” for an outgoing communication channels – when Exchange Online recipient needs to send E-mail message to the external recipient who has the domain name – thankyouforsharing.org.
In the next article (Configure Force TLS in Exchange Online environment | Settings of inbound connector | Part 7#12), we will review the required configuration settings, that we need to implement for configuring the option of Force TLS in the Exchange Online inbound connector.
What Others Are Reading
This Post Has 0 Comments