Outlook client entirely depends on the Autodiscover service as an infrastructure for his relationship with…
Autodiscover process and Exchange security infrastructure | Part 20#36
The article is all about the subject of the security mechanism that is implemented as part of the Autodiscover process.
Table of contents
Autodiscover and security
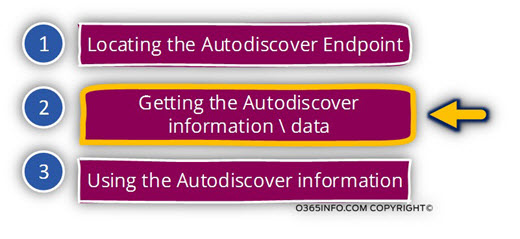
Autodiscover mechanism includes three major parts:
- Locating the Autodiscover Endpoint
- Getting the Autodiscover information \data
- Using the Autodiscover information
In the current article, we relate to the “middle part” in the diagram that deals with the task of – “Getting the Autodiscover information \ data “.
The Autodiscover process built for providing the “client” an efficient and secure way for getting the required information from a “server” (Exchange or Autodiscover Endpoint).
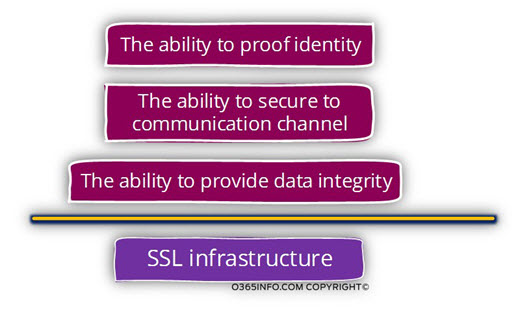
The meaning of a “secure way”, is translated into three major mandatory requirements:
1. The ability to prove identity
Each of the involved parties in the Autodiscover session, meaning the client and the server, need to identify himself and to “proof” his identity.
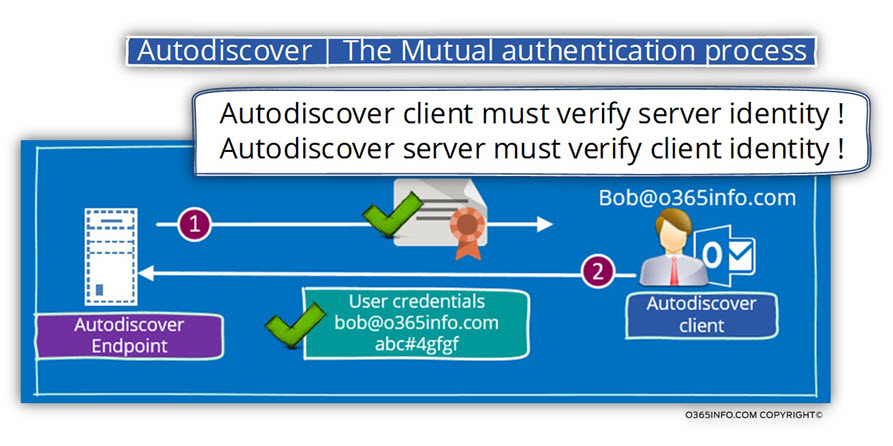
The client and the server must implement a model of – “mutual trust” in which the client can know that the server is a “reliable source of information” and the server can know that the client is “authorized” to get specific information.
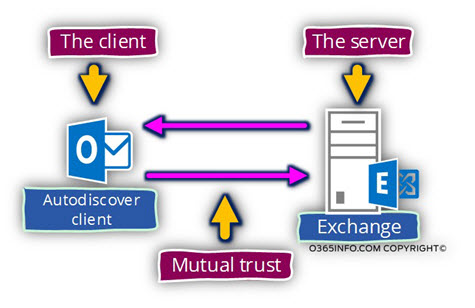
The trust between the involved parties achieved by using a mutual authentication.
The “server-side” will identify himself by providing a certificate; the client side will identify himself by providing user credentials. After the Autodiscover client verifies that the Exchange certificate is O.K, and the server can be trusted, the Autodiscover client also needs to prove his identity to the Exchange server.
The “Autodiscover client proof”, is not implemented by providing a certificate (client side certificate) but instead, by providing user credentials (username + password) that will encrypt by using the public key from the server certificate.
2. The ability to secure the communication channel
A safe communication channel implemented by encrypting the data that transferred between the two Autodiscover Endpoints.
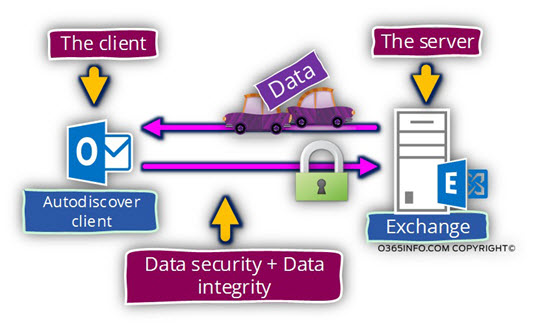
3. The ability to provide data integrity
The meaning of “data integrity” is using a mechanism that will enable each of the parties to ensure that the data that sent was not modified, corrupted, etc.
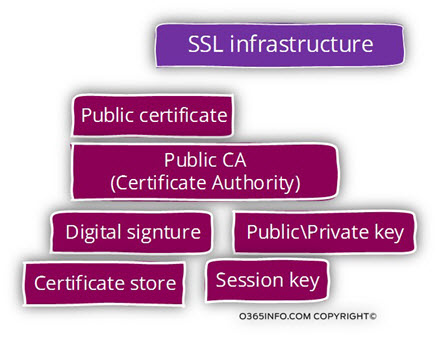
In the following diagram, we can see the essential requirements that need to fulfill. The implementation of this different requirement implemented by the SSL infrastructure.
SSL (HTTPS) infrastructure and Exchange Autodiscover
SSL stands for – secure socket layer. The SSL mechanism is implemented by a protocol named – HTTPS (HTTP secure).
The Exchange Autodiscover infrastructure built upon the SSL infrastructure.
The term “SSL infrastructure” built from many different parts and components. Getting into a detailed review for each element is Outlook of our current article’s scope.
Instead, we will mention some of the “parts” that build the SSL information and how this part are “used” by the Autodiscover process.
Autodiscover and server-side public certificate
The infrastructure for HTTPS and SSL (the mechanism that is used by the Exchange Autodiscover process) is heavily relied on the “server side certificate”.
The term “server”, relate to an element that provides a service to a client.
In our scenario, the server is Exchange server (Autodiscover Endpoint) that provides Autodiscover services to his Autodiscover clients.
Note – along the current article we will mention the term “public certificate”. Technically speaking the server certificate doesn’t have to be considered as public certificate what created by a public CA (certificate authority).
In a public environment, the mandatory need is for a public certificate. Because Exchange infrastructure provides services to an external client that reside on the public network, we can see that the Exchange server must use a public certificate.
The server side (Exchange server) public certificate used for two purposes:
The server side (Exchange server) public certificate used for two purposes:
1. The server ability to provide proof of identity to the Autodiscover client
The Exchange client (Autodiscover client) doesn’t relay to know if the Exchange server that he is trying to communicate is “Is really who he says he is.”
The server public certificate enables the Exchange server (the Autodiscover Endpoint) to prove his identity to the Autodiscover client.
2. Creating a secure communication link
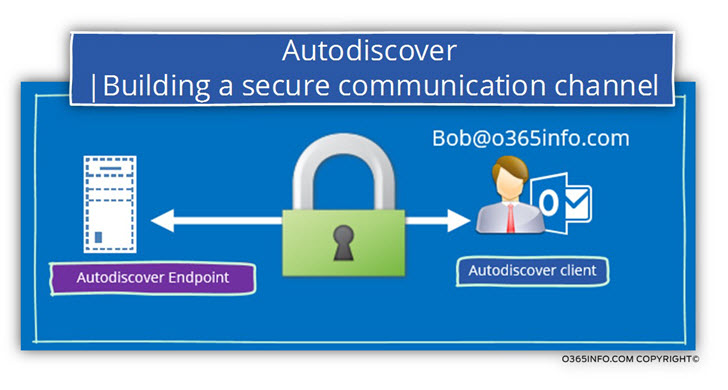
Autodiscover dictates a mandatory need encryption of the information that passes between the two sides.
The data encryption implemented by using a session key that the client creates and uses for the task of – data encryption between the two end points.
Type of public certificate
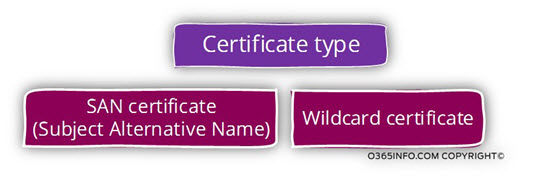
A general classification of a certificate can be:
- SAN – (Subject Alternative Name) – certificate which was created for “representing” a limited number of hosts. Most of the time, the host name will appear as an FQDN meaning a naming convention that includes the host name + a domain name.
- Wildcard certificate – a certificate that represents a “complete” domain name and not just a specific host or FQDN. The name “wildcard” is used because the syntax which is used is based upon the asterisk character that uses for representing the wildcard. For example, a wildcard certificate for the domain name – com will relate to the domain name as – *.o365info.com
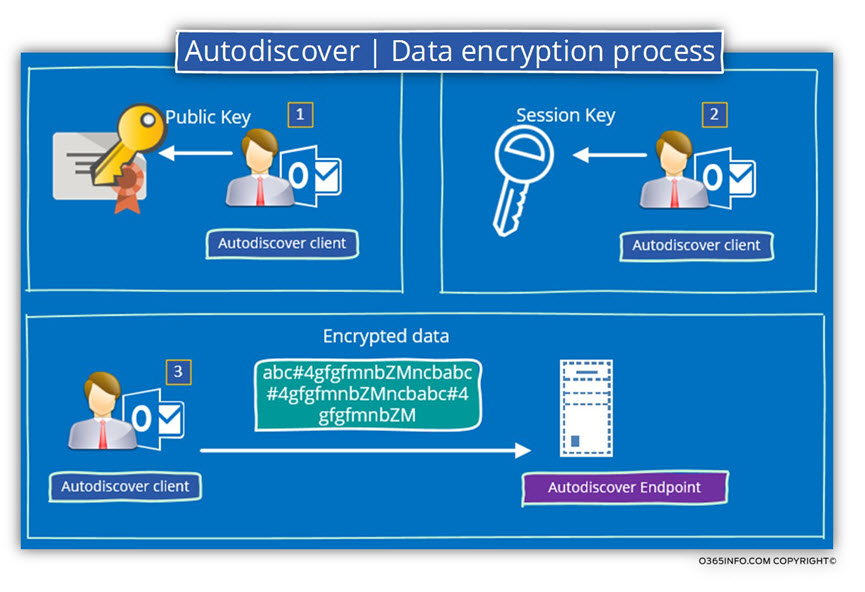
Autodiscover | Data encryption process
Just a quick view about the way that is used for “building the secure communication channel” between the server and the client.
Step 1 – verify server identity, get a public certificate, and fetch the public key from the certificate.
The client asks for the server to provide him his certificate. The client implements the process in which he verifies that the server certificate is “O.K.” and that the server can be trusted.
The client “fetch” from the server certificate the public key.
Step 2 – create a session key, encrypt, send to the server.
In case that the process of validating the server public certificate successfully completed, the client “generate a code” that describes as- Session key.
The session key is the “password”, which used by the server and the client for encrypting the data the travel through the secure communication link.
The client encrypts the session key by using the server public key.
“(The client “take” the value of the Public Key from the server certificate).
The client sends back the information to the server
Step 3 – server extract the session key
Only the server who has a private key, can open the encrypted code and find the value of the session key that was “hidden” in the encrypted data.
Now, the client and the server have a session key (password) that only they know.
From this day forwards, each piece of data that transferred between the client and the server will be encrypted using the values as the session key.
Note: A session key in the name implies, is “only good” for a specific session.
Each time the client creates a new communication with the server, the process is implemented all over again, and a new session key is generated.
Autodiscover process and security in details
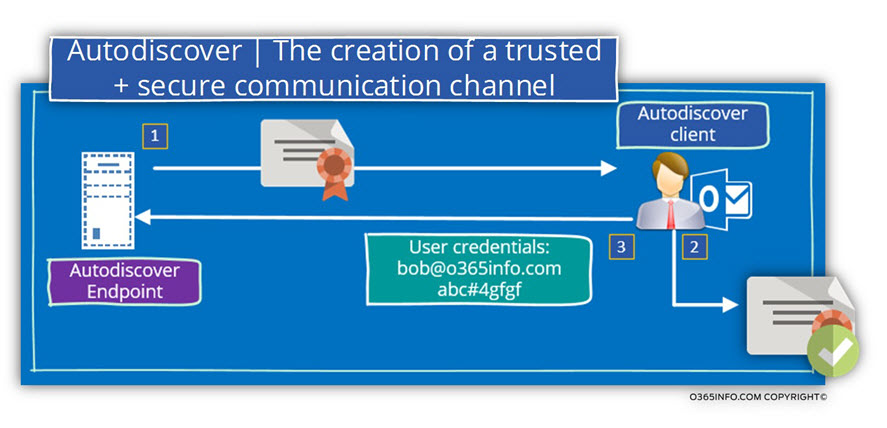
In an Autodiscover process, the first attempt of the Autodiscover client is to check if the Autodiscover Endpoint can communicate using HTTPS and if the answer is “yes,” the Autodiscover client will ask from the Autodiscover Endpoint his certificate.
The Autodiscover client will need to implement a serious about “validity checks” so he will be able to be sure beyond doubt, that the server certificate is valid and legitimate.
In case that the server certificate considered as valid, the Autodiscover client will provide his credentials to the server and from this day forwards, all the data that are pass-through the communication channel will be encrypted.
Server public certificate validity checks
The server certificate must comply with all the three validation tests that are performed by the client. To be able to say that the specific certificate is “valid,” all the three validation tests must me successfully completed.
Note: The validation process is based on the way that the HTTPS protocol “works” and in reality; the process is even more complex and includes additional steps such as verifying the integrity of the certificate data by using the server digital signature and more.
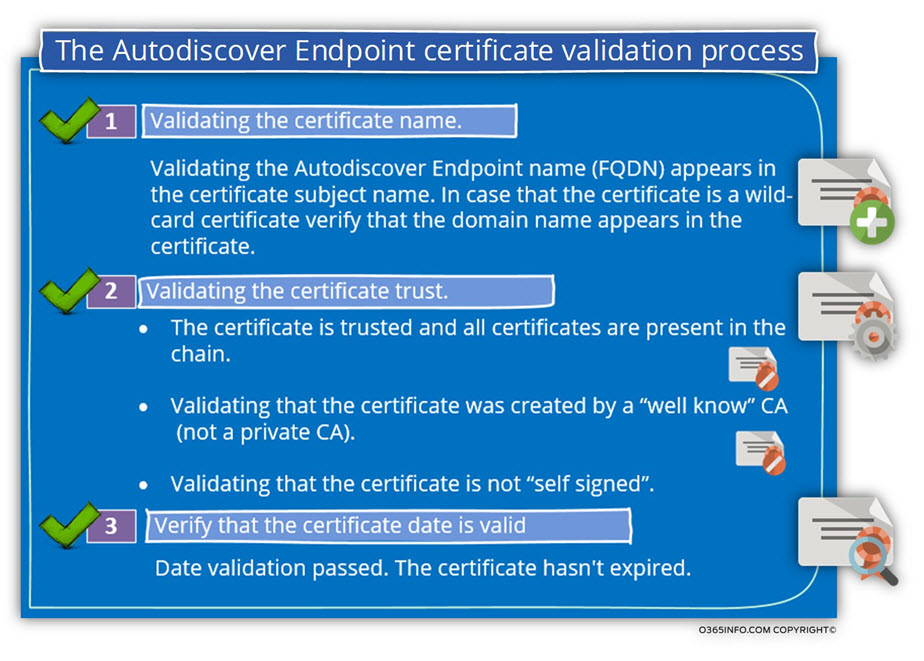
To three validation tests that are implemented by the client are:
1. Validating the certificate name.
The term – “Validating the certificate name“, is a little confusing.
The meaning is the when a client tries to address, the destination host, using a particular host name, or if to be more accurate an FQDN (Fully Qualified Domain name), the client except that the server certificate will include this hostname.
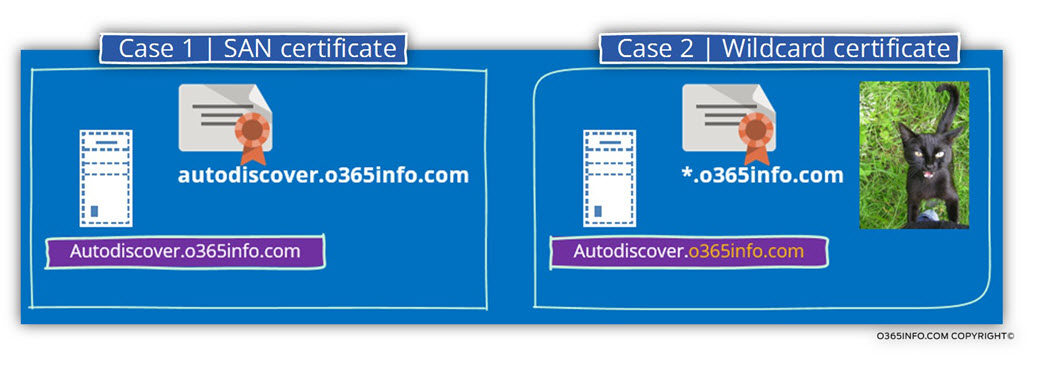
Case 1 – server use a SAN certificate
The term – ”SAN” (Subject Alternative Name) describes a certificate method that includes or relates to a particular host name\s.
In case that the SAN certificate includes four host names, the certificate can use by four different hosts or just one server who want to “present himself” using a different host name.
For example, when an Autodiscover client addresses an Autodiscover Endpoint called autodiscover.o365info.com, the client, except that the name will appear in the server certificate.
In case that the server certificate doesn’t include the server name whom the Autodiscover client expects to find, the Autodiscover process will fail.
If the server uses an SAN certificate, the requirement for a match between the host name whom the Autodiscover client use and the name who needs to appear in the server certificate are mandatory.
Case 2 – server uses a wild-card certificate
A wild-card certificate doesn’t relate to a particular hostname (the “left part” of the FQDN name) but instead, only to the domain name (the “right part” of the FQDN name).
In this case, the certificate includes only the domain name.
Each host who uses an FQDN name, in which the part of the domain name is identical to the domain name that appears on the wild-card certificate, can use this certificate.
For example, in case that the Autodiscover host name of a specific Exchange server is – autodiscover.o365info.com, the wild-card certificate that the server provides is a certificate that represents the domain name – o365info.com and not just a specific host name.
Real life examples
Type of public certificate
1. SAN certificate
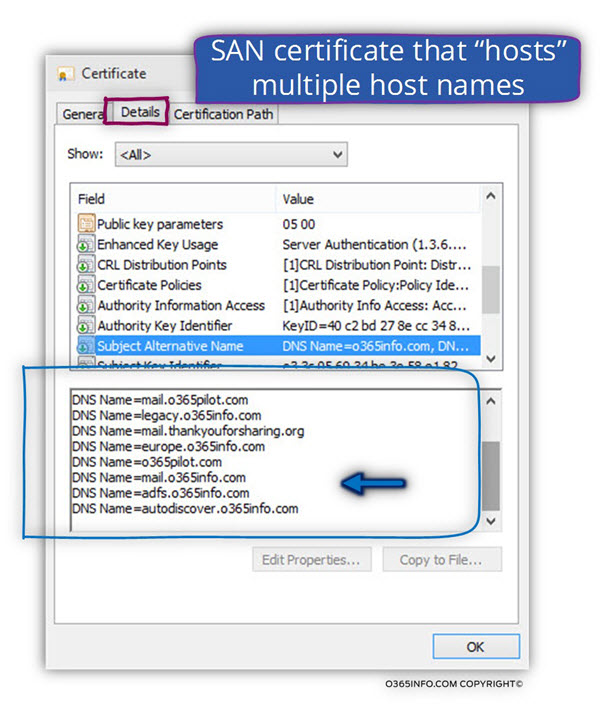
In the following screenshot, we can see an example of SAN certificate.
As we can see, one certificate chain “host” multiple host names and even multiple domain names.
2. Wild-card certificate
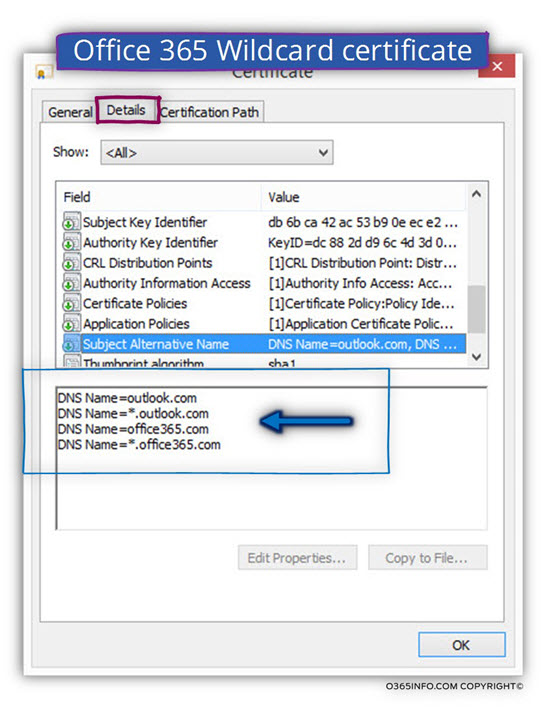
The next example is the Office 365 Wildcard certificate.
In the following screenshot, we can see an interesting phenomenon – all the huge Office 365 and Exchange Online infrastructure, is represented by a very simple and “thin certificate.”
Office 365 uses a Wildcard certificate that includes the domain names:
*.office365.com and, *.outlook.com
All of the Office 365 and Exchange Online server who “belong” to one of these domains can use this certificate.
We can relate to the wild-card certificate as a “logical umbrella” for all the hosts whom they FQDN name includes one of this domain name.
The certificate CA
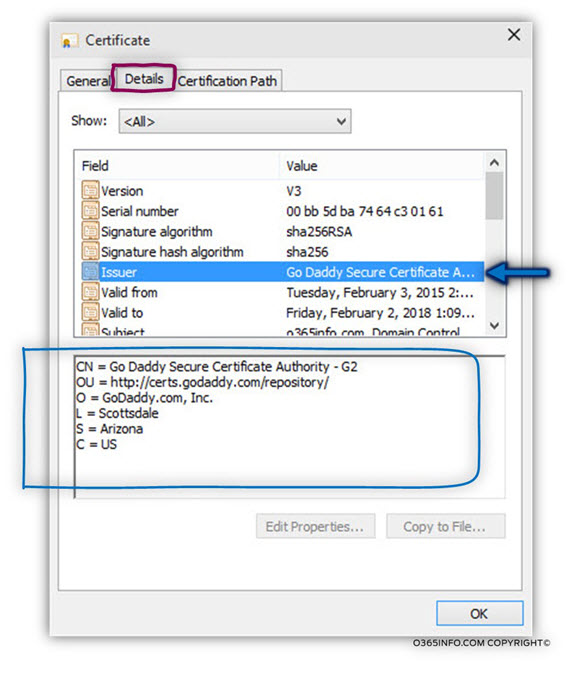
In the following screenshot, we can see an example of a public certificate that was created by a public CA – GoDaddy
The name of the CA appears under the “issuer” filed.
Certificate trust chain.
In most of the scenarios, the CA that provides the certificate is the last link in the chain.
Many times, there is an additional CA that “enroll” other CA as an authority who can “enroll” other servers.
In the world of “security”, the client must be sure behind any doubt that the certificate that the server provide is legitimate and can be trusted.
For this reason, after the server sends the client his certificate, the client need to “pull Outlook” from the certificate the Certificate trust chain.
The next step will be verifying any of the CA that appears in the Certificate trust chain.
Q1: How can the client (the Autodiscover client) trust the certificate that provided by the server (the Autodiscover Endpoint)?
A1: The certificate that is provided by the server is “stamped” by a public CA.
Q2: Why should the client trust this “CA”?
A2: The underlying assumption is that the client desktop includes a certificate store that includes a list of “approved” public CA that the client can trust.
The answer is quite simple: every “window based” OS includes by default a database named: certificate store.
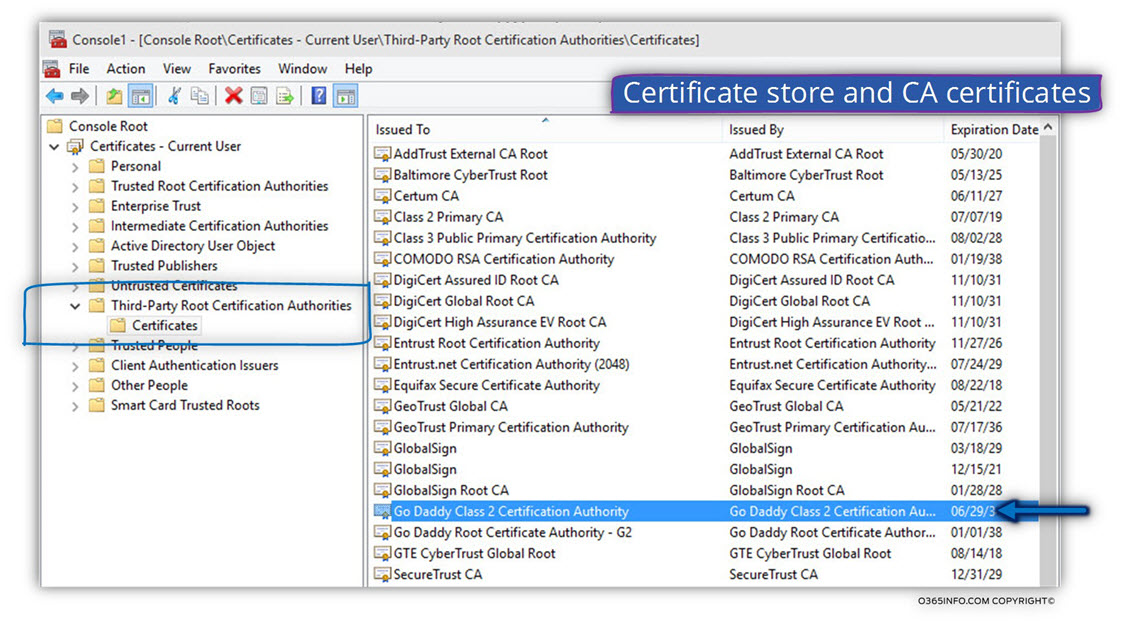
The certificate store includes the certificate if these “public companies” such as – GoDaddy, GTE Cyber Trust, DigiCert and more.
In the following screenshot, we can see an example to the “inside” of the Windows OS certificate store and the CA certificates.
The term “certificate trusts chain” describe a “hierarchy of trust” between entities.
To make simpler, many times the CA that “authorized” a particular server by providing him a public certificate is a “child” or subordinate of additional CA that authorized him.
When a client gets a server public certificate, besides of validating the details of the particular server who provide the certificate, the client must verify all the “hierarchy of trust,” meaning all of the CA that involved throughout the process.
The information about the Certificate trust chain must appear as part of the certificate.
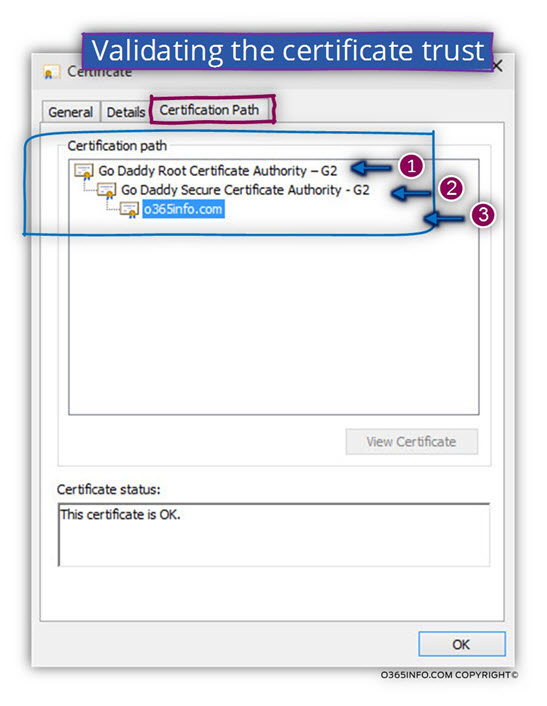
Real life example: let’s take for an example, the public certificate that I have.
Under the Certificate path tab, we can see a clear picture of the hierarchy.
The certificate was provided for a host named – o365info.com by a CA (Certificate authority) of GoDaddy.
The CA name that provides this certificate is – Go Daddy Secure Certification Authority G2 (number 2).
As we can see, the Go Daddy Secure Certification Authority CA is not on the “top of the chain.
The permission to enroll a server certificates were assigned or provided from a “higher authority” named – “Go Daddy Root Certificate Authority – G2” (number 1).
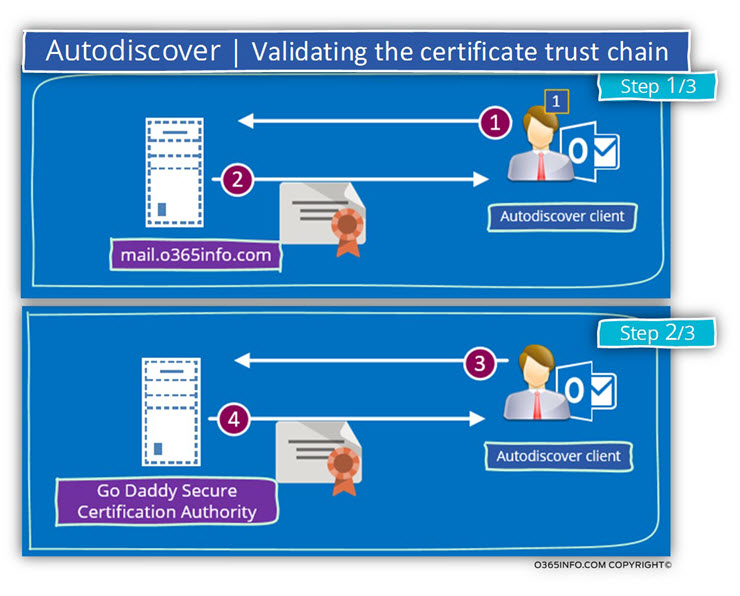
In the following diagram, we can see a description of the Certificate trust chain process.
Step 1+ 2 : the client accesses a server and asks him to provide his certificate.
When the client gets the server certificate, he verifies that the server name appears in the certificate and if the name appears the client move to the next step correctly.
Now, the client will try to communicate the CA server (Go Daddy Secure Certification Authority in our scenario) and ask him to provide his public certificate.
In case that the CA provide his public certificate, the client will check if this is the “end of the hierarchy.
In case that the answer is: “Yes”, the client moves to the next step.
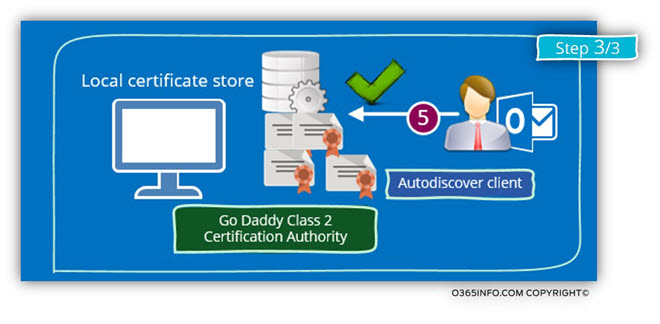
Step 3: the client accesses his local certificate store, and looks for the CA certificate (the last CA in the hierarchy).
In case that the CA certificate appears in the client certificate store and case that the certificate is valid, this is a “sign” for the client that he can trust the server that he wants to communicate with.
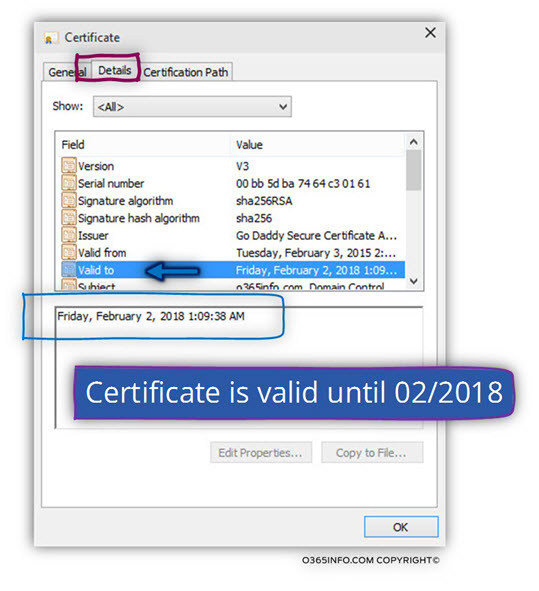
3. Verify that the certificate date is valid
This is the simplest part of the “certificate validation process.”
Each certificate has a “limited lifetime”. The most common “public certificate, lifetime” is 1-4 years.
Digital signature
Q3: How can the client be sure that the certificate is Legitimate and not fake?
A3: The public certificate includes a digital signature. The client “know” how to implement a procedure in which he can verify if the certificate that the server provides is the “original certificate” that he got from the CA.
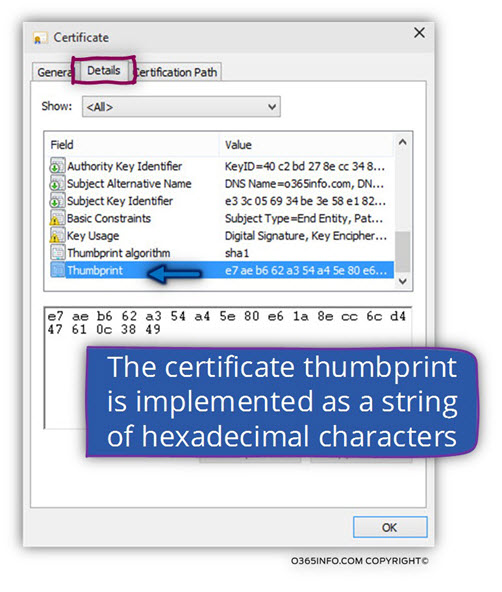
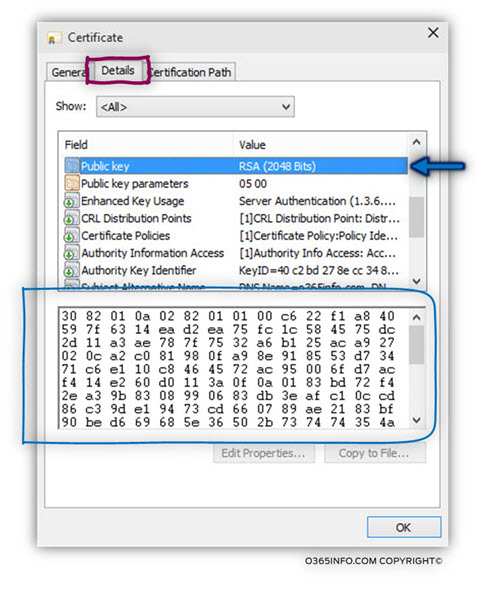
Certificate public key
In the following screenshot, we can see an example of the public key value that appear in the certificate.
Troubleshooting public certificate scenarios
In the following section, I would like to review a couple of possible scenarios, which can interfere in the Autodiscover process.
As we know, the Autodiscover process starts by looking for the root domain name.
In our scenario, the company public domain name is – o365pilot.com
A user named Bob, which has the E-mail address – Bob@o365pilot.com wants to create a new Outlook mail profile.
The Autodiscover process that is initialized by the Outlook client will try to look for a host named – o365pilot.com and if he finds one, try to create an HTTPS session and ask for the Autodiscover required information.
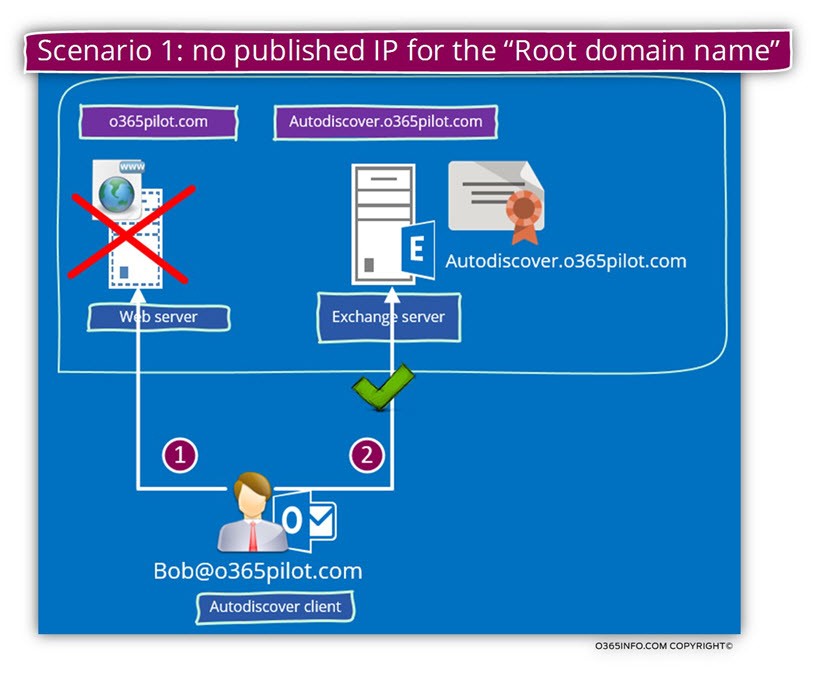
Scenario 1: no public website that is “mapped” to the domain name.
In our scenario, the company didn’t publish or “map” the domain name to a public website.
Note – there could be a different situation in which the corporation has a website, and, also, the root domain name was mapped in the DNS to the public IP of the web address, but the website doesn’t support HTTPS.
When the Autodiscover client starts the process, he will contact a DNS server looking for information about the public IP of – o365pilot.com
Because, in our scenario, there is no such information, the Autodiscover client “understand” that he should start using the second method of Autodiscover hostname using the naming convention – autodiscover.o365pilot.com
In case that the Exchange server configured correctly, the Autodiscover client will find the IP address of the host, check if the host (Exchange server) support HTTPS asks for the server certificate and so on.
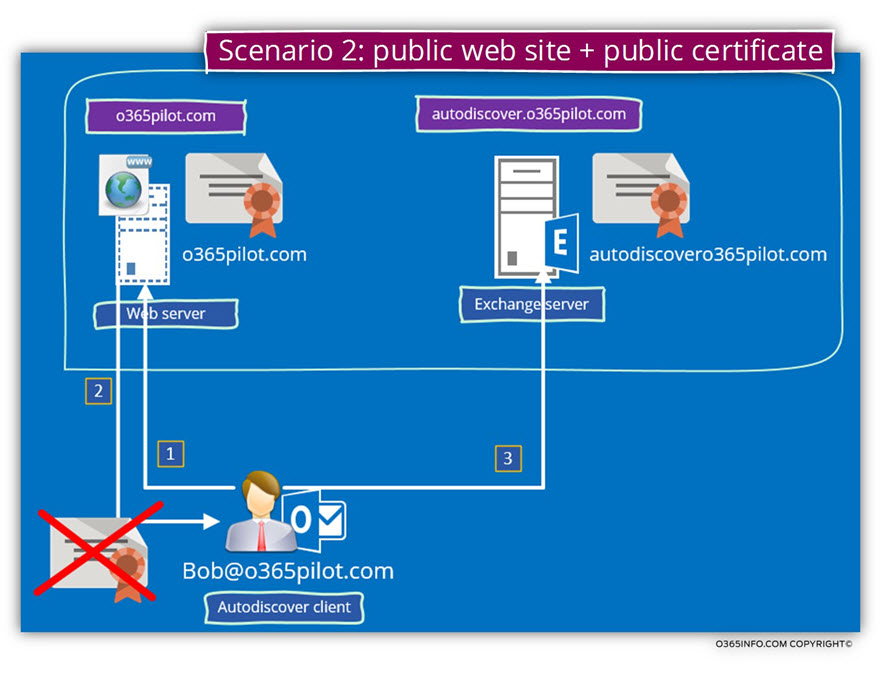
Scenario 2: public web site + public certificate
In this scenario, the company has a website.
The public IP of the website is “mapped” in the DNS server to the company public domain name – o365pilot.com
Also, the company website supported HTTPS and had a certificate.
To be able to demonstrate a possible problem with this scenario, we will simulate two adequate problems that relate to the web server certificate.
Problem 1: the server certificate was not provided by a public CA
In this scenario, the company website uses a certificate that was created by a non-public CA.
To be able to get more information about the “web server” certificate let’s take a look at the certificate content:
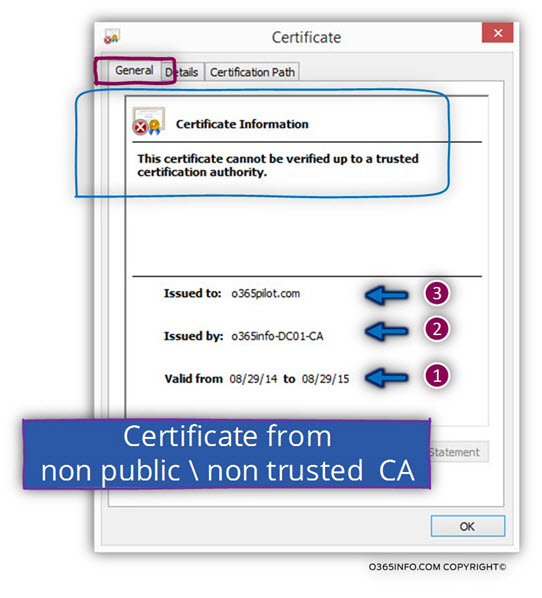
In the following screenshot, under the General tab, we can see that the certificate icon appears with a red stop sign. The warning notification is –
The certificate cannot be verified up to a trusted certification authority.
Pay attention that the server certificate includes the hostname – o365pilot.com and, the certificate date are valid but a “trusted CA did not create the server certificate” and for this reason, the validation check will fail.
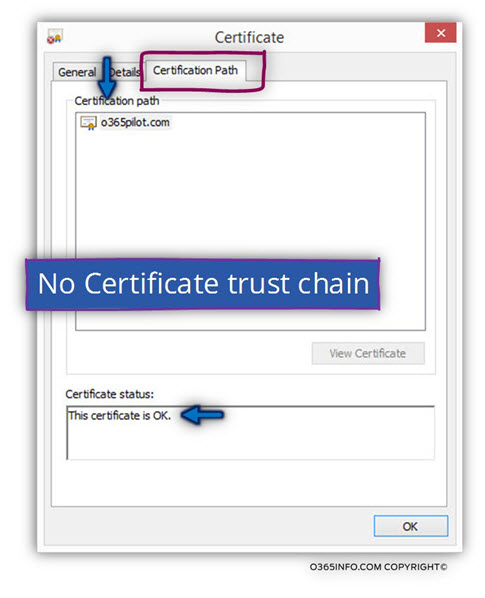
Under the Certificate Path tab, we can see that there is no “certificate chain” meaning – we cannot find the “element” (the public CA) that provide this certificate.
Analyzing the Autodiscover workflow by using ExRCA
To be able to take a closer look at the Autodiscover flow in this scenario, we will use the results of the ExRCA test.
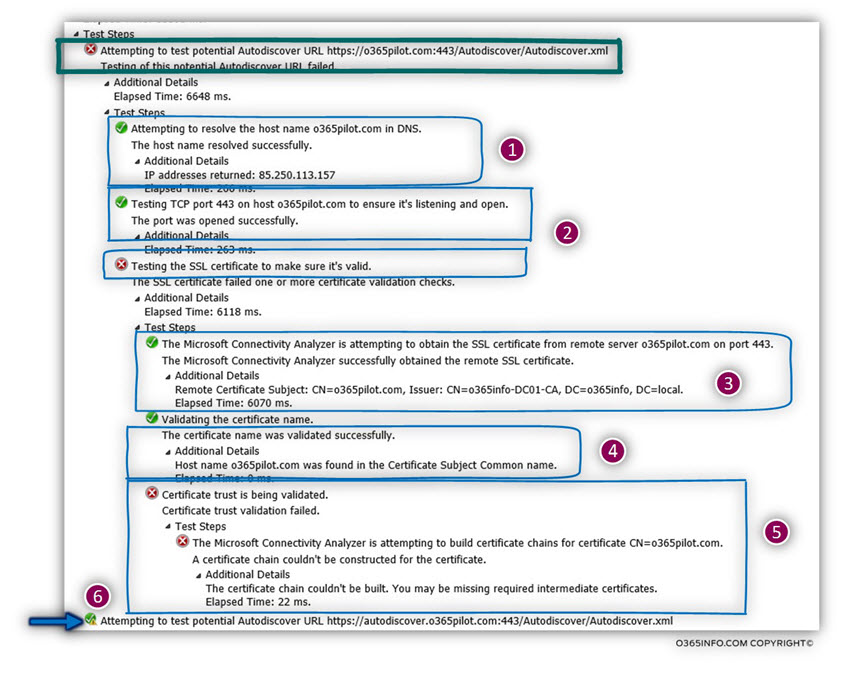
In the following screenshot, we can see that the first part of the Autodiscover processes complete successfully (number 1 + 2).
The Autodiscover client manage to get the IP address of the Autodiscover Endpoint (o365pilot.com) and, manage to verify that the Autodiscover Endpoint can communicate using the HTTPS protocol.
(IP addresses returned: 85.250.113.157 and Testing TCP port 443 on host o365pilot.com to ensure it’s listening and open).
The Autodiscover client asks for the server certificate, and the certificate was
Successfully sent to the Autodiscover client (number 3):
The Microsoft Remote Connectivity Analyzer successfully obtained the remote SSL certificate.
The certificate validation phase starts.
The first test that the Autodiscover clients perform is – the validating that the Autodiscover Endpoint name appears in the certificate (number 4).
In the ExRCA results, we can see that the server names (o365pilot.com) appear correctly-
Validating the certificate name. The certificate name was validated successfully. Hostname o365pilot.com found in the Certificate Subject Common name.
The next validation test that performed by the Autodiscover client is the “Certificate Trust” (number of 5).
In the test results, we can see that this test did not complete successfully (number 5) because the server certificate was not created or provided by a “trusted CA”:
Certificate trust is being validated. Certificate trust validation failed.
The Microsoft Connectivity Analyzer is attempting to build certificate chains for a certificate CN=o365pilot.com. A certificate chain couldn’t be constructed for the certificate.
In case the validity checks of the host failed, the Autodiscover client will “move forward” to the next step by starting to look for a possibility to communicate with the hostname – autodiscover.o365pilot.com (number 6).
Problem 2: the server certificate doesn’t contain the server hostname
In the following scenario, we experience a different problem.
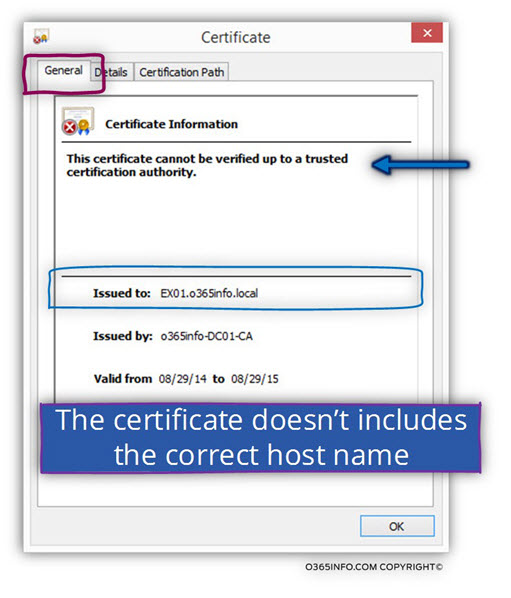
The server certificate doesn’t include the name of the Autodiscover Endpoint that the client is “expecting”.
In our scenario, the Autodiscover client starts the search by looking for a host named – o365pilot.com
By looking at the server certificate, we can see that the name that appears on the certificate is different. In our example, the server name which can be seen from the certificate is –
We can see that there is an additional optional problem because the certificate not provided by a public CA.
For this reason, the validity check will fail (and not continue) even before the Autodiscover client will try to check\test the certificate trust path.
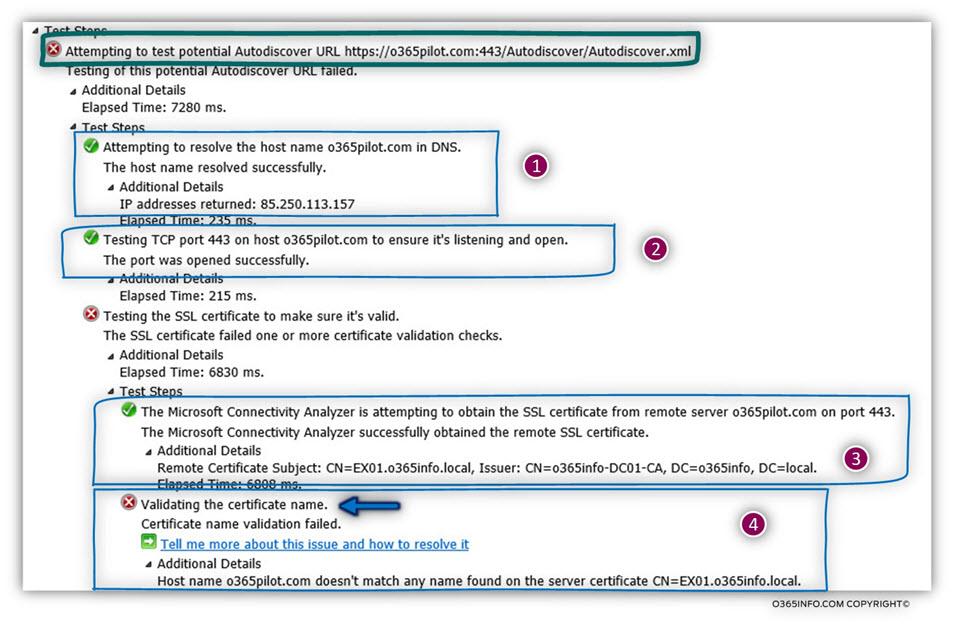
In the following screenshot, we can see that the first part of the Autodiscover processes complete successfully (number 1 + 2).
The Autodiscover client manage to get the IP address of the Autodiscover Endpoint (o365pilot.com) and, manage to verify that the Autodiscover Endpoint can communicate using the HTTPS protocol.
The Autodiscover client asks for the server certificate, and the certificate was
successfully sent to the Autodiscover client (number 3).
The certificate series of validation check start.
The first test that the Autodiscover clients perform is the validating that the Autodiscover Endpoint name appears in the certificate (number 4).
The validation test fails, and the following information appears –
Validating the certificate name. Certificate name validation failed. Host name o365pilot.com doesn’t match any name found on the server certificate CN=EX01.o365info.local.

This Post Has 0 Comments