The current article is the second article in a series of three articles, which will…
The checklist for preparing your Exchange 2010 infrastructure for Exchange 2013 coexistence |10#23
In the current article focus on the preparation that we will need to implement in the existing Exchange 2010 environment for a project of implementing Exchange 2013/2010 coexistence environment. Generally speaking, the good news is that the Exchange 2013 and Exchange CAS 2010 are “good friends.”
Vs. the scenario of Exchange 2013/2007 coexistence environment that required more comprehensive adjustment of a URL address, namespace, hostname, etc., the amount of the adjustments that we need to implement in the Exchange CAS 2010 infrastructure are minimal because the Exchange 2013 and the Exchange CAS 2010 infrastructure will use the same or an identical namespace.
Table of contents
- Exchange 2010 namespace – scenario description
- Exchange 2010 namespace vs. Exchange 2013 namespace
- Exchange namespace and DNS infrastructure
- Exchange 2013/2010 coexistence environment – Internal Autodiscover infrastructure considerations
- Exchange 2010 namespace in Exchange 2013 coexistence environment
- Implementing the required updated in Exchange 2010 infrastructure | Outlook Anywhere infrastructure
Exchange 2010 namespace – scenario description
The preparation that we will need to implement regarding the Exchange 2010 CAS namespace depends on the specific charters of the organization.
To simplify, let’s assume that in our scenario, the following rules are applied:
- Joint\contiguous namespace – the internal Exchange infrastructure namespace and the external Exchange namespace are based on the public domain name suffix: o365info.com the internal and the external host name who points to the Exchange 2010 CAS are: mail.o365info.com
- The organization uses Split DNS configuration – internal DNS infrastructure that hosts the domain name: o365info.com + External DNS infrastructure that hosts the domain name: o365info.com
- Autodiscover infrastructure – The internal and the external Autodiscover namespace are:
autodiscover.o365info.com
Exchange 2010 namespace vs. Exchange 2013 namespace
Despite the image “message”, in reality, the Exchange 2010 namespace and the vs. Exchange 2013 namespace function properly with each other.
The major concept is that in Exchange 2013/2010 coexistence environment, we will continue to use the same namespace as in the Exchange 2010 CAS environment. The “change” is that we will “repaint” the Exchange records that point, until now, to the Exchange 2010 to the “new Exchange infrastructure” – the Exchange 2013 infrastructure.
Exchange namespace and DNS infrastructure
In the following diagram, we can see an example of the “repoint” concept. Before the implementation of the Exchange 2013/2010 coexistence environment, the public DNS records of the Autodiscover and the Public facing Exchange CAS server host name were pointing to the Exchange 2010 CAS.
After the implementation of the Exchange 2013/2010 coexistence environment, the public DNS records of the Autodiscover and the Public facing Exchange CAS server host name will point to the Exchange 2013 CAS.
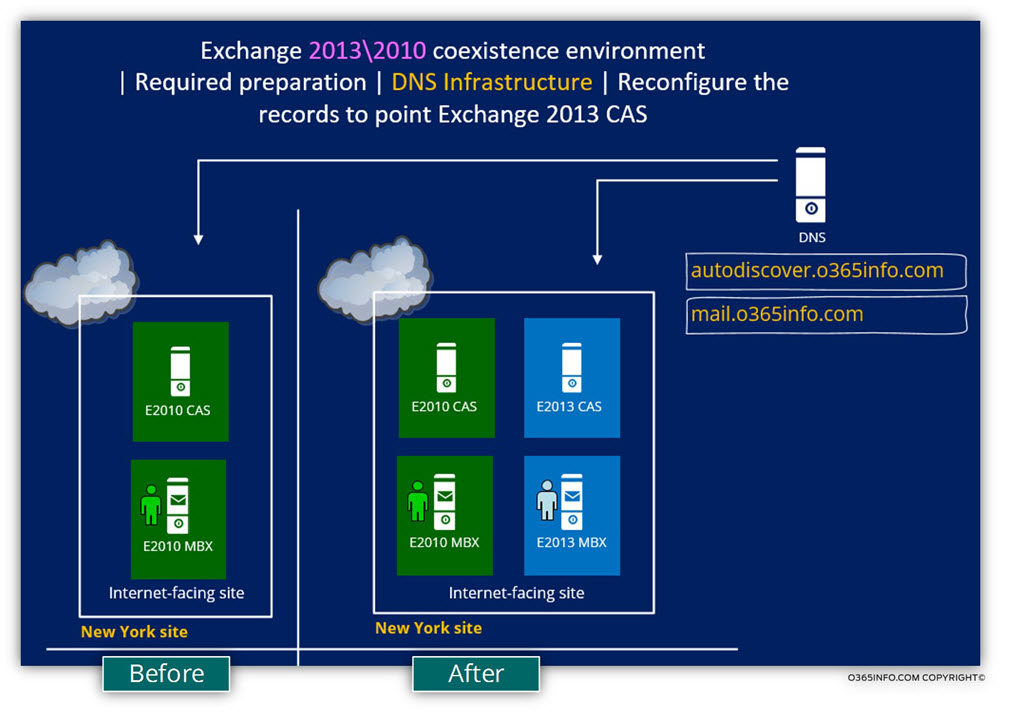
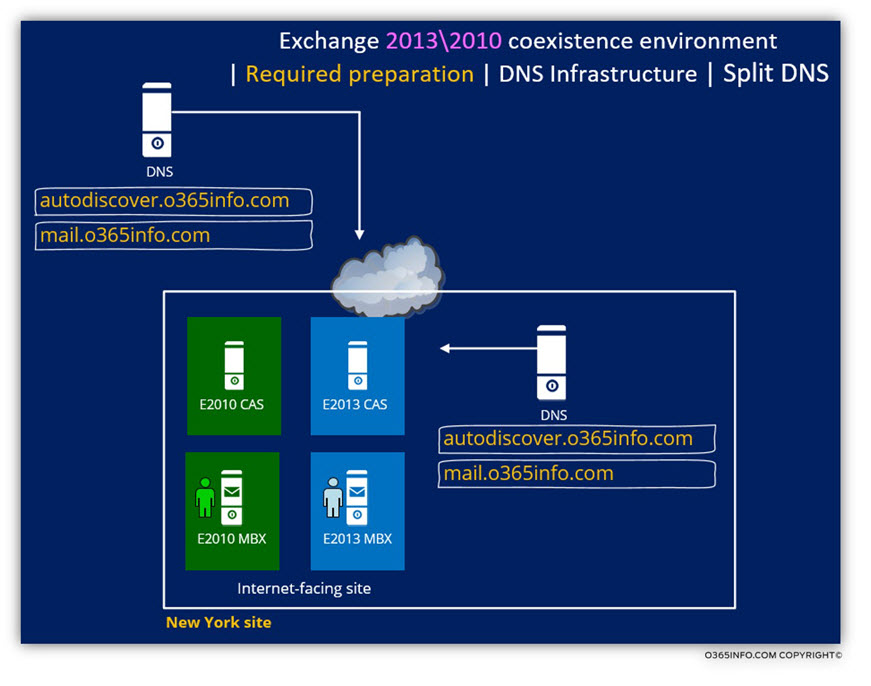
In a Split DNS infrastructure, the updates of the DNS records will need to be implemented for the internal DNS infrastructure and the External DNS infrastructure,
In the following diagram, we can see an example of the required DNS configuration settings.
Exchange 2013/2010 coexistence environment – Internal Autodiscover infrastructure considerations
Based on the assumption of our scenario in which the Exchange 2010 Autodiscover namespace infrastructure was based upon the concept of Joint\contiguous namespace, for example:
autodiscover.o365info.com, we will need to verify the implementation of the following requirements.
- DNS Infrastructure – verify that the internal\external DNS infrastructure will be updated by “mapping” the Autodiscover record to the IP address of the Exchange 2013.
- Verify that the Exchange 2013 CAS will be registered at the Active Directory SCP using the host name: autodiscover.o365info.com
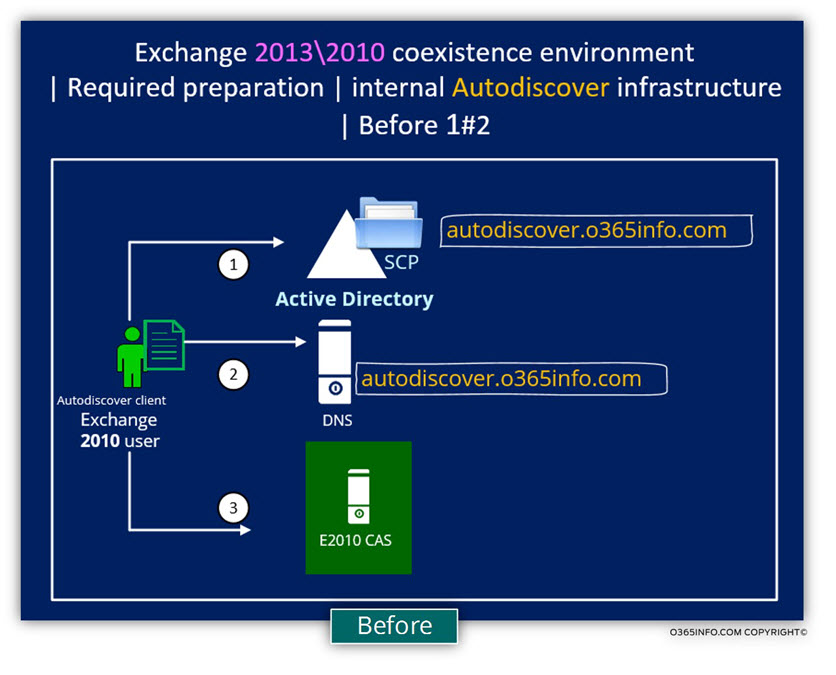
In the following diagram, we can see the implementation of the internal Autodiscover infrastructure in an Exchange 2010 environment.
- Exchange 2010 client query Active Directory for the name of the Autodiscover Endpoint and the answer is: autodiscover.o365info.com
- The Exchange 2010 client query DNS for the IP address of the host:
autodiscover.o365info.com and the “DNS answer” include the IP address of the Exchange 2010 CAS.
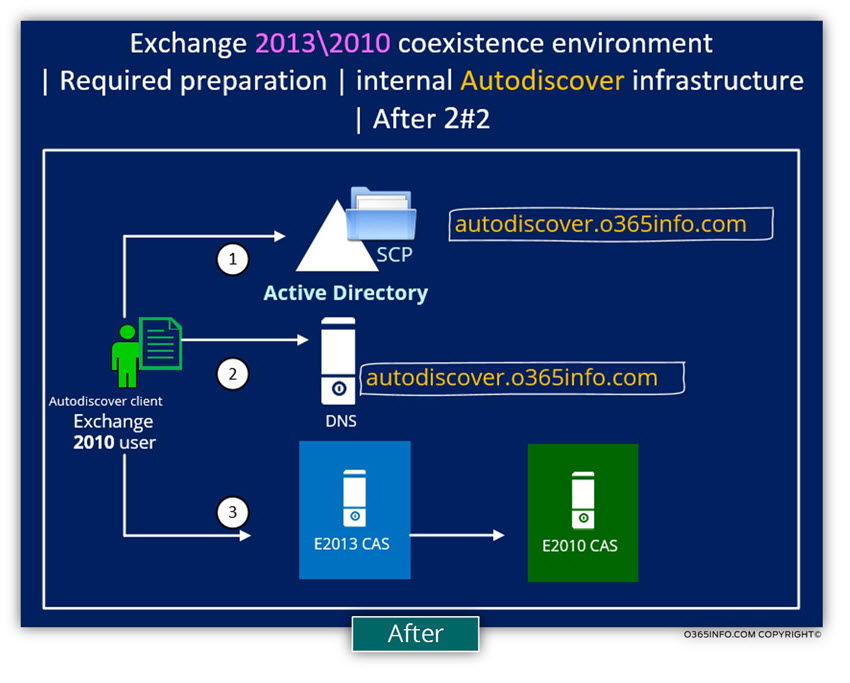
In the following diagram, we can see the implementation of the internal Autodiscover infrastructure in Exchange 2013/2010 coexistence environment.
- Exchange 2010 client query Active Directory for the name of the Autodiscover Endpoint and the answer is: autodiscover.o365info.com
- The Exchange 2010 client query DNS for the IP address of the host:
autodiscover.o365info.com and the “DNS answer” include the IP address of the Exchange 2013 server. - The Exchange 2010 client will address the Exchange 2013 CAS and the Exchange CAS server will proxy the request to Exchange 2010 CAS.
Other considerations
When implementing an Exchange 2013 coexistence environment, there are many other additional elements and consideration that need to be “included” in the preparation checklist.
Note – in case that you need to get more information about the required preparation in a scenario that is similar to the scenario that we use in the following article, you can read the information in the: Exchange Server Deployment Assistant
Just a little taste of the additional requirements could be:
- DNS infrastructure and MX records
In a scenario of Exchange 2013 coexistence environment, we will need to point to MX records to the “new Exchange 2013 CAS” that configured as the Public facing Exchange CAS server instead of the previous Exchange 2010 CAS. - Firewall infrastructure
We will need to update the Firewall rule that relates to the mail infrastructure was pointed to the IP address of the Exchange 2010 server to the “new IP address” of the Exchange 2013 server.
Exchange 2010 namespace in Exchange 2013 coexistence environment
The term that is use for describing the relationship that exists between the Exchange 2010 infrastructure namespace and the Exchange 2013 infrastructure namespace is: “the twin’s namespace concept”.
The meaning of this term is that booth of the infrastructures (Exchange CAS 2013/2010) will use the same namespace.
Exchange clients should address the Exchange CAS 2013 is a “focal point” for all of the availability services such as – Autodiscover, access to mailbox and Exchange web service.
The Exchange CAS 2013 will accept the Exchange client requests and in case that the Exchange client is: Exchange 2010 client, the Exchange CAS 2013 will “know what to do” with the request.
In other words: there is no need for using a dedicated or a particular namespace for the Exchange CAS 2010 infrastructure.
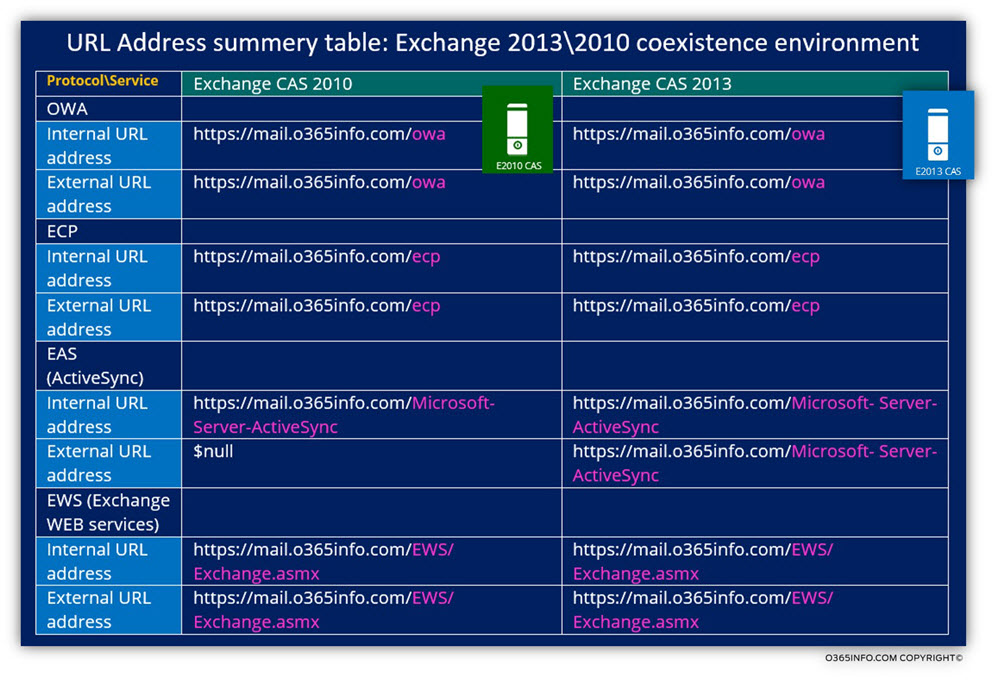
In the following table, we can see a summary of the namespace infrastructure in Exchange 2013/2010 coexistence environment. It’s easy to see that the Exchange 2010 namespace is identical to the Exchange CAS 2013 namespace.
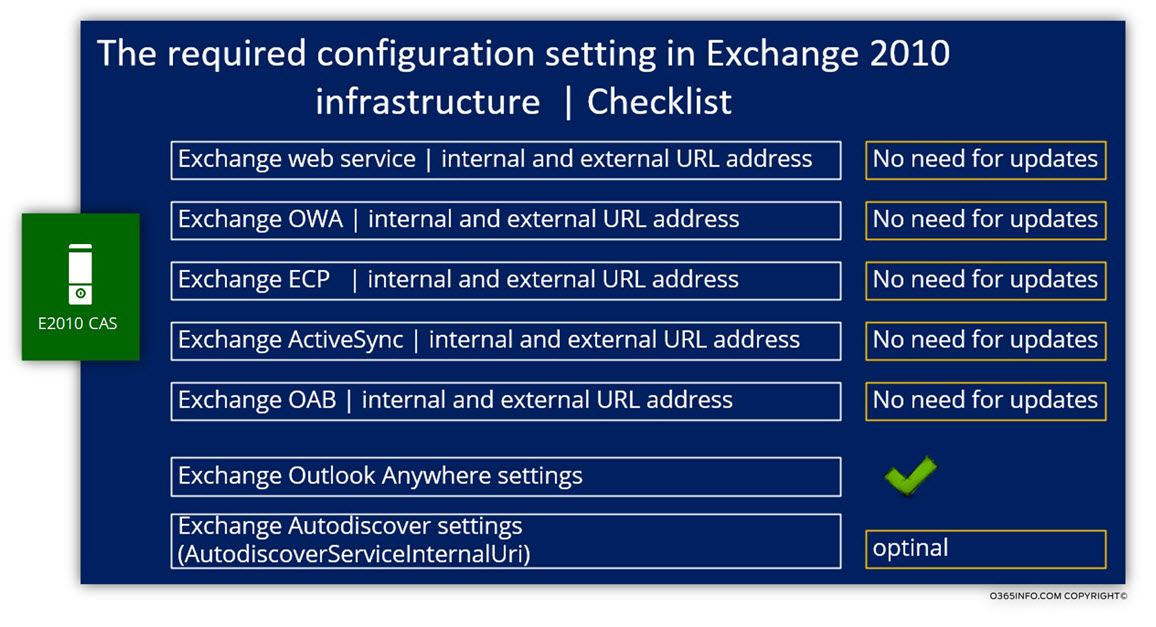
In the following diagram, we can see an example of the required configuration setting in Exchange 2010 infrastructure that relates to the Exchange 2010 URL address and services.
Implementing the required updated in Exchange 2010 infrastructure | Outlook Anywhere infrastructure
As mention, in an Exchange 2013/2010 coexistence environment we will need to verify that:
- Exchange CAS 2010 include Outlook Anywhere support
- The Outlook Anywhere use\have the required configuration settings
The required setting that relates to Outlook Anywhere service, that we will need to implement in the Exchange 2010 infrastructure are as follows:
- External host name
Verify if the Exchange CAS 2010 supports the Outlook Anywhere services.
Case 1: in case that the Exchange CAS 2010 support Outlook Anywhere services, we will need to update the authentication protocol setting.
Case 2: in case that the Exchange CAS 2010 doesn’t support Outlook Anywhere services, we will need to enable the Outlook Anywhere services and for the value of the external host name choose the host name that is “used by Exchange CAS 2013”. For example, in our scenario, we will configure the external host name as: mail.o365info.com
| External host name | |
| Outlook Anywhere | We will need to verify that the value of the external host name uses the primary namespace. In our scenario, the external host name is: mail.o365info.com. |
- External client authentication protocol
We will need to verify that the value of the “External client authentication” is set of basic
- IIS authentication method
We will need to configure the value of the: ”IIS authentication method“ to: basic and NTLM
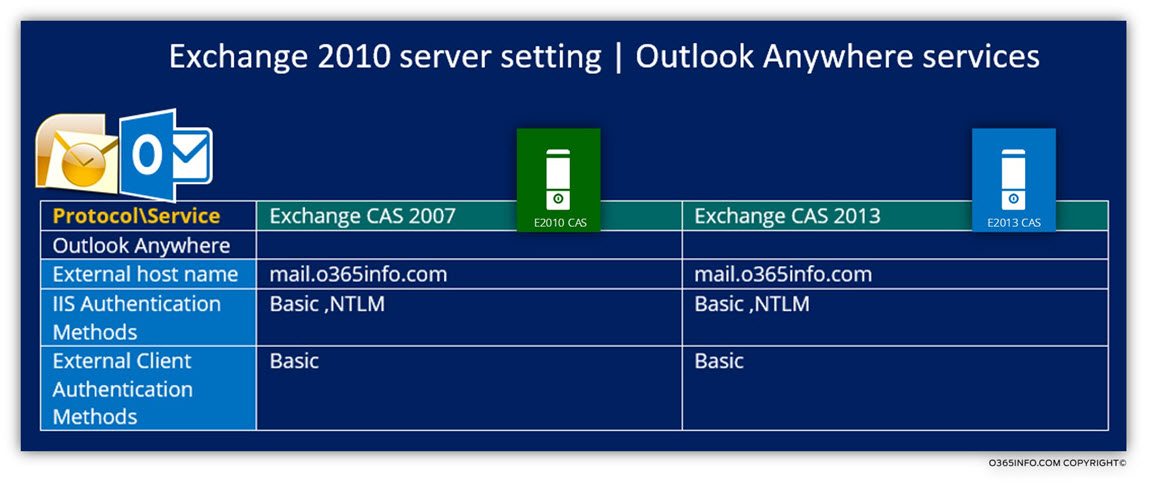
Mange and update the Exchange 2010 – Outlook Anywhere settings
In Exchange 2013/2010 coexistence environment, Exchange 2010 client Outlook client will address the Exchange CAS 2013 and the Exchange CAS 2013 will proxy the communication request to the Exchange CAS 2010.
To be able to “CAS to CAS” communication, we will need to set the value of the IISAuthenticationMethods to: NTLM and basic authentication
Additionally, set the ClientAuthenticationMethod to basic
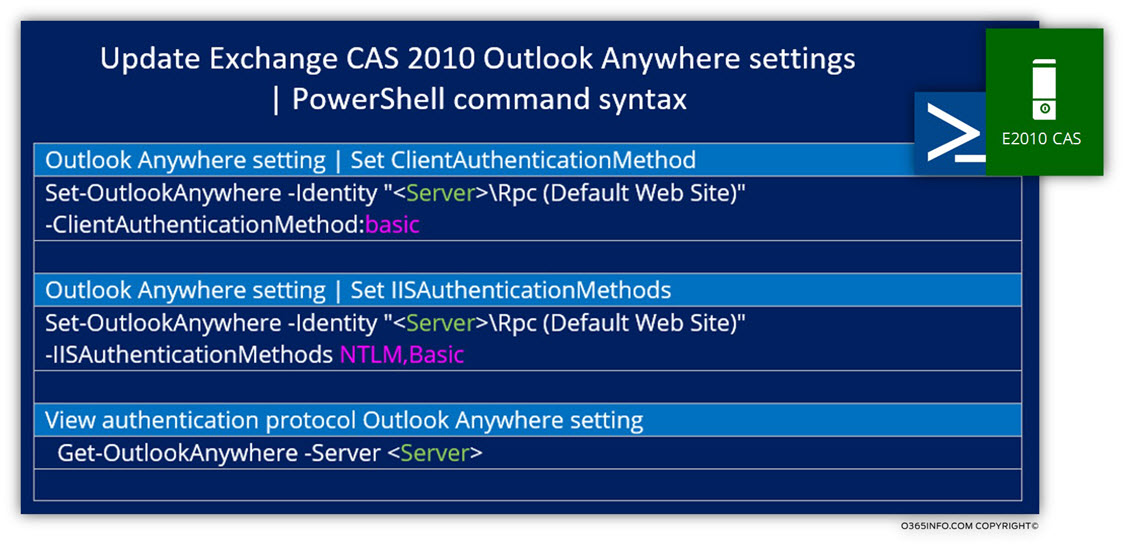
The PowerShell command that we use for setting the IISAuthenticationMethods authentication to use NTLM and basic is:
Set-OutlookAnywhere -Identity "CAS2010\Rpc (Default Web Site)" -IISAuthenticationMethods NTLM,BasicThe PowerShell command that we use for setting the ClientAuthenticationMethod authentication to use basic is:
Set-OutlookAnywhere -Identity "CAS2010\Rpc (Default Web Site)"
-ClientAuthenticationMethod:Basic
The PowerShell command that we use for viewing the setting of the Outlook Anywhere settings is:
Get-OutlookAnywhere -Server CAS2010
This Post Has 0 Comments