In the current article, I would like to review the possibility of a scenario which…
Setting up an Automatic Reply in Office 365 using Public Folder | Part 4#7
The current article is the sequel to the previous article, in which we review the process of configuring Public Folder in Office 365 based environment to use the option of an automatic reply.
Table of contents
- Step 7#12 – Creating a new security group for the Human Resources members
- Step 8#12 – Assign Public Folder “access permissions” to the human resources group.
- Step 9#12 – Assign Public Folder “Send As permissions” to the human resources group.
- Step 10#12 – Testing the Public Folder Send As permissions
- Step 11#12 – creating a Public folder automatic Forwarding rule
- Step 12#12 – Testing the Public folder automatic Forwarding rule
- The next article in the current article series
Our specific scenario is quite complicated and include many “parts” (business requirements).
In the previous article, we have already reviewed all the required steps that are needed for creating a mail-enabled Public Folder + create the required automatic reply inbox rule.
In the current article, we will review the “additional tasks” that need to be completed in our scenario.
Brief scenario description
A quick reminder of our scenario:
We want to enable the Human resource employees to access the “Jobs” Public Folder that contains the “resume E-mails” that sent by the external recipient who applies for a job position.
Human resource employees will need to have the Send As permissions to the “Jobs Public Folder”, so they will be able to send E-mail on behalf of the jobs Public Folder.
An additional requirement is – to create an automatic forwarding rule, that will forward a copy of each E-mail that sent to the Jobs Public Folder to additional Exchange recipient – Angelina.
Angelina is the Human resource reprehensive, that will handle the resume E-mails that will be sent to the job’s Public Folder.
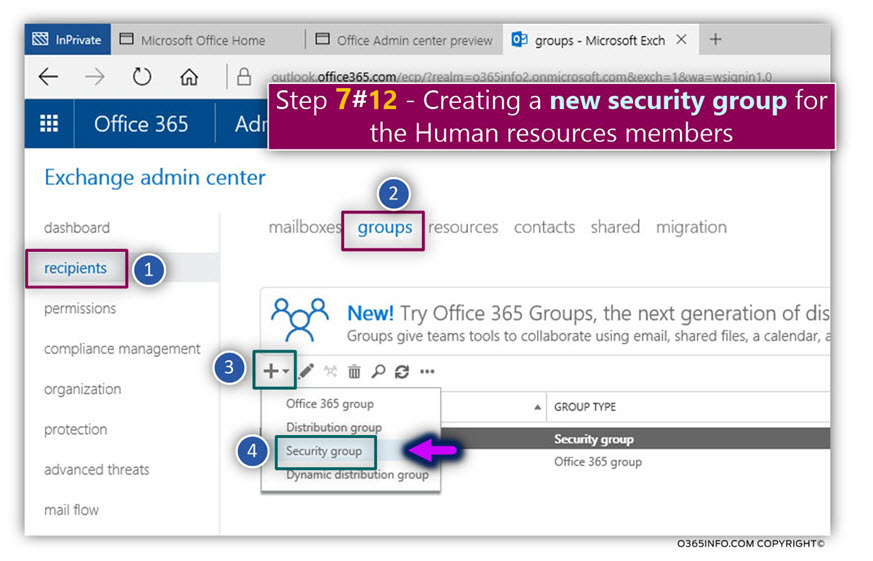
Step 7#12 – Creating a new security group for the Human Resources members
In the following section, we will create a new security group and add each of the Human resources employees to this group as a member.
Technically speaking, we can assign the required permissions to each of the Human resource employees separately. The reason for using a “security group” for assigning the required permissions is, that assign permissions to a group are more “right” from the administrative perspective.
When using a group, the permissions are assigned to the “group,” and the group members inherit the permissions from the group. In this way, we don’t “play” with the permissions that are assigned to the group. Instead, we only add or remove members from the security group.
To create an Exchange Online security group, use the following steps:
- Log in to the Exchange Online admin center
- On the left menu bar, choose the menu – recipients
- On the top menu bar, select the menu – groups
- Click on the plus icon
- Select – Security group
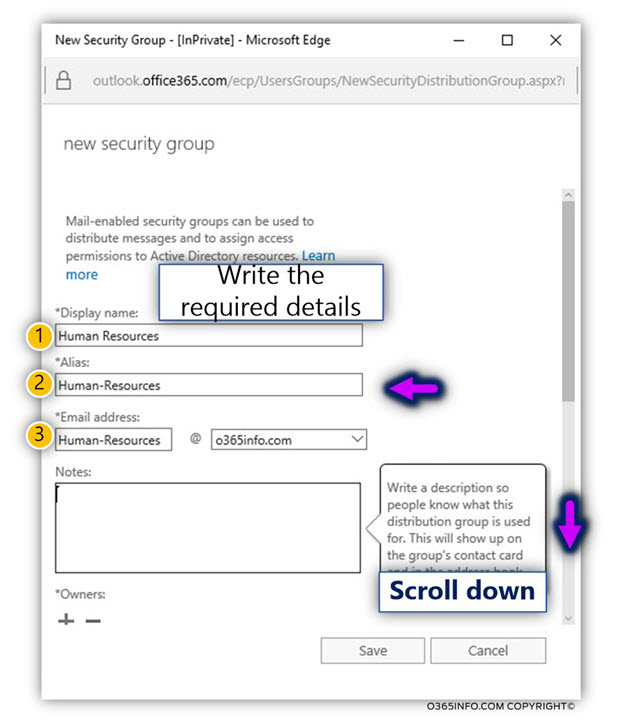
We will need to fill-in the following group properties:
- *Display name: in our example, the display name is – Human Resources
- *Alias: in our example, the alias name is – Human-Resources
- *E-mail address: in our example, the E-mail address is – Human-Resources@o365info.com
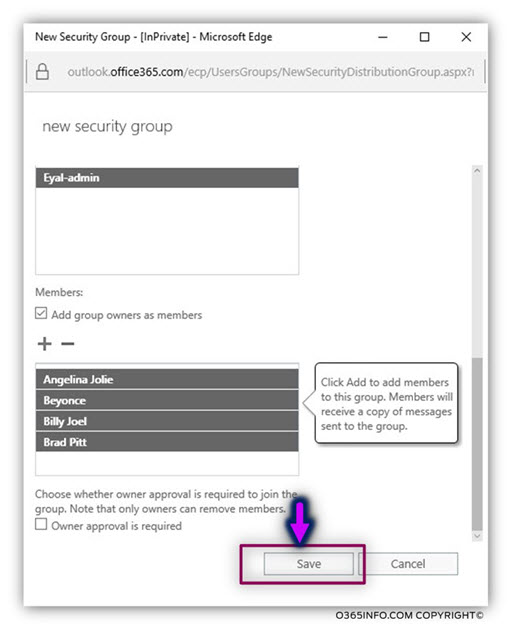
- Scroll down to continue editing the group properties
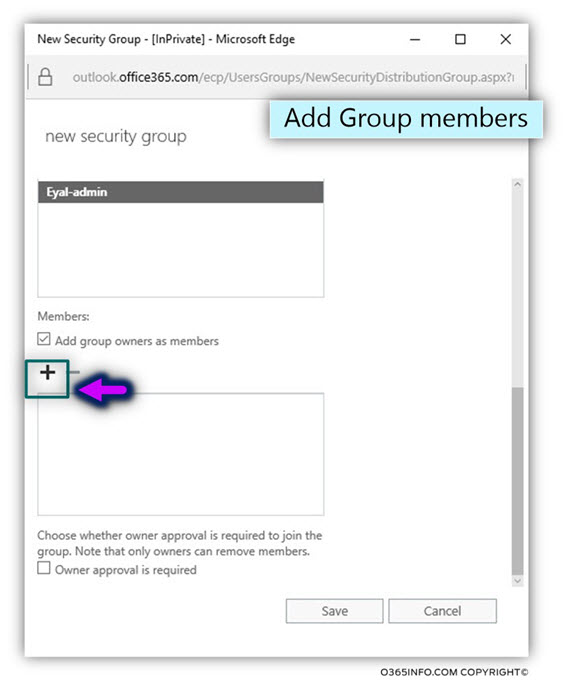
- To add the required group members, click on the plus icon
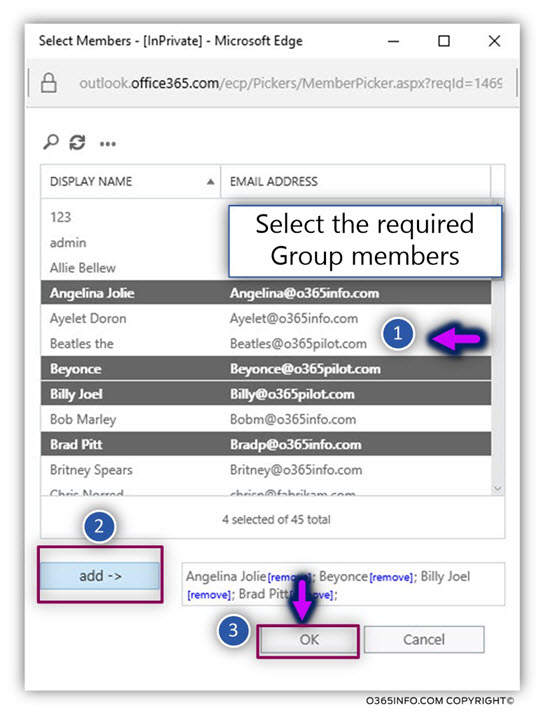
Select the required recipients who will be added as group members.
- Click – add ->
- Click OK
- Click Save
Step 8#12 – Assign Public Folder “access permissions” to the human resources group.
In this step, we will assign the Human resource security group, the required permissions that will enable the Human resource employees to access the job’s Public Folder.
This time, the assignment of the required Public Folder permissions will be implemented via the Outlook interface by – Bob, that has the owner permissions on the Jobs Public Folder.
The permissions that we want to assign to the Human Resources group are: publishing editor
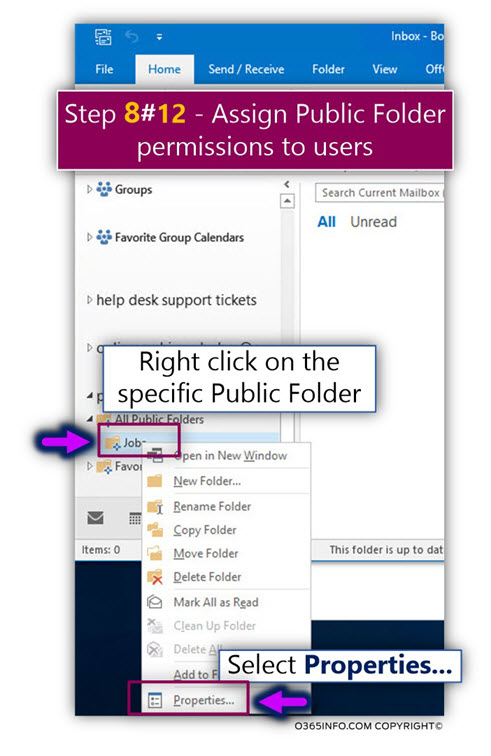
- We will log into Bob’s mailbox using Outlook and display the Public Folder tree.
- Right click on the job’s Public Folder and select Properties…
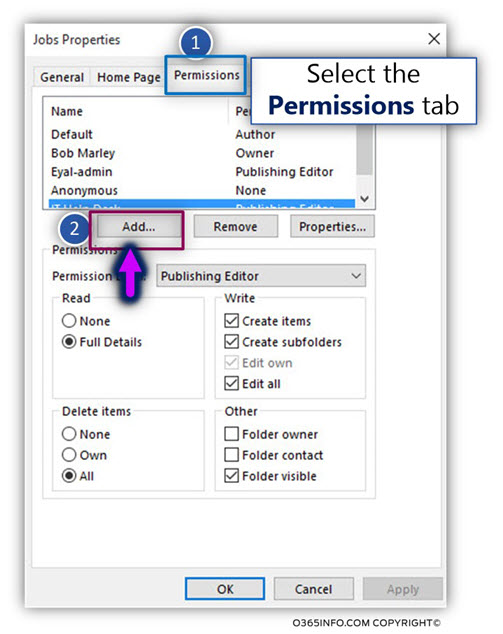
- Select the Permissions tab
- Click on the Add… button
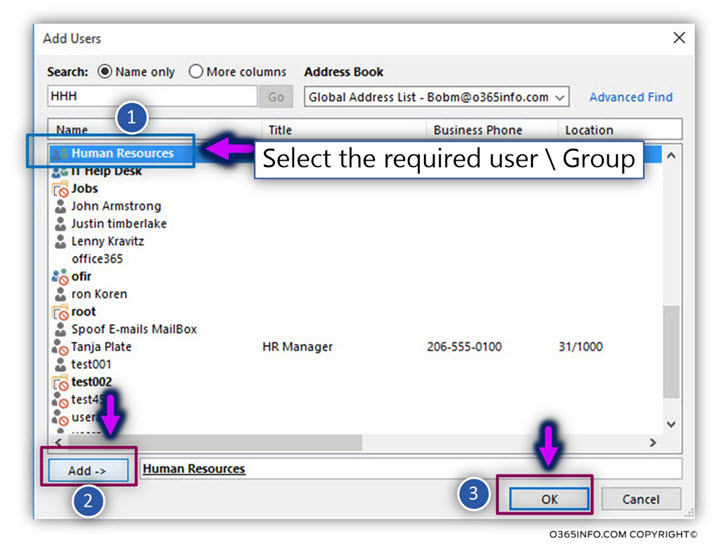
- Select the required recipients that will be assigned with the permissions. In our scenario, we select the Human Resources group.
- Click on the Add-> button
- Click OK
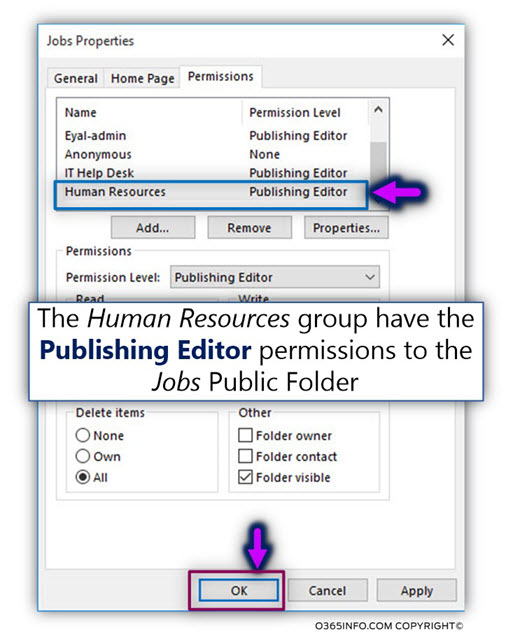
In the following screenshot, we can see that the Human Resources group has the publishing editor permissions.
Step 9#12 – Assign Public Folder “Send As permissions” to the human resources group.
In this step, we will assign the Send As permissions to the Human Resources group.
As mentioned, each of the Human resource employees needs to have the ability to send E-mail address on behalf of the Jobs Public Folder.
The assignment of Send As permissions in Exchange Online is implemented as follows:
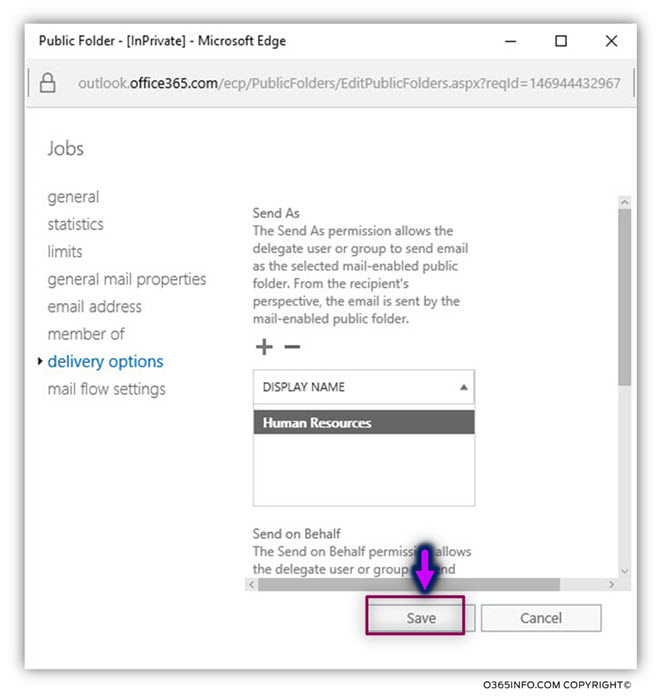
- Log in to the Exchange Online admin center
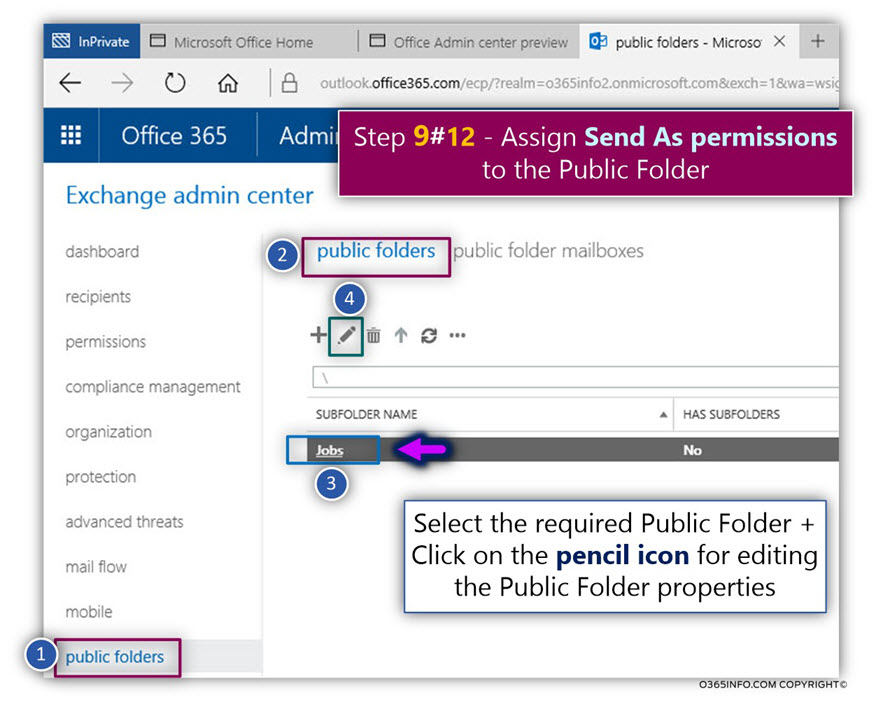
- On the left menu bar, choose the menu –public folders
- On the top menu bar, select the menu – public folders
- Select the specific Public Folder that you want to edit. In our example, we select the Jobs Public Folder
- Click on the pencil (edit) icon
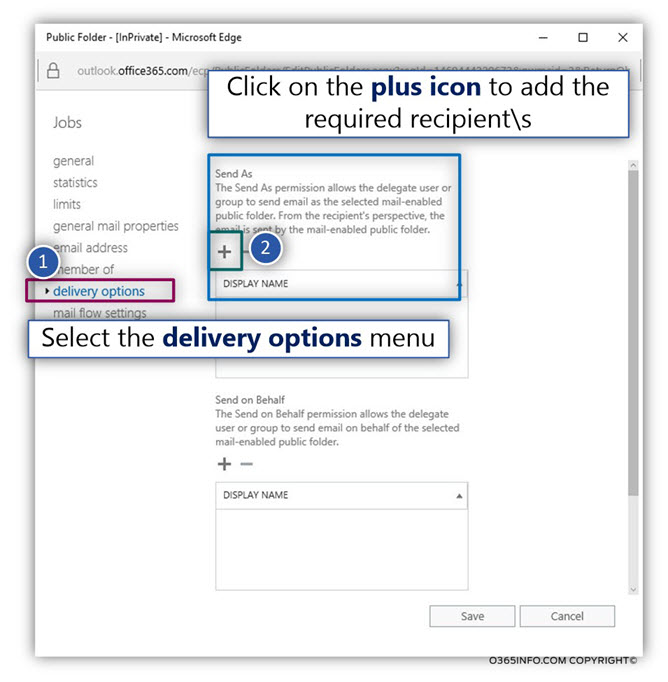
- On the left menu bar, select the menu – delivery options
- In the Send As section, click on the plus icon
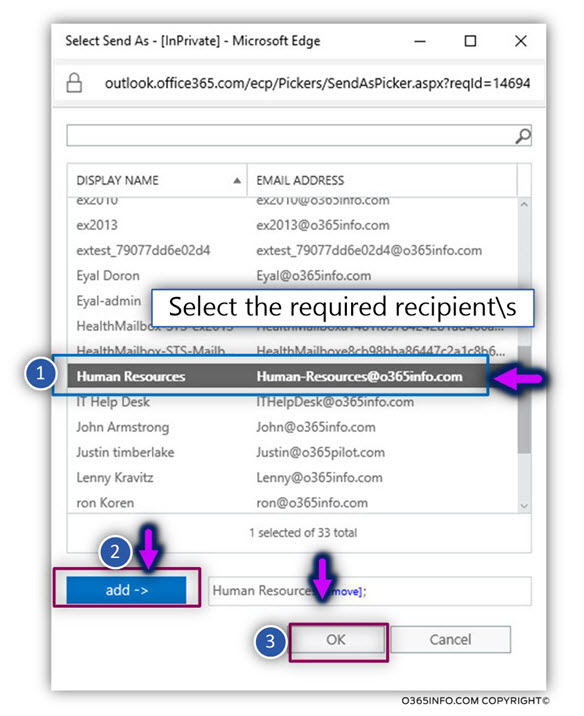
- Select the required recipients. In our example, we will select the Human resources
- Click – Save
Step 10#12 – Testing the Public Folder Send As permissions
In this section, we would like to verify that the Human resources employees, can send E-mail on behalf of the Job Public Folder.
The jobs Public Folder uses the E-mail address – Jobs@o365info.com
Angelina work in the Human resources department and she is a member of the Human resources security group.
We would like to verify if Angelina can send E-mail using the Jobs@o365info.com E-mail address.
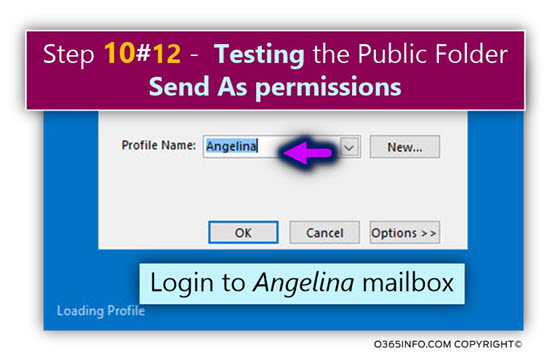
- We will log into Angelina Outlook mail profile
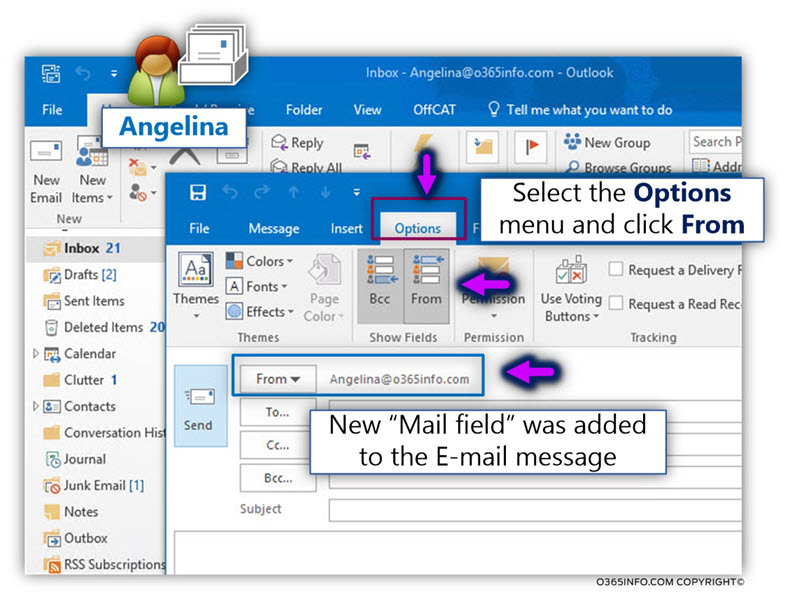
- To be able to use the Send As option, Angelina creates a new mail
- Select the Options menu
- Click on the From icon
In the following screenshot, we can see that a new “From…” field was added to the new mail
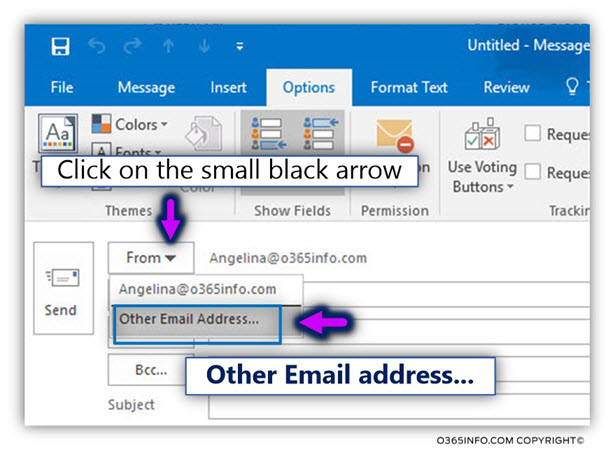
- Click on the Form button
- Select – Other email address…
- To select the required recipient, click on the Form button
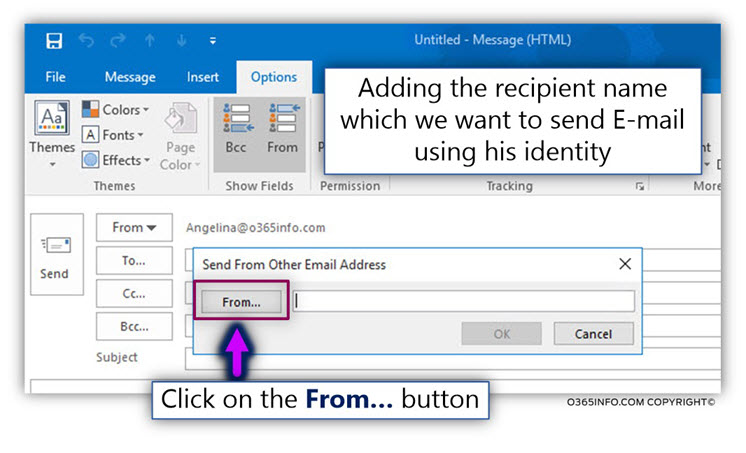
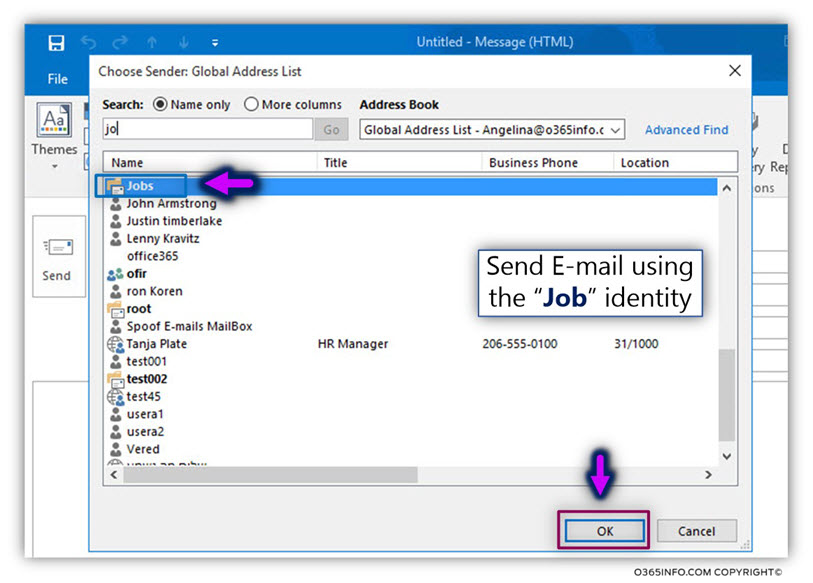
- In our example, we select the “Jobs” recipient
- Click OK
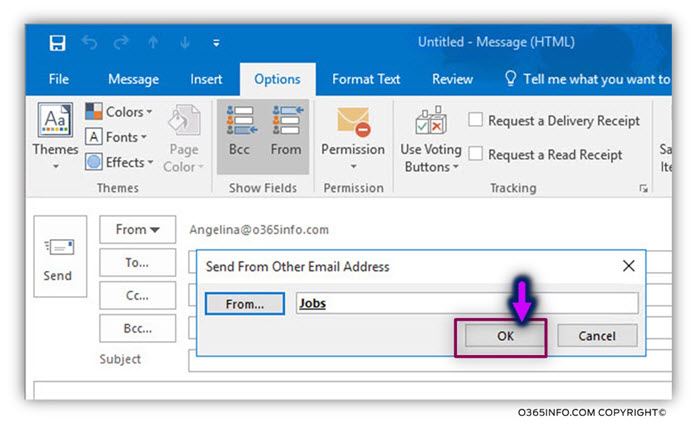
- Click OK
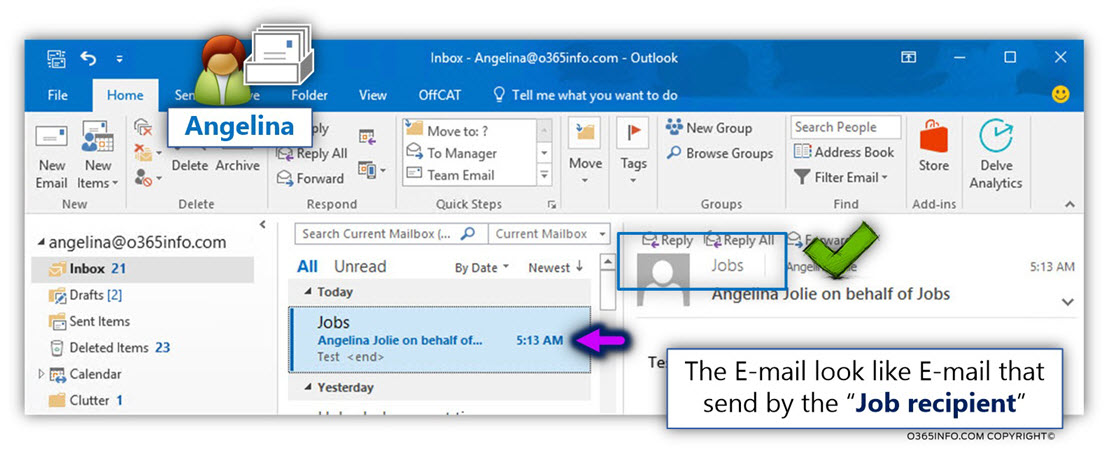
In our example, Angelina will send the E-mail to herself using the “identity” of the job’s recipient.
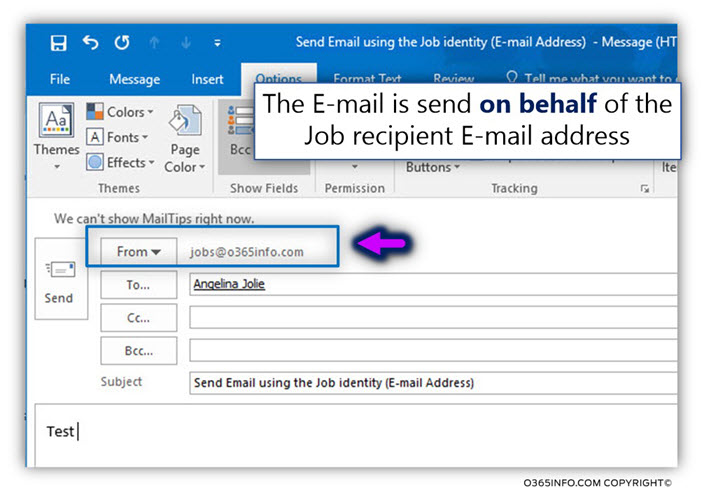
In the following screenshot, we can see that the E-mail was successfully sent. The E-mail that sent to Angelina, look like an E-mail that sent from the “jobs recipient”
Step 11#12 – creating a Public folder automatic Forwarding rule
A quick reminder, in our scenario, Angelina (Human resources employee), needs to get a copy of each E-mail that will reach the “Jobs Public Folder.”
Technically speaking, in case that a user has permission to access the specific Public folder (jobs Public folder in our scenario), he can access and view the content of the Public folder.
This option is not suitable for our need because, Angelina (the Human resources reprehensive) reprehensive prefers not to check every five minutes of a new mail arrived at the jobs Public folder but instead, to get a copy of each E-mail.
In the following step, we will configure the property of the “Jobs Public Folder” to send a copy of each E-mail that accepted to – Angelina.
- Log in to the Exchange Online admin center
- On the left menu bar, choose the menu – public folders
- On the top menu bar, select the menu – public folders
- Select the specific Public Folder that you want to edit. In our example, we select the Jobs Public Folder
- Click on the pencil (edit) icon
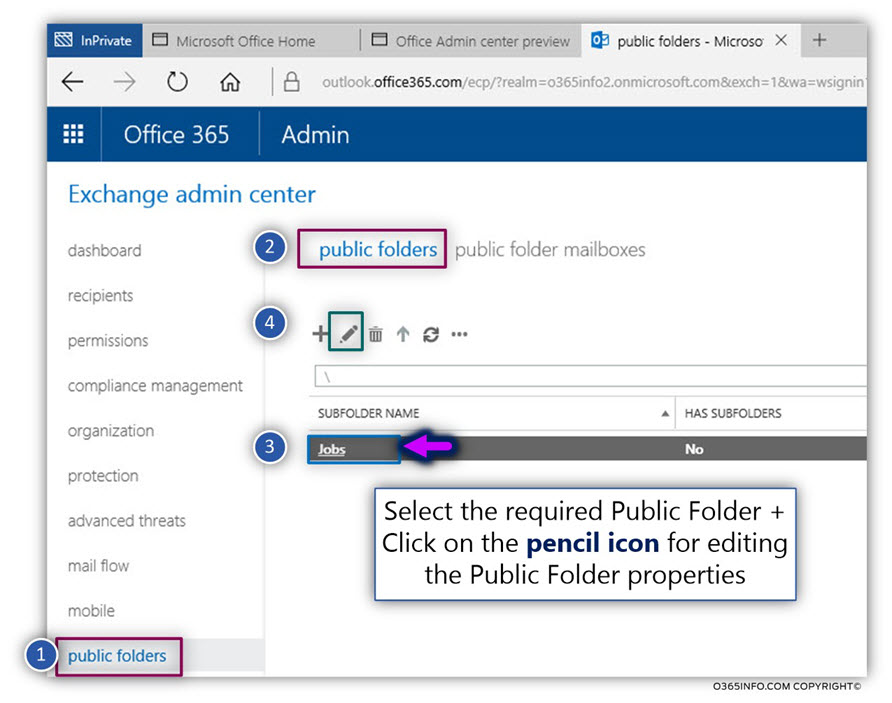
- On the right menu bar, select the menu – delivery options
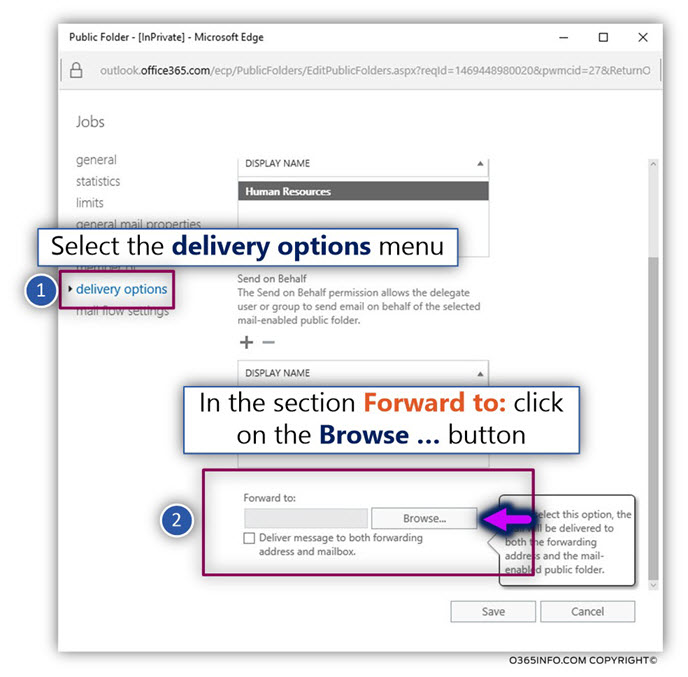
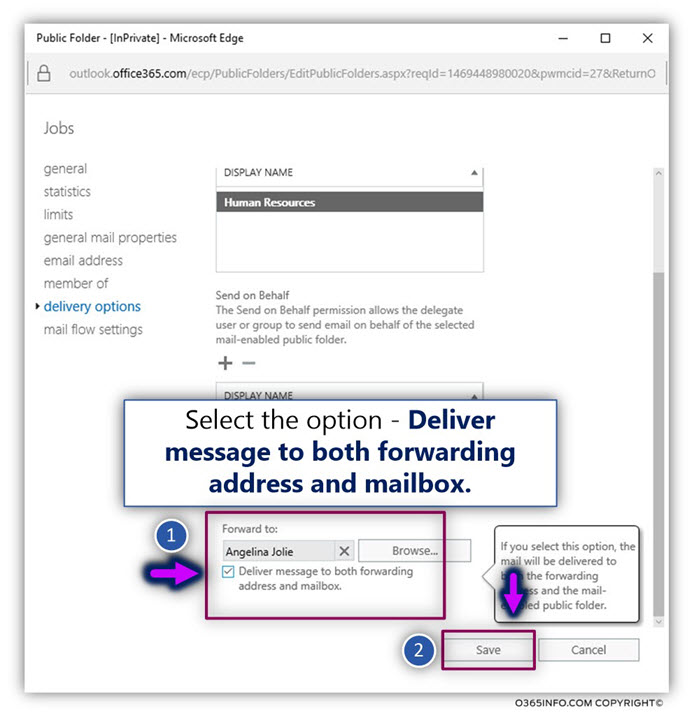
- In the Forward to: section, click on the Browse… button
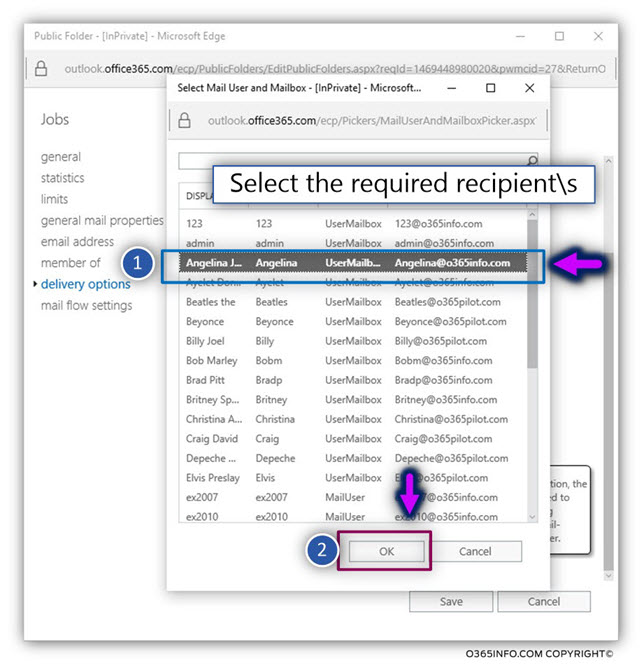
- Select the required recipient name. In our example, we want to forward a copy
of E-mail message to Angelina. - Click OK
- Select the option – Deliver message to both forwarding address and mailbox
- Click OK
Step 12#12 – Testing the Public folder automatic Forwarding rule
In this step, we would like to verify that the Public folder automatic Forwarding rule functions properly.
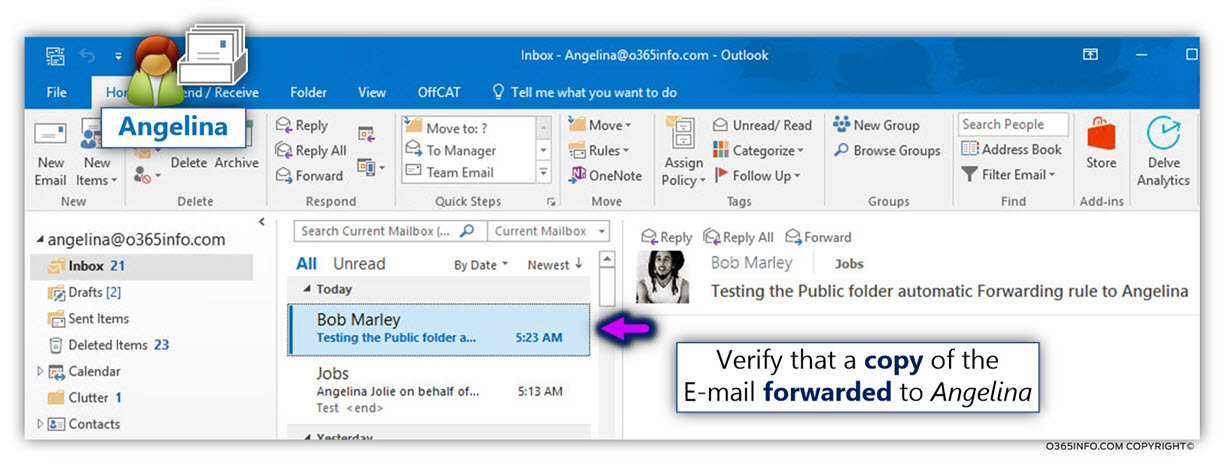
To be able to test the Public Folder Automatic Forwarding rule, we will send E-mail to the Public Folder jobs, and check if a copy of the E-mail sent also to the recipient who was configured – in our example – Angelina
In our scenario, we will use Bob’s Outlook mail profile
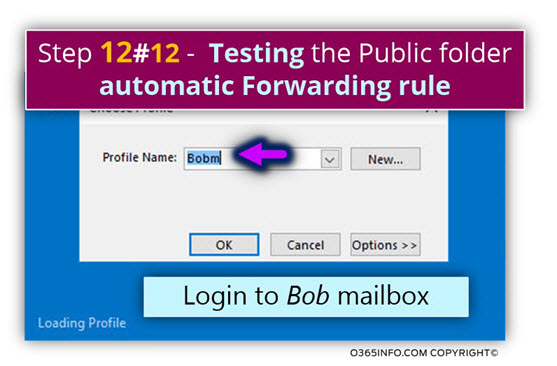
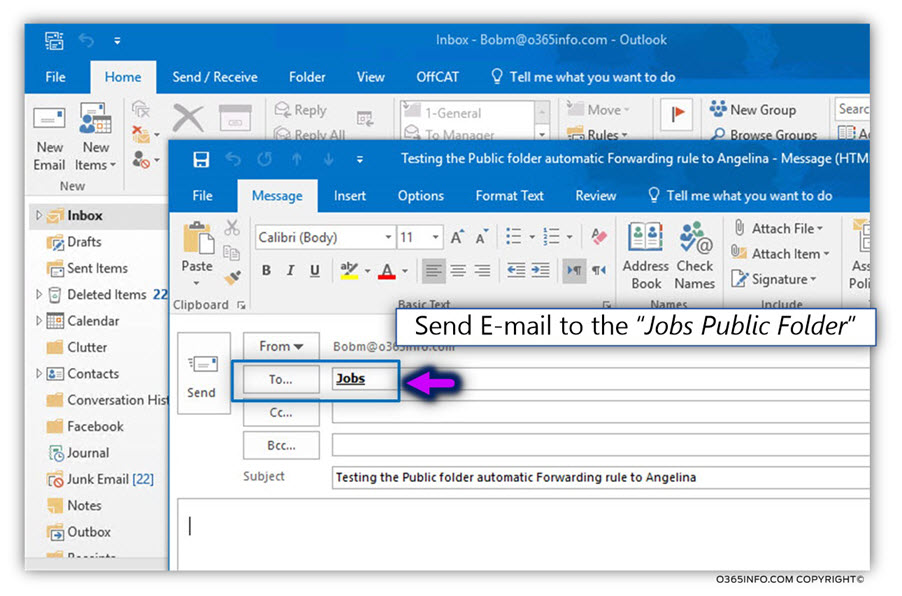
- Bob sends E-mail to the Jobs Public Folder
In the following screenshot, we can see that the E-mail was successfully sent to the Jobs Public Folder (Bob can view the content of the Jobs Public Folder).
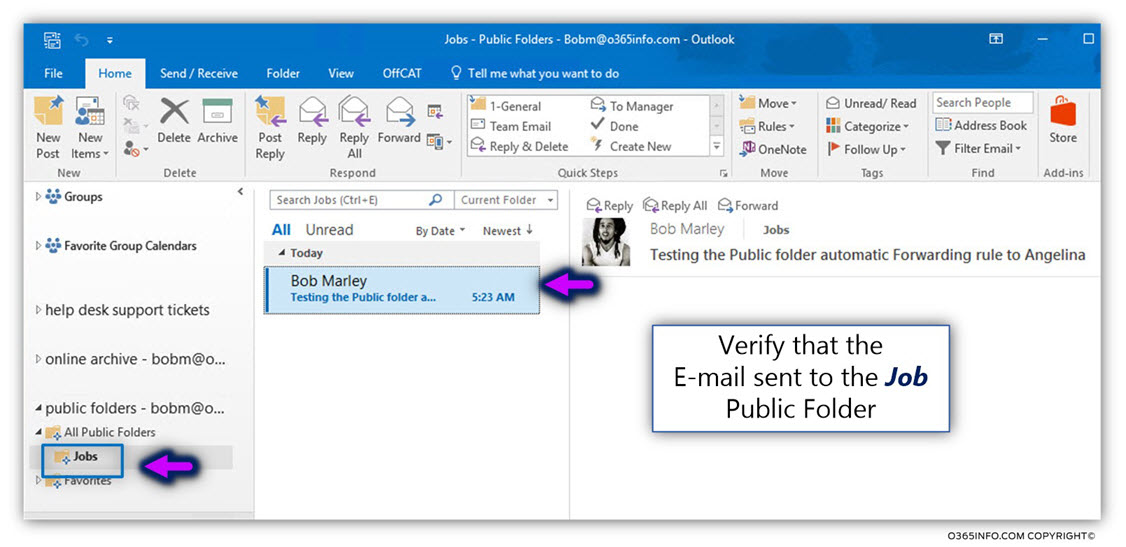
In addition, a copy of the original E-mail was forwarded to Angelina
The next article in the current article series
Setting up an Automatic Reply in Office 365 using mailbox rule and Shared mailbox | Part 5#7
This Post Has 0 Comments