You can create different Microsoft 365 group types in the Microsoft 365 portals. In the…
How to Restore a deleted Microsoft 365 mailbox
When you delete a room, equipment, shared, or user mailbox, it is soft deleted and stays in the recycle bin for 30 days. The deleted mailboxes can be restored in the Microsoft 365 admin center or with PowerShell. In this article, you will learn how to restore a deleted Microsoft 365 mailbox.
Table of contents
Restore deleted user mailbox
After you delete a user, you can restore it within 30 days. By default, the data on their connected devices, as well as the email aliases and the mailbox delegate permissions, will be removed.
Note: When you restore a user mailbox in the Microsoft 365 admin center, you can choose to keep the email aliases and mailbox permission. With PowerShell, it automatically restores all the aliases and permissions.
Method 1: Restore user mailbox in Microsoft admin center
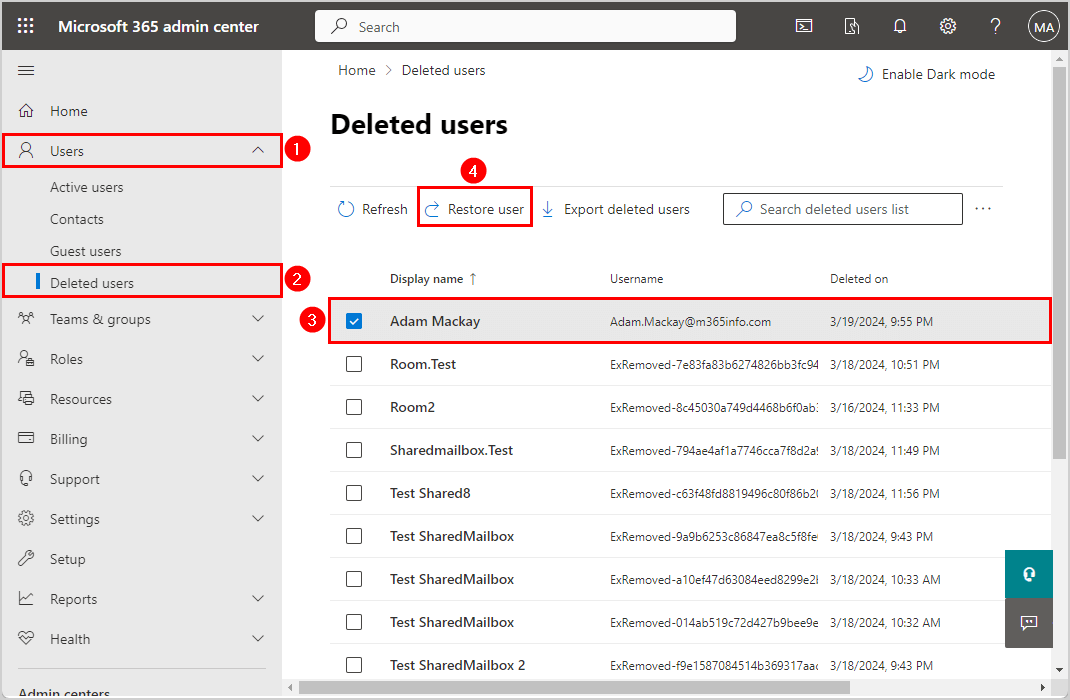
To restore a user mailbox in Microsoft 365 admin center:
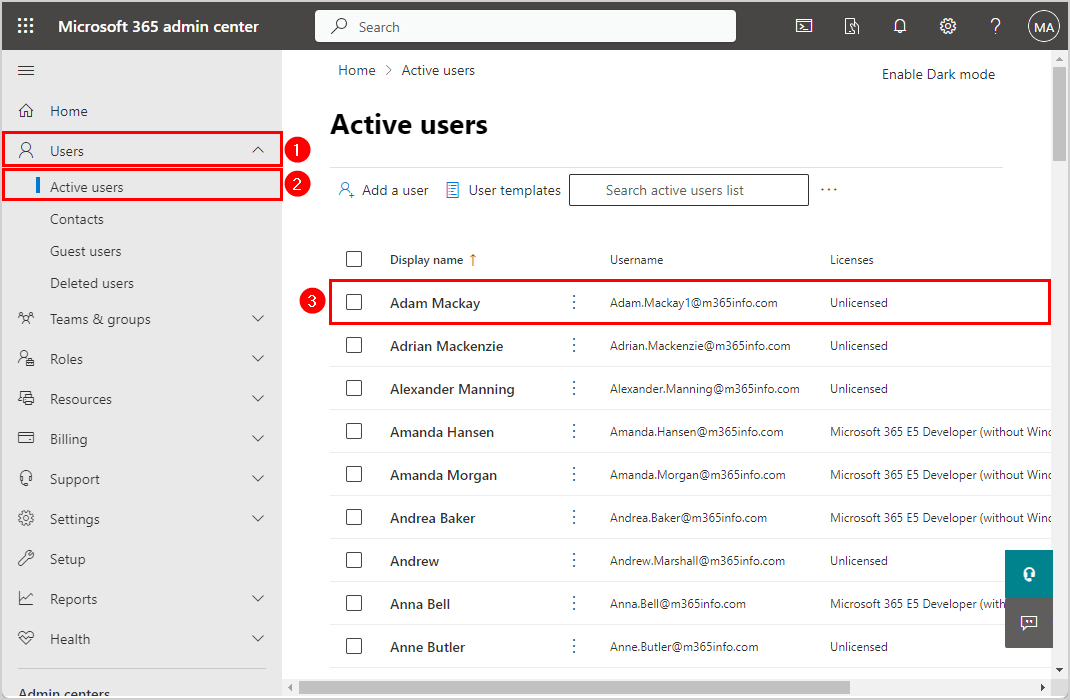
- Sign in to Microsoft 365 admin center
- Click Users > Deleted users
- Select the user
- Click Restore user
- Click Restore
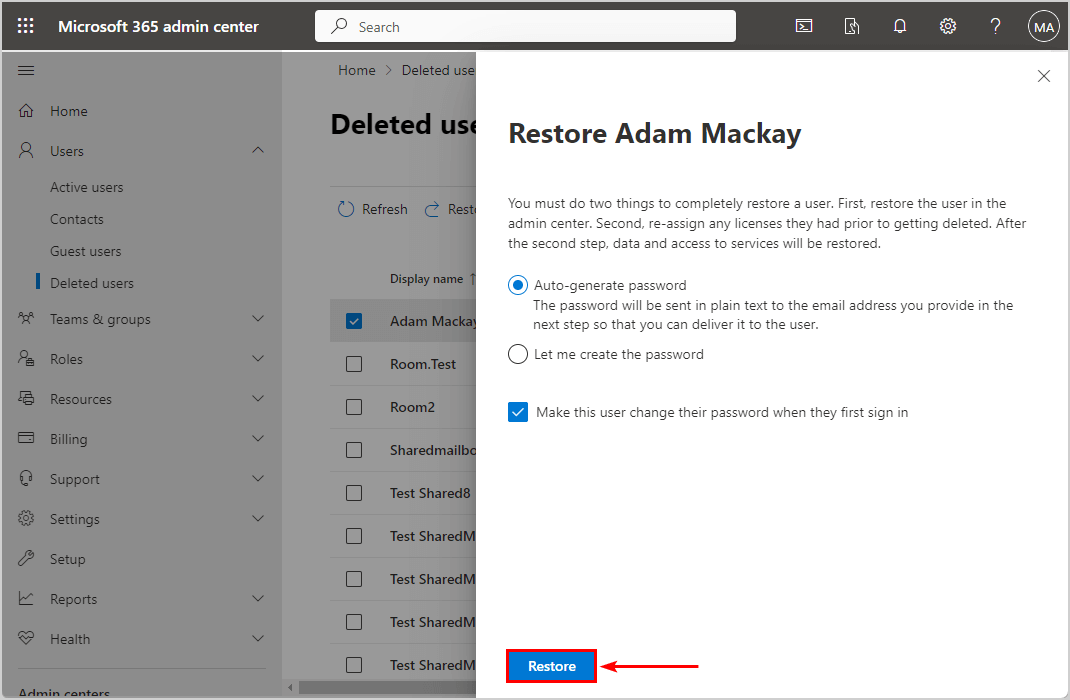
- Close the window
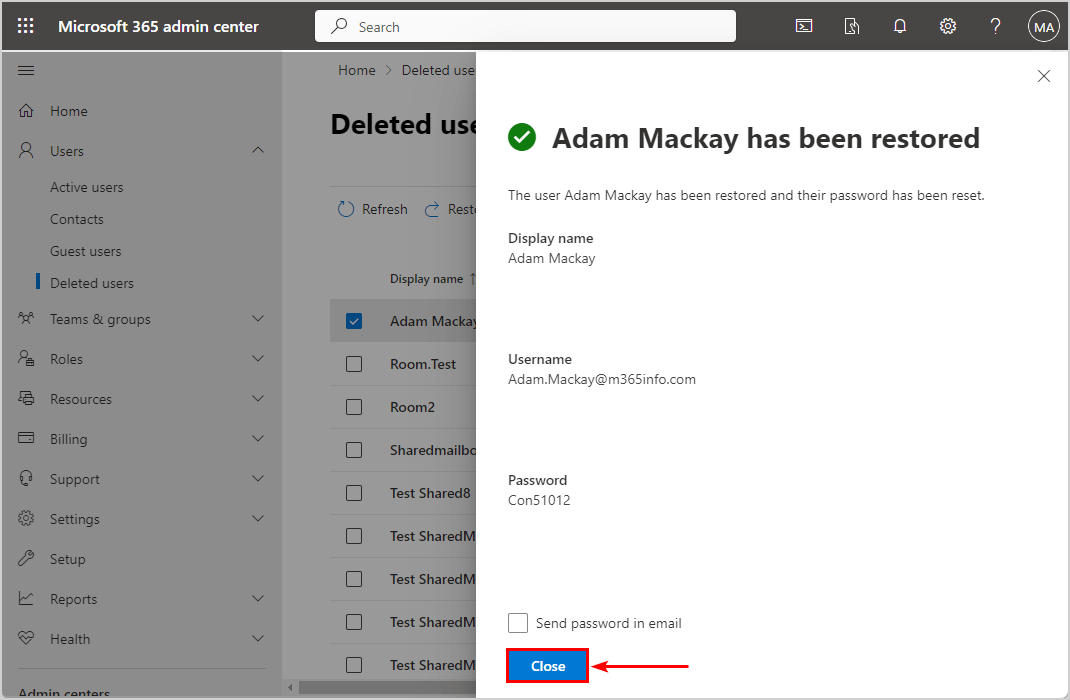
The user Adam Mackay has been restored, and the password has been reset.
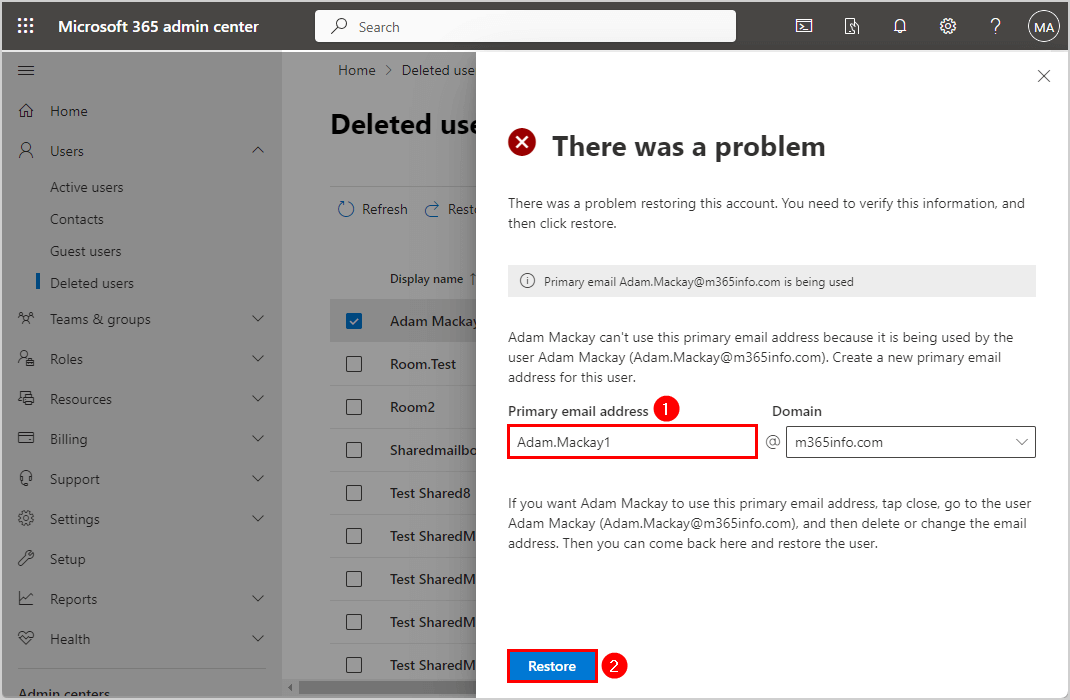
If you get the below error, you have two solutions:
- Change the primary email address and restore
- Change the active user primary email address to restore
Note: The user can’t use the same primary SMTP email address (Adam.Mackay@m365info.com) if it is being used by another user. To avoid any problems, create a new primary SMTP email address for this user.
Method 2: Restore user mailbox with PowerShell
Some user mailbox settings can be restored. It’s best to export all the deleted user mailbox settings to a TXT file before you restore the user.
In our example, we want to export the mailbox settings of the deleted user (Adam.Mackay@m365info.com) and save it.
To export the deleted user mailbox settings, follow these steps:
- Create a temp folder in the (C:) drive to export the file
- Specify the primary SMTP address of the user mailbox
- Specify the TXT path
Run the below PowerShell command to export the settings of a deleted single mailbox.
Get-Mailbox -SoftDeletedMailbox "Adam.Mackay@m365info.com" | Format-List | Out-File "C:\temp\UserSettings.txt" -Encoding utf8This is what the TXT file looks like.

We want to find the soft-deleted user mailbox in the Microsoft 365 recycle bin with PowerShell.
Get-Mailbox -SoftDeletedMailbox -ResultSize Unlimited | Format-Table Name, Alias, ExternalDirectoryObjectId, PrimarySmtpAddressThe PowerShell output shows the deleted user mailbox (Adam.Mackay@m365info.com) in the recycle bin.
Name                                 Alias               ExternalDirectoryObjectId            PrimarySmtpAddress
----                                 -----               -------------------------            ------------------
55f8d235-9a1d-49cf-83be-989ffd694f54 Adam.Mackay         55f8d235-9a1d-49cf-83be-989ffd694f54 Adam.Mackay@m365info.com
Room2                                Room2               13dcf59e-4113-44de-8b1d-b5a20c41fd90 Room2@m365info.com
Room01                               Room01                                                   Room01@m365info.com
Test SharedMailbox20240318093240     test.sharedmailbox  3402ad29-8a43-4692-b151-486309f6962b test.sharedmailbox123@m365info.com
Sharedmailbox.Test20240318224900     sharedmailbox.test  48a8f973-21ea-4d35-bbed-974adb794fe6 sharedmailbox.test@m365info.com
Test Shared820231212220538           test.shared8        114ee539-9208-4cec-88cb-c16fe2a75779 test.shared8@m365info.com
Room.Test                            Room.Test           c3e5b673-ba34-4a6b-a98b-a91972378400 Room.Test@m365info.com
Test SharedMailbox20231129082329     test.sharedmailbox  217d54ef-857a-45a8-ab85-d9c1794d0e49 test.sharedmailbox33@m365info.com
Test SharedMailbox 220231212224215   test.sharedmailbox2 9090ffa5-85e3-438d-8604-e1a773c3fb85 test.sharedmailbox2@m365info.com
We need to use the Undo-SoftDeletedMailbox PowerShell cmdlet to recover a deleted mailbox.
In our example, we will restore the user mailbox (Adam.Mackay@m365info.com).
The PowerShell command consists of these parts:
- Specify the soft deleted user mailbox primary SMTP address.
- Restore the user mailbox using the -WindowsLiveID parameter (Adam.Mackay1@m365info.com).
- Set a predefined -Password for the new user mailbox with the ConvertTo-SecureString.
Note: We recommend you provide a new email address (WindowsLiveId) to avoid any problems. Because if there is another user with the same primary SMTP email address, you will get an error.
Run the below PowerShell command.
Undo-SoftDeletedMailbox "55f8d235-9a1d-49cf-83be-989ffd694f54" -WindowsLiveID "Adam.Mackay1@m365info.com" -Password (ConvertTo-SecureString -String 'Asd#4R12' -AsPlainText -Force)The PowerShell output shows the below result.
Name                      Alias       Database           ProhibitSendQuota    ExternalDirectoryObjectId
----                      -----       --------           -----------------    -------------------------
55f8d235-9a1d-49cf-83be-… Adam.Mackay EURPR02DG108-db104 99 GB (106,300,440,… 2421e5cb-5eb0-42b8-beac-6098dd5717bf
Verify user mailbox restore
To check the user mailbox is restored, follow these steps:
- Sign in to Microsoft 365 admin center
- Click Users > Active users
- Verify the user in the list
Note: You need to assign licenses to the user and wait for Microsoft to restore the mailbox. Then you can check if it saved most of the mailbox settings.
Restore deleted shared mailbox
Once you delete a shared mailbox, you have up to 30 days to restore it from the recycle bin. In our example, we will restore a shared mailbox (sharedmailbox.test@m365info.com) in the Microsoft 365 admin center and show you why you shouldn’t do it.
Note: We do not recommend to restore a shared mailbox in the Microsoft 365 admin center because it’s incorrect.
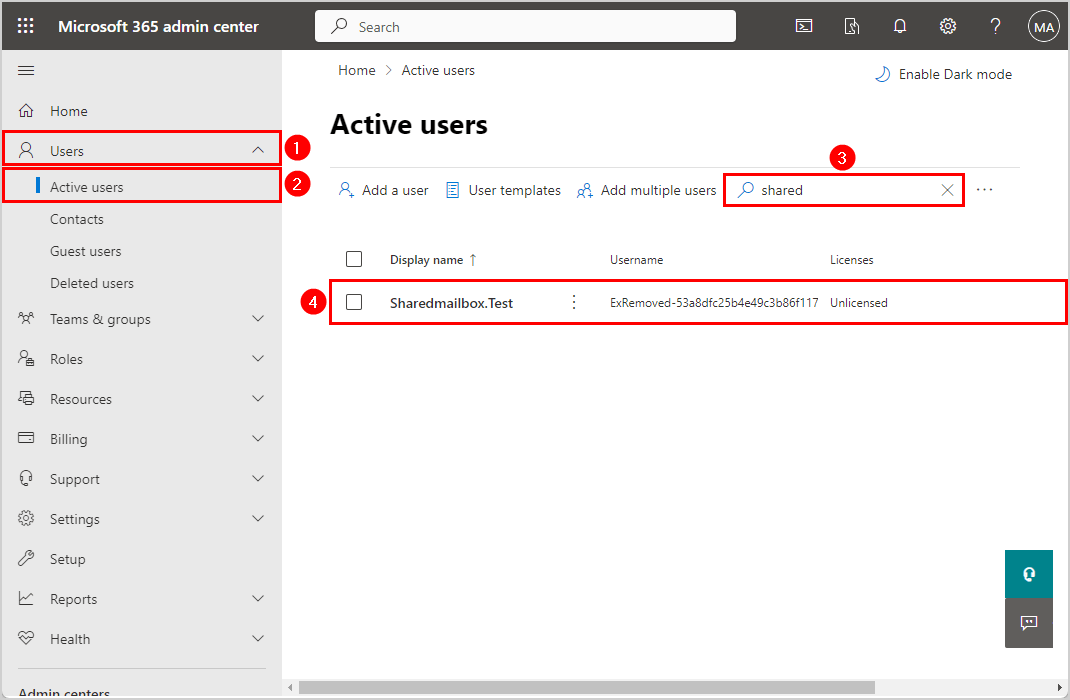
Check the restored shared mailbox in Microsoft 365 admin center:
- Click Users > Active Users
- Search and find the shared mailbox
- Find the restored shared mailbox (Sharedmailbox.Test) in the list with the wrong Username
- Click Teams & groups > Shared mailboxes
- The restored shared mailbox can’t be found in the list
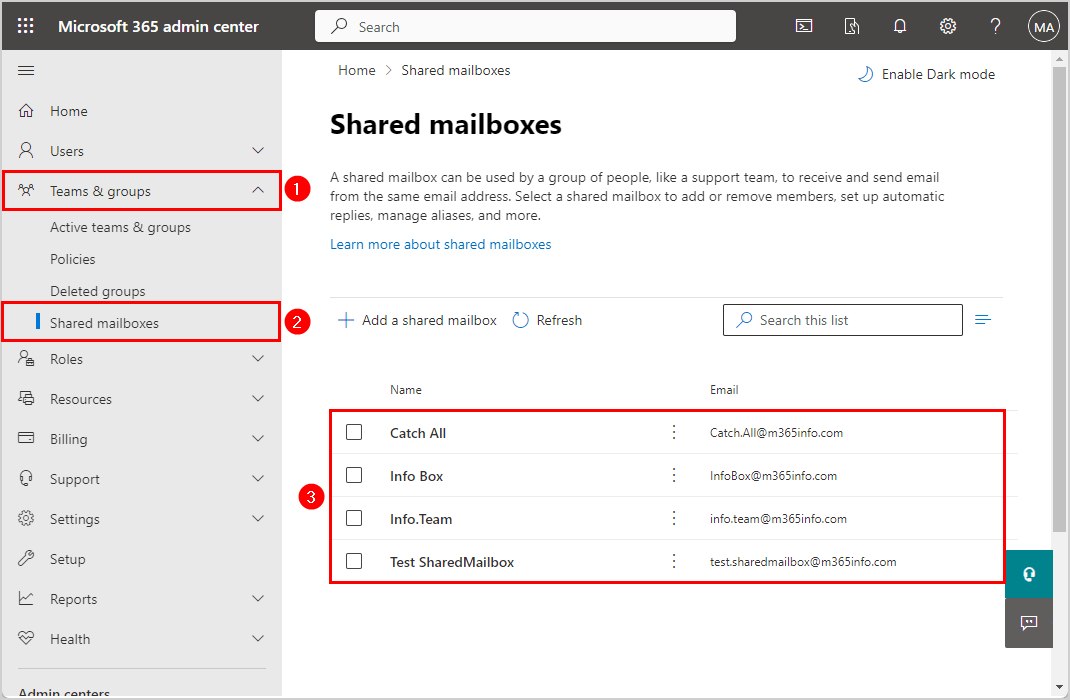
The restored shared mailbox is not on the list, which is incorrect. Therefore we will show you how to do it correctly with PowerShell in the next step.
Restore shared mailbox with PowerShell
Some shared mailbox settings can be restored, and others can’t. It’s best to export the deleted shared mailbox settings to a TXT file before you restore it so that you can compare it afterward.
To export the deleted shared mailbox settings, follow these steps:
- Create a temp folder in the (C:) drive to export the file
- Specify the primary SMTP address of the shared mailbox
- Specify the TXT path
Run the below PowerShell command to export the settings of the deleted shared mailbox.
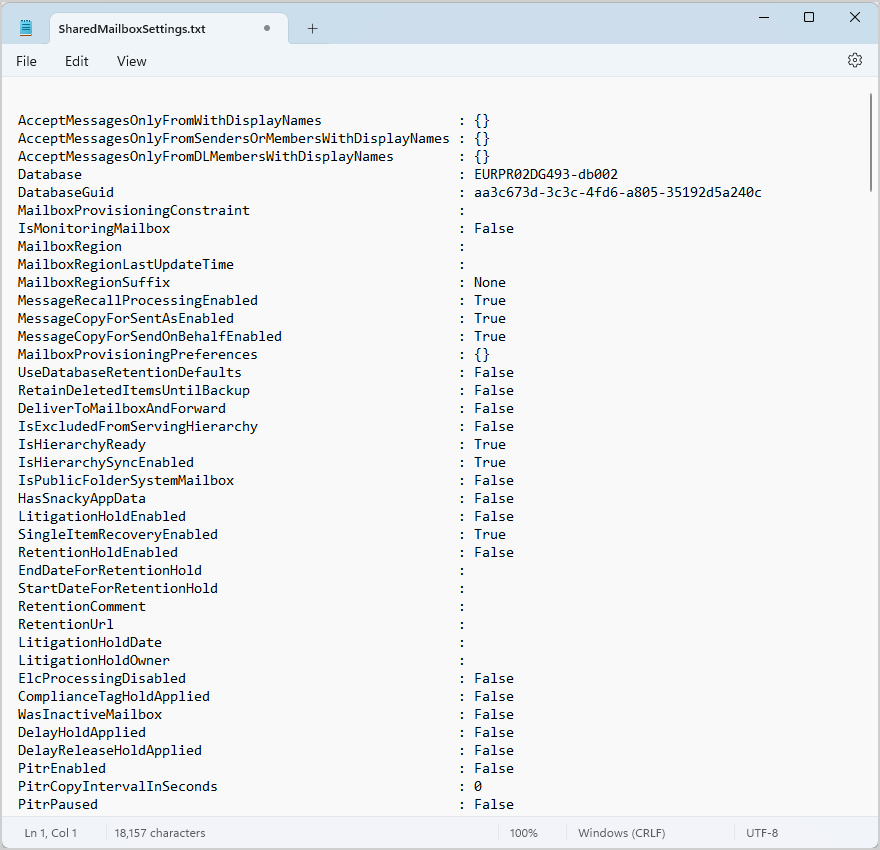
Get-Mailbox -SoftDeletedMailbox "sharedmailbox.test@m365info.com" | Format-List | Out-File "C:\temp\SharedMailboxSettings.txt" -Encoding utf8The TXT file shows all the settings of the deleted shared mailbox (Sharedmailbox.Test@m365info.com).
We want to find all the soft-deleted mailboxes in the Microsoft 365 recycle bin with PowerShell.
Get-Mailbox -SoftDeletedMailbox -ResultSize Unlimited | Format-Table Name, Alias, ExternalDirectoryObjectId, PrimarySmtpAddressThe PowerShell output shows the shared mailbox (sharedmailbox.test@m365info.com) in the recycle bin.
Name                               Alias               ExternalDirectoryObjectId            PrimarySmtpAddress
----                               -----               -------------------------            ------------------
Room2                              Room2               13dcf59e-4113-44de-8b1d-b5a20c41fd90 Room2@m365info.com
Room01                             Room01                                                   Room01@m365info.com
Test SharedMailbox20240318093240   test.sharedmailbox  3402ad29-8a43-4692-b151-486309f6962b test.sharedmailbox123@m365info.com
Test Shared820231212220538         test.shared8        114ee539-9208-4cec-88cb-c16fe2a75779 test.shared8@m365info.com
Test SharedMailbox20231129082329   test.sharedmailbox  217d54ef-857a-45a8-ab85-d9c1794d0e49 test.sharedmailbox33@m365info.com
Test SharedMailbox 220231212224215 test.sharedmailbox2 9090ffa5-85e3-438d-8604-e1a773c3fb85 test.sharedmailbox2@m365info.com
Sharedmailbox.Test20240318125412   sharedmailbox.test  7b13b9b7-fc9a-47cb-b91f-356f64ddb270 sharedmailbox.test@m365info.com
In our example, we will restore the shared mailbox (Sharedmailbox.Test@m365info.com).
The PowerShell command consists of these parts:
- Specify the soft deleted shared mailbox primary SMTP address.
- Restore the shared mailbox using the -WindowsLiveID parameter (Sharedmailbox.Test1@m365info.com).
- Set a predefined -Password for the new shared mailbox with the ConvertTo-SecureString.
Note: We recommend you provide a new email address (WindowsLiveId) to avoid any problems. Because if there is another mailbox with the same primary SMTP email address, you will get an error.
Run the below PowerShell command.
Undo-SoftDeletedMailbox "7b13b9b7-fc9a-47cb-b91f-356f64ddb270" -WindowsLiveID "sharedmailbox.test1@m365info.com" -Password (ConvertTo-SecureString -String 'Asd#4R12' -AsPlainText -Force)The PowerShell output shows the below result.
Name                      Alias           Database           ProhibitSendQuota    ExternalDirectoryObjectId
----                      -----           --------           -----------------    -------------------------
Sharedmailbox.Test202403… sharedmailbox.… EURPR02DG493-db002 49.5 GB (53,150,220… 5019377c-07ee-46de-81ef-89d575cfb37a
It will restore the shared mailbox, which we will check in the next step.
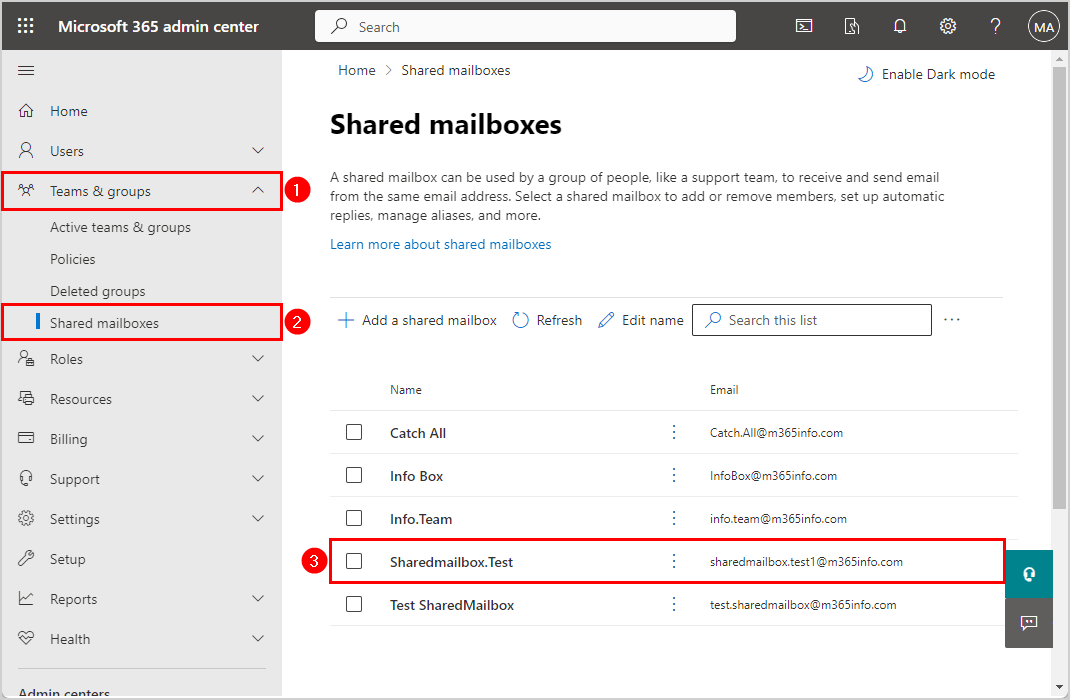
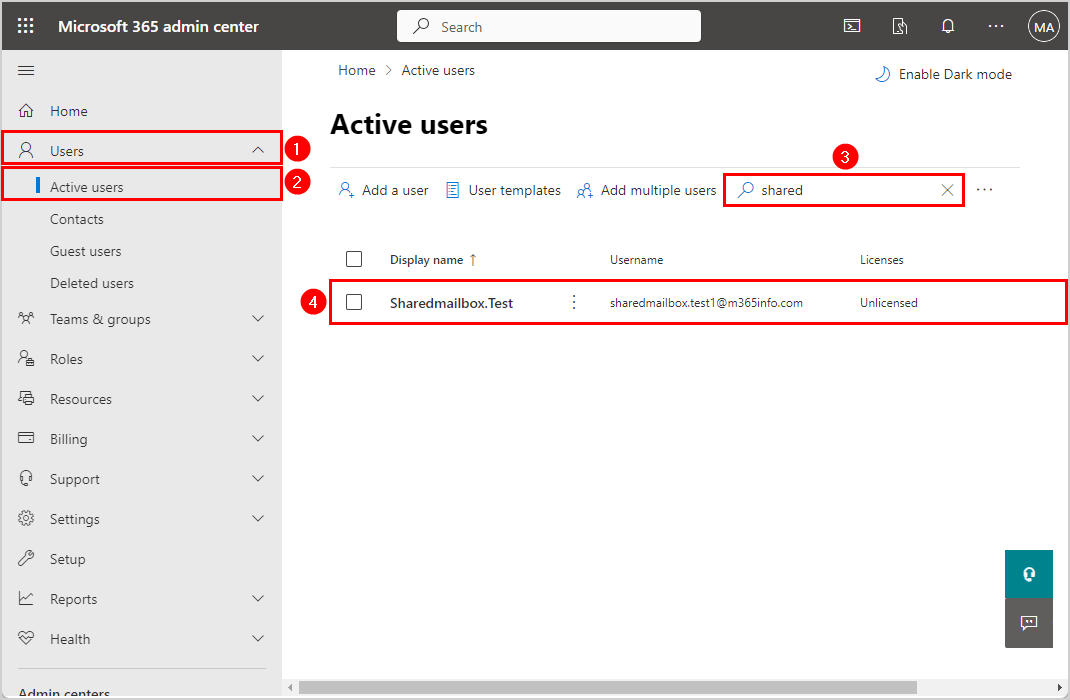
Verify shared mailbox restore
To check if you restored the shared mailbox, you need to follow these steps:
- Sign in to Microsoft 365 admin center
- Click on Teams & groups > Shared mailboxes
- Verify the shared mailbox appears in the list with the correct Name and Email
- Click on Users > Active users
- Search and find the shared mailbox in the list
- Verify the shared mailbox appears in the list with the correct Name and Email
Restore deleted room mailbox
You can always restore a deleted room mailbox within 30 days. However, if you restore it in the Microsoft 365 admin center, it will not be correct, as we will show you in our example.
Note: We do not recommend restoring a room mailbox in the Microsoft 365 admin center because it’s incorrect.
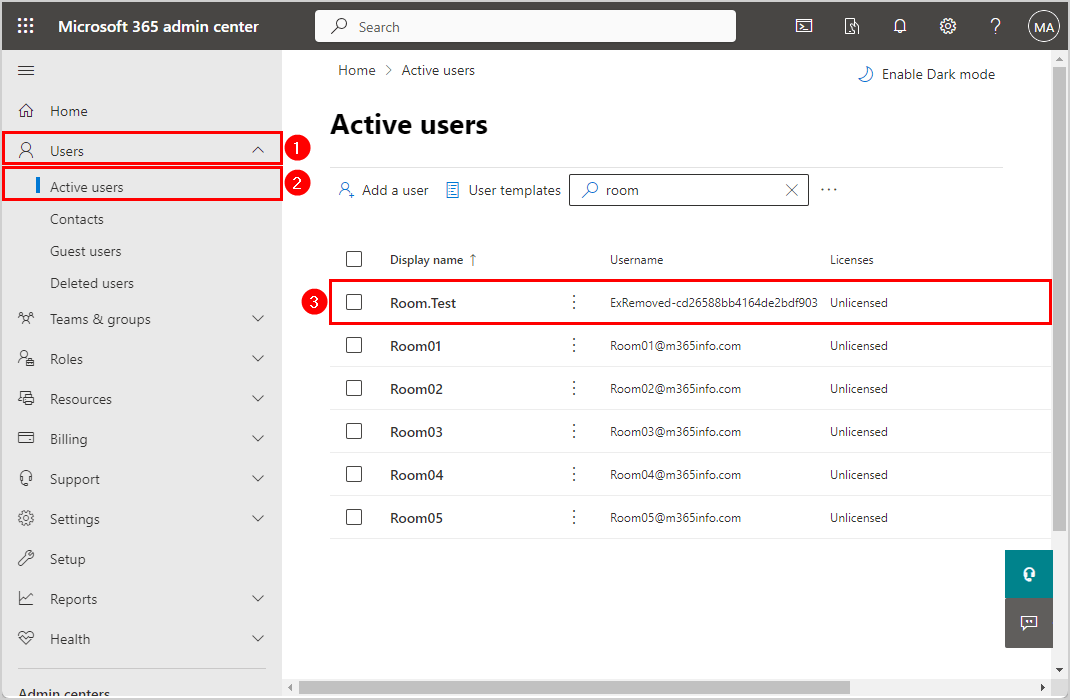
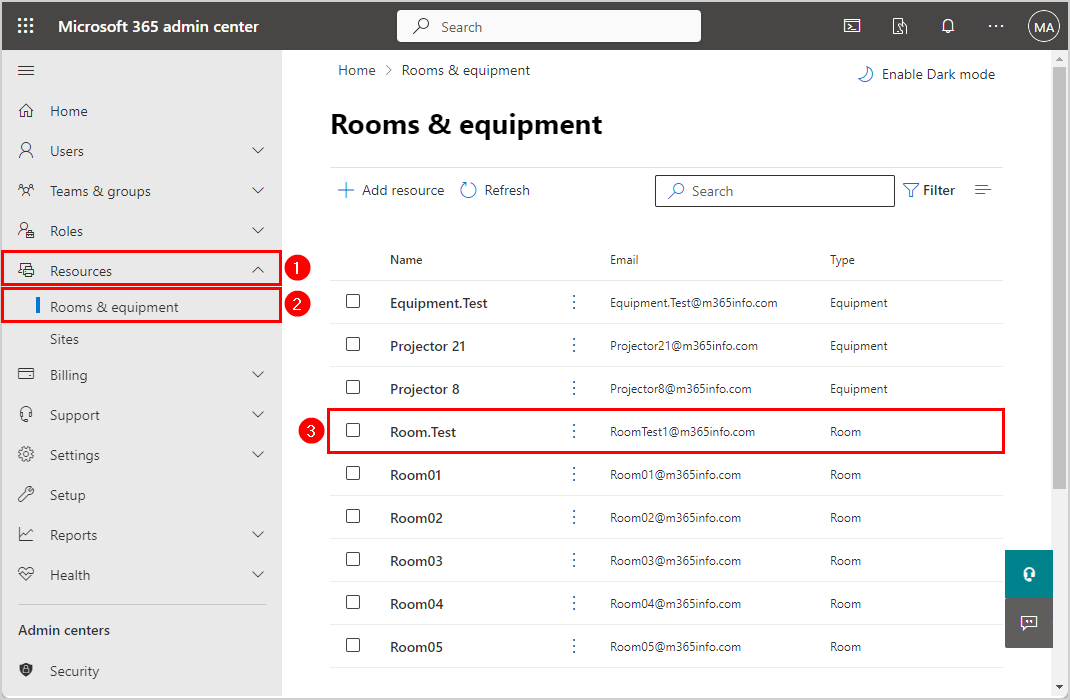
Check the restored deleted room mailbox in the Microsoft 365 admin center:
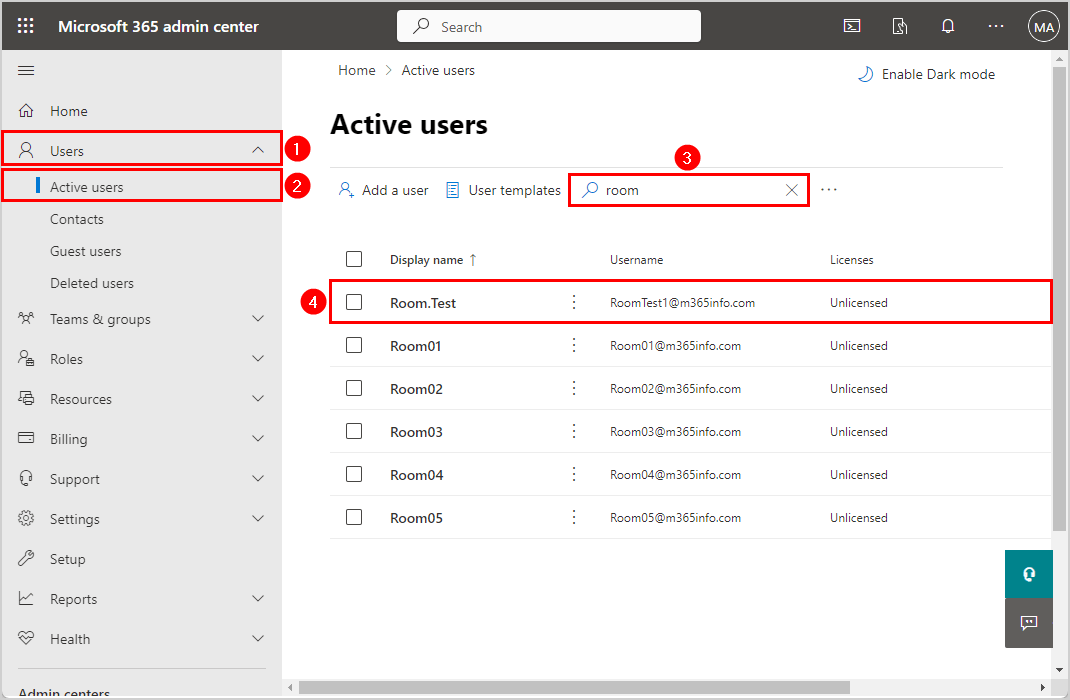
- Click Users > Active users
- Search the restored room mailbox in the list
- Find the restored room mailbox (Room.Test) in the list with the wrong Username
- Click Resources > Rooms & equipment
- The restored room mailbox can’t be found in the list
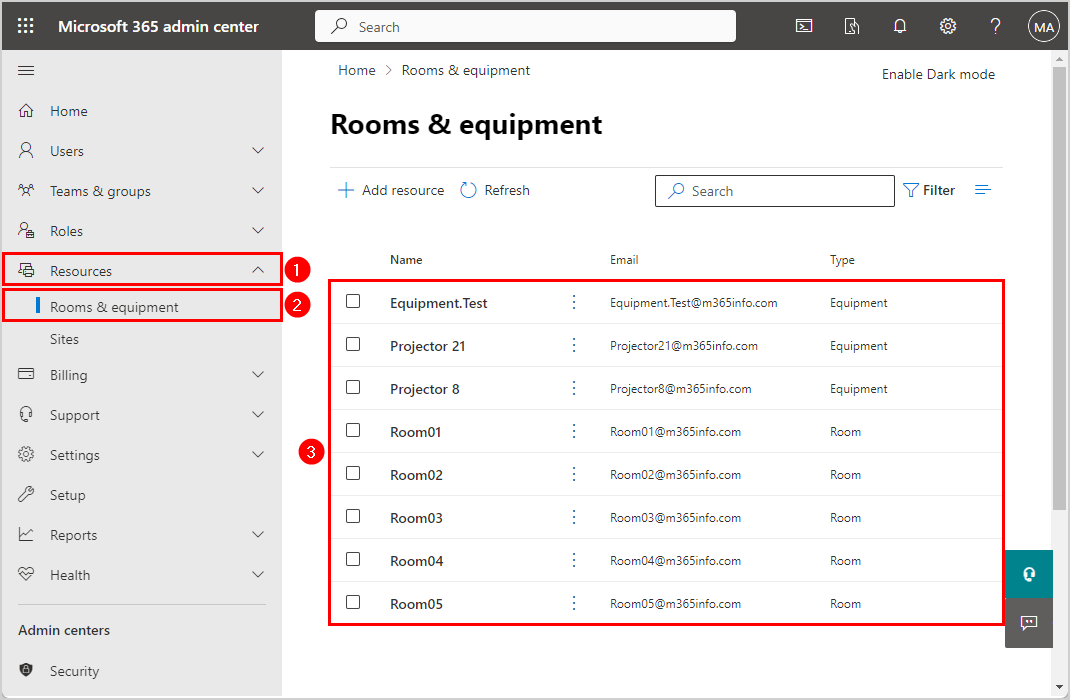
The restored room mailbox is not on the list, which is incorrect. Therefore we will show you how to do it correctly with PowerShell in the next step.
Restore room mailbox with PowerShell
Some room mailbox settings can be restored, and others can’t. So make an export of the deleted room mailbox before you restore it so you can compare the settings afterward.
How to export the deleted room mailbox settings:
- Create a temp folder in the (C:) drive to export the file
- Specify the primary SMTP address of the room mailbox
- Specify the TXT path
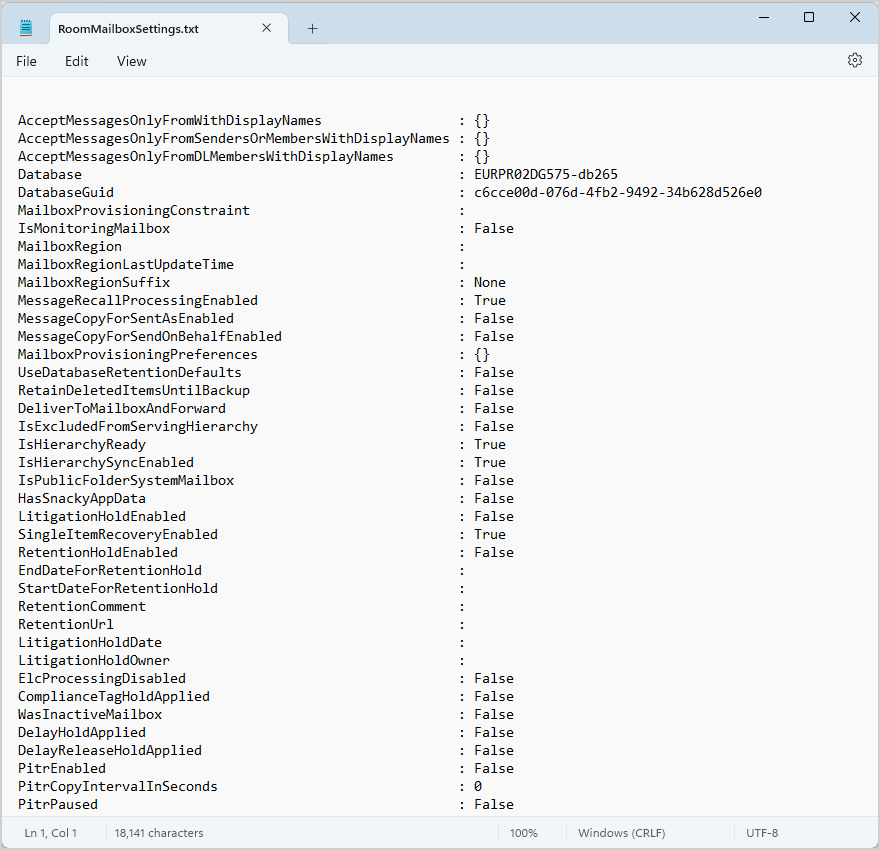
Run the below PowerShell command to export the deleted room mailbox settings to a TXT file.
Get-Mailbox -SoftDeletedMailbox "Room.Test@m365info.com" | Format-List | Out-File "C:\temp\RoomMailboxSettings.txt" -Encoding utf8Open the TXT file to see all the settings of the room mailbox.
When you delete a room mailbox, you can restore it within 30 days. Let’s find the soft-deleted mailboxes in the recycle bin with the PowerShell command below.
Get-Mailbox -SoftDeletedMailbox -ResultSize Unlimited | Format-Table Name, Alias, ExternalDirectoryObjectId, PrimarySmtpAddressThe PowerShell output result shows a list of soft-deleted mailboxes.
Name                               Alias               ExternalDirectoryObjectId            PrimarySmtpAddress
----                               -----               -------------------------            ------------------
Room2                              Room2               13dcf59e-4113-44de-8b1d-b5a20c41fd90 Room2@m365info.com
Room01                             Room01                                                   Room01@m365info.com
Room.Test                          Room.Test           1da6fd0d-9b3a-4f05-8fae-a39a88e9cecd Room.Test@m365info.com
Test SharedMailbox20240318093240   test.sharedmailbox  3402ad29-8a43-4692-b151-486309f6962b test.sharedmailbox123@m365info.com
Test Shared820231212220538         test.shared8        114ee539-9208-4cec-88cb-c16fe2a75779 test.shared8@m365info.com
Test SharedMailbox20231129082329   test.sharedmailbox  217d54ef-857a-45a8-ab85-d9c1794d0e49 test.sharedmailbox33@m365info.com
Test SharedMailbox 220231212224215 test.sharedmailbox2 9090ffa5-85e3-438d-8604-e1a773c3fb85 test.sharedmailbox2@m365info.com
Sharedmailbox.Test20240318125412   sharedmailbox.test  7b13b9b7-fc9a-47cb-b91f-356f64ddb270 sharedmailbox.test@m365info.com
In our example, we want to restore a room mailbox (Room.Test@m365info.com).
The PowerShell command consists of these parts:
- Specify the soft deleted room mailbox primary SMTP address.
- Restore the room mailbox using the -WindowsLiveID parameter (RoomTest1@m365info.com).
- Set a predefined -Password for the new room mailbox with the ConvertTo-SecureString.
Note: We recommend you provide a new email address (WindowsLiveId) to avoid any problems. Because if there is another mailbox with the same primary SMTP email address, you will get an error.
Run the below PowerShell command.
Undo-SoftDeletedMailbox "1da6fd0d-9b3a-4f05-8fae-a39a88e9cecd" -WindowsLiveID "RoomTest1@m365info.com" -Password (ConvertTo-SecureString -String 'Asd#4R12' -AsPlainText -Force)The PowerShell output shows the below result.
Name                      Alias           Database                       ProhibitSendQuota    ExternalDirectoryObjectId
----                      -----           --------                       -----------------    -------------------------
Room.Test                 Room.Test       EURPR02DG575-db265             49.5 GB (53,150,220… d9e5e22f-8529-4cfb-8a32-1c9dcc915b55
It will automatically restore the room mailbox, which we will check in the next step.
Verify room mailbox restore
To check the room mailbox is restored, follow these steps:
- Sign in to Microsoft 365 admin center
- Click Resources > Rooms & equipment
- Verify the room mailbox appears in the list with the correct Name and Email
- Click on Users > Active users
- Search and find the room mailbox in the list
- Verify the room mailbox appears in the list with the correct Name and Email
That’s it!
Read more: Change Microsoft 365 primary SMTP address »
Conclusion
You learned how to restore a deleted mailbox in Microsoft 365. To restore a user mailbox, you can choose between Microsoft 365 admin center and PowerShell. However, the shared mailbox and room mailbox can only be restored using PowerShell to avoid any problems.
Did you enjoy this article? You may also like Unblock Microsoft 365 user sign-in. Don’t forget to follow us and share this article.
This Post Has 0 Comments