Autodiscover is one of the most important and essential components of the Microsoft Exchange server…
Outlook client protocol connectivity flow in an internal network environment | Part 12#36
In the current article, we will review the basic concepts of the Autodiscover flow, which is implemented by internal Outlook clients.
The term “internal”, relate to a private network environment that has On-Premise Active Directory.
Table of contents
Getting Autodiscover information
The first part of the Autodiscover process implemented by the phase in which the Autodiscover client locates an available Autodiscover Endpoint that could provide him the required Autodiscover information.
One of the most interesting things about the Autodiscover protocol is that the phase of finding available Autodiscover Endpoint performed in an entirely different way by the internal Outlook client that are located in a private organization network and have to the On-Premise Active Directory vs. external Outlook client that doesn’t have access to On-Premise Active Directory.
In next article – Exchange clients and their Public facing Exchange server | Part 13#36, will describe that Autodiscover process that is implemented by external Outlook clients.
Scenario character’s description
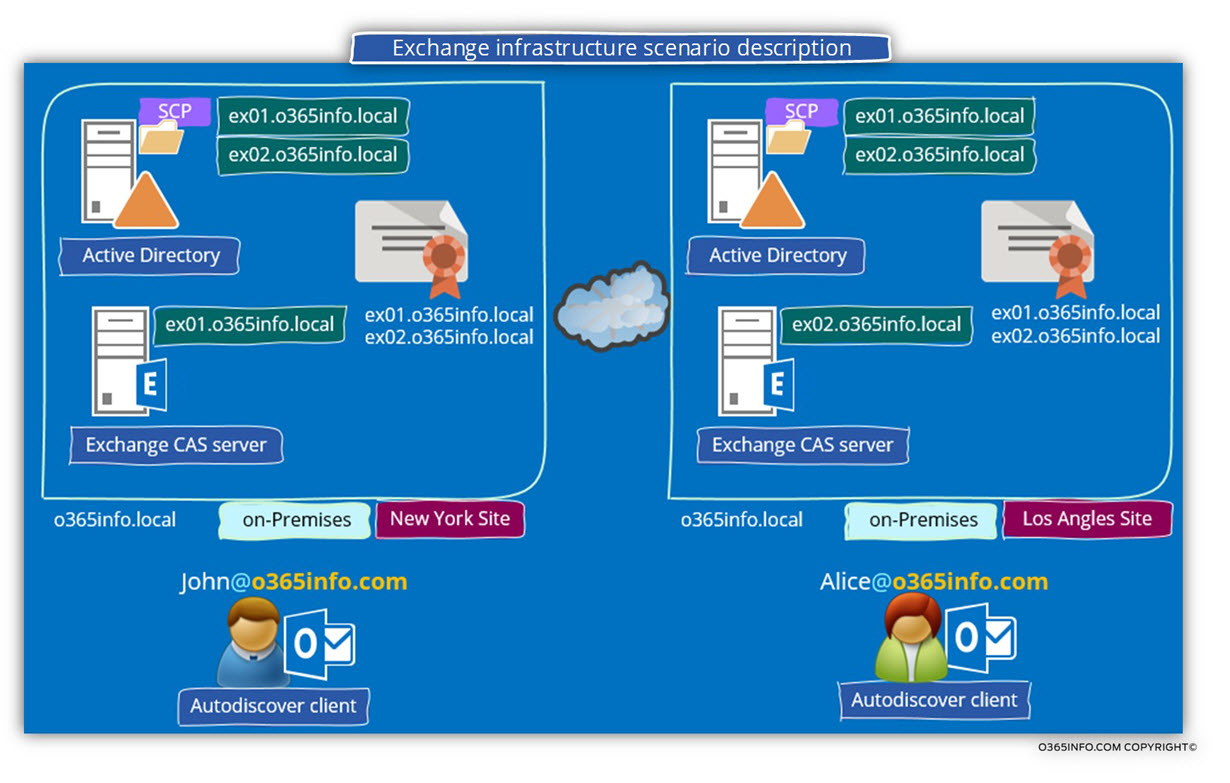
To be able to demonstrate the Autodiscover flow Active Directory-based environment, we will use a scenario with the following characters:
The charters of the Exchange environment in our scenario are as follows:
- Active directory internal domain name – o365info.local
- Public domain name – o365info.com
- The E-mail address of the organization users is based on the mail suffix –o365info.com
- Exchange\Active directory sites -the organization has two Exchange\Active Directory sites: New York Site and Los Angles Site (the New York site, is the headquarters of the company).
- The name of the Exchange CAS server in New York Site is – exo1.o365info.local
- The name of the Exchange CAS server in Los Angles Site is – exo2.o365info.local
- John is an organization’s user, whom his mailbox is hosted on the New York Exchange Site.
- Alice is an organization’s user, whom his mailbox is hosted on the Los Angles Exchange Site.
General notes
The description of the Exchange workflow in the internal network that will provide in the next scenarios is a “simplified explanation” or a real flow.
I have dropped some of the “client\server processes” to make the information more digestible because I would like to focus on the subject of the “Exchange internal FQDN and URL’s address.
Scenario 1: mail client needs access to his mailbox.
John’s mailbox hosted at the New York site.
John is located on the internal company network and needs access to his mailbox.
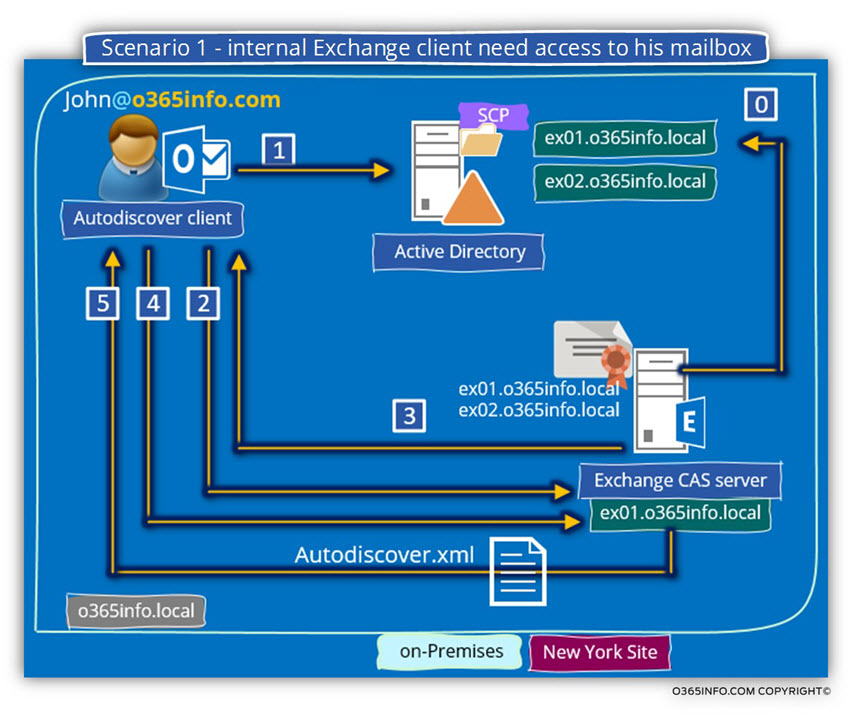
Step 0 – the registration of available Autodiscover Endpoint in On-Premise Active Directory
By default, each Exchange CAS server will automatically register himself in the Active Directory SCP by using his internal hostname.
In some scenario, we will need to change this default behavior.
In our particular scenario, the organization uses two Exchange CAS servers which automatically registered themselves in the Active Directory SCP (number 0).
Step 1: Mail client Autodiscover process
In an On-Premise Active Directory environment, the first phase of the Autodiscover process is implemented by a query to the local Active Directory (LDAP query).
The “answer” from the Active Directory will include the “internal FQDN name” of the Exchange CAS server – exo1.o365info.local (number 1).
Note that the Active Directory includes information about two available Exchange CAS servers. In case that we didn’t update the information in the On-Premise Active Directory SCP regarding the “physical location” (the Active Directory site name) of the Exchange CAS server, the Autodiscover client that gets the list of servers doesn’t have a specific Preference.
The Autodiscover will randomly pick one of the host names who appears in the list.
In our scenario, the mail client will try the address the hostname – exo1.o365info.local
Step 2: addressing the internal Exchange CAS server
The Autodiscover client initiates a connection attempts to the internal Exchange CAS server (exo1.o365info.local) by using the HTTPS protocol.
The Autodiscover client will ask for the server to prove his identity by providing a public certificate (number 2).
Step 3 – Verify the Exchange server public certificate
The Autodiscover client will verify that the server certificate includes the FQDN – exo1.o365info.local
Step 4 – Autodiscover clients provide user credentials
In case that the mail Autodiscover verifies that the Exchange certificate is “OK,” the Autodiscover client will need to provide user credentials to the Autodiscover Endpoint meaning the Exchange CAS server (number 4).
Step 5 – asking from the Exchange server to provide the autodiscover.xml file
The mail client will ask from Exchange server to provide him the required autodiscover.xml file. The exchange offers the Autodiscover client the autodiscover.xml file, meaning the Autodiscover response (number 5).
In the following screenshot, we can see a small example of the content of the autodiscover.xml file.
Exchange EWS services – we can see that the URL address of the Exchange EWS services provided by using the hostname – exo1.o365info.local
Exchange ECP – the URL address of the Exchange control panel (the web address that is used by a webmail client to configure user settings) includes the hostname – exo1.o365info.local

Scenario 2: internal mail client that needs to access mailbox data that is hosted on a different Exchange\Active Directory site.
The following scenario describes an Exchange environment that includes two different Exchange\Active directory sites.
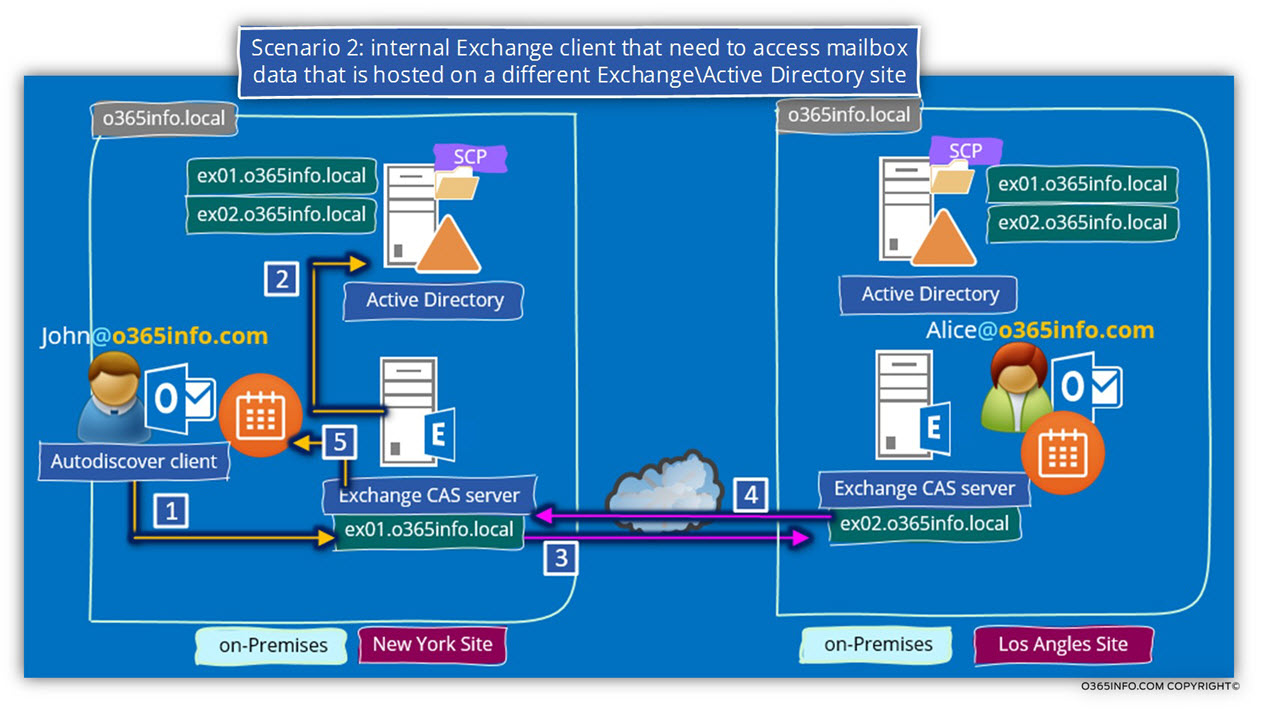
In our scenario, John (mail client from the New York site), need to get information about the Free\Busy time of Alice, mail recipient who is physically located at a different Exchange\Active directory site – Los Angles site.
Step 1 – internal mail client submits a request for Free\busy information.
Let’s assume that John was already successfully managed to connect his Exchange CAS server. The process begins, at the stage in which John “submit a request” to Free\Busy information to his Exchange CAS server (number 1).
Step 2 – Exchange verifies the location of the destination recipient.
John Exchange CAS server (exo1.o365info.local) accept John’s request and start a process sin which he will find the Exchange server that host the destination recipient mailbox.
“John Exchange CAS server,” doesn’t know where Alice’s mailbox located.
To be able to find this information, the “New York Exchange CAS server” query the local Active Directory for information about the location of Alice’s mailbox.
The answer from the Active Directory, includes the host name – exo2.o365info.local (number 2).
Step 3 – New York Exchange CAS servers submit a request for Free\busy information.
exo1.o365info.local create a communication channel to the “Los Angles Exchange CAS server (exo2.o365info.local) and ask for information about Alice Free\Busy time information (number 3).
Step 4 – Los Angles Exchange CAS server sends the required information.
The Los Angles Exchange CAS server, send back the necessary information to the New York Exchange CAS server (number 4).
Step 5 – John’s Exchange CAS server provide John the required information.
John’s Exchange CAS server, populate the “results” in John’s calendar (number 5).
Scenario 3: implementing load balancing and High availability of Exchange CAS servers
The third scenario is suitable for mid and enterprise companies that use multiple Exchange CAS servers for providing a solution to the business need of load balancing between Exchange CAS servers.
The purpose of the current section is not to provide a detailed explanation about the architecture of Exchange for implementing load balancing between Exchange CAS servers, but instead just to provide a small glimpse this subject in the context of registering the Autodiscover Endpoint in Active Directory.
- In an Exchange 2010 based environment, the need for implementing a solution for load balancing and High availability of Exchange CAS servers is performed by using a concept of RPC Client Access Array and most of the time; a hardware load balancer.
- In an Exchange 2013 based environment, the need for implementing a solution for load balancing and High availability of Exchange CAS servers is carried out in a simpler way without the need for building RPC Client Access Array.
The main point when we are implementing load balancing and high availability of Exchange CAS servers, the main idea is that this information is “hidden” from the Exchange client.
The Exchange client should “see” one entity that is represented by a logical name.
The logical name is “translated” to hostname and IP address of two or more Exchange CAS servers.
Note: The term “Exchange CAS array” is broad term and, we can say much about it, but at this time, our primary concern is the subject if the Exchange FQDN and URL address when using this option.
To demonstrate the Autodiscover characters in an Exchange environment that use load balancing and High availability of Exchange CAS servers, we will describe an Exchange 2010 based environment.
There are a couple of ways to implement a solution for the Exchange CAS array.
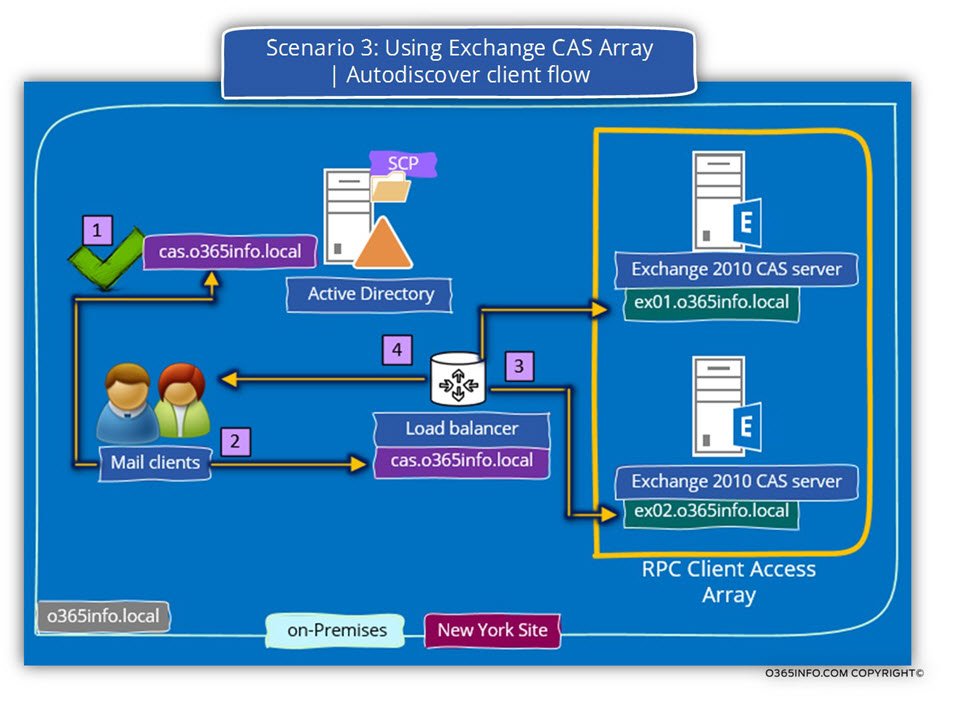
In our scenario, we use a load balancer that will “represent” two Exchange CAS servers.
From the mail client point of view, there are “only one Exchange CAS server” and the mail client doesn’t know that they are “talking” to a load balancer instead of the Exchange CAS server.
Scenario description
The organization decides to add additional Exchange CAS server to the New York Exchange\Active Directory site for solving problems of load and performance of the existing Exchange CAS server- exo1.o365info.local
The host name of the “new Exchange CAS server” is – exo2.o365info.local
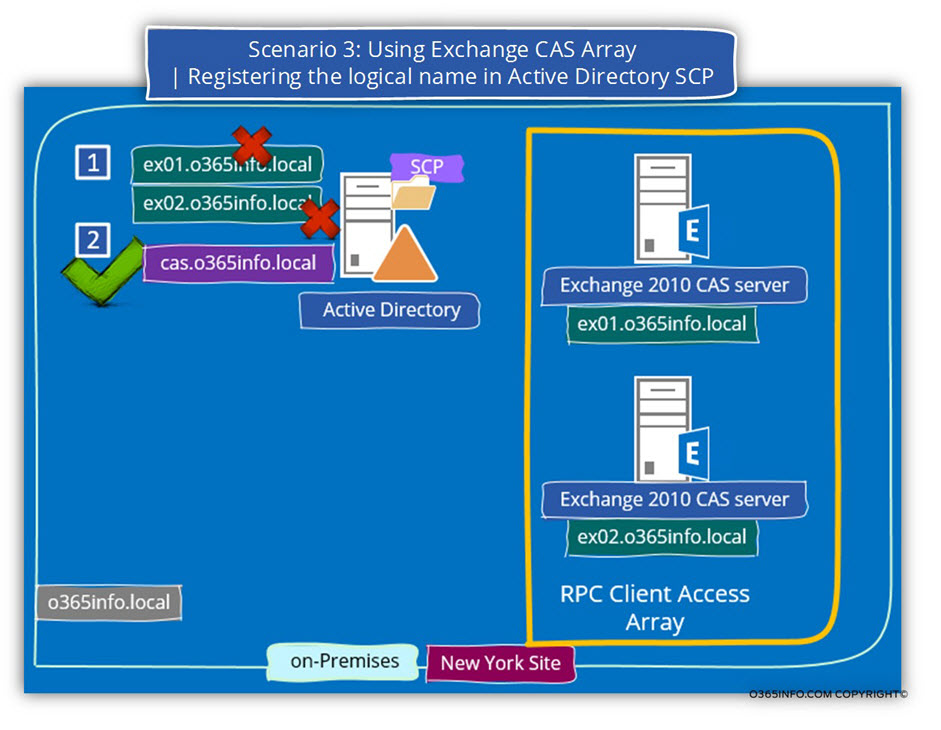
To be able to optimize the Exchange CAS server level of services, the two separated Exchange CAS servers configured as members in an Exchange CAS array.
The logical name who will be allocated to the Exchange CAS array is – cas.o365info.local
To be able to implement the Exchange CAS array configuration using the additional component of the load balancer, we will need to perform the following operations:
1. Remove the information from the Active Directory SCP about the New York Exchange CAS servers.
We will need to “Delete\Remove” the information from the Active Directory SCP about the “real names” of the existing two Exchange CAS servers (exo1.o365info.local and exo2.o365info.local). The purpose of this step is to prevent from Exchange CAS server client to “know” about the “real name” of each of the existing Exchange CAS servers (number 1).
2. Register the “logical name” of the load balancer.
The Exchange CAS Array is “exposed” to the mail client by using a “logical name” that will be “attached” to the load balancer.
In our example, the load balancer FQDN will be – cas.o365info.local (number 2).
3. Internal mail client asks for information about their Exchange CAS server.
From this day forwards, each time that a mail client (Autodiscover client) will query the Active Directory about information for existing Exchange CAS server\s, the Active Directory “answer” will include the name of the “Exchange CAS server” – cas.o365info.local (number 3).
4. Internal mail client access to their Exchange CAS server
The internal mail client will try to connect the “Exchange CAS server” using the FQDN- cas.o365info.local (number 4).
5. Load balancer forwards the request to the Exchange CAS array members.
The Load balancer (cas.o365info.local) will accept the mail client requests and “forward” the mail client request to one of the “real Exchange CAS servers.”

This Post Has 0 Comments