Let’s start from the end – what is the only purpose of the Exchange CAS…
Manage legacy Exchange URL address using a PowerShell script | 15#23
The current article dedicated to the presentation of a little PowerShell script that I have written that was created to simplify the task of the “preparation” of existing Exchange infrastructure to the Exchange 2013 coexistence environment.
The PowerShell script includes options that will help us to configure Exchange CAS server URL address, authentication type and more and additionally, view and export information about the existing Exchange infrastructure.
Regarding the use of the PowerShell script, my main advice is: be careful!
The changes\update that the PowerShell command “do” to the existing Exchange CAS server could be quite dramatic. Before you use the PowerShell command that “make the update” please look at the “behind the scenes” of the PowerShell script and verify that you are completely understood each of the many selections.
The reason for using the PowerShell script
The task of preparing the existing Exchange environment to the pace of Exchange 2013 coexistence environment, in which we add the Exchange CAS 2013 infrastructure, could consider as not so simple, especially in an enterprise Exchange environment because the preparation task consists of many tasks that we need to implement for each of the existing Exchange CAS servers.
We should not forget to most important phase be before with start with the step of exciting the different task: the planning stage.
We will need to have a very clear map of the existing Exchange infrastructure such as the different site, the ensemble of the Exchange server in each site and a specific detail about each of the Exchange servers such as: number to the Exchange server at each site, Exchange server version, the Exchange server role and so on.
The Exchange services\components that we need to configure.
The preparation checklist of the legacy Exchange CAS server infrastructure includes the following parts. The “Manage Exchange CAS server settings.ps1” PowerShell script includes reference for each of these parts.
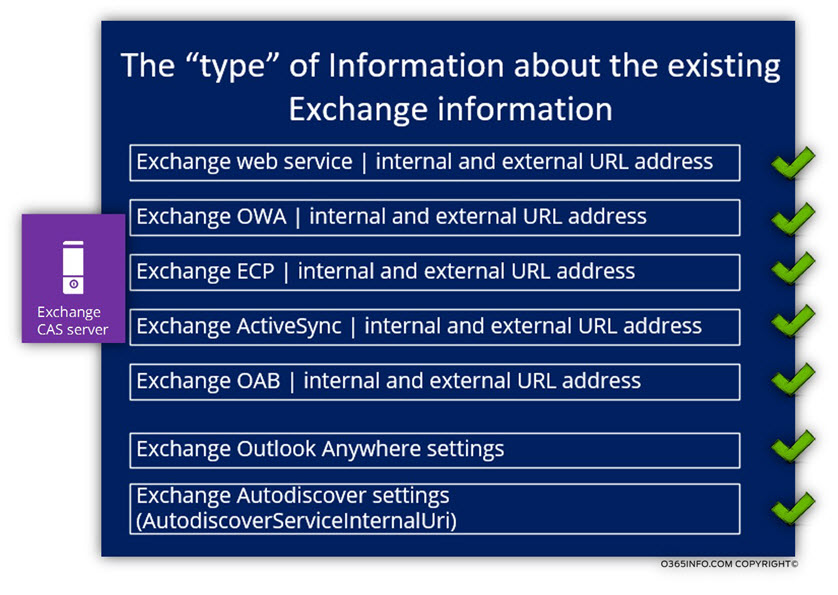
The content of the Exchange environment preparation PowerShell script
The structure of the “Manage Exchange CAS server settings” PowerShell script includes the following menu structure:
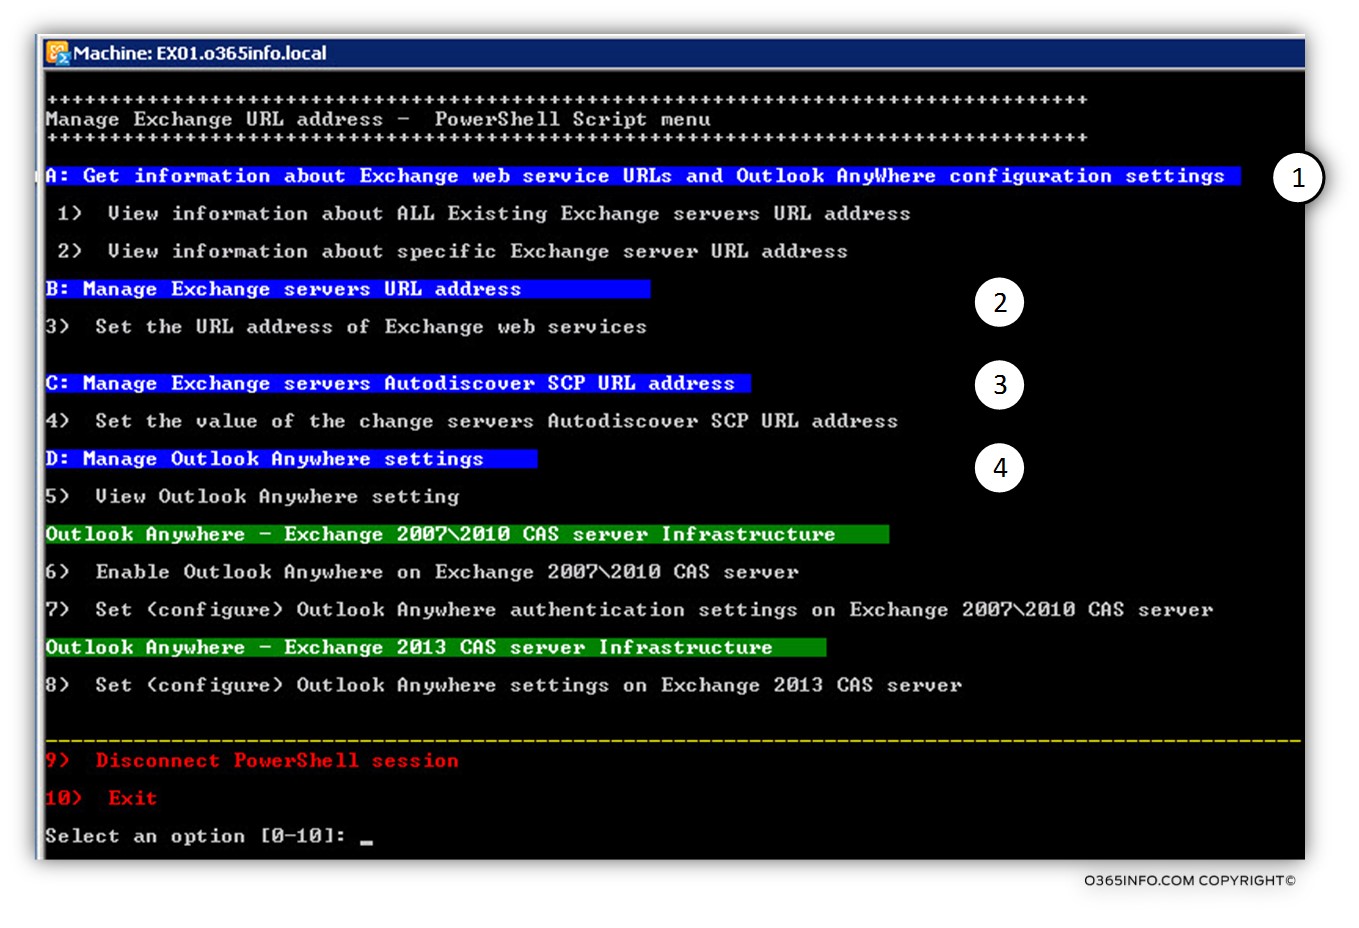
There are four main sections, which are “painted” in a blow. Each of the “sections” relates to a different administrative task that refers to the required Exchange CAS server’s preparations for the Exchange 2013 coexistence environment.
Section A: Get information about Exchange web service URLs and Outlook Anywhere configuration
This section used for getting information about the existing Exchange infrastructure.
The script will display information on the screen and at the same time, will export the information to an HTML file.
The exported file\s saved on C:\ drive on a folder named: INFO and subfolder named: “Exchange URL address and Outlook Anywhere information.”
The information that will be displayed will include information about the following Exchange services:
| Exchange web service | Internal and external URL address |
| Exchange OWA | Internal and external URL address |
| Exchange ECP | Internal and external URL address |
| Exchange ActiveSync | Internal and external URL address |
| Exchange OAB | Internal and external URL address |
| Exchange, Outlook Anywhere settings | All the available settings |
| Exchange Autodiscover settings | AutodiscoverServiceInternalUri |
This section includes two menu options:
Menu 1: View information about ALL existing Exchange servers URL address
Using this option will query the Active Directory about all the available Exchange CAS servers and display the information for each of these Exchange CAS servers.
Menu 2: View information about specific Exchange server URL address
This option will display to the screen + export the information to HTML for a particular Exchange CAS server.
In the following screenshot, we can see that result from the information that is displayed on the screen when choosing the Menu 1 option.
To “Top part” is the notification area to inform us about “what is the PowerShell command done” and about the location of the HTML reports that saved in: C:\INFO
The result divided into dedicated sections, for each of the Exchange CAS server services such as – Exchange web service, etc.
Each of the sections includes information about all the available Exchange CAS servers. In our particular scenario, we can see information about three Exchange CAS servers: STS, EX01 and EX02
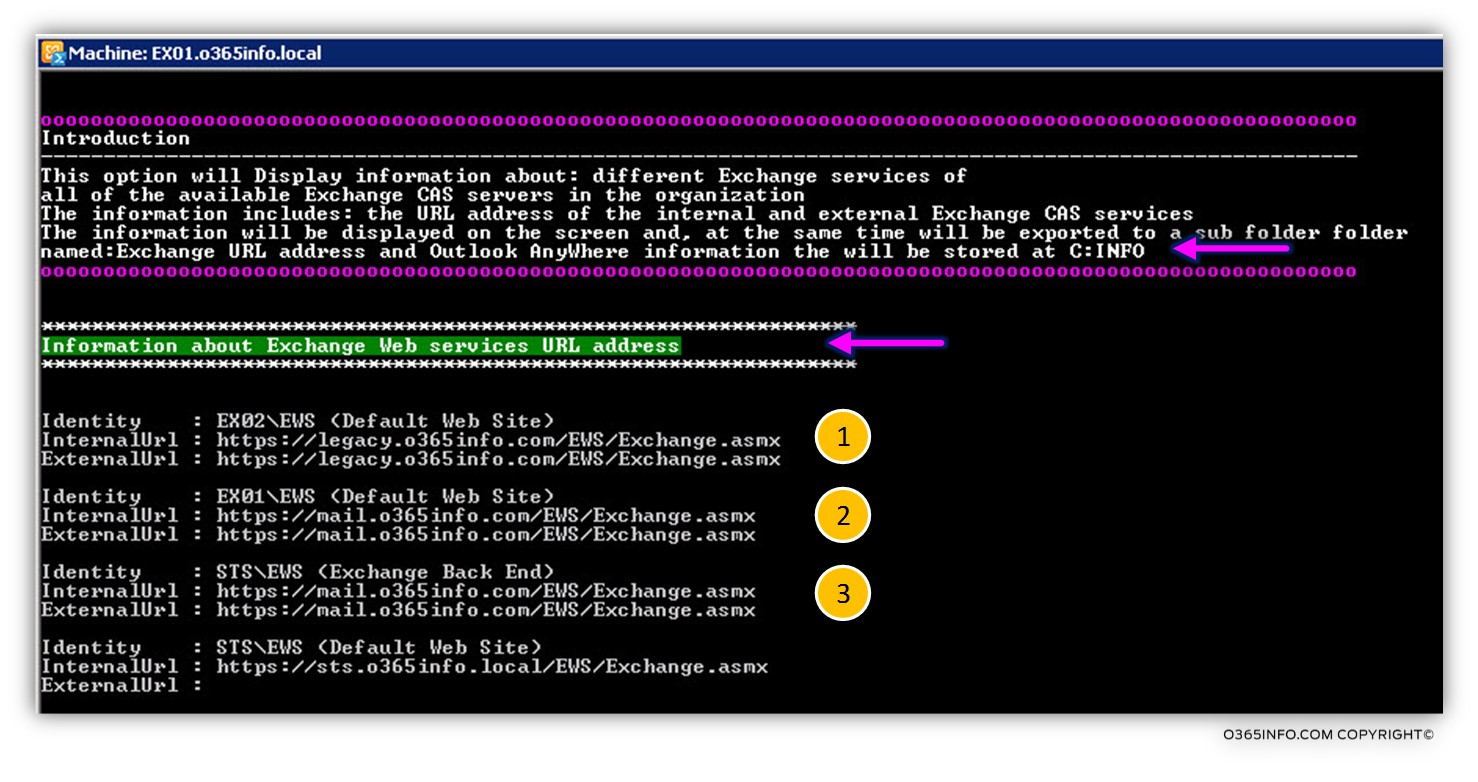
The HTML reports will be saved in: C:\INFO\Exchange URL address and Outlook Anywhere information
HTML reports for all of the Exchange CAS servers or a particular Exchange CAS server
In the following screenshot, we can see an example in the HTML reports that include information about all the existing Exchange CAS servers named – Exchange web services – Unified report.html, and two additional HTML reports that we created using Menu 2 options, that enable us to display information about a particular Exchange CAS server (in our scenario, EX01 and EX02).
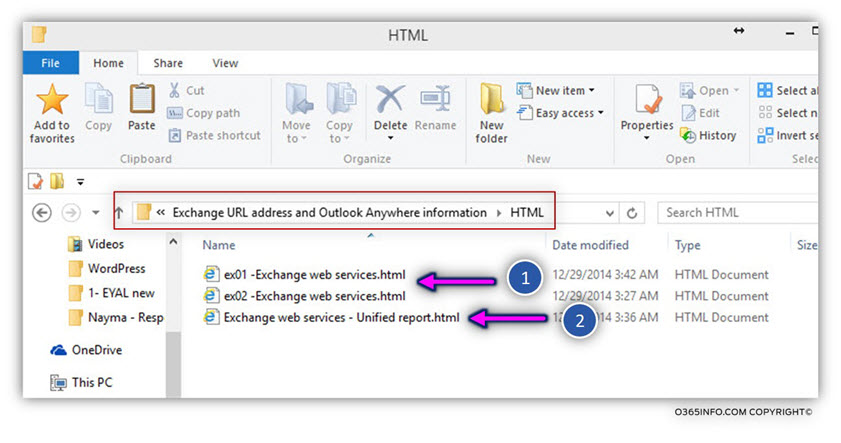
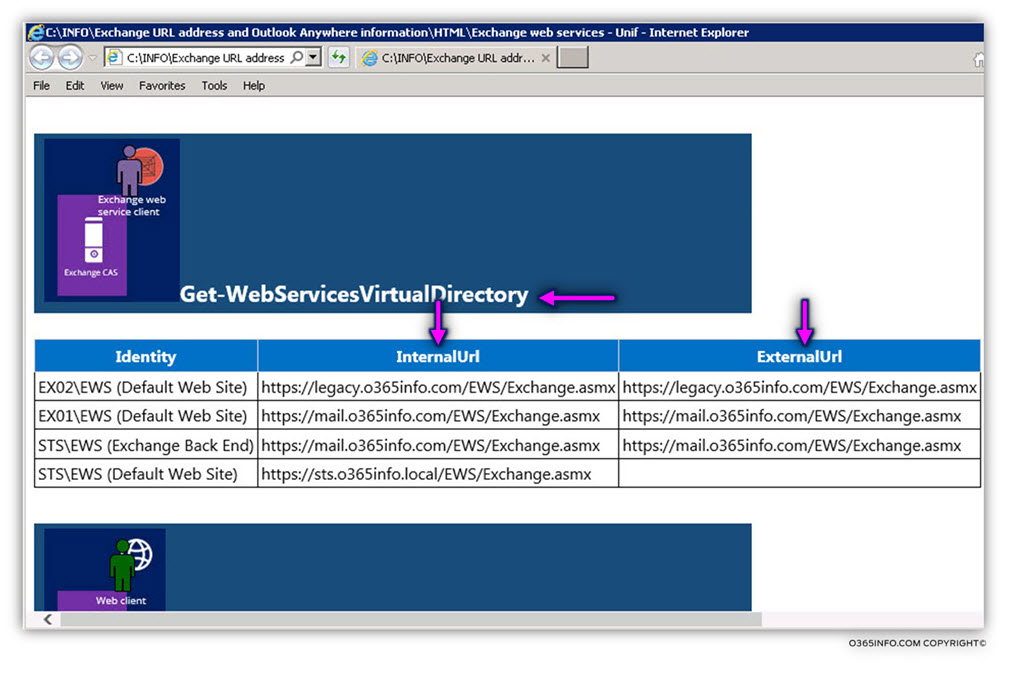
In the following screenshot, we can see an Example of the HTML Exchange CAS server report.
HTML report by Exchange server version
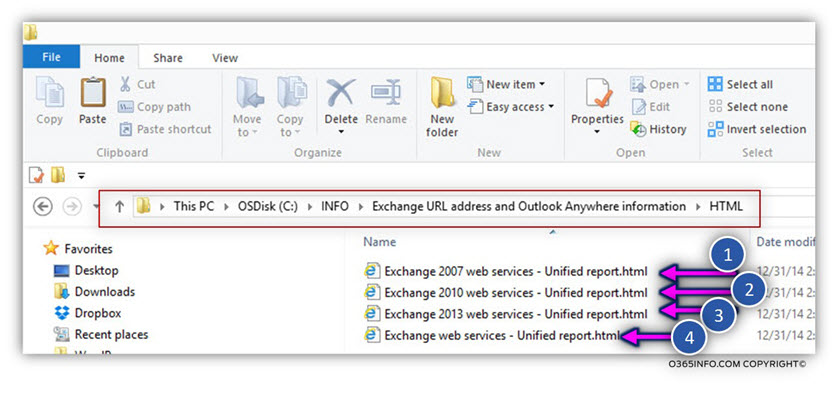
The HTML reports of the existing Exchange infrastructure will include a dedicated report for each of the Exchange server version: Exchange 2007, Exchange 2010 and Exchange 2013.
Section B: Manage Exchange servers URL address
Menu 3: Set the URL address of Exchange web services
The following menu will enable us set\configure the value of the following Exchange CAS services:
| 1 | Exchange web service | Internal and external URL address |
| 2 | Exchange OWA | Internal and external URL address |
| 3 | Exchange ECP | Internal and external URL address |
| 4 | Exchange ActiveSync | Internal and external URL address |
In the following screenshot, we can see that we have two possible options:
Using the same namespace for the external and the internal Exchange CAS services (option A) or choose to implement an option in which we use different namespace for the internal vs. external URL address (option B).
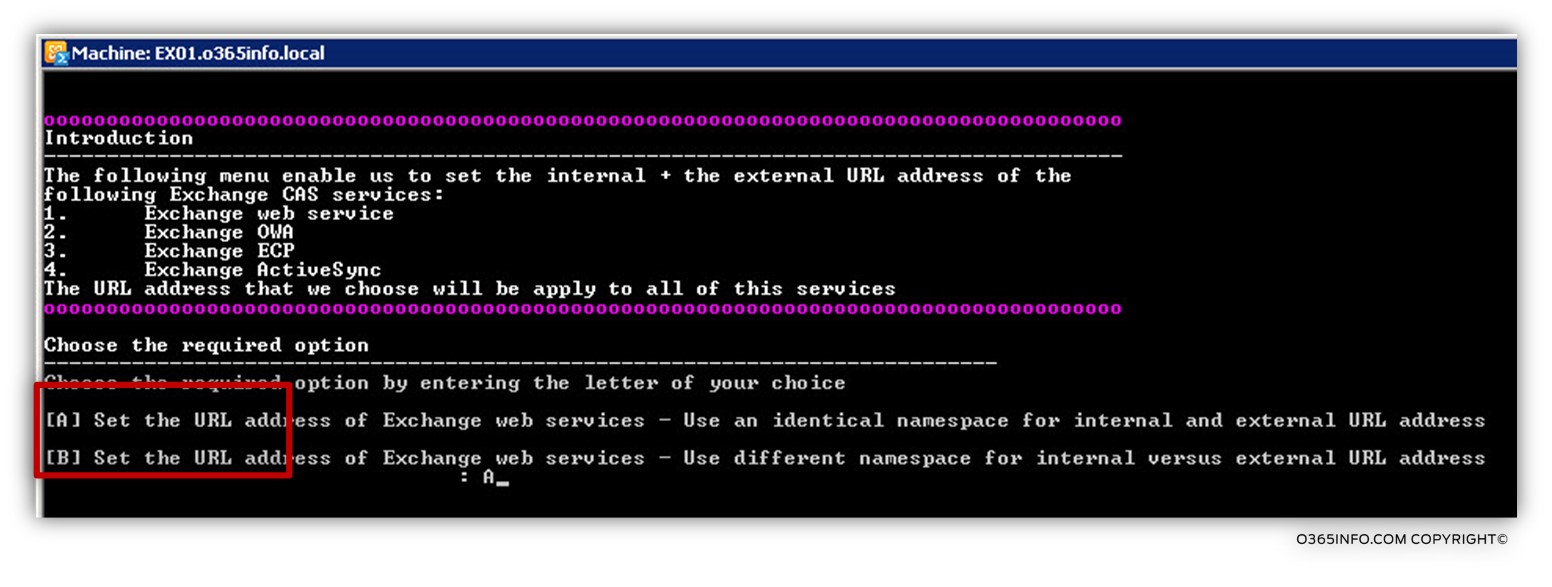
Example: in the following scenario, we choose option A, in which we will use the same namespace for the external + internal URL address.
In our example, we choose to configure Exchange CAS server named: EX02 and the host name whom we will use is: mail.o365info.com
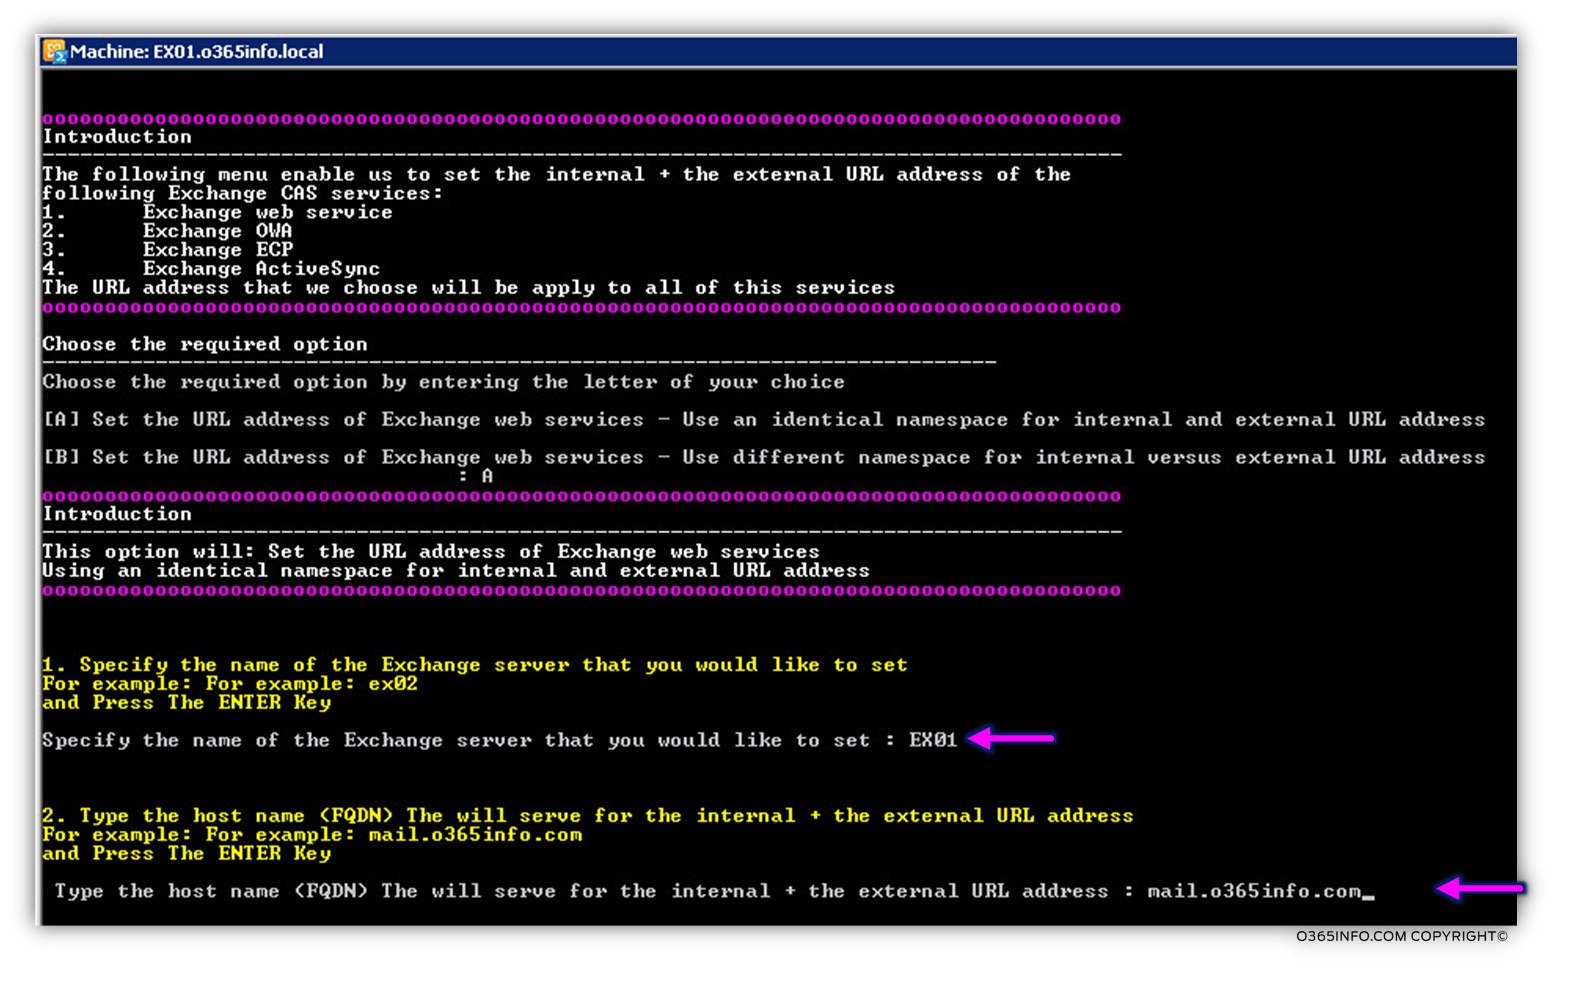
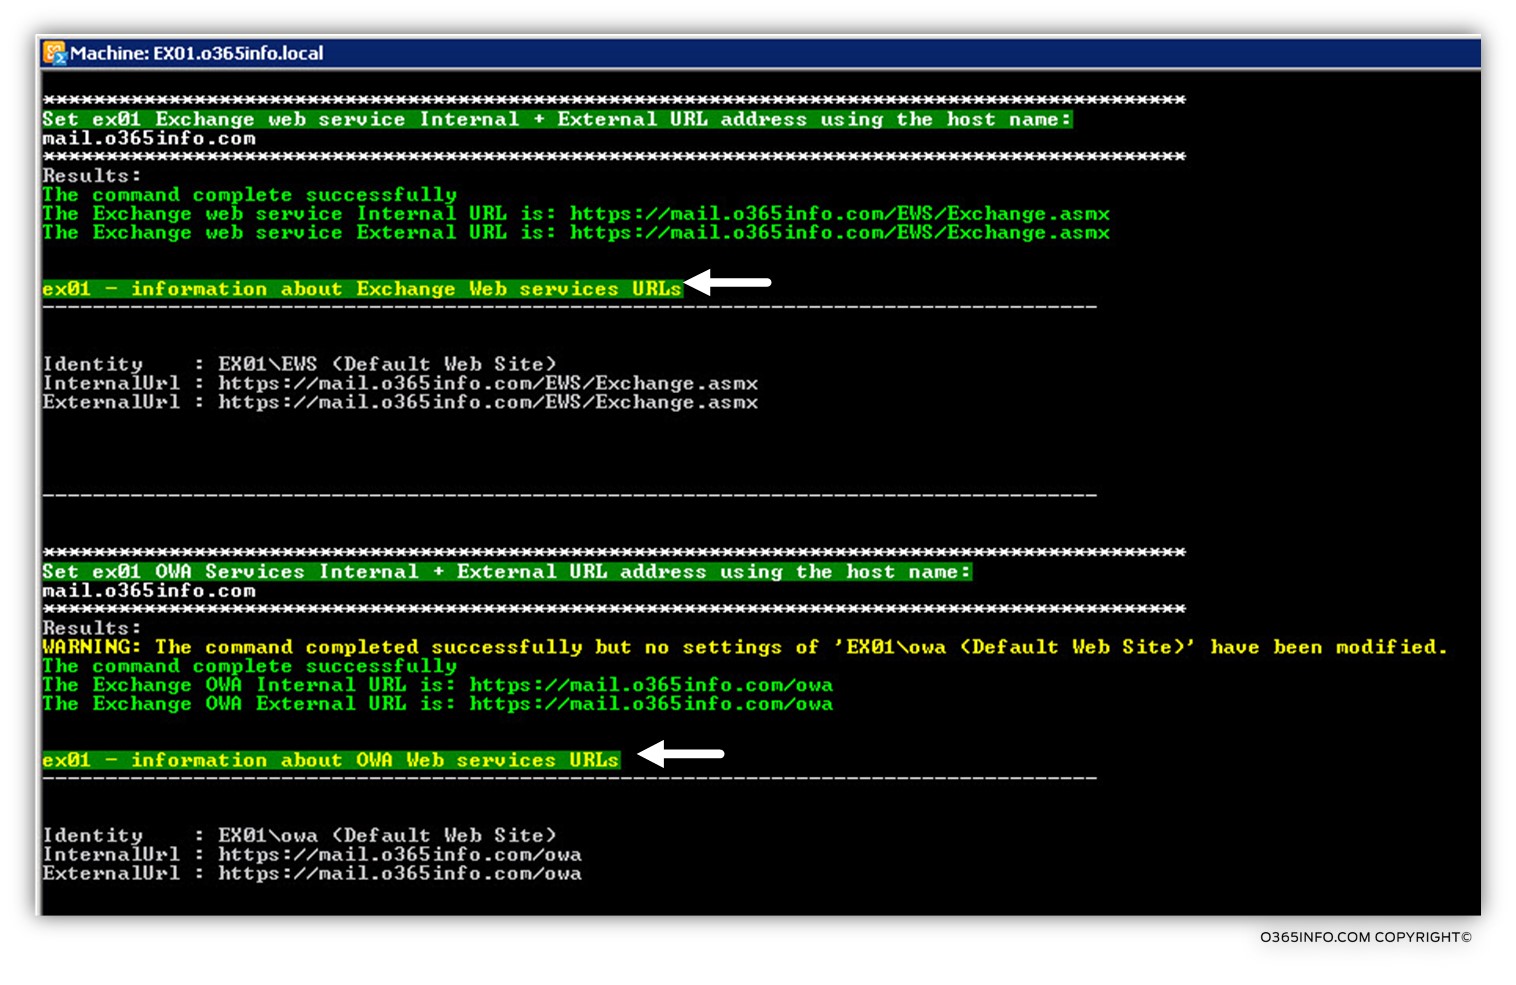
In the following screenshot, we can see the results: the PowerShell command will use the host name – mail.o365info.com for “constructing” the URL address of the different Exchange CAS server services such as the Exchange web services URL address: https://mail.o365info.com/EWS/Exchange.asmx and so on.
The output from the PowerShell command will inform as if the operation was completed successfully and displays the value in the URL address.
Section C: Manage Exchange servers Autodiscover SCP URL address
Menu 4: Set the value at the change servers Autodiscover SCP URL address
This menu will help us to set the Autodiscover URL address that Exchange CAS server register in the Active Directory SCP.
The best practice is to set the “internal Autodiscover URL address” of the legacy Exchange CAS server\s to point to the Autodiscover address of the Exchange 2013 CAS.
In our example, the internal and the external Autodiscover namespace that is used by the Exchange 2013 CAS is: autodiscover.o365info.com
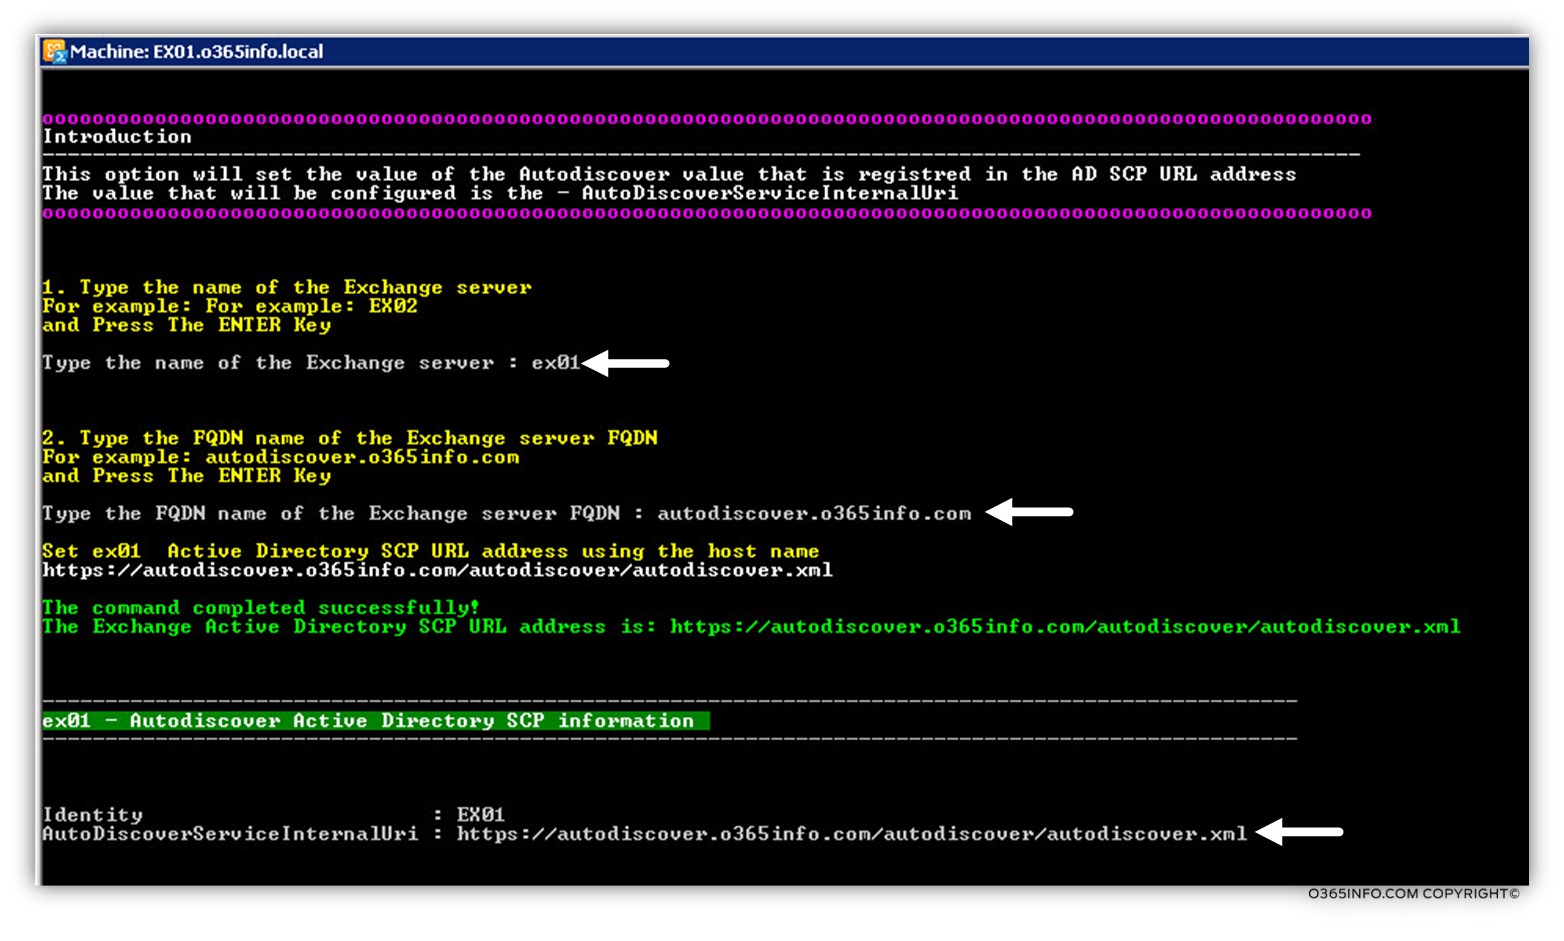
In the following screenshot, we can see an example to the parameters that we use of the PowerShell command.
- The first parameter is the Exchange CAS server whom we want to set his Autodiscover name: EX02
- The second parameter, is the Autodiscover address. In our example: autodiscover.o365info.com
Section D: Manage Outlook Anywhere settings
In the Exchange 2013 coexistence environment, we will need to configure the Outlook Anywhere Exchange infrastructure. The configuration will relate to the Exchange CAS 2013 and, to all the legacy Exchange CAS servers: Exchange 2007 and Exchange CAS 2010.
- The need for implementing the Outlook Anywhere setting will relate to the communication with the Outlook clients with the Exchange CAS 2013.
- The need for applying the Outlook Anywhere sitting on the legacy Exchange CAS servers, will relate to the “CAS to CAS” communication part, in which the Exchange CAS 2013 creates a communication channel with the legacy Exchange CAS servers for Proxy legacy Outlook client requests.
Menu 5: View Outlook Anywhere setting
In the section, we can view the existing Outlook Anywhere settings of all the Exchange CAS servers (option A) or choose to view Outlook Anywhere of a particular Exchange CAS server (option B).
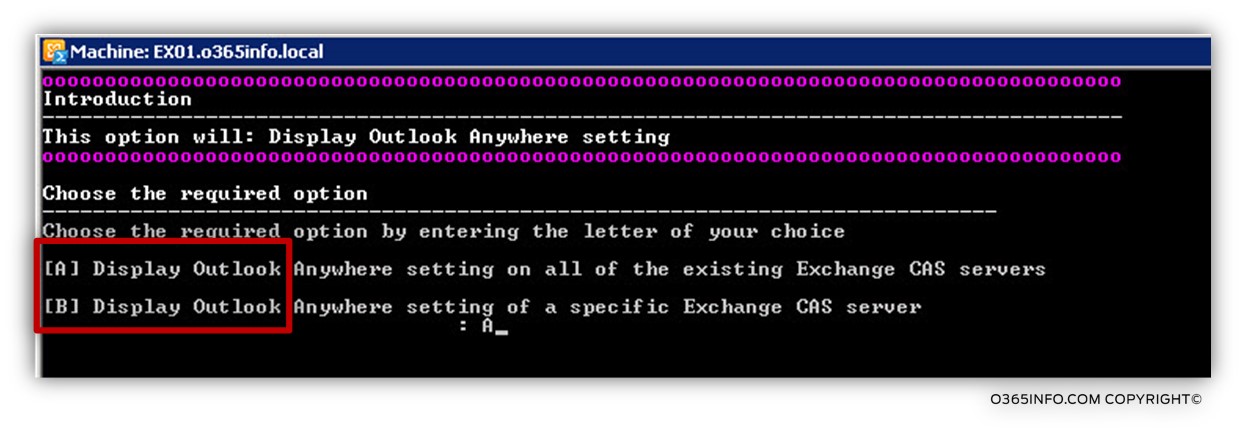
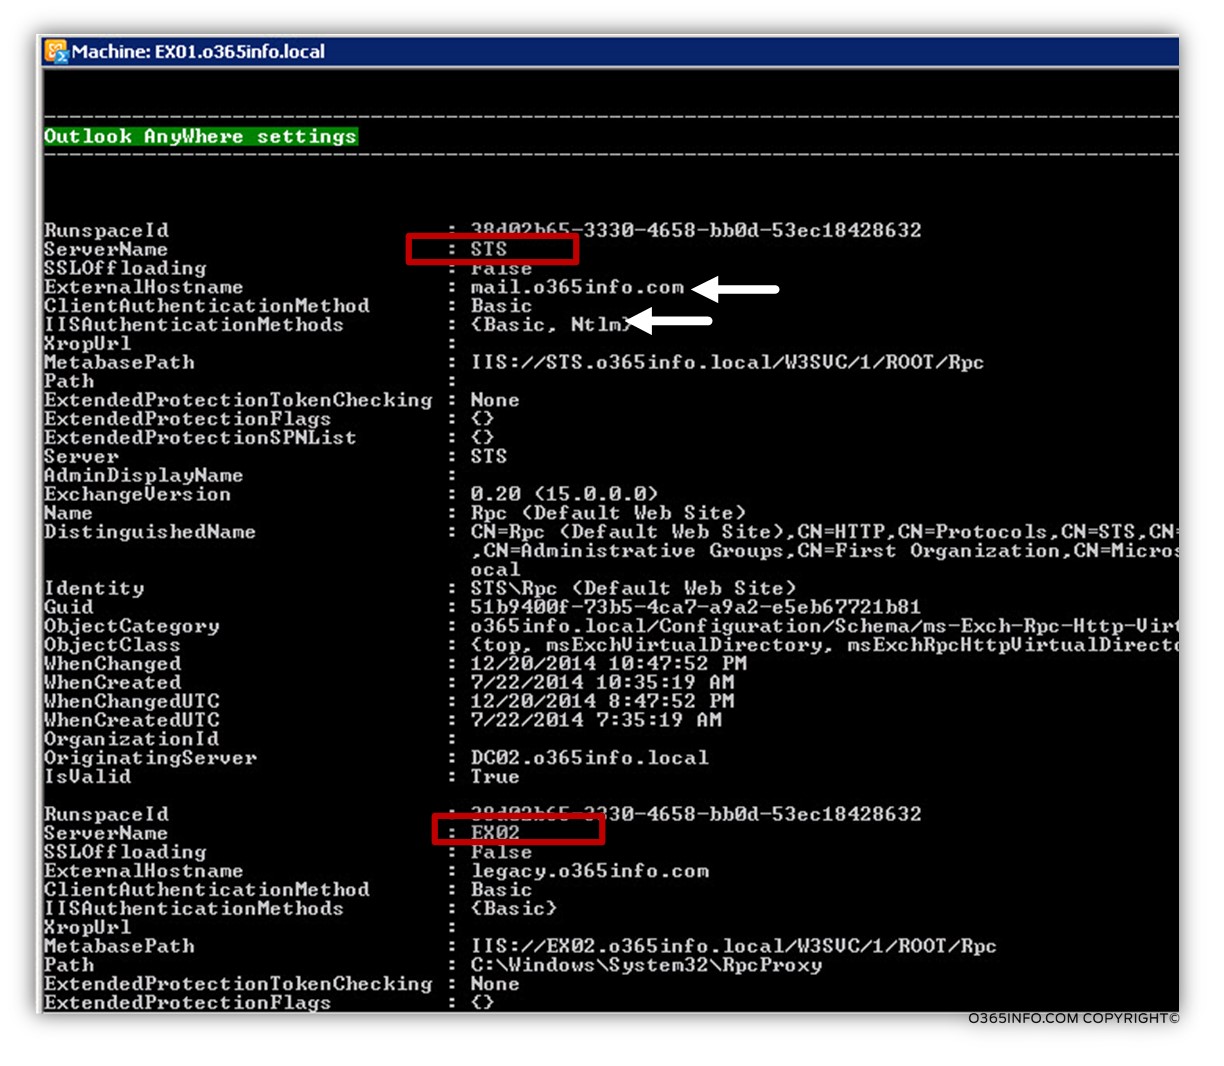
In the following screenshot, we can see the results. We can see the Outlook Anywhere configuration setting of all the Exchange CAS servers.
In our example, we can see the Outlook Anywhere setting of an Exchange CAS server named: STS and Exchange CAS server called: EX02
Outlook Anywhere – Exchange 2007/2010 CAS Server Infrastructure
This section relates to the management if the Outlook Anywhere infrastructure in “legacy Exchange CAS server\s.” The reason for that we are referring the Exchange 2007/2010 separately from the Exchange CAS 2013 infrastructure, is that the Outlook Anywhere setting and architecture are implemented differently in Exchange CAS 2013.
The configuration of Outlook Anywhere in Exchange 2007/2010 CAS servers, could be considered as a two-phase process.
- In phase 1, we enable the option of Outlook Anywhere on the Exchange CAS server.
- In phase 2, we configure the specific required settings of Outlook Anywhere on the Exchange CAS server.
Menu 6: Enable Outlook Anywhere on Exchange 2007/2010 CAS server
In case that Exchange CAS server 2007/2010 did not include support for Outlook Anywhere (RPC\HTTP), we will need to enable the Outlook Anywhere service + configure the required configuration settings.
The configuration setting that we will need to use are:
| ExternalHostname | This RPC Endpoint host name whom the external + internal Outlook Anywhere Outlook clients will refer. The host name whom we will need to provide will be the “primary namespace” host name who is also “attached” to the Exchange CAS 2013. For example: mail.o365info.com |
| Exchange client authentication method (protocol) | The value of the – Default Authentication Method will be set to: Basic. Note – The value will be configured automatically by the PowerShell command. |
| SSL off-loading | The value of the – SSL off-loading will be set to: False |
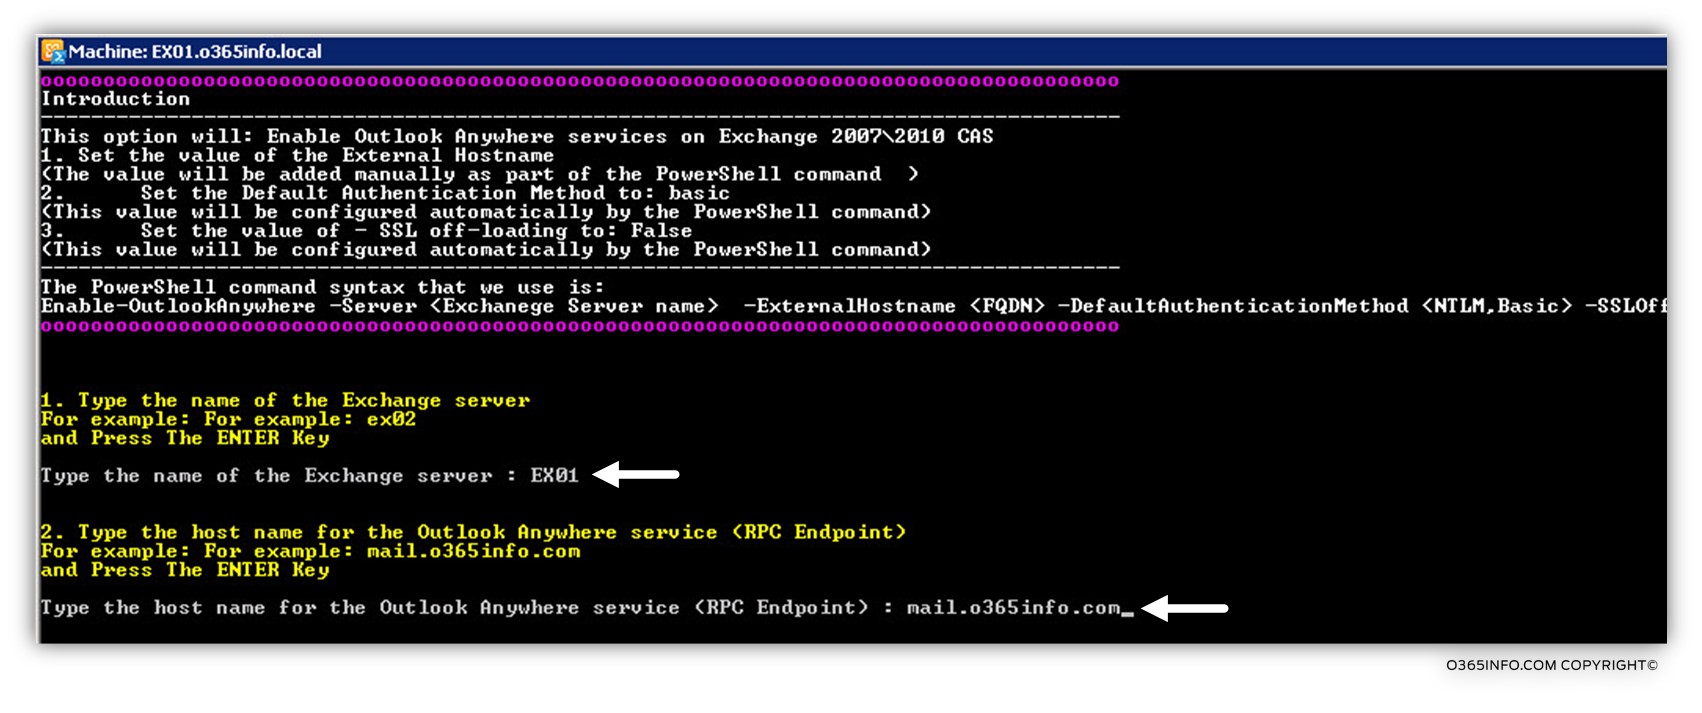
In the following screenshot, we can see an example to the parameters that we use of the PowerShell command.
- The first parameter is the Exchange CAS server whom we ask to address. In our example, we will enable the Outlook Anywhere setting on the Exchange CAS server named: EX02
- The second parameter, is the Hostname (RPC Endpoint name) that we want to assign to the Exchange CAS server. In our example, we will use the hostname: mail.o365info.com
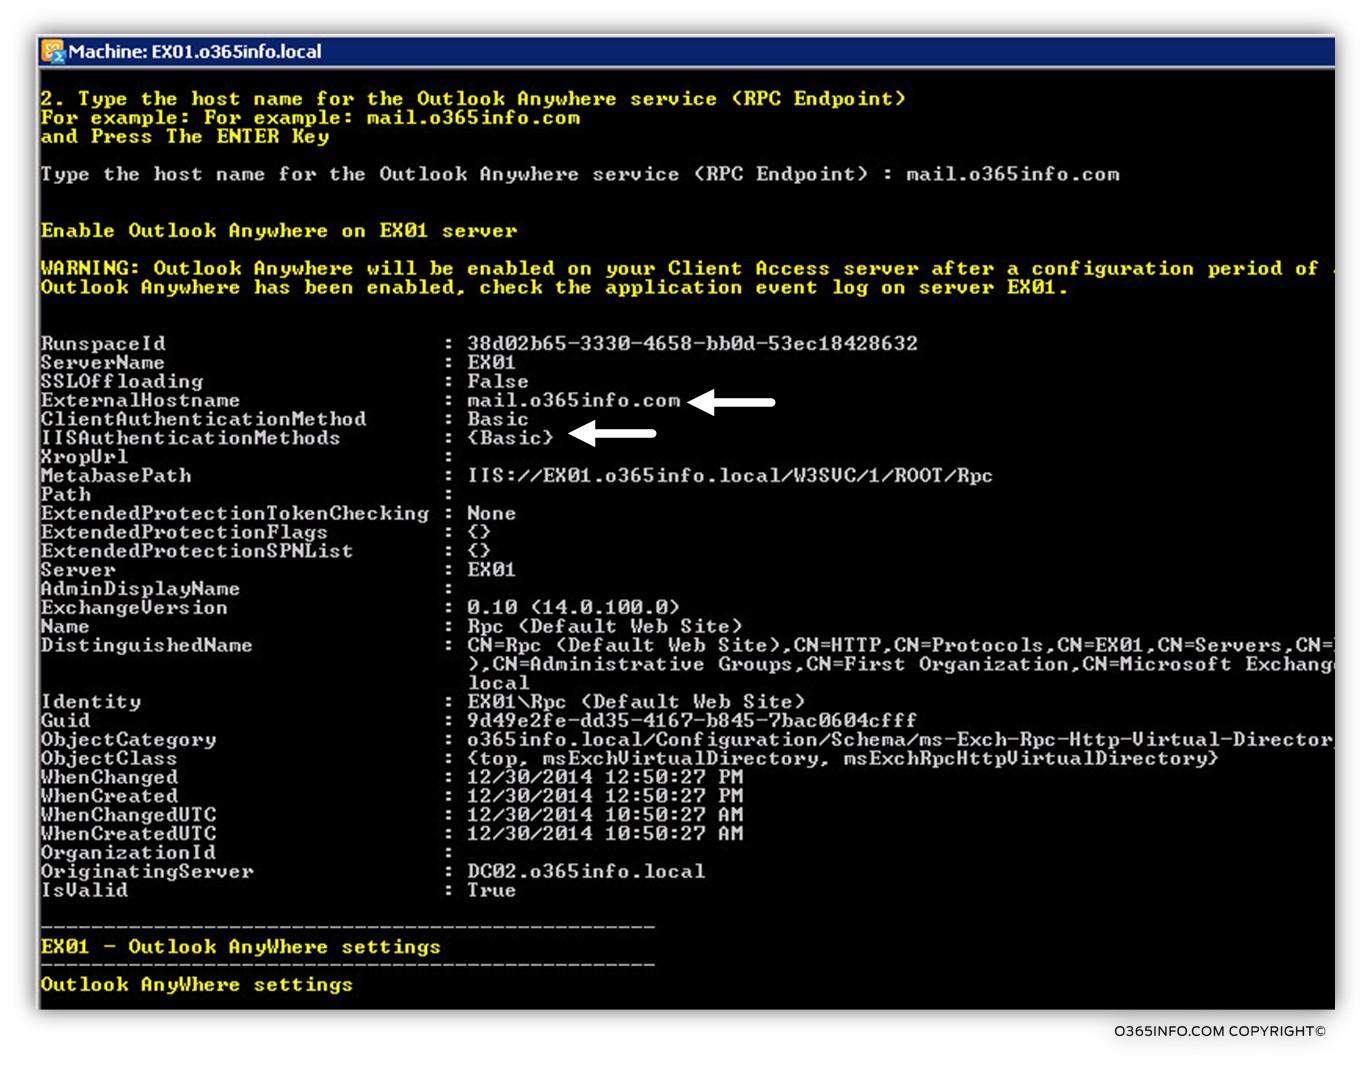
In the following screenshot, we can see the result of the “enable Outlook Anywhere setting” command.
We can see different parameters such as the: external host name (the RPC Endpoint name) and the various authentication methods.
Menu 7: Set Outlook Anywhere authentication settings on Exchange 2007/2010 CAS server
This menu used in the case that the legacy Exchange CAS server\s infrastructure already included support for Outlook Anywhere (RPC\HTTP).
In this case, we will not need to enable the Outlook Anywhere services, but instead, configure to existing Outlook Anywhere services with the required configuration setting in the Exchange 2013 coexistence environment.
| ExternalHostname | This is the “RPC Endpoint host name” whom the external + internal Outlook Anywhere Outlook clients will refer. The host name whom we will need to provide will be the “primary namespace” host name who is also “attached” to the Exchange CAS 2013. For example: mail.o365info.com |
| Exchange client authentication method (protocol) | The value of the – Default Authentication Method will be set to: Basic. Note – The value will be configured automatically by the PowerShell command. |
| IIS Authentication Method | The value of the – IIS Authentication Method will be set to: NTLM + Basic. Note – The value will be configured automatically by the PowerShell command. |
| A requirement for SSL | The value of the – Requirement for SSL will be set to: True Note – The value will be configured automatically by the PowerShell command. |
| SSL off-loading | The value of the – SSL off-loading will be set to: False |
Outlook Anywhere – Exchange 2013 CAS server Infrastructure
We use a dedicated section to the Outlook Anywhere configuration setting on the Exchange CAS 2013 server because, Exchange CAS 2013 include additional setting that are not include in previous version of Exchange CAS server\s.
For example – Exchange CAS 2013 can be configured to use the different server name for internal vs. external Outlook Anywhere client.
Menu 8: Set (configure) Outlook Anywhere settings on Exchange 2013 CAS server
The parameters that will be configured by this PowerShell command are:
| ExternalHostname | The RPC Endpoint host name whom the external Outlook Anywhere Outlook clients will refer.Note – the PowerShell command will set the RPC Endpoint host name based upon the value that was entered by the user. The value will be used for the ExternalHostname and the InternalHostname |
| InternalHostname | The RPC Endpoint host name whom the internal Outlook Anywhere Outlook clients will refer.Note – the PowerShell command will set the RPC Endpoint host name based upon the value that was entered by the user. The value will be used for the ExternalHostname and the InternalHostname |
| Exchange client authentication method (protocol) | The value of the – Default Authentication Method will be set to: Basic. Note – The value will be configured automatically by the PowerShell command. |
| IIS Authentication Method | The value of the – IIS Authentication Method will be set to: NTLM + Basic. Note – The value will be configured automatically by the PowerShell command. |
| A requirement for SSL | The value of the – Requirement for SSL will be set to: TrueNote – The value will be configured automatically by the PowerShell command. |
| SSL off-loading | The value of the – SSL off-loading will be set to: False |
The following command uses for setting the authentication setting of Exchange CAS 2013 in the following way:
- Exchange client authentication method (protocol) – will be automatically set to: Basic
- IIS Authentication Method (CAS to CAS) – will be automatically set to: NTLM and Basic
- SSL off-loading – the value will be automatically set to: False
- A requirement for SSL – the value will be automatically set to: True
This Post Has 0 Comments