In the current article, we will review the required configuration settings for implementing Force TLS…
Implementing Force TLS by using Transport rule & Conditional Mail Routing | Exchange online | Part 11#12
In the current article, we will review the option implementing the option of Force TLS using Exchange Transport rule & Conditional Mail Routing. The option of Conditional Mail Routing implemented by combining two different Exchange Online components:
- Exchange Online transport
- Exchange Online mail connector
Table of contents
Vs. the previous implementation of Force TLS by using “simple Exchange Online Transport rule”, which we have reviewed in the previous article, the option of Conditional Mail Routing enables us to define more complex level settings that relate to the TLS flow.
The Exchange Online Transport rule is responsible for defining the specific condition that needs to be realized. When the condition is realized, the TLS communication will be implemented by “activating” Exchange Online mail connector (outbound or inbound mail connector).
The Exchange Online mail connector, is responsible for configuring the specific Force TLS set with the “other mail server”. For example, a requirement for identification by providing a public certificate etc.
Force TLS using Exchange Transport rule & Conditional Mail Routing Scenario description
To demonstrate the use of Exchange Transport rule & Conditional Mail Routing, let’s use the following scenario:
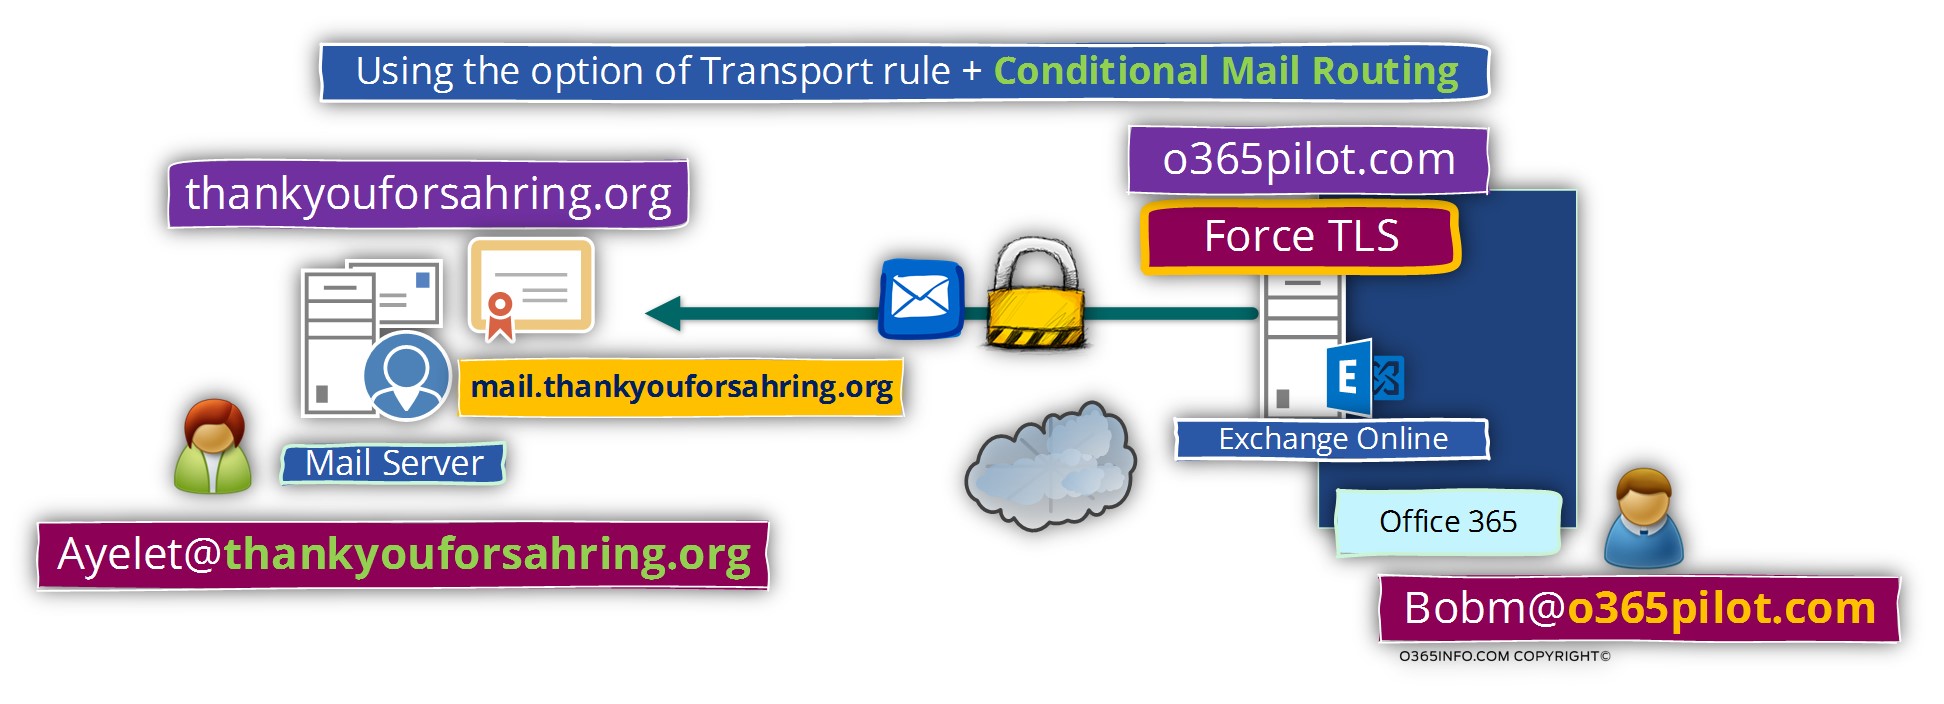
Our organization is hosted at Exchange Online and it represented by the public domain name – o365pilot.com
We have a business partner, which use the domain name – thankyouforsharing.org
Bob (Bobb@o365pilot.com is the account manager for our company, and we need to ensure that each time that Bob sends E-mail message to the account manager of our business partner, to a recipient named – Ayelet@thankyouforsharing.org, the mail communication must be implemented over a secure communication channel meaning -using TLS protocol for encrypting the communication line.
The business need in our scenario is to configure Exchange Online Outbound connector that will enforce the following requirements:
When the Exchange Online server needs to send E-mail message to a recipient with a domain name – thankyouforsharing.org, the Exchange Online server will “agree” to create the mail flow only when the following terms will be fulfilled:
- The mail communication will need to be implemented by using encrypted communication line (TLS).
- The “external server” (Exchange on-Premises) must support TLS.
- The “external server” (Exchange on-Premises) must identify himself using a trusted public certificate.
- The public certificate of the “external server” must include a specific hostname who will approve the identity of the mail server – o365pilot.com
- In the first phase, we will create a custom Outbound connector that will include all the required configuration settings for the Force TLS flow with the mail server that represents the thankyouforsharing.org organization.
- In the second phase, we will create a custom Exchange Online Transport rule that will include the condition (E-mail message that is sent by Bob to Ayelet@thankyouforsharing.org), then we will “bind” the Transport rule to the Outbound connector that was created in the previous phase.
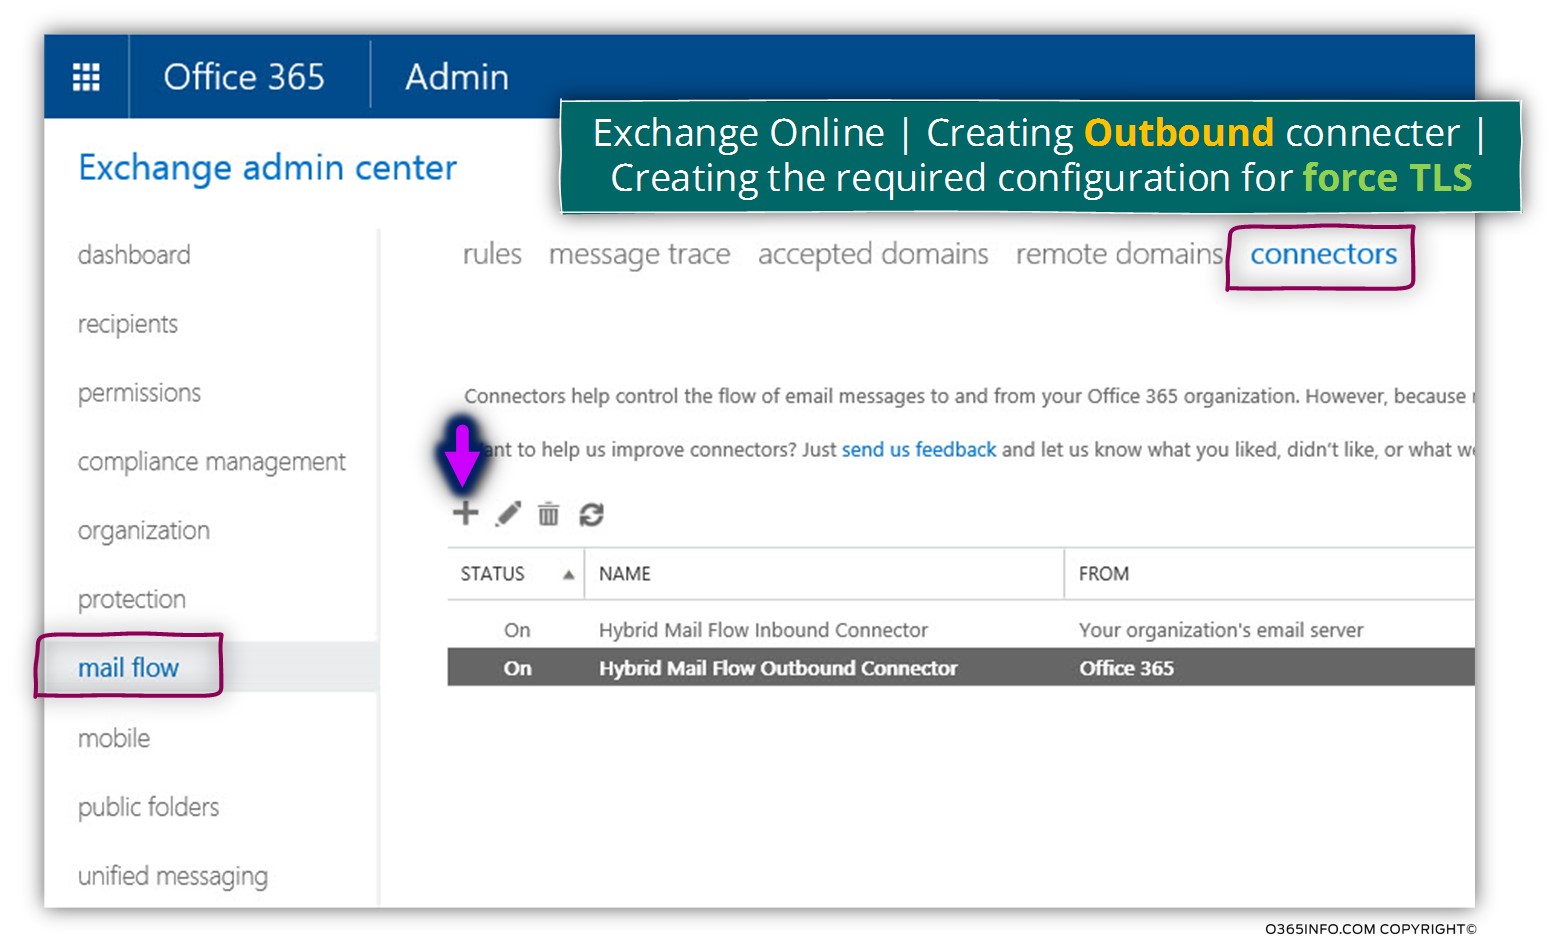
Step 1#2 – Exchange Online | Creating and configuring Outbound connector | Using force TLS
To create the require Exchange Online outbound connector we will use the following steps:
- Login to Exchange Online admin center
- On the left bar menu, choose the mail flow
- On the top bar menu, choose the connectors
- Click on the plus sign to create a new mail connector
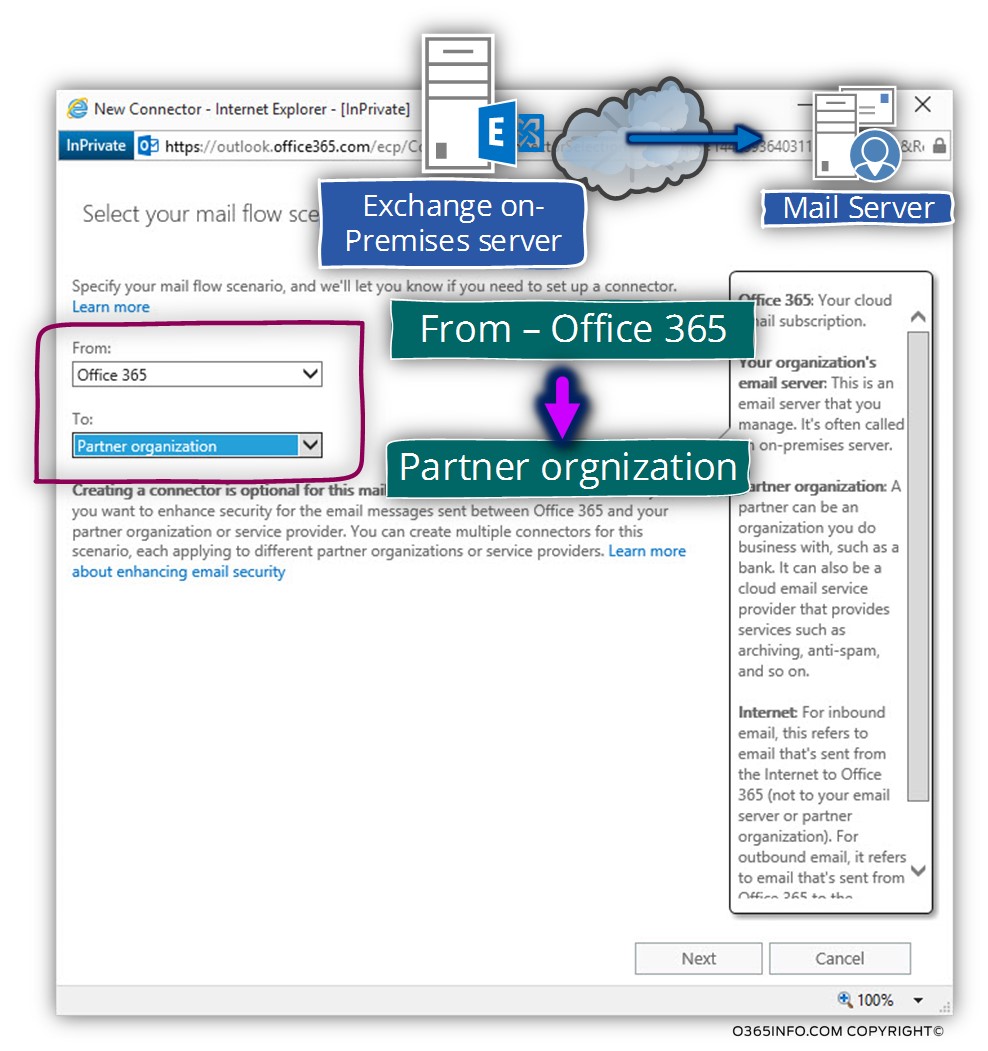
We need to configure the mail flow, of the mail that sent from Exchange Online to “the other side”.
In the From: option box choose – Office 365
In the To: option box choose – Partner organization
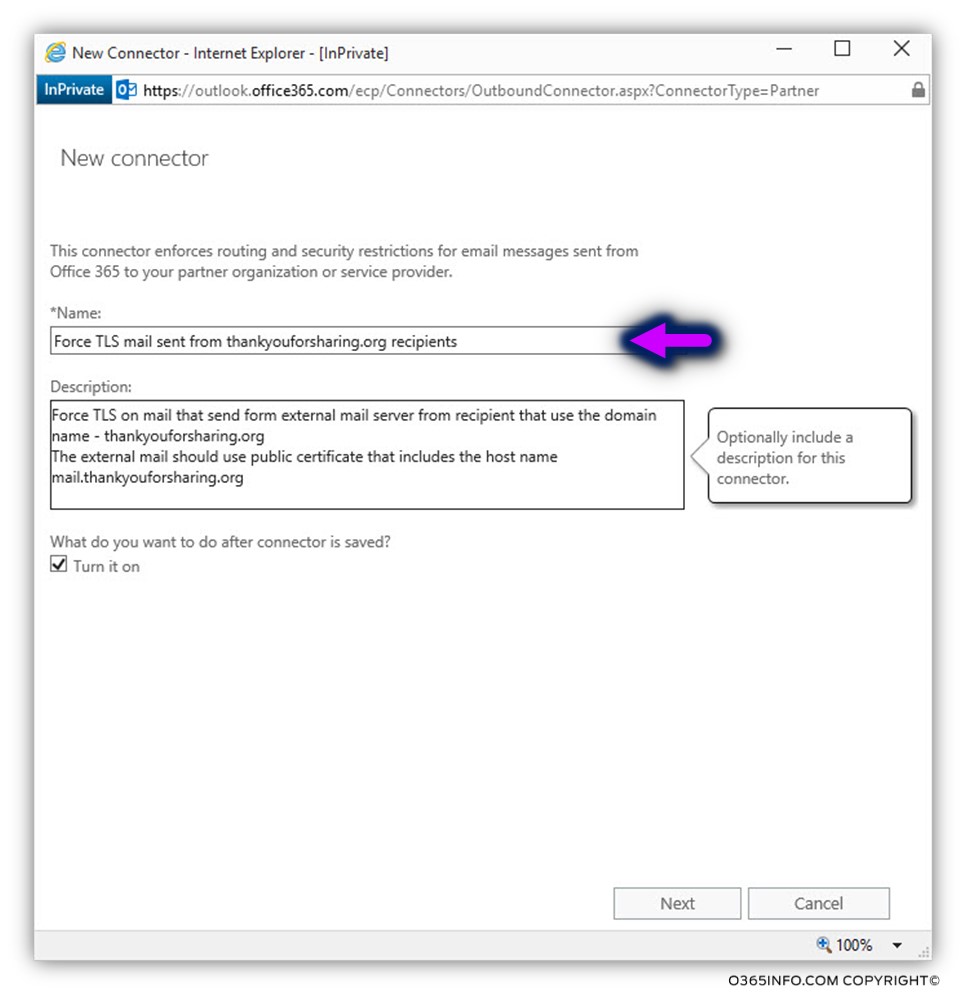
In the *name text box, write the name that is suitable for your needs.
My recommendation is to use a descriptive name + description so in the future, in the case of a troubleshooting process, it would be easy to understand the purpose of a particular mail connector.
From the next screen, we will select the option – Only when I have a transport rule set up that redirects messages to this connector
The meaning of this option is that – we “mark “or, “flag” the Exchange Online Outbound connector as a connector that can be used by an Exchange Transport rule.
Later, in the section Step 2#2 – Implementing Force TLS using Transport rule & Conditional Mail Routing , in which we will explain how to “bind” the Outbound connector to a specific TLS transport rule, we will see this connector in a list of optional connectors that we can choose from.

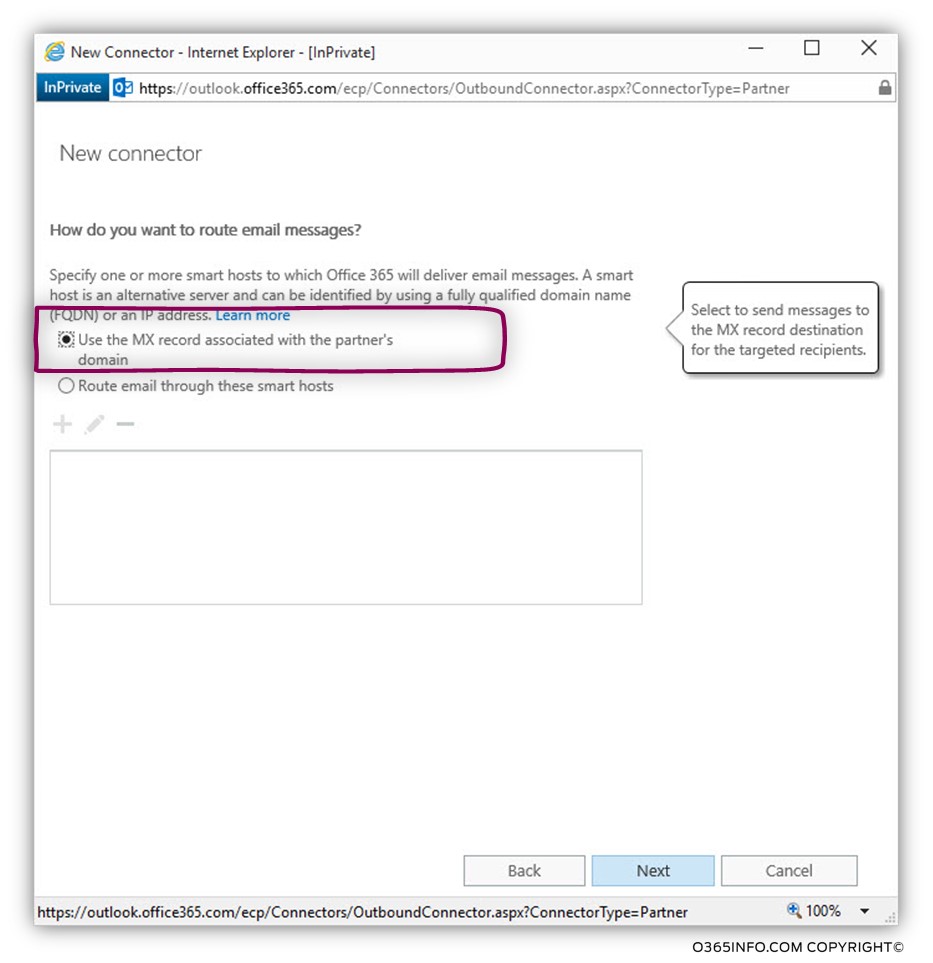
In the next screen, we will need to decide, how to “locate” the destination mail server.
We can choose between two options.
- MX record – a method in which the Exchange Online server, will query DNS server looking for an MX record for a specific destination domain name.
- Smart host – a method in which we “enforce” our mail server to address a specific IP address or specific host name.
In our scenario, we will choose the option of MX record: Use the MX record associated with the partner’s domain.
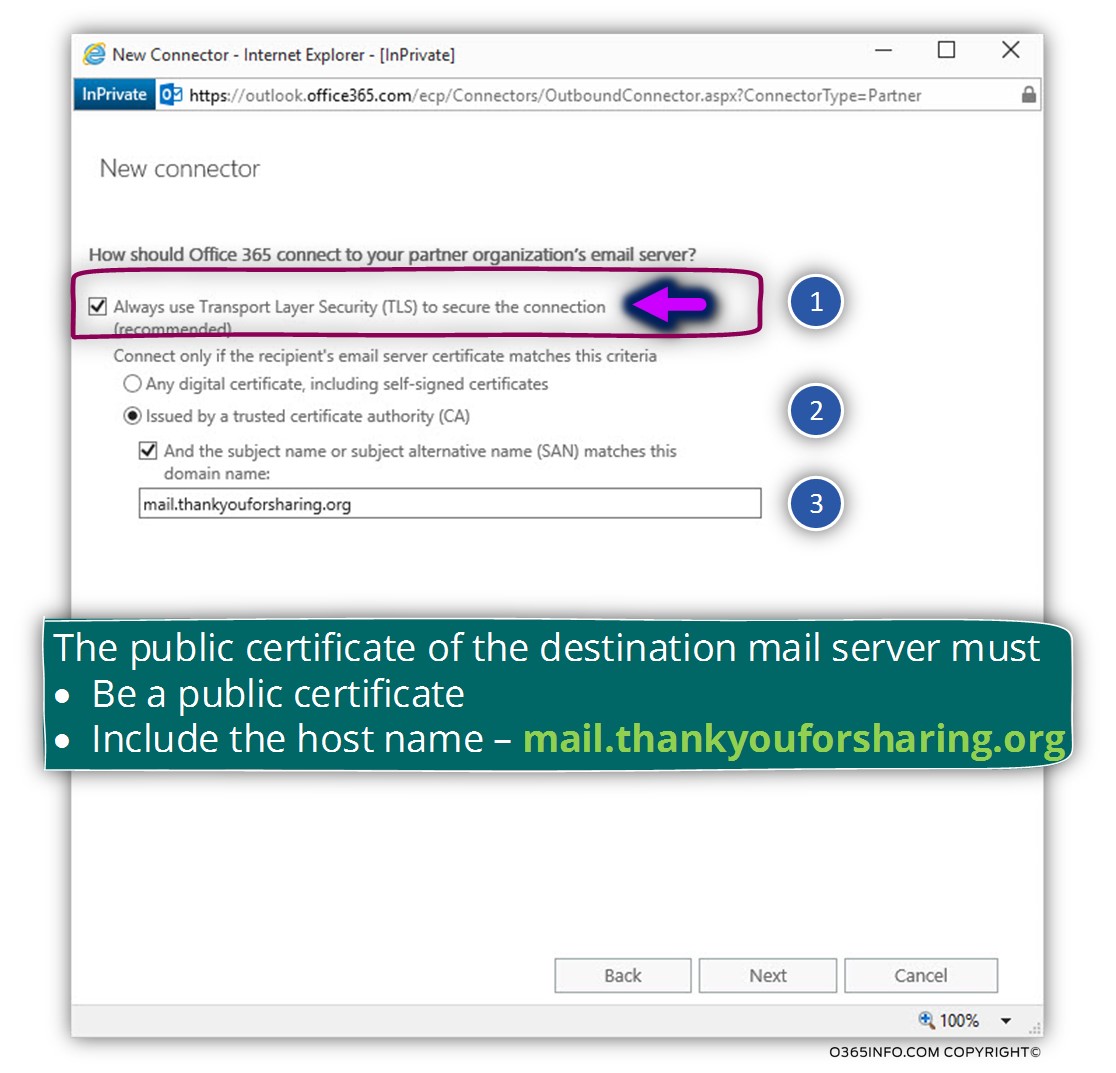
In the next screen, we will configure the option of Force TLS + decide how Exchange Online should identify the “destination mail server”.
In our particular scenario, we need to implement the most restrictive security requirements that include the following parameters:
- The mail flow must be implemented by using TLS.
- That the “other mail server”, will need to prove his identity by providing a public certificate that was created by a trusted CA.
- The certificate that the “other mail server” provides, must include the hostname – thankyouforsharing.org
1. Choose the option – Always use Transport Layer Security (TLS) to secure the connection (recommended).
This is the part in which we instruct Exchange Online to use Force TLS
2. In the section Connect only if the recipient’s email server certificate matches this criterion, we will choose the option of – Issued by a trusted certificate authority (CA)
This is the part in which we instruct Exchange Online, to approve the mail communication only if the “other mail server” can provide a public certificate.
3. In addition, we will choose the option: And the subject name or subject alternative name (SAN) matches this domain name.
In our specific scenario, the destination mail server that represents the domain name – thankyouforsharing.org, we have to provide a pubic certificate that includes the host name – thankyouforsharing.org
This is the part in which we instruct Exchange Online, to approve the mail communication only if the certificate that the “other mail server” provide includes a particular host name.
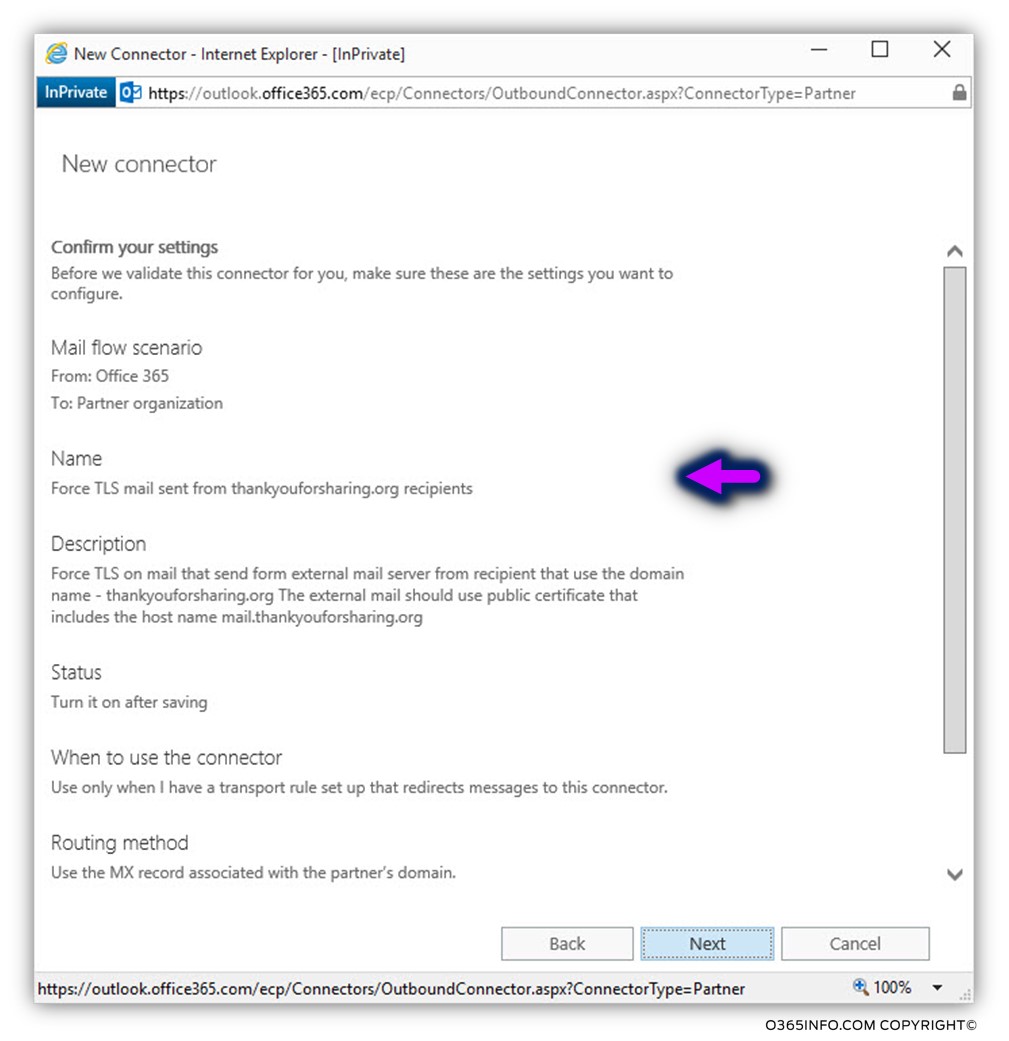
On the next screen, we can see a summary of the configuration settings.
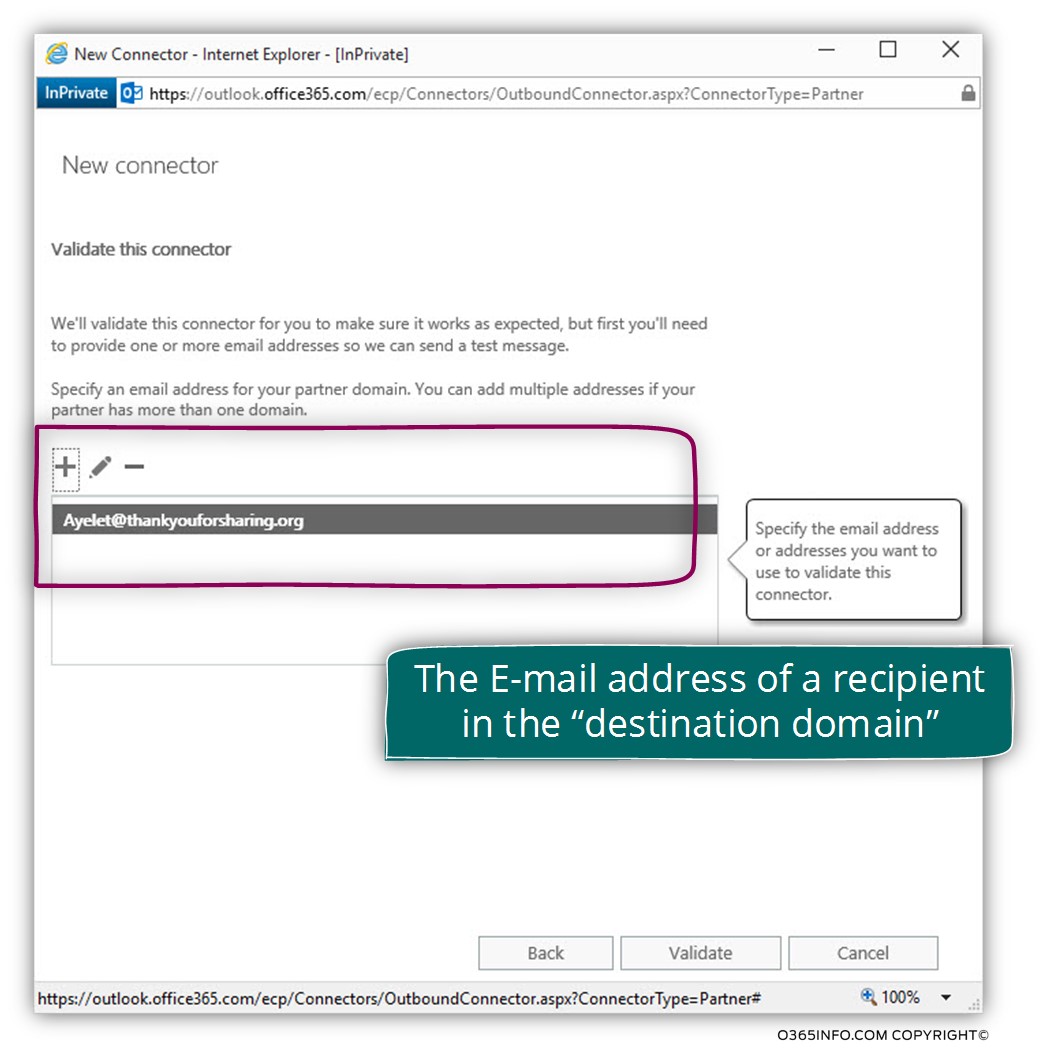
The next screen serves for using a “test procedure”, in which Exchange Online will try to send an E-mail message to a recipient from the “destination domain”, that appear in the transport TLS rule that created.
Quick reminders, the Exchange Online TLS transport rule, relates to a scenario in which mail sent to an external recipient who uses the E-mail address – Ayelet@thankyouforsharing.org
In our specific scenario, we will use the E-mail address – Ayelet@thankyouforsharing.org
Notice that the requirement for creating the test E-mail is “mandatory.”
You cannot complete the Outbound connector configuration without completing the test mail.
After the completion of the “test phase”, you would be able to save the Outbound connector settings.
Click on the plus sign and add the E-mail address of the “destination recipient”.
Exchange Online will try to verify if he can send an E-mail to the “destination recipient” using TLS and try to check if the mail server of the “target recipient” meets the conditions of the identification.
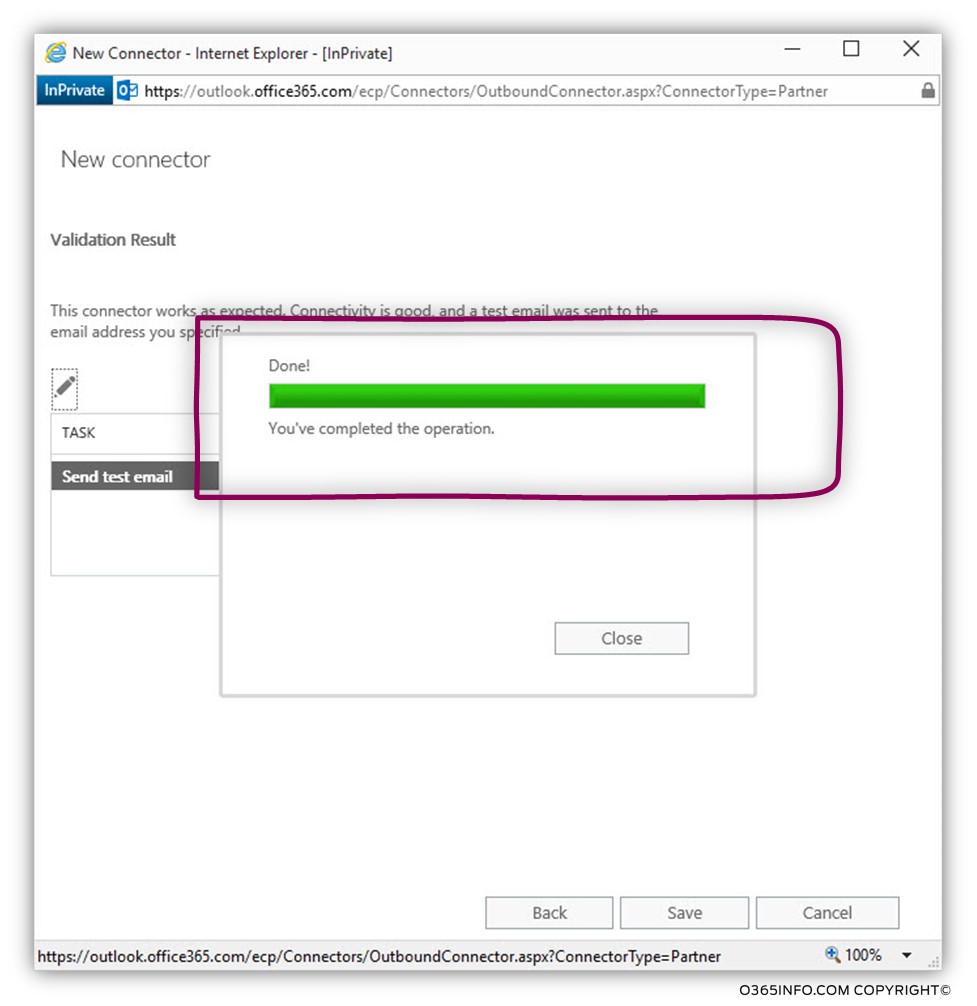
On the next screen, we can see that the – “test E-mail,” was completed.
Note that the fact that the “test E-mail” phase completed, doesn’t mean that the E-mail successfully sent to the destination recipient.
On the next screen, we will be able to know if the E-mail reaches his destination or not.
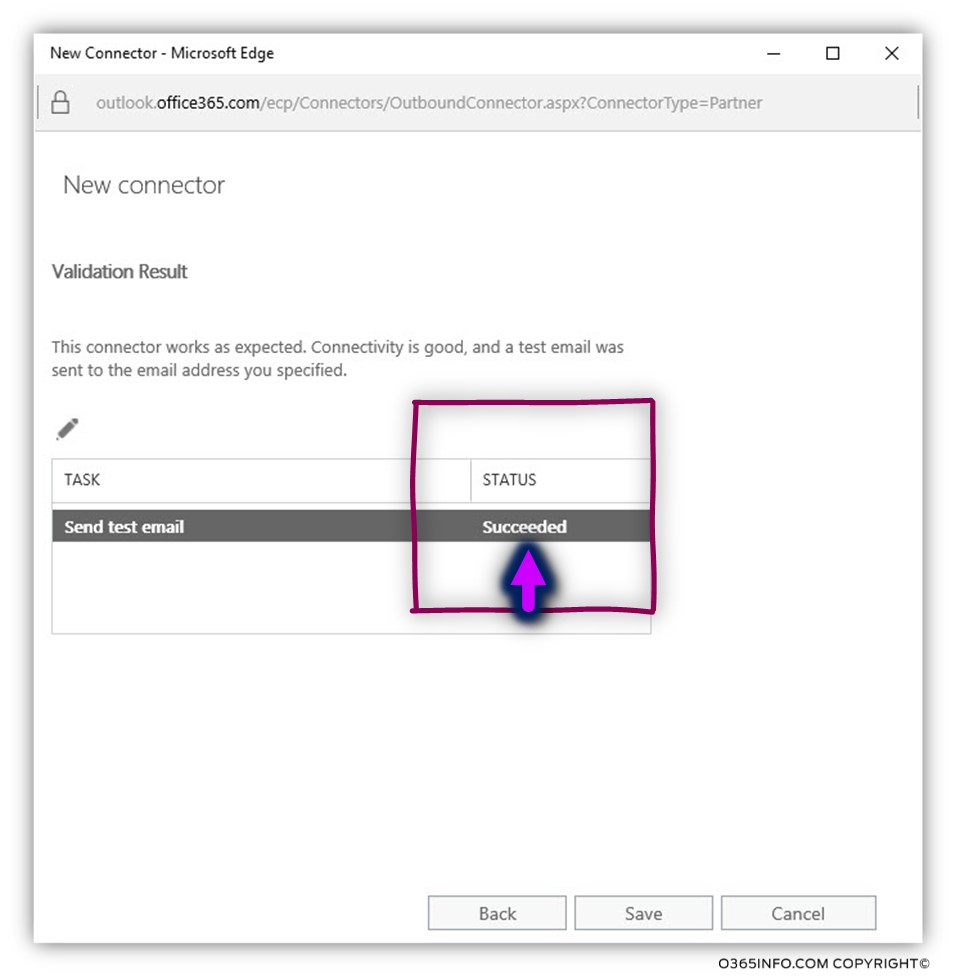
On the next screen, we can see that the “mail test” was successfully completed (Succeeded).
The meaning is that:
- The destination mail server that represents the domain name thankyouforsharing.org was located by using the MX record.
- The destination mail server that represents the domain name thankyouforsharing.org support TLS.
- The destination mail server that represents the domain name thankyouforsharing.org has a valid public certificate + the certificate includes the required hostname (mail.thankyouforsharing.org).
In the case that we want to get additional details about the mail flow, we can choose the pencil icon.
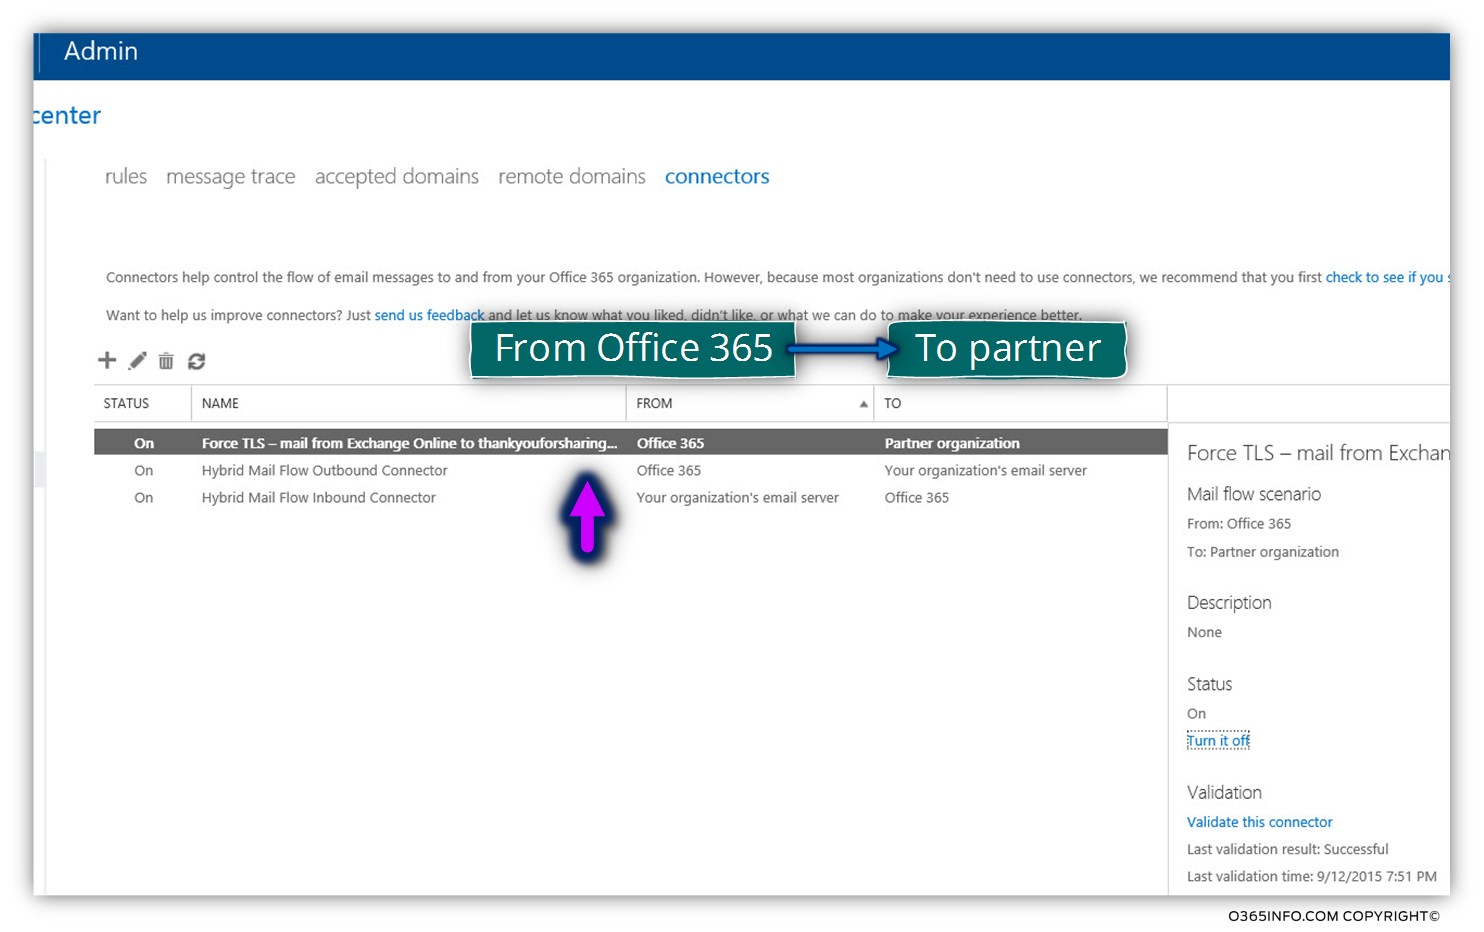
In the following screenshot, we can see the result. A new Outbound connector was created.
We can understand that this is an “Outbound connector” because, under the “FROM” section, we can see that the source is – Office 365 and the “TO” is partner organization.
Step 2#2 – Implementing Force TLS using Transport rule & Conditional Mail Routing
In the current section, we will review the required steps that we need to implement for creating the configuration of Force TLS, using Transport rule & Conditional Mail Routing.
Just a quick reminder, in the previous step, we have created an Exchange Online Outbound connector that includes all the “Force TLS settings” that we need to send E-mail address to our business partner organization (thankyouforsharing.org).
In the current phase, we will create an Exchange Online transport rule that will deal with the “condition” that needs to fulfill to activate the transport rule.
In our scenario, the condition is – mail that sent from Bobb@o365pilot.com to the destination recipient Ayelet@thankyouforsharing.org must be based on a secure channel using TLS.
We will need to “bind” this “condition” in the Exchange Online transport rule to an Exchange Online Outbound outgoing mail connector.
The Exchange Online Outbound outgoing mail connector, will deliver the E-mail message using TLS (and will need to identify the destination mail server).

The implementing of “forwarding” the E-mail message to mail connector based on a specific condition described as – Conditional Mail Routing
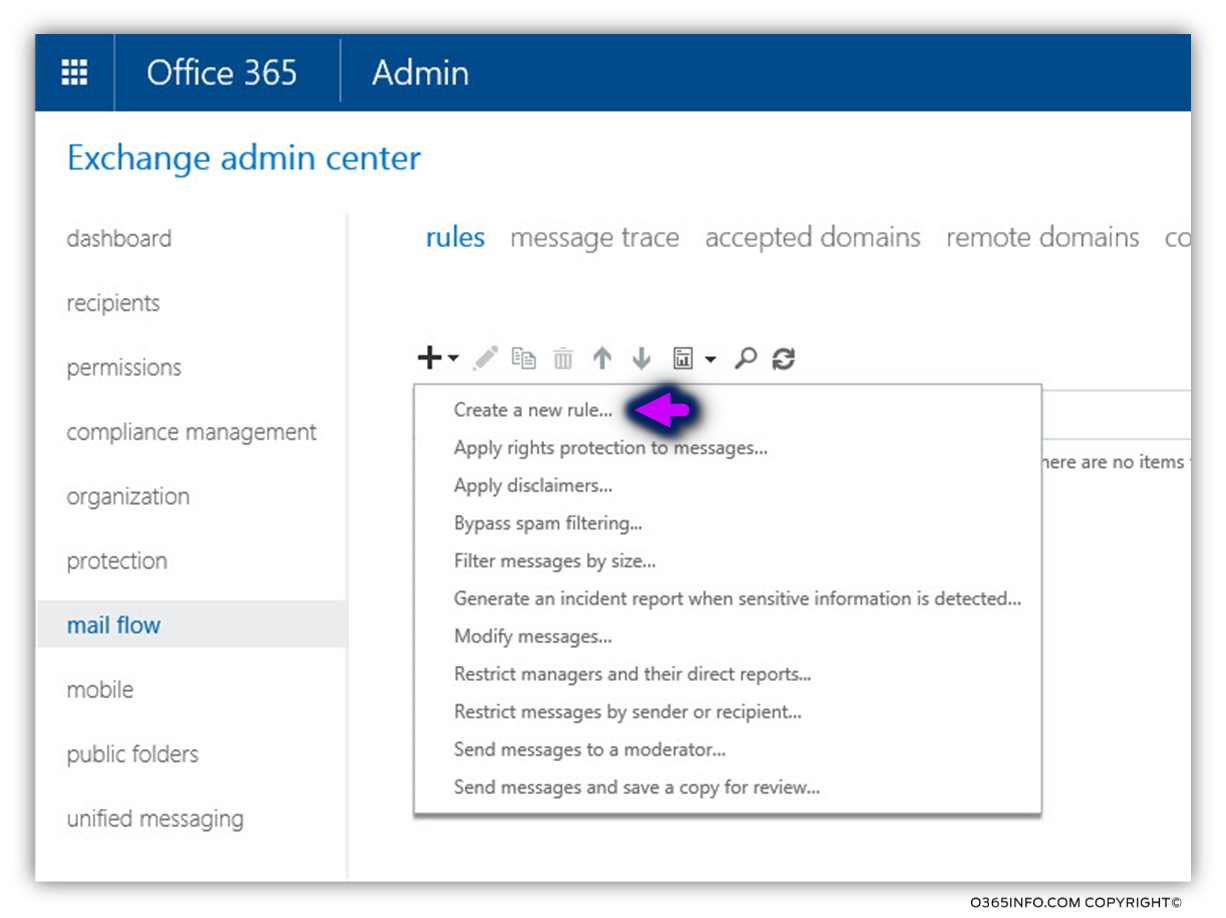
The steps that need to implement for creating Transport rule and Conditional Mail Routing are as follows:
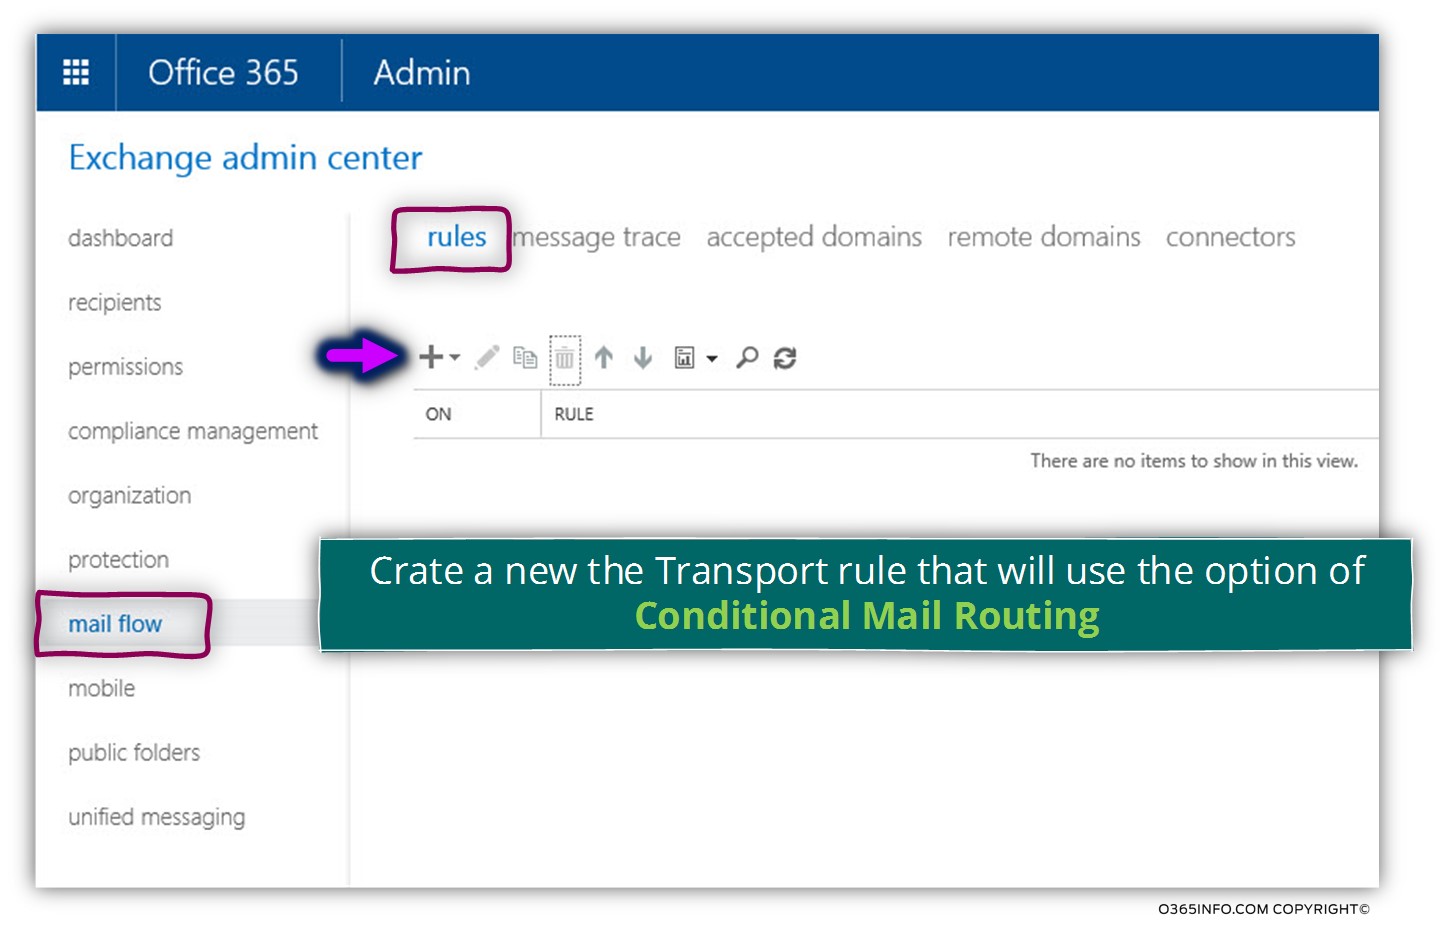
- Login to Exchange Online admin center
- On the left bar menu, choose the mail flow
- On the top bar menu, choose the rules
- Choose the plus icon for creating a new Transport rule
Choose the option – Create new rule…
In the *Name text box, write the name that is suitable for your needs.
- In the option box – Apply this rule if…, choose the option. The sender is….
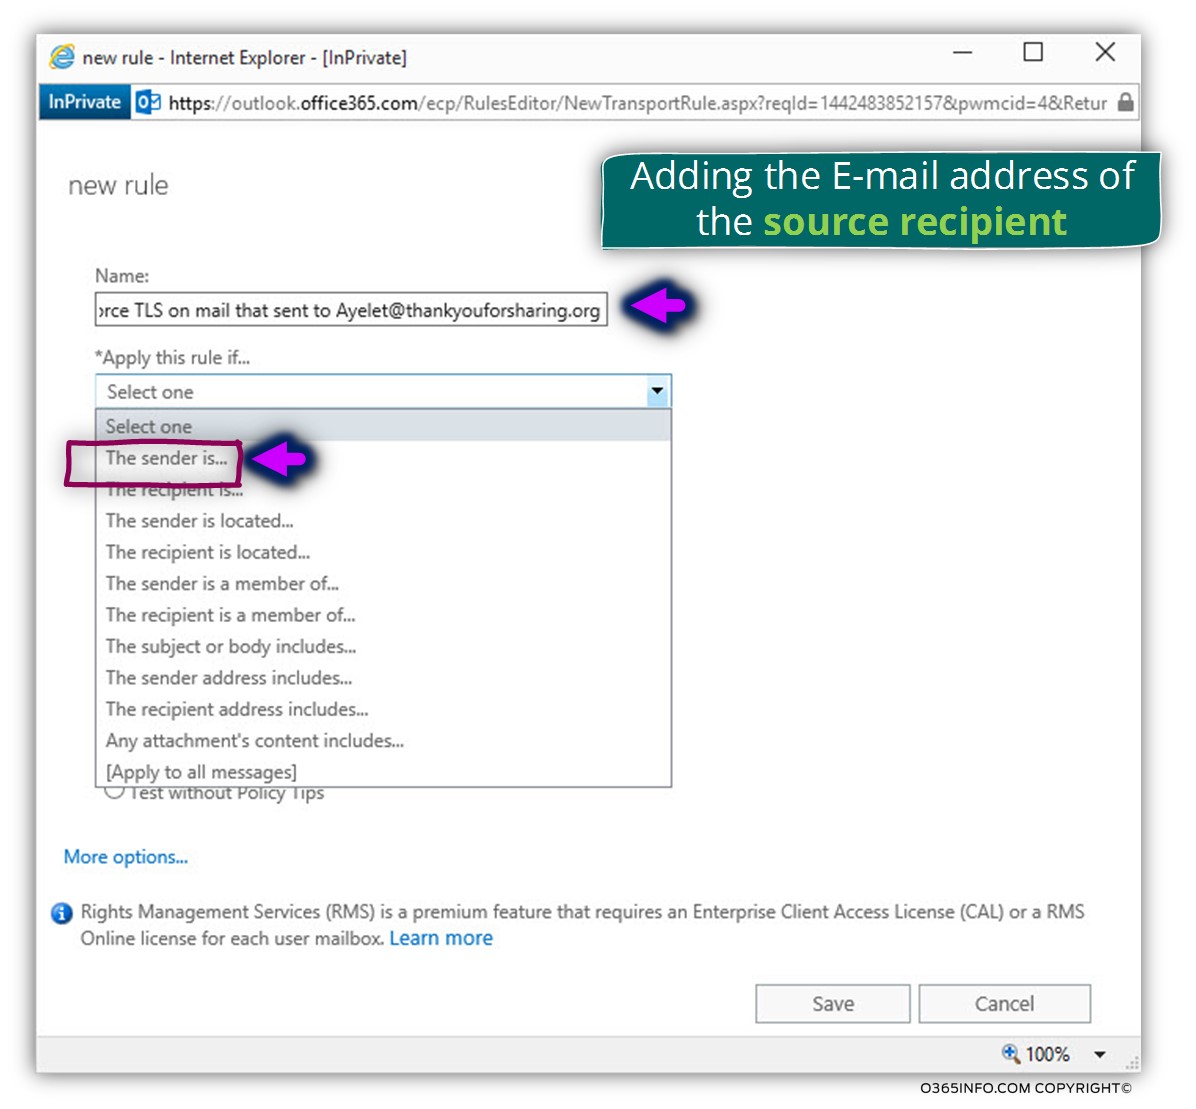
In our specific scenario, the “source recipient” is Bob. Choose the required recipient name and click on the add-> button to add the recipient name that was selected.

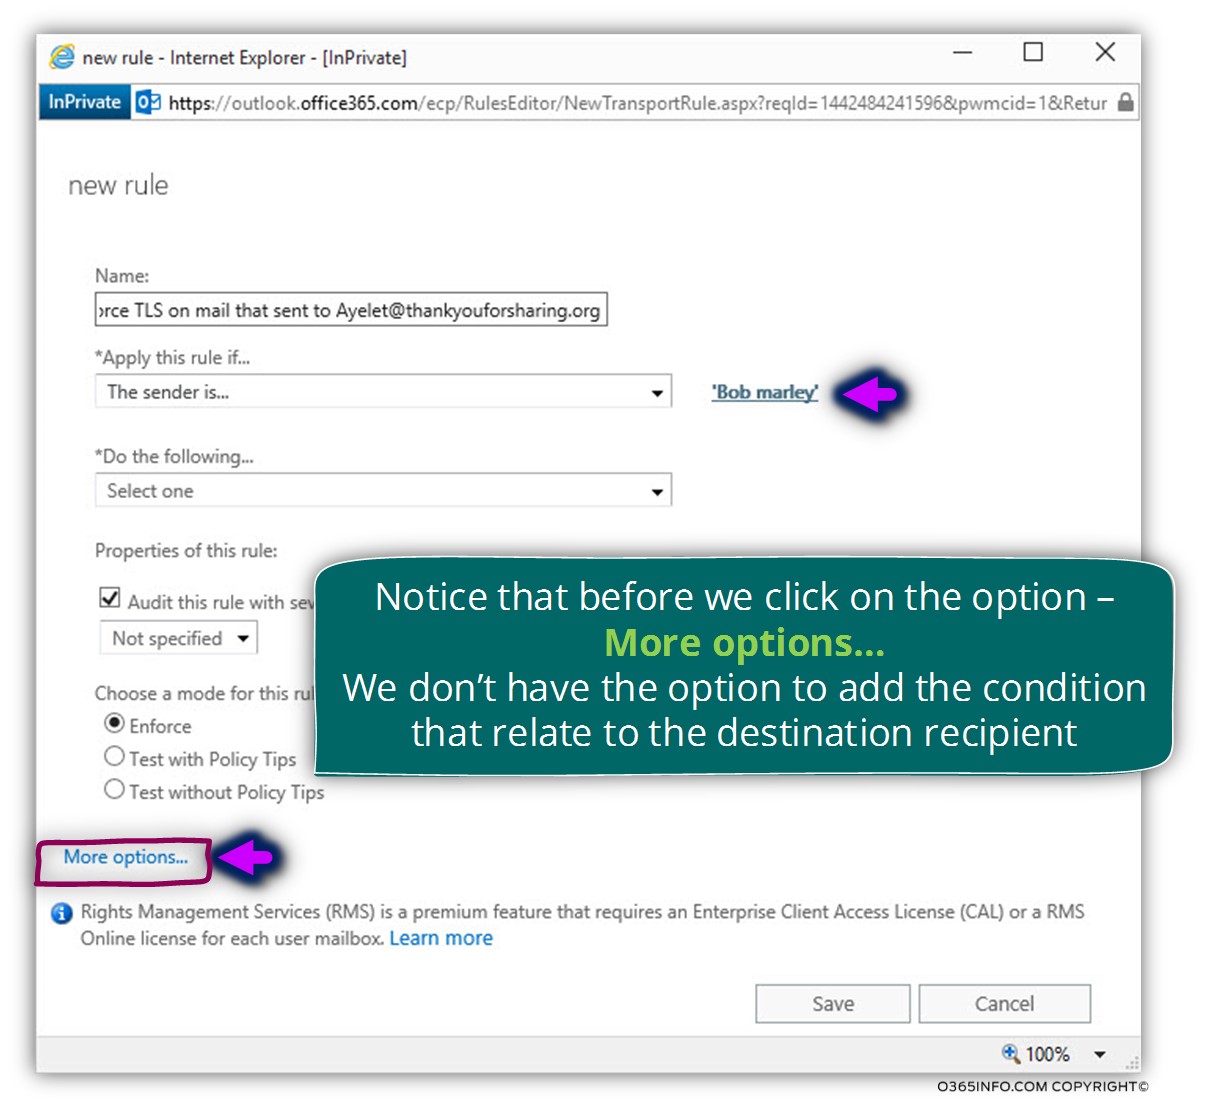
An important issue that I would like to emphasize is that the Exchange Online transport rule wizard interface is a little tricky!
By default, the wizard interface of the transport rules will display only a limited set of options.
To “reveal” the additional options that are available, click on the More options… link
In our specific scenario, we want to continue the “condition” of the transport rule by adding the “destination recipient” – Ayelet@thankyouforsharing.org
In the following screenshot, we can see that before we click on the More options… link, there is no option to add an additional step to the transport rule condition.
In the following screenshot, we can see that after we click on the More options… link we see an additional box named – and
Click on the and box and, choose the option – The recipient and in the sub menu choose is this person
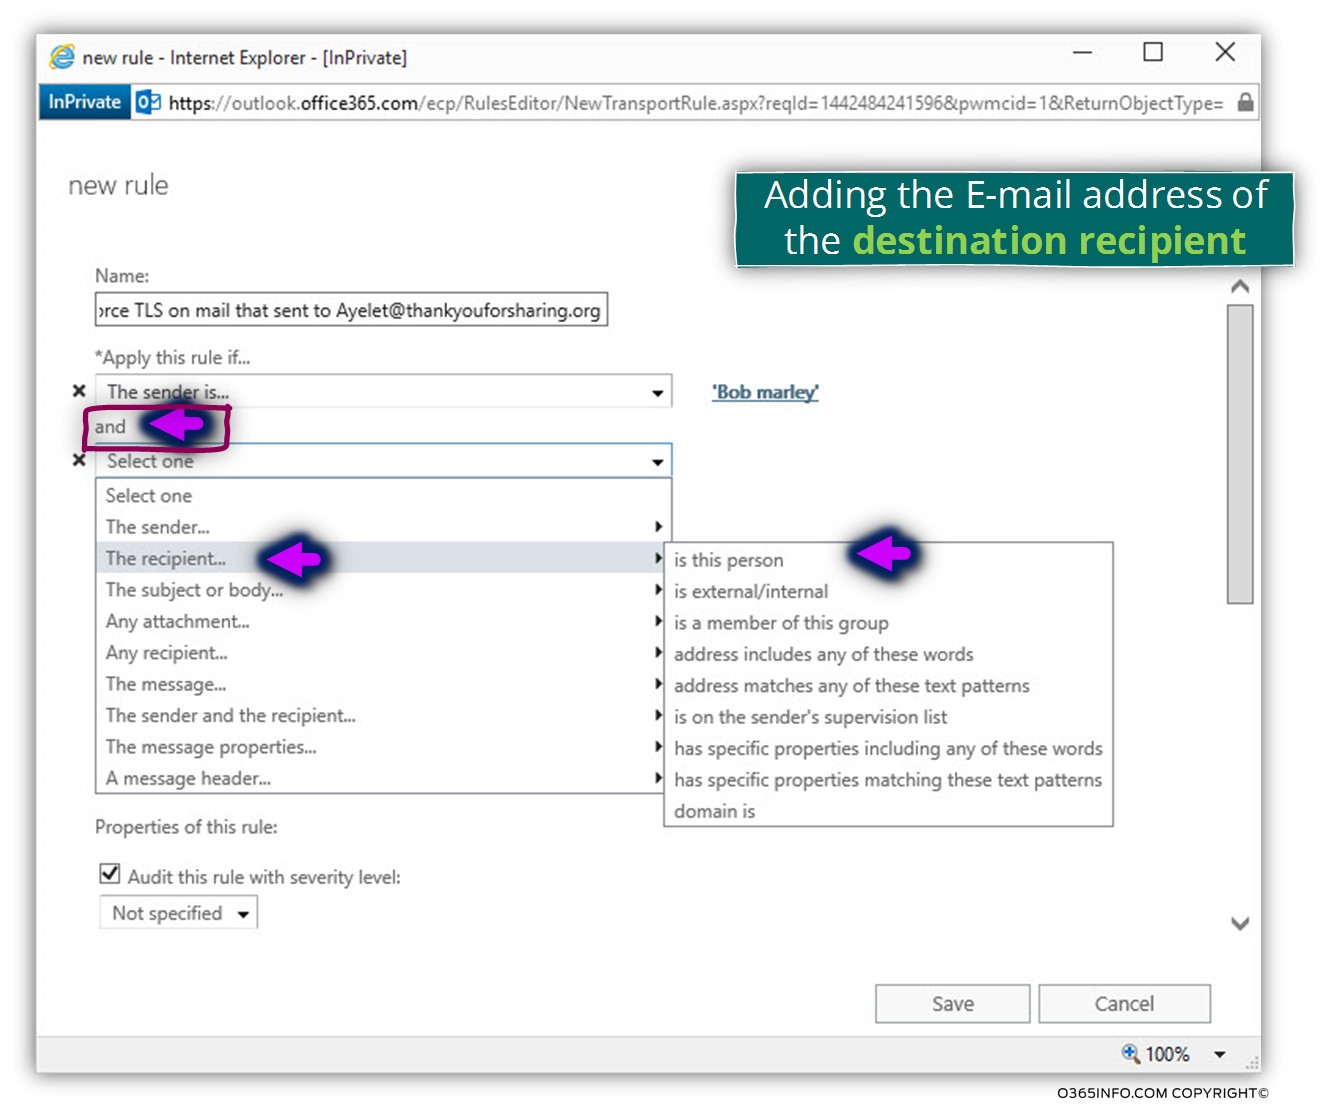
Most of the times, in case that the destination recipient is an external recipient, the recipient name will not appear in the GAL (Global address list).
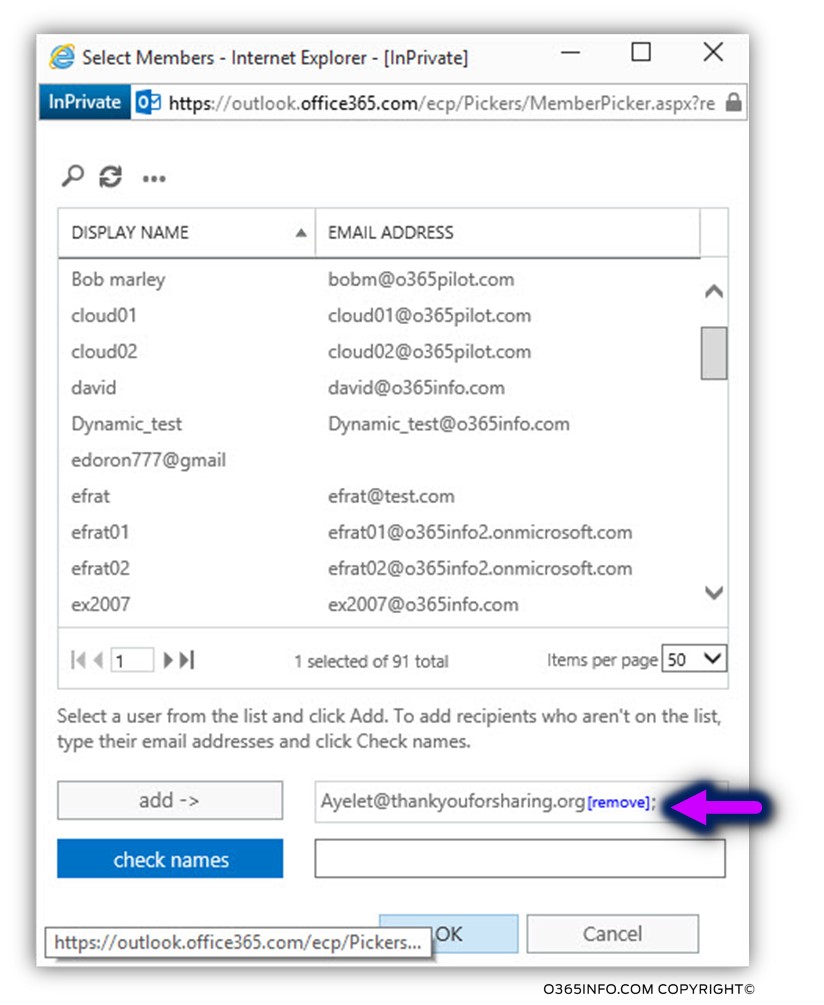
To be able to add the E-mail address of the destination recipient, we will write the E-mail address in the check names text box and then click on the check names button.
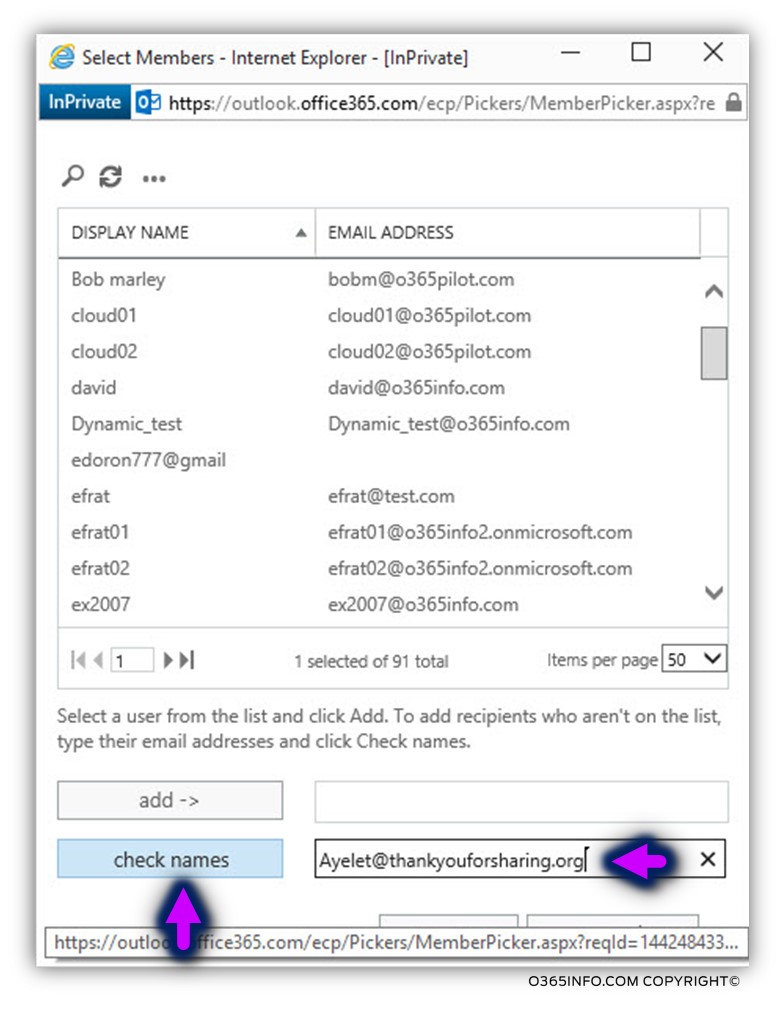
After we click on the checks names, the recipient name will appear in the add box
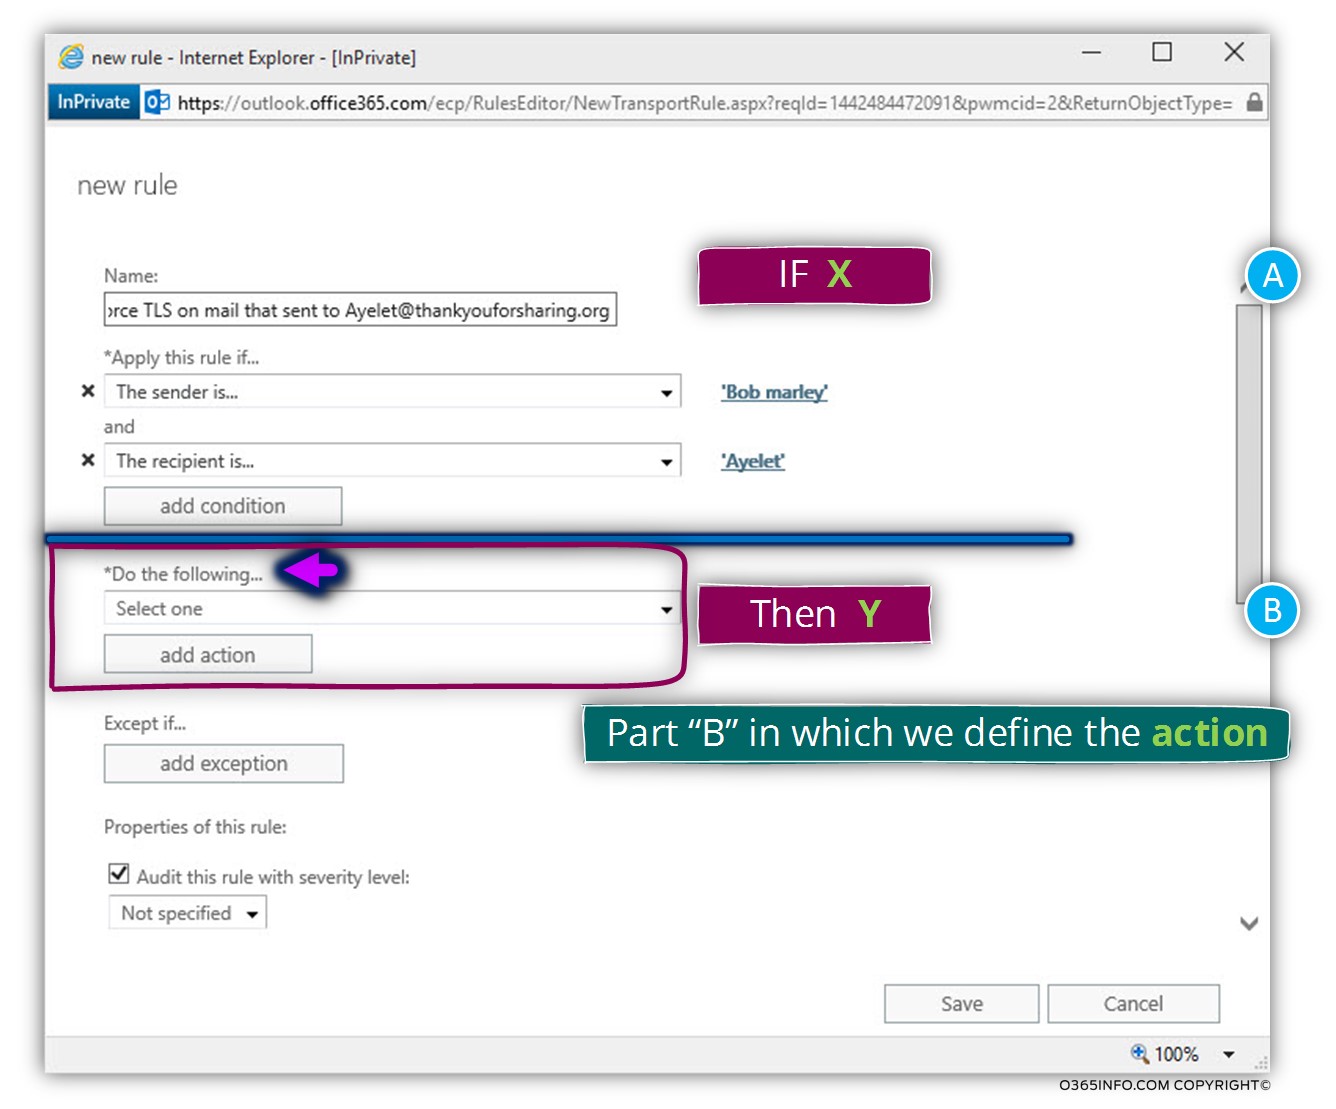
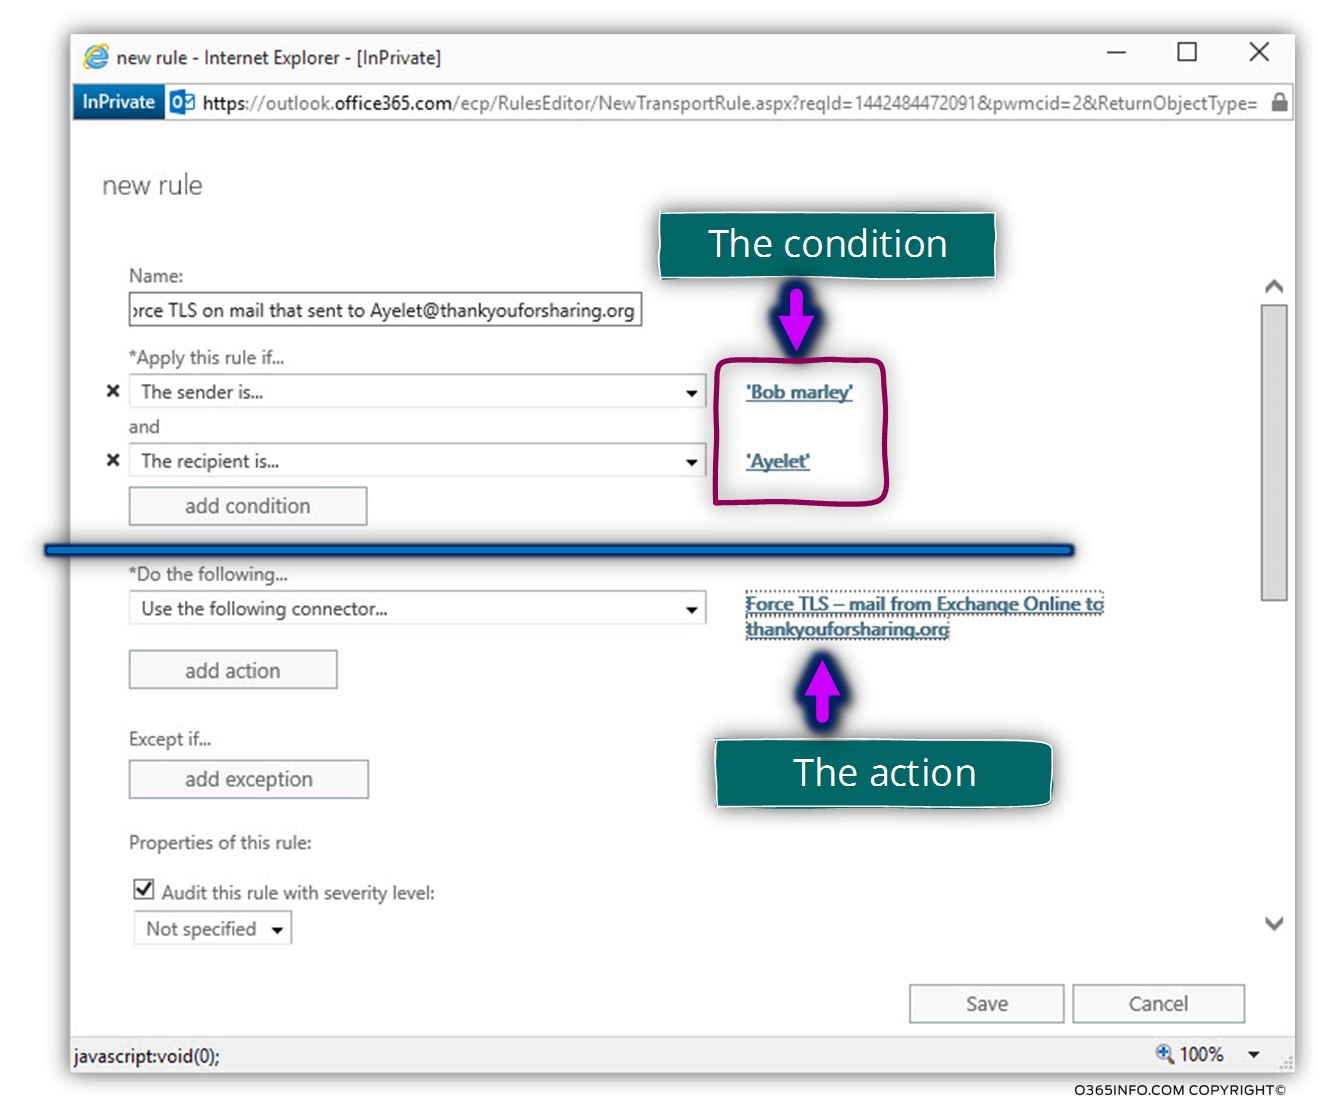
Until now, we have configured the first part of the Exchange Online transport rule, the part which defines the “condition” (IF X).
Now, we are getting to configure the second part which defines is the “action” (THEN Y).
Choose the option box – *Do the following…
Choose the option – Redirect the message to… and in the sub menu choose the option – the following connector
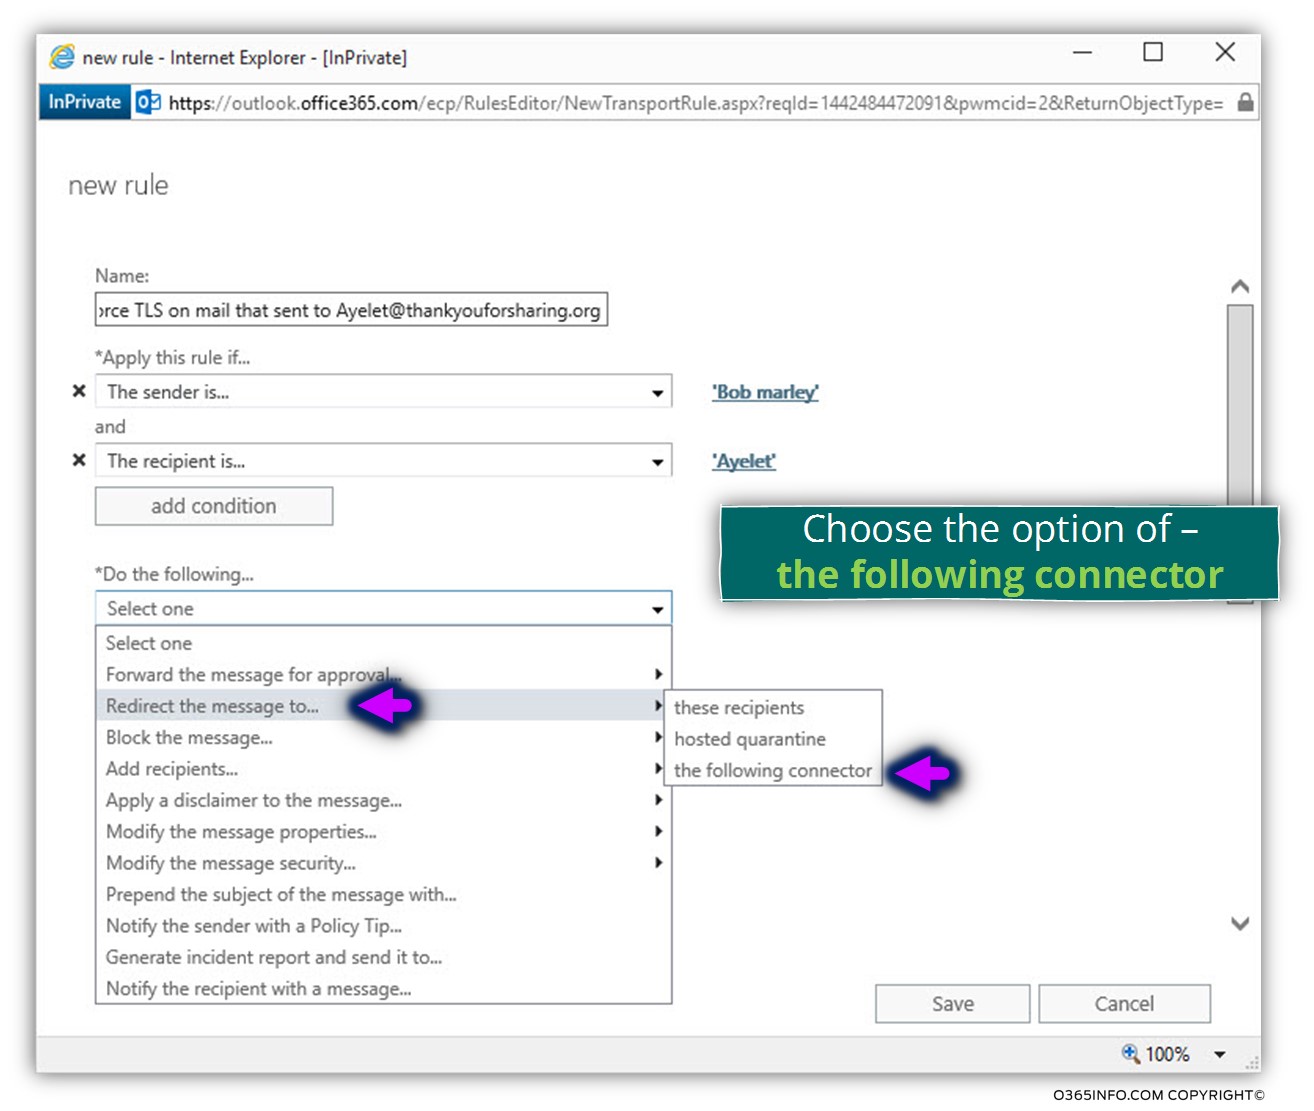
The list that appears, will include all the Exchange Online mail connector that was configured using the option on – Only when I have a transport rule set up that redirects messages to this connector (that was configured in the previous step).
In our specific example, we will choose the Exchange Online Outbound connector that was configured with the required setting for using Force TLS and identify the destination mail server that represents the domain thankyouforsharing.org
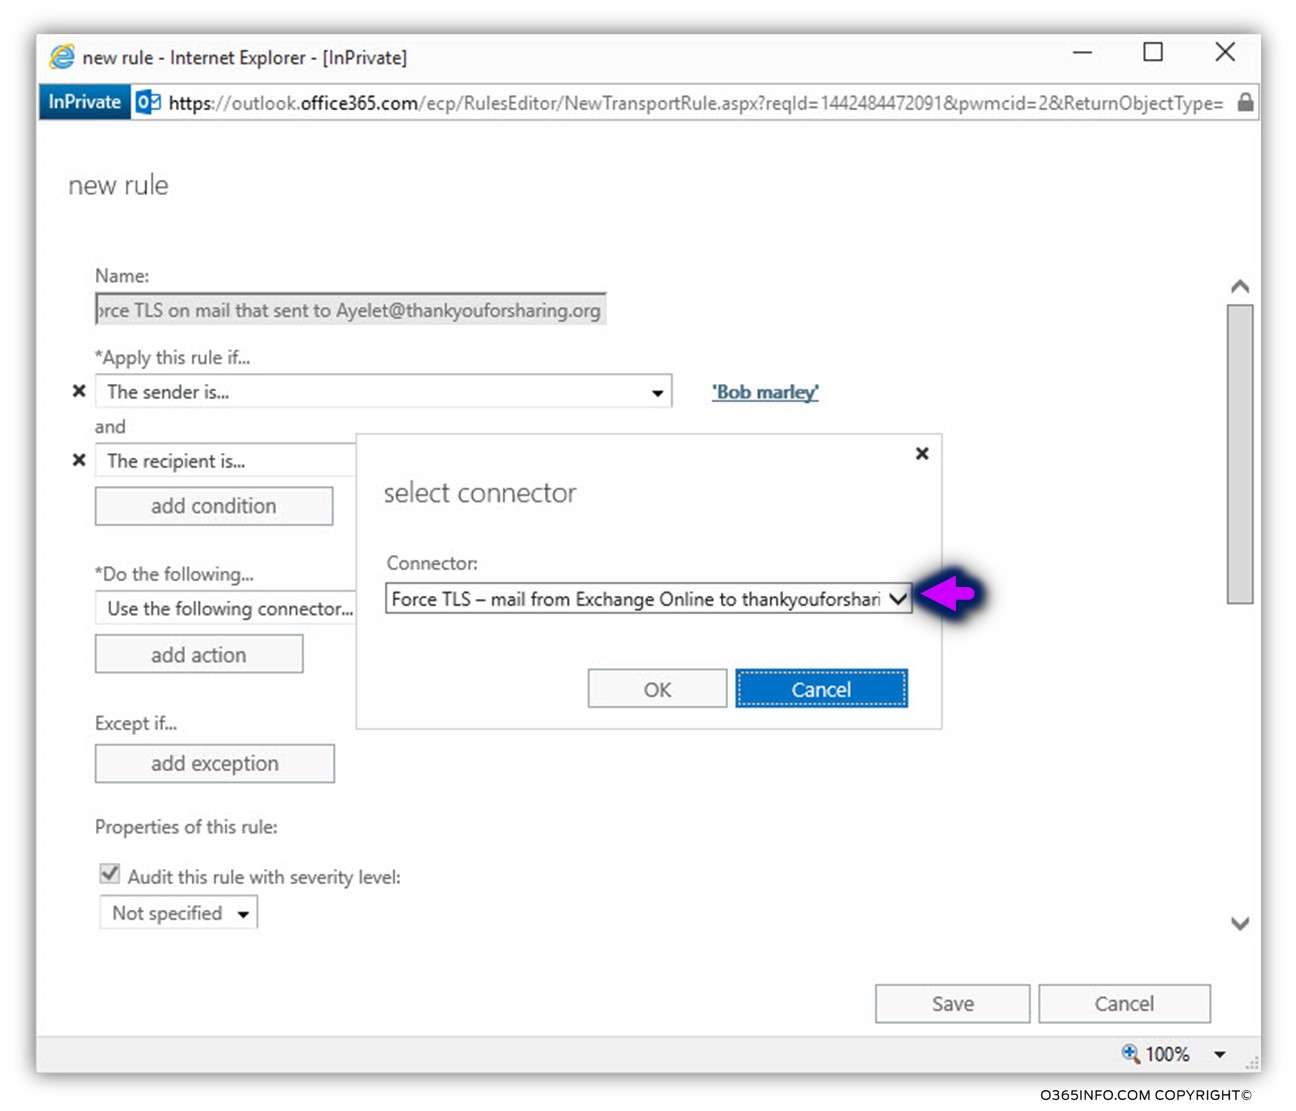
In the following screenshot, we can see the result.
The “top part” of the Exchange Online Transport rule defines the condition.
The “bottom part” describes the action – route the E-mail message via Exchange Online mail connector.
Verifying the Conditional Mail Routing Transport rule
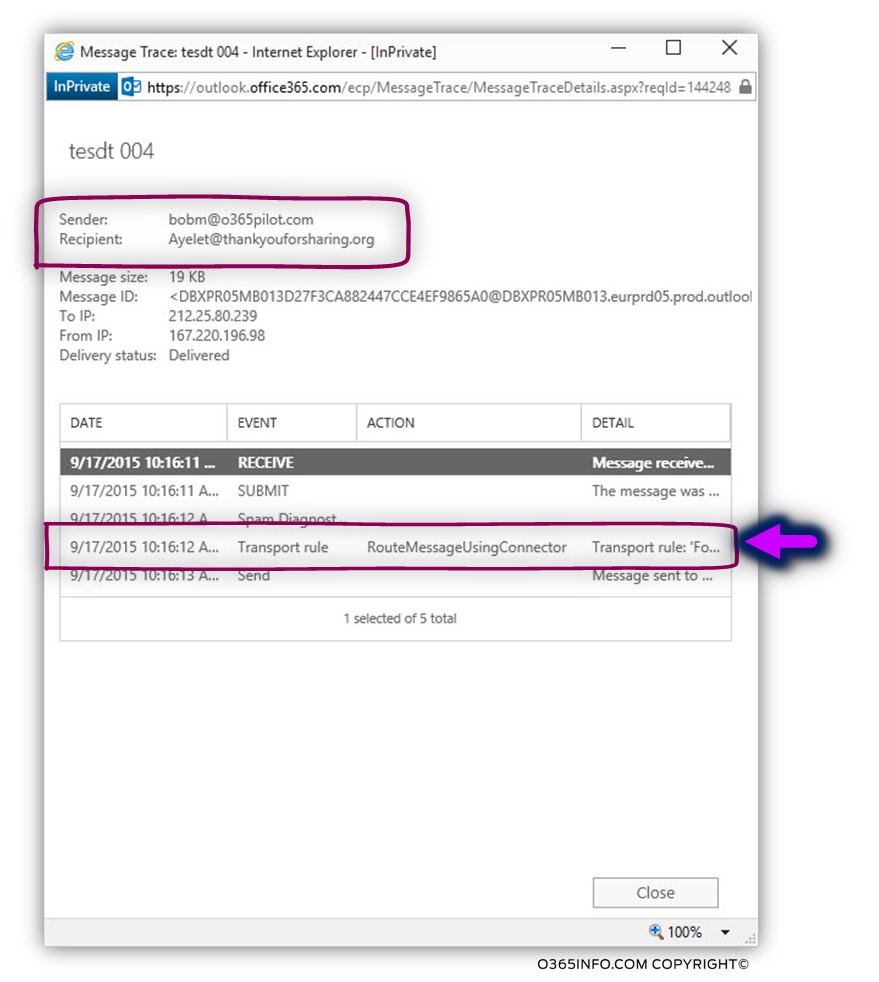
In the next section, we will check that the Conditional Mail Routing Transport rule implemented by using the Exchange Online message to trace.
We will “ask” Bob, to send an E-mail to the recipient Ayelet@thankyouforsharing.org and then look for information about the E-mail in the message trace.
- Login to Exchange Online admin center
- On the left bar menu, choose the mail flow
- On the top bar menu, choose the message trace menu

- We will look for an E-mail message that was sent by Bob – In the Sender: box, we will add Bob by clicking on the add sender… and choose Bob

In the following screenshot, we can see information about the E-mail message that was sent by Bob to Ayelet@thankyouforsharing.org
Under the EVENT row, we can see that the E-mail message was “processed” by a transport rule.
Under the ACTION row, we can see that the flow considers as – RouteMessageUsingConnector
Recap and the next article
In the current article, we have reviewed the required configuration setting that was needed for implementing the option of Force TLS using Exchange Transport rule & Conditional Mail Routing.
In the next article (Exchange Force TLS | Troubleshooting and verifying secure mail flow | Part 12#12), we will review the subject of troubleshooting in TLS mail flow scenario
What Others Are Reading
Hi there, after reading this remarkable post i
am also glad to share my knowledge here with friends.