After you install the Exchange Online PowerShell module, you can connect to Exchange Online. Once…
How to use Comparison Operators in PowerShell
Filter the PowerShell output result based on specific conditions. Use comparison operators to compare or find matching values when creating a script. In this article, you will learn how to use comparison operators in PowerShell.
Table of contents
- PowerShell Comparison operator types
- PowerShell Comparison operators list
- Connect to Exchange Online PowerShell
- PowerShell Comparison operators structure
- 1. Equality Comparison operator examples
- 2. Matching Comparison operator examples
- 3. Replacement Comparison operator examples
- 4. Containment Comparison operator examples
- 5. Type Comparison operator examples
- Combine PowerShell Comparison operators and Logical operator examples
- Conclusion
PowerShell Comparison operator types
There are five types of comparison operators in PowerShell:
| Comparison Operator type | Comparison Operator examples |
|---|---|
| Equality | -eq, -ne, -gt, -ge, -lt, -le |
| Matching | -like, -notlike, -match, -notmatch |
| Replacement | -replace |
| Containment | -contains, -notcontains, -in, -notin |
| Type | -is, -isnot |
PowerShell Comparison operators list
When you write a script, it’s best to use comparison operators to make it more efficient and get accurate results. Comparison operators let you compare values or find values that match specified patterns. It’s used to compare strings, numbers, dates, and other objects.
The following list displays the available PowerShell comparison operators.
| Comparison Operator | Description |
|---|---|
| -eq | equal to |
| -ne | not equal to |
| -gt | greater than |
| -ge | greater than or equal to |
| -lt | less than |
| -le | less than or equal to |
| -like | like (use wildcard for pattern matching) |
| -notlike | notlike (use wildcard for pattern matching) |
| -match | string matches pattern |
| -notmatch | string doesn’t match pattern |
| -replace | replaces strings matching a regex pattern |
| -contains | collection contains a value |
| -notcontains | collection doesn’t contain a value |
| -in | value is in a collection |
| -notin | value isn’t in a collection |
| -is | both objects are the same type |
| -isnot | the objects aren’t the same type |
Connect to Exchange Online PowerShell
To be able to run PowerShell commands and use comparison operators, you must first Connect to Exchange Online PowerShell. Open Windows PowerShell as administrator, run the below cmdlet and sign in with your admin credentials.
Connect-ExchangeOnlinePowerShell Comparison operators structure
An additional component we will use with the Comparison operators is Where-Object.
The Where-Object cmdlet, combined with the Comparison operators, enables us to create a PowerShell sentence that describes the required condition. In the next examples, we will use the shortened version of Where-Object, using the Where cmdlet.
We will show how to perform a PowerShell sentence structure with a specific condition.
PowerShell sentence structure:
- In the first part of the PowerShell sentence, we will use the Get-Mailbox cmdlet with -ResultSize Unlimited to find all the existing mailbox types.
- We use the pipeline (|) to get the input from the first part and do something with it in the second part.
- In the second part of the PowerShell sentence, we will use the Where cmdlet.
- The condition must be enclosed in braces brackets { }
- The $_. notation is used to represent the default object
- Specify the Property name
- Use the Comparison operator -eq
- Specify the Value in double quotation marks (“)
See the below PowerShell syntax example.
Get-Mailbox -ResultSize Unlimited | Where {$_.Property -eq "Value"}- Then, you can add an additional section using a pipeline (|) and Select cmdlet to specify the properties that will be displayed.
The PowerShell command syntax example with select properties.
Get-Mailbox -ResultSize Unlimited | Where {$_.Property -eq "Value"} | Select Property1, Property21. Equality Comparison operator examples
There are unlimited possibilities when using Comparison operators. You can write a simple PowerShell sentence that includes one condition or write a complicated PowerShell sentence that is built from a combination of conditions.
We will show you different examples of using Equality Comparison operators. The PowerShell Comparison operators are case-insensitive by default. With the -c prefix, you can use the PowerShell case-sensitive Equality Comparison operators, such as -ceq, -cne, -cgt, -cge, -clt, and -cle.
Comparison operator -eq
Exchange online enables us to create different types of mailboxes, such as:
We will show you two different examples using the comparison operator -eq.
Example 1: Use the Comparison operator -eq to display user mailboxes.
We want to display a list of all the user mailboxes and not show any other mailbox types.
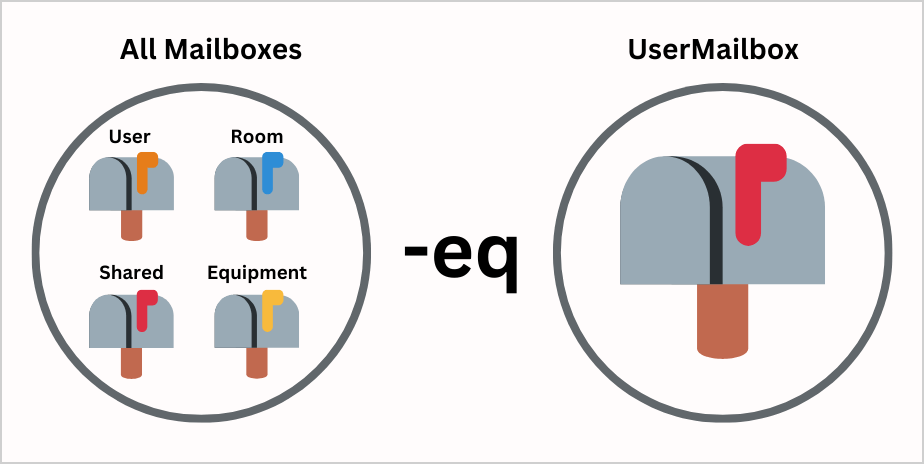
- In the first part of the PowerShell sentence, we will use the Get-Mailbox cmdlet, followed by -ResultSize Unlimited.
- In the second part of the PowerShell sentence, we will use the Where cmdlet, followed by a condition in braces brackets { }.
- Lastly, we use the property RecipientTypeDetails and the comparison operator -eq to filter the mailboxes with a value that equals “UserMailbox”.
Run the below PowerShell command example.
Get-Mailbox -ResultSize Unlimited | Where {$_.RecipientTypeDetails -eq "UserMailbox"} | Select Name, UserPrincipalName, RecipientTypeThe PowerShell output shows all the licensed user mailboxes in your organization.
Name                                 UserPrincipalName               RecipientType
----                                 -----------------               -------------
41377e9c-dc47-46c0-b4a5-1d5bbdcb5cc5 Amanda.Hansen@m365info.com      UserMailbox
82cd0d62-e974-4892-aca6-e0387abc62be Anna.Bell@m365info.com          UserMailbox
5cae3874-442b-459c-8f33-3aee5b879275 Anne.Butler@m365info.com        UserMailbox
0f38d53f-cbe0-4844-86e9-1032a45ba31b Brenda.Smith@m365info.com       UserMailbox
411a8f10-0dfa-4034-a1e3-a8b6e4cad2f6 Brian.Mill@m365info.com         UserMailbox
52a6c1c7-77d2-4109-99b9-a4076167b6e2 Carl.Hawk@m365info.com          UserMailbox
d5dc703a-45d0-4dc3-89ba-16f088925e41 Charles.MitchelNEW@m365info.com UserMailbox
b602b148-2fcf-435a-9d34-ce72c3a8c748 Diana.Baker@m365info.com        UserMailbox
29a12fd8-bbd2-440f-b457-8e304200a85d Frank.Olsen@m365info.com        UserMailbox
2ab57f6a-6824-40a3-8fb0-d4357e8b91b1 John.Doe2@m365info.com          UserMailbox
33a56fba-ed21-456d-90be-ade268b9acc8 Justin.Russel@m365info.com      UserMailbox
12eefbb2-e5f4-4eec-bd18-df7ca2f1ee6b Ken.Walker@m365info.com         UserMailbox
213a5a8b-0bcf-40cc-b114-edb1b2a423f4 Laura.Terry@m365info.com        UserMailbox
3bb176aa-d0ba-47f7-aecc-f4837593006e Mary.James@m365info.com         UserMailbox
8b31d6a0-6d92-4b5b-80bd-a4029e641d35 RoomMailboxTest@m365info.com    UserMailbox
e5c3a5e8-eeae-4829-94dc-fb7228bcf8da Ryan.Walker@m365info.com        UserMailbox
1e367b85-f0c0-4c9c-a16a-22d132f1d8e6 Soren.Vest@m365info.com         UserMailbox
c32b2b27-d809-439a-a3e3-eb7a749eeb72 Stephen.Hunter@m365info.com     UserMailbox
fd199cb4-2ebf-4171-96e2-12fd75453e39 Susan.Brown5@m365info.com       UserMailbox
Example 2: Use the Comparison operator -eq to display users from a specific department
In the next examples, we use the Get command for filtering information about user objects with a specific value. The examples are based on the Get-User cmdlet.
We want to display a list of all Microsoft 365 users from the Sales department.
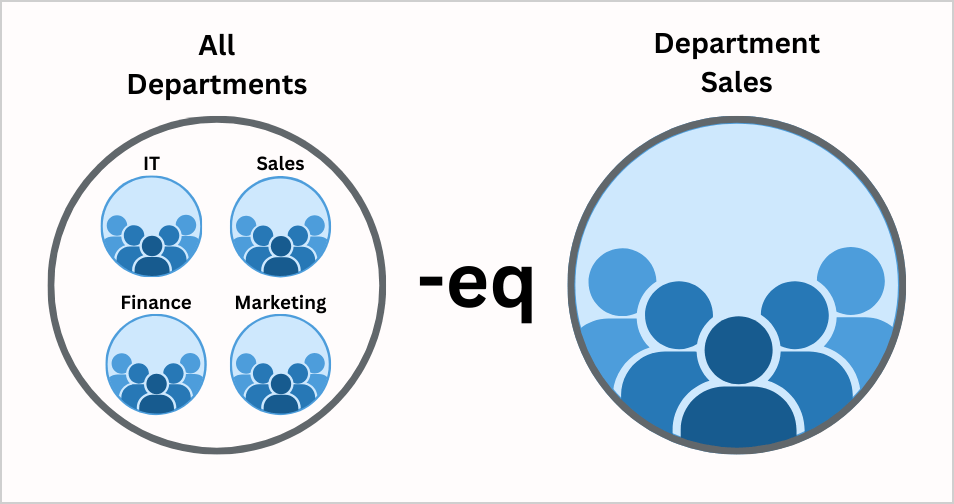
- In the first part of the PowerShell sentence, we will use the Get-User cmdlet followed by -ResultSize Unlimited cmdlet.
- In the second part of the PowerShell sentence, we will use the Where cmdlet, followed by a condition in braces brackets { }.
- Lastly, we use the property Department and the comparison operator -eq to display an exact match of users with a value that equals “Sales”.
Run the below PowerShell command syntax.
Get-User -ResultSize Unlimited | Where {$_.Department -eq "Sales"} | Select Name, RecipientType, DepartmentThe PowerShell output shows the users from the Sales department.
Name                                 RecipientType Department
----                                 ------------- ----------
fa956d8c-87df-4cd4-ac2a-ac1f3d7cac8b User          Sales
b602b148-2fcf-435a-9d34-ce72c3a8c748 UserMailbox   Sales
f8261d51-3df9-4f21-a6b1-533412669c11 User          Sales
bc741ead-e704-4eb9-a9e8-adfa1f187c92 User          Sales
0de964ae-f09a-4e65-bc8c-cbeac2745e4c User          Sales
27c03114-f9a1-4c02-83ef-bd4ee32f00cf User          Sales
82cd0d62-e974-4892-aca6-e0387abc62be UserMailbox   Sales
52a6c1c7-77d2-4109-99b9-a4076167b6e2 UserMailbox   Sales
Comparison operator -ne
Let’s say that your company is located in Canada, but most of the users are from the USA. There are users from New York, Texas, Florida and Washington.
We want to get a list of all the organization users who are not from the state of Ontario, Canada. You can write a PowerShell sentence and use four logical operators (-or). But that’s not efficient.
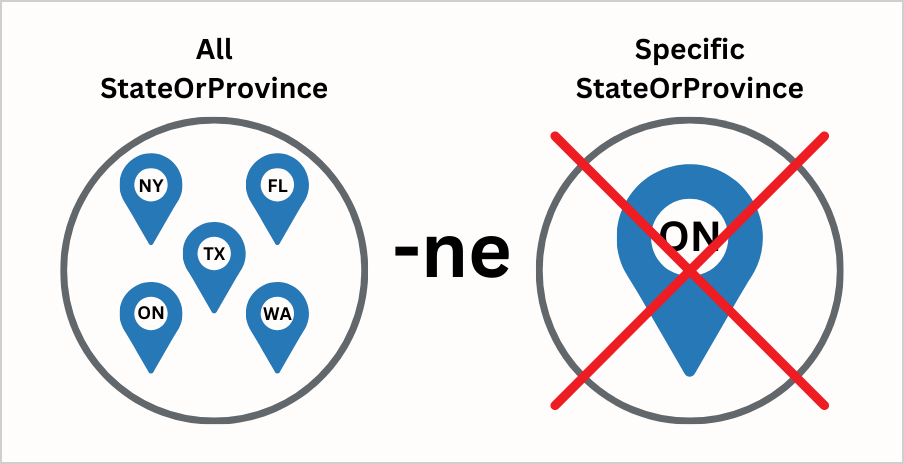
A more efficient approach is to use the comparison operator -ne. It means you want to find all the objects that don’t have the value “Ontario”.
Run the PowerShell command syntax example.
Get-User -ResultSize Unlimited | Where {$_.StateOrProvince -ne "Ontario"} | Select Name, DisplayName,RecipientType, StateOrProvinceName DisplayName RecipientType StateOrProvince
---- ----------- ------------- ---------------
4631b453-3a0a-439e-a2ea-7af2b9a741b3 Chris Green User Florida
f8261d51-3df9-4f21-a6b1-533412669c11 Cynthia Carey User Washington
652159b8-fc74-46bf-9d6f-d8a97d75e1eb John.Doe1 User Texas
bc741ead-e704-4eb9-a9e8-adfa1f187c92 John Doe2 UserMailbox Florida
ee042397-eb86-4c54-836a-7879df27ec1c Piers Wood User Texas
0de964ae-f09a-4e65-bc8c-cbeac2745e4c Susan Brown UserMailbox New York
e6f5f419-de0b-43c3-a1e8-52af2436f931 Victor Gray User TexasComparison operator -gt
When using the Equality Comparison operator -gt, you will only get an output if the value on the left is greater than the number on the right.
In our example, we want to get users from departments with lengths greater than 5 characters.
Run the below PowerShell command.
Get-User -ResultSize Unlimited | Where {$_.Department.Length -gt 5} | Select Name, RecipientType, DepartmentThe PowerShell output shows the users from departments with more than 5 characters, such as Spain Sales or Marketing.
Name                                 RecipientType Department
----                                 ------------- ----------
41377e9c-dc47-46c0-b4a5-1d5bbdcb5cc5 UserMailbox   Marketing
67962421-00e7-448b-b382-83b7b434e41c User          Sales UK
6ec79c8e-5a84-4992-b2df-4caf3f997a74 User          Spain Sales
5cae3874-442b-459c-8f33-3aee5b879275 UserMailbox   Marketing
2beda4b9-559b-4d39-9415-51ce47f2963f User          Sales UK
33a56fba-ed21-456d-90be-ade268b9acc8 UserMailbox   Sales USA
d23f1e98-02db-4292-98aa-6f511c433f1b User          SalesWorldWide
ee042397-eb86-4c54-836a-7879df27ec1c User          Brandsales
ca21f458-f33c-46bf-9f57-55c201ccbd82 User          Sales USA
4631b453-3a0a-439e-a2ea-7af2b9a741b3 User          Information Technology
7545348c-b473-45b5-890d-38bc59b4a163 User          Information Technology
0f38d53f-cbe0-4844-86e9-1032a45ba31b UserMailbox   Marketing
Comparison operator -ge
The Equality Comparison operator -ge is similar to -gt. Therefore, we will show you a similar example where we will get all users from departments with lengths greater than or equal to 2 characters.
Run the below PowerShell command.
Get-User -ResultSize Unlimited | Where {$_.Department.Length -ge 2} | Select Name, RecipientType, DepartmentThe PowerShell output shows users from departments that contain 2 letters and above, such as IT, Sales, and Marketing.
Name                                 RecipientType Department
----                                 ------------- ----------
fa956d8c-87df-4cd4-ac2a-ac1f3d7cac8b User          Sales
b602b148-2fcf-435a-9d34-ce72c3a8c748 UserMailbox   Sales
41377e9c-dc47-46c0-b4a5-1d5bbdcb5cc5 UserMailbox   Marketing
c32b2b27-d809-439a-a3e3-eb7a749eeb72 UserMailbox   IT
67962421-00e7-448b-b382-83b7b434e41c User          Sales UK
6ec79c8e-5a84-4992-b2df-4caf3f997a74 User          Spain Sales
5cae3874-442b-459c-8f33-3aee5b879275 UserMailbox   Marketing
bc741ead-e704-4eb9-a9e8-adfa1f187c92 User          Sales
0de964ae-f09a-4e65-bc8c-cbeac2745e4c User          Sales
2beda4b9-559b-4d39-9415-51ce47f2963f User          Sales UK
33a56fba-ed21-456d-90be-ade268b9acc8 UserMailbox   Sales USA
d23f1e98-02db-4292-98aa-6f511c433f1b User          SalesWorldWide
411a8f10-0dfa-4034-a1e3-a8b6e4cad2f6 UserMailbox   IT
e5c3a5e8-eeae-4829-94dc-fb7228bcf8da UserMailbox   IT
ee042397-eb86-4c54-836a-7879df27ec1c User          Brandsales
ca21f458-f33c-46bf-9f57-55c201ccbd82 User          Sales USA
4631b453-3a0a-439e-a2ea-7af2b9a741b3 User          Information Technology
7545348c-b473-45b5-890d-38bc59b4a163 User          Information Technology
0f38d53f-cbe0-4844-86e9-1032a45ba31b UserMailbox   Marketing
Comparison operator -lt
The Equality Comparison operator -lt is the opposite of -gt. When using -lt in PowerShell, you will only get an output if the value on the left is less than the number on the right.
In our example, we will find all users whose display names are less than 8 characters. To get a better PowerShell output result, we will select the objects we want to display.
Run the below PowerShell command.
Get-User -ResultSize Unlimited | Where {$_.DisplayName.Length -lt 8} | Select Name, RecipientType, DisplayNameThe PowerShell result shows all the users with a display name of less than 8 characters.
Name                                 RecipientType DisplayName
----                                 ------------- -----------
394963d9-cab1-4d3c-a99e-7839a2d19690 User          Mark
Comparison operator -le
The Equality Comparison operator -le is similar to -lt. Therefore, we will show you a similar example where we will find all the users whose display names are less than or equal to 8 characters.
Run the below PowerShell command.
Get-User -ResultSize Unlimited | Where {$_.DisplayName.Length -le 8} | Select Name, RecipientType, DisplayNameThe PowerShell result shows all the users with a display name of less than or equal to 8 characters.
Name                                 RecipientType DisplayName
----                                 ------------- -----------
Info Box                             UserMailbox   Info Box
954b27cf-8401-420b-bbd2-7f70903c0707 User          New User
394963d9-cab1-4d3c-a99e-7839a2d19690 User          Mark
2. Matching Comparison operator examples
We will show you different examples using Matching Comparison operators. The PowerShell Matching Comparison operators are case-insensitive by default. You can also use the case-sensitive versions of the Matching operators, which are the same but with the -c prefix, such as -clike, -cnotlike, -cmatch, and -cnotmatch.
Comparison operator -like
We want to display a list of all Microsoft 365 users from the Sales department. Let’s say your organization has these different Sales departments:
- Sales USA
- Sales UK
- Spain Sales
- Brandsales
- SalesWorldWide
- Store sales
- all SALES
The Matching Comparison operator (-like) enables us to locate values that include or have a particular string. Instead of creating two PowerShell sentences, we can create a condition to find all the departments that start with Sales.
In our example, we look for values that start with the string “Sales”. When using the comparison operator (-like), we need to add the asterisk (*) character, which serves as a wildcard.
Use an asterisk character to find the following values:
- Before the letters *Sales to find the values that end with it, like Brandales
- After the letters Sales* to find the values that start with it, like SalesWorldWide
- Before and after the letters *Sales* to find the values that include this exact word
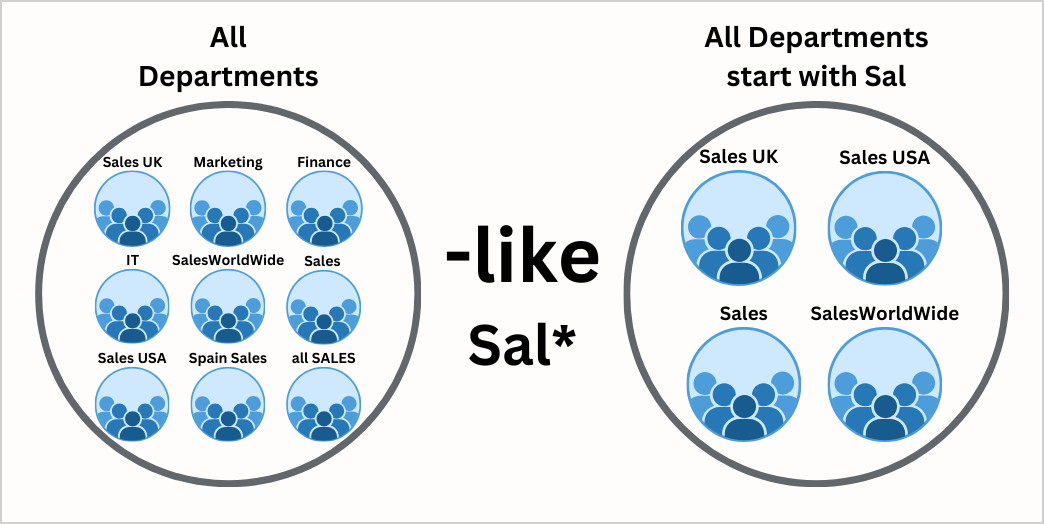
Option 1: Use the asterisk (*) after the letters
When using the asterisk character at the end of the string, PowerShell will find all the values that start with the string you provide. In our example, we will use the letters followed by an asterisk Sal*.
Run the below PowerShell command example.
Get-User -ResultSize Unlimited | Where {$_.Department -like "Sal*"} | Select Name, RecipientType, DepartmentThe below PowerShell output result shows the users of all departments that start with the letters Sal. In our example, it will get the users from Sales, Sales USA, Sales UK, and SalesWorldWide.
Name                                 RecipientType Department
----                                 ------------- ----------
fa956d8c-87df-4cd4-ac2a-ac1f3d7cac8b User          Sales
b602b148-2fcf-435a-9d34-ce72c3a8c748 UserMailbox   Sales
67962421-00e7-448b-b382-83b7b434e41c User          Sales UK
f8261d51-3df9-4f21-a6b1-533412669c11 User          Sales
bc741ead-e704-4eb9-a9e8-adfa1f187c92 User          Sales
0de964ae-f09a-4e65-bc8c-cbeac2745e4c User          Sales
2beda4b9-559b-4d39-9415-51ce47f2963f User          Sales UK
33a56fba-ed21-456d-90be-ade268b9acc8 UserMailbox   Sales USA
d23f1e98-02db-4292-98aa-6f511c433f1b User          SalesWorldWide
ca21f458-f33c-46bf-9f57-55c201ccbd82 User          Sales USA
Option 2: Use the asterisk (*) before and after the letters
Find all users from the departments that include the letters les. Use the -like comparison operator and type two asterisks *les*.
Run the below PowerShell command.
Get-User -ResultSize Unlimited | Where {$_.Department -like "*les*"} | Select Name, RecipientType, DepartmentThe PowerShell output shows all the users from a department that includes the letters les.
Name                                 RecipientType Department
----                                 ------------- ----------
fa956d8c-87df-4cd4-ac2a-ac1f3d7cac8b User          Sales
b602b148-2fcf-435a-9d34-ce72c3a8c748 UserMailbox   Sales
1a1fd41c-ca5f-4432-8313-7a662576856b User          Store sales
67962421-00e7-448b-b382-83b7b434e41c User          Sales UK
6ec79c8e-5a84-4992-b2df-4caf3f997a74 User          Spain Sales
dafbb7ee-6e2d-4786-8180-1dba57095ead User          all SALES
f8261d51-3df9-4f21-a6b1-533412669c11 User          Sales
7bfec79d-7806-484a-ac83-133cd4cf5af5 User          all SALES
bc741ead-e704-4eb9-a9e8-adfa1f187c92 User          Sales
0de964ae-f09a-4e65-bc8c-cbeac2745e4c User          Sales
2beda4b9-559b-4d39-9415-51ce47f2963f User          Sales UK
33a56fba-ed21-456d-90be-ade268b9acc8 UserMailbox   Sales USA
d23f1e98-02db-4292-98aa-6f511c433f1b User          SalesWorldWide
ee042397-eb86-4c54-836a-7879df27ec1c User          Brandsales
ca21f458-f33c-46bf-9f57-55c201ccbd82 User          Sales USA
Option 3: Use the asterisk (*) before the letters
To find users from a department that ends with the letters les, you must use the -like Comparison operator and type an asterisk before *les.
Run the below PowerShell command.
Get-User -ResultSize Unlimited | Where {$_.Department -like "*les"} | Select Name, RecipientType, DepartmentThe PowerShell output shows all the users of all departments that end with the letters les. In our example, it will get all the users from Sales, Store sales, Spain Sales, and Brandsales.
Name                                 RecipientType Department
----                                 ------------- ----------
fa956d8c-87df-4cd4-ac2a-ac1f3d7cac8b User          Sales
b602b148-2fcf-435a-9d34-ce72c3a8c748 UserMailbox   Sales
1a1fd41c-ca5f-4432-8313-7a662576856b User          Store sales
6ec79c8e-5a84-4992-b2df-4caf3f997a74 User          Spain Sales
dafbb7ee-6e2d-4786-8180-1dba57095ead User          all SALES
f8261d51-3df9-4f21-a6b1-533412669c11 User          Sales
7bfec79d-7806-484a-ac83-133cd4cf5af5 User          all SALES
bc741ead-e704-4eb9-a9e8-adfa1f187c92 User          Sales
0de964ae-f09a-4e65-bc8c-cbeac2745e4c User          Sales
ee042397-eb86-4c54-836a-7879df27ec1c User          Brandsales
Comparison operator -clike
When using the case-sensitive Matching Comparison operators -clike, you can get more specific results in PowerShell. It means that the string (letters or word) you provide will be case-sensitive, meaning you can distinguish between small and capital letters.
In our example, we want to get users from departments that end with the letters *LES in capital letters.
Run the below PowerShell command.
Get-User -ResultSize Unlimited | Where {$_.Department -clike "*LES"} | Select Name, RecipientType, DepartmentThe PowerShell output result shows the users from the department that end with the letters LES in capital letters, such as all SALES.
Name                                 RecipientType Department
----                                 ------------- ----------
dafbb7ee-6e2d-4786-8180-1dba57095ead User          all SALES
7bfec79d-7806-484a-ac83-133cd4cf5af5 User          all SALES
Comparison operator -match
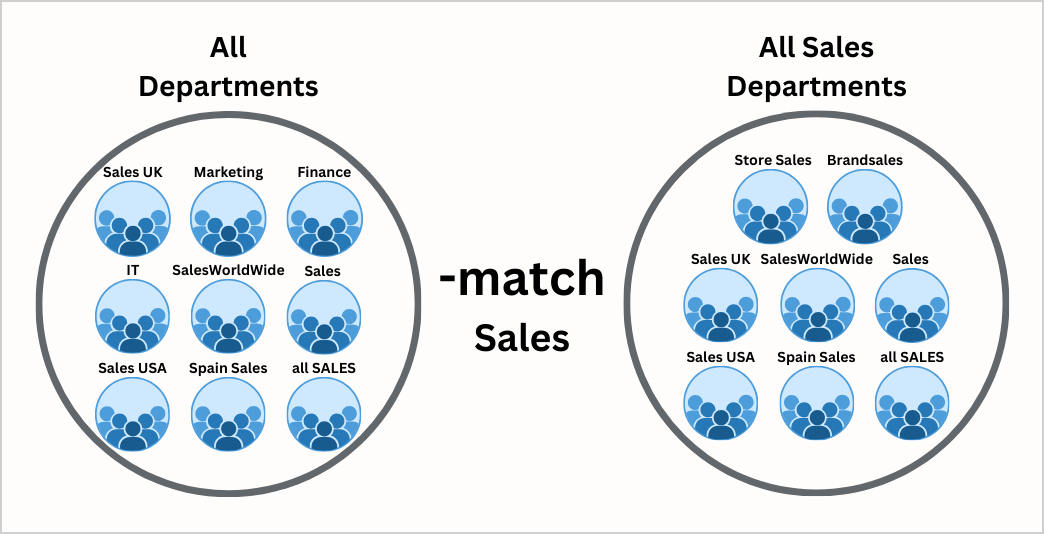
The -match comparison operator is similar to the -like operator. The -match comparison operator uses a regular expression (regex pattern). If you know the word you are looking for, it’s best to use the -match comparison operator because the results are faster.
Use the (^) character to indicate where the string begins or ends:
- Use the character (^) before the word ^Sales to find the values that end with it, like Brandsales
- Use the character (^) after the word Sales^ to find the values that start with it, like SalesWorldWide
Let’s find all the users from departments that match the word Sales.
Run the below PowerShell command example with the Comparison operator -match.
Get-User -ResultSize Unlimited | Where-Object {$_.Department -match "Sales"} | Select Name, RecipientType, DepartmentIt will show all the users from the departments that include the word Sales.
Comparison operator -cmatch
When using the case-sensitive Matching Comparison operator -cmatch, you can get more specific results in PowerShell.
In our example, we want to get users from departments that end with the word sales in small letters.
Get-User -ResultSize Unlimited | Where-Object {$_.Department -cmatch "sales"} | Select Name, RecipientType, DepartmentThe PowerShell output result shows the users from the department Store sales and Brandsales.
Name                                 RecipientType Department
----                                 ------------- ----------
1a1fd41c-ca5f-4432-8313-7a662576856b User          Store sales
ee042397-eb86-4c54-836a-7879df27ec1c User          Brandsales
3. Replacement Comparison operator examples
We will show you different examples of using Replacement Comparison operators.
Comparison operator -replace
The -replace operator supports regular expressions, so you can customize the pattern and replacement string based on your specific requirements.
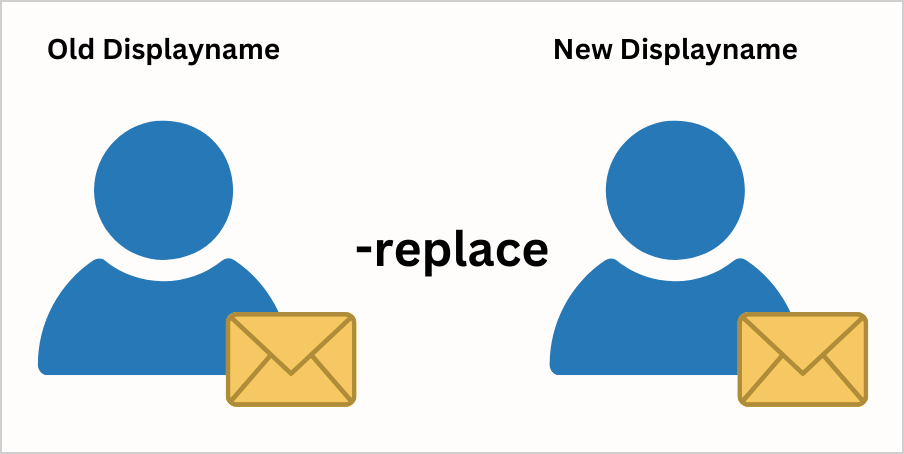
In our example we want to change the username of Andrew Marshall to Andrew.
- Type the username in line number 2
- Specify the old username in line number 5
- Specify the new username in line number 5
# Get user information
$user = Get-User -Identity "username"

# Use -replace operation
$newDisplayName = $user.DisplayName -replace "old username", "new username"

# Update user display name
Set-User -Identity $user.Identity -DisplayName $newDisplayName- Run the below PowerShell example script
# Get user information
$user = Get-User -Identity "Andrew Marshall"

# Use -replace operation
$newDisplayName = $user.DisplayName -replace "Andrew Marshall", "Andrew"

# Update user display name
Set-User -Identity $user.Identity -DisplayName $newDisplayName- There is no PowerShell output, but you will get a confirmation alert. Press Y followed by enter.
Confirm
Are you sure you want to perform this action?
[Y] Yes  [A] Yes to All  [N] No  [L] No to All  [S] Suspend  [?] Help (default is "Y"):
It will automatically change the old display name (Andrew MarShall) to the new username (Andrew) you provided.
4. Containment Comparison operator examples
We will show you different examples of using Containment Comparison operators.
Comparison operator -contains
The -contains operator in PowerShell is used to check if a value is present in a collection. In our example, we have multiple departments in our organization and want to get the users that contain one of the specified departments (Sales, Marketing, IT).
- In the first line, we will use the $departments and specify the collection in parenthesis brackets ( ).
- In the second line, we will use the Get-User cmdlet followed by -ResultSize Unlimited.
- In the next part of the PowerShell sentence, we will use the Where cmdlet, followed by a condition in braces brackets { }.
- Then, we use the specified element $departments followed by the comparison operator -contains to see if it includes the collection property $_.Department.
- Lastly, we use the shortened version of Select-Object to Select the properties we want to display.
Run the below PowerShell example.
$departments = @("Sales", "Marketing", "IT")
Get-User -ResultSize Unlimited | Where {$departments -contains $_.Department} | Select Name, RecipientType, Department
The PowerShell output result.
Name                                 RecipientType Department
----                                 ------------- ----------
fa956d8c-87df-4cd4-ac2a-ac1f3d7cac8b User          Sales
b602b148-2fcf-435a-9d34-ce72c3a8c748 UserMailbox   Sales
41377e9c-dc47-46c0-b4a5-1d5bbdcb5cc5 UserMailbox   Marketing
c32b2b27-d809-439a-a3e3-eb7a749eeb72 UserMailbox   IT
f8261d51-3df9-4f21-a6b1-533412669c11 User          Sales
5cae3874-442b-459c-8f33-3aee5b879275 UserMailbox   Marketing
bc741ead-e704-4eb9-a9e8-adfa1f187c92 User          Sales
0de964ae-f09a-4e65-bc8c-cbeac2745e4c User          Sales
411a8f10-0dfa-4034-a1e3-a8b6e4cad2f6 UserMailbox   IT
e5c3a5e8-eeae-4829-94dc-fb7228bcf8da UserMailbox   IT
27c03114-f9a1-4c02-83ef-bd4ee32f00cf User          Sales
82cd0d62-e974-4892-aca6-e0387abc62be UserMailbox   Sales
52a6c1c7-77d2-4109-99b9-a4076167b6e2 UserMailbox   Sales
0f38d53f-cbe0-4844-86e9-1032a45ba31b UserMailbox   Marketing
Comparison operator -in
The -in operator is similar to the -contain operator because you will get the same results. The main difference is the way you use the command in PowerShell. In our example, we want to get the users from one of the following departments (Sales, Marketing, IT).
We will first use the property $_.Department and the comparison operator -in to display the users that are in one of the specified $departments collection.
Run the below PowerShell command example.
$departments = @("Sales", "Marketing", "IT")
Get-User -ResultSize Unlimited | Where {$_.Department -in $departments} | Select Name, RecipientType, Department
The PowerShell result will show all the users from the departments you specified.
5. Type Comparison operator examples
We will show you an example using the Type Comparison operators.
Comparison operator -is
You can use the Type Comparison operator -is to check if the object is a specific type. First, you must provide the value followed by the Type operator -is and then specify the type name in square brackets [ ].
In our example, we want to check if a value is a string.
Run the below PowerShell command example.
$value = "Sales and Marketing"

if ($value -is [string]) {
    Write-Host "The value is a string!"
}
else {
    Write-Host "The value is not a string."
}
The PowerShell output shows that the value (Sales and Marketing) is a string.
The value is a string!Comparison operator -isnot
Use the Type Comparison operator -isnot to check if an object is not a specific type.
The PowerShell syntax command.
"object" -isnot "type-reference"First, you must provide a number and use the Type operator -isnot followed by a string in square brackets [ ].
In our example, we want to check if a number is not an integer.
Run the below PowerShell example.
42 -isnot [int]The PowerShell output shows True or False.
FalseCombine PowerShell Comparison operators and Logical operator examples
We will show you different examples of using Equality Comparison operators with Logical operators.
Comparison operators -eq -ne with Logical operator -and
You can use the logical operator -and to combine two or more conditions in a PowerShell command.
We want to display a list of all Microsoft 365 users from the Sales department, and the users should not be from the state of Texas.

The comparison operators we will use are -eq for the first condition and -ne for the second condition. The logical operator we will use is -and because the users should match both conditions.
Run the PowerShell command example.
Get-User -ResultSize Unlimited | Where {($_.Department -eq "Sales") -and ($_.StateOrProvince -ne "Texas")} | Select Name, RecipientType, Department, StateOrProvinceThe PowerShell output will display the users from the Sales department who are not from Texas.
Name                                 RecipientType Department StateOrProvince
----                                 ------------- ---------- ---------------
fa956d8c-87df-4cd4-ac2a-ac1f3d7cac8b User          Sales      Ontario
b602b148-2fcf-435a-9d34-ce72c3a8c748 UserMailbox   Sales      Ontario
f8261d51-3df9-4f21-a6b1-533412669c11 User          Sales      Washington
bc741ead-e704-4eb9-a9e8-adfa1f187c92 User          Sales      Florida
0de964ae-f09a-4e65-bc8c-cbeac2745e4c User          Sales      New York
Comparison operators -like -eq with Logical operator -or
We want to display a list of all Microsoft 365 users from the Marketing department or departments that start with the letters Sal. To implement this requirement, we need to use the comparison operator (-like) and (-eq) with a combination of the logical operator (or).

- In the first part of the PowerShell sentence, we will use the Get-User followed by -ResultSize Unlimited.
- In the second part of the PowerShell sentence, we will use the Where cmdlet, followed by two conditions in braces brackets { }.
- For each condition, you need to use parenthesis brackets ( ).
- The first condition will use the comparison operator -like to match users that start with the letters Sal department.
- After the first condition, we will use the logical operator -or.
- The second condition will use the comparison operator -eq to match users from the Marketing department.
Run the PowerShell command syntax.
Get-User -ResultSize Unlimited | Where {($_.Department -like "Sal*") -or ($_.Department -eq "Marketing")} | Select Name, RecipientType, Department, TitleThe PowerShell output will show all the users from the Marketing department or departments that start with Sal.
Name                                 RecipientType Department     Title
----                                 ------------- ----------     -----
fa956d8c-87df-4cd4-ac2a-ac1f3d7cac8b User          Sales
b602b148-2fcf-435a-9d34-ce72c3a8c748 UserMailbox   Sales
41377e9c-dc47-46c0-b4a5-1d5bbdcb5cc5 UserMailbox   Marketing      Leader
67962421-00e7-448b-b382-83b7b434e41c User          Sales UK
f8261d51-3df9-4f21-a6b1-533412669c11 User          Sales          Manager
5cae3874-442b-459c-8f33-3aee5b879275 UserMailbox   Marketing
bc741ead-e704-4eb9-a9e8-adfa1f187c92 User          Sales
0de964ae-f09a-4e65-bc8c-cbeac2745e4c User          Sales          Manager
2beda4b9-559b-4d39-9415-51ce47f2963f User          Sales UK
33a56fba-ed21-456d-90be-ade268b9acc8 UserMailbox   Sales USA
d23f1e98-02db-4292-98aa-6f511c433f1b User          SalesWorldWide
ca21f458-f33c-46bf-9f57-55c201ccbd82 User          Sales USA
27c03114-f9a1-4c02-83ef-bd4ee32f00cf User          Sales
82cd0d62-e974-4892-aca6-e0387abc62be UserMailbox   Sales          Member
52a6c1c7-77d2-4109-99b9-a4076167b6e2 UserMailbox   Sales
0f38d53f-cbe0-4844-86e9-1032a45ba31b UserMailbox   Marketing      Manager
Comparison operators -like -match -eq with Logical operators -and -or
We want to display a list of all Microsoft 365 users from the Sales or Marketing department and the state of Ontario.
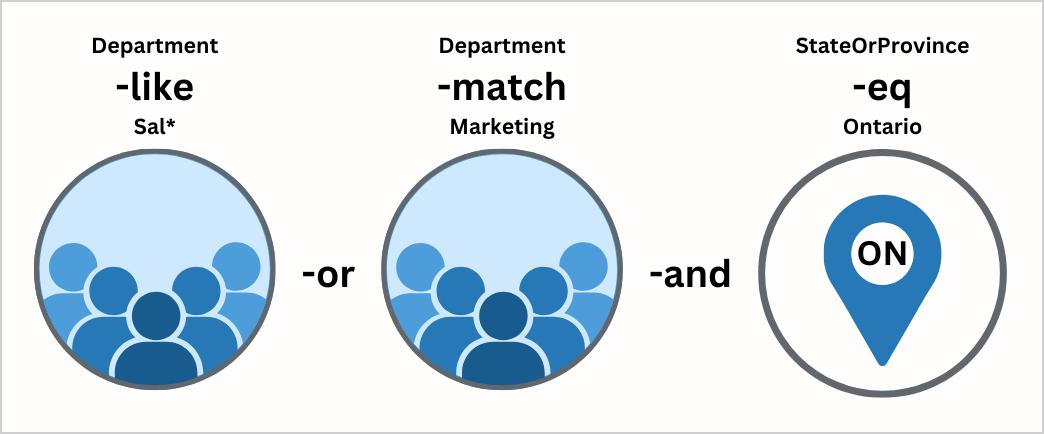
The combination of multiple conditions should be enclosed in braces brackets { }:
- For the first condition, we will use the comparison operator -like enclosed in parenthesis brackets ( ).
- For the second condition, we will use the comparison operator -match enclosed in parenthesis brackets ( ).
- For the third condition, we will use the comparison operator -eq enclosed in parenthesis brackets ( ).
- The first logical operator -or shows the users from the department that start with Sal* or Marketing department.
- The second logical operator -and shows the users should also be from the state of Ontario.
Run the below PowerShell command example.
Get-User -ResultSize Unlimited | Where {($_.Department -like "Sal*") -or ($_.Department -match "Marketing") -and ($_.StateOrProvince -eq "Ontario")} | Select Name, RecipientType, Department, StateOrProvince The PowerShell output will show all the users from the department that starts with Sal* or from the Marketing department, and the user should be from the state of Ontario.
Name                                 RecipientType Department StateOrProvince
----                                 ------------- ---------- ---------------
fa956d8c-87df-4cd4-ac2a-ac1f3d7cac8b User          Sales      Ontario
b602b148-2fcf-435a-9d34-ce72c3a8c748 UserMailbox   Sales      Ontario
5cae3874-442b-459c-8f33-3aee5b879275 UserMailbox   Marketing  Ontario
That’s it!
Read more: Update Azure AD users with Microsoft Graph PowerShell »
Conclusion
You learned how to use comparison operators in PowerShell to make your commands more efficient. With the comparison operators, you can make shorter scripts that will look more organized.
Did you enjoy this article? You may also like How to use Get-Mailbox in PowerShell. Don’t forget to follow us and share this article.
This Post Has 0 Comments