The current article is dedicated to the Interesting and not so clear subject of –…
Exchange Web services | Manage the Internal and external URL address | Part 10#36
The current article should provide us a small glimpse to the subject of managing the internal and the external Exchange URL address of the different services.
We will review a couple of examples to the interfaces the available to us for managing the variety of Exchange services – the graphical interface and the PowerShell interface.
In the following articles, we will look “under the hood” of Exchange configurations that relate to the configuration of the Exchange internal and external URL’s.
Table of contents
- Exchange web service vs. Exchange-based services
- Managing Exchange web services URL address.
- Managing Exchange 2010 web services using the Exchange graphic interface
- Managing Exchange 2013 web services using the Exchange graphical web interface
- Managing the Exchange Autodiscover services URL address in Active Directory based environment.
- Exchange web services | The Exchange PowerShell interface
- Managing the Exchange web services (EWS) using PowerShell
Exchange web service vs. Exchange-based services
Before we begin a little philosophical debate about the term – Exchange web service.
The regular use of the phrase – Exchange web service relate to a particular Exchange server interface named – EWS (Exchange web service).
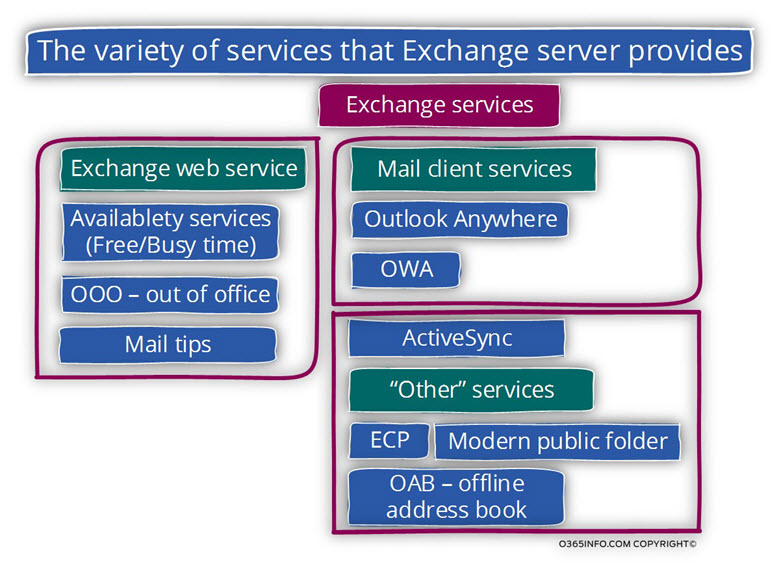
This Exchange interface enables clients to address the Exchange server and ask for unique web-based service such as – Availability service, Automatic reply (out of office), mail tips and more.
Besides of the EWS interface, Exchange Server provides many other different services.
For example, the Exchange provides a “dedicated” interface for each of the different mail clients such as:
- OWA – enable a web-based client to access their mailbox
- Outlook Anywhere – enable Outlook based client to access their mailbox
- ActiveSync – enable a mobile based client to access their mailbox.
Additional examples for services that Exchange provides are:
- OAB – the offline address book that is used by Outlook client.
- ECP – Exchange control panel, the ability to manage an Exchange server or access specific parts of Exchange management by using a web-based
The common denominator for all of these services is that all of them are can be described as a “web-based service.” services”. The communication protocol is – HTTP or HTTPS and the access for each of the different Exchange services implemented by using URL address.
So the big question is – when we say Exchange web service, what we the exact meaning?
My answer is that it doesn’t matter.
The Exchange architecture is based heavily on web-based services and, the exact definition of Exchange web service vs. Exchange web-based services doesn’t matter.
What matter is:
- Exchange dual identity in a scenario meaning internal hostname vs. external hostname, we need to know how these “identities” assigned for each of the Exchange web services.
- Multiple public names
Many times, the Exchange will have a couple of public names. In again, it’s important that we would know how these “identities” (different public names) assigned for each of the Exchange web services.
Managing Exchange web services URL address.
As mentioned, each of the Exchange web-based services, is represented by URL address. In the following article, we will review three Exchange management interfaces that we use for managing the URL address:
- Exchange 2010 graphical management interface
- Exchange 2013 graphical management interface
- Exchange PowerShell commands
Q: Why should I use Exchange PowerShell interface instead of the Exchange graphic interface?
A: In theory, we can assume that in case that we can manage the Exchange internal and external URL’s address using a graphical interface, and there is no need for using the un-friendly PowerShell interface.
In reality, many times we will have to use the PowerShell interface because some of the configurations are not available via the Exchange server graphical interface.
Another aspect is that the Exchange 2010 graphical interface doesn’t include the option to manage all the different Exchange web services.
One of the improvements in Exchange 2013 is the additional options for managing Exchange web services that were not available in the Exchange 2010 management interface.
The Exchange web services that we will need to know about.
In the following section, we will review the part of “how to” manage Exchange internal and external URL’s address, but it’s important to emphasize that the preliminary stage, is the “planning phase,” in which we decide about the most appropriate scenario that will match our specific organization needs.
For example
- Decide if we want to use the option of a unified namespace in which the internal namespace and the external namespace will be identical.
- Decide what are the public “identities” (public hostnames) that we will assign to the Public facing Exchange server.
Based on the characters of a specific scenario that is suitable for our organization, we will have the required information that needed for
- Purchasing a public certificate
- Create the required configuration in Exchange relating the Exchange web services internal + external URL address
Managing Exchange 2010 web services using the Exchange graphic interface
The configuration of most of the Exchange 2010 web services is implemented by accessing the section on – Server configuration and then the subsection of – Client Access.
Notes
- The management interface includes the option for managing POP3 and IMAP4 protocols. We will not relate to this part because this protocol not considered as an Exchange web service
- The current interface doesn’t include the option for managing the Exchange Outlook Anywhere service. The management of Outlook Anywhere implemented via the “server configuration” section.
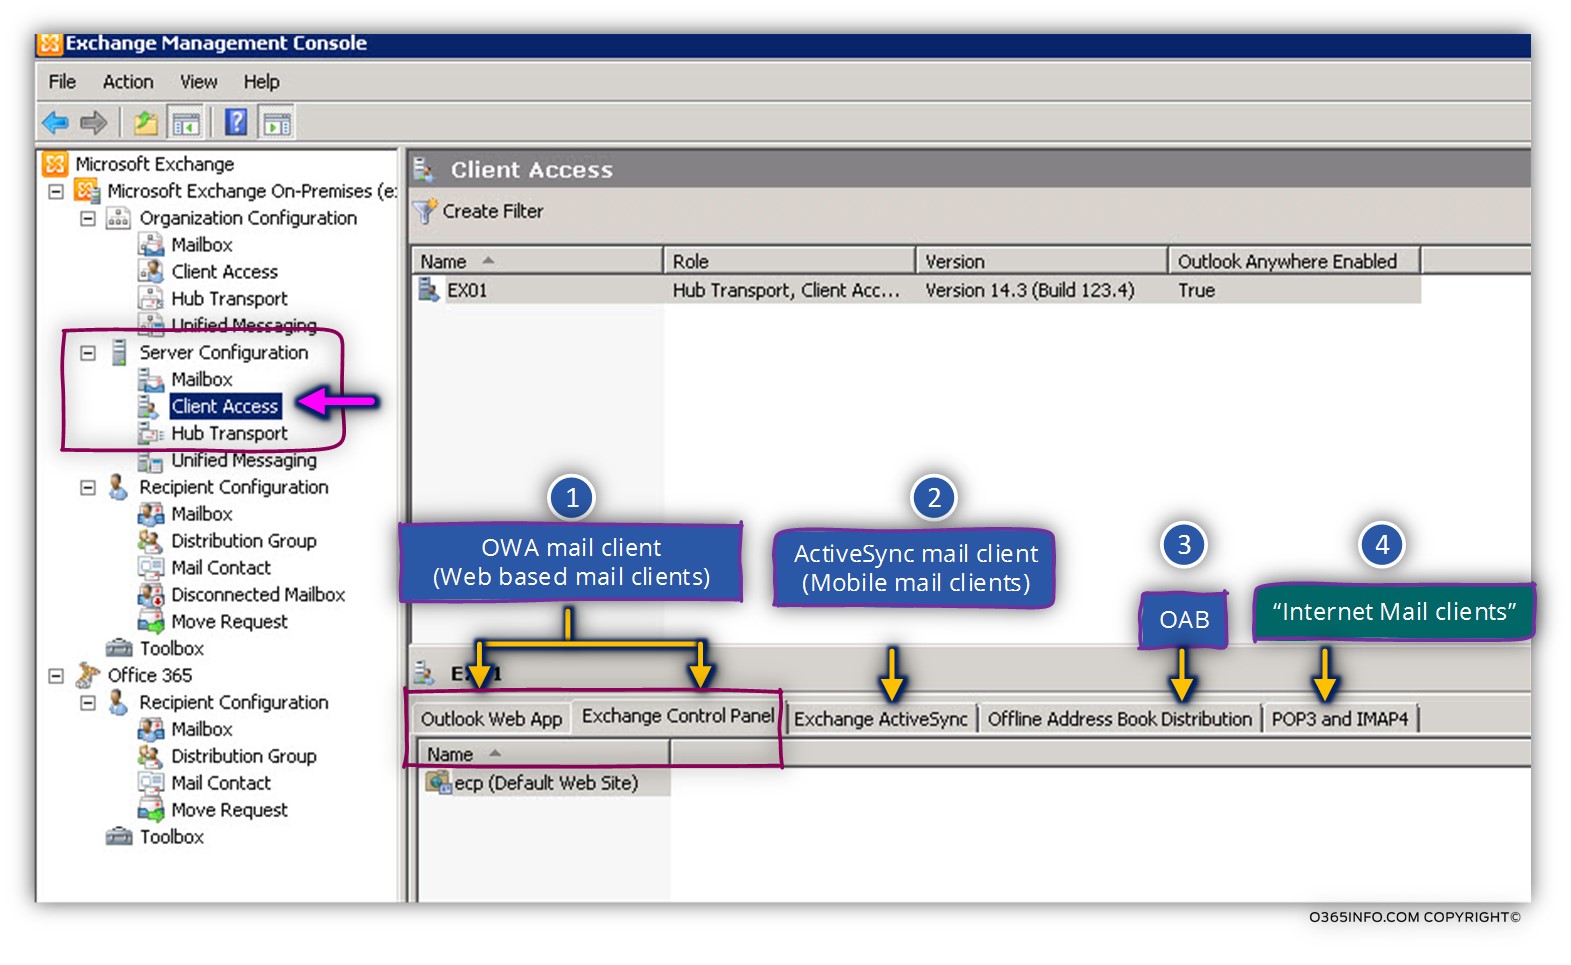
1.Outlook Web App and Exchange Control panel tab
This tab, enable us to set the URL address of the Exchange services for webmail clients (OWA) and the Exchange ECP (Exchange control panel).
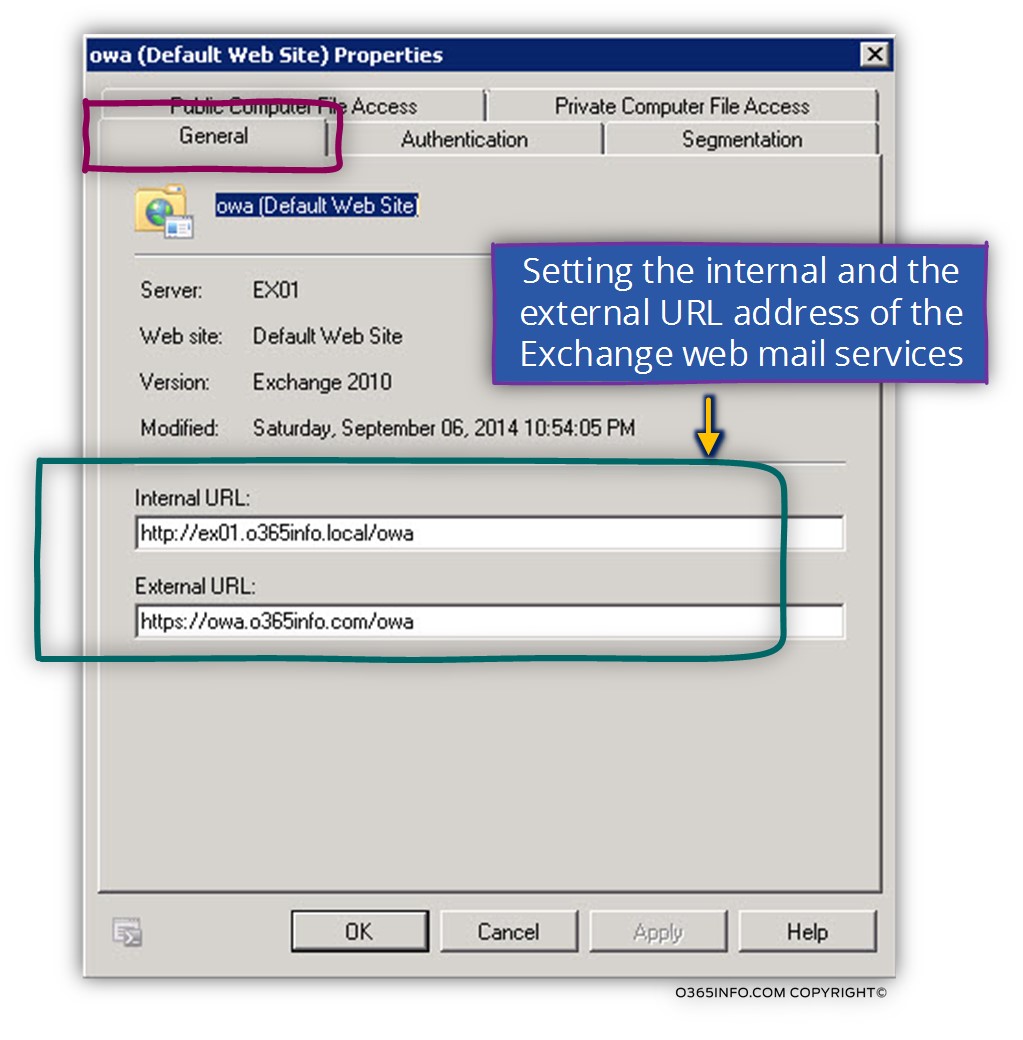
The first tab – Outlook Web App enables us to set the internal + external URL address which will be used by the OWA mail client.
In the following screenshot, we can see the option in the General tab.
In our example, the internal URL for the OWA mail client is based internal hostname of the Exchange server – ex01.0365info.local vs. the external or the public URL address that uses the public name of the Exchange server – owa.o365info.com
The Exchange OWA service includes additional tabs that allow us to establish the authentication protocol and another setting that relate to the OWA mail service.
2. Exchange ActiveSync URL settings
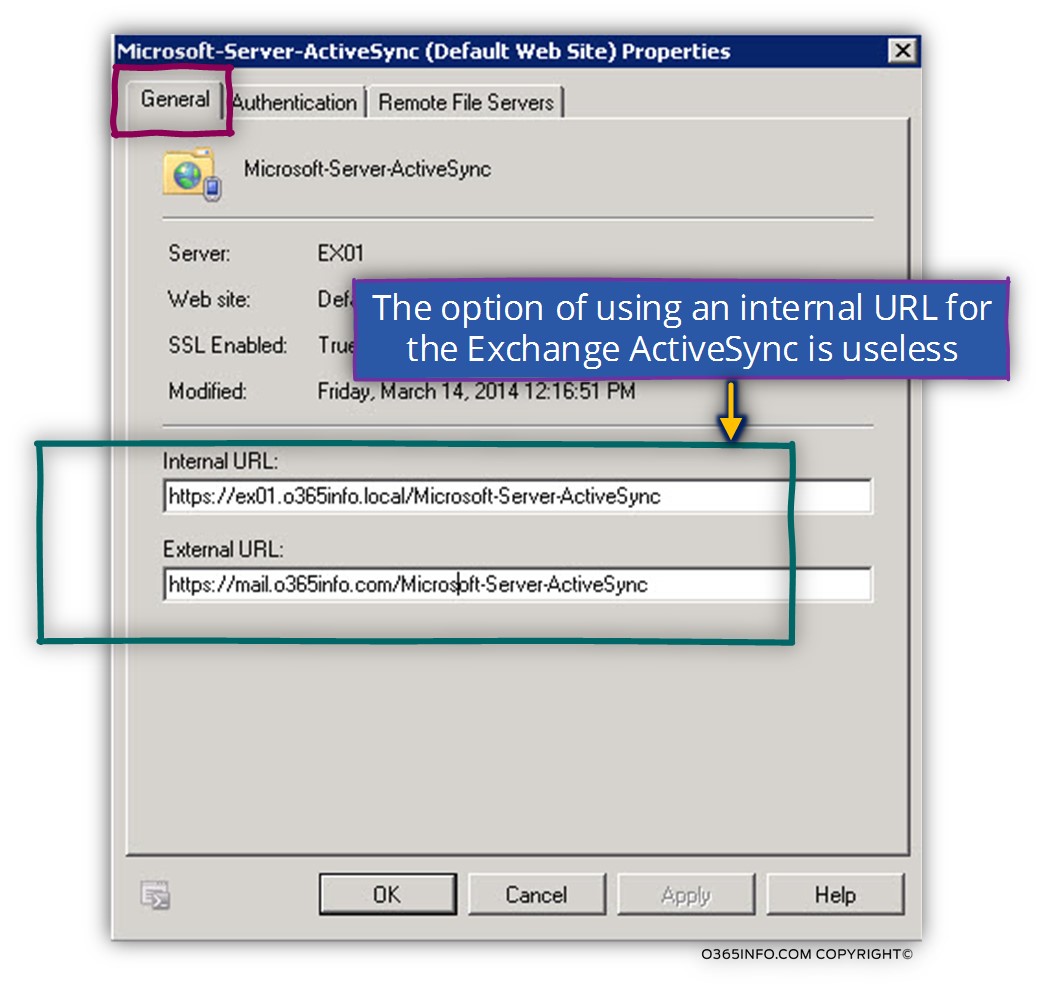
When looking at the options that are available to us regarding the Exchange ActiveSync URL configuration, we can see that we can set the external and the internal URL for the ActiveSync URL.
At a first glance, it looks a little strange because ActiveSync client such as a mobile device can never access the – “internal ActiveSync URL” because the ActiveSync clients are accessing the Exchange CAS server only via public networks.
The answer is that the Internal URL of the ActiveSync only used for proxying purposes in a scenario of Public facing Exchange CAS server who need to connect additional or internal (not exposed) Exchange server.
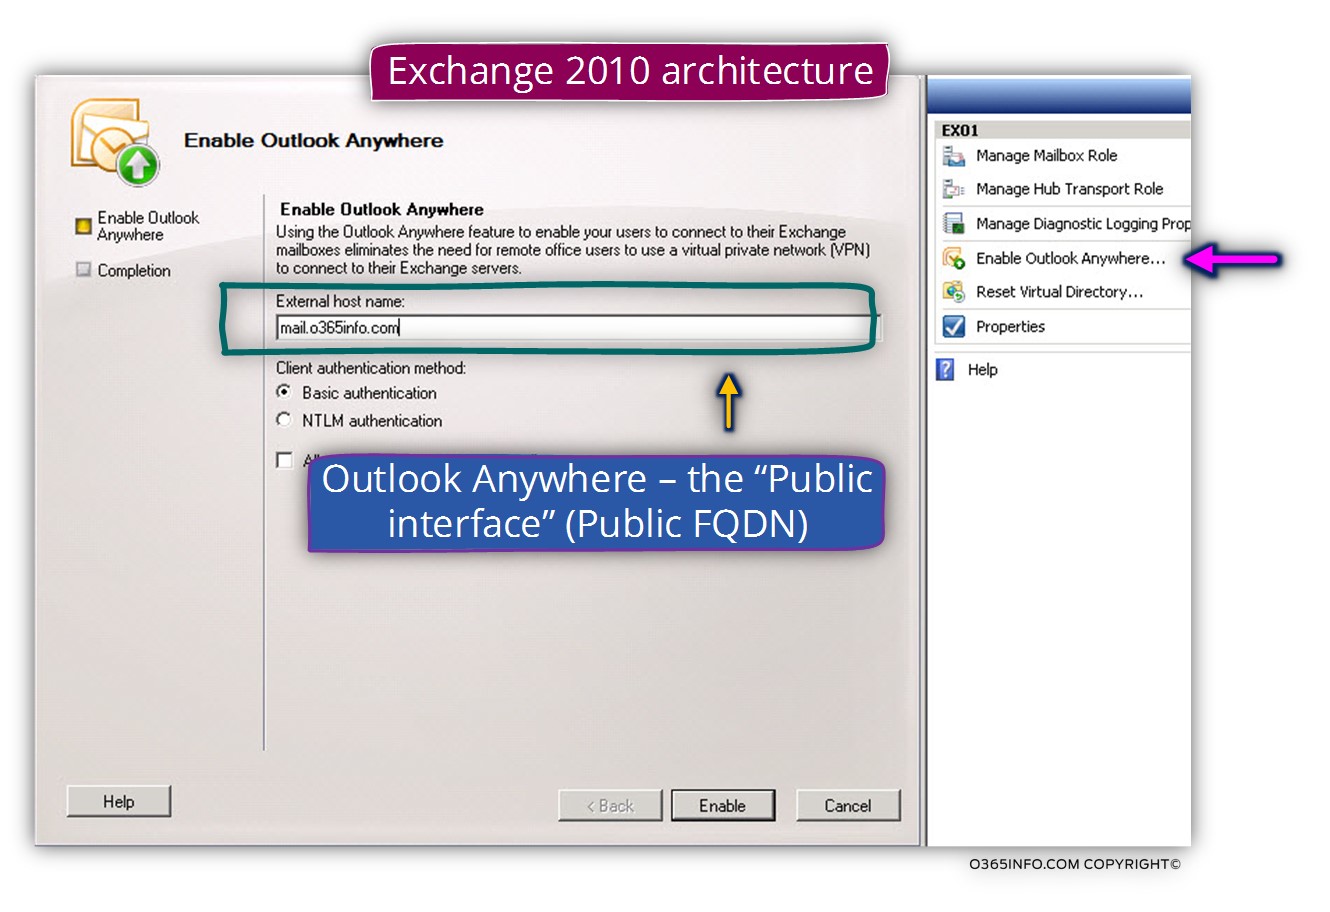
3. Outlook Anywhere host names settings.
In the following screenshot, we can see that way that we use the Exchange graphical interface for configuring the Outlook Anywhere service.
Note that in Exchange 2010 server architecture vs. all the “other Exchange web services,” the setting of the Outlook Anywhere service includes only the public hostname of the Exchange server.
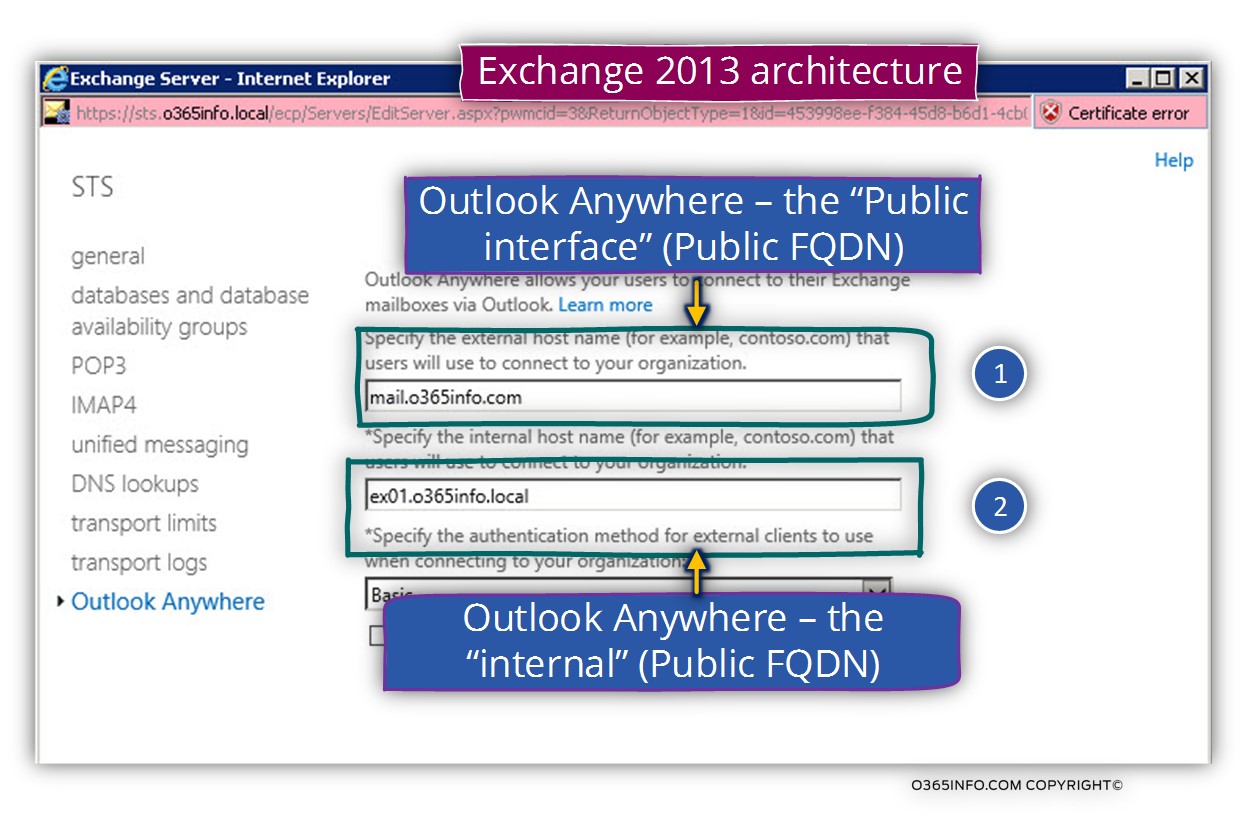
Exchange 2013 server architecture include the option of configuring internal + external server host name for Outlook Anywhere clients.
Exchange web services that cannot configure from the Exchange graphic management interface.
As mentioned, the Exchange graphic management interface doesn’t include the option of setting all the available Exchange web services.
The following Exchange web services cannot configure from the Exchange graphic management interface
- Exchange EWS services
- Exchange Autodiscover web service
Managing Exchange 2013 web services using the Exchange graphical web interface
Exchange 2013 graphic interface (web based)
We will not get into a detailed comparison of the Exchange 2010 graphic interface vs. the Exchange 2013 graphic interface, but I would like to review some significant differences between those two Exchange interfaces.
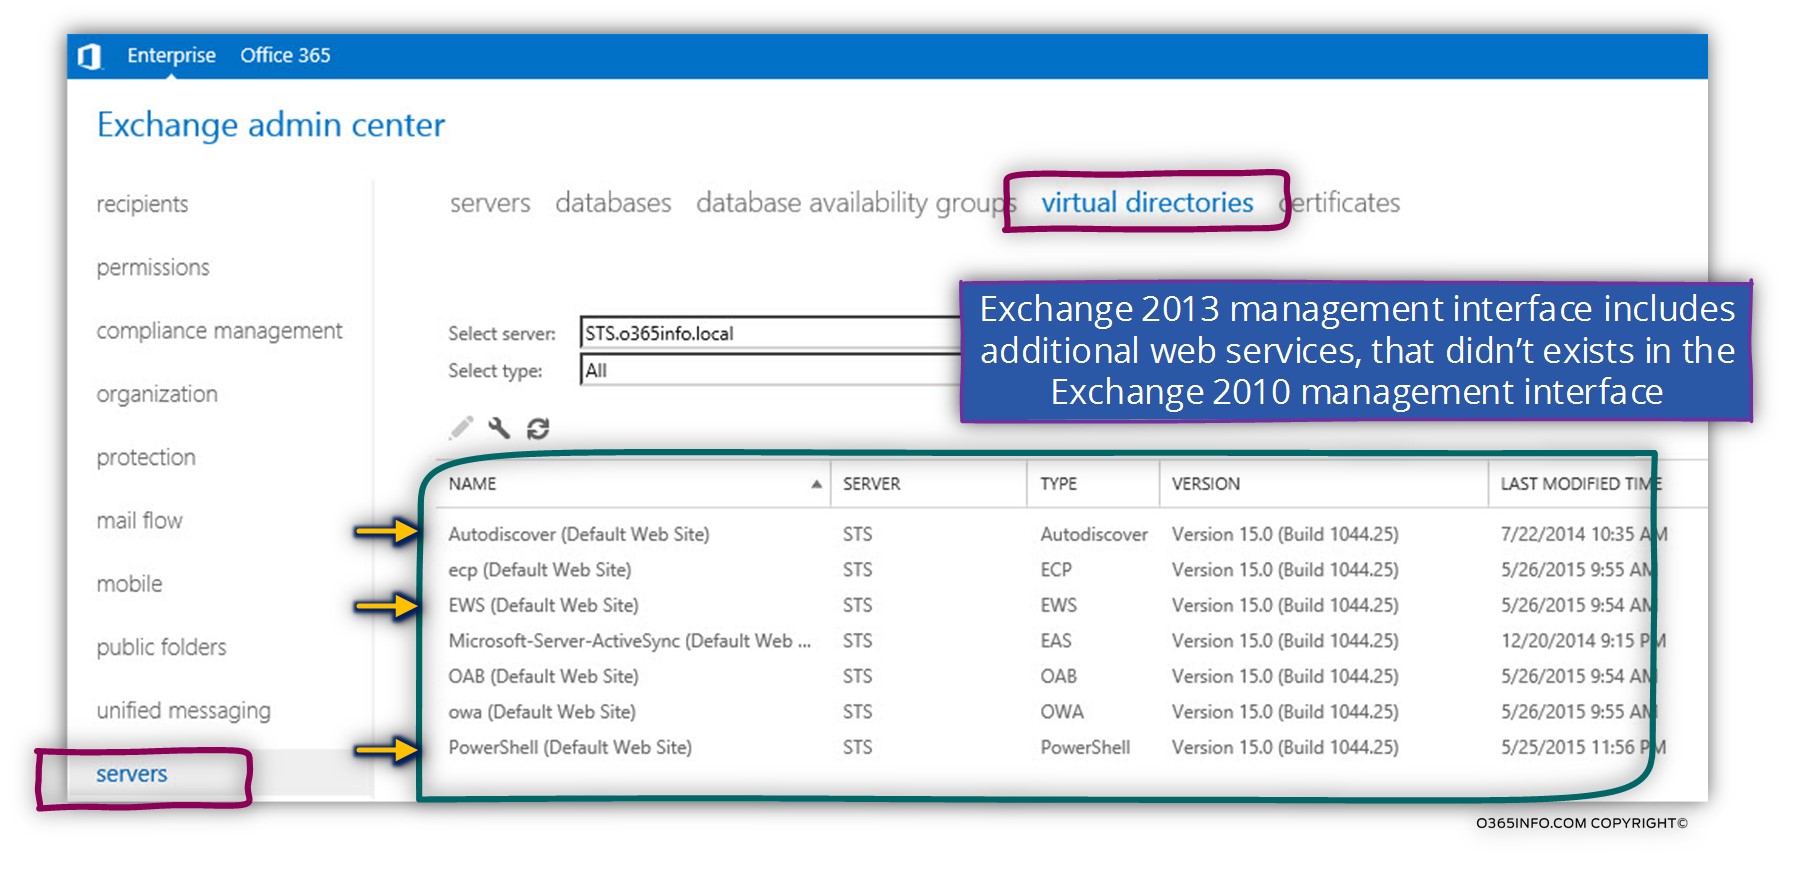
The setting of the Exchange web services in Exchange 2013 is implemented by accessing the server menu and at the top menu bar, the virtual directory menu.
The Exchange 2013 graphic interface includes the “additional web services” missing from the Exchange 2010 interface.
The other web services that appear in the Exchange 2013 management are:
- Exchange EWS
- Autodiscover
- PowerShell
1. Autodiscover web service settings
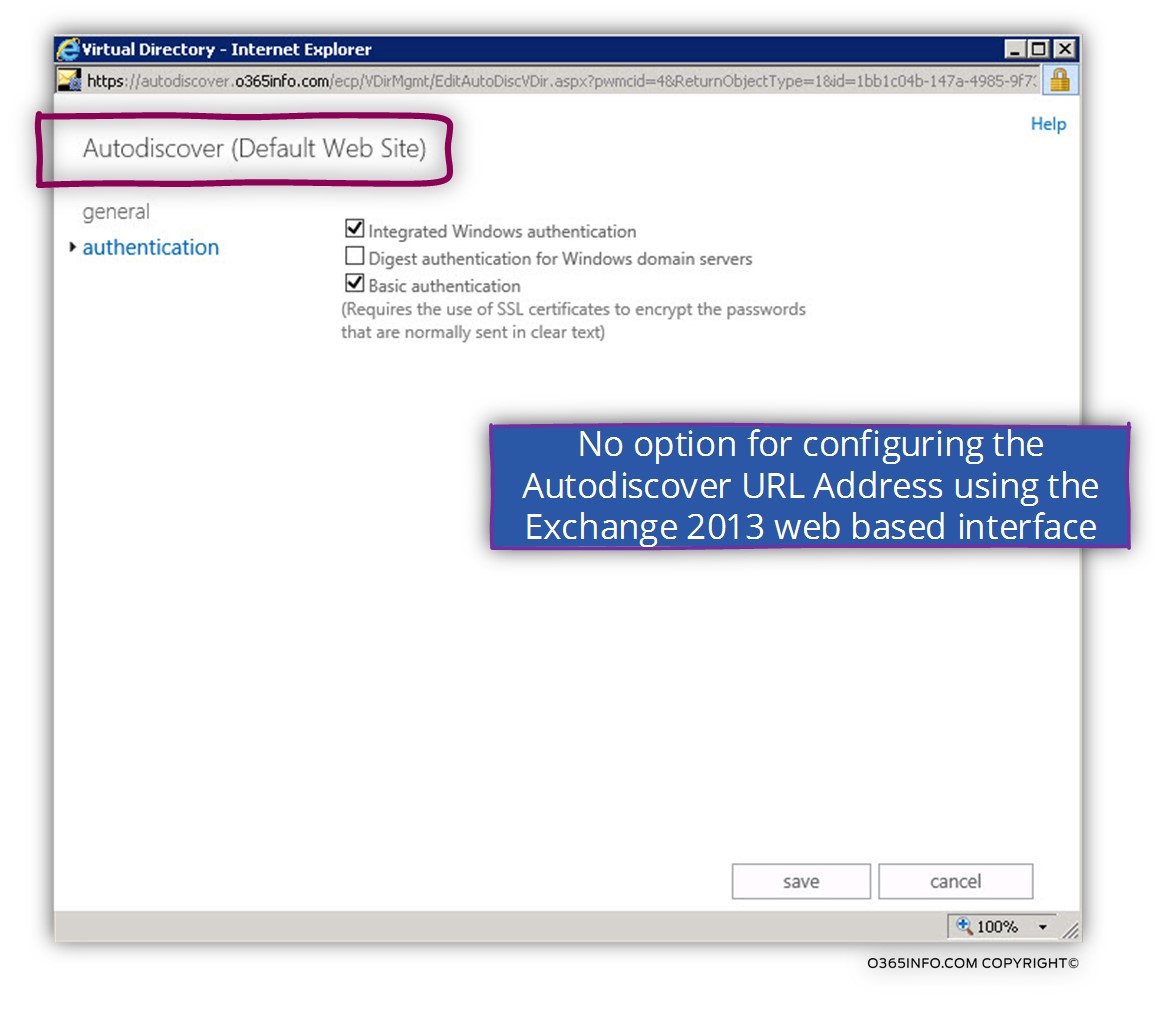
In case that we want to take a look at the configuration settings of the Autodiscover web service, we can see that the Exchange 2013 graphical interface, doesn’t include an option to configure the internal or the external URL of the Autodiscover service. The only option is to set the authentication protocols.
Note: Technically speaking, the scenario in which we will need to set\update the value of the Exchange web services that relate to Autodiscover are very rare.
2. Exchange EWS settings
An exciting refreshment is an ability in Exchange 2013 to configure the Exchange EWS URL’s using the graphic interface. The option omitted from the Exchange 2010 interface, for some reason.
Just a quick reminder of the purpose of the EWS – The EWS (Exchange Web Service) is one of the Primary Exchange web services, that serve as a “gateway” for many types of web services such as – Availability service (Free/Busy time), automatic reply (Outlook of office), Mail tips and more.
Note: The EWS URL serves for additional service such as the MRSProxy for moving mailbox and other Exchange services that are not directly related to the subject of – ”Autodiscover”
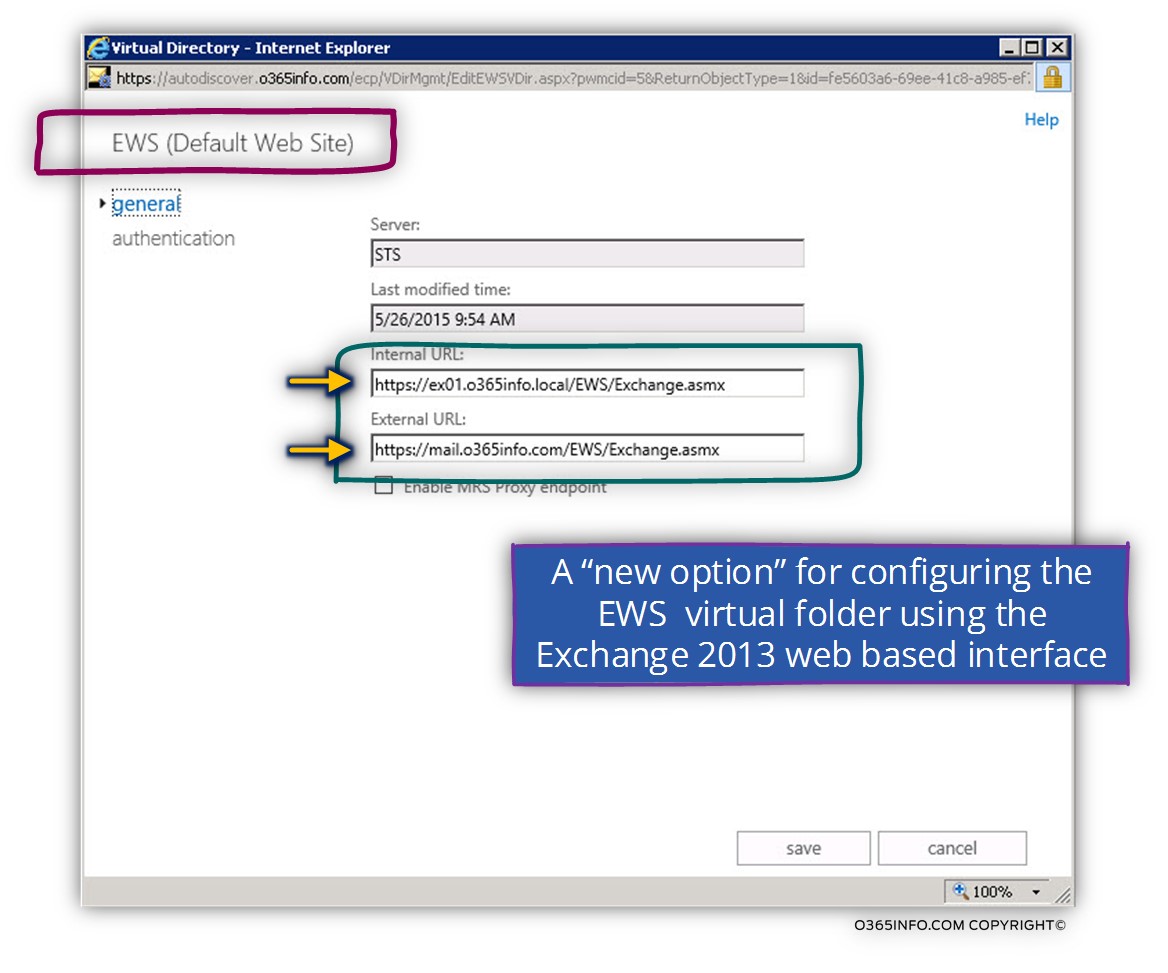
3. Exchange Outlook Anywhere management interface
The Exchange 2013 interface for managing the Outlook Anywhere service is a bit friendlier than the previous interface of Exchange 2010.
The 2013 interface enables us to edit + view the name of the Exchange server that will provide the Outlook Anywhere services and also enable to configure internal + external host name
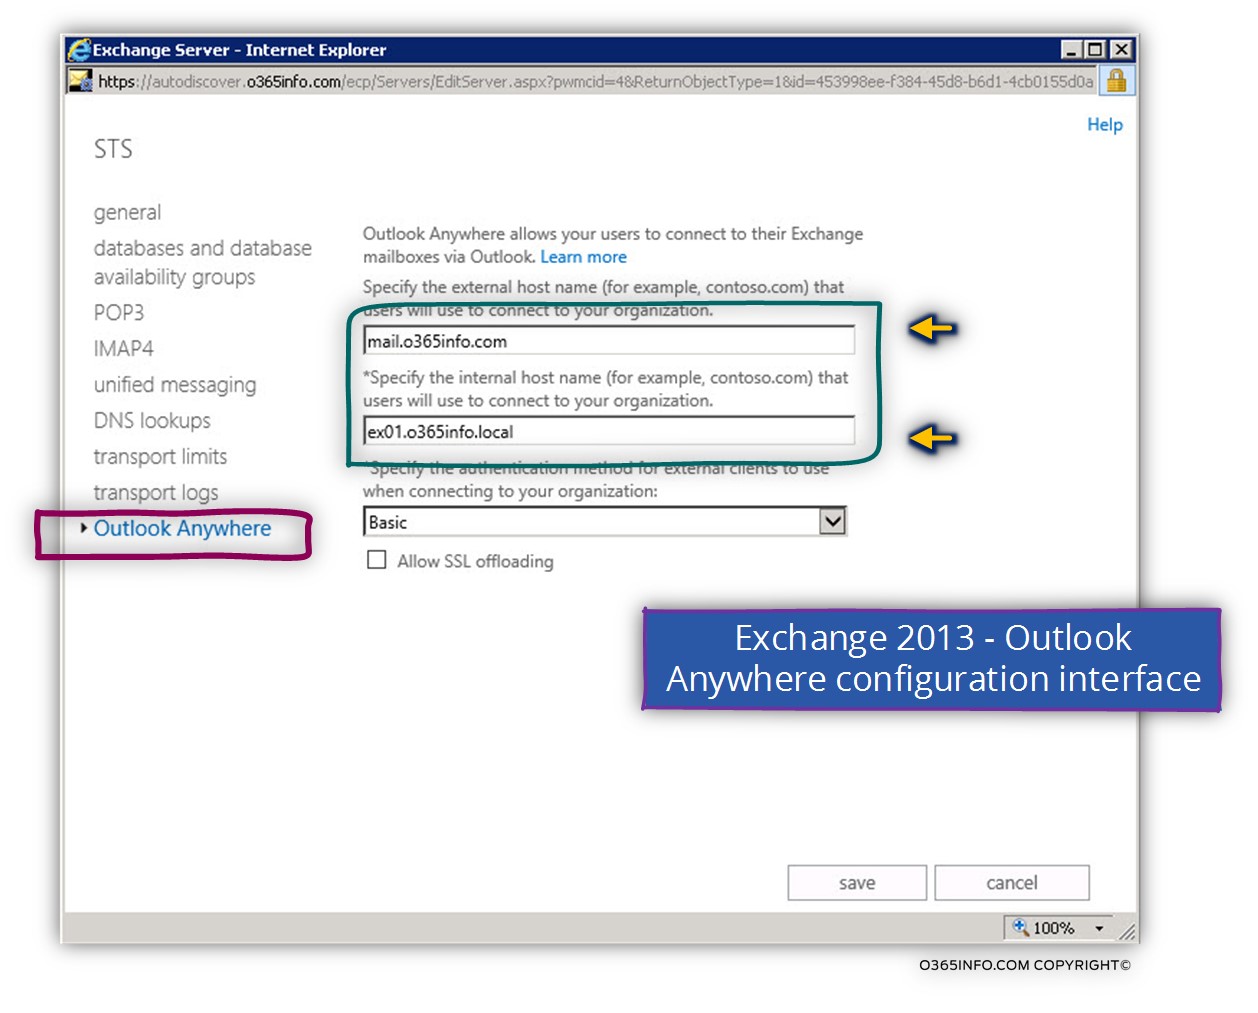
Managing the Exchange Autodiscover services URL address in Active Directory based environment.
The reason that I have decided to allocate a dedicated section for the subject of managing the URL address of the Exchange Autodiscover service is that this subject is very confusing and not so clear.
The Autodiscover client “journey” start with the first step in which the Autodiscover client needs to locate an Exchange server who will provide him the required Autodiscover services, address the Exchange server, submit a query and so on.
Now, let’s focus on the word – “locate”.
The method that internal Outlook client uses for finding the required Autodiscover Endpoint
(The Exchange server) is entirely different from the method that is implemented by external Outlook clients.
The internal Outlook client doesn’t know.
- Who are the available Exchange servers who can provide Autodiscover Services?
- What is their hostname?
- What is the required URL address for addressing the Exchange Autodiscover service?
In an On-Premise Active Directory environment, the Autodiscover client doesn’t know the name of “his” Exchange CAS server (the internal Exchange infrastructure, could have one or many Exchange CAS servers).
To be able to get the “names” of the available Exchange CAS server\s, the internal Autodiscover client needs to address the local Active Directory and query the Active Directory for the names of the available Exchange CAS server servers.
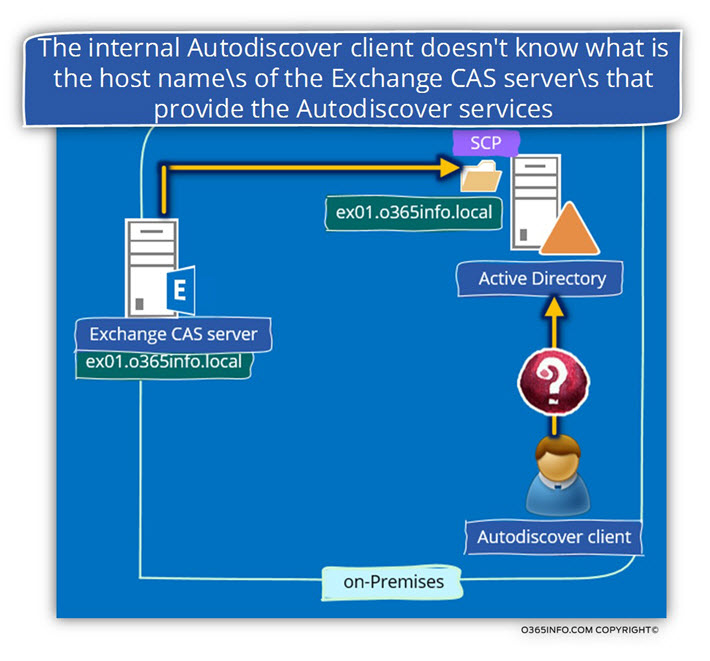
For this reason, there is a mandatory pre-requirement for the successful composition of the Exchange CAS server “registration process.”
Note: By default the process of the Exchange CAS server “registration process” is implemented automatically by each of the Exchange CAS server\s.
Vs. this character of the internal Outlook client, the opposite is true regarding external Outlook clients:
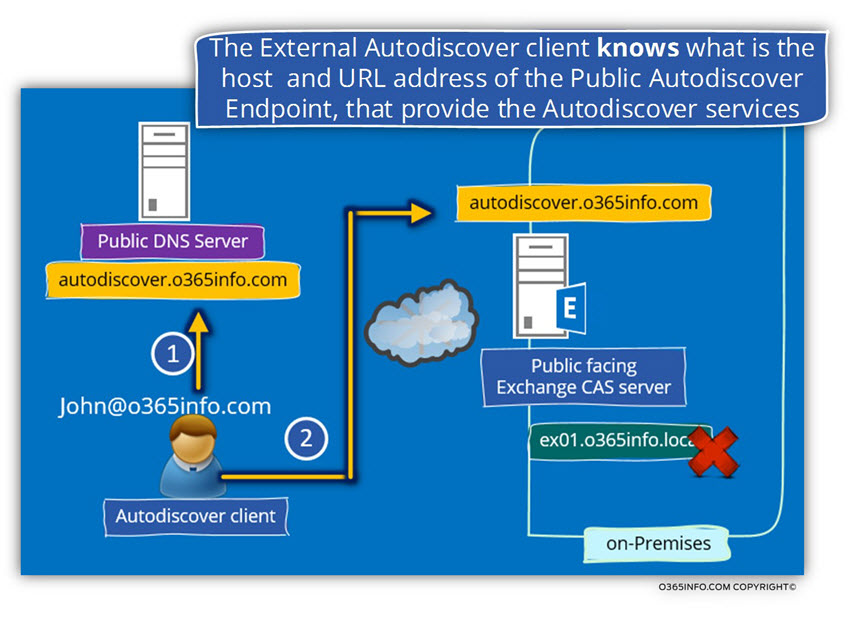
External Outlook client “know in advance” the exact URL address of the Exchange server that could provide him the required Autodiscover services.
The external Autodiscover client doesn’t need a “source of information” such as – the
On-Premise Active Directory that will provide him the name of existing Autodiscover Endpoint but instead, the external Autodiscover client is searching for a very specific host name.
In our example, because the E-mail address of the external mail client uses the domain name – o365info.com , the Autodiscover client (such as Outlook) will query the DNS server looking for the IP address of the host named – autodiscover.o365info.com
When the external Autodiscover client addresses the Public facing Exchange CAS server using the Autodiscover host name (autodiscover.o365info.com in our example) the IIS component of Exchange CAS server “know” how to accept the request for the FQDN autodiscover.o365info.com
Registering the information about the Autodiscover Endpoint
Let’s make it even more complicated.
Autodiscover service and internal organization infrastructure
Regarding the internal organization infrastructure, in standard or simple scenarios, we do not need to take any action for “registering” the Exchange server and inform the internal client about “their Autodiscover Endpoint” because Exchange knows how to register himself automatically in the Active Directory.
The automatic process in which Exchange server register himself in the Active Directory is relevant only in a simple scenario. In more advanced scenarios we will need to “cancel” the information that was registered by Exchange Automatically and create a new and updated value.
Autodiscover service and external infrastructure
Regarding a scene in which external Autodiscover client need to “consume” Exchange Autodiscover services, the way that the Autodiscover clients use for locating the Exchange server who will provide the required Autodiscover services are entirely different.
The Autodiscover client knows the host name + the URL address of the Exchange server that could provide the Autodiscover information.
As Exchange administrators, we will need to
- Publish the Autodiscover host name in the public DNS infrastructure
- Add the Autodiscover hostname to the public certificate
An interesting thing is that vs. the “other” Exchange web service in which we need to “play” with the internal and an external URL address, the authentication type, and other parameters, when dealing with the Exchange Autodiscover mechanism that should serve external Exchange clients, the main concept is that we don’t need to do anything!
The scenario in which we need to “play” with the Exchange Autodiscover setting that impact external Autodiscover clients is very rare.
Managing Exchange Autodiscover settings
In case we need to manage the Exchange Autodiscover settings, we need to use the Exchange PowerShell interface.
In the next section, we will demonstrate how to handle the “internal Autodiscover registration” of Exchange in the Active Directory.
We will not show how to manage the “external Autodiscover registration” of Exchange because of the simple reason that 99.9% we don’t need to “play” with the Exchange Autodiscover setting of the Exchange web service.
Q: What are the scenarios, in which we want\need to update the information that was registered by the Exchange server in the Active Directory?
A: The answer could relate to a couple of possible scenarios:
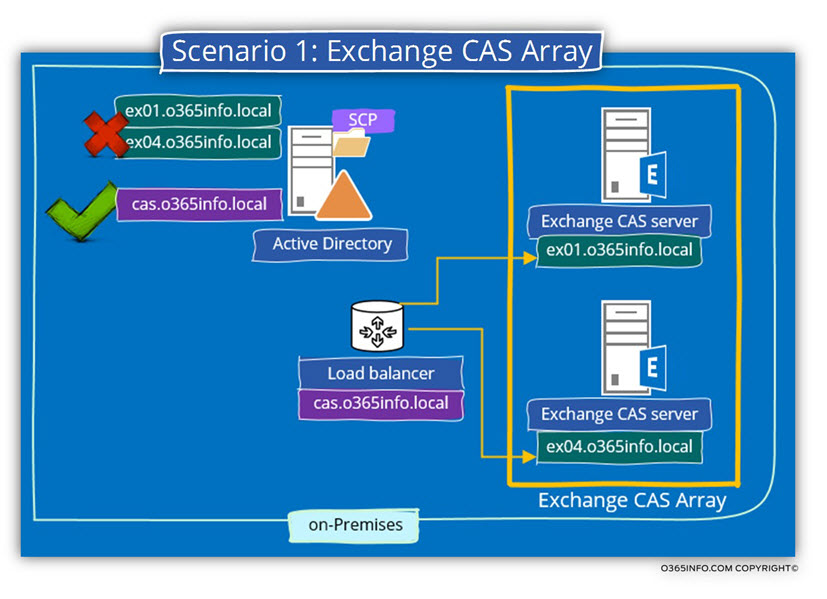
Scenario 1: Exchange 2010 CAS Array
In the scenario of Exchange CAS Array, we will need to “remove” the default URL address that was automatically registered with the Exchange CAS server and instead, add a new URL address that will include the host name (the FQDN) that represents the Exchange CAS Array name.
Scenario 2: Split DNS
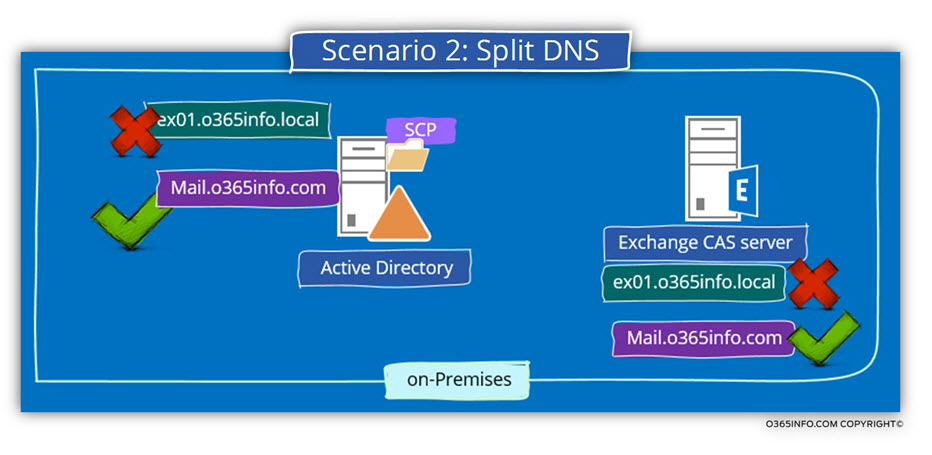
The scenario of “Split DNS”, describe a configuration in which the internal and the external Exchange CAS server URL’s address are identical.
In this scenario, we will also need to “remove” the default URL address that was automatically registered with the Exchange CAS server and instead, add the URL that includes the FQDN that used for the internal and the external URL’s.
By default, the Exchange CAS server will register his “NetBIOS” name as the host name + the Active Directory domain name.
In case that we want to use a different hostname who will represent the Exchange CAS server, we will need to change the default Exchange host name (the default “NetBIOS” name).
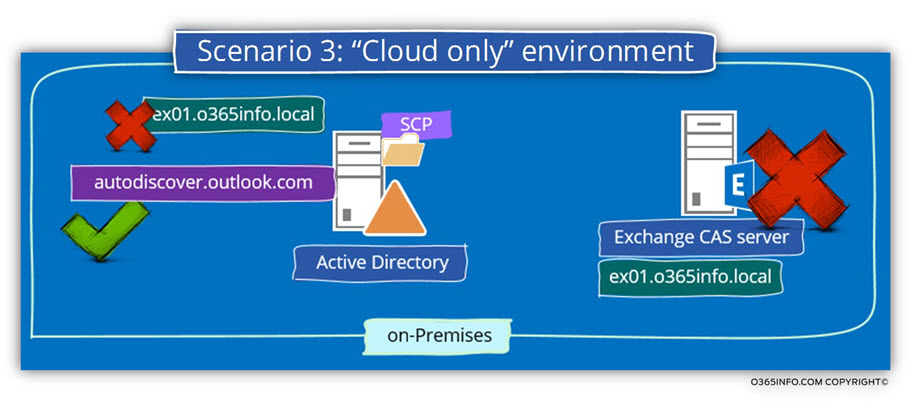
Scenario 3: “Cloud only” environment
In a specific scenario in which all of the mail infrastructure was migrated to the cloud (Office 365 and Exchange Online) it’s passably to change the default URL that was automatically created by the Exchange CAS server that “doesn’t exists anymore” and instead, update the part of the FQDN in the URL address to point to the Office 365 Autodiscover Endpoint –
autodiscover.o365info.com
Exchange web services | The Exchange PowerShell interface
In the following section, we will review the subject of the Exchange web services internal and external URL by using the PowerShell.
As mentioned, we will need to use the PowerShell interface because, in some scenarios such as when using the Exchange 2010 graphical interface, there is no available option for creating or updating the required URL settings.
There is an additional advantage for using PowerShell command because, many times we can see additional information that doesn’t appear in the default Exchange graphic interface
Managing Exchange Autodiscover information registered in the Active Directory SCP using PowerShell
Exchange Autodiscover service and On-Premise Active Directory SCP
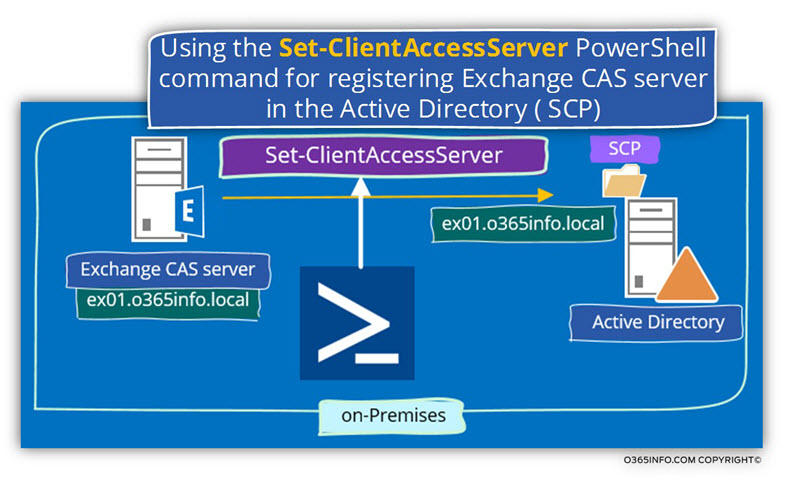
The management tasks, which relate to the information that registered with the Exchange CAS server in the SCP of the Active Directory are:
- View the details that were registered with the Exchange CAS server in the Active Directory SCP. To be able to view the information in the Active Directory service connection point (SCP), we use the command – Get-ClientAccessServer
- Managing (updating) the details that were registered with the Exchange CAS server in the Active Directory SCP. To be able to update the information in the Active Directory service connection point (SCP), we use the command – Set-ClientAccessServer
Q: What is the “information” that is registered with the Exchange CAS server in the Active Directory service connection point (SCP)?
A: The details of the Exchange CAS server who are registered in the Active Directory service connection point (SCP) are:
- Internal FQDN of the Exchange On-Premise server
- The Autodiscover URL (the more accurate term is URI)
- The Autodiscover Site scope (the On-Premise Active Directory site in which the Exchange server is located).
The “magical” PowerShell command that will help us to manage the information registered in the Active Directory service connection point (SCP) is – Set-ClientAccessServer
1. Display information that registered in the Active Directory service connection point (SCP)
To be able to see this information (the information that is registered with the Exchange server for internal clients), we can use the following PowerShell command:
Get-ClientAccessServer –Identity <Server> | FL Autodiscover*Example 1: view information about the name who was registered at the Active Directory SCP by Exchange server named – ex01
In the following screenshot, we can see that the Exchange server registered at the SCP by using the URL address:
https://ex01.0365info.local/Autodiscver/Autodiscver.xml
In addition, we can see that the Exchange server appear is a member in the
{Default-First-Site-Name}
The value which represents the information that Exchange server register in the Active Directory is – AutoDiscoverServiceInternalUri

Example 2: optimize the output from the PowerShell command
In case that we want to optimize the output from the PowerShell command, so we can clearly see the information that realized to the URL address that was registered + the information about
Get-ClientAccessServer –Identity <Server> | Select name, AutodiscoverServiceInternalURI, AutodiscoverSiteScope | FT –AutoSizeIn the following screenshot, we can see the details on Exchange server named – ex01.o365local.com
Under the section of – AutodiscoverServiceInternalURI, we can see the Autodiscover URL address Active Directory service connection point (SCP).
We can see that the Exchange server FQDN based on the “private” (NetBIOS) Exchange name + On-Premise Active Directory domain name.
Additionally, we can see information about the On-Premise Active Directory site in which the Exchange server installed. In our scenario, we can see that the Exchange server is installed on an On-Premise Active Directory site named – {Default-First-Site-Name}.

2. Update the Exchange CAS server Autodiscover information
In some scenarios, we need to change or update the Autodiscover Exchange CAS server default values that automatically registered at the Active Directory service connection point (SCP)
Example 1: Exchange CAS Array
In case that we want to add the name of the CAS array to the Active Directory Service Connection Point (SCP) we can use the following PowerShell command syntax:
Set-ClientAccessServer -Identity "<Exchange server>" -AutodiscoverServiceInternalURI "<CAS Autodiscover URL address>"For example, in our scenario the Exchange CAS server CAS array name is – cas.o365info.local
Set-ClientAccessServer -Identity "<Exchange server>" -AutodiscoverServiceInternalURI "<CAS Autodiscover URL address>"Example 2: add additional Active Directory site to the Exchange CAS server
In a scenario of multiple Exchange sites, the best practice is to “assign” the site value of the information that appears in the Active Directory SCP.
For example, we want to implement a configuration in which a particular Exchange CAS server named – exo1, will “register” himself as an available Exchange CAS server for two different Active Directory sites at the same time.
In our example, we want to “attach” the Exchange CAS server to the following Active Directory sites: USA-NY and USA-LA
The PowerShell command that we use will be:
Set-ClientAccessServer -Identity "ex01" -AutodiscoverSiteScope "USA-NY","USA-LA"Get information about the Exchange Autodiscover web service using PowerShell
As we have mentioned before, most of the time there is no need for configuring or managing the Autodiscover internal and external URL address of the Exchange CAS server.
But I’m sure that some of you are a little bit curious and, want to verify this is just a fairy tale or a real statement.
To be able to satisfy your hunger get some more information about the Autodiscover internal and the external URL address of the Exchange CAS server.
The PowerShell commands that we use for getting information and managing the Autodiscover service -internal and external URL address are:
Get-AutodiscovervirtualDirectorySet-AutodiscovervirtualDirectory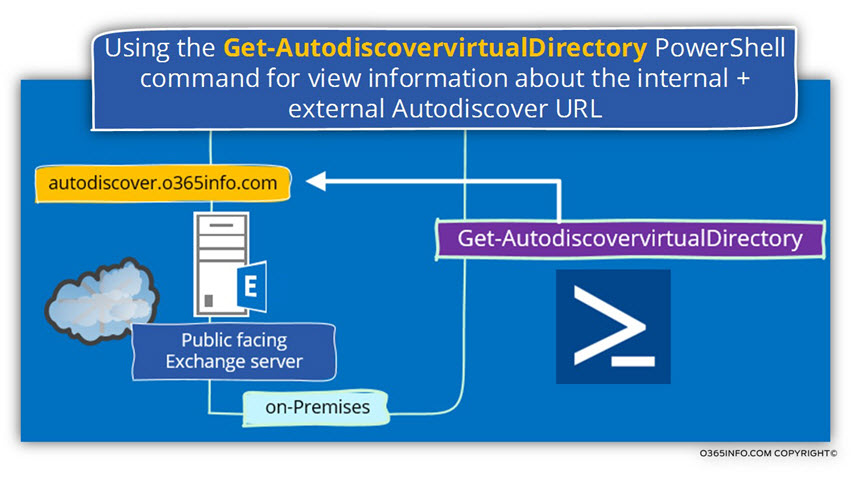
Display information about Exchange Autodiscover virtual folder
Example 1: view the Autodiscover web service settings of Autodiscover a specific Exchange CAS server
To be able to view the Autodiscover web service settings of Autodiscover a particular Exchange CAS server, we will use the following PowerShell command:
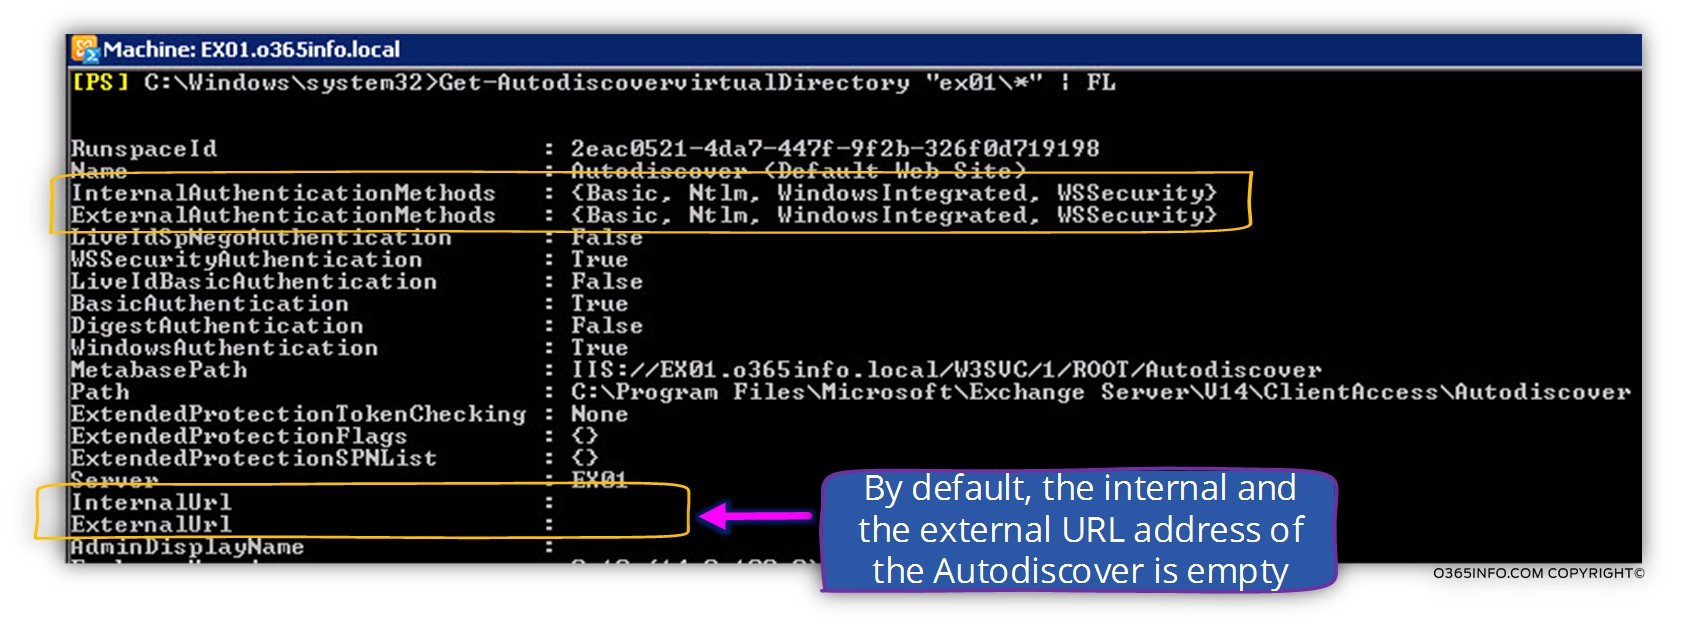
Get-AutodiscovervirtualDirectory "ex01\*" | FLIn the following screenshot, we can see a couple of details about the Exchange CAS server Autodiscover virtual folder.
You can see the value of the InternalUrl and, the ExternalUrl are empty!
Additional available information relates to the authentication method that will be used such as – Basic, NTLM, Windows Integrated and WSSecurity.
Example 2: refine the results of the PowerShell
In case that we want to refine the results of the PowerShell command we can filter the output by using the PowerShell command:
Get-AutodiscovervirtualDirectory "ex01\*" | Select name, Server, InternalUrl, ExternalUrlExample 3: get information about the Autodiscover settings of all of the existing Exchange CAS servers
In case that you want to get information about the Autodiscover settings of all of the current Exchange CAS servers you can use the PowerShell command:
Get-AutodiscovervirtualDirectory | Select name, Server, InternalUrl, ExternalUrlIn the following screenshot, we can see information about the Autodiscover settings of all of the existing Exchange CAS servers

Setting the authentication settings of the Exchange CAS server Autodiscover service
The authentication settings for the Autodiscover web services are supposed to configure automatically to support the requirement for authentication + support the required authentication protocol.
In some troubleshooting scenario, in case that there is a problem or a miss configuration of the Autodiscover web services, we can “fix” the issue by using a PowerShell command.
In the following PowerShell we will configure the Autodiscover web services to support the WSSecurity authentication protocol:
Set-AutodiscoverVirtualDirectory –identity "CASServerName\Autodiscover (Default Web Site)" –WSSecurityAuthentication $trueManaging the Exchange web services (EWS) using PowerShell
As mentioned, the option for configuring the internal and the external URL address of Exchange web services (EWS) is not available when using the Exchange 2010 graphic interface only when using the Exchange 2013 web management interface.
Just a quick reminder – the Exchange web services (EWS) are an essential component for many of the well-known Exchange web servers such as the available service (Free\Busy time), Auto reply (Out of office), mail tips and much more.
In a scenario of Public facing Exchange CAS server, it’s important to check and verify that the Exchange web services (EWS) external URL is updated and include the “right settings” that will enable external mail client to access the required Exchange EWS services.
Display information about Exchange web services (EWS)
The first step is to display information about the “values” of the Exchange web services (EWS) internal and external URL’s.
Example 1: display information about a specific Exchange CAS server EWS setting
To be able to view the EWS settings of an Exchange CAS server named: exo1, we will use the following PowerShell command:
Get-WebServicesVirtualDirectory "ex01\*" | FL *url*In the following screenshot, we can see an example for the Outlook that we get from Exchange server that configured as Public facing Exchange server.
We can see that
- The value in the InternalURL includes the “private host name” of the Exchange server – o365info.local
- The value in the ExternalURL includes the “public host name” of the Exchange server – o365info.com

Example 2: display information about the EWS settings of all of the existing Exchange CAS servers
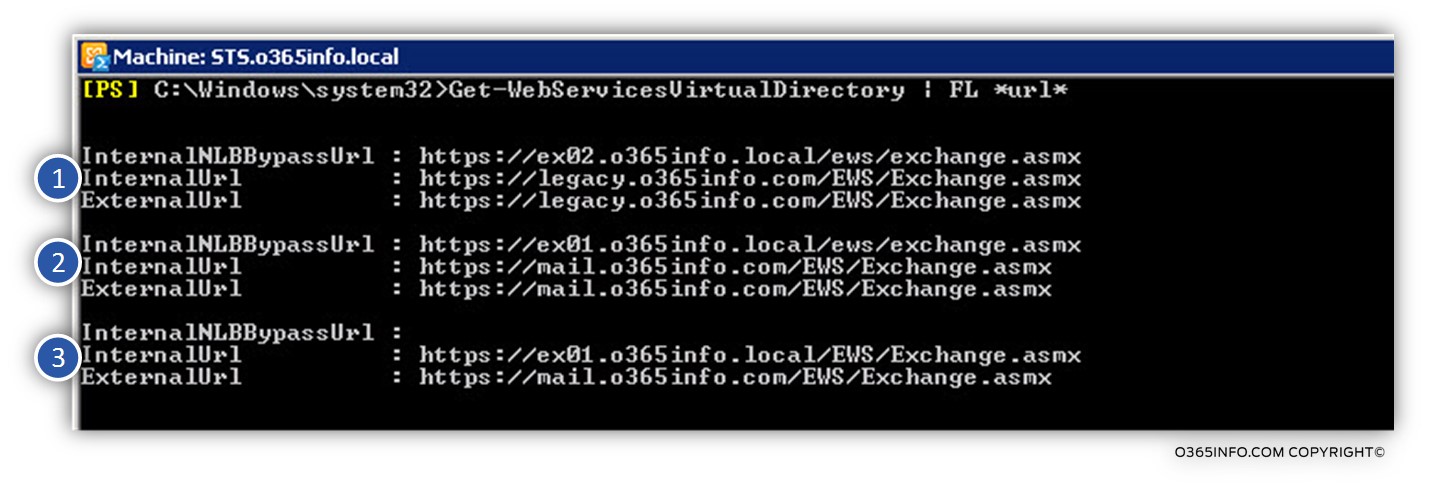
To be able to view the EWS settings of all of the current Exchange CAS servers, we will use the following PowerShell command:
Get-WebServicesVirtualDirectory | FL *url*In the following screenshot, we can see information about the Exchange web service URL address of all the Exchange servers in the organization.
Example 3: display information about a particular Exchange CAS server EWS setting + refined the output results
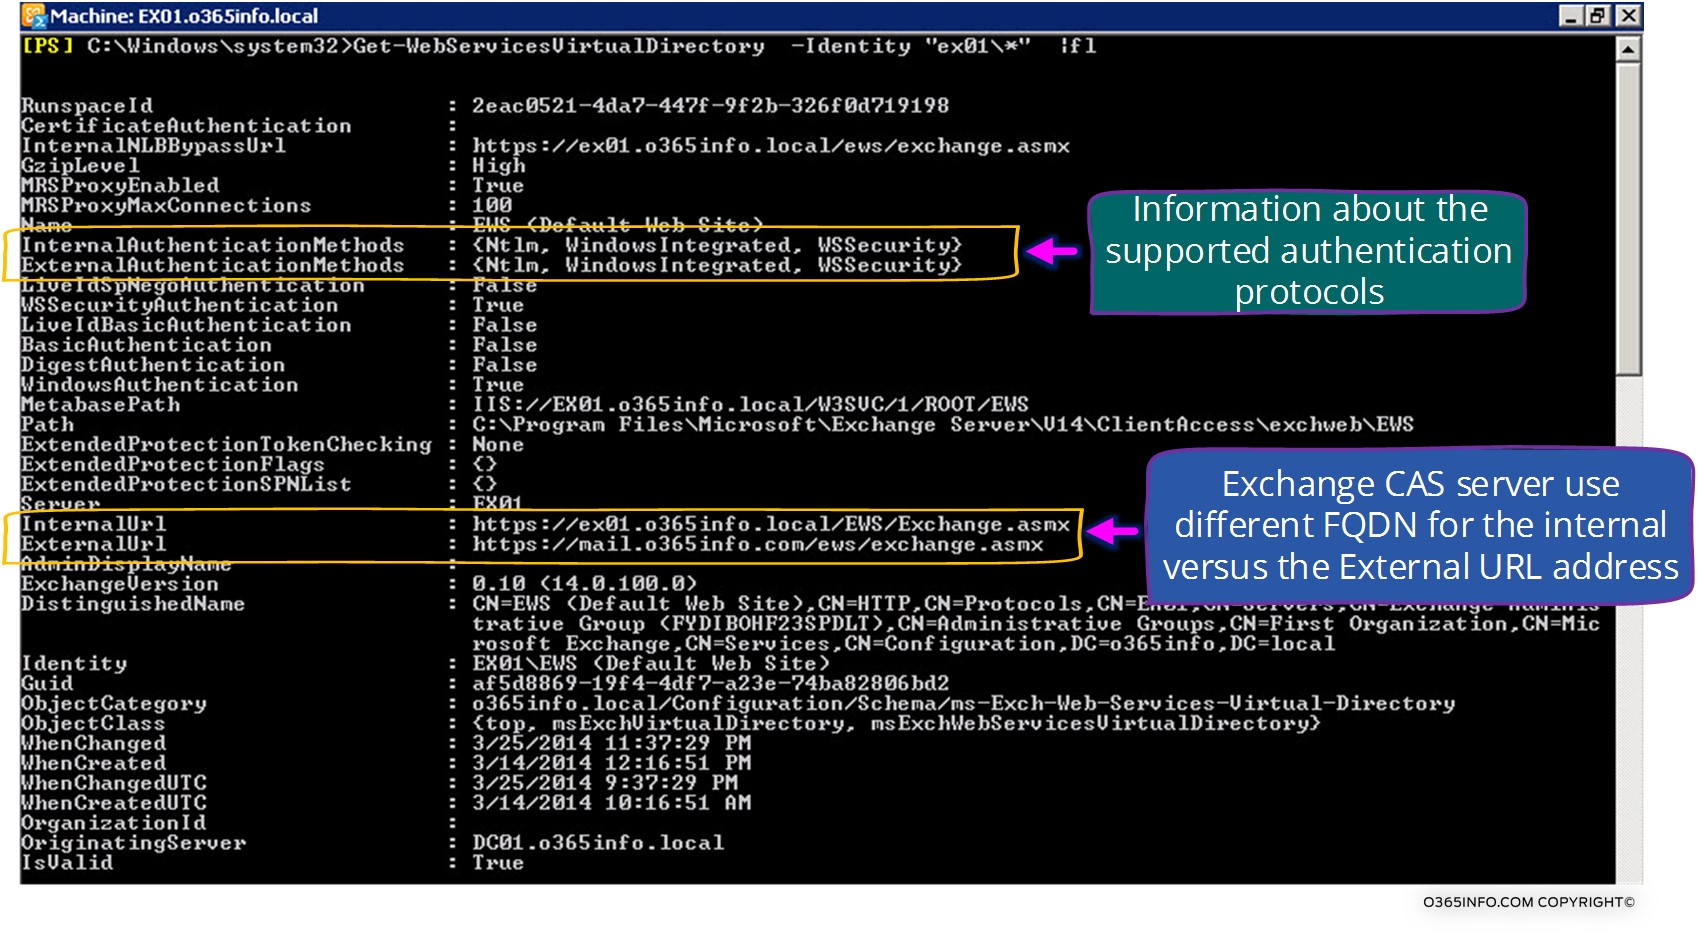
Get-WebServicesVirtualDirectory "ex01\*" | Select InternalUrl,ExternalUrl
In the following screenshot, we can see information about the Exchange web service authentication settings.
Set\update the URL address of the Exchange web services (EWS)
Example 1: Set the “public” (external) URL address of the Exchange web services (EWS)
In the following example, the FQDN of the Public facing Exchange CAS server is – mail.o365info.com
PowerShell command:
Set-WebServicesVirtualDirectory -Identity "CAS01\EWS (Default Web Site)" – ExternalUrl https://mail.o365info.com/ews/exchange.asmxExample 2: Set the internal URL address of the Exchange web services (EWS)
In the following example, the FQDN of the Exchange CAS server is – ex01.o365info.local
PowerShell command:
Set-WebServicesVirtualDirectory -Identity "CAS01\EWS (Default Web Site)" -InternalUrl https://ex01.o365info.local/ews/exchange.asmxManaging the “reset” of Exchange web services using PowerShell
In the following section, we will provide some general examples to common scenario in which we need to manage the URL address host name for different Exchange web services
Exchange OAB (offline address book)
Set-OABVirtualDirectory -identity "ex01\OAB (Default Web Site)"
-InternalUrl "https://ex01.o365info.local/oab"
-ExternalUrl "https://mail.o365info.com/oab"
ActiveSync Exchange web service
Example 1: Display information about the Exchange ActiveSync | internal and external URL
PowerShell command:
Get-ActiveSyncVirtualDirectory -Server "ex01" | FLExample 2: set the Exchange ActiveSync internal and external URL
Set-ActiveSyncVirtualDirectory -Identity "EX01\Microsoft-Server-ActiveSync"
-InternalUrl "https://ex01.o365info.local/Microsoft-Server-ActiveSync"
-ExternalUrl "https://mail.o365info.com/Microsoft-Server-ActiveSync"
OWA Exchange web service
Display information about OWA Exchange web service
Example 1: display all of the available information about the OWA Exchange web service on a particular Exchange CAS server.
PowerShell command:
Get-OWAVirtualDirectory -identity "EX01\owa (default web site)"Example 2: display information about the internal and external URL address of the OWA Exchange web service on a particular Exchange CAS server.
Get-OWAVirtualDirectory -identity "EX01\owa (default web site)" | Select InternalUrl,ExternalUrlExample 3: display all of the available information about the OWA Exchange web service of all of the existing Exchange CAS servers.
Get-OwaVirtualDirectory | Select identity,InternalUrl,ExternalUrlSet internal and external URL address for the OWA Exchange web service
Example 1: Set internal and external URL address for the OWA Exchange web service on a particular Exchange CAS server
Set-OwaVirtualDirectory -Identity "ex01\owa (default Web site)"
-InternalUrl "https://ex01.o365info.local/owa"
-ExternalUrl "https://mail.o365info.com/owa"
Display information about ECP Exchange web service
Example 1: display all of the available information about the ECP Exchange web service on a particular Exchange CAS server.
PowerShell command:
Get-EcpVirtualDirectory -server "EX01"Example 2: display information about the internal and external URL address of the ECP Exchange web service on a particular Exchange CAS server.
Get-EcpVirtualDirectory -server "EX01" | Select identity,InternalUrl,ExternalUrlExample 3: display all of the available information about the ECP Exchange web service of all of the existing Exchange CAS servers.
Get-EcpVirtualDirectory | Select identity,InternalUrl,ExternalUrl | FLSet internal and external URL address for the ECP Exchange web service
Example 1: Set internal and external URL address for the OWA Exchange web service on a particular Exchange CAS server
Set-EcpVirtualDirectory -Identity "ex01\ECP (Default Web Site)"
-InternalUrl "https://ex01.o365info.local/ecp"
-ExternalUrl "https://mail.o365info.com/ecp"
Outlook Anywhere Exchange web service
Example 1: display all of the available information about the Outlook Anywhere Exchange web service on a specific Exchange CAS server.
PowerShell command:
Get-OutlookAnywhere -Identity "ex01\*"Example 2: display information about the External Hostname URL address of the Outlook Anywhere Exchange web service of a particular Exchange CAS server.
Get-OutlookAnywhere -Identity "ex01\*"Example 3: display all of the available information about the Outlook Anywhere Exchange web service of all of the existing Exchange CAS servers.
Get-OutlookAnywhere | Select identity,ExternalHostname |FL
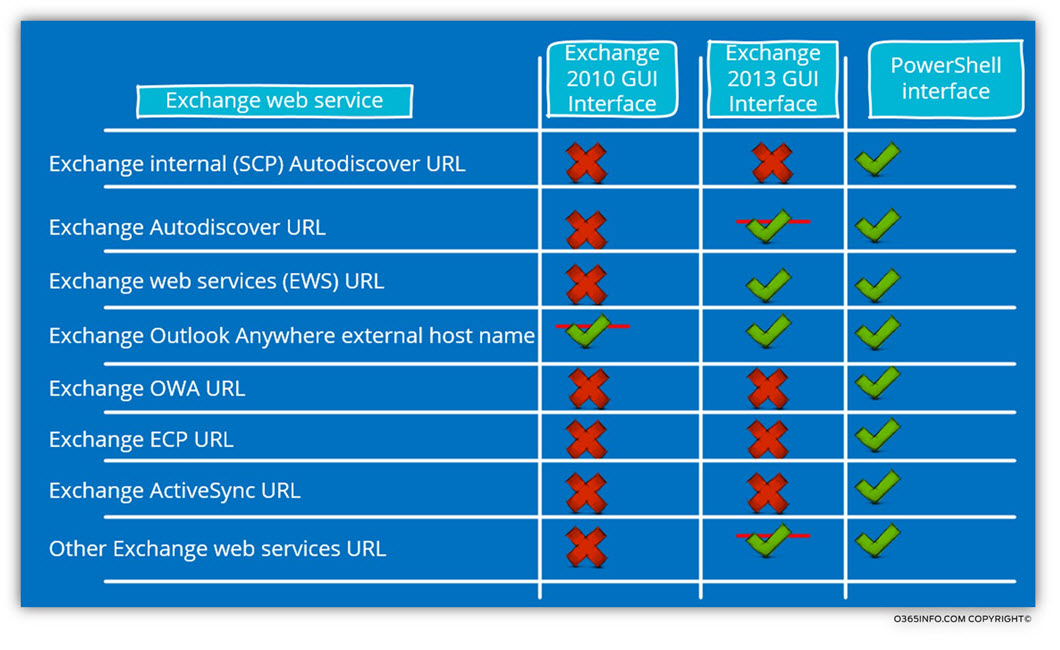
Summary table
In case that you got a little bit confused from all of the different Exchange web services management options, you can use the following table


Great !!!!!!!!!!!!! Excellent!!!!!!!!
Great article! If mail has been moved to Exchange online and in a Hybrid environment, what should the on-prem Exchange server virtual directories be changed to? The server really isn’t being used other than for management purposes.